Anbauanleitung Fitting Instructions Istruzione - Wunderlich
Anbauanleitung Fitting Instructions Istruzione - Wunderlich
Anbauanleitung Fitting Instructions Istruzione - Wunderlich

You also want an ePaper? Increase the reach of your titles
YUMPU automatically turns print PDFs into web optimized ePapers that Google loves.
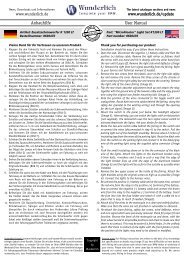
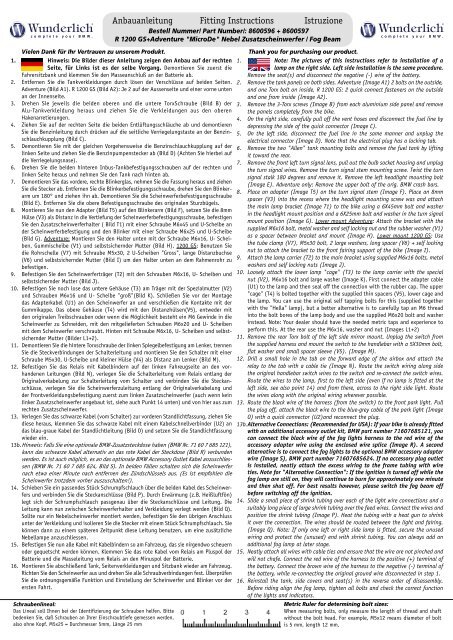
Schraubenlineal:<br />
Das Lineal soll Ihnen bei der Identifizierung der Schrauben helfen. Bitte<br />
bedenken Sie, daß Schrauben an Ihrer Einschraubtiefe gemessen werden,<br />
also ohne Kopf. M5x25 = Durchmesser 5mm, Länge 25 mm<br />
<strong>Anbauanleitung</strong> <strong>Fitting</strong> <strong>Instructions</strong> <strong>Istruzione</strong><br />
Bestell Nummer/ Part Number/: 8600596 + 8600597<br />
R 1200 GS+Adventure "MicroDe" Nebel Zusatzscheinwerfer / Fog Beam<br />
1.<br />
Vielen Dank für Ihr Vertrauen zu unserem Produkt.<br />
Hinweis: Die Bilder dieser Anleitung zeigen den Anbau auf der rechten 1.<br />
Thank you for purchasing our product.<br />
Note: The pictures of this instructions refer to installation of a<br />
Seite, für Links ist es der selbe Vorgang. Demontieren Sie zuerst die<br />
Fahrersitzbank und klemmen Sie den Masseanschluß an der Batterie ab.<br />
lamp on the right side. Left side installation is the same procedure.<br />
Remove the seat(s) and disconnect the negative (-) wire of the battery.<br />
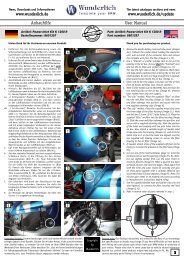
2. Entfernen Sie die Tankverkleidungen durch lösen der Verschlüsse auf beiden Seiten. 2. Remove the tank panels on both sides. Adventure (Image A1) 2 bolts on the outside,<br />
Adventure (Bild A1). R 1200 GS (Bild A2): Je 2 auf der Aussenseite und einer vorne unten<br />
an der Innenseite.<br />
and one Torx bolt on inside. R 1200 GS: 2 quick connect fasteners on the outside<br />
and one from inside (Image A2).<br />
3. Drehen Sie jeweils die beiden oberen und die untere TorxSchraube (Bild B) der 3. Remove the 3-Torx screws (Image B) from each aluminium side panel and remove<br />
Alu-Tankverkleidung heraus und ziehen Sie die Verkleidungen aus den oberen<br />
Hakenarretierungen.<br />
4. Ziehen Sie auf der rechten Seite die beiden Entlüftungsschläuche ab und demontieren<br />
the panels completely from the bike.<br />
4. On the right side, carefully pull off the vent hoses and disconnect the fuel line by<br />
depressing the side of the quick connector (Image C).<br />
Sie die Benzinleitung durch drücken auf die seitliche Verriegelungstaste an der Benzinschlauchkupplung<br />
(Bild C).<br />
electrical connector (Image D). Note that the electrical plug has a locking tab.<br />
5. On the left side, disconnect the fuel line in the same manner and unplug the<br />
5. Demontieren Sie mit der gleichen Vorgehensweise die Benzinschlauchkupplung auf der 6. Remove the two "Allen" tank mounting bolts and remove the fuel tank by lifting<br />
linken Seite und ziehen Sie die Benzinpumpenstecker ab (Bild D) (Achten Sie hierbei auf it toward the rear.<br />
die Verriegelungsnase).<br />
7. Remove the front left turn signal lens, pull out the bulb socket housing and unplug<br />
6. Drehen Sie die beiden hinteren Inbus-Tankbefestigungsschrauben auf der rechten und<br />
the turn signal wires. Remove the turn signal stem mounting screw. Twist the turn<br />
linken Seite heraus und nehmen Sie den Tank nach hinten ab.<br />
signal stalk 180 degrees and remove it. Remove the left headlight mounting bolt<br />
7. Demontieren Sie das vordere, rechte Blinkerglas, nehmen Sie die Fassung heraus und ziehen<br />
(Image E). Adventure only: Remove the upper bolt of the orig. BMW crash bars.<br />
Sie die Stecker ab. Entfernen Sie die Blinkerbefestigungsschraube, drehen Sie den Blinkerarm<br />
um 180° und ziehen ihn ab. Demontieren Sie die Scheinwerferbefestigungsschraube<br />
8. Place an adapter (Image T5) on the turn signal stem (Image F). Place an 8mm<br />
spacer (V3) into the recess where the headlight mounting screw was and attach<br />
(Bild E). Entfernen Sie die obere Befestigungsschraube des originalen Sturzbügels.<br />
the main lamp bracket (Image T1) to the bike using a 6X45mm bolt and washer<br />
8. Montieren Sie nun den Adapter (Bild T5) auf den Blinkerarm (Bild F), setzen Sie die 8mm<br />
in the headlight mount position and a 6X25mm bolt and washer in the turn signal<br />
Hülse (V3) als Distanz in die Vertiefung der Scheinwerferbefestigungsschraube, befestigen<br />
mount position (Image G). Lower mount Adventure: Attach the bracket with the<br />
Sie den Zusatzscheinwerferhalter ( Bild T1) mit einer Schraube M6x45 und U-Scheibe an<br />
supplied M6x16 bolt, metal washer and self locking nut and the rubber washer (V1)<br />
der Scheinwerferbefestigung und den Blinker mit einer Schraube M6x25 und U-Scheibe<br />
(Bild G). Adventure: Montieren Sie den Halter unten mit der Schraube M6x16, U- Scheiben,<br />
Gummischeibe (V1) und selbstsichernder Mutter (Bild H). 1200 GS: Benutzen Sie<br />
as a spacer between bracket and mount (Image H). Lower mount 1200 GS: Use<br />
the tube clamp (V7), M5x30 bolt, 2 large washers, long spacer (V6) + self locking<br />
die Rohrschelle (V7) mit Schraube M5x30, 2 U-Scheiben "Gross", lange Distanzbuchse<br />
nut to attach the bracket to the front fairing support of the bike (Image I).<br />
(V6) und selbstsichernder Mutter (Bild I) um den Halter unten an dem Rahmenrohr zu 9. Attach the lamp carrier (T2) to the main bracket using supplied M6x16 bolts, metal<br />
befestigen.<br />
washers and self locking nuts (Image J).<br />
9. Befestigen Sie den Scheinwerferträger (T2) mit den Schrauben M6x16, U- Scheiben und 10. Loosely attach the lower lamp "cage" (T3) to the lamp carrier with the special<br />
selbstsichernder Mutter (Bild J).<br />
nut (V2), M6x16 bolt and large washer (Image K). First connect the adapter cable<br />
10. Befestigen Sie noch lose das untere Gehäuse (T3) am Träger mit der Spezialmutter (V2) (U1) to the lamp and then seal off the connection with the rubber cap. The upper<br />
und Schrauben M6x16 und U- Scheibe "groß"(Bild K). Schließen Sie vor der Montage "cage" (T4) is bolted together with the supplied thin spacers (V5), lower cage and<br />
das Adapterkabel (U1) an den Scheinwerfer an und verschließen die Kontakte mit der the lamp. You can use the original self tapping bolts for this (supplied together<br />
Gummikappe. Das obere Gehäuse (T4) wird mit den Distanzhülsen(V5), entweder mit with the "Hella" lamp), but a better alternative is to carefully tap an M6 thread<br />
den originalen Treibschrauben oder wenn die Möglichkeit besteht ein M6 Gewinde in die into the bolt bores of the lamp body and use the supplied M6x20 bolt and washer<br />
Scheinwerfer zu Schneiden, mit den mitgelieferten Schrauben M6x20 und U- Scheiben instead. Note: Your dealer should have the needed metric taps and experience to<br />
mit dem Scheinwerfer verschraubt. Hinten mit Schraube M6x16, U- Scheiben und selbstsichernder<br />
Mutter (Bilder L1+2).<br />
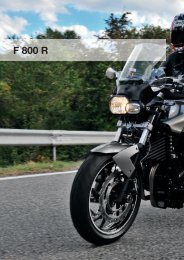
11. Remove the rear Torx bolt of the left side mirror mount. Unplug the switch from<br />
perform this. At the rear use the M6x16, washer and nut (Images L1+2)<br />
11. Demontieren Sie die hintere Torxschraube der linken Spiegelbefestigung am Lenker, trennen<br />
Sie die Steckverbindungen der Schalterleitung und montieren Sie den Schalter mit einer<br />
Schraube M5x30, U-Scheibe und kleiner Hülse (V4) als Distanz am Lenker (Bild M).<br />
12. Befestigen Sie das Relais mit Kabelbindern auf der linken Fahreugseite an den vorhandenen<br />
Leitungen (Bild N), verlegen Sie die Schalterleitung vom Relais entlang der<br />
Originalverkabelung zur Schalterleitung vom Schalter und verbinden Sie die Steckanschlüsse,<br />
verlegen Sie die Scheinwerferzuleitung entlang der Originalverkabelung und<br />
der Frontverkleidungsbefestigung zuerst zum linken Zusatzscheinwerfer (auch wenn kein<br />
the supplied harness and mount the switch to the handlebar with a 5X30mm bolt,<br />
flat washer and small spacer sleeve (V5). (Image M).<br />
12. Drill a small hole in the tab on the forward edge of the airbox and attach the<br />
relay to the tab with a cable tie (Image N). Route the switch wiring along side<br />
the original handlebar switch wires to the switch and re-connect the switch wires.<br />
Route the wires to the lamp, first to the left side (even if no lamp is fitted at the<br />
left side, see also point 14) and from there, across to the right side light. Route<br />
the wires along with the original wiring wherever possible.<br />
linker Zusatzscheinwerfer angebaut ist, siehe auch Punkt 14 unten) und von hier aus zum 13. Route the black wire of the harness (from the switch) to the front park light. Pull<br />
rechten Zusatzscheinwerfer.<br />
13. Verlegen Sie das schwarze Kabel (vom Schalter) zur vorderen Standlichtfassung, ziehen Sie<br />
the plug off, attach the black wire to the blue-grey cable of the park light (Image<br />
O) with a quick connector (U2)and reconnect the plug.<br />
diese heraus, klemmen Sie das schwarze Kabel mit einem Kabelschnellverbinder (U2) an 13b. Alternative Connections: (Recommended for USA): If your bike is already fitted<br />
das blau-graue Kabel der Standlichtleitung (Bild O) und setzen Sie die Standlichtfassung<br />
wieder ein.<br />
13b. Hinweis: Falls Sie eine optionale BMW-Zusatzsteckdose haben (BMW Nr. 71 60 7 685 121),<br />
kann das schwarze Kabel alternativ an das rote Kabel der Steckdose (Bild R) verbunden<br />
werden. Es ist auch möglich, es an das optionale BMW Accessory Outlet Kabel anzuschliessen<br />
(BMW Nr. 71 60 7 685 624, Bild S). In beiden Fällen schalten sich die Scheinwerfer<br />
nach etwa einer Minute nach entfernen des Zündschlüssels aus. (Es ist empfohlen die<br />
Scheinwerfer trotzdem vorher auszuschalten!).<br />
14. Schieben Sie ein passendes Stück Schrumpfschlauch über die beiden Kabel des Scheinwerfers<br />
und verbinden Sie die Steckanschlüsse (Bild P). Durch Erwärmung (z.B. Heißluftfön)<br />
with an additional accessory outlet kit, BMW part number 71607685121, you<br />
can connect the black wire of the fog lights harness to the red wire of the<br />
accessory adapter wire using the enclosed wire splice (Image R). A second<br />
alternative is to connect the fog lights to the optional BMW accessory adapter<br />
wire (Image S), BMW part number 71607685624. If no accessory plug outlet<br />
is installed, neatly attach the excess wiring to the frame tubing with wire<br />
ties. Note for "Alternative Connection": If the ignition is turned off while the<br />
fog lamp are still on, they will continue to burn for approximately one minute<br />
and then shut off. For best results however, please switch the fog beam off<br />
before switching off the ignition.<br />
legt sich der Schrumpfschlauch passgenau über die Steckanschlüsse und Leitung. Die 14. Slide a small piece of shrink tubing over each of the light wire connections and a<br />
Leitung kann nun zwischen Scheinwerferhalter und Verkleidung verlegt werden (Bild Q).<br />
Sollte nur ein Nebelscheinwerfer montiert werden, befestigen Sie den übrigen Anschluss<br />
unter der Verkleidung und isolieren Sie die Stecker mit einem Stück Schrumpfschlauch. Sie<br />
können dann zu einem späteren Zeitpunkt diese Leitung benutzen, um eine zusätzliche<br />
Nebellampe anzuschliessen.<br />
15. Befestigen Sie nun alle Kabel mit Kabelbindern so am Fahrzeug, das sie nirgendwo scheuern<br />
suitably long piece of large shrink tubing over the feed wires. Connect the wires and<br />
position the shrink tubing (Image P). Heat the tubing with a heat gun to shrink<br />
it over the connection. The wires should be routed between the light and fairing.<br />
(Image Q). Note: If only one left or right side lamp is fitted, secure the unused<br />
wiring and protect the (unused) end with shrink tubing. You can always add an<br />
additional fog lamp at later stage.<br />
oder gequetscht werden können. Klemmen Sie das rote Kabel vom Relais am Pluspol der 15. Neatly attach all wires with cable ties and ensure that the wire are not pinched and<br />
Batterie und die Masseleitung vom Relais an den Minuspol der Batterie.<br />
16. Montieren Sie abschließend Tank, Seitenverkleidungen und Sitzbank wieder am Fahrzeug.<br />
Richten Sie den Scheinwerfer aus und drehen Sie alle Schraubverbindungen fest. Überprüfen<br />
will not chafe. Connect the red wire of the harness to the positive (+) terminal of<br />
the battery. Connect the brown wire of the harness to the negative (-) terminal of<br />
the battery, while re-connecting the original ground wire disconnected in step 1.<br />
Sie die ordnungsgemäße Funktion und Einstellung der Scheinwerfer und Blinker vor der 16. Reinstall the tank, side covers and seat(s) in the reverse order of disassembly.<br />
ersten Fahrt.<br />
Before riding align the fog lamp, tighten all bolts and check the correct function<br />
of the lights and indicators.<br />
Metric Ruler for determining bolt sizes:<br />
When measuring bolts, only measure the length of thread and shaft<br />
without the bolt head. For example, M5x12 means diameter of bolt<br />
is 5 mm, length 12 mm.
<strong>Anbauanleitung</strong> <strong>Fitting</strong> <strong>Instructions</strong> <strong>Istruzione</strong><br />
Codice / Part Number : 8600596 + 8600597<br />
R 1200 GS + Adventure "MicroDe" Fari supplementari / Fog Beam<br />
Grazie di aver acquistato un prodotto <strong>Wunderlich</strong><br />
Nota: Le immagini di questa istruzione illustrano il<br />
montaggio nella parte destra, e stessa operazione va‘<br />
effettuata nella parte sinistra.<br />
1. Rimuovere prima la sella e scollegare il cavo nero negativo (-)<br />
della batteria.<br />
2. Rimuovere i fianchetti dal serbatoio svitando le viti in entrambi<br />
i lati. Adventure (figura A). R1200GS (B): 2 viti a lato ed una<br />
inferiore nella parte interna.<br />
3. Smontare le 3 viti TORX (figura B) e rimuovere completamente<br />
entrambe le coperture del serbatoio.<br />
4. Staccare nella parte destra i due tubi spurgo e rimuovere il tubo<br />
benzina premendo il bottone dell’attacco rapido (figura C).<br />
5. Rimuovere con la stessa procedura il tubo nella parte sinistra e<br />
scollegare la presa della pompa benzina. M (figura D)<br />
6. Smontare i due bulloni del serbatoio e posizionarlo in modo tale<br />
da raggiungere il vetro della freccia anteriore destra, rimuovere<br />
l’inserto e scollegare gli attacchi.<br />
7. Svitare la vite del supporto frecce, girare il braccetto di 180°<br />
e rimuoverlo. Svitare la vite dell‘attacco del faro (figura E).<br />
Rimuovere il bullone superiore del paracilindro originale.<br />
8. Posizionare l’adattatore (figura T5) sul braccetto della frecce<br />
(figura F). Posizionare il distanziale (V3) all’accesso dove il faro<br />
è stato montato e montare il supporto principale del faro (figura<br />
T1) al veicolo con una vite 6x45mm, e la freccia utilizzando<br />
una vite Mx25mm con rondella (figura G). Adventure: Montare il<br />
supporto nella parte inferiore con la vite M6x16mm, gommini e<br />
dado autobloccante (figura H).<br />
1200GS: Usare la fascetta (V7) con la vite M6x30, 2 rondelle<br />
“Grandi”, distanziale lungo (V6) e dado autobloccante (figura<br />
I) per montare il supporto al telaio.<br />
9. Installare il supporto del faro (T2) con le viti M6x16, rondelle e<br />
dado autobloccante (figura J).<br />
10. Ora procedete al montaggio della “gabbia” faro (T3) al supporto<br />
utilizzando la vite speciale M6x 16 (V2) e la rondella larga (figura<br />
K). Collegare il cavo adattatore (u1) al faro, mettendo il tubo di<br />
protezione. La “gabbia” superiore (T4) è montata assieme alla<br />
gabbia inferiore faro, utilizzando le rondelle sottili (v5) e le viti<br />
in dotazione Hella. In alternativa portare i fori a misura M6 e<br />
fissare tutto con le viti M6x 20 e rondelle della dotazione. Nota:<br />
considerando il livello di difficoltà si consiglia eventualmente<br />
di fare eseguire questa operazione ad una struttura abilitata.<br />
Nella parte posteriore usare la vite M6x16, rondella e dado<br />
autobloccante (figure L1+L2).<br />
11. Smontare la vite TORX posteriori del supporto specchi, scollegare<br />
gli attacchi del cavo e montare l’interruttore con una vite M5x30,<br />
rondella e distanziale piccolo (V4) al manubrio (figura M).<br />
12. Installare il relè nella parte sinistra con fascette ai cavi esistenti<br />
(figura N), portare il cavo partendo dal relè all’interruttore<br />
seguendo la linea dei cavi originali. Collegare i due cavi. Portare<br />
i cavi verso il faro, prima verso il faro sinistro (anche se non<br />
ancora installato`, vedasi punto 14) e da li al faro destro.<br />
13. Portare il cavo nero (dall’interruttore) all’attacco elettrico del<br />
faro. Collegare il cavo nero con il cavo blu-grigio del faro di<br />
posizione (figura O) attraverso l’attacco rapido (U2). Montare il<br />
faro.<br />
13b.Note: se si possiede una presa di bordo originale (BMW 71<br />
60 7 685 121), il cavo nero alternativamente può essere<br />
collegato col cavo rosso (R). È anche possibile collegare i fari<br />
al cavo Accessori Outlet della BMW (71 60 7 685 624, figura<br />
S). In entrambi i casi si spengono 1 minuto dopo aver estratto<br />
la chiave d’accensione (consigliamo comunque di spegnere<br />
prima i fari!).<br />
14. Isolate tutti i collegamenti con guaina autorestringente (figura<br />
P). Riscaldandola con un apposito phon in modo da isolare<br />
perfettamente i collegamenti del faro. Inserire il cavo fra carena<br />
e supporto faro. Se utilizzate un faro unico, isolate il secondo<br />
cavo con lo stesso procedimento della guaina autorestringente<br />
e posizionatelo al di sotto della carena.<br />
15. Fissare tutti i cavi con fascette per evitare lo strofinamento e lo<br />
schiacciamento. Collegare il cavo rosso dal relè al positivo (+)<br />
della batteria e quello marrone al negativo (-).<br />
16. Rimontare il serbatoio, le carene laterali e la sella al motoveicolo.<br />
Regolare la posizione del faro e controllare nuovamente tutti i<br />
fissaggi. Controllare la funzione del faro e delle frecce prima di<br />
mettersi alla guida del mezzo.<br />
Schraubenlineal:<br />
Das Lineal soll Ihnen bei der Identifizierung der Schrauben helfen. Bitte<br />
bedenken Sie, daß Schrauben an Ihrer Einschraubtiefe gemessen werden,<br />
also ohne Kopf. M5x25 = Durchmesser 5mm, Länge 25 mm<br />
Metric Ruler for determining bolt sizes:<br />
When measuring bolts, only measure the length of thread and shaft<br />
without the bolt head. For example, M5x12 means diameter of bolt<br />
is 5 mm, length 12 mm.<br />
News, Shop, Downloads und Informationen: w w w . w u n d e r l i c h . d e<br />
The latest catalogue sections and news www.wunderlich.de/update<br />
Alles um das Thema Navigation: w w w . n a v i g a t i o n . w u n d e r l i c h . d e<br />
<strong>Fitting</strong> instructions download w w w . w u n d e r l i c h . d e / m a n u a l s<br />
Genereller Hinweis: Unsere Anleitungen sind nach bestem Wissen erstellt worden, erfolgen jedoch ohne Gewähr. Sollten Sie mit dem Anbau nicht zurecht kommen oder Zweifel haben, so<br />
wenden Sie sich bitte an Ihren BMW-Händler oder die Werkstatt Ihres Vertrauens.<br />
Bitte beachten Sie , dass wir keine Gewährleistungen für fahrzeugspezifische Toleranzen<br />
übernehmen können! Es kann im Einzelfall notwendig sein, dass Produkte Copyright diesen angepasst werden müssen.<br />
General note: Our fitting instructions are written to the best of our by knowledge but specifications or details may change. If you have difficulties or<br />
have doubts with fitting this part please seek advice from your BMW dealer<br />
or workshop of your choice. Please note that in some cases due to vehicle related<br />
tolerances beyond our control some products might need adjusting to <strong>Wunderlich</strong> fit. We cannot warranty parts fitting in those circumstances.<br />
Note generali: Le nostre istruzioni di montaggio sono scritte al meglio delle nostre<br />
possibilità ma dettagli o specifiche possono venire variate. Se avete difficoltà o dubbi<br />
sul montaggio di questo accessorio vi invitiamo a rivolgervi al vostro concessionario BMW o alla vostra officina di fiducia.Prendete nota che in qualche caso per tolleranze relative<br />
al veicolo al di fuori del nostro controllo alcuni accessori possono necessitare di aggiustamenti appropriati. In questo caso non possiamo garantire un perfetto montaggio. 2
<strong>Anbauanleitung</strong> <strong>Fitting</strong> <strong>Instructions</strong> <strong>Istruzione</strong><br />
Bestell Nummer / Part Number / Codice: 8600596 + 8600597<br />
R 1200 GS+Adventure "MicroDe" Nebel Zusatzscheinwerfer / Fog Beam<br />
A1<br />
A2<br />
B<br />
C<br />
D<br />
E<br />
F<br />
G<br />
H<br />
Adapter<br />
I<br />
J<br />
K<br />
News, Shop, Downloads und Informationen: w w w . w u n d e r l i c h . d e<br />
Alles um das Thema Navigation: w w w . n a v i g a t i o n . w u n d e r l i c h . d e<br />
The latest catalogue sections and news www.wunderlich.de/update<br />
<strong>Fitting</strong> instructions download w w w . w u n d e r l i c h . d e / m a n u a l s<br />
Genereller Hinweis: Unsere Anleitungen sind nach bestem Wissen erstellt worden, erfolgen jedoch ohne Gewähr. Sollten Sie mit dem Anbau nicht zurecht kommen oder Zweifel haben, so<br />
wenden Sie sich bitte an Ihren BMW-Händler oder die Werkstatt Ihres Vertrauens.<br />
Bitte beachten Sie , dass wir keine Gewährleistungen für fahrzeugspezifische Toleranzen<br />
übernehmen können! Es kann im Einzelfall notwendig sein, dass Produkte Copyright diesen angepasst werden müssen.<br />
General note: Our fittings instructions are written to the best of our by knowledge but specifications or details may change. If you have difficulties or<br />
have doubts with fitting this part please seek advice from your BMW dealer<br />
or workshop of your choice. Please note that in some cases due to vehicle related<br />
tolerances beyond our control some products might need adjusting to <strong>Wunderlich</strong> fit. We cannot warranty parts fitting in those circumstances.<br />
Note generali: Le nostre istruzioni di montaggio sono scritte al meglio delle nostre<br />
possibilità ma dettagli o specifiche possono venire variate. Se avete difficoltà o dubbi<br />
sul montaggio di questo accessorio vi invitiamo a rivolgervi al vostro concessionario BMW o alla vostra officina di fiducia.Prendete nota che in qualche caso per tolleranze relative<br />
al veicolo al di fuori del nostro controllo alcuni accessori possono necessitare di aggiustamenti appropriati. In questo caso non possiamo garantire un perfetto montaggio.<br />
3
<strong>Anbauanleitung</strong> <strong>Fitting</strong> <strong>Instructions</strong> <strong>Istruzione</strong><br />
Bestell Nummer / Part Number / Codice: 8600596 + 8600597<br />
R 1200 GS+Adventure "MicroDe" Nebel Zusatzscheinwerfer / Fog Beam<br />
L1<br />
L2<br />
M<br />
N<br />
O<br />
P<br />
Q<br />
R<br />
DS<br />
T<br />
4<br />
2<br />
U<br />
V<br />
7<br />
1<br />
Ø 6mm<br />
Ø 5mm<br />
1<br />
1<br />
3 5<br />
2<br />
2<br />
3 4 5<br />
6<br />
News, Shop, Downloads und Informationen: w w w . w u n d e r l i c h . d e<br />
Alles um das Thema Navigation: w w w . n a v i g a t i o n . w u n d e r l i c h . d e<br />
The latest catalogue sections and news www.wunderlich.de/update<br />
<strong>Fitting</strong> instructions download w w w . w u n d e r l i c h . d e / m a n u a l s<br />
Genereller Hinweis: Unsere Anleitungen sind nach bestem Wissen erstellt worden, erfolgen jedoch ohne Gewähr. Sollten Sie mit dem Anbau nicht zurecht kommen oder Zweifel haben, so<br />
wenden Sie sich bitte an Ihren BMW-Händler oder die Werkstatt Ihres Vertrauens.<br />
Bitte beachten Sie , dass wir keine Gewährleistungen für fahrzeugspezifische Toleranzen<br />
übernehmen können! Es kann im Einzelfall notwendig sein, dass Produkte Copyright diesen angepasst werden müssen.<br />
General note: Our fittings instructions are written to the best of our by knowledge but specifications or details may change. If you have difficulties or<br />
have doubts with fitting this part please seek advice from your BMW dealer<br />
or workshop of your choice. Please note that in some cases due to vehicle related<br />
tolerances beyond our control some products might need adjusting to <strong>Wunderlich</strong> fit. We cannot warranty parts fitting in those circumstances.<br />
Note generali: Le nostre istruzioni di montaggio sono scritte al meglio delle nostre<br />
possibilità ma dettagli o specifiche possono venire variate. Se avete difficoltà o dubbi<br />
sul montaggio di questo accessorio vi invitiamo a rivolgervi al vostro concessionario BMW o alla vostra officina di fiducia.Prendete nota che in qualche caso per tolleranze relative<br />
al veicolo al di fuori del nostro controllo alcuni accessori possono necessitare di aggiustamenti appropriati. In questo caso non possiamo garantire un perfetto montaggio.<br />
4