BeoLink Active Setting Up Guide - Iconic AV
BeoLink Active Setting Up Guide - Iconic AV
BeoLink Active Setting Up Guide - Iconic AV

You also want an ePaper? Increase the reach of your titles
YUMPU automatically turns print PDFs into web optimized ePapers that Google loves.
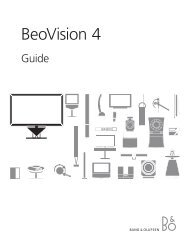
6 > Connections<br />
In the link room: Using a Master Link cable, connect the<br />
Master Link connection<br />
to the main system<br />
Main System<br />
Link System<br />
Junction box<br />
<strong>BeoLink</strong> <strong>Active</strong> box<br />
PC*<br />
multi-pin plug to the socket marked MASTER LINK on<br />
the <strong>BeoLink</strong> <strong>Active</strong> box, and run the cable to the junction<br />
box.<br />
Using Power Link cables (8-pin DIN), connect your active<br />
speakers to the sockets marked POWER LINK. Remember<br />
to set the L • R • LINE switch on each speaker to<br />
L and R (left and right channel), respectively.<br />
In the main room: Using a Master Link cable, connect the<br />
flat multi-pin plug to the socket marked MASTER LINK<br />
on the main system, and run the cable to the junction<br />
box.<br />
Inside the junction box: Join the cables as explained in<br />
the documentation enclosed with the box. This document<br />
contains information of the many possibilities of<br />
the box and how to join the cables.<br />
Connect one speaker to the<br />
socket marked Power Link and<br />
then loop the signals through to<br />
the other speaker as described<br />
in the User’s guide for your<br />
speakers.<br />
*The socket marked PC is used in<br />
<strong>BeoLink</strong> PC setups only. Please<br />
refer to the User’s guide enclosed<br />
with the <strong>BeoLink</strong> PC kit.