BeoCenter 2 Socket Unit Guide - Iconic AV
BeoCenter 2 Socket Unit Guide - Iconic AV
BeoCenter 2 Socket Unit Guide - Iconic AV

Create successful ePaper yourself
Turn your PDF publications into a flip-book with our unique Google optimized e-Paper software.
<strong>BeoCenter</strong> 2<br />
<strong>Guide</strong> – <strong>Socket</strong> <strong>Unit</strong>
CAUTION<br />
RISK OF ELECTRIC SHOCK<br />
DO NOT OPEN<br />
CAUTION: To reduce the risk of<br />
electric shock, do not remove<br />
cover (or back).<br />
No User-serviceable parts inside.<br />
Refer servicing to qualified service<br />
personnel.<br />
WARNING: To reduce the risk of fire or<br />
electric shock, do not expose this appliance<br />
to rain or moisture. Do not expose this equipment<br />
to dripping or splashing and ensure<br />
that no objects filled with liquids, such as<br />
vases, are placed on the equipment.<br />
To completely disconnect this equipment<br />
from the AC Mains, disconnect the mains<br />
plug from the wall socket. The disconnect<br />
device shall remain readily operable.<br />
The lightning flash with arrowhead symbol<br />
within an equilateral triangle, is intended<br />
to alert the user to the presence of uninsulated<br />
“dangerous voltage” within the<br />
product’s enclosure that may be of sufficient<br />
magnitude to constitute a risk of electric<br />
shock to persons.<br />
The exclamation point within an equilateral<br />
triangle is intended to alert the user to the<br />
presence of important operating and maintenance<br />
(servicing) instructions in the<br />
literature accompanying the product.<br />
For the US-market only!<br />
NOTE: This equipment has been tested and found<br />
to comply with the limits for a class B digital device,<br />
pursuant to part 15 of the FCC Rules. These limits<br />
are designed to provide reasonable protection<br />
against harmful interference in a residential<br />
installation.<br />
This equipment generates, uses and can radiate radio<br />
frequency energy and, if not installed and used<br />
in accordance with the instructions, may cause<br />
harmful interference to radio communications.<br />
However, there is no guarantee that interference<br />
will not occur in a particular installation. If this<br />
equipment does cause harmful interference to radio<br />
or television reception, which can be determined<br />
by turning the equipment off and on, the user is<br />
encouraged to try to correct the interference by<br />
one or more of the following measures:<br />
– Reorient or relocate the receiving antenna.<br />
– Increase the separation between the equipment<br />
and receiver.<br />
– Connect the equipment into an outlet on a<br />
circuit different from that to which the receiver<br />
is connected.<br />
– Consult the dealer or an experienced radio/TV<br />
technician for help.<br />
For the Canadian market only:<br />
CAUTION: To prevent electric shock do not use the<br />
polarized plug, attached to this apparatus, with an<br />
extension cord, receptacle or other outlet unless<br />
the blades can be fully inserted to prevent blade<br />
exposure.<br />
This class B digital apparatus meets all requirements<br />
of the Canadian Interference-Causing<br />
Equipment Regulations.
Contents<br />
3<br />
Placing your music system, 4<br />
Find out how to place your <strong>BeoCenter</strong> 2 and the <strong>Socket</strong> unit.<br />
Connect the cables, 6<br />
Find out how to connect all cables to the <strong>Socket</strong> unit.<br />
Mounting the wall bracket, 8<br />
Find out how to mount the optional wall bracket for the <strong>Socket</strong> unit.<br />
Audio/Video system, 10<br />
Find out how set up your products to the correct option and operate different<br />
Audio/Video systems.<br />
Looking after your music system, 12<br />
Find out how to clean your system and your discs.<br />
Index, 13
4<br />
Placing your music system<br />
Make sure that the music system is<br />
set up, placed and connected in<br />
accordance with the instructions in<br />
this guide.<br />
We recommend that you follow this<br />
procedure when you set up your<br />
music system:<br />
1 Connect the cable between the<br />
Master unit and the <strong>Socket</strong> unit<br />
2 Connect all cables to the sockets in<br />
the <strong>Socket</strong> unit – remember not to<br />
connect it to the mains yet<br />
3 Lead the cables through the<br />
opening at each end of the <strong>Socket</strong><br />
unit<br />
4 Mount the cover for the sockets on<br />
the <strong>Socket</strong> unit<br />
5 Connect the products to the mains<br />
If you wish to mount the <strong>Socket</strong> unit<br />
on a wall bracket, refer to the<br />
following pages.<br />
Placing the Master unit and the <strong>Socket</strong> unit …<br />
– Place your music system on a firm surface,<br />
preferably on the table, sideboard or stand<br />
where you want it placed permanently. Use<br />
Bang & Olufsen approved stands and wall<br />
brackets only!<br />
– Do not place any items on top of<br />
<strong>BeoCenter</strong> 2.<br />
– The music system is designed for indoor use<br />
in dry, domestic environments only, and for<br />
use within a temperature range of<br />
10–40º C (50–105º F).<br />
– Avoid placing the system in direct sunlight,<br />
near radiators or other sources of heat.<br />
– Do not connect any of the products in your<br />
system to the mains, until you have<br />
connected all the cables (refer to page 6).<br />
– The music system can only be switched off<br />
completely by disconnecting it from the<br />
mains supply. Therefore, connect the music<br />
system to an easily accessible wall socket.<br />
– If the <strong>Socket</strong> unit is placed close to the floor,<br />
it is best to connect all the necessary cables<br />
to the <strong>Socket</strong> unit before you mount it on<br />
the wall bracket. Also make sure that there<br />
is room enough to detach the <strong>Socket</strong> unit<br />
from the wall bracket again.<br />
– Before mounting the wall bracket, ensure<br />
that all cables have the proper length.<br />
– The <strong>Socket</strong> unit can be placed vertically or<br />
horisontally, for example on the floor – however,<br />
the need for ventilation must be<br />
observed. If required, the <strong>Socket</strong> unit can<br />
be fastened to the wall with the enclosed<br />
wall bracket (refer to page 8).<br />
Remember to leave enough space at the sides for<br />
the doors to open.<br />
To ensure proper ventilation, allow for at least 5 cm<br />
(2") of space at the sides of the <strong>Socket</strong> unit and<br />
10 cm (4") above the unit. The <strong>Socket</strong> unit must<br />
under no circumstances be covered by for example<br />
insulation material.
5<br />
1 2<br />
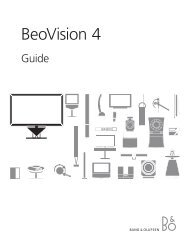
You can fasten the <strong>Socket</strong> unit either horisontally or<br />
vertically. Note that the lock mechanism of the<br />
wall bracket requires that the sockets face downward<br />
if you mount the <strong>Socket</strong> unit horisontally.<br />
Cover for sockets: To gain access to the sockets,<br />
it is necessary to remove the cover. Lift one end of<br />
the cover, slide the cover to the side and lift it off.<br />
The cables must be lead through the openings at<br />
each end of the <strong>Socket</strong> unit.<br />
Mains lead: For security reasons the cover must<br />
be mounted. When the mains cord has been lead<br />
through the opening at the end of the <strong>Socket</strong> unit<br />
and the cover has been mounted, the mains cord<br />
cannot be pulled out of the socket by accident.
6<br />
Connect the cables<br />
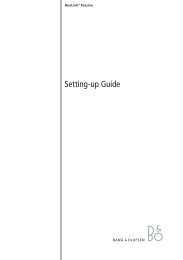
Use the diagram and graphics<br />
imprinted on the <strong>Socket</strong> unit when<br />
locating the sockets. Note that the<br />
greyed out sockets are only present if<br />
your <strong>BeoCenter</strong> 2 is equipped with<br />
DVD.<br />
Do not connect your system to the<br />
mains until you have finished<br />
connecting all other cables.<br />
To access the sockets in the <strong>Socket</strong><br />
unit, you must remove the cover –<br />
refer to page 5 and the graphics<br />
imprinted on the cover.<br />
DAB FM AM POWER LINK<br />
MASTER LINK<br />
<strong>AV</strong><br />
~<br />
AUX<br />
IN<br />
R<br />
L<br />
AUX<br />
OUT<br />
R<br />
L<br />
Master Link<br />
connection to other<br />
rooms …<br />
MASTER UNIT<br />
LINE<br />
OUT VIDEO<br />
S-VIDEO<br />
CTRL<br />
R<br />
L<br />
DIG.OUT<br />
Master <strong>Unit</strong> connection<br />
Connect the Master unit to the <strong>Socket</strong> unit with<br />
the enclosed cable. Longer cables are available<br />
from your Bang & Olufsen retailer.<br />
<strong>Socket</strong> <strong>Unit</strong><br />
Master Link connections<br />
Use a Master Link cable to connect the sockets<br />
marked Master Link on the <strong>Socket</strong> unit and the<br />
television. The socket is also used for BeoLink<br />
distribution of sound throughout the house.
7<br />
Aerial connections – AM/FM/DAB<br />
We recommend that you connect your DAB aerial<br />
before connecting your other aerials. DAB radio<br />
programs are only available if your music system is<br />
equipped with the built-in DAB module.<br />
Connect your DAB aerial to the socket marked<br />
DAB, your FM aerial to the socket marked FM, and<br />
your AM aerial to the socket marked AM.<br />
When using an AM loop aerial or FM dipol<br />
aerial …<br />
Tune in to the radio station you want, then turn<br />
the aerial horisontally until you receive the best<br />
possible signal.<br />
When using a DAB aerial …<br />
Use the DAB AERIAL ADJUSTMENT menu, described<br />
on page 10 in the <strong>BeoCenter</strong> 2 <strong>Guide</strong>, to find out<br />
where to place your aerial. The menu lets you<br />
know how strong the DAB signal is.<br />
Make sure that you hang or mount the aerial<br />
vertically.<br />
Do not mount your <strong>BeoCenter</strong> 2 or the <strong>Socket</strong> unit<br />
permanently – for example, in a wall bracket – until<br />
you have found out where the signal is strongest<br />
and placed your system accordingly!<br />
Loudspeaker connections – Power Link<br />
Connect your active speakers to the socket<br />
marked Power Link and loop the signal through<br />
from speaker to speaker. Refer to the <strong>Guide</strong>s for<br />
the BeoLab Loudspeakers.<br />
When headphones are plugged in, the speakers,<br />
connected to your music system, are muted.<br />
Prolonged listening at a high volume level may<br />
cause hearing damages!<br />
Audio/Video connections – <strong>AV</strong><br />
This connection is only available if your <strong>BeoCenter</strong> 2<br />
is equipped with DVD.<br />
Use a 21-pin <strong>AV</strong> cable to connect the sockets<br />
marked <strong>AV</strong> on the <strong>Socket</strong> unit and the television.<br />
For connection without a 21-pin <strong>AV</strong> cable, refer to<br />
the next column.<br />
DIG.OUT<br />
If you connect your music system to a Bang &<br />
Olufsen television with a built-in surround sound<br />
module, you must connect the socket marked<br />
DIG.OUT to the digital input socket on your television<br />
or speakers. If the required cable is not<br />
enclosed, it is available from your Bang & Olufsen<br />
retailer.<br />
Mains connection<br />
Plug the mains cord into the socket marked ~ on<br />
the socket unit, but do not connect it to the mains<br />
before you have finished all connections.<br />
Audio/Video connection without a<br />
21-pin <strong>AV</strong> cable …<br />
If your television is not equipped with an 21-<br />
pin <strong>AV</strong> socket, you can still connect it to the<br />
music system. This applies only if your <strong>BeoCenter</strong> 2<br />
is equipped with DVD!<br />
> Connect the CTRL socket on the <strong>Socket</strong> unit to<br />
the CTRL socket on your television.<br />
> Connect the S-VIDEO socket on the <strong>Socket</strong> unit<br />
to the S-VIDEO socket on your television.<br />
> Connect the VIDEO socket on the <strong>Socket</strong> unit to<br />
the VIDEO socket on your television.<br />
> Connect the DIG.OUT socket on the socket unit<br />
to the digital input on your television.<br />
> Connect the LINE OUT R and L socket for right<br />
and left channel audio output on the socket unit<br />
to the R and L sockets on your television.<br />
Connect auxiliary equipment …<br />
AUX IN R – L<br />
For connection of auxiliary equipment, such as a<br />
record player.<br />
AUX OUT R – L<br />
For connection of auxiliary equipment, such as a<br />
mini disc or a recorder.
8<br />
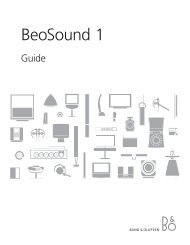
Mounting the wall bracket<br />
The <strong>Socket</strong> <strong>Unit</strong> can be mounted on<br />
the enclosed wall bracket in either a<br />
horisontal or vertical position.<br />
We recommend that you follow this<br />
procedure when you mount the wall<br />
bracket:<br />
20 cm<br />
8"<br />
27 cm<br />
10.6"<br />
17.5 cm<br />
6.9"<br />
27 cm<br />
10.6"<br />
17.5 cm<br />
6.9"<br />
10 cm<br />
3.9"<br />
– Use the wall bracket to mark the<br />
placement of the holes to be drilled in<br />
the wall.<br />
The dimensional sketch on this page<br />
5.5 cm<br />
2.2"<br />
shows the placement of the <strong>Socket</strong> unit<br />
compared to the wall bracket<br />
– Mount the wall bracket on the wall<br />
– Mount the <strong>Socket</strong> unit on the wall<br />
bracket. If you place the unit close to<br />
the floor, we suggest that you connect<br />
all cables before mounting the <strong>Socket</strong><br />
unit on the bracket<br />
See the special notice about light partition<br />
walls on the next page.<br />
Should questions arise concerning screws<br />
or fasteners, please contact your Bang &<br />
Olufsen retailer.<br />
Mounting the wall bracket: Two screws/<br />
fasteners with a minimum load rating of 6 kg<br />
(13 lbs.) each must be used.<br />
Fastening the <strong>Socket</strong> <strong>Unit</strong> to the Wall bracket:<br />
Slide the <strong>Socket</strong> unit down into place on the wall<br />
bracket. Make sure that the socket unit is pushed<br />
all the way down to engage the two lock<br />
mechanisms.
9<br />
Removing the <strong>Socket</strong> unit from the wall<br />
bracket:<br />
To ensure that the <strong>Socket</strong> unit is placed securely<br />
on the wall bracket, the wall bracket has two lock<br />
mechanisms (A) which must be released before<br />
the unit can be removed.<br />
A<br />
A<br />
2<br />
Push the two clips in towards the wall and lift the<br />
unit out of the bracket.<br />
1<br />
Special notice about light partition walls<br />
If you intend to hang the <strong>BeoCenter</strong> 2 <strong>Socket</strong> unit<br />
on a gypsum wall (also known as drywall or wallboard),<br />
the wall bracket must be fastened to a<br />
vertical stud.<br />
Horizontal position: One screw must be a lag<br />
screw (4 mm – countersunk/#8 – 5/32"), which<br />
penetrates the gypsum, and is screwed a<br />
minimum of 15 mm (5/8") into a vertical stud.<br />
Furthermore, for stability, at least one screw of a<br />
type intended for gypsum panels, must be used in<br />
one of the other holes.<br />
Vertical position: Use two lag screws (4 mm –<br />
countersunk/#8 – 5/32"), which penetrate the<br />
gypsum, and are screwed a minimum of 15 mm<br />
(5/8") into a vertical stud.
10<br />
Audio/Video system<br />
You can use your music system as a<br />
stand-alone system or as an Audio/<br />
Video system, if you connect the<br />
systems with a Master Link cable.<br />
If you connect your music system and<br />
your video system, you must make<br />
sure that they are set up to function<br />
together. This means that you have<br />
set it to the correct Option with Beo4<br />
as described on this page.<br />
When your music system is connected to<br />
your video system with a Master Link<br />
cable, you choose whether to use the<br />
speakers connected to the music system, if<br />
any, or the speakers connected to the<br />
video system. Via the menu ‘DVD SOUND’<br />
described on page 21 in the <strong>BeoCenter</strong> 2<br />
<strong>Guide</strong>, you decide which speakers should<br />
be used. Note: This function is only available<br />
if your <strong>BeoCenter</strong> 2 is equipped with<br />
DVD.<br />
To program Option for your audio system<br />
with the Beo4 remote control …<br />
> While holding down the • button, press LIST.<br />
> Let go of both buttons.<br />
> Press LIST repeatedly until OPTION? is shown in<br />
the Beo4 display and press GO.<br />
> Press LIST repeatedly until A.OPT is shown in<br />
the Beo4 display and then key in the<br />
appropriate number (0, 1, 2, 5 or 6).<br />
Choose V.OPT to program Option for your video<br />
system.<br />
The music system has five different Option<br />
settings:<br />
Option 0: Used when your music system is<br />
connected to your video system and no<br />
speakers are connected directly to your music<br />
system. If you wish to change the Option<br />
setting to 0 from any other setting, change it<br />
first to 1 before changing it to 0.<br />
Option 1: Used when your music system is set up<br />
on its own or connected to a video system, when<br />
speakers are connected to your music system.<br />
Option 2: Used when your music system is set up<br />
in one room and connected to a video system<br />
set up in another room.<br />
Option 5: Used when your music system is set up<br />
in a link room which also comprises a Bang &<br />
Olufsen television.<br />
Option 6: Used when your music system is set up<br />
in a link room without a Bang & Olufsen television.<br />
An Audio/Video system. When your music system<br />
is connected to a video system and the speakers<br />
are connected to the video system, the video<br />
system takes over some of the functions<br />
mentioned in the <strong>BeoCenter</strong> 2 <strong>Guide</strong>, for example<br />
programming a Timer.<br />
A stand-alone setup.<br />
Option 2 Option 0<br />
Option 1
11<br />
Audio and Video system in one room<br />
If your <strong>BeoCenter</strong> 2 is set up with its own<br />
speakers and connected to a television<br />
(Option 1–1), you can listen to the radio while<br />
watching a DVD. However, all close-up<br />
operation is directed at the radio. DVD<br />
operation with Beo4 is directed through the<br />
television. Note: This function is only available<br />
if your <strong>BeoCenter</strong> 2 is equipped with<br />
DVD!<br />
Audio and Video system in two rooms<br />
If your speakers are connected to your music<br />
system, your audio and video systems do not<br />
have to be placed in the same room<br />
(Option 2–2).<br />
However, if your <strong>BeoCenter</strong> 2 is equipped<br />
with DVD and you activate DVD playback in<br />
the room where the <strong>BeoCenter</strong> 2 is placed,<br />
the television does not start up.<br />
Option 1 Option 1<br />
An Audio and Video system set up in one room.<br />
To listen to sound from your video system on<br />
your music system speakers without switching<br />
on the television screen …<br />
> Press LIST repeatedly until <strong>AV</strong> is shown in the<br />
Beo4 display.<br />
> Then press a video source button such as TV.<br />
Option 2 Option 2<br />
If you press a source button before or after <strong>AV</strong><br />
has been shown in the Beo4 display, the television<br />
screen will be switched on.<br />
To listen to sound from your music system on<br />
the television speakers …<br />
> Press LIST repeatedly until <strong>AV</strong> is shown in the<br />
Beo4 display.<br />
> Then press a source button such as RADIO.<br />
An Audio/Video system set up in two rooms.
12<br />
Looking after your music system<br />
Normal maintenance, such as<br />
cleaning the music system, is the<br />
responsibility of the user. To achieve<br />
the best result, please follow these<br />
instructions.<br />
Handle discs with care. If the disc is<br />
always held by its edges and placed<br />
in its original cassette when out of<br />
the player, no cleaning will be<br />
required.<br />
Cleaning your music system<br />
Wipe dust off the surface of the system using<br />
a dry, soft cloth. If necessary, remove grease<br />
stains or more persistent dirt with a firmly<br />
wrung, soft cloth which you have dipped in a<br />
solution of water containing a few drops of<br />
mild detergent.<br />
Do not attempt to clean the optics of the<br />
system or open any part of the music system<br />
yourself. Leave such operations to qualified<br />
service personnel.<br />
Never use alcohol or other solvents to clean<br />
any part of the system!<br />
Handling your discs: When cleaning your discs,<br />
wipe in a straight line from the centre to the edge.<br />
Note: Should the disc become soiled by fingerprints,<br />
dust or dirt, it can be wiped clean with a<br />
lint-free, soft, dry cloth. No solvents or abrasive<br />
cleaners should ever be used on the discs. Avoid<br />
extreme heat and humidity, and never write on<br />
your discs.
Index<br />
13<br />
Audio/Video system<br />
Connect your music system to a video<br />
system, 6<br />
Option programming, 10<br />
Use an Audio/Video system, 11<br />
Beo4 remote control<br />
Use the Beo4 remote control, <strong>BeoCenter</strong> 2<br />
<strong>Guide</strong> p. 22<br />
Cables<br />
Connect the cables, 6<br />
Mount the cable cover, 5<br />
CD player<br />
Delete CD names, <strong>BeoCenter</strong> 2 <strong>Guide</strong> p. 12<br />
Load a disc, <strong>BeoCenter</strong> 2 <strong>Guide</strong> p. 5<br />
Name CDs, <strong>BeoCenter</strong> 2 <strong>Guide</strong> p. 12<br />
Play a CD, <strong>BeoCenter</strong> 2 <strong>Guide</strong> p. 4<br />
Play favourite tracks only, <strong>BeoCenter</strong> 2 <strong>Guide</strong><br />
p. 12<br />
Play tracks in random order, <strong>BeoCenter</strong> 2 <strong>Guide</strong><br />
p. 12<br />
Repeat a CD for up to 12 hours, <strong>BeoCenter</strong> 2<br />
<strong>Guide</strong> p. 12<br />
Cleaning<br />
Looking after your music system, 12<br />
Handling your CDs, 12<br />
Clock<br />
Enter settings for the built-in clock,<br />
<strong>BeoCenter</strong> 2 <strong>Guide</strong> p. 15<br />
Connections<br />
Aerial socket, 6<br />
Connect headphones, <strong>BeoCenter</strong> 2 <strong>Guide</strong> p. 5<br />
Connect speakers, 6<br />
Connect your music system to a video<br />
system, 6<br />
<strong>Socket</strong> unit, 6<br />
Contact<br />
Contact Bang & Olufsen, <strong>BeoCenter</strong> 2<br />
<strong>Guide</strong> p. 25<br />
DAB radio programs<br />
Adjust DAB audio signal compression – DAB<br />
DRC, <strong>BeoCenter</strong> 2 <strong>Guide</strong> p. 10<br />
Adjust your DAB aerial, <strong>BeoCenter</strong> 2 <strong>Guide</strong> p. 11<br />
DAB aerial socket, 6<br />
Tune in DAB radio programs, <strong>BeoCenter</strong> 2<br />
<strong>Guide</strong> pp. 10–11<br />
Delete<br />
Delete CD names, <strong>BeoCenter</strong> 2 <strong>Guide</strong> p. 12<br />
Delete radio programs, <strong>BeoCenter</strong> 2 <strong>Guide</strong><br />
p. 10<br />
Delete series of tracks, <strong>BeoCenter</strong> 2 <strong>Guide</strong> p. 12<br />
Displays<br />
Understand and change the displayed<br />
information, <strong>BeoCenter</strong> 2 <strong>Guide</strong> p. 5 and 15<br />
DVD<br />
DVD – audio language, <strong>BeoCenter</strong> 2 <strong>Guide</strong><br />
p. 19<br />
DVD on-screen menus, <strong>BeoCenter</strong> 2 <strong>Guide</strong> p. 19<br />
DVD operation, <strong>BeoCenter</strong> 2 <strong>Guide</strong> p. 18<br />
DVD OPTIONS menu, <strong>BeoCenter</strong> 2 <strong>Guide</strong> p. 20<br />
DVD – Parental Lock, Beocenter 2 <strong>Guide</strong><br />
p. 19–20<br />
DVD – subtitle language, <strong>BeoCenter</strong> 2 <strong>Guide</strong><br />
p. 19<br />
Play a DVD, <strong>BeoCenter</strong> 2 <strong>Guide</strong> p. 18<br />
First-time setup<br />
The first-time setup procedure, <strong>BeoCenter</strong> 2<br />
<strong>Guide</strong> p. 8<br />
Headphones<br />
Connect headphones, <strong>BeoCenter</strong> 2 <strong>Guide</strong> p. 5<br />
Indicator light<br />
The indicator light, <strong>BeoCenter</strong> 2 <strong>Guide</strong> p. 5<br />
Language<br />
Change DVD languages, <strong>BeoCenter</strong> 2 <strong>Guide</strong> p. 19<br />
Change the language in the display, <strong>BeoCenter</strong> 2<br />
<strong>Guide</strong> p. 15<br />
Loudspeakers<br />
Connect loudspeakers, 6
14<br />
>> Index<br />
Maintenance<br />
Looking after your music system, 12<br />
Master Link<br />
Audio/Video setup, 10<br />
Option programming, 10<br />
Use an Audio/Video system, 11<br />
Menus<br />
How to read menu symbols, <strong>BeoCenter</strong> 2 <strong>Guide</strong><br />
p. 6<br />
How to use the menus, <strong>BeoCenter</strong> 2 <strong>Guide</strong> p. 7<br />
Naming<br />
Delete CD names, <strong>BeoCenter</strong> 2 <strong>Guide</strong> p. 12<br />
Name a CD, <strong>BeoCenter</strong> 2 <strong>Guide</strong> p. 12<br />
Name a radio program, <strong>BeoCenter</strong> 2 <strong>Guide</strong> p. 10<br />
N.Music<br />
Play N. MUSIC, <strong>BeoCenter</strong> 2 <strong>Guide</strong> p. 9<br />
N.Radio<br />
Play N.RADIO, <strong>BeoCenter</strong> 2 <strong>Guide</strong> p. 9<br />
Placement<br />
Placing your music system, 4<br />
Radio<br />
Delete radio programs, <strong>BeoCenter</strong> 2 <strong>Guide</strong><br />
p. 10<br />
Move radio programs, <strong>BeoCenter</strong> 2 <strong>Guide</strong> p. 10<br />
Name radio programs, <strong>BeoCenter</strong> 2 <strong>Guide</strong> p. 10<br />
Switch on the radio, <strong>BeoCenter</strong> 2 <strong>Guide</strong> p. 4<br />
Tune in radio programs, <strong>BeoCenter</strong> 2 <strong>Guide</strong><br />
p. 10<br />
Random<br />
Play tracks in random order, <strong>BeoCenter</strong> 2 <strong>Guide</strong><br />
p. 12<br />
Repeat<br />
Repeat a CD, <strong>BeoCenter</strong> 2 <strong>Guide</strong> p. 12<br />
Settings<br />
Set the clock, <strong>BeoCenter</strong> 2 <strong>Guide</strong> p. 15<br />
Setting your preferences for DVD playback,<br />
<strong>BeoCenter</strong> 2 <strong>Guide</strong> p. 19–20<br />
Sound adjustments, <strong>BeoCenter</strong> 2 <strong>Guide</strong> p. 14<br />
Tracks<br />
Play favourite tracks only, <strong>BeoCenter</strong> 2 <strong>Guide</strong><br />
p. 12<br />
Play tracks in random order, <strong>BeoCenter</strong> 2 <strong>Guide</strong><br />
p. 12<br />
Wall bracket<br />
Mount the optional wall bracket, 8<br />
Operation panel<br />
Overview of the operation panel, <strong>BeoCenter</strong> 2<br />
<strong>Guide</strong> p. 4<br />
Option<br />
Program your music system to the correct<br />
Option, 10<br />
Pincode<br />
Activate the pincode system, <strong>BeoCenter</strong> 2<br />
<strong>Guide</strong> p. 16<br />
Change or delete your pincode, <strong>BeoCenter</strong> 2<br />
<strong>Guide</strong> p. 16<br />
Did you forget your pincode?, <strong>BeoCenter</strong> 2<br />
<strong>Guide</strong> p. 16<br />
Open for Mastercode, <strong>BeoCenter</strong> 2 <strong>Guide</strong> p. 16<br />
Use your pincode, <strong>BeoCenter</strong> 2 <strong>Guide</strong> p. 16<br />
<strong>Socket</strong> panel<br />
Overview of sockets, 6<br />
Sound<br />
Adjust or mute the sound volume, <strong>BeoCenter</strong> 2<br />
<strong>Guide</strong> p. 4<br />
Change sound from stereo to mono,<br />
<strong>BeoCenter</strong> 2 <strong>Guide</strong> p. 10<br />
Change volume, bass, treble or loudness,<br />
<strong>BeoCenter</strong> 2 <strong>Guide</strong> p. 14<br />
Timer<br />
Enter settings for the built-in clock,<br />
<strong>BeoCenter</strong> 2 <strong>Guide</strong> p. 15<br />
Make your music system start or stop<br />
automatically, <strong>BeoCenter</strong> 2 <strong>Guide</strong> p. 13<br />
Switch on the Timer play function,<br />
<strong>BeoCenter</strong> 2 <strong>Guide</strong> p. 13<br />
To view, edit or delete a Timer, <strong>BeoCenter</strong> 2<br />
<strong>Guide</strong> p. 13
This product fulfils the conditions stated in the<br />
Directives 89/336/EEC and 73/23/EEC.<br />
Technical specifications, features and the use<br />
thereof are subject to change without notice!<br />
3505814 0702
www.bang-olufsen.com