FIBEROCK® AQUA-TOUGH™ Tile Backerboard ... - USG Corporation
FIBEROCK® AQUA-TOUGH™ Tile Backerboard ... - USG Corporation
FIBEROCK® AQUA-TOUGH™ Tile Backerboard ... - USG Corporation

Create successful ePaper yourself
Turn your PDF publications into a flip-book with our unique Google optimized e-Paper software.
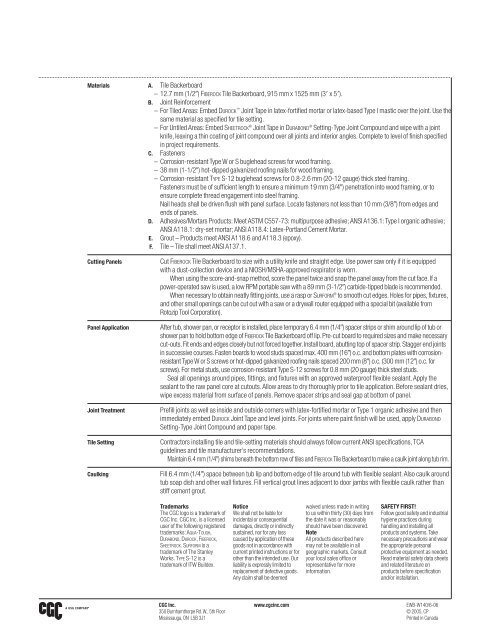
Materials A. <strong>Tile</strong> <strong>Backerboard</strong><br />
– 12.7 mm (1/2)FIBEROCK <strong>Tile</strong> <strong>Backerboard</strong>, 915 mm x 1525 mm (3 x 5).<br />
B. Joint Reinforcement<br />
– For <strong>Tile</strong>d Areas: Embed DUROCK Joint Tape in latex-fortified mortar or latex-based Type I mastic over the joint. Use the<br />
same material as specified for tile setting.<br />
– For Untiled Areas: Embed SHEETROCK ® Joint Tape in DURABOND ® Setting-Type Joint Compound and wipe with a joint<br />
knife, leaving a thin coating of joint compound over all joints and interior angles. Complete to level of finish specified<br />
in project requirements.<br />
C. Fasteners<br />
– Corrosion-resistant Type W or S buglehead screws for wood framing.<br />
– 38 mm (1-1/2) hot-dipped galvanized roofing nails for wood framing.<br />
– Corrosion-resistant TYPE S-12 buglehead screws for 0.8-2.6 mm (20-12 gauge) thick steel framing.<br />
Fasteners must be of sufficient length to ensure a minimum 19 mm (3/4) penetration into wood framing, or to<br />
ensure complete thread engagement into steel framing.<br />
Nail heads shall be driven flush with panel surface. Locate fasteners not less than 10 mm (3/8) from edges and<br />
ends of panels.<br />
D. Adhesives/Mortars Products: Meet ASTM C557-73: multipurpose adhesive; ANSI A136.1:Type I organic adhesive;<br />
ANSI A118.1: dry-set mortar; ANSI A118.4: Latex-Portland Cement Mortar.<br />
E. Grout – Products meet ANSI A118.6 and A118.3 (epoxy).<br />
F. <strong>Tile</strong> – <strong>Tile</strong> shall meet ANSI A137.1.<br />
Cutting Panels<br />
Panel Application<br />
Joint Treatment<br />
<strong>Tile</strong> Setting<br />
Caulking<br />
Cut FIBEROCK <strong>Tile</strong> <strong>Backerboard</strong> to size with a utility knife and straight edge. Use power saw only if it is equipped<br />
with a dust-collection device and a NIOSH/MSHA-approved respirator is worn.<br />
When using the score-and-snap method, score the panel twice and snap the panel away from the cut face. If a<br />
power-operated saw is used, a low RPM portable saw with a 89 mm (3-1/2) carbide-tipped blade is recommended.<br />
When necessary to obtain neatly fitting joints, use a rasp or SURFORM ® to smooth cut edges. Holes for pipes, fixtures,<br />
and other small openings can be cut out with a saw or a drywall router equipped with a special bit (available from<br />
Rotozip Tool <strong>Corporation</strong>).<br />
After tub, shower pan, or receptor is installed, place temporary 6.4 mm (1/4) spacer strips or shim around lip of tub or<br />
shower pan to hold bottom edge of FIBEROCK <strong>Tile</strong> <strong>Backerboard</strong> off lip. Pre-cut board to required sizes and make necessary<br />
cut-outs. Fit ends and edges closely but not forced together. Install board, abutting top of spacer strip. Stagger end joints<br />
in successive courses. Fasten boards to wood studs spaced max. 400 mm (16) o.c. and bottom plates with corrosionresistant<br />
Type W or S screws or hot-dipped galvanized roofing nails spaced 200 mm (8) o.c. (300 mm (12) o.c. for<br />
screws). For metal studs, use corrosion-resistant Type S-12 screws for 0.8 mm (20 gauge) thick steel studs.<br />
Seal all openings around pipes, fittings, and fixtures with an approved waterproof flexible sealant.Apply the<br />
sealant to the raw panel core at cutouts.Allow areas to dry thoroughly prior to tile application. Before sealant dries,<br />
wipe excess material from surface of panels. Remove spacer strips and seal gap at bottom of panel.<br />
Prefill joints as well as inside and outside corners with latex-fortified mortar or Type 1 organic adhesive and then<br />
immediately embed DUROCK Joint Tape and level joints. For joints where paint finish will be used, apply DURABOND<br />
Setting-Type Joint Compound and paper tape.<br />
Contractors installing tile and tile-setting materials should always follow current ANSI specifications,TCA<br />
guidelines and tile manufacturer’s recommendations.<br />
Maintain 6.4 mm (1/4) shims beneath the bottom row of tiles and FIBEROCK <strong>Tile</strong> <strong>Backerboard</strong> to make a caulk joint along tub rim.<br />
Fill 6.4 mm (1/4) space between tub lip and bottom edge of tile around tub with flexible sealant.Also caulk around<br />
tub soap dish and other wall fixtures. Fill vertical grout lines adjacent to door jambs with flexible caulk rather than<br />
stiff cement grout.<br />
Trademarks<br />
The CGC logo is a trademark of<br />
CGC Inc. CGC Inc. is a licensed<br />
user of the following registered<br />
trademarks: <strong>AQUA</strong>-TOUGH,<br />
DURABOND,DUROCK,FIBEROCK,<br />
SHEETROCK.SURFORM is a<br />
trademark of The Stanley<br />
Works. TYPE S-12 is a<br />
trademark of ITW Buildex.<br />
Notice<br />
We shall not be liable for<br />
incidental or consequential<br />
damages, directly or indirectly<br />
sustained, nor for any loss<br />
caused by application of these<br />
goods not in accordance with<br />
current printed instructions or for<br />
other than the intended use. Our<br />
liability is expressly limited to<br />
replacement of defective goods.<br />
Any claim shall be deemed<br />
waived unless made in writing<br />
to us within thirty (30) days from<br />
the date it was or reasonably<br />
should have been discovered.<br />
Note<br />
All products described here<br />
may not be available in all<br />
geographic markets. Consult<br />
your local sales office or<br />
representative for more<br />
information.<br />
SAFETY FIRST!<br />
Follow good safety and industrial<br />
hygiene practices during<br />
handling and installing all<br />
products and systems.Take<br />
necessary precautions and wear<br />
the appropriate personal<br />
protective equipment as needed.<br />
Read material safety data sheets<br />
and related literature on<br />
products before specification<br />
and/or installation.<br />
CGC Inc.<br />
350 Burnhamthorpe Rd.W., 5th Floor<br />
Mississauga, ON L5B 3J1<br />
www.cgcinc.com<br />
EWB-W140/6-06<br />
© 2005, CP<br />
Printed in Canada