TerraStar 60 Manual - Meade
TerraStar 60 Manual - Meade
TerraStar 60 Manual - Meade

You also want an ePaper? Increase the reach of your titles
YUMPU automatically turns print PDFs into web optimized ePapers that Google loves.
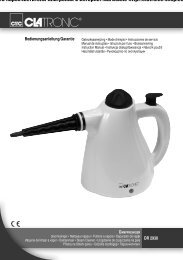
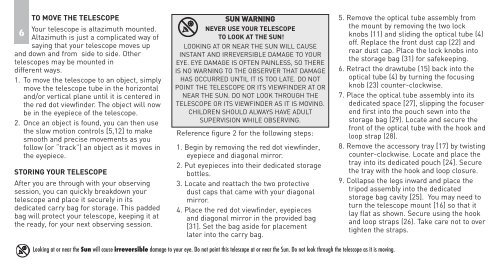
TO MOVE THE TELESCOPE<br />
Your telescope is altazimuth mounted.<br />
6<br />
Altazimuth is just a complicated way of<br />
saying that your telescope moves up<br />
and down and from side to side. Other<br />
telescopes may be mounted in<br />
different ways.<br />
1. To move the telescope to an object, simply<br />
move the telescope tube in the horizontal<br />
and/or vertical plane until it is centered in<br />
the red dot viewfinder. The object will now<br />
be in the eyepiece of the telescope.<br />
2. Once an object is found, you can then use<br />
the slow motion controls [5,12] to make<br />
smooth and precise movements as you<br />
follow (or “track”) an object as it moves in<br />
the eyepiece.<br />
STORING YOUR TELESCOPE<br />
After you are through with your observing<br />
session, you can quickly breakdown your<br />
telescope and place it securely in its<br />
dedicated carry bag for storage. This padded<br />
bag will protect your telescope, keeping it at<br />
the ready, for your next observing session.<br />
SUN WARNING<br />
NEVER USE YOUR TELESCOPE<br />
TO LOOK AT THE SUN!<br />
LOOKING AT OR NEAR THE SUN WILL CAUSE<br />
INSTANT AND IRREVERSIBLE DAMAGE TO YOUR<br />
EYE. EYE DAMAGE IS OFTEN PAINLESS, SO THERE<br />
IS NO WARNING TO THE OBSERVER THAT DAMAGE<br />
HAS OCCURRED UNTIL IT IS TOO LATE. DO NOT<br />
POINT THE TELESCOPE OR ITS VIEWFINDER AT OR<br />
NEAR THE SUN. DO NOT LOOK THROUGH THE<br />
TELESCOPE OR ITS VIEWFINDER AS IT IS MOVING.<br />
CHILDREN SHOULD ALWAYS HAVE ADULT<br />
SUPERVISION WHILE OBSERVING.<br />
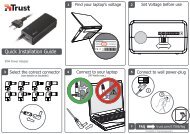
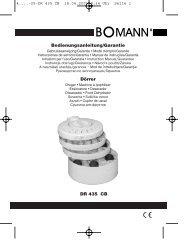
Reference figure 2 for the following steps:<br />
1. Begin by removing the red dot viewfinder,<br />
eyepiece and diagonal mirror.<br />
2. Put eyepieces into their dedicated storage<br />
bottles.<br />
3. Locate and reattach the two protective<br />
dust caps that came with your diagonal<br />
mirror.<br />
4. Place the red dot viewfinder, eyepieces<br />
and diagonal mirror in the provided bag<br />
[31]. Set the bag aside for placement<br />
later into the carry bag.<br />
5. Remove the optical tube assembly from<br />
the mount by removing the two lock<br />
knobs (11) and sliding the optical tube (4)<br />
off. Replace the front dust cap (22) and<br />
rear dust cap. Place the lock knobs into<br />
the storage bag (31) for safekeeping.<br />
6. Retract the drawtube (15) back into the<br />
optical tube (4) by turning the focusing<br />
knob (23) counter-clockwise.<br />
7. Place the optical tube assembly into its<br />
dedicated space [27], slipping the focuser<br />
end first into the pouch sewn into the<br />
storage bag (29). Locate and secure the<br />
front of the optical tube with the hook and<br />
loop strap (28).<br />
8. Remove the accessory tray [17] by twisting<br />
counter-clockwise. Locate and place the<br />
tray into its dedicated pouch [24]. Secure<br />
the tray with the hook and loop closure.<br />
9. Collapse the legs inward and place the<br />
tripod assembly into the dedicated<br />
storage bag cavity [25]. You may need to<br />
turn the telescope mount [16] so that it<br />
lay flat as shown. Secure using the hook<br />
and loop straps (26). Take care not to over<br />
tighten the straps.<br />
Looking at or near the Sun will cause irreversible damage to your eye. Do not point this telescope at or near the Sun. Do not look through the telescope as it is moving.