Building Secure ASP.NET Applications - People Search Directory
Building Secure ASP.NET Applications - People Search Directory
Building Secure ASP.NET Applications - People Search Directory

Create successful ePaper yourself
Turn your PDF publications into a flip-book with our unique Google optimized e-Paper software.
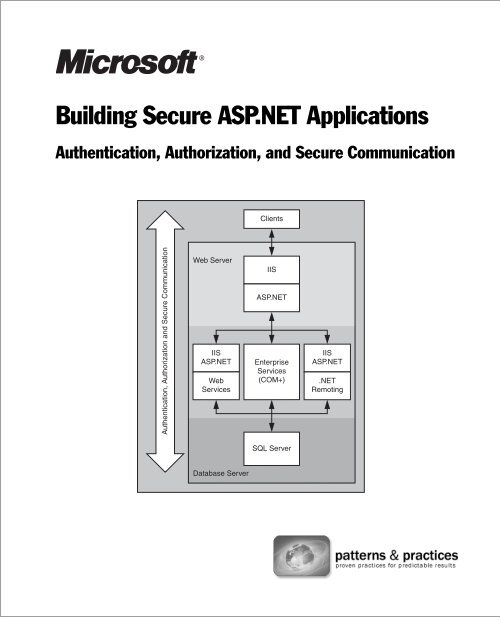
<strong>Building</strong> <strong>Secure</strong> <strong>ASP</strong>.<strong>NET</strong> <strong>Applications</strong><br />
Authentication, Authorization, and <strong>Secure</strong> Communication<br />
Clients<br />
Authentication, Authorization and <strong>Secure</strong> Communication<br />
Web Server<br />
IIS<br />
<strong>ASP</strong>.<strong>NET</strong><br />
Web<br />
Services<br />
IIS<br />
<strong>ASP</strong>.<strong>NET</strong><br />
Enterprise<br />
Services<br />
(COM+)<br />
IIS<br />
<strong>ASP</strong>.<strong>NET</strong><br />
.<strong>NET</strong><br />
Remoting<br />
SQL Server<br />
Database Server
Information in this document, including URL and other Internet Web site<br />
references, is subject to change without notice. Unless otherwise noted, the<br />
example companies, organizations, products, domain names, e-mail addresses,<br />
logos, people, places and events depicted herein are fictitious, and no association<br />
with any real company, organization, product, domain name, e-mail address, logo,<br />
person, place or event is intended or should be inferred. Complying with all<br />
applicable copyright laws is the responsibility of the user. Without limiting the<br />
rights under copyright, no part of this document may be reproduced, stored in or<br />
introduced into a retrieval system, or transmitted in any form or by any means<br />
(electronic, mechanical, photocopying, recording, or otherwise), or for any purpose,<br />
without the express written permission of Microsoft Corporation.<br />
Microsoft, MS-DOS, Windows, Active <strong>Directory</strong>, C#, Visual Basic, Visual Studio, and<br />
Win32 are either registered trademarks or trademarks of Microsoft Corporation<br />
in the United States and/or other countries.<br />
© 2002 Microsoft Corporation. All rights reserved.<br />
Version 1.0<br />
The names of actual companies and products mentioned herein may be the<br />
trademarks of their respective owners.
Contents<br />
About This Book<br />
Summary . . . . . . . . . . . . . . . . . . . . . . . . . . . . . . . . . . . . . . . . . . . . . . . . . . . . . . . . xxi<br />
Applies To . . . . . . . . . . . . . . . . . . . . . . . . . . . . . . . . . . . . . . . . . . . . . . . . . . . . . . . . xxi<br />
What This Guide is About . . . . . . . . . . . . . . . . . . . . . . . . . . . . . . . . . . . . . . . . . . . . . xxi<br />
Who Should Read This Guide? . . . . . . . . . . . . . . . . . . . . . . . . . . . . . . . . . . . . . . . . xxiii<br />
What You Must Know . . . . . . . . . . . . . . . . . . . . . . . . . . . . . . . . . . . . . . . . . . . . . . . xxiii<br />
Feedback and Support . . . . . . . . . . . . . . . . . . . . . . . . . . . . . . . . . . . . . . . . . . . . . . xxiii<br />
The Team That Brought You This Guide . . . . . . . . . . . . . . . . . . . . . . . . . . . . . . . . . . xxiii<br />
Contributors and Reviewers . . . . . . . . . . . . . . . . . . . . . . . . . . . . . . . . . . . . . . . . xxiv<br />
At a Glance<br />
xxi<br />
xxvii<br />
Chapter 1 – Introduction . . . . . . . . . . . . . . . . . . . . . . . . . . . . . . . . . . . . . . . . . . . . xxvii<br />
Chapter 2 – Security Model for <strong>ASP</strong>.<strong>NET</strong> <strong>Applications</strong> . . . . . . . . . . . . . . . . . . . . . . . . xxvii<br />
Chapter 3 – Authentication and Authorization . . . . . . . . . . . . . . . . . . . . . . . . . . . . . xxvii<br />
Chapter 4 – <strong>Secure</strong> Communication . . . . . . . . . . . . . . . . . . . . . . . . . . . . . . . . . . . . xxix<br />
Chapter 5 – Intranet Security . . . . . . . . . . . . . . . . . . . . . . . . . . . . . . . . . . . . . . . . . . xxx<br />
Chapter 6 – Extranet Security . . . . . . . . . . . . . . . . . . . . . . . . . . . . . . . . . . . . . . . . . xxxii<br />
Chapter 7 – Internet Security . . . . . . . . . . . . . . . . . . . . . . . . . . . . . . . . . . . . . . . . xxxiii<br />
Chapter 8 – <strong>ASP</strong>.<strong>NET</strong> Security . . . . . . . . . . . . . . . . . . . . . . . . . . . . . . . . . . . . . . . . xxxiv<br />
Chapter 9 – Enterprise Services Security . . . . . . . . . . . . . . . . . . . . . . . . . . . . . . . . . xxxv<br />
Chapter 10 – Web Services Security . . . . . . . . . . . . . . . . . . . . . . . . . . . . . . . . . . . xxxvii<br />
Chapter 11 – .<strong>NET</strong> Remoting Security . . . . . . . . . . . . . . . . . . . . . . . . . . . . . . . . . . xxxviii<br />
Chapter 12 – Data Access Security . . . . . . . . . . . . . . . . . . . . . . . . . . . . . . . . . . . . xxxix<br />
Chapter 13 – Troubleshooting Security Issues . . . . . . . . . . . . . . . . . . . . . . . . . . . . . . . xl<br />
Reference . . . . . . . . . . . . . . . . . . . . . . . . . . . . . . . . . . . . . . . . . . . . . . . . . . . . . . . . . xl<br />
Chapter 1<br />
Introduction 1<br />
The Connected Landscape . . . . . . . . . . . . . . . . . . . . . . . . . . . . . . . . . . . . . . . . . . . . . 1<br />
Scope . . . . . . . . . . . . . . . . . . . . . . . . . . . . . . . . . . . . . . . . . . . . . . . . . . . . . . . . . . . . 2<br />
What Are the Goals of This Guide? . . . . . . . . . . . . . . . . . . . . . . . . . . . . . . . . . . . . . . . 2<br />
How You Should Read This Guide . . . . . . . . . . . . . . . . . . . . . . . . . . . . . . . . . . . . . . . . 3<br />
Organization of the Guide . . . . . . . . . . . . . . . . . . . . . . . . . . . . . . . . . . . . . . . . . . . . . . 3<br />
Part I, Security Models . . . . . . . . . . . . . . . . . . . . . . . . . . . . . . . . . . . . . . . . . . . . . . 3<br />
Part II, Application Scenarios . . . . . . . . . . . . . . . . . . . . . . . . . . . . . . . . . . . . . . . . . 4<br />
Part III, Securing the Tiers . . . . . . . . . . . . . . . . . . . . . . . . . . . . . . . . . . . . . . . . . . . 4<br />
Part IV, Reference . . . . . . . . . . . . . . . . . . . . . . . . . . . . . . . . . . . . . . . . . . . . . . . . . 5<br />
Key Terminology . . . . . . . . . . . . . . . . . . . . . . . . . . . . . . . . . . . . . . . . . . . . . . . . . . . . . 5<br />
Principles . . . . . . . . . . . . . . . . . . . . . . . . . . . . . . . . . . . . . . . . . . . . . . . . . . . . . . . . . 6<br />
Summary . . . . . . . . . . . . . . . . . . . . . . . . . . . . . . . . . . . . . . . . . . . . . . . . . . . . . . . . . 7
iv<br />
Contents<br />
Chapter 2<br />
Security Model for <strong>ASP</strong>.<strong>NET</strong> <strong>Applications</strong> 9<br />
.<strong>NET</strong> Web <strong>Applications</strong> . . . . . . . . . . . . . . . . . . . . . . . . . . . . . . . . . . . . . . . . . . . . . . . . 9<br />
Logical Tiers . . . . . . . . . . . . . . . . . . . . . . . . . . . . . . . . . . . . . . . . . . . . . . . . . . . . . 9<br />
Physical Deployment Models . . . . . . . . . . . . . . . . . . . . . . . . . . . . . . . . . . . . . . . . 10<br />
Implementation Technologies . . . . . . . . . . . . . . . . . . . . . . . . . . . . . . . . . . . . . . . . . . 12<br />
<strong>ASP</strong>.<strong>NET</strong> . . . . . . . . . . . . . . . . . . . . . . . . . . . . . . . . . . . . . . . . . . . . . . . . . . . . . . . . 12<br />
Enterprise Services . . . . . . . . . . . . . . . . . . . . . . . . . . . . . . . . . . . . . . . . . . . . . . . 12<br />
Web Services . . . . . . . . . . . . . . . . . . . . . . . . . . . . . . . . . . . . . . . . . . . . . . . . . . . 12<br />
.<strong>NET</strong> Remoting . . . . . . . . . . . . . . . . . . . . . . . . . . . . . . . . . . . . . . . . . . . . . . . . . . . 13<br />
ADO.<strong>NET</strong> and SQL Server 2000 . . . . . . . . . . . . . . . . . . . . . . . . . . . . . . . . . . . . . . 13<br />
Internet Protocol Security (IPSec) . . . . . . . . . . . . . . . . . . . . . . . . . . . . . . . . . . . . . 13<br />
<strong>Secure</strong> Sockets Layer (SSL) . . . . . . . . . . . . . . . . . . . . . . . . . . . . . . . . . . . . . . . . . 13<br />
Security Architecture . . . . . . . . . . . . . . . . . . . . . . . . . . . . . . . . . . . . . . . . . . . . . . . . 14<br />
Security Across the Tiers . . . . . . . . . . . . . . . . . . . . . . . . . . . . . . . . . . . . . . . . . . . 14<br />
Authentication . . . . . . . . . . . . . . . . . . . . . . . . . . . . . . . . . . . . . . . . . . . . . . . . . . . 15<br />
Authorization . . . . . . . . . . . . . . . . . . . . . . . . . . . . . . . . . . . . . . . . . . . . . . . . . . . . 18<br />
Gatekeepers and Gates . . . . . . . . . . . . . . . . . . . . . . . . . . . . . . . . . . . . . . . . . . . . 20<br />
Identities and Principals . . . . . . . . . . . . . . . . . . . . . . . . . . . . . . . . . . . . . . . . . . . . . . 22<br />
WindowsPrincipal and WindowsIdentity . . . . . . . . . . . . . . . . . . . . . . . . . . . . . . . . . 24<br />
GenericPrincipal and Associated Identity Objects . . . . . . . . . . . . . . . . . . . . . . . . . . 24<br />
<strong>ASP</strong>.<strong>NET</strong> and HttpContext.User . . . . . . . . . . . . . . . . . . . . . . . . . . . . . . . . . . . . . . . 25<br />
Remoting and Web Services . . . . . . . . . . . . . . . . . . . . . . . . . . . . . . . . . . . . . . . . . 25<br />
Summary . . . . . . . . . . . . . . . . . . . . . . . . . . . . . . . . . . . . . . . . . . . . . . . . . . . . . . . . 26<br />
Chapter 3<br />
Authentication and Authorization 29<br />
Designing an Authentication and Authorization Strategy . . . . . . . . . . . . . . . . . . . . . . . 30<br />
Identify Resources . . . . . . . . . . . . . . . . . . . . . . . . . . . . . . . . . . . . . . . . . . . . . . . . 30<br />
Choose an Authorization Strategy . . . . . . . . . . . . . . . . . . . . . . . . . . . . . . . . . . . . . 30<br />
Choose the Identities Used for Resource Access . . . . . . . . . . . . . . . . . . . . . . . . . . 31<br />
Consider Identity Flow . . . . . . . . . . . . . . . . . . . . . . . . . . . . . . . . . . . . . . . . . . . . . 32<br />
Choose an Authentication Approach . . . . . . . . . . . . . . . . . . . . . . . . . . . . . . . . . . . 32<br />
Decide How to Flow Identity . . . . . . . . . . . . . . . . . . . . . . . . . . . . . . . . . . . . . . . . . 33<br />
Authorization Approaches . . . . . . . . . . . . . . . . . . . . . . . . . . . . . . . . . . . . . . . . . . . . . 33<br />
Role Based . . . . . . . . . . . . . . . . . . . . . . . . . . . . . . . . . . . . . . . . . . . . . . . . . . . . . 34<br />
Resource Based . . . . . . . . . . . . . . . . . . . . . . . . . . . . . . . . . . . . . . . . . . . . . . . . . 34<br />
Resource Access Models . . . . . . . . . . . . . . . . . . . . . . . . . . . . . . . . . . . . . . . . . . . 35<br />
The Trusted Subsystem Model . . . . . . . . . . . . . . . . . . . . . . . . . . . . . . . . . . . . . . . 35<br />
The Impersonation / Delegation Model . . . . . . . . . . . . . . . . . . . . . . . . . . . . . . . . . 37<br />
Choosing a Resource Access Model . . . . . . . . . . . . . . . . . . . . . . . . . . . . . . . . . . . 38<br />
Flowing Identity . . . . . . . . . . . . . . . . . . . . . . . . . . . . . . . . . . . . . . . . . . . . . . . . . . . . 40<br />
Application vs. Operating System Identity Flow . . . . . . . . . . . . . . . . . . . . . . . . . . . . 40<br />
Impersonation and Delegation . . . . . . . . . . . . . . . . . . . . . . . . . . . . . . . . . . . . . . . 40
Contents<br />
v<br />
Role-Based Authorization . . . . . . . . . . . . . . . . . . . . . . . . . . . . . . . . . . . . . . . . . . . . . 42<br />
.<strong>NET</strong> Roles . . . . . . . . . . . . . . . . . . . . . . . . . . . . . . . . . . . . . . . . . . . . . . . . . . . . . 42<br />
Enterprise Services (COM+) Roles . . . . . . . . . . . . . . . . . . . . . . . . . . . . . . . . . . . . 44<br />
SQL Server User Defined Database Roles . . . . . . . . . . . . . . . . . . . . . . . . . . . . . . . 44<br />
SQL Server Application Roles . . . . . . . . . . . . . . . . . . . . . . . . . . . . . . . . . . . . . . . . 44<br />
.<strong>NET</strong> Roles versus Enterprise Services (COM+) Roles . . . . . . . . . . . . . . . . . . . . . . . 45<br />
Using .<strong>NET</strong> Roles . . . . . . . . . . . . . . . . . . . . . . . . . . . . . . . . . . . . . . . . . . . . . . . . . 46<br />
Choosing an Authentication Mechanism . . . . . . . . . . . . . . . . . . . . . . . . . . . . . . . . . . 49<br />
Internet Scenarios . . . . . . . . . . . . . . . . . . . . . . . . . . . . . . . . . . . . . . . . . . . . . . . . 51<br />
Intranet / Extranet Scenarios . . . . . . . . . . . . . . . . . . . . . . . . . . . . . . . . . . . . . . . . 52<br />
Authentication Mechanism Comparison . . . . . . . . . . . . . . . . . . . . . . . . . . . . . . . . . 53<br />
Summary . . . . . . . . . . . . . . . . . . . . . . . . . . . . . . . . . . . . . . . . . . . . . . . . . . . . . . . . 53<br />
Chapter 4<br />
<strong>Secure</strong> Communication 55<br />
Know What to <strong>Secure</strong> . . . . . . . . . . . . . . . . . . . . . . . . . . . . . . . . . . . . . . . . . . . . . . . . 56<br />
SSL/TLS . . . . . . . . . . . . . . . . . . . . . . . . . . . . . . . . . . . . . . . . . . . . . . . . . . . . . . . . . 57<br />
Using SSL . . . . . . . . . . . . . . . . . . . . . . . . . . . . . . . . . . . . . . . . . . . . . . . . . . . . . . 57<br />
IPSec . . . . . . . . . . . . . . . . . . . . . . . . . . . . . . . . . . . . . . . . . . . . . . . . . . . . . . . . . . . 58<br />
Using IPSec . . . . . . . . . . . . . . . . . . . . . . . . . . . . . . . . . . . . . . . . . . . . . . . . . . . . . 58<br />
RPC Encryption . . . . . . . . . . . . . . . . . . . . . . . . . . . . . . . . . . . . . . . . . . . . . . . . . . . . 59<br />
Using RPC Encryption . . . . . . . . . . . . . . . . . . . . . . . . . . . . . . . . . . . . . . . . . . . . . . 59<br />
Point to Point Security . . . . . . . . . . . . . . . . . . . . . . . . . . . . . . . . . . . . . . . . . . . . . . . 60<br />
Browser to Web Server . . . . . . . . . . . . . . . . . . . . . . . . . . . . . . . . . . . . . . . . . . . . . 60<br />
Web Server to Remote Application Server . . . . . . . . . . . . . . . . . . . . . . . . . . . . . . . 61<br />
Application Server to Database Server . . . . . . . . . . . . . . . . . . . . . . . . . . . . . . . . . 61<br />
Choosing Between IPSec and SSL . . . . . . . . . . . . . . . . . . . . . . . . . . . . . . . . . . . . . . . 63<br />
Farming and Load Balancing . . . . . . . . . . . . . . . . . . . . . . . . . . . . . . . . . . . . . . . . . . . 63<br />
More Information . . . . . . . . . . . . . . . . . . . . . . . . . . . . . . . . . . . . . . . . . . . . . . . . . 63<br />
Summary . . . . . . . . . . . . . . . . . . . . . . . . . . . . . . . . . . . . . . . . . . . . . . . . . . . . . . . . 63<br />
Chapter 5<br />
Intranet Security 65<br />
<strong>ASP</strong>.<strong>NET</strong> to SQL Server . . . . . . . . . . . . . . . . . . . . . . . . . . . . . . . . . . . . . . . . . . . . . . . 66<br />
Characteristics . . . . . . . . . . . . . . . . . . . . . . . . . . . . . . . . . . . . . . . . . . . . . . . . . . 66<br />
<strong>Secure</strong> the Scenario . . . . . . . . . . . . . . . . . . . . . . . . . . . . . . . . . . . . . . . . . . . . . . 67<br />
The Result. . . . . . . . . . . . . . . . . . . . . . . . . . . . . . . . . . . . . . . . . . . . . . . . . . . . . . 67<br />
Security Configuration Steps. . . . . . . . . . . . . . . . . . . . . . . . . . . . . . . . . . . . . . . . . 68<br />
Analysis . . . . . . . . . . . . . . . . . . . . . . . . . . . . . . . . . . . . . . . . . . . . . . . . . . . . . . . 70<br />
Q&A . . . . . . . . . . . . . . . . . . . . . . . . . . . . . . . . . . . . . . . . . . . . . . . . . . . . . . . . . . 71<br />
Related Scenarios . . . . . . . . . . . . . . . . . . . . . . . . . . . . . . . . . . . . . . . . . . . . . . . . 72
vi<br />
Contents<br />
<strong>ASP</strong>.<strong>NET</strong> to Enterprise Services to SQL Server . . . . . . . . . . . . . . . . . . . . . . . . . . . . . . 73<br />
Characteristics . . . . . . . . . . . . . . . . . . . . . . . . . . . . . . . . . . . . . . . . . . . . . . . . . . 74<br />
<strong>Secure</strong> the Scenario . . . . . . . . . . . . . . . . . . . . . . . . . . . . . . . . . . . . . . . . . . . . . . 74<br />
The Result. . . . . . . . . . . . . . . . . . . . . . . . . . . . . . . . . . . . . . . . . . . . . . . . . . . . . . 75<br />
Security Configuration Steps. . . . . . . . . . . . . . . . . . . . . . . . . . . . . . . . . . . . . . . . . 76<br />
Analysis . . . . . . . . . . . . . . . . . . . . . . . . . . . . . . . . . . . . . . . . . . . . . . . . . . . . . . . 78<br />
Pitfalls . . . . . . . . . . . . . . . . . . . . . . . . . . . . . . . . . . . . . . . . . . . . . . . . . . . . . . . . 79<br />
<strong>ASP</strong>.<strong>NET</strong> to Web Services to SQL Server . . . . . . . . . . . . . . . . . . . . . . . . . . . . . . . . . . . 79<br />
Characteristics . . . . . . . . . . . . . . . . . . . . . . . . . . . . . . . . . . . . . . . . . . . . . . . . . . 80<br />
<strong>Secure</strong> the Scenario . . . . . . . . . . . . . . . . . . . . . . . . . . . . . . . . . . . . . . . . . . . . . . 80<br />
The Result. . . . . . . . . . . . . . . . . . . . . . . . . . . . . . . . . . . . . . . . . . . . . . . . . . . . . . 81<br />
Security Configuration Steps. . . . . . . . . . . . . . . . . . . . . . . . . . . . . . . . . . . . . . . . . 81<br />
Analysis . . . . . . . . . . . . . . . . . . . . . . . . . . . . . . . . . . . . . . . . . . . . . . . . . . . . . . . 84<br />
Pitfalls . . . . . . . . . . . . . . . . . . . . . . . . . . . . . . . . . . . . . . . . . . . . . . . . . . . . . . . . 86<br />
Q&A . . . . . . . . . . . . . . . . . . . . . . . . . . . . . . . . . . . . . . . . . . . . . . . . . . . . . . . . . . 86<br />
<strong>ASP</strong>.<strong>NET</strong> to Remoting to SQL Server . . . . . . . . . . . . . . . . . . . . . . . . . . . . . . . . . . . . . . 87<br />
Characteristics . . . . . . . . . . . . . . . . . . . . . . . . . . . . . . . . . . . . . . . . . . . . . . . . . . 87<br />
<strong>Secure</strong> the Scenario . . . . . . . . . . . . . . . . . . . . . . . . . . . . . . . . . . . . . . . . . . . . . . 87<br />
The Result. . . . . . . . . . . . . . . . . . . . . . . . . . . . . . . . . . . . . . . . . . . . . . . . . . . . . . 88<br />
Security Configuration Steps. . . . . . . . . . . . . . . . . . . . . . . . . . . . . . . . . . . . . . . . . 89<br />
Analysis . . . . . . . . . . . . . . . . . . . . . . . . . . . . . . . . . . . . . . . . . . . . . . . . . . . . . . . 91<br />
Pitfalls . . . . . . . . . . . . . . . . . . . . . . . . . . . . . . . . . . . . . . . . . . . . . . . . . . . . . . . . 92<br />
Flowing the Original Caller to the Database . . . . . . . . . . . . . . . . . . . . . . . . . . . . . . . . 93<br />
<strong>ASP</strong>.<strong>NET</strong> to SQL Server . . . . . . . . . . . . . . . . . . . . . . . . . . . . . . . . . . . . . . . . . . . . . 94<br />
<strong>ASP</strong>.<strong>NET</strong> to Enterprise Services to SQL Server . . . . . . . . . . . . . . . . . . . . . . . . . . . . 95<br />
The Result. . . . . . . . . . . . . . . . . . . . . . . . . . . . . . . . . . . . . . . . . . . . . . . . . . . . . . 96<br />
Analysis . . . . . . . . . . . . . . . . . . . . . . . . . . . . . . . . . . . . . . . . . . . . . . . . . . . . . . 100<br />
Pitfalls . . . . . . . . . . . . . . . . . . . . . . . . . . . . . . . . . . . . . . . . . . . . . . . . . . . . . . . 101<br />
Summary . . . . . . . . . . . . . . . . . . . . . . . . . . . . . . . . . . . . . . . . . . . . . . . . . . . . . . . 101<br />
Chapter 6<br />
Extranet Security 103<br />
Exposing a Web Service . . . . . . . . . . . . . . . . . . . . . . . . . . . . . . . . . . . . . . . . . . . . . 103<br />
Characteristics . . . . . . . . . . . . . . . . . . . . . . . . . . . . . . . . . . . . . . . . . . . . . . . . . 104<br />
<strong>Secure</strong> the Scenario . . . . . . . . . . . . . . . . . . . . . . . . . . . . . . . . . . . . . . . . . . . . . 105<br />
The Result. . . . . . . . . . . . . . . . . . . . . . . . . . . . . . . . . . . . . . . . . . . . . . . . . . . . . 105<br />
Security Configuration Steps. . . . . . . . . . . . . . . . . . . . . . . . . . . . . . . . . . . . . . . . 106<br />
Analysis . . . . . . . . . . . . . . . . . . . . . . . . . . . . . . . . . . . . . . . . . . . . . . . . . . . . . . 109<br />
Pitfalls . . . . . . . . . . . . . . . . . . . . . . . . . . . . . . . . . . . . . . . . . . . . . . . . . . . . . . . 110<br />
Q&A . . . . . . . . . . . . . . . . . . . . . . . . . . . . . . . . . . . . . . . . . . . . . . . . . . . . . . . . . 110<br />
Exposing a Web Application . . . . . . . . . . . . . . . . . . . . . . . . . . . . . . . . . . . . . . . . . . 111<br />
Scenario Characteristics . . . . . . . . . . . . . . . . . . . . . . . . . . . . . . . . . . . . . . . . . . 111<br />
<strong>Secure</strong> the Scenario . . . . . . . . . . . . . . . . . . . . . . . . . . . . . . . . . . . . . . . . . . . . . 112<br />
The Result. . . . . . . . . . . . . . . . . . . . . . . . . . . . . . . . . . . . . . . . . . . . . . . . . . . . . 113<br />
Analysis . . . . . . . . . . . . . . . . . . . . . . . . . . . . . . . . . . . . . . . . . . . . . . . . . . . . . . 115<br />
Pitfalls . . . . . . . . . . . . . . . . . . . . . . . . . . . . . . . . . . . . . . . . . . . . . . . . . . . . . . . 117<br />
Summary . . . . . . . . . . . . . . . . . . . . . . . . . . . . . . . . . . . . . . . . . . . . . . . . . . . . . . . 117
Contents<br />
vii<br />
Chapter 7<br />
Internet Security 119<br />
<strong>ASP</strong>.<strong>NET</strong> to SQL Server . . . . . . . . . . . . . . . . . . . . . . . . . . . . . . . . . . . . . . . . . . . . . . 120<br />
Characteristics . . . . . . . . . . . . . . . . . . . . . . . . . . . . . . . . . . . . . . . . . . . . . . . . . 120<br />
<strong>Secure</strong> the Scenario . . . . . . . . . . . . . . . . . . . . . . . . . . . . . . . . . . . . . . . . . . . . . 121<br />
The Result. . . . . . . . . . . . . . . . . . . . . . . . . . . . . . . . . . . . . . . . . . . . . . . . . . . . . 122<br />
Security Configuration Steps. . . . . . . . . . . . . . . . . . . . . . . . . . . . . . . . . . . . . . . . 122<br />
Analysis . . . . . . . . . . . . . . . . . . . . . . . . . . . . . . . . . . . . . . . . . . . . . . . . . . . . . . 124<br />
Pitfalls . . . . . . . . . . . . . . . . . . . . . . . . . . . . . . . . . . . . . . . . . . . . . . . . . . . . . . . 126<br />
Related Scenarios . . . . . . . . . . . . . . . . . . . . . . . . . . . . . . . . . . . . . . . . . . . . . . . 126<br />
<strong>ASP</strong>.<strong>NET</strong> to Remote Enterprise Services to SQL Server . . . . . . . . . . . . . . . . . . . . . . . 127<br />
Characteristics . . . . . . . . . . . . . . . . . . . . . . . . . . . . . . . . . . . . . . . . . . . . . . . . . 128<br />
<strong>Secure</strong> the Scenario . . . . . . . . . . . . . . . . . . . . . . . . . . . . . . . . . . . . . . . . . . . . . 129<br />
The Result. . . . . . . . . . . . . . . . . . . . . . . . . . . . . . . . . . . . . . . . . . . . . . . . . . . . . 130<br />
Security Configuration Steps. . . . . . . . . . . . . . . . . . . . . . . . . . . . . . . . . . . . . . . . 130<br />
Analysis . . . . . . . . . . . . . . . . . . . . . . . . . . . . . . . . . . . . . . . . . . . . . . . . . . . . . . 134<br />
Pitfalls . . . . . . . . . . . . . . . . . . . . . . . . . . . . . . . . . . . . . . . . . . . . . . . . . . . . . . . 135<br />
Related Scenarios . . . . . . . . . . . . . . . . . . . . . . . . . . . . . . . . . . . . . . . . . . . . . . . 135<br />
Summary . . . . . . . . . . . . . . . . . . . . . . . . . . . . . . . . . . . . . . . . . . . . . . . . . . . . . . . 136<br />
Chapter 8<br />
<strong>ASP</strong>.<strong>NET</strong> Security 137<br />
<strong>ASP</strong>.<strong>NET</strong> Security Architecture . . . . . . . . . . . . . . . . . . . . . . . . . . . . . . . . . . . . . . . . . 137<br />
Gatekeepers . . . . . . . . . . . . . . . . . . . . . . . . . . . . . . . . . . . . . . . . . . . . . . . . . . . 139<br />
Authentication and Authorization Strategies . . . . . . . . . . . . . . . . . . . . . . . . . . . . . . . 141<br />
Available Authorization Options . . . . . . . . . . . . . . . . . . . . . . . . . . . . . . . . . . . . . . 141<br />
Windows Authentication with Impersonation . . . . . . . . . . . . . . . . . . . . . . . . . . . . 143<br />
Windows Authentication without Impersonation . . . . . . . . . . . . . . . . . . . . . . . . . . 145<br />
Windows Authentication Using a Fixed Identity . . . . . . . . . . . . . . . . . . . . . . . . . . . 147<br />
Forms Authentication . . . . . . . . . . . . . . . . . . . . . . . . . . . . . . . . . . . . . . . . . . . . . 147<br />
Passport Authentication . . . . . . . . . . . . . . . . . . . . . . . . . . . . . . . . . . . . . . . . . . . 149<br />
Configuring Security . . . . . . . . . . . . . . . . . . . . . . . . . . . . . . . . . . . . . . . . . . . . . . . . 150<br />
Configure IIS Settings . . . . . . . . . . . . . . . . . . . . . . . . . . . . . . . . . . . . . . . . . . . . 151<br />
Configure <strong>ASP</strong>.<strong>NET</strong> Settings . . . . . . . . . . . . . . . . . . . . . . . . . . . . . . . . . . . . . . . . . 151<br />
<strong>Secure</strong> Resources . . . . . . . . . . . . . . . . . . . . . . . . . . . . . . . . . . . . . . . . . . . . . . . 154<br />
<strong>Secure</strong> Communication . . . . . . . . . . . . . . . . . . . . . . . . . . . . . . . . . . . . . . . . . . . 157<br />
Programming Security . . . . . . . . . . . . . . . . . . . . . . . . . . . . . . . . . . . . . . . . . . . . . . 157<br />
An Authorization Pattern . . . . . . . . . . . . . . . . . . . . . . . . . . . . . . . . . . . . . . . . . . . 157<br />
Creating a Custom IPrincipal class . . . . . . . . . . . . . . . . . . . . . . . . . . . . . . . . . . . 160<br />
Windows Authentication . . . . . . . . . . . . . . . . . . . . . . . . . . . . . . . . . . . . . . . . . . . . . 161<br />
Forms Authentication . . . . . . . . . . . . . . . . . . . . . . . . . . . . . . . . . . . . . . . . . . . . . . . 162<br />
Development Steps for Forms Authentication . . . . . . . . . . . . . . . . . . . . . . . . . . . . 163<br />
Forms Implementation Guidelines . . . . . . . . . . . . . . . . . . . . . . . . . . . . . . . . . . . . 167<br />
Hosting Multiple <strong>Applications</strong> Using Forms Authentication . . . . . . . . . . . . . . . . . . 168<br />
Cookieless Forms Authentication . . . . . . . . . . . . . . . . . . . . . . . . . . . . . . . . . . . . 168
viii<br />
Contents<br />
Passport Authentication . . . . . . . . . . . . . . . . . . . . . . . . . . . . . . . . . . . . . . . . . . . . . 169<br />
Custom Authentication . . . . . . . . . . . . . . . . . . . . . . . . . . . . . . . . . . . . . . . . . . . . . . 170<br />
Process Identity for <strong>ASP</strong>.<strong>NET</strong> . . . . . . . . . . . . . . . . . . . . . . . . . . . . . . . . . . . . . . . . . . 170<br />
Use a Least Privileged Account . . . . . . . . . . . . . . . . . . . . . . . . . . . . . . . . . . . . . . 170<br />
Avoid Running as SYSTEM . . . . . . . . . . . . . . . . . . . . . . . . . . . . . . . . . . . . . . . . . 171<br />
Using the Default <strong>ASP</strong><strong>NET</strong> Account . . . . . . . . . . . . . . . . . . . . . . . . . . . . . . . . . . . 171<br />
Impersonation . . . . . . . . . . . . . . . . . . . . . . . . . . . . . . . . . . . . . . . . . . . . . . . . . . . . 173<br />
Impersonation and Local Resources . . . . . . . . . . . . . . . . . . . . . . . . . . . . . . . . . . 173<br />
Impersonation and Remote Resources . . . . . . . . . . . . . . . . . . . . . . . . . . . . . . . . 174<br />
Impersonation and Threading . . . . . . . . . . . . . . . . . . . . . . . . . . . . . . . . . . . . . . . 174<br />
Accessing System Resources . . . . . . . . . . . . . . . . . . . . . . . . . . . . . . . . . . . . . . . . . 174<br />
Accessing the Event Log. . . . . . . . . . . . . . . . . . . . . . . . . . . . . . . . . . . . . . . . . . . 174<br />
Accessing the Registry . . . . . . . . . . . . . . . . . . . . . . . . . . . . . . . . . . . . . . . . . . . . 175<br />
Accessing COM Objects . . . . . . . . . . . . . . . . . . . . . . . . . . . . . . . . . . . . . . . . . . . . . 175<br />
Apartment Model Objects . . . . . . . . . . . . . . . . . . . . . . . . . . . . . . . . . . . . . . . . . . 176<br />
Accessing Network Resources . . . . . . . . . . . . . . . . . . . . . . . . . . . . . . . . . . . . . . . . 177<br />
Using the <strong>ASP</strong>.<strong>NET</strong> Process Identity . . . . . . . . . . . . . . . . . . . . . . . . . . . . . . . . . . . 178<br />
Using a Serviced Component . . . . . . . . . . . . . . . . . . . . . . . . . . . . . . . . . . . . . . . 179<br />
Using the Anonymous Internet User Account . . . . . . . . . . . . . . . . . . . . . . . . . . . . 180<br />
Using LogonUser and Impersonating a Specific Windows Identity . . . . . . . . . . . . . 182<br />
Using the Original Caller . . . . . . . . . . . . . . . . . . . . . . . . . . . . . . . . . . . . . . . . . . . 182<br />
Accessing Files on a UNC File Share . . . . . . . . . . . . . . . . . . . . . . . . . . . . . . . . . . 183<br />
Accessing Non-Windows Network Resources . . . . . . . . . . . . . . . . . . . . . . . . . . . . 183<br />
<strong>Secure</strong> Communication . . . . . . . . . . . . . . . . . . . . . . . . . . . . . . . . . . . . . . . . . . . . . 184<br />
Storing Secrets . . . . . . . . . . . . . . . . . . . . . . . . . . . . . . . . . . . . . . . . . . . . . . . . . . . 184<br />
Options for Storing Secrets in <strong>ASP</strong>.<strong>NET</strong> . . . . . . . . . . . . . . . . . . . . . . . . . . . . . . . . 186<br />
Consider Storing Secrets in Files on Separate Logical Volumes . . . . . . . . . . . . . . . 186<br />
Securing Session and View State . . . . . . . . . . . . . . . . . . . . . . . . . . . . . . . . . . . . . . 187<br />
Securing View State . . . . . . . . . . . . . . . . . . . . . . . . . . . . . . . . . . . . . . . . . . . . . . 187<br />
Securing Cookies . . . . . . . . . . . . . . . . . . . . . . . . . . . . . . . . . . . . . . . . . . . . . . . . 187<br />
Securing SQL Session State . . . . . . . . . . . . . . . . . . . . . . . . . . . . . . . . . . . . . . . . 187<br />
Web Farm Considerations . . . . . . . . . . . . . . . . . . . . . . . . . . . . . . . . . . . . . . . . . . . . 189<br />
Session State . . . . . . . . . . . . . . . . . . . . . . . . . . . . . . . . . . . . . . . . . . . . . . . . . . 190<br />
DPAPI . . . . . . . . . . . . . . . . . . . . . . . . . . . . . . . . . . . . . . . . . . . . . . . . . . . . . . . . 190<br />
Using Forms Authentication in a Web Farm . . . . . . . . . . . . . . . . . . . . . . . . . . . . . 190<br />
The Element . . . . . . . . . . . . . . . . . . . . . . . . . . . . . . . . . . . . . . . . 191<br />
Summary . . . . . . . . . . . . . . . . . . . . . . . . . . . . . . . . . . . . . . . . . . . . . . . . . . . . . . . 192<br />
Chapter 9<br />
Enterprise Services Security 195<br />
Security Architecture . . . . . . . . . . . . . . . . . . . . . . . . . . . . . . . . . . . . . . . . . . . . . . . 195<br />
Gatekeepers and Gates . . . . . . . . . . . . . . . . . . . . . . . . . . . . . . . . . . . . . . . . . . . 197<br />
Use Server <strong>Applications</strong> for Increased Security . . . . . . . . . . . . . . . . . . . . . . . . . . 198<br />
Security for Server and Library <strong>Applications</strong> . . . . . . . . . . . . . . . . . . . . . . . . . . . . . 199<br />
Code Access Security Requirements . . . . . . . . . . . . . . . . . . . . . . . . . . . . . . . . . . 199
Contents<br />
ix<br />
Configuring Security . . . . . . . . . . . . . . . . . . . . . . . . . . . . . . . . . . . . . . . . . . . . . . . . 200<br />
Configuring a Server Application . . . . . . . . . . . . . . . . . . . . . . . . . . . . . . . . . . . . . 200<br />
Configuring an <strong>ASP</strong>.<strong>NET</strong> Client Application . . . . . . . . . . . . . . . . . . . . . . . . . . . . . . 207<br />
Configuring Impersonation Levels for an Enterprise Services Application . . . . . . . . 208<br />
Programming Security . . . . . . . . . . . . . . . . . . . . . . . . . . . . . . . . . . . . . . . . . . . . . . 209<br />
Programmatic Role-Based Security . . . . . . . . . . . . . . . . . . . . . . . . . . . . . . . . . . . 209<br />
Identifying Callers . . . . . . . . . . . . . . . . . . . . . . . . . . . . . . . . . . . . . . . . . . . . . . . 210<br />
Choosing a Process Identity . . . . . . . . . . . . . . . . . . . . . . . . . . . . . . . . . . . . . . . . . . 210<br />
Never Run as the Interactive User . . . . . . . . . . . . . . . . . . . . . . . . . . . . . . . . . . . . 210<br />
Use a Least-Privileged Custom Account . . . . . . . . . . . . . . . . . . . . . . . . . . . . . . . . 211<br />
Accessing Network Resources . . . . . . . . . . . . . . . . . . . . . . . . . . . . . . . . . . . . . . . . 211<br />
Using the Original Caller . . . . . . . . . . . . . . . . . . . . . . . . . . . . . . . . . . . . . . . . . . . 212<br />
Using the Current Process Identity . . . . . . . . . . . . . . . . . . . . . . . . . . . . . . . . . . . 212<br />
Using a Specific Service Account . . . . . . . . . . . . . . . . . . . . . . . . . . . . . . . . . . . . 213<br />
Flowing the Original Caller . . . . . . . . . . . . . . . . . . . . . . . . . . . . . . . . . . . . . . . . . . . 213<br />
Calling CoImpersonateClient . . . . . . . . . . . . . . . . . . . . . . . . . . . . . . . . . . . . . . . . 214<br />
RPC Encryption . . . . . . . . . . . . . . . . . . . . . . . . . . . . . . . . . . . . . . . . . . . . . . . . . . . 215<br />
More Information . . . . . . . . . . . . . . . . . . . . . . . . . . . . . . . . . . . . . . . . . . . . . . . . 215<br />
<strong>Building</strong> Serviced Components . . . . . . . . . . . . . . . . . . . . . . . . . . . . . . . . . . . . . . . . 215<br />
DLL Locking Problems . . . . . . . . . . . . . . . . . . . . . . . . . . . . . . . . . . . . . . . . . . . . 215<br />
Versioning . . . . . . . . . . . . . . . . . . . . . . . . . . . . . . . . . . . . . . . . . . . . . . . . . . . . . 216<br />
QueryInterface Exceptions . . . . . . . . . . . . . . . . . . . . . . . . . . . . . . . . . . . . . . . . . 217<br />
DCOM and Firewalls . . . . . . . . . . . . . . . . . . . . . . . . . . . . . . . . . . . . . . . . . . . . . . . . 217<br />
More Information . . . . . . . . . . . . . . . . . . . . . . . . . . . . . . . . . . . . . . . . . . . . . . . . 217<br />
Calling Serviced Components from <strong>ASP</strong>.<strong>NET</strong> . . . . . . . . . . . . . . . . . . . . . . . . . . . . . . . 218<br />
Caller’s Identity . . . . . . . . . . . . . . . . . . . . . . . . . . . . . . . . . . . . . . . . . . . . . . . . . 218<br />
Use Windows Authentication and Impersonation Within<br />
the Web-based Application . . . . . . . . . . . . . . . . . . . . . . . . . . . . . . . . . . . . . . . 218<br />
Configure Authentication and Impersonation within Machine.config . . . . . . . . . . . . 218<br />
Configuring Interface Proxies . . . . . . . . . . . . . . . . . . . . . . . . . . . . . . . . . . . . . . . 218<br />
Security Concepts . . . . . . . . . . . . . . . . . . . . . . . . . . . . . . . . . . . . . . . . . . . . . . . . . 221<br />
Enterprise Services (COM+) Roles and .<strong>NET</strong> Roles . . . . . . . . . . . . . . . . . . . . . . . . 222<br />
Authentication . . . . . . . . . . . . . . . . . . . . . . . . . . . . . . . . . . . . . . . . . . . . . . . . . . 223<br />
Impersonation . . . . . . . . . . . . . . . . . . . . . . . . . . . . . . . . . . . . . . . . . . . . . . . . . . 224<br />
Summary . . . . . . . . . . . . . . . . . . . . . . . . . . . . . . . . . . . . . . . . . . . . . . . . . . . . . . . 226<br />
Chapter 10<br />
Web Services Security 227<br />
Web Service Security Model . . . . . . . . . . . . . . . . . . . . . . . . . . . . . . . . . . . . . . . . . . 227<br />
Platform/Transport Level (Point-to-Point) Security . . . . . . . . . . . . . . . . . . . . . . . . . 228<br />
Application Level Security . . . . . . . . . . . . . . . . . . . . . . . . . . . . . . . . . . . . . . . . . . 229<br />
Message Level (End-to-End) Security . . . . . . . . . . . . . . . . . . . . . . . . . . . . . . . . . . 229<br />
Platform/Transport Security Architecture . . . . . . . . . . . . . . . . . . . . . . . . . . . . . . . . . 231<br />
Gatekeepers . . . . . . . . . . . . . . . . . . . . . . . . . . . . . . . . . . . . . . . . . . . . . . . . . . . 232
x<br />
Contents<br />
Authentication and Authorization Strategies . . . . . . . . . . . . . . . . . . . . . . . . . . . . . . . 233<br />
Windows Authentication with Impersonation . . . . . . . . . . . . . . . . . . . . . . . . . . . . 233<br />
Windows Authentication without Impersonation . . . . . . . . . . . . . . . . . . . . . . . . . . 235<br />
Windows Authentication Using a Fixed Identity . . . . . . . . . . . . . . . . . . . . . . . . . . . 237<br />
Configuring Security . . . . . . . . . . . . . . . . . . . . . . . . . . . . . . . . . . . . . . . . . . . . . . . . 238<br />
Configure IIS Settings . . . . . . . . . . . . . . . . . . . . . . . . . . . . . . . . . . . . . . . . . . . . 238<br />
Configure <strong>ASP</strong> .<strong>NET</strong> Settings . . . . . . . . . . . . . . . . . . . . . . . . . . . . . . . . . . . . . . . . 239<br />
<strong>Secure</strong> Resources . . . . . . . . . . . . . . . . . . . . . . . . . . . . . . . . . . . . . . . . . . . . . . . 239<br />
Disable HTTP-GET, HTTP-POST . . . . . . . . . . . . . . . . . . . . . . . . . . . . . . . . . . . . . . . 239<br />
<strong>Secure</strong> Communication . . . . . . . . . . . . . . . . . . . . . . . . . . . . . . . . . . . . . . . . . . . 240<br />
Passing Credentials for Authentication to Web Services . . . . . . . . . . . . . . . . . . . . . . 240<br />
Specifying Client Credentials for Windows Authentication . . . . . . . . . . . . . . . . . . . 241<br />
Calling Web Services from Non-Windows Clients . . . . . . . . . . . . . . . . . . . . . . . . . 243<br />
Proxy Server Authentication . . . . . . . . . . . . . . . . . . . . . . . . . . . . . . . . . . . . . . . . 244<br />
Flowing the Original Caller . . . . . . . . . . . . . . . . . . . . . . . . . . . . . . . . . . . . . . . . . . . 244<br />
Default Credentials with Kerberos Delegation . . . . . . . . . . . . . . . . . . . . . . . . . . . 245<br />
Explicit Credentials with Basic or Forms Authentication . . . . . . . . . . . . . . . . . . . . 247<br />
Trusted Subsystem . . . . . . . . . . . . . . . . . . . . . . . . . . . . . . . . . . . . . . . . . . . . . . . . 250<br />
Flowing the Caller’s Identity . . . . . . . . . . . . . . . . . . . . . . . . . . . . . . . . . . . . . . . . 251<br />
Configuration Steps . . . . . . . . . . . . . . . . . . . . . . . . . . . . . . . . . . . . . . . . . . . . . . 251<br />
Accessing System Resources . . . . . . . . . . . . . . . . . . . . . . . . . . . . . . . . . . . . . . . . . 252<br />
Accessing Network Resources . . . . . . . . . . . . . . . . . . . . . . . . . . . . . . . . . . . . . . . . 252<br />
Accessing COM Objects . . . . . . . . . . . . . . . . . . . . . . . . . . . . . . . . . . . . . . . . . . . . . 253<br />
More Information . . . . . . . . . . . . . . . . . . . . . . . . . . . . . . . . . . . . . . . . . . . . . . . . 253<br />
Using Client Certificates with Web Services . . . . . . . . . . . . . . . . . . . . . . . . . . . . . . . 253<br />
Authenticating Web Browser Clients with Certificates . . . . . . . . . . . . . . . . . . . . . . 254<br />
Using the Trusted Subsystem Model . . . . . . . . . . . . . . . . . . . . . . . . . . . . . . . . . . 254<br />
<strong>Secure</strong> Communication . . . . . . . . . . . . . . . . . . . . . . . . . . . . . . . . . . . . . . . . . . . . . 257<br />
Transport Level Options . . . . . . . . . . . . . . . . . . . . . . . . . . . . . . . . . . . . . . . . . . . 258<br />
Message Level Options . . . . . . . . . . . . . . . . . . . . . . . . . . . . . . . . . . . . . . . . . . . 258<br />
Summary . . . . . . . . . . . . . . . . . . . . . . . . . . . . . . . . . . . . . . . . . . . . . . . . . . . . . . . 258<br />
Chapter 11<br />
.<strong>NET</strong> Remoting Security 261<br />
.<strong>NET</strong> Remoting Architecture . . . . . . . . . . . . . . . . . . . . . . . . . . . . . . . . . . . . . . . . . . 261<br />
Remoting Sinks . . . . . . . . . . . . . . . . . . . . . . . . . . . . . . . . . . . . . . . . . . . . . . . . . 262<br />
Anatomy of a Request When Hosting in <strong>ASP</strong>.<strong>NET</strong> . . . . . . . . . . . . . . . . . . . . . . . . . . 264<br />
<strong>ASP</strong>.<strong>NET</strong> and the HTTP Channel . . . . . . . . . . . . . . . . . . . . . . . . . . . . . . . . . . . . . . 265<br />
.<strong>NET</strong> Remoting Gatekeepers . . . . . . . . . . . . . . . . . . . . . . . . . . . . . . . . . . . . . . . . . . 266<br />
Authentication . . . . . . . . . . . . . . . . . . . . . . . . . . . . . . . . . . . . . . . . . . . . . . . . . . . . 267<br />
Hosting in <strong>ASP</strong>.<strong>NET</strong> . . . . . . . . . . . . . . . . . . . . . . . . . . . . . . . . . . . . . . . . . . . . . . . 267<br />
Hosting in a Windows Service . . . . . . . . . . . . . . . . . . . . . . . . . . . . . . . . . . . . . . . 268<br />
Authorization . . . . . . . . . . . . . . . . . . . . . . . . . . . . . . . . . . . . . . . . . . . . . . . . . . . . . 269<br />
Using File Authorization . . . . . . . . . . . . . . . . . . . . . . . . . . . . . . . . . . . . . . . . . . . 269<br />
Authentication and Authorization Strategies . . . . . . . . . . . . . . . . . . . . . . . . . . . . . . . 270<br />
More Information . . . . . . . . . . . . . . . . . . . . . . . . . . . . . . . . . . . . . . . . . . . . . . . . 271
Contents<br />
xi<br />
Accessing System Resources . . . . . . . . . . . . . . . . . . . . . . . . . . . . . . . . . . . . . . . . . 271<br />
Accessing Network Resources . . . . . . . . . . . . . . . . . . . . . . . . . . . . . . . . . . . . . . . . 272<br />
Passing Credentials for Authentication to Remote Objects . . . . . . . . . . . . . . . . . . . . 272<br />
Specifying Client Credentials . . . . . . . . . . . . . . . . . . . . . . . . . . . . . . . . . . . . . . . 272<br />
Flowing the Original Caller . . . . . . . . . . . . . . . . . . . . . . . . . . . . . . . . . . . . . . . . . . . 275<br />
Default Credentials with Kerberos Delegation . . . . . . . . . . . . . . . . . . . . . . . . . . . 276<br />
Explicit Credentials with Basic or Forms Authentication . . . . . . . . . . . . . . . . . . . . 278<br />
Trusted Subsystem . . . . . . . . . . . . . . . . . . . . . . . . . . . . . . . . . . . . . . . . . . . . . . . . 282<br />
Flowing the Caller’s Identity . . . . . . . . . . . . . . . . . . . . . . . . . . . . . . . . . . . . . . . . 283<br />
Choosing a Host . . . . . . . . . . . . . . . . . . . . . . . . . . . . . . . . . . . . . . . . . . . . . . . . 284<br />
Configuration Steps . . . . . . . . . . . . . . . . . . . . . . . . . . . . . . . . . . . . . . . . . . . . . . 284<br />
<strong>Secure</strong> Communication . . . . . . . . . . . . . . . . . . . . . . . . . . . . . . . . . . . . . . . . . . . . . 286<br />
Platform Level Options . . . . . . . . . . . . . . . . . . . . . . . . . . . . . . . . . . . . . . . . . . . . 286<br />
Choosing a Host Process . . . . . . . . . . . . . . . . . . . . . . . . . . . . . . . . . . . . . . . . . . . . 287<br />
Recommendation . . . . . . . . . . . . . . . . . . . . . . . . . . . . . . . . . . . . . . . . . . . . . . . . 287<br />
Hosting in <strong>ASP</strong>.<strong>NET</strong> . . . . . . . . . . . . . . . . . . . . . . . . . . . . . . . . . . . . . . . . . . . . . . . 287<br />
Hosting in a Windows Service . . . . . . . . . . . . . . . . . . . . . . . . . . . . . . . . . . . . . . . 288<br />
Hosting in a Console Application . . . . . . . . . . . . . . . . . . . . . . . . . . . . . . . . . . . . . 289<br />
Remoting vs. Web Services . . . . . . . . . . . . . . . . . . . . . . . . . . . . . . . . . . . . . . . . . . 290<br />
Summary . . . . . . . . . . . . . . . . . . . . . . . . . . . . . . . . . . . . . . . . . . . . . . . . . . . . . . . 291<br />
Chapter 12<br />
Data Access Security 293<br />
Introducing Data Access Security . . . . . . . . . . . . . . . . . . . . . . . . . . . . . . . . . . . . . . 293<br />
SQL Server Gatekeepers . . . . . . . . . . . . . . . . . . . . . . . . . . . . . . . . . . . . . . . . . . 295<br />
Trusted Subsystem vs. Impersonation/Delegation . . . . . . . . . . . . . . . . . . . . . . . . 295<br />
Authentication . . . . . . . . . . . . . . . . . . . . . . . . . . . . . . . . . . . . . . . . . . . . . . . . . . . . 297<br />
Windows Authentication . . . . . . . . . . . . . . . . . . . . . . . . . . . . . . . . . . . . . . . . . . . 297<br />
SQL Authentication . . . . . . . . . . . . . . . . . . . . . . . . . . . . . . . . . . . . . . . . . . . . . . 303<br />
Authenticating Against Non-SQL Server Databases. . . . . . . . . . . . . . . . . . . . . . . . 305<br />
Authorization . . . . . . . . . . . . . . . . . . . . . . . . . . . . . . . . . . . . . . . . . . . . . . . . . . . . . 306<br />
Using Multiple Database Roles . . . . . . . . . . . . . . . . . . . . . . . . . . . . . . . . . . . . . . 306<br />
<strong>Secure</strong> Communication . . . . . . . . . . . . . . . . . . . . . . . . . . . . . . . . . . . . . . . . . . . . . 310<br />
The Options. . . . . . . . . . . . . . . . . . . . . . . . . . . . . . . . . . . . . . . . . . . . . . . . . . . . 310<br />
Choosing an Approach . . . . . . . . . . . . . . . . . . . . . . . . . . . . . . . . . . . . . . . . . . . . 310<br />
Connecting with Least Privilege . . . . . . . . . . . . . . . . . . . . . . . . . . . . . . . . . . . . . . . . 311<br />
The Database Trusts the Application . . . . . . . . . . . . . . . . . . . . . . . . . . . . . . . . . . 311<br />
The Database Trusts Different Roles . . . . . . . . . . . . . . . . . . . . . . . . . . . . . . . . . . 312<br />
The Database Trusts the Original Caller . . . . . . . . . . . . . . . . . . . . . . . . . . . . . . . . 312<br />
Creating a Least Privilege Database Account . . . . . . . . . . . . . . . . . . . . . . . . . . . . . . 313<br />
Storing Database Connection Strings <strong>Secure</strong>ly . . . . . . . . . . . . . . . . . . . . . . . . . . . . . 314<br />
The Options. . . . . . . . . . . . . . . . . . . . . . . . . . . . . . . . . . . . . . . . . . . . . . . . . . . . 314<br />
Using DPAPI. . . . . . . . . . . . . . . . . . . . . . . . . . . . . . . . . . . . . . . . . . . . . . . . . . . . 314<br />
Using Web.config and Machine.config . . . . . . . . . . . . . . . . . . . . . . . . . . . . . . . . . 319
xii<br />
Contents<br />
Using UDL Files . . . . . . . . . . . . . . . . . . . . . . . . . . . . . . . . . . . . . . . . . . . . . . . . . 319<br />
Using Custom Text Files . . . . . . . . . . . . . . . . . . . . . . . . . . . . . . . . . . . . . . . . . . . 320<br />
Using the Registry . . . . . . . . . . . . . . . . . . . . . . . . . . . . . . . . . . . . . . . . . . . . . . . 321<br />
Using the COM+ Catalog . . . . . . . . . . . . . . . . . . . . . . . . . . . . . . . . . . . . . . . . . . 321<br />
Authenticating Users Against a Database . . . . . . . . . . . . . . . . . . . . . . . . . . . . . . . . 322<br />
Store One-way Password Hashes (with Salt) . . . . . . . . . . . . . . . . . . . . . . . . . . . . . 322<br />
SQL Injection Attacks . . . . . . . . . . . . . . . . . . . . . . . . . . . . . . . . . . . . . . . . . . . . . . . 323<br />
The Problem . . . . . . . . . . . . . . . . . . . . . . . . . . . . . . . . . . . . . . . . . . . . . . . . . . . 324<br />
Anatomy of a SQL Script Injection Attack . . . . . . . . . . . . . . . . . . . . . . . . . . . . . . . 324<br />
Protecting Pattern Matching Statements . . . . . . . . . . . . . . . . . . . . . . . . . . . . . . . 327<br />
Auditing . . . . . . . . . . . . . . . . . . . . . . . . . . . . . . . . . . . . . . . . . . . . . . . . . . . . . . . . 327<br />
Process Identity for SQL Server . . . . . . . . . . . . . . . . . . . . . . . . . . . . . . . . . . . . . . . 329<br />
Summary . . . . . . . . . . . . . . . . . . . . . . . . . . . . . . . . . . . . . . . . . . . . . . . . . . . . . . . 329<br />
Chapter 13<br />
Troubleshooting Security Issues 331<br />
Process for Troubleshooting . . . . . . . . . . . . . . . . . . . . . . . . . . . . . . . . . . . . . . . . . . 331<br />
<strong>Search</strong>ing for Implementation Solutions . . . . . . . . . . . . . . . . . . . . . . . . . . . . . . . 332<br />
Troubleshooting Authentication Issues . . . . . . . . . . . . . . . . . . . . . . . . . . . . . . . . . . 333<br />
IIS Authentication Issues . . . . . . . . . . . . . . . . . . . . . . . . . . . . . . . . . . . . . . . . . . 333<br />
Using Windows Authentication . . . . . . . . . . . . . . . . . . . . . . . . . . . . . . . . . . . . . . 334<br />
Using Forms Authentication . . . . . . . . . . . . . . . . . . . . . . . . . . . . . . . . . . . . . . . . 335<br />
Kerberos Troubleshooting . . . . . . . . . . . . . . . . . . . . . . . . . . . . . . . . . . . . . . . . . . 335<br />
Troubleshooting Authorization Issues . . . . . . . . . . . . . . . . . . . . . . . . . . . . . . . . . . . 335<br />
Check Windows ACLs . . . . . . . . . . . . . . . . . . . . . . . . . . . . . . . . . . . . . . . . . . . . . 335<br />
Check Identity . . . . . . . . . . . . . . . . . . . . . . . . . . . . . . . . . . . . . . . . . . . . . . . . . . 335<br />
Check the Element. . . . . . . . . . . . . . . . . . . . . . . . . . . . . . . . . . . 336<br />
<strong>ASP</strong>.<strong>NET</strong> . . . . . . . . . . . . . . . . . . . . . . . . . . . . . . . . . . . . . . . . . . . . . . . . . . . . . . . . . 336<br />
Enable Tracing . . . . . . . . . . . . . . . . . . . . . . . . . . . . . . . . . . . . . . . . . . . . . . . . . . 336<br />
Configuration Settings . . . . . . . . . . . . . . . . . . . . . . . . . . . . . . . . . . . . . . . . . . . . 337<br />
Determining Identity . . . . . . . . . . . . . . . . . . . . . . . . . . . . . . . . . . . . . . . . . . . . . . . . 337<br />
Determining Identity in a Web Page . . . . . . . . . . . . . . . . . . . . . . . . . . . . . . . . . . . 337<br />
Determining Identity in a Web service . . . . . . . . . . . . . . . . . . . . . . . . . . . . . . . . . 339<br />
Determining Identity in a Visual Basic 6 COM Object . . . . . . . . . . . . . . . . . . . . . . 340<br />
.<strong>NET</strong> Remoting . . . . . . . . . . . . . . . . . . . . . . . . . . . . . . . . . . . . . . . . . . . . . . . . . . . . 340<br />
More Information . . . . . . . . . . . . . . . . . . . . . . . . . . . . . . . . . . . . . . . . . . . . . . . . 341<br />
SSL . . . . . . . . . . . . . . . . . . . . . . . . . . . . . . . . . . . . . . . . . . . . . . . . . . . . . . . . . . . 341<br />
More Information . . . . . . . . . . . . . . . . . . . . . . . . . . . . . . . . . . . . . . . . . . . . . . . . 342<br />
IPSec . . . . . . . . . . . . . . . . . . . . . . . . . . . . . . . . . . . . . . . . . . . . . . . . . . . . . . . . . . 342<br />
Auditing and Logging . . . . . . . . . . . . . . . . . . . . . . . . . . . . . . . . . . . . . . . . . . . . . . . 342<br />
Windows Security Logs . . . . . . . . . . . . . . . . . . . . . . . . . . . . . . . . . . . . . . . . . . . . 342<br />
SQL Server Auditing . . . . . . . . . . . . . . . . . . . . . . . . . . . . . . . . . . . . . . . . . . . . . . 343<br />
IIS Logging . . . . . . . . . . . . . . . . . . . . . . . . . . . . . . . . . . . . . . . . . . . . . . . . . . . . 344
Contents<br />
xiii<br />
Troubleshooting Tools. . . . . . . . . . . . . . . . . . . . . . . . . . . . . . . . . . . . . . . . . . . . . . . 345<br />
File Monitor (FileMon.exe) . . . . . . . . . . . . . . . . . . . . . . . . . . . . . . . . . . . . . . . . . 345<br />
Fusion Log Viewer (Fuslogvw.exe) . . . . . . . . . . . . . . . . . . . . . . . . . . . . . . . . . . . . 345<br />
ISQL.exe . . . . . . . . . . . . . . . . . . . . . . . . . . . . . . . . . . . . . . . . . . . . . . . . . . . . . . 346<br />
Windows Task Manager . . . . . . . . . . . . . . . . . . . . . . . . . . . . . . . . . . . . . . . . . . . 346<br />
Network Monitor (NetMon.exe) . . . . . . . . . . . . . . . . . . . . . . . . . . . . . . . . . . . . . . 347<br />
Registry Monitor (regmon.exe) . . . . . . . . . . . . . . . . . . . . . . . . . . . . . . . . . . . . . . 347<br />
WFetch.exe . . . . . . . . . . . . . . . . . . . . . . . . . . . . . . . . . . . . . . . . . . . . . . . . . . . . 347<br />
Visual Studio .<strong>NET</strong> Tools . . . . . . . . . . . . . . . . . . . . . . . . . . . . . . . . . . . . . . . . . . . 348<br />
WebServiceStudio . . . . . . . . . . . . . . . . . . . . . . . . . . . . . . . . . . . . . . . . . . . . . . . 348<br />
Windows 2000 Resource Kit. . . . . . . . . . . . . . . . . . . . . . . . . . . . . . . . . . . . . . . . 348<br />
How To:<br />
Index 349<br />
<strong>ASP</strong>.<strong>NET</strong> . . . . . . . . . . . . . . . . . . . . . . . . . . . . . . . . . . . . . . . . . . . . . . . . . . . . . . . . . 349<br />
Authentication and Authorization . . . . . . . . . . . . . . . . . . . . . . . . . . . . . . . . . . . . . . . 349<br />
Cryptography . . . . . . . . . . . . . . . . . . . . . . . . . . . . . . . . . . . . . . . . . . . . . . . . . . . . . 349<br />
Enterprise Services Security . . . . . . . . . . . . . . . . . . . . . . . . . . . . . . . . . . . . . . . . . . 349<br />
Web Services Security . . . . . . . . . . . . . . . . . . . . . . . . . . . . . . . . . . . . . . . . . . . . . . 350<br />
Remoting Security . . . . . . . . . . . . . . . . . . . . . . . . . . . . . . . . . . . . . . . . . . . . . . . . . 350<br />
<strong>Secure</strong> Communication . . . . . . . . . . . . . . . . . . . . . . . . . . . . . . . . . . . . . . . . . . . . . 350<br />
How To:<br />
Create a Custom Account to Run <strong>ASP</strong>.<strong>NET</strong> 351<br />
<strong>ASP</strong>.<strong>NET</strong> Worker Process Identity . . . . . . . . . . . . . . . . . . . . . . . . . . . . . . . . . . . . . . . 351<br />
Impersonating Fixed Identities . . . . . . . . . . . . . . . . . . . . . . . . . . . . . . . . . . . . . . . . 352<br />
Notes . . . . . . . . . . . . . . . . . . . . . . . . . . . . . . . . . . . . . . . . . . . . . . . . . . . . . . . . . . 352<br />
Summary . . . . . . . . . . . . . . . . . . . . . . . . . . . . . . . . . . . . . . . . . . . . . . . . . . . . . . . 352<br />
1. Create a New Local Account . . . . . . . . . . . . . . . . . . . . . . . . . . . . . . . . . . . . . . . . 353<br />
2. Assign Minimum Privileges . . . . . . . . . . . . . . . . . . . . . . . . . . . . . . . . . . . . . . . . . 353<br />
3. Assign NTFS Permissions . . . . . . . . . . . . . . . . . . . . . . . . . . . . . . . . . . . . . . . . . . 353<br />
4. Configure <strong>ASP</strong>.<strong>NET</strong> to Run Using the New Account . . . . . . . . . . . . . . . . . . . . . . . . . 356<br />
How To:<br />
Use Forms Authentication with Active <strong>Directory</strong> 357<br />
Requirements . . . . . . . . . . . . . . . . . . . . . . . . . . . . . . . . . . . . . . . . . . . . . . . . . . . . 357<br />
Summary . . . . . . . . . . . . . . . . . . . . . . . . . . . . . . . . . . . . . . . . . . . . . . . . . . . . . . . 357<br />
1. Create a Web Application with a Logon Page . . . . . . . . . . . . . . . . . . . . . . . . . . . . 358<br />
2. Configure the Web Application for Forms Authentication . . . . . . . . . . . . . . . . . . . . 359<br />
3. Develop LDAP Authentication Code to Look Up the User in Active <strong>Directory</strong> . . . . . . 360<br />
4. Develop LDAP Group Retrieval Code to Look Up the User’s Group Membership . . . 361<br />
5. Authenticate the User and Create a Forms Authentication Ticket . . . . . . . . . . . . . . 362<br />
6. Implement an Authentication Request Handler to Construct<br />
a GenericPrincipal Object . . . . . . . . . . . . . . . . . . . . . . . . . . . . . . . . . . . . . . . . . . 364<br />
7. Test the Application . . . . . . . . . . . . . . . . . . . . . . . . . . . . . . . . . . . . . . . . . . . . . . 366
xiv<br />
Contents<br />
How To:<br />
Use Forms Authentication with SQL Server 2000 367<br />
Requirements . . . . . . . . . . . . . . . . . . . . . . . . . . . . . . . . . . . . . . . . . . . . . . . . . . . . 368<br />
Summary . . . . . . . . . . . . . . . . . . . . . . . . . . . . . . . . . . . . . . . . . . . . . . . . . . . . . . . 368<br />
1. Create a Web Application with a Logon Page . . . . . . . . . . . . . . . . . . . . . . . . . . . . 368<br />
2. Configure the Web Application for Forms Authentication . . . . . . . . . . . . . . . . . . . . 369<br />
3. Develop Functions to Generate a Hash and Salt value . . . . . . . . . . . . . . . . . . . . . 370<br />
4. Create a User Account Database . . . . . . . . . . . . . . . . . . . . . . . . . . . . . . . . . . . . 371<br />
5. Use ADO.<strong>NET</strong> to Store Account Details in the Database . . . . . . . . . . . . . . . . . . . . 372<br />
6. Authenticate User Credentials Against the Database . . . . . . . . . . . . . . . . . . . . . . 373<br />
7. Test the Application . . . . . . . . . . . . . . . . . . . . . . . . . . . . . . . . . . . . . . . . . . . . . . 375<br />
Additional Resources . . . . . . . . . . . . . . . . . . . . . . . . . . . . . . . . . . . . . . . . . . . . . . . 376<br />
How To:<br />
Create GenericPrincipal Objects with Forms Authentication 377<br />
Requirements . . . . . . . . . . . . . . . . . . . . . . . . . . . . . . . . . . . . . . . . . . . . . . . . . . . . 378<br />
Summary . . . . . . . . . . . . . . . . . . . . . . . . . . . . . . . . . . . . . . . . . . . . . . . . . . . . . . . 378<br />
1. Create a Web Application with a Logon Page . . . . . . . . . . . . . . . . . . . . . . . . . . . . 378<br />
2. Configure the Web Application for Forms Authentication . . . . . . . . . . . . . . . . . . . . 379<br />
3. Generate an Authentication Ticket for Authenticated Users . . . . . . . . . . . . . . . . . . 379<br />
4. Construct GenericPrincipal and FormsIdentity Objects . . . . . . . . . . . . . . . . . . . . . 382<br />
5. Test the Application . . . . . . . . . . . . . . . . . . . . . . . . . . . . . . . . . . . . . . . . . . . . . . 383<br />
Additional Resources . . . . . . . . . . . . . . . . . . . . . . . . . . . . . . . . . . . . . . . . . . . . . 384<br />
How To:<br />
Implement Kerberos Delegation for Windows 2000 385<br />
Notes . . . . . . . . . . . . . . . . . . . . . . . . . . . . . . . . . . . . . . . . . . . . . . . . . . . . . . . . . . 385<br />
Requirements . . . . . . . . . . . . . . . . . . . . . . . . . . . . . . . . . . . . . . . . . . . . . . . . . . . . 386<br />
Summary . . . . . . . . . . . . . . . . . . . . . . . . . . . . . . . . . . . . . . . . . . . . . . . . . . . . . . . 386<br />
1. Confirm that the Client Account is Configured for Delegation . . . . . . . . . . . . . . . . 386<br />
2. Confirm that the Server Process Account is Trusted for Delegation . . . . . . . . . . . . 386<br />
References . . . . . . . . . . . . . . . . . . . . . . . . . . . . . . . . . . . . . . . . . . . . . . . . . . . . . . 387<br />
How To:<br />
Implement IPrincipal 389<br />
Requirements . . . . . . . . . . . . . . . . . . . . . . . . . . . . . . . . . . . . . . . . . . . . . . . . . . . . 390<br />
Summary . . . . . . . . . . . . . . . . . . . . . . . . . . . . . . . . . . . . . . . . . . . . . . . . . . . . . . . 390<br />
1. Create a Simple Web Application . . . . . . . . . . . . . . . . . . . . . . . . . . . . . . . . . . . . 390<br />
2. Configure the Web Application for Forms Authentication . . . . . . . . . . . . . . . . . . . . 391<br />
3. Generate an Authentication Ticket for Authenticated Users . . . . . . . . . . . . . . . . . . 392<br />
4. Create a Class that Implements and Extends IPrincipal . . . . . . . . . . . . . . . . . . . . 394<br />
5. Create the CustomPrincipal Object . . . . . . . . . . . . . . . . . . . . . . . . . . . . . . . . . . . 395<br />
5. Test the Application . . . . . . . . . . . . . . . . . . . . . . . . . . . . . . . . . . . . . . . . . . . . . . 397<br />
Additional Resources . . . . . . . . . . . . . . . . . . . . . . . . . . . . . . . . . . . . . . . . . . . . . . . 398
Contents<br />
xv<br />
How To:<br />
Create a DPAPI Library 399<br />
Notes . . . . . . . . . . . . . . . . . . . . . . . . . . . . . . . . . . . . . . . . . . . . . . . . . . . . . . . . . . 399<br />
Requirements . . . . . . . . . . . . . . . . . . . . . . . . . . . . . . . . . . . . . . . . . . . . . . . . . . . . 400<br />
Summary . . . . . . . . . . . . . . . . . . . . . . . . . . . . . . . . . . . . . . . . . . . . . . . . . . . . . . . 400<br />
1. Create a C# Class Library. . . . . . . . . . . . . . . . . . . . . . . . . . . . . . . . . . . . . . . . . . 400<br />
2. Strong Name the Assembly (Optional) . . . . . . . . . . . . . . . . . . . . . . . . . . . . . . . . . 406<br />
References . . . . . . . . . . . . . . . . . . . . . . . . . . . . . . . . . . . . . . . . . . . . . . . . . . . . . . 407<br />
How To:<br />
Use DPAPI (Machine Store) from <strong>ASP</strong>.<strong>NET</strong> 409<br />
Notes . . . . . . . . . . . . . . . . . . . . . . . . . . . . . . . . . . . . . . . . . . . . . . . . . . . . . . . . . . 409<br />
Requirements . . . . . . . . . . . . . . . . . . . . . . . . . . . . . . . . . . . . . . . . . . . . . . . . . . 410<br />
Summary . . . . . . . . . . . . . . . . . . . . . . . . . . . . . . . . . . . . . . . . . . . . . . . . . . . . . . . 410<br />
1. Create an <strong>ASP</strong>.<strong>NET</strong> Client Web Application . . . . . . . . . . . . . . . . . . . . . . . . . . . . . . 410<br />
2. Test the Application . . . . . . . . . . . . . . . . . . . . . . . . . . . . . . . . . . . . . . . . . . . . . . 412<br />
3. Modify the Web Application to Read an Encrypted Connection String<br />
from Web.Config . . . . . . . . . . . . . . . . . . . . . . . . . . . . . . . . . . . . . . . . . . . . . . . . 413<br />
References . . . . . . . . . . . . . . . . . . . . . . . . . . . . . . . . . . . . . . . . . . . . . . . . . . . . . . 414<br />
How To:<br />
Use DPAPI (User Store) from <strong>ASP</strong>.<strong>NET</strong> with Enterprise Services 415<br />
Notes . . . . . . . . . . . . . . . . . . . . . . . . . . . . . . . . . . . . . . . . . . . . . . . . . . . . . . . . . . 415<br />
Why Use Enterprise Services? . . . . . . . . . . . . . . . . . . . . . . . . . . . . . . . . . . . . . . 416<br />
Why Use a Windows Service? . . . . . . . . . . . . . . . . . . . . . . . . . . . . . . . . . . . . . . . 417<br />
Requirements . . . . . . . . . . . . . . . . . . . . . . . . . . . . . . . . . . . . . . . . . . . . . . . . . . . . 417<br />
Summary . . . . . . . . . . . . . . . . . . . . . . . . . . . . . . . . . . . . . . . . . . . . . . . . . . . . . . . 418<br />
1. Create a Serviced Component that Provides Encrypt and Decrypt Methods . . . . . . 418<br />
2. Call the Managed DPAPI Class Library . . . . . . . . . . . . . . . . . . . . . . . . . . . . . . . . . 419<br />
3. Create a Dummy Class that will Launch the Serviced Component . . . . . . . . . . . . . 420<br />
4. Create a Windows Account to Run the Enterprise Services Application and<br />
Windows Service . . . . . . . . . . . . . . . . . . . . . . . . . . . . . . . . . . . . . . . . . . . . . . . . 420<br />
5. Configure, Strong Name, and Register the Serviced Component . . . . . . . . . . . . . . 421<br />
6. Create a Windows Service Application that will Launch the Serviced<br />
Component . . . . . . . . . . . . . . . . . . . . . . . . . . . . . . . . . . . . . . . . . . . . . . . . . . . . 422<br />
7. Install and Start the Windows Service Application . . . . . . . . . . . . . . . . . . . . . . . . 424<br />
8. Write a Web Application to Test the Encryption and Decryption Routines . . . . . . . . 424<br />
9. Modify the Web Application to Read an Encrypted Connection String from<br />
an Application Configuration File . . . . . . . . . . . . . . . . . . . . . . . . . . . . . . . . . . . . . 427<br />
References . . . . . . . . . . . . . . . . . . . . . . . . . . . . . . . . . . . . . . . . . . . . . . . . . . . . . . 428
xvi<br />
Contents<br />
How To:<br />
Create an Encryption Library 429<br />
Requirements . . . . . . . . . . . . . . . . . . . . . . . . . . . . . . . . . . . . . . . . . . . . . . . . . . . . 429<br />
Summary . . . . . . . . . . . . . . . . . . . . . . . . . . . . . . . . . . . . . . . . . . . . . . . . . . . . . . . 429<br />
1. Create a C# Class Library. . . . . . . . . . . . . . . . . . . . . . . . . . . . . . . . . . . . . . . . . . 430<br />
2. Create a Console Test Application . . . . . . . . . . . . . . . . . . . . . . . . . . . . . . . . . . . . 437<br />
References . . . . . . . . . . . . . . . . . . . . . . . . . . . . . . . . . . . . . . . . . . . . . . . . . . . . . . 438<br />
How To:<br />
Store an Encrypted Connection String in the Registry 439<br />
Notes . . . . . . . . . . . . . . . . . . . . . . . . . . . . . . . . . . . . . . . . . . . . . . . . . . . . . . . . . . 439<br />
Requirements . . . . . . . . . . . . . . . . . . . . . . . . . . . . . . . . . . . . . . . . . . . . . . . . . . . . 439<br />
Summary . . . . . . . . . . . . . . . . . . . . . . . . . . . . . . . . . . . . . . . . . . . . . . . . . . . . . . . 440<br />
1. Store the Encrypted Data in the Registry . . . . . . . . . . . . . . . . . . . . . . . . . . . . . . . 440<br />
2. Create an <strong>ASP</strong>.<strong>NET</strong> Web Application . . . . . . . . . . . . . . . . . . . . . . . . . . . . . . . . . . . 443<br />
References . . . . . . . . . . . . . . . . . . . . . . . . . . . . . . . . . . . . . . . . . . . . . . . . . . . . . . 444<br />
How To:<br />
Use Role-based Security with Enterprise Services 445<br />
Notes . . . . . . . . . . . . . . . . . . . . . . . . . . . . . . . . . . . . . . . . . . . . . . . . . . . . . . . . . . 445<br />
Requirements . . . . . . . . . . . . . . . . . . . . . . . . . . . . . . . . . . . . . . . . . . . . . . . . . . . . 445<br />
Summary . . . . . . . . . . . . . . . . . . . . . . . . . . . . . . . . . . . . . . . . . . . . . . . . . . . . . . . 446<br />
1. Create a C# Class Library Application to Host the Serviced Component . . . . . . . . . 446<br />
2. Create the Serviced Component . . . . . . . . . . . . . . . . . . . . . . . . . . . . . . . . . . . . . 446<br />
3. Configure the Serviced Component . . . . . . . . . . . . . . . . . . . . . . . . . . . . . . . . . . . 447<br />
4. Generate a Strong Name for the Assembly . . . . . . . . . . . . . . . . . . . . . . . . . . . . . 448<br />
5. Build the Assembly and Add it to the Global Assembly Cache . . . . . . . . . . . . . . . . 449<br />
6. Manually Register the Serviced Component . . . . . . . . . . . . . . . . . . . . . . . . . . . . . 449<br />
7. Examine the Configured Application . . . . . . . . . . . . . . . . . . . . . . . . . . . . . . . . . . 449<br />
8. Create a Test Client Application . . . . . . . . . . . . . . . . . . . . . . . . . . . . . . . . . . . . . 450<br />
How To:<br />
Call a Web Service Using Client Certificates from <strong>ASP</strong>.<strong>NET</strong> 453<br />
Why Use a Serviced Component? . . . . . . . . . . . . . . . . . . . . . . . . . . . . . . . . . . . . . . 453<br />
Why is a User Profile Required? . . . . . . . . . . . . . . . . . . . . . . . . . . . . . . . . . . . . . 454<br />
Requirements . . . . . . . . . . . . . . . . . . . . . . . . . . . . . . . . . . . . . . . . . . . . . . . . . . . . 455<br />
Summary . . . . . . . . . . . . . . . . . . . . . . . . . . . . . . . . . . . . . . . . . . . . . . . . . . . . . . . 455<br />
1. Create a Simple Web Service . . . . . . . . . . . . . . . . . . . . . . . . . . . . . . . . . . . . . . . 455<br />
2. Configure the Web Service Virtual <strong>Directory</strong> to Require Client Certificates . . . . . . . 456<br />
3. Create a Custom Account for Running the Serviced Component . . . . . . . . . . . . . . 457<br />
4. Request a Client Certificate for the Custom Account . . . . . . . . . . . . . . . . . . . . . . 457<br />
5. Test the Client Certificate Using a Browser . . . . . . . . . . . . . . . . . . . . . . . . . . . . . 459
Contents<br />
xvii<br />
6. Export the Client Certificate to a File . . . . . . . . . . . . . . . . . . . . . . . . . . . . . . . . . . 459<br />
7. Develop the Serviced Component Used to Call the Web Service . . . . . . . . . . . . . . 460<br />
8. Configure and Install the Serviced Component . . . . . . . . . . . . . . . . . . . . . . . . . . . 463<br />
9. Develop a Web Application to Call the Serviced Component . . . . . . . . . . . . . . . . . 464<br />
Additional Resources . . . . . . . . . . . . . . . . . . . . . . . . . . . . . . . . . . . . . . . . . . . . . . . 466<br />
How To:<br />
Call a Web Service Using SSL 467<br />
Requirements . . . . . . . . . . . . . . . . . . . . . . . . . . . . . . . . . . . . . . . . . . . . . . . . . . . . 467<br />
Summary . . . . . . . . . . . . . . . . . . . . . . . . . . . . . . . . . . . . . . . . . . . . . . . . . . . . . . . 467<br />
1. Create a Simple Web Service . . . . . . . . . . . . . . . . . . . . . . . . . . . . . . . . . . . . . . . 468<br />
2. Configure the Web Service Virtual <strong>Directory</strong> to Require SSL . . . . . . . . . . . . . . . . . 468<br />
3. Test the Web Service Using a Browser. . . . . . . . . . . . . . . . . . . . . . . . . . . . . . . . . 469<br />
4. Install the Certificate Authority’s Certificate on the Client Computer . . . . . . . . . . . 470<br />
5. Develop a Web Application to Call the Web Service . . . . . . . . . . . . . . . . . . . . . . . 471<br />
Additional Resources . . . . . . . . . . . . . . . . . . . . . . . . . . . . . . . . . . . . . . . . . . . . . . . 472<br />
How To:<br />
Host a Remote Object in a Windows Service 473<br />
Notes . . . . . . . . . . . . . . . . . . . . . . . . . . . . . . . . . . . . . . . . . . . . . . . . . . . . . . . . . . 473<br />
Requirements . . . . . . . . . . . . . . . . . . . . . . . . . . . . . . . . . . . . . . . . . . . . . . . . . . . . 473<br />
Summary . . . . . . . . . . . . . . . . . . . . . . . . . . . . . . . . . . . . . . . . . . . . . . . . . . . . . . . 474<br />
1. Create the Remote Object Class . . . . . . . . . . . . . . . . . . . . . . . . . . . . . . . . . . . . . 474<br />
2. Create a Windows Service Host Application . . . . . . . . . . . . . . . . . . . . . . . . . . . . . 474<br />
3. Create a Windows Account to Run the Service . . . . . . . . . . . . . . . . . . . . . . . . . . . 477<br />
4. Install the Windows Service . . . . . . . . . . . . . . . . . . . . . . . . . . . . . . . . . . . . . . . . 477<br />
5. Create a Test Client Application . . . . . . . . . . . . . . . . . . . . . . . . . . . . . . . . . . . . . 478<br />
References . . . . . . . . . . . . . . . . . . . . . . . . . . . . . . . . . . . . . . . . . . . . . . . . . . . . . . 478<br />
How To:<br />
Set Up SSL on a Web Server 479<br />
Requirements . . . . . . . . . . . . . . . . . . . . . . . . . . . . . . . . . . . . . . . . . . . . . . . . . . . . 479<br />
Summary . . . . . . . . . . . . . . . . . . . . . . . . . . . . . . . . . . . . . . . . . . . . . . . . . . . . . . . 479<br />
1. Generate a Certificate Request . . . . . . . . . . . . . . . . . . . . . . . . . . . . . . . . . . . . . . 479<br />
2. Submit a Certificate Request . . . . . . . . . . . . . . . . . . . . . . . . . . . . . . . . . . . . . . . 481<br />
3. Issue the Certificate . . . . . . . . . . . . . . . . . . . . . . . . . . . . . . . . . . . . . . . . . . . . . 482<br />
4. Install the Certificate on the Web Server . . . . . . . . . . . . . . . . . . . . . . . . . . . . . . . 482<br />
5. Configure Resources to Require SSL Access . . . . . . . . . . . . . . . . . . . . . . . . . . . . 483
xviii<br />
Contents<br />
How To:<br />
Set Up Client Certificates 485<br />
Requirements . . . . . . . . . . . . . . . . . . . . . . . . . . . . . . . . . . . . . . . . . . . . . . . . . . . . 485<br />
Summary . . . . . . . . . . . . . . . . . . . . . . . . . . . . . . . . . . . . . . . . . . . . . . . . . . . . . . . 485<br />
1. Create a Simple Web Application . . . . . . . . . . . . . . . . . . . . . . . . . . . . . . . . . . . . 486<br />
2. Configure the Web Application to Require Client Certificates . . . . . . . . . . . . . . . . . 486<br />
3. Request and Install a Client Certificate . . . . . . . . . . . . . . . . . . . . . . . . . . . . . . . . 487<br />
4. Verify Client Certificate Operation . . . . . . . . . . . . . . . . . . . . . . . . . . . . . . . . . . . . 488<br />
Additional Resources . . . . . . . . . . . . . . . . . . . . . . . . . . . . . . . . . . . . . . . . . . . . . . . 488<br />
How To:<br />
Use IPSec to Provide <strong>Secure</strong> Communication Between Two Servers 489<br />
Notes . . . . . . . . . . . . . . . . . . . . . . . . . . . . . . . . . . . . . . . . . . . . . . . . . . . . . . . . . . 491<br />
Requirements . . . . . . . . . . . . . . . . . . . . . . . . . . . . . . . . . . . . . . . . . . . . . . . . . . . . 491<br />
Summary . . . . . . . . . . . . . . . . . . . . . . . . . . . . . . . . . . . . . . . . . . . . . . . . . . . . . . . 492<br />
1. Create an IP Filter . . . . . . . . . . . . . . . . . . . . . . . . . . . . . . . . . . . . . . . . . . . . . . . 492<br />
2. Create Filter Actions . . . . . . . . . . . . . . . . . . . . . . . . . . . . . . . . . . . . . . . . . . . . . 493<br />
3. Create Rules . . . . . . . . . . . . . . . . . . . . . . . . . . . . . . . . . . . . . . . . . . . . . . . . . . . 494<br />
4. Export the IPSec Policy to the Remote Computer . . . . . . . . . . . . . . . . . . . . . . . . . 495<br />
5. Assign Policies . . . . . . . . . . . . . . . . . . . . . . . . . . . . . . . . . . . . . . . . . . . . . . . . . 495<br />
6. Verify that it Works . . . . . . . . . . . . . . . . . . . . . . . . . . . . . . . . . . . . . . . . . . . . . . . 496<br />
Additional Resources . . . . . . . . . . . . . . . . . . . . . . . . . . . . . . . . . . . . . . . . . . . . . . . 498<br />
How To:<br />
Use SSL to <strong>Secure</strong> Communication with SQL Server 2000 499<br />
Notes . . . . . . . . . . . . . . . . . . . . . . . . . . . . . . . . . . . . . . . . . . . . . . . . . . . . . . . . . . 499<br />
Requirements . . . . . . . . . . . . . . . . . . . . . . . . . . . . . . . . . . . . . . . . . . . . . . . . . . . . 500<br />
Summary . . . . . . . . . . . . . . . . . . . . . . . . . . . . . . . . . . . . . . . . . . . . . . . . . . . . . . . 500<br />
1. Install a Server Authentication Certificate . . . . . . . . . . . . . . . . . . . . . . . . . . . . . . 500<br />
2. Verify that the Certificate Has Been Installed . . . . . . . . . . . . . . . . . . . . . . . . . . . . 501<br />
3. Install the Issuing CA’s Certificate on the Client . . . . . . . . . . . . . . . . . . . . . . . . . . 502<br />
4. Force All Clients to Use SSL . . . . . . . . . . . . . . . . . . . . . . . . . . . . . . . . . . . . . . . . 502<br />
5. Allow Clients to Determine Whether to Use SSL . . . . . . . . . . . . . . . . . . . . . . . . . . 503<br />
6. Verify that Communication is Encrypted . . . . . . . . . . . . . . . . . . . . . . . . . . . . . . . . 504<br />
Additional Resources . . . . . . . . . . . . . . . . . . . . . . . . . . . . . . . . . . . . . . . . . . . . . . . 507<br />
Base Configuration 509<br />
Configuration Stores and Tools 511
Contents<br />
xix<br />
Reference Hub 517<br />
<strong>Search</strong>ing the Knowledge Base . . . . . . . . . . . . . . . . . . . . . . . . . . . . . . . . . . . . . . . . 517<br />
Tips . . . . . . . . . . . . . . . . . . . . . . . . . . . . . . . . . . . . . . . . . . . . . . . . . . . . . . . . . 518<br />
.<strong>NET</strong> Security . . . . . . . . . . . . . . . . . . . . . . . . . . . . . . . . . . . . . . . . . . . . . . . . . . . . . 518<br />
Hubs . . . . . . . . . . . . . . . . . . . . . . . . . . . . . . . . . . . . . . . . . . . . . . . . . . . . . . . . . 518<br />
Active <strong>Directory</strong> . . . . . . . . . . . . . . . . . . . . . . . . . . . . . . . . . . . . . . . . . . . . . . . . . . . 518<br />
Hubs . . . . . . . . . . . . . . . . . . . . . . . . . . . . . . . . . . . . . . . . . . . . . . . . . . . . . . . . . 518<br />
Key Notes . . . . . . . . . . . . . . . . . . . . . . . . . . . . . . . . . . . . . . . . . . . . . . . . . . . . . 519<br />
Articles . . . . . . . . . . . . . . . . . . . . . . . . . . . . . . . . . . . . . . . . . . . . . . . . . . . . . . . 519<br />
ADO.<strong>NET</strong> . . . . . . . . . . . . . . . . . . . . . . . . . . . . . . . . . . . . . . . . . . . . . . . . . . . . . . . . 519<br />
Roadmaps and Overviews . . . . . . . . . . . . . . . . . . . . . . . . . . . . . . . . . . . . . . . . . 519<br />
Seminars and WebCasts . . . . . . . . . . . . . . . . . . . . . . . . . . . . . . . . . . . . . . . . . . 519<br />
<strong>ASP</strong>.<strong>NET</strong> . . . . . . . . . . . . . . . . . . . . . . . . . . . . . . . . . . . . . . . . . . . . . . . . . . . . . . . . . 519<br />
Hubs . . . . . . . . . . . . . . . . . . . . . . . . . . . . . . . . . . . . . . . . . . . . . . . . . . . . . . . . . 519<br />
Roadmaps and Overviews . . . . . . . . . . . . . . . . . . . . . . . . . . . . . . . . . . . . . . . . . 520<br />
Knowledge Base . . . . . . . . . . . . . . . . . . . . . . . . . . . . . . . . . . . . . . . . . . . . . . . . 520<br />
Articles . . . . . . . . . . . . . . . . . . . . . . . . . . . . . . . . . . . . . . . . . . . . . . . . . . . . . . . 520<br />
How Tos . . . . . . . . . . . . . . . . . . . . . . . . . . . . . . . . . . . . . . . . . . . . . . . . . . . . . . 520<br />
Seminars and WebCasts . . . . . . . . . . . . . . . . . . . . . . . . . . . . . . . . . . . . . . . . . . 521<br />
Enterprise Services . . . . . . . . . . . . . . . . . . . . . . . . . . . . . . . . . . . . . . . . . . . . . . . . 521<br />
Knowledge Base . . . . . . . . . . . . . . . . . . . . . . . . . . . . . . . . . . . . . . . . . . . . . . . . 521<br />
Roadmaps and Overviews . . . . . . . . . . . . . . . . . . . . . . . . . . . . . . . . . . . . . . . . . 521<br />
How Tos . . . . . . . . . . . . . . . . . . . . . . . . . . . . . . . . . . . . . . . . . . . . . . . . . . . . . . 522<br />
FAQs . . . . . . . . . . . . . . . . . . . . . . . . . . . . . . . . . . . . . . . . . . . . . . . . . . . . . . . . . 522<br />
Seminars and WebCasts . . . . . . . . . . . . . . . . . . . . . . . . . . . . . . . . . . . . . . . . . . 522<br />
IIS (Internet Information Server) . . . . . . . . . . . . . . . . . . . . . . . . . . . . . . . . . . . . . . . 522<br />
Hubs . . . . . . . . . . . . . . . . . . . . . . . . . . . . . . . . . . . . . . . . . . . . . . . . . . . . . . . . . 522<br />
Remoting . . . . . . . . . . . . . . . . . . . . . . . . . . . . . . . . . . . . . . . . . . . . . . . . . . . . . . . 522<br />
Roadmaps and Overviews . . . . . . . . . . . . . . . . . . . . . . . . . . . . . . . . . . . . . . . . . 522<br />
How Tos . . . . . . . . . . . . . . . . . . . . . . . . . . . . . . . . . . . . . . . . . . . . . . . . . . . . . . 523<br />
Seminars and WebCasts . . . . . . . . . . . . . . . . . . . . . . . . . . . . . . . . . . . . . . . . . . 523<br />
SQL Server . . . . . . . . . . . . . . . . . . . . . . . . . . . . . . . . . . . . . . . . . . . . . . . . . . . . . . 523<br />
Hubs . . . . . . . . . . . . . . . . . . . . . . . . . . . . . . . . . . . . . . . . . . . . . . . . . . . . . . . . . 523<br />
Seminars and WebCasts . . . . . . . . . . . . . . . . . . . . . . . . . . . . . . . . . . . . . . . . . . 523<br />
Visual Studio .<strong>NET</strong> . . . . . . . . . . . . . . . . . . . . . . . . . . . . . . . . . . . . . . . . . . . . . . . . . 523<br />
Hubs . . . . . . . . . . . . . . . . . . . . . . . . . . . . . . . . . . . . . . . . . . . . . . . . . . . . . . . . . 523<br />
Roadmaps and Overviews: . . . . . . . . . . . . . . . . . . . . . . . . . . . . . . . . . . . . . . . . . 523<br />
Web Services . . . . . . . . . . . . . . . . . . . . . . . . . . . . . . . . . . . . . . . . . . . . . . . . . . . . 524<br />
Hubs . . . . . . . . . . . . . . . . . . . . . . . . . . . . . . . . . . . . . . . . . . . . . . . . . . . . . . . . . 524<br />
Roadmaps and Overviews . . . . . . . . . . . . . . . . . . . . . . . . . . . . . . . . . . . . . . . . . 524<br />
How Tos . . . . . . . . . . . . . . . . . . . . . . . . . . . . . . . . . . . . . . . . . . . . . . . . . . . . . . 524<br />
Seminars and WebCasts . . . . . . . . . . . . . . . . . . . . . . . . . . . . . . . . . . . . . . . . . . 524<br />
Windows 2000 . . . . . . . . . . . . . . . . . . . . . . . . . . . . . . . . . . . . . . . . . . . . . . . . . . . 525<br />
Hubs . . . . . . . . . . . . . . . . . . . . . . . . . . . . . . . . . . . . . . . . . . . . . . . . . . . . . . . . . 525
xx<br />
Contents<br />
How Does It Work? 527<br />
IIS and <strong>ASP</strong>.<strong>NET</strong> Processing . . . . . . . . . . . . . . . . . . . . . . . . . . . . . . . . . . . . . . . . . . . 527<br />
Application Isolation. . . . . . . . . . . . . . . . . . . . . . . . . . . . . . . . . . . . . . . . . . . . . . 528<br />
The <strong>ASP</strong>.<strong>NET</strong> ISAPI Extension . . . . . . . . . . . . . . . . . . . . . . . . . . . . . . . . . . . . . . . . 528<br />
IIS 6.0 and Windows .<strong>NET</strong> Server . . . . . . . . . . . . . . . . . . . . . . . . . . . . . . . . . . . . 528<br />
<strong>ASP</strong>.<strong>NET</strong> Pipeline Processing . . . . . . . . . . . . . . . . . . . . . . . . . . . . . . . . . . . . . . . . . . 529<br />
The Anatomy of a Web Request . . . . . . . . . . . . . . . . . . . . . . . . . . . . . . . . . . . . . 530<br />
Event Handling . . . . . . . . . . . . . . . . . . . . . . . . . . . . . . . . . . . . . . . . . . . . . . . . . 534<br />
Implementing a Custom HTTP Module . . . . . . . . . . . . . . . . . . . . . . . . . . . . . . . . . 535<br />
Implementing a Custom HTTP Handler . . . . . . . . . . . . . . . . . . . . . . . . . . . . . . . . 535<br />
<strong>ASP</strong>.<strong>NET</strong> Identity Matrix 537<br />
Cryptography and Certificates 541<br />
Keys and Certificates . . . . . . . . . . . . . . . . . . . . . . . . . . . . . . . . . . . . . . . . . . . . . . . 541<br />
X.509 Digital Certificates . . . . . . . . . . . . . . . . . . . . . . . . . . . . . . . . . . . . . . . . . . 542<br />
Certificate Stores . . . . . . . . . . . . . . . . . . . . . . . . . . . . . . . . . . . . . . . . . . . . . . . 542<br />
More Information . . . . . . . . . . . . . . . . . . . . . . . . . . . . . . . . . . . . . . . . . . . . . . . . 543<br />
Cryptography . . . . . . . . . . . . . . . . . . . . . . . . . . . . . . . . . . . . . . . . . . . . . . . . . . . . . 543<br />
Technical Choices . . . . . . . . . . . . . . . . . . . . . . . . . . . . . . . . . . . . . . . . . . . . . . . 543<br />
Cryptography in .<strong>NET</strong> . . . . . . . . . . . . . . . . . . . . . . . . . . . . . . . . . . . . . . . . . . . . . 544<br />
Summary . . . . . . . . . . . . . . . . . . . . . . . . . . . . . . . . . . . . . . . . . . . . . . . . . . . . . . . 547<br />
.<strong>NET</strong> Web Application Security 549<br />
Glossary 551
About This Book<br />
Summary<br />
This guide presents a practical, scenario driven approach to designing and building<br />
secure <strong>ASP</strong>.<strong>NET</strong> applications for Windows 2000 and version 1.0 of the .<strong>NET</strong> Framework.<br />
It focuses on the key elements of authentication, authorization and secure<br />
communication within and across the tiers of distributed .<strong>NET</strong> Web applications.<br />
Applies To<br />
The information in this guide applies to:<br />
● .<strong>NET</strong> Framework Version 1.0 Service Pack 2<br />
● <strong>ASP</strong>.<strong>NET</strong><br />
● Enterprise Services<br />
● Web Services<br />
● .<strong>NET</strong> Remoting<br />
● ADO.<strong>NET</strong><br />
● Visual Studio .<strong>NET</strong><br />
● SQL Server 2000 Service Pack 2<br />
● Windows 2000 Service Pack 3<br />
Recommendations and sample code in the guide were built and tested using Visual<br />
Studio .<strong>NET</strong> and validated on servers running Windows 2000 Advanced Server SP 3,<br />
.<strong>NET</strong> Framework SP 2, and SQL Server 2000 SP 2.<br />
What This Guide is About<br />
This guide focuses on:<br />
● Authentication (to identify the clients of your application)<br />
● Authorization (to provide access controls for those clients)<br />
● <strong>Secure</strong> communication (to ensure that messages remain private and are not<br />
altered by unauthorized parties)
xxii<br />
<strong>Building</strong> <strong>Secure</strong> <strong>ASP</strong>.<strong>NET</strong> <strong>Applications</strong><br />
Why authentication, authorization, and secure communication?<br />
Security is a broad topic. Research has shown that early design of authentication<br />
and authorization eliminates a high percentage of application vulnerabilities.<br />
<strong>Secure</strong> communication is an integral part of securing your distributed application to<br />
protect sensitive data, including credentials, passed to and from your application,<br />
and between application tiers.<br />
There are many technologies used to build .<strong>NET</strong> Web applications. To build effective<br />
application-level authentication and authorization strategies, you need to<br />
understand how to fine-tune the various security features within each product and<br />
technology area, and how to make them work together to provide an effective,<br />
defense-in-depth security strategy. This guide will help you do just that.<br />
Figure 1 summarizes the various technologies discussed throughout the guide.<br />
Clients<br />
IIS<br />
<strong>Secure</strong> Communication (SSL / IPSec)<br />
Web Server<br />
IIS<br />
<strong>ASP</strong>.<strong>NET</strong><br />
Web<br />
Services<br />
IIS<br />
<strong>ASP</strong>.<strong>NET</strong><br />
Enterprise<br />
Services<br />
(COM+)<br />
IIS<br />
<strong>ASP</strong>.<strong>NET</strong><br />
.<strong>NET</strong><br />
Remoting<br />
Authentication<br />
Anonymous<br />
Basic<br />
Digest<br />
Integrated<br />
Certificates<br />
Authentication<br />
Windows<br />
Forms<br />
Passport<br />
None (Custom)<br />
Authentication<br />
RPC<br />
<strong>ASP</strong>.<strong>NET</strong><br />
Authorization<br />
NTFS Perms<br />
IP Restrictions<br />
Authorization<br />
URL Auth<br />
File Auth<br />
.<strong>NET</strong> Roles<br />
Enterprise Services<br />
Authorization<br />
COM+ Roles<br />
NTFS Perms<br />
SQL Server<br />
Database Server<br />
Figure 1<br />
.<strong>NET</strong> Web Application Security<br />
SQL Server<br />
Authentication<br />
Windows<br />
SQL Auth<br />
Authorization<br />
Logins<br />
Object Perms<br />
Dbase Roles<br />
User Roles<br />
App Roles
About This Book<br />
xxiii<br />
Who Should Read This Guide?<br />
If you are a middleware developer or architect, who plans to build, or is currently<br />
building .<strong>NET</strong> Web applications using one or more of the following technologies,<br />
you should read this guide.<br />
● <strong>ASP</strong>.<strong>NET</strong><br />
● Web Services<br />
● Enterprise Services<br />
● Remoting<br />
● ADO.<strong>NET</strong><br />
What You Must Know<br />
To most effectively use this guide to design and build secure .<strong>NET</strong> Web applications,<br />
you should already have some familiarity and experience with .<strong>NET</strong> development<br />
techniques and technologies. You should be familiar with distributed<br />
application architecture and if you have already implemented .<strong>NET</strong> Web application<br />
solutions, you should know your own application architecture and deployment<br />
pattern.<br />
Feedback and Support<br />
Questions? Comments? Suggestions? For feedback on this security guide, please<br />
send e-mail to secguide@microsoft.com.<br />
The security guide is designed to help you build secure .<strong>NET</strong> distributed applications.<br />
The sample code and guidance is provided as-is. While this material has<br />
undergone testing and is considered a robust set of procedures and recommendations,<br />
it is not supported like a traditional Microsoft product.<br />
The Team That Brought You This Guide<br />
This guide was produced by the following .<strong>NET</strong> development specialists:<br />
● J.D. Meier, Microsoft, Program Manager, Prescriptive Architecture Guidance<br />
(PAG)<br />
● Alex Mackman, Content Master Ltd, Founding member and Principal<br />
Technologist<br />
● Srinath Vasireddy, Microsoft, Developer Support Engineer, Product Support<br />
and Services (PSS)<br />
● Michael Dunner, Microsoft, Developer Support Engineer, Product Support<br />
and Services (PSS)
xxiv<br />
<strong>Building</strong> <strong>Secure</strong> <strong>ASP</strong>.<strong>NET</strong> <strong>Applications</strong><br />
Contributors and Reviewers<br />
Many thanks to the following contributors and reviewers:<br />
●<br />
●<br />
●<br />
●<br />
Thanks to external reviewers – Keith Brown (DevelopMentor) for review and<br />
feedback on the <strong>ASP</strong>.<strong>NET</strong> chapter, Andy Eunson for providing scenarios on<br />
middleware applications, John Langley (KANA Software) for bringing J2EE<br />
and .<strong>NET</strong> perspectives to the table, Kurt Dillard and Christof Sprenger for<br />
reviewing application scenarios and the authentication and authorization<br />
process, J.K.Meadows and David Alberto for reviewing application scenarios<br />
and individual chapters and Bernard Chen (Sapient) for reviewing the<br />
authentication and authorization process<br />
Product Group – Thanks to Manish Prabhu, Jesus Ruiz-Scougall, Jonathan<br />
Hawkins and Doug Purdy from the .<strong>NET</strong> Remoting team; Keith Ballinger Yann<br />
Christensen and Alexei Vopilov from the Web Services team; Laura Barsan from<br />
the <strong>ASP</strong>.<strong>NET</strong> team; Greg Fee (.<strong>NET</strong> Roles / Principal permission checks), Greg<br />
Singleton and Sebastian Lange (CAS); Tarik Soulami from the CLR team; Erik<br />
Olson (extensive validation and recommendations on <strong>ASP</strong>.<strong>NET</strong>); Caesar Samsi<br />
(for sharing in depth e-commerce Internet facing application scenarios), Riyaz<br />
Pishori, Shannon Pahl and Ron Jacobs (Enterprise Services), Dave McPherson<br />
(Windows security architecture and authorization strategies), Christopher Brown<br />
(helping resolve cross product issues), John Banes (DPAPI), Joel Scambray, Girish<br />
Chander (SQL Server security)<br />
MCS / Field – William Zentmayer (Remote application tier scenarios with Enterprise<br />
Services), Shantanu Sarkar (validation of application architecture scenarios),<br />
Carl Nolan (Web services), Samuel Melendez and Jacquelyn Schmidt<br />
(infrastructure and deployment scenarios), Steve Busby, Len Cardinal, Monica<br />
DeZulueta, Paula Paul (Data Access and Web application security), Ed Draper,<br />
Sean Finnegan (pushing Active <strong>Directory</strong> and Windows authentication with<br />
technical depth and practical scenarios), David Alberto, Kenny Jones (for bringing<br />
real world field issues to the table and helping to involve the field), Doug<br />
Orange (real world Extranet authorization scenarios), Alexey Yeltsov (SQL<br />
Injection), Martin Kohlleppel (Architecture review), Joel Yoker (firewalls and<br />
IPSec)<br />
Special thanks to Jay Nanduri (Microsoft.com) for reviewing and sharing real<br />
world experiences, Ilia Fortunov (Senior Architect) for providing continuous and<br />
diligent feedback and Aaron Margosis (MCS) for thoroughly reviewing several<br />
chapters and making excellent suggestions at various stages of the project.
About This Book<br />
xxv<br />
●<br />
●<br />
●<br />
Special thanks to Product Support Services folks for contributing and review<br />
various portions of the guide – Venkat Chilakala (Troubleshooting section), John<br />
Allen and Jeremy Bostron (<strong>ASP</strong>.<strong>NET</strong>), Martin Petersen-Frey (simplifying and<br />
helping to structure the Remoting and Web Service portions of the guide), Karl<br />
Westerholm (SSL), Jayaprakasam Siddian Thirunavukkarasu (SQL Roles and<br />
ADO), Wade Mascia (valuable feedback on Enterprise Services, COM threading,<br />
<strong>ASP</strong>.<strong>NET</strong> and Web services), Ryan Kivett (IIS6 and <strong>ASP</strong>.<strong>NET</strong>), Sarath<br />
Mallavarapu (Data Access), Jerry Bryant (bringing community issues to the<br />
table) and Peter Kyte for resources<br />
Thanks also, to Philip Teale, Ram Sunkara, Shaun Hayes, Eric Schmidt, Michael<br />
Howard, Rich Benack, Carlos Lyons, Ted Kehl. Thanks to Peter Dampier, Mike<br />
Sherrill and Devendra Tiwari from the Enterprise Alliance team for validating<br />
our application scenarios. Thanks to Tavi Siochi (IT Audit) for feedback on SQL<br />
Injection.<br />
Finally, thanks to our colleagues on the patterns & practices team: Per Vonge<br />
Nielsen, Andrew Mason, Edward Jezierski, Sandy Khaund, RoAnn Corbisier,<br />
Tina Burden, Edward Lafferty, Peter M. Clift, John Munyan, Mohammad Al-Sabt,<br />
Anandha Murukan and Chris Sfanos
At a Glance<br />
This section allows you to quickly see the scope and coverage of the individual<br />
chapters in the guide.<br />
Chapter 1 – Introduction<br />
This chapter highlights the goals of the guide, introduces key terminology and<br />
presents a set of core principles that apply to the guidance presented in later<br />
chapters.<br />
Chapter 2 – Security Model for <strong>ASP</strong>.<strong>NET</strong> <strong>Applications</strong><br />
This chapter describes the common characteristics of .<strong>NET</strong> Web applications from<br />
a security perspective and introduces the .<strong>NET</strong> Web application security model.<br />
It also introduces the set of core implementation technologies that you will use to<br />
build secure .<strong>NET</strong> Web applications.<br />
The full range of gatekeepers that allow you to develop defense-in-depth security<br />
strategies are also introduced and the concept of principal-based authorization,<br />
using principal and identity objects is explained.<br />
This chapter will help you answer the following questions:<br />
● What are the typical deployment patterns adopted by .<strong>NET</strong> Web applications?<br />
● What security features are provided by the various technologies that I use to<br />
build .<strong>NET</strong> Web applications?<br />
● What gatekeepers should I be aware of and how do I use them to provide a<br />
defense-in-depth security strategy?<br />
● What are principal and identity objects and why are they so significant?<br />
● How does .<strong>NET</strong> security relate to Windows security?<br />
Chapter 3 – Authentication and Authorization<br />
Designing a coherent authentication and authorization strategy across your<br />
application’s multiple tiers is a critical task. This chapter provides guidance to help<br />
you develop an appropriate strategy for your particular application scenario. It will<br />
help you choose the most appropriate authentication and authorization technique<br />
and apply them at the correct places in your application.
xxviii <strong>Building</strong> <strong>Secure</strong> <strong>ASP</strong>.<strong>NET</strong> <strong>Applications</strong><br />
Read this chapter to learn how to:<br />
●<br />
●<br />
●<br />
●<br />
●<br />
●<br />
Choose an appropriate authentication mechanism to identify users.<br />
Develop an effective authorization strategy.<br />
Choose an appropriate type of role-based security.<br />
Compare and contrast .<strong>NET</strong> roles with Enterprise Services (COM+) roles.<br />
Use database roles.<br />
Choose between the trusted subsystem resource access model and the impersonation/delegation<br />
model which is used to flow the original caller’s security<br />
context at the operating system level throughout an application’s multiple tiers.<br />
These two core resource access models are shown below in Figure 1 and Figure 2.<br />
Web or Application Server<br />
Database Server<br />
A<br />
B<br />
C<br />
D<br />
E<br />
Role-Based<br />
Authorization<br />
Trusted<br />
Service<br />
Identity<br />
SQL<br />
Server<br />
Trust Boundary<br />
Database trusts the<br />
Web server. Web server<br />
authorizes users.<br />
Figure 1<br />
The Trusted Subsystem model<br />
With the trusted subsystem model:<br />
● Downstream resource access is performed using a fixed trusted identity and<br />
security context.<br />
● The downstream resource manager (for example, database) trusts the upstream<br />
application to properly authenticate and authorize callers.<br />
● The resource manager authorizes the application to access resources. Original<br />
callers are not authorized to directly access the resource manager.<br />
● A trust boundary exists between the downstream and upstream components.<br />
● Original caller identity (for auditing) flows at the application (not operating<br />
system) level.
At a Glance<br />
xxix<br />
A<br />
B<br />
C<br />
D<br />
E<br />
Web or Application<br />
Server<br />
A<br />
B<br />
C<br />
D<br />
E<br />
Database<br />
Server<br />
SQL<br />
Server<br />
Caller<br />
Impersonation/Delegation<br />
Figure 2<br />
The impersonation/delegation model<br />
With the impersonation/delegation model:<br />
● Downstream resource access is performed using the original caller’s security<br />
context.<br />
● The downstream resource manager (for example, database) authorizes individual<br />
callers.<br />
● The original caller identity flows at the operating system and is available for<br />
platform level auditing and per caller authorization.<br />
Chapter 4 – <strong>Secure</strong> Communication<br />
This chapter introduces the two core technologies that can be used to provide<br />
message confidentiality and message integrity for data that flows across the network<br />
between clients and servers on the Internet and corporate intranet. These are<br />
SSL and IPSec. It also discusses RPC encryption which can be used to secure the<br />
communication with remote serviced components.<br />
Read this chapter to learn how to:<br />
● Apply secure communication techniques throughout the various tiers of your<br />
application.<br />
● Choose between SSL and IPSec.<br />
● Configure secure communication.<br />
● Use RPC encryption.<br />
The chapter addresses the need to provide secure communication channels between<br />
your application’s various physical tiers as shown in Figure 3 on the next page.
xxx<br />
<strong>Building</strong> <strong>Secure</strong> <strong>ASP</strong>.<strong>NET</strong> <strong>Applications</strong><br />
Clients<br />
Web<br />
Server<br />
Application<br />
Server<br />
Database<br />
Server<br />
SSL<br />
(Privacy/Integrity)<br />
IPSec or RPC<br />
(Privacy/Integrity)<br />
IPSec or SSL<br />
(Privacy/Integrity)<br />
Figure 3<br />
A typical Web deployment model, with secure communications<br />
Chapter 5 – Intranet Security<br />
This chapter presents a set of common intranet application scenarios and for each<br />
one presents recommended security configurations. In each case, the configuration<br />
steps necessary to build the secure solution are presented, together with analysis<br />
and related scenario variations.<br />
The application scenarios covered in this chapter are:<br />
● <strong>ASP</strong>.<strong>NET</strong> to SQL Server<br />
This scenario is shown in Figure 4.<br />
● <strong>ASP</strong>.<strong>NET</strong> to Enterprise Services to SQL Server<br />
● <strong>ASP</strong>.<strong>NET</strong> to Web Services to SQL Server<br />
● <strong>ASP</strong>.<strong>NET</strong> to Remoting to SQL Server<br />
● Flowing the original caller to the database<br />
This includes multi-tier Kerberos delegation scenarios, as shown in Figure 5.<br />
NTFS<br />
Permissions<br />
(Authorization)<br />
File Authorization<br />
.<strong>NET</strong> Roles<br />
(Authorization)<br />
SQL Permissions<br />
Database Roles<br />
(Authorization)<br />
Alice<br />
Mary<br />
Bob<br />
IIS<br />
Alice<br />
Mary<br />
Bob<br />
<strong>ASP</strong>.<strong>NET</strong><br />
<strong>ASP</strong>.<strong>NET</strong><br />
Process Identity<br />
SQL<br />
Server<br />
SSL<br />
(Privacy/<br />
Integrity)<br />
Integrated<br />
Windows<br />
Authentication<br />
Web Server<br />
Windows<br />
Authentication<br />
IPSec<br />
(Privacy/Integrity)<br />
Database<br />
Server<br />
Windows<br />
Authentication<br />
Figure 4<br />
Security configuration for <strong>ASP</strong>.<strong>NET</strong> to remote SQL Server scenarios
At a Glance<br />
xxxi<br />
Integrated<br />
Windows<br />
(Kerberos)<br />
(Authentication)<br />
Windows<br />
(Authentication)<br />
A<br />
A<br />
Internet<br />
Explorer<br />
B<br />
C<br />
IIS<br />
B<br />
C<br />
<strong>ASP</strong>.<strong>NET</strong><br />
Impersonation<br />
Clients<br />
SSL<br />
(Privacy/<br />
Integrity)<br />
Web Server<br />
A B C<br />
RPC Packet Windows<br />
Privacy (Authentication)<br />
(Privacy/Integrity)<br />
Enterprise Services<br />
(COM+) Roles<br />
(Authorization)<br />
Windows<br />
(Authentication)<br />
Enterprise Services<br />
Application Server<br />
A<br />
B<br />
C<br />
SQL<br />
Server<br />
Database<br />
Server<br />
Impersonation IPSec Database Permissions<br />
(Programmatic) (Privacy/ Integrity) (Authorization)<br />
Figure 5<br />
Security configuration for <strong>ASP</strong>.<strong>NET</strong> to remote Enterprise Services to remote SQL Server Kerberos<br />
delegation scenario<br />
Read this chapter to lean how to:<br />
● Use the local <strong>ASP</strong><strong>NET</strong> account to make calls from an <strong>ASP</strong>.<strong>NET</strong> Web application<br />
to a remote SQL Server database.<br />
● Establish trusted database connections to SQL Server using Windows<br />
authentication.<br />
● Authorize database access with SQL Server user-defined database roles.<br />
● Avoid storing credentials within your application.<br />
● <strong>Secure</strong> sensitive data with a combination of SSL and IPSec.<br />
● Implement Kerberos delegation to flow the original caller’s security context<br />
across multiple application tiers to a back-end database.<br />
● Flow the original caller’s security context by using Basic authentication.<br />
●<br />
●<br />
Authorize users with a combination of <strong>ASP</strong>.<strong>NET</strong> file authorization, URL<br />
authorization, .<strong>NET</strong> roles and Enterprise Services (COM+) roles.<br />
Effectively use impersonation within an <strong>ASP</strong>.<strong>NET</strong> Web application.
xxxii <strong>Building</strong> <strong>Secure</strong> <strong>ASP</strong>.<strong>NET</strong> <strong>Applications</strong><br />
Chapter 6 – Extranet Security<br />
This chapter presents a set of common extranet application scenarios and for each<br />
one presents recommended security configurations, configuration steps and analysis.<br />
This chapter covers the following extranet scenarios.<br />
● Exposing a Web Service (B2B partner exchange)<br />
This scenario is shown in Figure 6.<br />
● Exposing a Web Application (partner application portal)<br />
IIS<br />
Partner Company<br />
<strong>ASP</strong>.<strong>NET</strong><br />
(Web App)<br />
NTFS<br />
Permissions<br />
(Authorization)<br />
File<br />
authorization<br />
.<strong>NET</strong> Roles<br />
(Authorization)<br />
Publisher Company<br />
Certificate<br />
Mapping<br />
Enterprise<br />
Services<br />
Internet<br />
IIS<br />
<strong>ASP</strong>.<strong>NET</strong><br />
(Web<br />
Service)<br />
Active<br />
<strong>Directory</strong><br />
Firewalls<br />
SSL<br />
(Privacy/Integrity)<br />
Certificate<br />
Authentication<br />
<strong>ASP</strong>.<strong>NET</strong><br />
Identity<br />
IPSec<br />
(Privacy/<br />
Integrity)<br />
Windows<br />
Authentication<br />
User-defined<br />
Database Roles<br />
(Authorization)<br />
SQL<br />
Server<br />
Figure 6<br />
Security configuration for Web Service B2B partner exchange scenario<br />
Read this chapter to lean how to:<br />
● Authenticate partner companies by using client certificate authentication against<br />
a dedicated extranet Active <strong>Directory</strong>.<br />
● Map certificates to Windows accounts.<br />
● Authorize partner companies by using <strong>ASP</strong>.<strong>NET</strong> file authorization and .<strong>NET</strong><br />
roles.<br />
● Use the <strong>ASP</strong><strong>NET</strong> identity to access a remote SQL Server database located on the<br />
corporate intranet.
At a Glance xxxiii<br />
Chapter 7 – Internet Security<br />
This chapter presents a set of common Internet application scenarios, and for<br />
each one presents recommended security configurations, configuration steps, and<br />
analysis.<br />
This chapter covers the following Internet application scenarios:<br />
● <strong>ASP</strong>.<strong>NET</strong> to SQL Server<br />
● <strong>ASP</strong>.<strong>NET</strong> to Remote Enterprise Services to SQL Server<br />
This scenario is shown in Figure 7.<br />
Alice<br />
Mary<br />
Bob<br />
NTFS<br />
Permissions<br />
(Authorization)<br />
IIS<br />
Web Server<br />
URL<br />
Authorization<br />
(Authorization)<br />
<strong>ASP</strong>.<strong>NET</strong><br />
<strong>ASP</strong><strong>NET</strong><br />
(Process<br />
Identity)<br />
Integrated Windows<br />
(Authentication)<br />
Require SSL<br />
(Privacy/Integrity)<br />
SOAP<br />
IIS<br />
Application Server<br />
Windows<br />
(Authentication)<br />
<strong>ASP</strong>.<strong>NET</strong><br />
(Web<br />
Services<br />
Façade)<br />
SSL<br />
(Privacy/Integrity)<br />
Anonymous<br />
Authentication<br />
Forms<br />
Authentication<br />
SSL<br />
(Privacy/<br />
Integrity)<br />
Enterprise Services<br />
Server Application<br />
(dllhost.exe)<br />
ES Process<br />
Identity<br />
IPSec<br />
(Privacy/<br />
Integrity)<br />
User defined<br />
database roles<br />
(Authorization)<br />
SQL<br />
Server<br />
Windows<br />
Authentication<br />
Database Server<br />
Figure 7<br />
Security configuration for <strong>ASP</strong>.<strong>NET</strong> to remote Enterprise Services to SQL Server<br />
Read this chapter to learn how to:<br />
● Use Forms authentication with a SQL Server credential database.<br />
● Avoid storing passwords in the credential database.<br />
● Authorize Internet users with URL Authorization and .<strong>NET</strong> roles.
xxxiv <strong>Building</strong> <strong>Secure</strong> <strong>ASP</strong>.<strong>NET</strong> <strong>Applications</strong><br />
●<br />
●<br />
●<br />
●<br />
Use Windows authentication from an <strong>ASP</strong>.<strong>NET</strong> Web application to SQL Server<br />
through a firewall.<br />
<strong>Secure</strong> sensitive data with a combination of SSL and IPSec.<br />
Communicate from an <strong>ASP</strong>.<strong>NET</strong> Web application to a remote Enterprise Services<br />
application through a firewall by using SOAP.<br />
<strong>Secure</strong> calls to serviced component in the application’s middle tier.<br />
Chapter 8 – <strong>ASP</strong>.<strong>NET</strong> Security<br />
This chapter provides in-depth security recommendations for <strong>ASP</strong>.<strong>NET</strong> Web applications.<br />
This chapter covers the range of authentication, authorization and secure<br />
communication services provided by IIS and <strong>ASP</strong>.<strong>NET</strong>. These are illustrated in<br />
Figure 8.<br />
4<br />
Authenticated caller’s access token<br />
(or IUSR_MACHINE access token)<br />
1<br />
HTTP<br />
Requests<br />
SSL<br />
(Privacy/<br />
Integrity)<br />
2<br />
Authentication<br />
Anonymous<br />
Basic<br />
Digest<br />
Integrated<br />
Certificate<br />
Web Server<br />
IIS<br />
(inetinfo.exe)<br />
3<br />
Authorization<br />
Web Permissions<br />
NTFS Permissions<br />
IP Address<br />
Restrictions<br />
5<br />
Authentication<br />
Windows<br />
Forms<br />
Passport<br />
None<br />
<strong>ASP</strong>.<strong>NET</strong><br />
(aspnet_wp.exe)<br />
6<br />
Authorization<br />
File AuthZ<br />
URL AuthZ<br />
.<strong>NET</strong> Roles<br />
<strong>ASP</strong>.<strong>NET</strong> Process<br />
Original Caller<br />
Fixed Proxy Identity<br />
Identity<br />
7<br />
Local or<br />
Remote<br />
Resource<br />
Figure 8<br />
<strong>ASP</strong>.<strong>NET</strong> security services
At a Glance xxxv<br />
Read this chapter to learn how to:<br />
●<br />
●<br />
●<br />
●<br />
●<br />
●<br />
●<br />
●<br />
●<br />
●<br />
●<br />
●<br />
●<br />
●<br />
●<br />
●<br />
●<br />
Configure the various <strong>ASP</strong>.<strong>NET</strong> authentication modes.<br />
Implement Forms authentication.<br />
Implement Windows authentication.<br />
Work with IPrincipal and IIdentity objects.<br />
Effectively use the IIS and <strong>ASP</strong>.<strong>NET</strong> gatekeepers.<br />
Configure and use <strong>ASP</strong>.<strong>NET</strong> File authorization.<br />
Configure and use <strong>ASP</strong>.<strong>NET</strong> URL authorization.<br />
Implement declarative, imperative and programmatic role-based security, using<br />
principal permission demands and IPrincipal.IsInRole.<br />
Know when and when not to use impersonation within an <strong>ASP</strong>.<strong>NET</strong> Web<br />
application.<br />
Choose an appropriate account to run <strong>ASP</strong>.<strong>NET</strong>.<br />
Access local and network resources using the <strong>ASP</strong>.<strong>NET</strong> process identity.<br />
Access remote SQL Server databases using the local <strong>ASP</strong><strong>NET</strong> account.<br />
Call COM objects from <strong>ASP</strong>.<strong>NET</strong>.<br />
Effectively use the anonymous Internet user account in Web hosting<br />
environments.<br />
Store secrets in an <strong>ASP</strong>.<strong>NET</strong> Web application.<br />
<strong>Secure</strong> session and view state.<br />
Configure <strong>ASP</strong>.<strong>NET</strong> security in Web Farm scenarios.<br />
Chapter 9 – Enterprise Services Security<br />
This chapter explains how to secure business functionality in serviced components<br />
contained within Enterprise Services applications. It shows you how and when to<br />
use Enterprise Services (COM+) roles for authorization, and how to configure RPC<br />
authentication and impersonation. It also shows you how to securely call serviced<br />
components from an <strong>ASP</strong>.<strong>NET</strong> Web application and how to identify and flow the<br />
original caller’s security context through a middle tier serviced component.
xxxvi <strong>Building</strong> <strong>Secure</strong> <strong>ASP</strong>.<strong>NET</strong> <strong>Applications</strong><br />
Figure 9 shows the Enterprise Services security features covered by this chapter.<br />
Role List<br />
“Manager”<br />
“Senior Manager”<br />
“Employee”<br />
COM+<br />
Catalog<br />
Check role membership<br />
Bob<br />
Client Application<br />
(e.g. aspnet_wp.exe)<br />
Bob<br />
(DCOM)<br />
Access<br />
Check<br />
Serviced<br />
Component<br />
Interceptor<br />
Windows<br />
Authentication<br />
+ Impersonation<br />
Machine.config<br />
(DCOM client<br />
authentication and<br />
impersonation<br />
settings)<br />
Figure 9<br />
Enterprise Services security overview<br />
RPC<br />
Packet Privacy<br />
Packet Integrity<br />
(Privacy/Integrity)<br />
DCOM/RPC<br />
(Authentication)<br />
Enterprise Services<br />
(COM+) Roles<br />
(Authorization)<br />
None<br />
Connect<br />
Call<br />
Packet<br />
Packet Integrity<br />
Packet Privacy<br />
Enterprise Services<br />
Server Application<br />
(dllhost.exe)<br />
Read this chapter to learn how to:<br />
● Configure an Enterprise Services application using .<strong>NET</strong> attributes.<br />
● <strong>Secure</strong> server and library applications.<br />
● Choose an appropriate account to run an Enterprise Services server application.<br />
● Implement method level Enterprise Services (COM+) role based security both<br />
programmatically and declaratively.<br />
● Configure <strong>ASP</strong>.<strong>NET</strong> as a DCOM client.<br />
● <strong>Secure</strong>ly call serviced components from <strong>ASP</strong>.<strong>NET</strong>.<br />
● Compare Enterprise Services (COM+) roles with .<strong>NET</strong> roles.<br />
● Identify callers within a serviced component.<br />
● Flow the original caller’s security context through an Enterprise Services application<br />
by using programmatic impersonation within a serviced component.<br />
● Access local and network resources from a serviced component.
At a Glance xxxvii<br />
●<br />
●<br />
●<br />
Use RPC encryption to secure sensitive data passed to and from serviced<br />
components.<br />
Understand the process of RPC authentication level negotiation.<br />
Use DCOM through firewalls.<br />
Chapter 10 – Web Services Security<br />
This chapter focuses on platform level security for Web services using the underlying<br />
features of IIS and <strong>ASP</strong>.<strong>NET</strong>. For message level security, Microsoft is developing<br />
the Web Services Development Kit, which allows you to build security solutions<br />
that conform to the WS-Security specification, part of the Global XML Architecture<br />
(GXA) initiative.<br />
The <strong>ASP</strong>.<strong>NET</strong> Web services platform security architecture is shown in Figure 10.<br />
Authentication<br />
SOAP Header<br />
(optional<br />
credentials)<br />
SOAP Body<br />
1<br />
IIS<br />
2<br />
(inetinfo.exe)<br />
3<br />
Authentication<br />
Anonymous<br />
Basic<br />
Digest<br />
Integrated<br />
Certificate<br />
Authentication<br />
Windows<br />
None<br />
(Custom)<br />
<strong>ASP</strong>.<strong>NET</strong> Web Service<br />
(aspnet_wp.exe)<br />
Authorization<br />
NTFS Permissions<br />
IP Address<br />
Restrictions<br />
Authorization<br />
File AuthZ<br />
URL AuthZ<br />
.<strong>NET</strong> Roles<br />
5 6<br />
Identity<br />
7<br />
Web Server<br />
4<br />
Authenticated caller’s<br />
access token (or<br />
IUSR_MACHINE<br />
access token)<br />
Locator<br />
Remote<br />
Resource<br />
<strong>ASP</strong>.<strong>NET</strong> Process<br />
Original Caller<br />
Fixed Service Identity<br />
Figure 10<br />
Web services security architecture
xxxviii<strong>Building</strong> <strong>Secure</strong> <strong>ASP</strong>.<strong>NET</strong> <strong>Applications</strong><br />
Read this chapter to learn how to:<br />
●<br />
●<br />
●<br />
●<br />
●<br />
●<br />
●<br />
●<br />
●<br />
●<br />
Implement platform-based Web service security solutions.<br />
Develop an authentication and authorization strategy for a Web service.<br />
Use client certificate authentication with Web services.<br />
Use <strong>ASP</strong>.<strong>NET</strong> file authorization, URL authorization, and .<strong>NET</strong> roles to provide<br />
authorization in Web services.<br />
Flow the original caller’s security context through a Web service.<br />
Call Web services using SSL.<br />
Access local and network resources from Web services.<br />
Pass credentials for authentication to a Web service through a Web service proxy.<br />
Implement the trusted subsystem model for Web services.<br />
Call COM objects from Web services.<br />
Chapter 11 – .<strong>NET</strong> Remoting Security<br />
The .<strong>NET</strong> Framework provides a remoting infrastructure that allows clients to<br />
communicate with objects, hosted in remote application domains and processes, or<br />
on remote computers. This chapter shows you how to implement secure .<strong>NET</strong><br />
Remoting solutions.<br />
Read this chapter to learn how to:<br />
● Choose an appropriate host for remote components.<br />
● Use all of the available gatekeepers to provide defense-in-depth security.<br />
● Use URL authentication and .<strong>NET</strong> roles to authorize access to remote<br />
components.<br />
● Use File authentication with remoting. This requires you to create a physical .rem<br />
or .soap file that corresponds to the remote component’s object URI.<br />
●<br />
●<br />
●<br />
●<br />
●<br />
Access local and network resources from a remote component.<br />
Pass credentials for authentication to a remote component through the remote<br />
component proxy object.<br />
Flow the original caller’s security context through a remote component.<br />
<strong>Secure</strong> communication to and from remote components using a combination of<br />
SSL and IPSec.<br />
Know when to use remoting and when to use Web services.
At a Glance xxxix<br />
Chapter 12 – Data Access Security<br />
This chapter presents recommendations and guidance that will help you develop<br />
a secure data access strategy. The key issues covered by this chapter are shown in<br />
Figure 11. These include storing connection strings securely, using an appropriate<br />
identity for database access, securing data passed to and from the database, using<br />
an appropriate authentication mechanism and implementing authorization in the<br />
database.<br />
4<br />
Windows or SQL<br />
(Authentication)<br />
Client<br />
Identity<br />
Client<br />
Application<br />
(for example<br />
<strong>ASP</strong>.<strong>NET</strong>)<br />
2<br />
Data<br />
Access<br />
Identity<br />
SQL<br />
Server<br />
SQL Server<br />
1<br />
<strong>Secure</strong><br />
Connection<br />
String Storage<br />
3<br />
SSL or IPSec<br />
(Privacy/Integrity)<br />
5<br />
Database<br />
Permissions<br />
(Authorization)<br />
Figure 11<br />
Data Access security overview<br />
Read this chapter to learn how to:<br />
● Use Windows authentication from <strong>ASP</strong>.<strong>NET</strong> to your database.<br />
● <strong>Secure</strong> connection strings.<br />
● Use DPAPI from <strong>ASP</strong>.<strong>NET</strong> Web applications to store secrets such as connection<br />
strings and credentials.<br />
● Store credentials for authentication securely in a database.<br />
● Validate user input to protect against SQL injection attacks.<br />
● Mitigate the security threats associated with the use of SQL authentication.<br />
● Know which type of database roles to use.<br />
● Compare and contrast database user roles with SQL Server application roles.<br />
● <strong>Secure</strong> communication to SQL Server using IPSec and also SSL.<br />
● Create a least privilege database account.<br />
● Enable auditing in SQL Server.
xl<br />
<strong>Building</strong> <strong>Secure</strong> <strong>ASP</strong>.<strong>NET</strong> <strong>Applications</strong><br />
Chapter 13 – Troubleshooting Security Issues<br />
This chapter provides troubleshooting tips, techniques and tools to help diagnose<br />
security related issues. Read this chapter to learn a proven process for effectively<br />
troubleshooting security issues you may encounter while building your <strong>ASP</strong>.<strong>NET</strong><br />
applications. For example, you’ll learn techniques for determining identity in your<br />
<strong>ASP</strong>.<strong>NET</strong> pages, which can be used to diagnose authentication and access control<br />
issues. You’ll also learn how to troubleshoot Kerberos authentication. The chapter<br />
concludes with a concise list of some of the more useful troubleshooting tools, used<br />
by Microsoft support to troubleshoot customer issues.<br />
Reference<br />
Use the supplementary information in this section of the guide to help further your<br />
understanding of the techniques, strategies and security solutions presented in<br />
earlier chapters. Detailed How Tos provide step-by-step procedures that enable you<br />
to implement specific security solutions. It contains the following information:<br />
● Reference Hub<br />
● How Tos<br />
● How Does it Work?<br />
● <strong>ASP</strong>.<strong>NET</strong> Identity Matrix<br />
● Base Configuration<br />
● Configuring Security<br />
● Cryptography and Certificates<br />
● .<strong>NET</strong> Web Application Security Figure<br />
● Glossary
1<br />
Introduction<br />
<strong>Building</strong> secure distributed Web applications is challenging. Your application is<br />
only as secure as its weakest link. With distributed applications, you have a lot of<br />
moving parts and making those parts work together in a secure fashion requires<br />
a working knowledge that spans products and technologies.<br />
You already have a lot to consider; integrating various technologies, staying current<br />
with technology, and keeping a step ahead of the competition. If you don’t already<br />
know how to build secure applications, can you afford the time and effort to learn?<br />
More to the point, can you afford not to?<br />
The Connected Landscape<br />
If you already know how to build secure applications, are you able to apply what<br />
you know when you build .<strong>NET</strong> Web applications? Are you able to apply your<br />
knowledge in today’s landscape of Web-based distributed applications, where Web<br />
services connect businesses to other business and business to customers and where<br />
applications offer various degrees of exposure; for example, to users on intranets,<br />
extranets, and the Internet?<br />
Consider some of the fundamental characteristics of this connected landscape:<br />
● Web services use standards such as SOAP, Extensible Markup Language (XML),<br />
and Hypertext Transport Protocol (HTTP), but fundamentally they pass potentially<br />
sensitive information using plain text.<br />
● Internet business-to-consumer applications pass sensitive data over the Web.<br />
● Extranet business-to-business applications blur the lines of trust and allow<br />
applications to be called by other applications in partner companies.<br />
● Intranet applications are not without their risks considering the sensitive nature<br />
of payroll and Human Resource (HR) applications. Such applications are particularly<br />
vulnerable to rogue administrators and disgruntled employees.
2<br />
<strong>Building</strong> <strong>Secure</strong> <strong>ASP</strong>.<strong>NET</strong> <strong>Applications</strong><br />
Scope<br />
This guide focuses on:<br />
●<br />
●<br />
Authentication (to identify the clients of your application)<br />
Authorization (to provide access controls for those clients)<br />
● <strong>Secure</strong> communication (to ensure that messages remain private and are not<br />
altered by unauthorized parties)<br />
Why authentication, authorization, and secure communication?<br />
Security is a broad topic. Research has shown that early design of authentication<br />
and authorization eliminates a high percentage of application vulnerabilities.<br />
<strong>Secure</strong> communication is an integral part of securing your distributed application to<br />
protect sensitive data, including credentials, passed to and from your application<br />
and between application tiers.<br />
What Are the Goals of This Guide?<br />
This guide is not an introduction to security. It is not a security reference for the<br />
Microsoft .<strong>NET</strong> Framework — for that you have the .<strong>NET</strong> Framework Software<br />
Development Kit (SDK) available from MSDN, see the “References” section of this<br />
guide for details. This guide picks up where the documentation leaves off and<br />
presents a scenario-based approach to sharing recommendations and proven<br />
techniques, as gleaned from the field, customer experience, and insight from the<br />
product teams at Microsoft.<br />
The information in this guide is designed to show you how to:<br />
● Raise the security bar for your application.<br />
● Identify where and how you need to perform authentication.<br />
● Identify where and how you need to perform authorization.<br />
● Identify where and how you need to secure communication both to your application<br />
(from your end users) and between application tiers.<br />
● Identify common pitfalls and how to avoid them.<br />
● Identify top risks and their mitigation related to authentication and authorization.<br />
● Avoid opening up security just to make things work.<br />
● Identify not only how, but also when to use various security features.<br />
●<br />
●<br />
Eliminate FUD (fear, uncertainty, and doubt).<br />
Promote best practices and predictable results.
Chapter 1: Introduction 3<br />
How You Should Read This Guide<br />
The guide has been developed to be modular. This allows you to pick and choose<br />
which chapters to read. For example, if you are interested in learning about the<br />
in-depth security features provided by a specific technology, you can jump straight<br />
to Part III of the guide (Chapters 8 through 12), which contains in-depth material<br />
covering <strong>ASP</strong>.<strong>NET</strong>, Enterprise Services, Web Services, .<strong>NET</strong> Remoting, and data<br />
access.<br />
However, you are encouraged to read the early chapters (Chapters 1 through 4) in<br />
Part I of the guide first, because these will help you understand the security model<br />
and identify the core technologies and security services at your disposal. Application<br />
architects should make sure they read Chapter 3, which provides some key<br />
insights into designing an authentication and authorization strategy that spans the<br />
tiers of your Web application. Part I will provide you with the foundation materials<br />
which will allow you to extract maximum benefit from the remainder of the guide.<br />
The intranet, extranet, and Internet chapters (Chapters 5 through 7) in Part II of the<br />
guide will show you how to secure specific application scenarios. If you know the<br />
architecture and deployment pattern that is or will be adopted by your application,<br />
use this part of the guide to understand the security issues involved and the basic<br />
configuration steps required to secure specific scenarios.<br />
Finally, additional information and reference material in Part IV of the guide will<br />
help further your understanding of specific technology areas. It also contains a<br />
library of How To articles which enable you to develop working security solutions<br />
in the shortest possible time.<br />
Organization of the Guide<br />
The guide is divided into four parts. The aim is to provide a logical partitioning,<br />
which will help you to more easily digest the content.<br />
Part I, Security Models<br />
Part 1 of the guide provides a foundation for the rest of the guide. Familiarity with<br />
the concepts, principles, and technologies introduced in Part 1 will enable you to<br />
extract maximum value from the remainder of the guide. Part 1 contains the following<br />
chapters.<br />
● Chapter 1, “Introduction”<br />
● Chapter 2, “Security Model for <strong>ASP</strong>.<strong>NET</strong> <strong>Applications</strong> “<br />
●<br />
●<br />
Chapter 3, “Authentication and Authorization”<br />
Chapter 4, “<strong>Secure</strong> Communication”
4<br />
<strong>Building</strong> <strong>Secure</strong> <strong>ASP</strong>.<strong>NET</strong> <strong>Applications</strong><br />
Part II, Application Scenarios<br />
Most applications can be categorized as intranet, extranet, or Internet applications.<br />
This part of the guide presents a set of common application scenarios, each of which<br />
falls into one of the aforementioned categories. The key characteristics of each<br />
scenario are described and the potential security threats analyzed.<br />
You are then shown how to configure and implement the most appropriate authentication,<br />
authorization, and secure communication strategy for each application<br />
scenario. Each scenario also contains sections that include a detailed analysis,<br />
common pitfalls to watch out for, and frequently asked questions (FAQ). Part II<br />
contains the following chapters:<br />
● Chapter 5, “Intranet Security”<br />
●<br />
●<br />
Chapter 6, “Extranet Security”<br />
Chapter 7, “Internet Security”<br />
Part III, Securing the Tiers<br />
This part of the guide contains detailed information that relates to the individual<br />
tiers and technologies associated with secure .<strong>NET</strong>-connected Web applications.<br />
Part III contains the following chapters:<br />
● Chapter 8, “<strong>ASP</strong>.<strong>NET</strong> Security”<br />
●<br />
●<br />
●<br />
Chapter 9, “Enterprise Services Security”<br />
Chapter 10, “Web Services Security”<br />
Chapter 11, “.<strong>NET</strong> Remoting Security”<br />
● Chapter 12, “Data Access Security”<br />
Within each chapter, a brief overview of the security architecture as it applies to the<br />
particular technology in question is presented. Authentication and authorization<br />
strategies are discussed for each technology along with configurable security<br />
options, programmatic security options, and actionable recommendations of when<br />
to use the particular strategy.<br />
Each chapter offers guidance and insight that will allow you to choose and implement<br />
the most appropriate authentication, authorization, and secure communication<br />
option for each technology. In addition, each chapter presents additional<br />
information specific to the particular technology. Finally, each chapter concludes<br />
with a concise recommendation summary.
Chapter 1: Introduction 5<br />
Part IV, Reference<br />
This reference part of the guide contains supplementary information to help further<br />
your understanding of the techniques, strategies, and security solutions presented<br />
in earlier chapters. Detailed How Tos provide step-by-step procedures that enable<br />
you to implement specific security solutions. It contains the following information:<br />
● Chapter 13, “Troubleshooting Security”<br />
●<br />
●<br />
●<br />
●<br />
●<br />
●<br />
●<br />
●<br />
●<br />
“How Tos”<br />
“Base Configuration”<br />
“Configuration Stores and Tools”<br />
“How Does It Work?”<br />
“<strong>ASP</strong>.<strong>NET</strong> Identity Matrix”<br />
“Cryptography and Certificates”<br />
“<strong>ASP</strong>.<strong>NET</strong> Security Model”<br />
“Reference Hub”<br />
“Glossary”<br />
Key Terminology<br />
This section introduces some key security terminology used throughout the guide.<br />
Although a full glossary of terminology is provided within the “Reference” section<br />
of this guide, make sure you are very familiar with the following terms:<br />
● Authentication. Positively identifying the clients of your application; clients<br />
might include end-users, services, processes or computers.<br />
● Authorization. Defining what authenticated clients are allowed to see and do<br />
within the application.<br />
● <strong>Secure</strong> Communications. Ensuring that messages remain private and unaltered<br />
as they cross networks.<br />
● Impersonation. This is the technique used by a server application to access<br />
resources on behalf of a client. The client’s security context is used for access<br />
checks performed by the server.<br />
● Delegation. An extended form of impersonation that allows a server process<br />
that is performing work on behalf of a client, to access resources on a remote<br />
computer. This capability is natively provided by Kerberos on Microsoft®<br />
Windows® 2000 and later operating systems. Conventional impersonation (for<br />
example, that provided by NTLM) allows only a single network hop. When<br />
NTLM impersonation is used, the one hop is used between the client and server<br />
computers, restricting the server to local resource access while impersonating.
6<br />
<strong>Building</strong> <strong>Secure</strong> <strong>ASP</strong>.<strong>NET</strong> <strong>Applications</strong><br />
●<br />
●<br />
Security Context. Security context is a generic term used to refer to the collection<br />
of security settings that affect the security-related behavior of a process or<br />
thread. The attributes from a process’ logon session and access token combine to<br />
form the security context of the process.<br />
Identity. Identity refers to a characteristic of a user or service that can uniquely<br />
identify it. For example, this is often a display name, which often takes the form<br />
authority/user name.<br />
Principles<br />
There are a number of overarching principles that apply to the guidance presented<br />
in later chapters. The following summarizes these principles:<br />
● Adopt the principle of least privilege. Processes that run script or execute code<br />
should run under a least privileged account to limit the potential damage that<br />
can be done if the process is compromised. If a malicious user manages to inject<br />
code into a server process, the privileges granted to that process determine to<br />
a large degree the types of operations the user is able to perform. Code that<br />
requires additional trust (and raised privileges) should be isolated within separate<br />
processes.<br />
The <strong>ASP</strong>.<strong>NET</strong> team made a conscious decision to run the <strong>ASP</strong>.<strong>NET</strong> account with<br />
least privileges (using the <strong>ASP</strong><strong>NET</strong> account). During the beta release of the .<strong>NET</strong><br />
Framework, <strong>ASP</strong>.<strong>NET</strong> ran as SYSTEM, an inherently less secure setting.<br />
● Use defense in depth. Place check points within each of the layers and subsystems<br />
within your application. The check points are the gatekeepers that<br />
ensure that only authenticated and authorized users are able to access the next<br />
downstream layer.<br />
● Don’t trust user input. <strong>Applications</strong> should thoroughly validate all user input<br />
before performing operations with that input. The validation may include<br />
filtering out special characters. This preventive measure protects the application<br />
against accidental misuse or deliberate attacks by people who are attempting to<br />
inject malicious commands into the system. Common examples include SQL<br />
injection attacks, script injection, and buffer overflow.<br />
● Use secure defaults. A common practice among developers is to use reduced<br />
security settings, simply to make an application work. If your application demands<br />
features that force you to reduce or change default security settings, test<br />
the effects and understand the implications before making the change.<br />
● Don’t rely on security by obscurity. Trying to hide secrets by using misleading<br />
variable names or storing them in odd file locations does not provide security. In<br />
a game of hide-and-seek, it’s better to use platform features or proven techniques<br />
for securing your data.
Chapter 1: Introduction 7<br />
●<br />
●<br />
●<br />
●<br />
●<br />
●<br />
Check at the gate. You don’t always need to flow a user’s security context to the<br />
back end for authorization checks. Often, in a distributed system, this is not the<br />
best choice. Checking the client at the gate refers to authorizing the user at the<br />
first point of authentication (for example, within the Web application on the Web<br />
server), and determining which resources and operations (potentially provided<br />
by downstream services) the user should be allowed to access.<br />
If you design solid authentication and authorization strategies at the gate, you<br />
can circumvent the need to delegate the original caller’s security context all the<br />
way through to your application’s data tier.<br />
Assume external systems are insecure. If you don’t own it, don’t assume security<br />
is taken care of for you.<br />
Reduce surface area. Avoid exposing information that is not required. By doing<br />
so, you are potentially opening doors that can lead to additional vulnerabilities.<br />
Also, handle errors gracefully; don’t expose any more information than is required<br />
when returning an error message to the end user.<br />
Fail to a secure mode. If your application fails, make sure it does not leave<br />
sensitive data unprotected. Also, do not provide too much detail in error<br />
messages; meaning don’t include details that could help an attacker exploit<br />
a vulnerability in your application. Write detailed error information to the<br />
Windows event log.<br />
Remember you are only as secure as your weakest link. Security is a concern<br />
across all of your application tiers.<br />
If you don’t use it, disable it. You can remove potential points of attack by<br />
disabling modules and components that your application does not require. For<br />
example, if your application doesn’t use output caching, then you should disable<br />
the <strong>ASP</strong>.<strong>NET</strong> output cache module. If a future security vulnerability is found in<br />
the module, your application is not threatened.<br />
Summary<br />
This chapter has provided some foundation material to prepare you for the rest of<br />
the guide. It has described the goals of the guide and presented its overall structure.<br />
Make sure you are familiar with the key terminology and principles introduced in<br />
this chapter, because these are used and referenced extensively throughout the<br />
forthcoming chapters.
2<br />
Security Model for <strong>ASP</strong>.<strong>NET</strong><br />
<strong>Applications</strong><br />
This chapter introduces .<strong>NET</strong> Web application security. It provides an overview<br />
of the security features and services that span the tiers of a typical .<strong>NET</strong> Web<br />
application.<br />
The goal of the chapter is to:<br />
● Provide a frame of reference for typical .<strong>NET</strong> Web applications.<br />
● Identify the authentication, authorization, and secure communication security<br />
features provided by the various implementation technologies used to build<br />
.<strong>NET</strong> Web applications.<br />
● Identify gatekeepers and gates that can be used in your application to enforce<br />
trust boundaries.<br />
.<strong>NET</strong> Web <strong>Applications</strong><br />
This section provides a brief introduction to .<strong>NET</strong> Web applications and describes<br />
their characteristics both from a logical and physical viewpoint. It also provides an<br />
introduction to the various implementation technologies used to build .<strong>NET</strong> Web<br />
applications.<br />
Logical Tiers<br />
Logical application architecture views any system as a set of cooperating services<br />
grouped in the following layers:<br />
● User Services<br />
● Business Services<br />
● Data Services
10<br />
<strong>Building</strong> <strong>Secure</strong> <strong>ASP</strong>.<strong>NET</strong> <strong>Applications</strong><br />
The value of this logical architecture view is to identify the generic types of services<br />
invariably present in any system, to ensure proper segmentation, and to drive the<br />
definition of interfaces between tiers. This segmentation allows you to make more<br />
discreet architecture and design choices when implementing each layer, and to<br />
build a more maintainable application.<br />
The layers can be described as follows:<br />
● User Services are responsible for the client interaction with the system and<br />
provide a common bridge into the core business logic encapsulated by components<br />
within the Business Services layer. Traditionally, User Services are associated<br />
most often with interactive users. However, they also perform the initial<br />
processing of programmatic requests from other systems, where no visible user<br />
interface is involved. Authentication and authorization, the precise nature of<br />
which varies depending upon the client type, are typically performed within the<br />
User Services layer.<br />
● Business Services provide the core functionality of the system and encapsulate<br />
business logic. They are independent from the delivery channel and back-end<br />
systems or data sources. This provides the stability and flexibility necessary to<br />
evolve the system to support new and different channels and back-end systems.<br />
Typically, to service a particular business request involves a number of cooperating<br />
components within the Business Services layer.<br />
● Data Services provide access to data (hosted within the boundaries of the system),<br />
and to other (back-end) systems through generic interfaces, which are<br />
convenient to use from components within the Business Services layer. Data<br />
Services abstract the multitude of back-end systems and data sources, and<br />
encapsulate specific access rules and data formats.<br />
The logical classification of service types within a system may correlate with, but is<br />
relatively independent from, the possible physical distribution of the components<br />
implementing the services.<br />
It is also important to remember that the logical tiers can be identified at any level<br />
of aggregation; that is, the tiers can be identified for the system as a whole (in the<br />
context of its environment and external interactions) and for any contained subsystem.<br />
For example, each remote node that hosts a Web service consists of User<br />
Services (handling incoming requests and messages), Business Services, and Data<br />
Services.<br />
Physical Deployment Models<br />
The three logical service layers described earlier, in no way imply specific numbers<br />
of physical tiers. All three logical services may be physically located on the same<br />
computer, or they may be spread across multiple computers.
Chapter 2: Security Model for <strong>ASP</strong>.<strong>NET</strong> <strong>Applications</strong> 11<br />
The Web Server as an Application Server<br />
A common deployment pattern for .<strong>NET</strong> Web applications is to locate business and<br />
data access components on the Web server. This minimizes the network hops, which<br />
can help performance. This model is shown in Figure 2.1.<br />
Web Server<br />
Database Server<br />
UI<br />
<strong>ASP</strong>.<strong>NET</strong><br />
Component Services<br />
Enterprise Services<br />
Communication<br />
Web Services<br />
Remoting<br />
Data Access<br />
ADO.<strong>NET</strong><br />
SQL<br />
Server<br />
Figure 2.1<br />
The Web server as an application server<br />
Remote Application Tier<br />
The remote application tier is a common deployment pattern, particularly for<br />
Internet scenarios where the Web tier is self-contained within a perimeter network<br />
(also known as DMZ, demilitarized zone, and screened subnet) and is separated<br />
from end users and the remote application tier with packet filtering firewalls. The<br />
remote application tier is shown in Figure 2.2.<br />
Web Server<br />
Application Server<br />
Database Server<br />
UI<br />
<strong>ASP</strong>.<strong>NET</strong><br />
Component Services<br />
Enterprise Services<br />
Communication<br />
Web Services<br />
Remoting<br />
Data Access<br />
ADO.<strong>NET</strong><br />
SQL<br />
Server<br />
Figure 2.2<br />
The introduction of a remote application tier
12<br />
<strong>Building</strong> <strong>Secure</strong> <strong>ASP</strong>.<strong>NET</strong> <strong>Applications</strong><br />
Implementation Technologies<br />
.<strong>NET</strong> Web applications typically implement one or more of the logical services by<br />
using the following technologies:<br />
● <strong>ASP</strong>.<strong>NET</strong><br />
● Enterprise Services<br />
● Web Services<br />
● .<strong>NET</strong> Remoting<br />
● ADO.<strong>NET</strong> and Microsoft® SQL Server 2000<br />
●<br />
●<br />
Internet Protocol Security (IPSec)<br />
<strong>Secure</strong> Sockets Layer (SSL)<br />
<strong>ASP</strong>.<strong>NET</strong><br />
<strong>ASP</strong>.<strong>NET</strong> is typically used to implement User Services. <strong>ASP</strong>.<strong>NET</strong> provides a<br />
pluggable architecture that can be used to build Web pages. For more information<br />
about <strong>ASP</strong>.<strong>NET</strong>, see the following resources:<br />
● Chapter 8, “<strong>ASP</strong>.<strong>NET</strong> Security”<br />
●<br />
“<strong>ASP</strong>.<strong>NET</strong>” in the “Reference Hub” section of this guide<br />
Enterprise Services<br />
Enterprise Services provide infrastructure-level services to applications. These<br />
include distributed transactions and resource management services such as object<br />
pooling for .<strong>NET</strong> components. For more information about Enterprise Services, see<br />
the following resources:<br />
● Chapter 9, “Enterprise Services Security”<br />
●<br />
●<br />
“Understanding Enterprise Services (COM+) in .<strong>NET</strong>” on MSDN<br />
“Enterprise Services” in the “Reference Hub” section of this guide<br />
Web Services<br />
Web Services enable the exchange of data and the remote invocation of application<br />
logic using SOAP-based message exchanges to move data through firewalls and<br />
between heterogeneous systems. For more information about Web Services, see the<br />
following resources:<br />
● Chapter 10, “Web Services Security”<br />
●<br />
●<br />
“XML Web Services Development Center” on MSDN<br />
“Web Services” in the “Reference Hub” section of this guide
Chapter 2: Security Model for <strong>ASP</strong>.<strong>NET</strong> <strong>Applications</strong> 13<br />
.<strong>NET</strong> Remoting<br />
.<strong>NET</strong> Remoting provides a framework for accessing distributed objects across<br />
process and machine boundaries. For more information about .<strong>NET</strong> Remoting, see<br />
the following resources:<br />
● Chapter 11, “.<strong>NET</strong> Remoting Security”<br />
●<br />
“.<strong>NET</strong> Remoting” in the “Reference Hub” section of this guide<br />
ADO.<strong>NET</strong> and SQL Server 2000<br />
ADO.<strong>NET</strong> provides data access services. It is designed from the ground up for<br />
distributed Web applications, and it has rich support for the disconnected scenarios<br />
inherently associated with Web applications. For more information about<br />
ADO.<strong>NET</strong>, see the following resources:<br />
● Chapter 12, “Data Access Security”<br />
● “ADO.<strong>NET</strong>” in the “Reference Hub” section of this guide<br />
SQL Server provides integrated security that uses the operating system authentication<br />
mechanisms (Kerberos or NTLM). Authorization is provided by logons and<br />
granular permissions that can be applied to individual database objects. For more<br />
information about SQL Server 2000, see the following resources:<br />
● Chapter 13, “Data Access Security”<br />
Internet Protocol Security (IPSec)<br />
IPSec provides point-to-point, transport level encryption and authentication services.<br />
For more information about IPSec, see the following resources:<br />
● Chapter 4, “<strong>Secure</strong> Communication”<br />
●<br />
IPSec – The New Security Standard for the Internet, Intranets and Virtual Private<br />
Networks by Naganand Doraswamy and Dan Harkins (Prentice Hall PTR, ISBN;<br />
ISBN: 0-13-011898-2); Chapter 4 is available on TechNet<br />
<strong>Secure</strong> Sockets Layer (SSL)<br />
SSL provides a point-to-point secure communication channel. Data sent over the<br />
channel is encrypted. For more information about SSL, see the following resources:<br />
● Chapter 4, “<strong>Secure</strong> Communication”<br />
● Microsoft® Windows® 2000 and IIS 5.0 Administrator’s Pocket Consultant (Microsoft<br />
Press, ISBN: 0-7356-1024-X); Chapter 6 is available on TechNet
14<br />
<strong>Building</strong> <strong>Secure</strong> <strong>ASP</strong>.<strong>NET</strong> <strong>Applications</strong><br />
Security Architecture<br />
Figure 2.3 shows the remote application tier model together with the set of security<br />
services provided by the various technologies introduced earlier. Authentication<br />
and authorization occurs at many individual points throughout the tiers. These<br />
services are provided primarily by Internet Information Services (IIS), <strong>ASP</strong>.<strong>NET</strong>,<br />
Enterprise Services, and SQL Server. <strong>Secure</strong> communication channels are also<br />
applied throughout the tiers and stretch from the client browser or device, right<br />
through to the database. Channels are secured with a combination of <strong>Secure</strong> Sockets<br />
Layer (SSL) or IPSec.<br />
IIS<br />
Anonymous<br />
Basic<br />
Digest<br />
Integrated Windows<br />
Certificate<br />
Authentication<br />
Windows<br />
Forms, Passport, None (Custom)<br />
Authorization<br />
Web Permissions,<br />
NTFS Permissions, URL authz,<br />
File authz, Principal permissions,<br />
.<strong>NET</strong> Roles<br />
Authentication<br />
Windows. SQL<br />
Authorization<br />
Logins,<br />
Permissions,<br />
Roles<br />
Clients<br />
IIS/<strong>ASP</strong>.<strong>NET</strong><br />
Web<br />
Application<br />
IIS/<strong>ASP</strong>.<strong>NET</strong><br />
Web Services<br />
IIS/<strong>ASP</strong>.<strong>NET</strong><br />
Remoting<br />
SQL<br />
Server<br />
Web Server<br />
Enterprise Services<br />
Database<br />
Server<br />
RPC<br />
None<br />
Connect<br />
Cal<br />
Packet<br />
Integrity<br />
Privacy<br />
Authentication<br />
RPC<br />
Authorization<br />
ES (COM+) Roles<br />
NTFS Permissions<br />
<strong>Secure</strong> Communication (SSL / IPSec)<br />
Figure 2.3<br />
Security architecture<br />
Security Across the Tiers<br />
The authentication, authorization, and secure communication features provided by<br />
the technologies discussed earlier are summarized in Table 2.1.
Chapter 2: Security Model for <strong>ASP</strong>.<strong>NET</strong> <strong>Applications</strong> 15<br />
Table 2.1: Security features<br />
Technology Authentication Authorization <strong>Secure</strong><br />
Communication<br />
IIS Anonymous IP/DNS Address SSL<br />
Basic<br />
Restrictions<br />
Digest<br />
Web Permissions<br />
Windows Integrated NTFS Permissions;<br />
(Kerberos/NTLM)<br />
Certificate<br />
Windows Access<br />
Control Lists (ACLs)<br />
on requested files<br />
<strong>ASP</strong>.<strong>NET</strong> None (Custom) File Authorization<br />
Windows<br />
URL Authorization<br />
Forms<br />
Principal Permissions<br />
Passport<br />
.<strong>NET</strong> Roles<br />
Web Services Windows File Authorization SSL and Message<br />
None (Custom) URL Authorization level encryption<br />
Message level Principal Permissions<br />
authentication .<strong>NET</strong> Roles<br />
Remoting Windows File Authorization SSL and message<br />
URL Authorization level encryption<br />
Principal Permissions<br />
.<strong>NET</strong> Roles<br />
Enterprise Windows Enterprise Services Remote Procedure<br />
Services (COM+) Roles Call (RPC)<br />
NTFS Permissions Encryption<br />
SQL Server Windows Server logins SSL<br />
2000 (Kerberos/NTLM) Database logins<br />
SQL authentication Fixed database roles<br />
User defined roles<br />
Application roles<br />
Object permissions<br />
Windows 2000 Kerberos Windows ACLs IPSec<br />
NTLM<br />
Authentication<br />
The .<strong>NET</strong> Framework on Windows 2000 provides the following authentication<br />
options:<br />
● <strong>ASP</strong>.<strong>NET</strong> Authentication Modes<br />
● Enterprise Services Authentication<br />
● SQL Server Authentication
16<br />
<strong>Building</strong> <strong>Secure</strong> <strong>ASP</strong>.<strong>NET</strong> <strong>Applications</strong><br />
<strong>ASP</strong>.<strong>NET</strong> Authentication Modes<br />
<strong>ASP</strong>.<strong>NET</strong> authentication modes include Windows, Forms, Passport, and None.<br />
●<br />
Windows authentication. With this authentication mode, <strong>ASP</strong>.<strong>NET</strong> relies on IIS<br />
to authenticate users and create a Windows access token to represent the authenticated<br />
identity. IIS provides the following authentication mechanisms:<br />
● Basic authentication. Basic authentication requires the user to supply credentials<br />
in the form of a user name and password to prove their identity. It is a<br />
proposed Internet standard based on RFC 2617. Both Netscape Navigator and<br />
Microsoft Internet Explorer support Basic authentication. The user’s credentials<br />
are transmitted from the browser to the Web server in an unencrypted<br />
Base64 encoded format. Because the Web server obtains the user’s credentials<br />
unencrypted, the Web server can issue remote calls (for example, to access<br />
remote computers and resources) using the user’s credentials.<br />
Note: Basic authentication should only be used in conjunction with a secure channel<br />
(typically established by using SSL). Otherwise, user names and passwords can be<br />
easily stolen with network monitoring software. If you use Basic authentication you<br />
should use SSL on all pages (not just a logon page), because credentials are passed on<br />
all subsequent requests. For more information about using Basic authentication with<br />
SSL, see Chapter 8, “<strong>ASP</strong>.<strong>NET</strong> Security.”<br />
●<br />
●<br />
●<br />
Digest authentication. Digest authentication, introduced with IIS 5.0, is<br />
similar to Basic authentication except that instead of transmitting the user’s<br />
credentials unencrypted from the browser to the Web server, it transmits a<br />
hash of the credentials. As a result it is more secure, although it requires an<br />
Internet Explorer 5.0 or later client and specific server configuration.<br />
Integrated Windows authentication. Integrated Windows Authentication<br />
(Kerberos or NTLM depending upon the client and server configuration) uses<br />
a cryptographic exchange with the user’s Internet Explorer Web browser to<br />
confirm the identity of the user. It is supported only by Internet Explorer (and<br />
not by Netscape Navigator), and as a result tends to be used only in intranet<br />
scenarios, where the client software can be controlled. It is used only by the<br />
Web server if either anonymous access is disabled or if anonymous access is<br />
denied through Windows file system permissions.<br />
Certificate authentication. Certificate authentication uses client certificates to<br />
positively identify users. The client certificate is passed by the user’s browser<br />
(or client application) to the Web server. (In the case of Web services, the Web<br />
services client passes the certificate by means of the ClientCertificates property<br />
of the HttpWebRequest object). The Web server then extracts the user’s<br />
identity from the certificate. This approach relies on a client certificate being<br />
installed on the user’s computer and as a result tends to be used mostly in<br />
intranet or extranet scenarios where the user population is well known and<br />
controlled. IIS, upon receipt of a client certificate, can map the certificate to<br />
a Windows account.
Chapter 2: Security Model for <strong>ASP</strong>.<strong>NET</strong> <strong>Applications</strong> 17<br />
●<br />
●<br />
● Anonymous authentication. If you do not need to authenticate your clients<br />
(or you implement a custom authentication scheme), IIS can be configured for<br />
Anonymous authentication. In this event, the Web server creates a Windows<br />
access token to represent all anonymous users with the same anonymous (or<br />
guest) account. The default anonymous account is IUSR_MACHINENAME,<br />
where MACHINENAME is the NetBIOS name of your computer specified at<br />
install time.<br />
Passport authentication. With this authentication mode, <strong>ASP</strong>.<strong>NET</strong> uses the<br />
centralized authentication services of Microsoft Passport. <strong>ASP</strong>.<strong>NET</strong> provides a<br />
convenient wrapper around functionality exposed by the Microsoft Passport<br />
Software Development Kit (SDK), which must be installed on the Web server.<br />
Forms authentication. This approach uses client-side redirection to forward<br />
unauthenticated users to a specified HTML form that allows them to enter their<br />
credentials (typically user name and password). These credentials are then<br />
validated and an authentication ticket is generated and returned to the client.<br />
The authentication ticket maintains the user identity and optionally a list of roles<br />
that the user is a member of for the duration of the user’s session.<br />
Forms authentication is sometimes used solely for Web site personalization. In<br />
this case, you need write little custom code because <strong>ASP</strong>.<strong>NET</strong> handles much of<br />
the process automatically with simple configuration. For personalization scenarios,<br />
the cookie needs to hold only the user name.<br />
Note: Forms authentication sends the user name and password to the Web server in plain<br />
text. As a result, you should use Forms authentication in conjunction with a channel<br />
secured by SSL. For continued protection of the authentication cookie transmitted on<br />
subsequent requests, you should consider using SSL for all pages within your application<br />
and not just the logon page.<br />
●<br />
None. None indicates that you either don’t want to authenticate users or that<br />
you are using a custom authentication protocol.<br />
More Information<br />
For more details about <strong>ASP</strong>.<strong>NET</strong> authentication, see Chapter 8, “<strong>ASP</strong>.<strong>NET</strong> Security.”<br />
Enterprise Services Authentication<br />
Enterprises services authentication is performed by using the underlying Remote<br />
Procedure Call (RPC) transport infrastructure, which in turn uses the operating<br />
system Security Service Provider Interface (SSPI). Clients of Enterprise Services<br />
applications may be authenticated using Kerberos or NTLM authentication.<br />
A serviced component can be hosted in a Library application or Server application.<br />
Library applications are hosted within client processes and as a result assume the<br />
client’s identity. Server applications run in separate server processes under their<br />
own identity. For more information about identity, see the “Identities and Principals”<br />
section later in this chapter.
18<br />
<strong>Building</strong> <strong>Secure</strong> <strong>ASP</strong>.<strong>NET</strong> <strong>Applications</strong><br />
The incoming calls to a serviced component can be authenticated at the following<br />
levels:<br />
● Default: The default authentication level for the security package is used.<br />
●<br />
●<br />
●<br />
●<br />
●<br />
●<br />
None: No authentication occurs.<br />
Connect: Authentication occurs only when the connection is made.<br />
Call: Authenticates at the start of each remote procedure call.<br />
Packet: Authenticates and verifies that all call data is received.<br />
Packet Integrity: Authenticates and verifies that none of the data has been<br />
modified in transit.<br />
Packet Privacy: Authenticates and encrypts the packet, including the data and<br />
the sender’s identity and signature.<br />
More Information<br />
For more information about Enterprise Services authentication, see Chapter 9,<br />
“Enterprise Services Security.”<br />
SQL Server Authentication<br />
SQL Server can authenticate users by using Windows authentication (NTLM or<br />
Kerberos) or can use its own built-in authentication scheme referred to as SQL<br />
authentication. The following two options are available:<br />
● SQL Server and Windows. Clients can connect to an instance of Microsoft SQL<br />
Server by using either SQL Server authentication or Windows authentication.<br />
This is sometimes referred to as mixed mode authentication.<br />
● Windows Only. The user must connect to the instance of Microsoft SQL Server<br />
by using Windows authentication.<br />
More Information<br />
The relative merits of each approach are discussed in Chapter 12, “Data Access<br />
Security.”<br />
Authorization<br />
The .<strong>NET</strong> Framework on Windows 2000 provides of the following authorization<br />
options:<br />
● <strong>ASP</strong>.<strong>NET</strong> Authorization Options<br />
● Enterprise Services Authorization<br />
● SQL Server Authorization<br />
<strong>ASP</strong>.<strong>NET</strong> Authorization Options<br />
<strong>ASP</strong>.<strong>NET</strong> authorization options can be used by <strong>ASP</strong>.<strong>NET</strong> Web applications, Web<br />
services and remote components. <strong>ASP</strong>.<strong>NET</strong> provides the following authorization<br />
options:
Chapter 2: Security Model for <strong>ASP</strong>.<strong>NET</strong> <strong>Applications</strong> 19<br />
●<br />
●<br />
●<br />
●<br />
URL Authorization. This is an authorization mechanism, configured by settings<br />
within machine and application configuration files. URL Authorization allows<br />
you to restrict access to specific files and folders within your application’s<br />
Uniform Resource Identifier (URI) namespace. For example, you can selectively<br />
deny or allow access to specific files or folders (addressed by means of a URL) to<br />
nominated users. You can also restrict access based on the user’s role membership<br />
and the type of HTTP verb used to issue a request (GET, POST, and so on).<br />
URL Authorization requires an authenticated identity. This can be obtained by a<br />
Windows or ticket-based authentication scheme.<br />
File Authorization. File authorization applies only if you use one of the IISsupplied<br />
Windows authentication mechanisms to authenticate callers and<br />
<strong>ASP</strong>.<strong>NET</strong> is configured for Windows authentication.<br />
You can use it to restrict access to specified files on a Web server. Access permissions<br />
are determined by Windows ACLs attached to the files.<br />
Principal Permission Demands. Principal permission demands can be used<br />
(declaratively or programmatically) as an additional fine-grained access control<br />
mechanism. They allow you to control access to classes, methods, or individual<br />
code blocks based on the identity and group membership of individual users.<br />
.<strong>NET</strong> Roles. .<strong>NET</strong> roles are used to group together users who have the same<br />
permissions within your application. They are conceptually similar to previous<br />
role-based implementations, for example Windows groups and COM+ roles.<br />
However, unlike these earlier approaches, .<strong>NET</strong> roles do not require authenticated<br />
Windows identities and can be used with ticket-based authentication<br />
schemes such as Forms authentication.<br />
.<strong>NET</strong> roles can be used to control access to resources and operations and they can<br />
be configured both declaratively and programmatically.<br />
More Information<br />
For more information about <strong>ASP</strong>.<strong>NET</strong> authorization, see Chapter 8, “<strong>ASP</strong>.<strong>NET</strong><br />
Security.”<br />
Enterprise Services Authorization<br />
Access to functionality contained in serviced components within Enterprise Services<br />
applications is governed by Enterprise Services role membership. These are different<br />
from .<strong>NET</strong> roles and can contain Windows group or user accounts. Role membership<br />
is defined within the COM+ catalog and is administered by using the<br />
Component Services tool.<br />
More Information<br />
For more information about Enterprise Services authorization, see Chapter 9,<br />
“Enterprise Services Security.”
20<br />
<strong>Building</strong> <strong>Secure</strong> <strong>ASP</strong>.<strong>NET</strong> <strong>Applications</strong><br />
SQL Server Authorization<br />
SQL Server allows fine-grained permissions that can be applied to individual<br />
database objects. Permissions may be based on role membership (SQL Server<br />
provides fixed database roles, user defined roles, and application roles), or<br />
permission may be granted to individual Windows user or group accounts.<br />
More Information<br />
For more information about SQL Server authorization, see Chapter 12, “Data Access<br />
Security.”<br />
Gatekeepers and Gates<br />
Throughout the remainder of this document, the term gatekeeper is used to identify<br />
the technology that is responsible for a gate. A gate represents an access control<br />
point (guarding a resource) within an application. For example, a resource might be<br />
an operation (represented by a method on an object) or a database or file system<br />
resource.<br />
Each of the core technologies listed earlier provide gatekeepers for access authorization.<br />
Requests must pass through a series of gates before being allowed to access the<br />
requested resource or operation. The following describes the gates the requests<br />
must pass through:<br />
● IIS provides a gate when you authenticate users (that is, you disable Anonymous<br />
authentication). IIS Web permissions can be used as an access control mechanism<br />
to restrict the capabilities of Web users to access specific files and folders. Unlike<br />
NTFS file permissions, Web permissions apply to all Web users, as opposed to<br />
individual users or groups. NTFS file permissions provide further restrictions on<br />
Web resources such as Web pages, images files, and so on. These restrictions<br />
apply to individual users or groups.<br />
IIS checks Web permissions, followed by NTFS file permissions. A user must<br />
be authorized by both mechanisms for them to be able to access the file or folder.<br />
A failed Web permission check results in IIS returning an HTTP 403 – Access<br />
Forbidden response, whereas a failed NTFS permission check results in IIS<br />
returning an HTTP 401 – Access Denied.<br />
●<br />
●<br />
●<br />
●<br />
<strong>ASP</strong>.<strong>NET</strong> provides various configurable and programmatic gates. These include<br />
URL Authorization, File Authorization, Principal Permission demands, and .<strong>NET</strong><br />
Roles.<br />
The Enterprise Services gatekeeper uses Enterprise Services roles to authorize<br />
access to business functionality.<br />
SQL Server 2000 includes a series of gates that include server logins, database<br />
logins, and database object permissions.<br />
Windows 2000 provides gates using ACLs attached to secure resources.
Chapter 2: Security Model for <strong>ASP</strong>.<strong>NET</strong> <strong>Applications</strong> 21<br />
The bottom line is that gatekeepers perform authorization based on the identity of<br />
the user or service calling into the gate and attempting to access a specific resource.<br />
The value of multiple gates is in-depth security with multiple lines of defense. Table<br />
2.2 summaries the set of gatekeepers and identifies for each one the gates that they<br />
are responsible for.<br />
Table 2.2: Gatekeepers responsibilities and the gates they provide<br />
Gatekeeper<br />
Windows Operating<br />
System<br />
IIS<br />
<strong>ASP</strong>.<strong>NET</strong><br />
Enterprise Services<br />
Web Services<br />
Remoting<br />
ADO.<strong>NET</strong><br />
SQL Server<br />
Gates<br />
Logon rights (positive and negative, for example “Deny logon<br />
locally”)<br />
Other privileges (for example “Act as part of the operating system”)<br />
Access checks against secured resources such as the registry and file<br />
system. Access checks use ACLs attached to the secure resources,<br />
which specify who is and who is not allowed to access the resource<br />
and also the types of operation that may be permitted.<br />
TCP/IP filtering<br />
IP Security<br />
Authentication (Anonymous, Basic, Digest, Integrated, Certificate)<br />
IP address and domain name restrictions (these can be used as an<br />
additional line of defense, but should not be relied upon due to the<br />
relative ease of spoofing IP addresses).<br />
Web permissions<br />
NTFS permissions<br />
URL Authorization<br />
File Authorization<br />
Principal Permission Demands<br />
.<strong>NET</strong> Roles<br />
Windows (NTLM / Kerberos) authentication<br />
Enterprise Services (COM+) roles<br />
Impersonation levels<br />
Uses gates provided by IIS and <strong>ASP</strong>.<strong>NET</strong><br />
Uses gates provided by the host. If hosted in <strong>ASP</strong>.<strong>NET</strong> it uses the<br />
gates provided by IIS and <strong>ASP</strong>.<strong>NET</strong>. If hosted in a Windows service,<br />
then you must develop a custom solution.<br />
Connection strings. Credentials may be explicit or you may use<br />
Windows authentication (for example, if you connect to SQL Server)<br />
Server logins<br />
Database logins<br />
Database object permissions<br />
By using the various gates throughout the tiers of your application, you can filter<br />
out users that should be allowed access to your back-end resources. The scope of<br />
access is narrowed by successive gates which become more and more granular as<br />
the request proceeds through the application to the back-end resources.
22<br />
<strong>Building</strong> <strong>Secure</strong> <strong>ASP</strong>.<strong>NET</strong> <strong>Applications</strong><br />
Consider the Internet-based application example using IIS that is shown in Figure 2.4.<br />
Anonymous<br />
Access Disabled<br />
Role Membership<br />
Demands<br />
Internet User<br />
Population<br />
IIS<br />
URL<br />
AuthZ<br />
File<br />
AuthZ<br />
Imperative<br />
Principal<br />
Permission<br />
Demands<br />
G G G G<br />
<strong>ASP</strong>.<strong>NET</strong><br />
G<br />
10,000<br />
Users<br />
= Gatekeeper<br />
1,000<br />
Users<br />
100<br />
Users<br />
10<br />
Users<br />
Figure 2.4<br />
Filtering users with gatekeepers<br />
Figure 2.4 illustrates the following:<br />
● You can disable Anonymous authentication in IIS. As a result, only accounts that<br />
IIS is able to authenticate are allowed access. This might reduce the potential<br />
number of users to 10,000.<br />
● Next, in <strong>ASP</strong>.<strong>NET</strong> you use URL Authorization which might reduce the user count<br />
to 1,000 users.<br />
● File authorization might further narrow access down to 100 users.<br />
● Finally, your Web application code might allow only 10 users to access your<br />
restricted resource, based on specific role membership.<br />
Identities and Principals<br />
.<strong>NET</strong> security is layered on top of Windows security. The user centric concept of<br />
Windows security is based on security context provided by a logon session while<br />
.<strong>NET</strong> security is based on IPrincipal and IIdentity objects.<br />
In Windows programming when you want to know the security context code is<br />
running under, the identity of the process owner or currently executing thread is<br />
consulted. With .<strong>NET</strong> programming, if you want to query the security context of<br />
the current user, you retrieve the current IPrincipal object from<br />
Thread.CurrentPrincipal.
Chapter 2: Security Model for <strong>ASP</strong>.<strong>NET</strong> <strong>Applications</strong> 23<br />
The .<strong>NET</strong> Framework uses identity and principal objects to represent users when<br />
.<strong>NET</strong> code is running and together they provide the backbone of .<strong>NET</strong> role-based<br />
authorization.<br />
Identity and principal objects must implement the IIdentity and IPrincipal interfaces<br />
respectively. These interfaces are defined within the System.Security.Principal<br />
namespace. Common interfaces allow the .<strong>NET</strong> Framework to treat identity and<br />
principal objects in a polymorphic fashion, regardless of the underlying implementation<br />
details.<br />
The IPrincipal interface allows you to test role membership through an IsInRole<br />
method and also provides access to an associated IIdentity object.<br />
public interface IPrincipal<br />
{<br />
bool IsInRole( string role );<br />
IIdentity Identity {get;}<br />
}<br />
The IIdentity interface provides additional authentication details such as the name<br />
and authentication type.<br />
public interface IIdentity<br />
{<br />
string authenticationType {get;}<br />
bool IsAuthenticated {get;}<br />
string Name {get;}<br />
}<br />
The .<strong>NET</strong> Framework supplies a number of concrete implementations of IPrincipal<br />
and IIdentity as shown in Figure 2.5 and described in the following sections.<br />
IPrincipal<br />
GenericPrincipal<br />
WindowsPrincipal<br />
Custom<br />
IIdentity<br />
GenericIdentity<br />
WindowsIdentity<br />
Custom<br />
PassportIdentity<br />
FormsIdentity<br />
Figure 2.5<br />
IPrincipal and IIdentity implementation classes
24<br />
<strong>Building</strong> <strong>Secure</strong> <strong>ASP</strong>.<strong>NET</strong> <strong>Applications</strong><br />
WindowsPrincipal and WindowsIdentity<br />
The .<strong>NET</strong> version of a Windows security context is divided between two classes:<br />
●<br />
●<br />
WindowsPrincipal. This class stores the roles associated with the current Windows<br />
user. The WindowsPrincipal implementation treats Windows groups as<br />
roles. The IPrncipal.IsInRole method returns true or false based on the user’s<br />
Windows group membership.<br />
WindowsIdentity. This class holds the identity part of the current user’s security<br />
context and can be obtained from the static WindowsIdentity.GetCurrent()<br />
method. This returns a WindowsIdentity object that has a Token property that<br />
returns an IntPtr that represents a Windows handle to the access token associated<br />
with the current execution thread. This token can then be passed to native<br />
Win32® application programming interface (API) functions such as<br />
GetTokenInformation, SetTokenInformation, CheckTokenMembership and so<br />
on, to retrieve security information about the token.<br />
Note: The static WindowsIdentity.GetCurrent() method returns the identity of the currently<br />
executing thread, which may or may not be impersonating. This is similar to the Win32<br />
GetUserName API.<br />
GenericPrincipal and Associated Identity Objects<br />
These implementations are very simple and are used by applications that do not use<br />
Windows authentication and where the application does not need complex representations<br />
of a principal. They can be created in code very easily and as a result a<br />
certain degree of trust must exist when an application deals with a<br />
GenericPrincipal.<br />
If you are relying upon using the IsInRole method on the GenericPrincipal in<br />
order to make authorization decisions, you must trust the application that sends<br />
you the GenericPrincipal. This is in contrast to using WindowsPrincipal objects,<br />
where you must trust the operating system to provide a valid WindowsPrincipal<br />
object with an authenticated identity and valid group/role names.<br />
The following types of identity object can be associated with the GenericPrincipal<br />
class:<br />
● FormsIdentity. This class represents an identity that has been authenticated with<br />
Forms authentication. It contains a FormsAuthenticationTicket which contains<br />
information about the user’s authentication session.<br />
●<br />
●<br />
PassportIdentity. This class represents an identity that has been authenticated<br />
with Passport authentication and contains Passport profile information.<br />
GenericIdentity. This class represents a logical user that is not tied to any particular<br />
operating system technology and is typically used in association with<br />
custom authentication and authorization mechanisms.
Chapter 2: Security Model for <strong>ASP</strong>.<strong>NET</strong> <strong>Applications</strong> 25<br />
<strong>ASP</strong>.<strong>NET</strong> and HttpContext.User<br />
Typically, Thread.CurrentPrincipal is checked in .<strong>NET</strong> code before any authorization<br />
decisions are made. <strong>ASP</strong>.<strong>NET</strong>, however, provides the authenticated user’s<br />
security context using HttpContext.User.<br />
This property accepts and returns an IPrincipal interface. The property contains an<br />
authenticated user for the current request. <strong>ASP</strong>.<strong>NET</strong> retrieves HttpContext.User<br />
when it makes authorization decisions.<br />
When you use Windows authentication, the Windows authentication<br />
module automatically constructs a WindowsPrincipal object and stores it in<br />
HttpContext.User. If you use other authentication mechanisms such as Forms<br />
or Passport, you must construct a GenericPrincipal object and store it in<br />
HttpContext.User.<br />
<strong>ASP</strong>.<strong>NET</strong> Identities<br />
At any given time during the execution of an <strong>ASP</strong>.<strong>NET</strong> Web application, there may<br />
be multiple identities present during a single request. These identities include:<br />
● HttpContext.User returns an IPrincipal object that contains security information<br />
for the current Web request. This is the authenticated Web client.<br />
● WindowsIdentity.GetCurrent() returns the identity of the security context of<br />
the currently executing Win32 thread. By default, this identity is <strong>ASP</strong><strong>NET</strong>; the<br />
default account used to run <strong>ASP</strong>.<strong>NET</strong> Web applications. However, if the Web<br />
application has been configured for impersonation, the identity represents the<br />
authenticated user (which if IIS Anonymous authentication is in effect, is<br />
IUSR_MACHINE).<br />
● Thread.CurrentPrincipal returns the principal of the currently executing .<strong>NET</strong><br />
thread which rides on top of the Win32 thread.<br />
More Information<br />
● For a detailed analysis of <strong>ASP</strong>.<strong>NET</strong> identity for a combination of Web application<br />
configurations (both with and without impersonation), see “<strong>ASP</strong>.<strong>NET</strong> Identity<br />
Matrix” within the “Reference” section of this guide.<br />
●<br />
For more information about creating your own IPrincipal implementation, see<br />
Chapter 8, “<strong>ASP</strong>.<strong>NET</strong> Security,” and “How to implement IPrincipal” in the<br />
“Reference” section of this guide.<br />
Remoting and Web Services<br />
In the current version of the .<strong>NET</strong> Framework, Remoting and Web services do not<br />
have their own security model. They both inherit the security feature of IIS and<br />
<strong>ASP</strong>.<strong>NET</strong>.
26<br />
<strong>Building</strong> <strong>Secure</strong> <strong>ASP</strong>.<strong>NET</strong> <strong>Applications</strong><br />
Although there is no security built into the remoting architecture, it was designed<br />
with security in mind. It is left up to the developer and/or administrator to incorporate<br />
certain levels of security in remoting applications. Whether or not principal<br />
objects are passed across remoting boundaries depends on the location of the client<br />
and remote object, for example:<br />
● Remoting within the same process. When remoting is used between objects in<br />
the same or separate application domain(s), the remoting infrastructure copies a<br />
reference to the IPrincipal object associated with the caller’s context to the<br />
receiver’s context.<br />
●<br />
Remoting across processes. In this case, IPrincipal objects are not transmitted<br />
between processes. The credentials used to construct the original IPrincipal must<br />
be transmitted to the remote process, which may be located on a separate computer.<br />
This allows the remote computer to construct an appropriate IPrincipal<br />
object based on the supplied credentials.<br />
Summary<br />
This chapter has introduced the full set of authentication and authorization options<br />
provided by the various .<strong>NET</strong> related technologies. By using multiple gatekeepers<br />
throughout your .<strong>NET</strong> Web application, you will be able to implement a defense-indepth<br />
security strategy. To summarize:<br />
● <strong>ASP</strong>.<strong>NET</strong> applications can use the existing security features provided by Windows<br />
and IIS.<br />
● A combination of SSL and IPSec can be used to provide secure communications<br />
across the layers of a .<strong>NET</strong> Web application; for example, from browser to database.<br />
● Use SSL to protect the clear text credentials passed across the network when you<br />
use Basic or Forms authentication.<br />
● .<strong>NET</strong> represents users who have been identified with Windows authentication<br />
using a combination of the WindowsPrincipal and WindowsIdentity classes.<br />
●<br />
●<br />
●<br />
The GenericPrincipal and GenericIdentity or FormsIdentity classes are used to<br />
represent users who have been identified with non-Windows authentication<br />
schemes, such as Forms authentication.<br />
You can create your own principal and identity implementations by creating<br />
classes that implement IPrincipal and IIdentity.<br />
Within <strong>ASP</strong>.<strong>NET</strong> Web applications, the IPrincipal object that represents the<br />
authenticated user is associated with the current HTTP Web request using the<br />
HttpContext.User property.
Chapter 2: Security Model for <strong>ASP</strong>.<strong>NET</strong> <strong>Applications</strong> 27<br />
●<br />
●<br />
Gates are access control points within your application through which authorized<br />
users can access resources or services. Gatekeepers are responsible for<br />
controlling access to gates.<br />
Use multiple gatekeepers to provide a defense-in-depth strategy.<br />
The next chapter, Chapter 3, “Authentication and Authorization,” provides additional<br />
information to help you choose the most appropriate authentication and<br />
authorization strategy for your particular application scenario.
3<br />
Authentication and Authorization<br />
Designing an authentication and authorization strategy for distributed Web applications<br />
is a challenging task. The good news is that proper authentication and<br />
authorization design during the early phases of your application development<br />
helps to mitigate many top security risks.<br />
This chapter will help you design an appropriate authorization strategy for your<br />
application and will also help answer the following key questions:<br />
● Where should I perform authorization and what mechanisms should I use?<br />
● What authentication mechanism should I use?<br />
● Should I use Active <strong>Directory</strong>® directory service for authentication or should I<br />
validate credentials against a custom data store?<br />
● What are the implications and design considerations for heterogeneous and<br />
homogenous platforms?<br />
● How should I represent users who do not use the Microsoft® Windows®<br />
operating system within my application?<br />
● How should I flow user identity throughout the tiers of my application? When<br />
should I use operating system level impersonation/delegation?<br />
When you consider authorization, you must also consider authentication. The two<br />
processes go hand in hand for two reasons:<br />
● First, any meaningful authorization policy requires authenticated users.<br />
● Second, the way in which you authenticate users (and specifically the way in<br />
which the authenticated user identity is represented within your application)<br />
determines the available gatekeepers at your disposal.<br />
Some gatekeepers such as <strong>ASP</strong>.<strong>NET</strong> file authorization, Enterprise Services<br />
(COM+) roles, and Windows ACLs, require an authenticated Windows identity<br />
(in the form of a WindowsIdentity object that encapsulates a Windows access<br />
token, which defines the caller’s security context). Other gatekeepers, such as
30<br />
<strong>Building</strong> <strong>Secure</strong> <strong>ASP</strong>.<strong>NET</strong> <strong>Applications</strong><br />
<strong>ASP</strong>.<strong>NET</strong> URL authorization and .<strong>NET</strong> roles, do not. They simply require an<br />
authenticated identity; one that is not necessarily represented by a Windows<br />
access token.<br />
Designing an Authentication and Authorization Strategy<br />
The following steps identify a process that will help you develop an authentication<br />
and authorization strategy for your application:<br />
1. Identify resources<br />
2. Choose an authorization strategy<br />
3. Choose the identities used for resource access<br />
4. Consider identity flow<br />
5. Choose an authentication approach<br />
6. Decide how to flow identity<br />
Identify Resources<br />
Identify resources that your application needs to expose to clients. Typical resources<br />
include:<br />
● Web Server resources such as Web pages, Web services, static resources (HTML<br />
pages and images).<br />
● Database resources such as per-user data or application-wide data.<br />
● Network resources such as remote file system resources and data from directory<br />
stores such as Active <strong>Directory</strong>.<br />
You must also identify the system resources that your application needs to access.<br />
This is in contrast to resources that are exposed to clients. Examples of system<br />
resources include the registry, event logs, and configuration files.<br />
Choose an Authorization Strategy<br />
The two basic authorization strategies are:<br />
● Role based. Access to operations (typically methods) is secured based on the role<br />
membership of the caller. Roles are used to partition your application’s user base<br />
into sets of users that share the same security privileges within the application;<br />
for example, Senior Managers, Managers and Employees .Users are mapped to<br />
roles and if the user is authorized to perform the requested operation, the application<br />
uses fixed identities with which to access resources. These identities are<br />
trusted by the respective resource managers (for example, databases, the file<br />
system, and so on).
Chapter 3: Authentication and Authorization 31<br />
●<br />
Resource based. Individual resources are secured using Windows ACLs. The<br />
application impersonates the caller prior to accessing resources, which allows<br />
the operating system to perform standard access checks. All resource access<br />
is performed using the original caller’s security context. This impersonation<br />
approach severely impacts application scalability, because it means that connection<br />
pooling cannot be used effectively within the application’s middle tier.<br />
In the vast majority of .<strong>NET</strong> Web applications where scalability is essential, a rolebased<br />
approach to authorization represents the best choice. For certain smaller scale<br />
intranet applications that serve per-user content from resources (such as files) that<br />
can be secured with Windows ACLs against individual users, a resource-based<br />
approach may be appropriate.<br />
The recommended and common pattern for role-based authorization is:<br />
● Authenticate users within your front-end Web application.<br />
● Map users to roles.<br />
● Authorize access to operations (not directly to resources) based on role membership.<br />
● Access the necessary back-end resources (required to support the requested and<br />
authorized operations) by using fixed service identities. The back-end resource<br />
managers (for example, databases) trust the application to authorize callers and<br />
are willing to grant permissions to the trusted service identity or identities.<br />
For example, a database administrator may grant access permissions exclusively<br />
to a specific HR application (but not to individual users).<br />
More Information<br />
● For more information about the two contrasting authorization approaches, see<br />
“Authorization Approaches” later in this chapter.<br />
●<br />
For more information about role-based authorization and the various types<br />
of roles that can be used, see “Role-Based Authorization” later in this chapter.<br />
Choose the Identities Used for Resource Access<br />
Answer the question, “who will access resources?”<br />
Choose the identity or identities that should be used to access resources across the<br />
layers of your application. This includes resources accessed from Web-based applications,<br />
and optionally Web services, Enterprise Services, and .<strong>NET</strong> Remoting<br />
components. In all cases, the identity used for resource access can be:<br />
● Original caller’s identity. This assumes an impersonation/delegation model in<br />
which the original caller identity can be obtained and then flowed through each<br />
layer of your system. The delegation factor is a key criteria used to determine<br />
your authentication mechanism.
32<br />
<strong>Building</strong> <strong>Secure</strong> <strong>ASP</strong>.<strong>NET</strong> <strong>Applications</strong><br />
●<br />
●<br />
●<br />
Process identity. This is the default case (without specific impersonation). Local<br />
resource access and downstream calls are made using the current process identity.<br />
The feasibility of this approach depends on the boundary being crossed,<br />
because the process identity must be recognized by the target system.<br />
This implies that calls are made in one of the following ways:<br />
● Within the same Windows security domain<br />
● Across Windows security domains (using trust and domain accounts, or<br />
duplicated user names and passwords where no trust relationship exists)<br />
Service account. This approach uses a (fixed) service account. For example:<br />
● For database access this might be a fixed SQL user name and password<br />
presented by the component connecting to the database.<br />
● When a fixed Windows identity is required, use an Enterprise Services server<br />
application.<br />
Custom identity. When you don’t have Windows accounts to work with, you can<br />
construct your own identities (using IPrincipal and IIdentity implementations)<br />
that can contain details that relate to your own specific security context. For<br />
example, these could include role lists, unique identifiers, or any other type of<br />
custom information.<br />
By implementing your custom identity with IPrincipal and IIdentity types and<br />
placing them in the current Web context (using HttpContext.User), you immediately<br />
benefit from built-in gatekeepers such as .<strong>NET</strong> roles and<br />
PrincipalPermission demands.<br />
Consider Identity Flow<br />
To support per-user authorization, auditing, and per-user data retrieval you may<br />
need to flow the original caller’s identity through various application tiers and<br />
across multiple computer boundaries. For example, if a back-end resource manager<br />
needs to perform per-caller authorization, the caller’s identity must be passed to<br />
that resource manager.<br />
Based on resource manager authorization requirements and the auditing requirements<br />
of your system, identify which identities need to be passed through your<br />
application.<br />
Choose an Authentication Approach<br />
Two key factors that influence the choice of authentication approach are first and<br />
foremost the nature of your application’s user base (what types of browsers are they<br />
using and do they have Windows accounts), and secondly your application’s<br />
impersonation/delegation and auditing requirements.
Chapter 3: Authentication and Authorization 33<br />
More Information<br />
For more detailed considerations that help you to choose an authentication mechanism<br />
for your application, see “Choosing an Authentication Mechanism” later in<br />
this chapter.<br />
Decide How to Flow Identity<br />
You can flow identity (to provide security context) at the application level or you<br />
can flow identity and security context at the operating system level.<br />
To flow identity at the application level, use method and stored procedure parameters.<br />
Application identity flow supports:<br />
● Per-user data retrieval using trusted query parameters<br />
SELECT x,y FROM SomeTable WHERE username="bob"<br />
●<br />
Custom auditing within any application tier<br />
Operating system identity flow supports:<br />
● Platform level auditing (for example, Windows auditing and SQL Server<br />
auditing)<br />
● Per-user authorization based on Windows identities<br />
To flow identity at the operating system level, you can use the impersonation/<br />
delegation model. In some circumstances you can use Kerberos delegation, while in<br />
others (where perhaps the environment does not support Kerberos) you may need<br />
to use other approaches such as, using Basic authentication. With Basic authentication,<br />
the user’s credentials are available to the server application and can be used to<br />
access downstream network resources.<br />
More Information<br />
For more information about flowing identity and how to obtain an impersonation<br />
token with network credentials (that is, supports delegation), see “Flowing Identity”<br />
later in this chapter.<br />
Authorization Approaches<br />
There are two basic approaches to authorization:<br />
● Role based. Users are partitioned into application-defined, logical roles. Members<br />
of a particular role share the same privileges within the application. Access<br />
to operations (typically expressed by method calls) is authorized based on the<br />
role-membership of the caller.
34<br />
<strong>Building</strong> <strong>Secure</strong> <strong>ASP</strong>.<strong>NET</strong> <strong>Applications</strong><br />
●<br />
Resources are accessed using fixed identities (such as a Web application’s or Web<br />
service’s process identity). The resource managers trust the application to correctly<br />
authorize users and they authorize the trusted identity.<br />
Resource based. Individual resources are secured using Windows ACLs. The<br />
ACL determines which users are allowed to access the resource and also the<br />
types of operation that each user is allowed to perform (read, write, delete, and<br />
so on).<br />
Resources are accessed using the original caller’s identity (using impersonation).<br />
Role Based<br />
With a role (or operations) based approach to security, access to operations (not<br />
back-end resources) is authorized based on the role membership of the caller. Roles<br />
(analyzed and defined at application design time) are used as logical containers that<br />
group together users who share the same security privileges (or capabilities) within<br />
the application. Users are mapped to roles within the application and role membership<br />
is used to control access to specific operations (methods) exposed by the<br />
application.<br />
Where within your application this role mapping occurs is a key design criterion;<br />
for example:<br />
● On one extreme, role mapping might be performed within a back-end resource<br />
manager such as a database. This requires the original caller’s security context to<br />
flow through your application’s tiers to the back-end database.<br />
● On the other extreme, role mapping might be performed within your front-end<br />
Web application. With this approach, downstream resource managers are accessed<br />
using fixed identities that each resource manager authorizes and is<br />
willing to trust.<br />
● A third option is to perform role mapping somewhere in between the front-end<br />
and back-end tiers; for example, within a middle tier Enterprise Services<br />
application.<br />
In multi-tiered Web applications, the use of trusted identities to access back-end<br />
resource managers provides greater opportunities for application scalability (thanks<br />
to connection pooling). Also, the use of trusted identities alleviates the need to flow<br />
the original caller’s security context at the operating system level, something that<br />
can be difficult (if not impossible in certain scenarios) to achieve.<br />
Resource Based<br />
The resource-based approach to authorization relies on Windows ACLs and the<br />
underlying access control mechanics of the operating system. The application<br />
impersonates the caller and leaves it to the operating system in conjunction with<br />
specific resource managers (the file system, databases, and so on) to perform access<br />
checks.
Chapter 3: Authentication and Authorization 35<br />
This approach tends to work best for applications that provide access to resources<br />
that can be individually secured with Windows ACLs, such as files. An example<br />
would be an FTP application or a simple data driven Web application. The approach<br />
starts to break down where the requested resource consists of data that<br />
needs to be obtained and consolidated from a number of different sources; for<br />
example, multiple databases, database tables, external applications, or Web services.<br />
The resource-based approach also relies on the original caller’s security context<br />
flowing through the application to the back-end resource managers. This can<br />
require complex configuration and significantly reduces the ability of a multi-tiered<br />
application to scale to large numbers of users, because it prevents the efficient use<br />
of pooling (for example, database connection pooling) within the application’s<br />
middle tier.<br />
Resource Access Models<br />
The two contrasting approaches to authorization can be seen within the two most<br />
commonly used resource-access security models used by .<strong>NET</strong> Web applications<br />
(and distributed multi-tier applications in general). These are:<br />
● The trusted subsystem model<br />
● The impersonation/delegation model<br />
Each model offers advantages and disadvantages both from a security and<br />
scalability perspective. The next sections describe these models.<br />
The Trusted Subsystem Model<br />
With this model, the middle tier service uses a fixed identity to access downstream<br />
services and resources. The security context of the original caller does not flow<br />
through the service at the operating system level, although the application may<br />
choose to flow the original caller’s identity at the application level. It may need to<br />
do so to support back-end auditing requirements, or to support per-user data access<br />
and authorization.<br />
The model name stems from the fact that the downstream service (perhaps a database)<br />
trusts the upstream service to authorize callers. Figure 3.1 on the next page<br />
shows this model. Pay particular attention to the trust boundary. In this example,<br />
the database trusts the middle tier to authorize callers and allow only authorized<br />
callers to access the database using the trusted identity.
36<br />
<strong>Building</strong> <strong>Secure</strong> <strong>ASP</strong>.<strong>NET</strong> <strong>Applications</strong><br />
Web or Application Server<br />
Database Server<br />
A<br />
B<br />
C<br />
D<br />
E<br />
Role-Based<br />
Authorization<br />
Trusted<br />
Service<br />
Identity<br />
SQL<br />
Server<br />
Trust Boundary<br />
Database trusts the<br />
Web server. Web server<br />
authorizes users.<br />
Figure 3.1<br />
The Trusted Subsystem model<br />
The pattern for resource access in the trusted subsystem model is the following:<br />
● Authenticate users<br />
● Map users to roles<br />
● Authorize based on role membership<br />
● Access downstream resource manager using a fixed trusted identity<br />
Fixed Identities<br />
The fixed identity used to access downstream systems and resource managers is<br />
often provided by a preconfigured Windows account, referred to as a service account.<br />
With a Microsoft SQL Server resource manager, this implies Windows<br />
authentication to SQL Server.<br />
Alternatively, some applications use a nominated SQL account (specified by a user<br />
name and password in a connection string) to access SQL Server. In this scenario,<br />
the database must be configured for SQL authentication.<br />
For more information about the relative merits of Windows and SQL authentication<br />
when communicating with SQL Server, see Chapter 12, “Data Access Security.”<br />
Using Multiple Trusted Identities<br />
Some resource managers may need to be able to perform slightly more fine-grained<br />
authorization, based on the role membership of the caller. For example, you may<br />
have two groups of users, one who should be authorized to perform read/write<br />
operations and the other read-only operations.
Chapter 3: Authentication and Authorization 37<br />
Consider the following approach with SQL Server:<br />
● Create two Windows accounts, one for read operations and one for read/write<br />
operations.<br />
More generally, you have separate accounts to mirror application-specific roles.<br />
For example, you might want to use one account for Internet users and another<br />
for internal operators and/or administrators.<br />
● Map each account to a SQL Server user-defined database role, and establish the<br />
necessary database permissions for each role.<br />
● Map users to roles within your application and use role membership to determine<br />
which account to impersonate before connecting to the database.<br />
This approach is shown in Figure 3.2.<br />
Web or Application Server<br />
Database Server<br />
A<br />
B<br />
C<br />
D<br />
E<br />
Role1<br />
Role2<br />
Trusted Identity 1<br />
Trusted Identity 2<br />
SQL<br />
Server<br />
Role Mapping<br />
Identity1 has read permissions<br />
Identity2 has read/write permissions<br />
Trust Boundary<br />
Figure 3.2<br />
Using multiple identities to access a database to support more fine-grained authorization<br />
The Impersonation / Delegation Model<br />
With this model, a service or component (usually somewhere within the logical<br />
business services layer) impersonates the client’s identity (using operating systemlevel<br />
impersonation) before it accesses the next downstream service. If the next<br />
service in line is on the same computer, impersonation is sufficient. Delegation is<br />
required if the downstream service is located on a remote computer.<br />
As a result of the delegation, the security context used for the downstream resource<br />
access is that of the client. This model is typically used for a couple of reasons:<br />
● It allows the downstream service to perform per-caller authorization using the<br />
original caller’s identity.<br />
●<br />
It allows the downstream service to use operating system-level auditing features.
38<br />
<strong>Building</strong> <strong>Secure</strong> <strong>ASP</strong>.<strong>NET</strong> <strong>Applications</strong><br />
As a concrete example of this technique, a middle-tier Enterprise Services component<br />
might impersonate the caller prior to accessing a database. The database is<br />
accessed using a database connection tied to the security context of the original<br />
caller. With this model, the database authenticates each and every caller and makes<br />
authorization decisions based on permissions assigned to the individual caller’s<br />
identity (or the Windows group membership of the caller). The impersonation/<br />
delegation model is shown in Figure 3.3.<br />
A<br />
B<br />
C<br />
D<br />
E<br />
Web or Application<br />
Server<br />
A<br />
B<br />
C<br />
D<br />
E<br />
Database<br />
Server<br />
SQL<br />
Server<br />
Caller<br />
Impersonation/Delegation<br />
Figure 3.3<br />
The impersonation/delegation model<br />
Choosing a Resource Access Model<br />
The trusted subsystem model is used in the vast majority of Internet applications<br />
and large scale intranet applications, primarily for scalability reasons. The impersonation<br />
model tends to be used in smaller-scale applications where scalability is<br />
not the primary concern and those applications where auditing (for reasons of nonrepudiation)<br />
is a critical concern.<br />
Advantage of the Impersonation / Delegation Model<br />
The primary advantage of the impersonation / delegation model is auditing (close<br />
to the data). Auditing allows administrators to track which users have attempted to<br />
access specific resources. Generally auditing is considered most authoritative if the<br />
audits are generated at the precise time of resource access and by the same routines<br />
that access the resource.<br />
The impersonation / delegation model supports this by maintaining the user’s<br />
security context for downstream resource access. This allows the back-end system<br />
to authoritatively log the user and the requested access.
Chapter 3: Authentication and Authorization 39<br />
Disadvantages of the Impersonation / Delegation Model<br />
The disadvantages associated with the impersonation / delegation model include:<br />
●<br />
●<br />
●<br />
Technology challenges. Most security service providers don’t support delegation,<br />
Kerberos is the notable exception.<br />
Processes that perform impersonation require higher privileges (specifically the<br />
Act as part of the operating system privilege). (This restriction applies to Windows<br />
2000 and will not apply to Windows .<strong>NET</strong> Server).<br />
Scalability. The impersonation / delegation model means that you cannot<br />
effectively use database connection pooling, because database access is performed<br />
by using connections that are tied to the individual security contexts of<br />
the original callers. This significantly limits the application’s ability to scale to<br />
large numbers of users.<br />
Increased administration effort. ACLs on back-end resources need to be maintained<br />
in such a way that each user is granted the appropriate level of access.<br />
When the number of back-end resources increases (and the number of users<br />
increases), a significant administration effort is required to manage ACLs.<br />
Advantages of the Trusted Subsystem Model<br />
The trusted subsystem model offers the following advantages:<br />
● Scalability. The trusted subsystem model supports connection pooling, an<br />
essential requirement for application scalability. Connection pooling allows<br />
multiple clients to reuse available, pooled connections. It works with this model<br />
because all back-end resource access uses the security context of the service<br />
account, regardless of the caller’s identity.<br />
●<br />
●<br />
Minimizes back-end ACL management. Only the service account accesses backend<br />
resources (for example, databases). ACLs are configured against this single<br />
identity.<br />
Users can’t access data directly. In the trusted-subsystem model, only the<br />
middle-tier service account is granted access to the back-end resources. As a<br />
result, users cannot directly access back-end data without going through the<br />
application (and being subjected to application authorization).<br />
Disadvantages of the Trusted Subsystem Model<br />
The trusted-subsystem model suffers from a couple of drawbacks:<br />
● Auditing. To perform auditing at the back end, you can explicitly pass (at the<br />
application level) the identity of the original caller to the back end, and have the<br />
auditing performed there. You have to trust the middle-tier and you do have a<br />
potential repudiation risk. Alternatively, you can generate an audit trail in the<br />
middle tier and then correlate it with back-end audit trails (for this you must<br />
ensure that the server clocks are synchronized).
40<br />
<strong>Building</strong> <strong>Secure</strong> <strong>ASP</strong>.<strong>NET</strong> <strong>Applications</strong><br />
●<br />
Increased risk from server compromise. In the trusted-subsystem model, the<br />
middle-tier service is granted broad access to back-end resources. As a result, a<br />
compromised middle-tier service potentially makes it easier for an attacker to<br />
gain broad access to back-end resources.<br />
Flowing Identity<br />
Distributed applications can be divided into multiple secure subsystems. For<br />
example, a front-end Web application, a middle-tier Web service, a remote component,<br />
and a database represent four different security subsystems. Each performs<br />
authentication and authorization.<br />
You must identify those subsystems that must flow the caller’s identity (and associated<br />
security context) to the next downstream subsystem in order to support authorization<br />
against the original caller.<br />
Application vs. Operating System Identity Flow<br />
Strategies for flowing identities include using the delegation features of the<br />
operating system or passing tickets and/or credentials at the application level.<br />
For example:<br />
● To flow identity at the application level, you typically pass credentials (or tickets)<br />
using method arguments or stored procedure parameters.<br />
Note: GenericPrincipal objects that carry the authenticated caller’s identity do not automatically<br />
flow across processes. This requires custom code.<br />
You can pass parameters to stored procedures that allow you to retrieve and<br />
process user-specific data. For example:<br />
SELECT CreditLimit From Table Where UserName="Bob"<br />
●<br />
This approach is sometimes referred to as a trusted query parameter approach.<br />
Operating system identity flow requires an extended form of impersonation<br />
called delegation.<br />
Impersonation and Delegation<br />
Under typical circumstances, threads within a server application run using the<br />
security context of the server process. The attributes that comprise the process’<br />
security context are maintained by the process’ logon session and are exposed by<br />
the process level Windows access token. All local and remote resource access is<br />
performed using the process level security context that is determined by the<br />
Windows account used to run the server process.
Chapter 3: Authentication and Authorization 41<br />
Impersonation<br />
When a server application is configured for impersonation, an impersonation token<br />
is attached to the thread used to process a request. The impersonation token represents<br />
the security context of the authenticated caller (or anonymous user). Any local<br />
resource access is performed using the thread impersonation token that results in<br />
the use of the caller’s security context.<br />
Delegation<br />
If the server application thread attempts to access a remote resource, delegation is<br />
required. Specifically, the impersonated caller’s token must have network credentials.<br />
If it doesn’t, all remote resource access is performed as the anonymous user<br />
(AUTHORITY\ANONYMOUS LOGON).<br />
There are a number of factors that determine whether or not a security context can<br />
be delegated. Table 3.1 shows the various IIS authentication types and for each one<br />
indicates whether or not the security context of the authenticated caller can be<br />
delegated.<br />
Table 3.1: IIS Authentication types<br />
Authentication Type Can Delegate Notes<br />
Anonymous Depends If the anonymous account (by default IUSR_MACHINE) is<br />
configured in IIS as a local account, it cannot be<br />
delegated unless the local (Web server) and remote<br />
computer have identical local accounts (with matching<br />
usernames and passwords).<br />
If the anonymous account is a domain account it can<br />
be delegated.<br />
Basic Yes If Basic authentication is used with local accounts, it<br />
can be delegated if the local accounts on the local and<br />
remote computers are identical. Domain accounts can<br />
also be delegated.<br />
Digest<br />
No<br />
Integrated Windows Depends Integrated Windows authentication either results in<br />
NTLM or Kerberos (depending upon the version of<br />
operating system on client and server computer).<br />
NTLM does not support delegation.<br />
Kerberos supports delegation with a suitably configured<br />
environment.<br />
For more information, see “How To: Implement<br />
Kerberos Delegation for Windows 2000” in the<br />
References section of this guide.<br />
(continued)
42<br />
<strong>Building</strong> <strong>Secure</strong> <strong>ASP</strong>.<strong>NET</strong> <strong>Applications</strong><br />
Authentication Type Can Delegate Notes<br />
Client Certificates Depends Can be delegated if used with IIS certificate mapping<br />
and the certificate is mapped to a local account that<br />
is duplicated on the remote computer or is mapped to<br />
a domain account.<br />
This works because the credentials for the mapped<br />
account are stored on the local server and are used to<br />
create an Interactive logon session (which has network<br />
credentials).<br />
Active <strong>Directory</strong> certificate mapping does not support<br />
delegation.<br />
Important: Kerberos delegation under Windows 2000 is unconstrained. In other words, a user<br />
may be able to make multiple network hops across multiple remote computers. To close this<br />
potential security risk, you should limit the scope of the domain account’s reach by removing<br />
the account from the Domain Users group and allow the account to be used only to log on to<br />
specific computers.<br />
Role-Based Authorization<br />
Most .<strong>NET</strong> Web applications will use a role-based approach to authorization. You<br />
need to consider the various role types and choose the one(s) most appropriate for<br />
your application scenario. You have the following options:<br />
● .<strong>NET</strong> roles<br />
● Enterprise Services (COM+) roles<br />
● SQL Server User Defined Database roles<br />
● SQL Server Application roles<br />
.<strong>NET</strong> Roles<br />
.<strong>NET</strong> roles are extremely flexible and revolve around IPrincipal objects that contain<br />
the list of roles that an authenticated identity belongs to. .<strong>NET</strong> roles can be used<br />
within Web applications, Web services, or remote components hosted within<br />
<strong>ASP</strong>.<strong>NET</strong> (and accessed using the HttpChannel).<br />
You can perform authorization using .<strong>NET</strong> roles either declaratively using<br />
PrincipalPermission demands or programmatically in code, using imperative<br />
PrincipalPermission demands or the IPrincipal.IsInRole method.
Chapter 3: Authentication and Authorization 43<br />
.<strong>NET</strong> Roles with Windows Authentication<br />
If your application uses Windows authentication, <strong>ASP</strong>.<strong>NET</strong> automatically constructs<br />
a WindowsPrincipal that is attached to the context of the current Web request<br />
(using HttpContext.User). After the authentication process is complete and<br />
<strong>ASP</strong>.<strong>NET</strong> has attached to object to the current request, it is used for all subsequent<br />
.<strong>NET</strong> role-based authorization.<br />
The Windows group membership of the authenticated caller is used to determine<br />
the set of roles. With Windows authentication, .<strong>NET</strong> roles are the same as Windows<br />
groups.<br />
.<strong>NET</strong> Roles with non-Windows Authentication<br />
If your application uses a non-Windows authentication mechanism such as Forms<br />
or Passport, you must write code to create a GenericPrincipal object (or a custom<br />
IPrincipal object) and populate it with a set of roles obtained from a custom authentication<br />
data store such as a SQL Server database.<br />
Custom IPrincipal Objects<br />
The .<strong>NET</strong> Role-based security mechanism is extensible. You can develop your own<br />
classes that implement IPrincipal and IIdentity and provide your own extended<br />
role-based authorization functionality.<br />
As long as the custom IPrincipal object (containing roles obtained from a custom<br />
data store) is attached to the current request context (using HttpContext.User),<br />
basic role-checking functionality is ensured.<br />
By implementing the IPrincipal interface, you ensure that both the declarative and<br />
imperative forms of PrincipalPermission demands work with your custom identity.<br />
Furthermore, you can implement extended role semantics; for example, by providing<br />
an additional method such as IsInMultipleRoles( string [] roles ) which would<br />
allow you to test and assert for membership of multiple roles.<br />
More Information<br />
● For more information about .<strong>NET</strong> role-based authorization, see Chapter 8,<br />
“<strong>ASP</strong>.<strong>NET</strong> Security.”<br />
● For more information about creating GenericPrincipal objects, see “How to use<br />
Forms authentication with GenericPrincipal objects” in the Reference section of<br />
this guide.
44<br />
<strong>Building</strong> <strong>Secure</strong> <strong>ASP</strong>.<strong>NET</strong> <strong>Applications</strong><br />
Enterprise Services (COM+) Roles<br />
Using Enterprise Services (COM+) roles pushes access checks to the middle tier and<br />
allows you to use database connection pooling when connecting to back-end databases.<br />
However, for meaningful Enterprise Services (COM+) role-based authorization,<br />
your front-end Web application must impersonate and flow the original<br />
caller’s identity (using a Windows access token) to the Enterprise Services application.<br />
To achieve this, the following entries must be placed in the Web application’s<br />
Web.config file.<br />
<br />
<br />
If it is sufficient to use declarative checks at the method level (to determine which<br />
users can call which methods), you can deploy your application and update role<br />
membership using the Component Services administration tool.<br />
If you require programmatic checks in method code, you lose some of the administrative<br />
and deployment advantages of Enterprise Services (COM+) roles, because<br />
role logic is hard-coded.<br />
SQL Server User Defined Database Roles<br />
With this approach, you create roles in the database, assign permissions based on<br />
the roles and map Windows group and user accounts to the roles. This approach<br />
requires you to flow the caller’s identity to the back end (if you are using the preferred<br />
Windows authentication to SQL Server).<br />
SQL Server Application Roles<br />
With this approach, permissions are granted to the roles within the database, but<br />
SQL Server application roles contain no user or group accounts. As a result, you lose<br />
the granularity of the original caller.<br />
With application roles, you are authorizing access to a specific application (as<br />
opposed to a set of users). The application activates the role using a built-in stored<br />
procedure that accepts a role name and password. One of the main disadvantages<br />
of this approach is that it requires the application to securely manage credentials<br />
(the role name and associated password).<br />
More Information<br />
For more information about SQL Server user defined database roles and application<br />
roles, see Chapter 12, “Data Access Security.”
Chapter 3: Authentication and Authorization 45<br />
.<strong>NET</strong> Roles versus Enterprise Services (COM+) Roles<br />
The following table presents a comparison of the features of .<strong>NET</strong> roles and Enterprise<br />
Services (COM+) roles.<br />
Table 3.2: Comparing Enterprise Services roles with .<strong>NET</strong> roles<br />
Feature Enterprise Services Roles .<strong>NET</strong> Roles<br />
Administration Component Services Custom<br />
Administration Tool<br />
Data Store COM+ Catalog Custom data store (for example, SQL<br />
Server or Active <strong>Directory</strong>)<br />
Declarative Yes Yes<br />
[SecurityRole(“Manager”)]<br />
[PrincipalPermission(<br />
SecurityAction.Demand,<br />
Role=”Manager”)]<br />
Imperative Yes Yes<br />
ContextUtil.IsCallerInRole()<br />
IPrincipal.IsInRole<br />
Class, Interface Yes Yes<br />
and Method<br />
Level<br />
Granularity<br />
Extensible No Yes<br />
(using custom IPrincipal<br />
implementation)<br />
Available to all Only for components that Yes<br />
.<strong>NET</strong><br />
derive from ServicedComponent<br />
components base class<br />
Role Roles contain Windows group or When using WindowsPrincipals,<br />
Membership user accounts roles ARE Windows groups – no extra<br />
level of abstraction<br />
Requires Yes No<br />
explicit<br />
To obtain method level<br />
Interface<br />
authorization, an interface must<br />
implementation be explicitly defined and<br />
implemented
46<br />
<strong>Building</strong> <strong>Secure</strong> <strong>ASP</strong>.<strong>NET</strong> <strong>Applications</strong><br />
Using .<strong>NET</strong> Roles<br />
You can secure the following items with .<strong>NET</strong> roles:<br />
●<br />
●<br />
●<br />
●<br />
●<br />
●<br />
Files<br />
Folders<br />
Web pages (.aspx files)<br />
Web services (.asmx files)<br />
Objects<br />
Methods and properties<br />
● Code blocks within methods<br />
The fact that you can use .<strong>NET</strong> roles to protect operations (performed by methods<br />
and properties) and specific code blocks means that you can protect access to local<br />
and remote resources accessed by your application.<br />
Note: The first four items in the preceding list (Files, folders, Web pages, and Web services)<br />
are protected using the UrlAuthorizationModule, which can use the role membership of the<br />
caller (and the caller’s identity) to make authorization decisions.<br />
If you use Windows authentication, much of the work required to use .<strong>NET</strong> roles is<br />
done for you. <strong>ASP</strong>.<strong>NET</strong> constructs a WindowsPrincipal object and the Windows<br />
group membership of the user determines the associated role set.<br />
To use .<strong>NET</strong> roles with a non-Windows authentication mechanism, you must write<br />
code to:<br />
● Capture the user’s credentials.<br />
●<br />
●<br />
Validate the user’s credentials against a custom data store such as a SQL Server<br />
database.<br />
Retrieve a role list, construct a GenericPrincipal object and associate it with the<br />
current Web request.<br />
The GenericPrincipal object represents the authenticated user and is used for<br />
subsequent .<strong>NET</strong> role checks, such as declarative PrincipalPermission demands<br />
and programmatic IPrincipal.IsInRole checks.<br />
More Information<br />
For more information about the process involved in creating a GenericPrincipal<br />
object for Forms authentication, see Chapter 8, “<strong>ASP</strong>.<strong>NET</strong> Security.”<br />
Checking Role Membership<br />
The following types of .<strong>NET</strong> role checks are available:
Chapter 3: Authentication and Authorization 47<br />
Important: .<strong>NET</strong> role checking relies upon an IPrincipal object (representing the authenticated<br />
user) being associated with the current request. For <strong>ASP</strong>.<strong>NET</strong> Web applications, the<br />
IPrincipal object must be attached to HttpContext.User. For Windows Forms applications,<br />
the IPrincipal object must be attached to Thread.CurrentPrincipal.<br />
●<br />
●<br />
●<br />
Manual role checks. For fine-grained authorization, you can call the<br />
IPrincipal.IsInRole method to authorize access to specific code blocks based<br />
on the role membership of the caller. Both AND and OR logic can be used<br />
when checking role membership.<br />
Declarative role checks (gates to your methods). You can annotate methods<br />
with the PrincipalPermissionAttribute class (which can be shortened to<br />
PrincipalPermission), to declaratively demand role membership. These support<br />
OR logic only. For example you can demand that a caller is in at least one specific<br />
role (for example, the caller must be a teller or a manager). You cannot specify<br />
that a caller must be a manager and a teller using declarative checks.<br />
Imperative role checks (checks within your methods). You can call<br />
PrincipalPermission.Demand within code to perform fine-grained authorization<br />
logic. Logical AND and OR operations are supported.<br />
Role Checking Examples<br />
The following code fragments show some example role checks using programmatic,<br />
declarative, and imperative techniques.<br />
1. Authorizing Bob to perform an operation:<br />
Note: Although you can authorize individual users, you should generally authorize based on<br />
role membership which allows you to authorize sets of users who share the same privileges<br />
within your application.<br />
●<br />
Direct user name check<br />
GenericIdentity userIdentity = new GenericIdentity("Bob");<br />
if (userIdentity.Name=="Bob")<br />
{<br />
}<br />
●<br />
Declarative check<br />
[PrincipalPermissionAttribute(SecurityAction.Demand, User="Bob")]<br />
public void DoPrivilegedMethod()<br />
{<br />
}<br />
●<br />
Imperative check<br />
PrincipalPermission permCheckUser = new PrincipalPermission(<br />
"Bob", null);<br />
permCheckUser.Demand();
48<br />
<strong>Building</strong> <strong>Secure</strong> <strong>ASP</strong>.<strong>NET</strong> <strong>Applications</strong><br />
2. Authorizing tellers to perform an operation:<br />
●<br />
Direct role name check<br />
GenericIdentity userIdentity = new GenericIdentity("Bob");<br />
// Role names would be retrieved from a custom data store<br />
string[] roles = new String[]{"Manager", "Teller"};<br />
GenericPrincipal userPrincipal = new GenericPrincipal(userIdentity,<br />
roles);<br />
if (userPrincipal.IsInRole("Teller"))<br />
{<br />
}<br />
●<br />
Declarative check<br />
[PrincipalPermissionAttribute(SecurityAction.Demand, Role="Teller")]<br />
void SomeTellerOnlyMethod()<br />
{<br />
}<br />
●<br />
Imperative check<br />
public SomeMethod()<br />
{<br />
PrincipalPermission permCheck = new PrincipalPermission(<br />
null,"Teller");<br />
permCheck.Demand();<br />
// Only Tellers can execute the following code<br />
// Non members of the Teller role result in a security exception<br />
. . .<br />
}<br />
3. Authorize managers OR tellers to perform operation:<br />
● Direct role name check<br />
if (Thread.CurrentPrincipal.IsInRole("Teller") ||<br />
Thread.CurrentPrincipal.IsInRole("Manager"))<br />
{<br />
// Perform privileged operations<br />
}<br />
●<br />
Declarative check<br />
[PrincipalPermissionAttribute(SecurityAction.Demand, Role="Teller"),<br />
PrincipalPermissionAttribute(SecurityAction.Demand, Role="Manager")]<br />
public void DoPrivilegedMethod()<br />
{<br />
…<br />
}
Chapter 3: Authentication and Authorization 49<br />
●<br />
Imperative check<br />
PrincipalPermission permCheckTellers = new PrincipalPermission(<br />
null,"Teller");<br />
PrincipalPermission permCheckManagers = new PrincipalPermission(<br />
null,"Manager");<br />
(permCheckTellers.Union(permCheckManagers)).Demand();<br />
4. Authorize only those people who are managers AND tellers to perform<br />
operation:<br />
● Direct role name check<br />
if (Thread.CurrentPrincipal.IsInRole("Teller") &&<br />
Thread.CurrentPrincipal.IsInRole("Manager"))<br />
{<br />
// Perform privileged operation<br />
}<br />
●<br />
●<br />
Declarative check<br />
It is not possible to perform AND checks with .<strong>NET</strong> roles declaratively.<br />
Stacking PrincipalPermission demands together results in a logical OR.<br />
Imperative check<br />
PrincipalPermission permCheckTellers = new PrincipalPermission(<br />
null,"Teller");<br />
permCheckTellers.Demand();<br />
PrincipalPermission permCheckManagers = new PrincipalPermission(<br />
null, "Manager");<br />
permCheckManagers.Demand();<br />
Choosing an Authentication Mechanism<br />
This section presents guidance which is designed to help you choose an appropriate<br />
authentication mechanism for common application scenarios. You should start by<br />
considering the following issues:<br />
● Identities. A Windows authentication mechanism is appropriate only if your<br />
application’s users have Windows accounts that can be authenticated by a<br />
trusted authority accessible by your application’s Web server.<br />
● Credential management. One of the key advantages of Windows authentication<br />
is that it enables you to let the operating system take care of credential management.<br />
With non-Windows approaches, such as Forms authentication, you must
50<br />
<strong>Building</strong> <strong>Secure</strong> <strong>ASP</strong>.<strong>NET</strong> <strong>Applications</strong><br />
●<br />
●<br />
carefully consider where and how you store user credentials. The two most<br />
common approaches are to use:<br />
● SQL Server databases<br />
● User objects within Active <strong>Directory</strong><br />
For more information about the security considerations of using SQL Server as a<br />
credential store, see Chapter 12, “Data Access Security.”<br />
For more information about using Forms authentication against custom data<br />
stores (including Active <strong>Directory</strong>), see Chapter 8, “<strong>ASP</strong>.<strong>NET</strong> Security.”<br />
Identity flow. Do you need to implement an impersonation/delegation model<br />
and flow the original caller’s security context at the operating system level across<br />
tiers? For example, to support auditing or per-user (granular) authorization. If<br />
so, you need to be able to impersonate the caller and delegate their security<br />
context to the next downstream subsystem, as described in the “Delegation”<br />
section earlier in this chapter.<br />
Browser type. Do your users all have Internet Explorer or do you need to support<br />
a user base with mixed browser types? Table 3.3 illustrates which authentication<br />
mechanisms require Internet Explorer browsers, and which support a<br />
variety of common browser types.<br />
Table 3.3: Authentication browser requirements<br />
Authentication Type Requires Notes<br />
Internet<br />
Explorer<br />
Forms<br />
No<br />
Passport<br />
No<br />
Integrated Windows Yes Kerberos also requires Windows 2000 or later<br />
(Kerberos or NTLM)<br />
operating systems on the client and server computers<br />
and accounts configured for delegation. For more<br />
information, see “How To: Implement Kerberos<br />
Delegation for Windows 2000” in the Reference<br />
section of this guide.<br />
Basic No Basic authentication is part of the HTTP 1.1 protocol<br />
that is supported by virtually all browsers<br />
Digest<br />
Yes<br />
Certificate No Clients require X.509 certificates
Chapter 3: Authentication and Authorization 51<br />
Internet Scenarios<br />
The basic assumptions for Internet scenarios are:<br />
● Users do not have Windows accounts in the server’s domain or in a trusted<br />
domain accessible by the server.<br />
● Users do not have client certificates.<br />
Figure 3.4 shows a decision tree for choosing an authentication mechanism for<br />
Internet scenarios.<br />
Internet Scenarios<br />
Start<br />
Base Assumption:<br />
Users don’t have Windows<br />
accounts or certificates<br />
Interactive Web<br />
Application?<br />
Yes<br />
Use Passport OR<br />
Forms<br />
Authentication<br />
No - Web Service<br />
Use GXA WS-Security<br />
Authentication<br />
Figure 3.4<br />
Choosing an authentication mechanism for Internet applications<br />
For more information about Web service security and the WS-Security specification,<br />
part of the Global XML Architecture (GXA) initiative, see Chapter 10, “Web Services<br />
Security.”<br />
Forms / Passport Comparison<br />
This section summarizes the relative merits of Forms and Passport authentication.<br />
Advantages of Forms Authentication<br />
●<br />
●<br />
●<br />
●<br />
Supports authentication against a custom data store; typically a SQL Server<br />
database or Active <strong>Directory</strong>.<br />
Supports role-based authorization with role lookup from a data store.<br />
Smooth integration with Web user interface.<br />
<strong>ASP</strong>.<strong>NET</strong> provides much of the infrastructure. Relatively little custom code is<br />
required in comparison to classic <strong>ASP</strong>.
52<br />
<strong>Building</strong> <strong>Secure</strong> <strong>ASP</strong>.<strong>NET</strong> <strong>Applications</strong><br />
Advantages of Passport Authentication<br />
●<br />
●<br />
●<br />
●<br />
Passport is a centralized solution.<br />
It removes credential management issues from the application.<br />
It can be used with role-based authorization schemes.<br />
It is very secure as it is built on cryptography technologies.<br />
More Information<br />
●<br />
●<br />
For more information about Web service authentication approaches, see Chapter<br />
10, “Web Services Security.”<br />
For more information about using Forms Authentication with SQL Server, see<br />
“How To: Use Forms authentication with SQL Server 2000” in the Reference<br />
section of this guide.<br />
Intranet / Extranet Scenarios<br />
Figure 3.5 shows a decision tree that can be used to help choose an authentication<br />
mechanism for intranet and extranet application scenarios.<br />
Extranet / Intranet Scenarios<br />
Start<br />
Use Passport<br />
Authentication<br />
Do users have<br />
Active <strong>Directory</strong><br />
accounts?<br />
No<br />
Yes<br />
Is delegation<br />
required?<br />
No<br />
Yes<br />
Use Basic,<br />
Kerberos OR<br />
Forms + Custom<br />
Mapping<br />
Yes<br />
Users require<br />
passports?<br />
Yes<br />
Interactive Web<br />
Application?<br />
Win2K Servers<br />
+ Clients?<br />
Yes<br />
No<br />
Use Basic, NTLM<br />
or Certificates<br />
No<br />
Use Forms<br />
Authentication<br />
No - Web Service<br />
Use Basic, Digest,<br />
NTLM, Kerberos or<br />
Certificates<br />
Use Certificate<br />
Authentication<br />
Yes<br />
Do clients have<br />
certificates?<br />
No<br />
Use WS-Security<br />
Authentication<br />
Figure 3.5<br />
Choosing an authentication mechanism for intranet and extranet applications
Chapter 3: Authentication and Authorization 53<br />
Authentication Mechanism Comparison<br />
The following table presents a comparison of the available authentication<br />
mechanisms.<br />
Table 3.4: Available authentication methods<br />
Basic Digest NTLM Kerberos Certs Forms Passport<br />
Users need Yes Yes Yes Yes No No No<br />
Windows<br />
accounts in<br />
server’s<br />
domain<br />
Supports Yes No No Yes Can do Yes Yes<br />
delegation*<br />
Requires No Yes No Yes No No No<br />
Win2K<br />
clients and<br />
servers<br />
Credentials Yes No No No No Yes No<br />
passed as<br />
clear text<br />
(requires<br />
SSL)<br />
Supports Yes No No No Yes Yes Yes<br />
non-IE<br />
browsers<br />
* Refer to the “Delegation” topic in the “Flowing Identity” section earlier in this chapter for details.<br />
Summary<br />
Designing distributed application authentication and authorization approaches is<br />
a challenging task. Proper authentication and authorization design during the early<br />
design phases of your application development helps mitigate many of the top<br />
security risks. The following summarizes the information in this chapter:<br />
● Use the trusted subsystem resource access model to gain the benefits of database<br />
connection pooling.<br />
● If your application does not use Windows authentication, use .<strong>NET</strong> role checking<br />
to provide authorization. Validate credentials against a custom data store,<br />
retrieve a role list and create a GenericPrincipal object. Associate it with the<br />
current Web request (HttpContext.User).
54<br />
<strong>Building</strong> <strong>Secure</strong> <strong>ASP</strong>.<strong>NET</strong> <strong>Applications</strong><br />
●<br />
●<br />
●<br />
●<br />
●<br />
●<br />
If your application uses Windows authentication and doesn’t use Enterprise<br />
Services, use .<strong>NET</strong> roles. Remember that for Windows authentication, .<strong>NET</strong> roles<br />
are Windows groups.<br />
If your application uses Windows authentication and Enterprise Services, consider<br />
using Enterprise Services (COM+) roles.<br />
For meaningful role-based authorization using Enterprise Services (COM+) roles,<br />
the original caller’s identity must flow to the Enterprise Services application. If<br />
the Enterprise Services application is called from an <strong>ASP</strong>.<strong>NET</strong> Web application,<br />
this means that the Web application must use Windows authentication and be<br />
configured for impersonation.<br />
Annotate methods with the PrincipalPermission attribute to declaratively<br />
demand role membership. The method is not called if the caller is not in the<br />
specified role and a security exception is generated.<br />
Call PrincipalPermission.Demand within method code (or use<br />
IPrincipal.IsInRole) for fine-grained authorization decisions.<br />
Consider implementing a custom IPrincipal object to gain additional rolechecking<br />
semantics.
4<br />
<strong>Secure</strong> Communication<br />
Many applications pass security sensitive data across networks to and from end<br />
users and between intermediate application nodes. Sensitive data might include<br />
credentials used for authentication, or data such as credit card numbers or bank<br />
transaction details. To guard against unwanted information disclosure and to<br />
protect the data from unauthorized modification while in transit, the channel<br />
between communication end points must be secured.<br />
<strong>Secure</strong> communication provides the following two features:<br />
● Privacy. Privacy is concerned with ensuring that data remains private and<br />
confidential, and cannot be viewed by eavesdroppers who may be armed with<br />
network monitoring software. Privacy is usually provided by means of encryption.<br />
● Integrity. <strong>Secure</strong> communication channels must also ensure that data is protected<br />
from accidental or deliberate (malicious) modification while in transit. Integrity<br />
is usually provided by using Message Authentication Codes (MACs).<br />
This chapter covers the following secure communication technologies:<br />
● <strong>Secure</strong> Sockets Layer / Transport Layer Security (SSL/TLS). This is most commonly<br />
used to secure the channel between a browser and Web server. However,<br />
it can also be used to secure Web service messages and communications to and<br />
from a database server running Microsoft® SQL Server 2000.<br />
●<br />
●<br />
Internet Protocol Security (IPSec). IPSec provides a transport level secure<br />
communication solution and can be used to secure the data sent between two<br />
computers; for example, an application server and a database server.<br />
Remote Procedure Call (RPC) Encryption. The RPC protocol used by Distributed<br />
COM (DCOM) provides an authentication level (packet privacy) that results<br />
in the encryption of every packet of data sent between client and server.
56<br />
<strong>Building</strong> <strong>Secure</strong> <strong>ASP</strong>.<strong>NET</strong> <strong>Applications</strong><br />
Know What to <strong>Secure</strong><br />
When a Web request flows across the physical deployment tiers of your application,<br />
it crosses a number of communication channels. A commonly used Web application<br />
deployment model is shown in Figure 4.1.<br />
Clients<br />
Web<br />
Server<br />
Application<br />
Server<br />
Database<br />
Server<br />
Figure 4.1<br />
A typical Web deployment model<br />
In this typical deployment model, a request passes through three distinct channels.<br />
The client-to-Web server link may be over the Internet or corporate intranet and<br />
typically uses HTTP. The remaining two links are between internal servers within<br />
your corporate domain. Nonetheless, all three links represent potential security<br />
concerns. Many purely intranet-based applications convey security sensitive data<br />
between tiers; for example, HR and payroll applications that deal with sensitive<br />
employee data.<br />
Figure 4.2 shows how each channel can be secured by using a combination of SSL,<br />
IPSec and RPC encryption.<br />
Clients<br />
Web<br />
Server<br />
Application<br />
Server<br />
Database<br />
Server<br />
SSL<br />
(Privacy/Integrity)<br />
IPSec or RPC<br />
(Privacy/Integrity)<br />
IPSec or SSL<br />
(Privacy/Integrity)<br />
Figure 4.2<br />
A typical Web deployment model, with secure communications<br />
The choice of technology depends on a number of factors including the transport<br />
protocol, end point technologies, and environmental considerations (such as hardware,<br />
operating system versions, firewalls, and so on).
Chapter 4: <strong>Secure</strong> Communication 57<br />
SSL/TLS<br />
SSL/TLS is used to establish an encrypted communication channel between client<br />
and server. The handshake mechanism used to establish the secure channel is well<br />
documented and details can be found in the following articles in the Microsoft<br />
Knowledge Base:<br />
● Q257591, “Description of the <strong>Secure</strong> Sockets Layer (SSL) Handshake”<br />
●<br />
●<br />
Q257587, “Description of the Server Authentication Process During the SSL<br />
Handshake”<br />
Q257586, “Description of the Client Authentication Process During the SSL<br />
Handshake”<br />
Using SSL<br />
When you use SSL you should be aware of the following:<br />
●<br />
●<br />
●<br />
●<br />
●<br />
When SSL is applied, the client uses the HTTPS protocol (and specifies an<br />
https:// URL) and the server listens on TCP port 443.<br />
You should monitor your application’s performance when you enable SSL.<br />
SSL uses complex cryptographic functions to encrypt and decrypt data and as a<br />
result impacts the performance of your application. The largest performance hit<br />
occurs during the initial handshake, where asymmetric public/private-key<br />
encryption is used. Subsequently (after a secure session key is generated and<br />
exchanged), faster, symmetric encryption is used to encrypt application data.<br />
You should optimize pages that use SSL by including less text and simple<br />
graphics in those pages.<br />
Because the performance hit associated with SSL is greatest during session<br />
establishment, ensure that your connections do not time out.<br />
You can fine tune this by increasing the value of the ServerCacheTime registry<br />
entry. For more information, see article Q247658, “HOW TO: Configure <strong>Secure</strong><br />
Sockets Layer Server and Client Cache Elements” in the Microsoft Knowledge<br />
Base.<br />
SSL requires a server authentication certificate to be installed on the Web server<br />
(or database server if you are using SSL to communicate with SQL Server 2000).<br />
For more information about installing server authentication certificates, see<br />
“How to setup SSL on a Web server” within the Reference section of this guide.
58<br />
<strong>Building</strong> <strong>Secure</strong> <strong>ASP</strong>.<strong>NET</strong> <strong>Applications</strong><br />
IPSec<br />
IPSec can be used to secure the data sent between two computers; for example, an<br />
application server and a database server. IPSec is completely transparent to applications<br />
as encryption, integrity, and authentication services are implemented at the<br />
transport level. <strong>Applications</strong> continue to communicate with one another in the<br />
normal manner using TCP and UDP ports.<br />
Using IPSec you can:<br />
● Provide message confidentiality by encrypting all of the data sent between two<br />
computers.<br />
● Provide message integrity between two computers (without encrypting data).<br />
● Provide mutual authentication between two computers (not users). For example,<br />
you can help secure a database server by establishing a policy that permits<br />
requests only from a specific client computer (for example, an application or Web<br />
server).<br />
● Restrict which computers can communicate with one another. You can also<br />
restrict communication to specific IP protocols and TCP/UDP ports.<br />
Note: IPSec is not intended as a replacement for application level security. Today it is used as<br />
a defense-in-depth mechanism or to secure insecure applications without changing them, and<br />
to secure non-TLS protocols from network-wire attacks.<br />
Using IPSec<br />
When you use IPSec you should be aware of the following:<br />
● IPSec can be used for both authentication and encryption.<br />
● There are no IPSec APIs for developers to programmatically control settings.<br />
IPSec is completely controlled and configured through the IPSec snap-in, within<br />
the Local Security Policy Microsoft Management Console (MMC).<br />
● IPSec in the Microsoft Windows® 2000 operating system cannot secure all types<br />
of IP traffic.<br />
Specifically, it cannot be used to secure Broadcast, Multicast, Internet Key<br />
Exchange, or Kerberos (which is already a secure protocol) traffic.<br />
For more information, see article Q253169, “Traffic That Can and Cannot Be<br />
<strong>Secure</strong>d by IPSec,” in the Microsoft Knowledge Base.<br />
●<br />
You use IPSec filters to control when IPSec is applied.<br />
To test the IPSec policies, use IPSec Monitor. IPSec Monitor (Ipsecmon.exe)<br />
provides information about which IPSec policy is active and whether a secure<br />
channel between computers is established.
Chapter 4: <strong>Secure</strong> Communication 59<br />
●<br />
●<br />
For more information, see the Knowledge Base articles:<br />
● Q313195, “HOW TO: Use IPSec Monitor in Windows 2000”<br />
●<br />
Q231587, “Using the IP Security Monitor Tool to View IPSec Communications”<br />
To establish a trust between two servers, you can use IPSec with mutual authentication.<br />
This uses certificates to authenticate both computers.<br />
For more information, see the following Knowledge Base articles:<br />
● Q248711, “Mutual Authentication Methods Supported for L2TP/IPSec”<br />
●<br />
Q253498, “HOW TO: Install a Certificate for Use with IP Security”<br />
If you need to use IPSec to secure communication between two computers that<br />
are separated by a firewall, make sure that the firewall does not use Network<br />
Address Translation (NAT). IPSec does not work with any NAT-based devices.<br />
For more information and configuration steps, see article Q233256, “HOW TO<br />
Enable IPSec Traffic through a Firewall” in the Microsoft Knowledge Base and<br />
“How To: Use IPSec to Provide <strong>Secure</strong> Communication between Two Servers” in<br />
the Reference section of this guide.<br />
RPC Encryption<br />
RPC is the underlying transport mechanism used by DCOM. RPC provides a set of<br />
configurable authentication levels that range from no authentication (and no protection<br />
of data) to full encryption of parameter state.<br />
The most secure level (RPC Packet Privacy) encrypts parameter state for every<br />
remote procedure call (and therefore every DCOM method invocation). The level of<br />
RPC encryption, 40-bit or 128-bit, depends on the version of the Windows operating<br />
system that is running on the client and server computers.<br />
Using RPC Encryption<br />
You are most likely to want to use RPC encryption when your Web-based application<br />
communicates with serviced components (within Enterprise Services server<br />
applications) located on remote computers.<br />
In this event, to use RPC Packet Privacy authentication (and encryption) you must<br />
configure both the client and the server. A process of high-water mark negotiation<br />
occurs between client and server, which ensures that the higher of the two (client<br />
and server) settings are used.<br />
The server settings can be defined at the (Enterprise Services) application level,<br />
either by using .<strong>NET</strong> attributes within your serviced component assembly, or by<br />
using the Component Services administration tool at deployment time.
60<br />
<strong>Building</strong> <strong>Secure</strong> <strong>ASP</strong>.<strong>NET</strong> <strong>Applications</strong><br />
If the client is an <strong>ASP</strong>.<strong>NET</strong> Web application or Web service, the authentication level<br />
used by the client is configured using the comAuthenticationLevel attribute on the<br />
element within Machine.config. This provides the default authentication<br />
level for all <strong>ASP</strong>.<strong>NET</strong> applications that run on the Web server.<br />
More Information<br />
For more information about RPC authentication level negotiation and service<br />
component configuration, see Chapter 9, “Enterprise Services Security.”<br />
Point to Point Security<br />
Point-to-point communication scenarios can be broadly categorized into the following<br />
topics:<br />
● Browser to Web Server<br />
● Web Server to Remote Application Server<br />
● Application Server to Database Server<br />
Browser to Web Server<br />
To secure sensitive data sent between a browser and Web server, use SSL. You need<br />
to use SSL in the following situations:<br />
● You are using Forms authentication and need to secure the clear text credentials<br />
submitted to a Web server from a logon form.<br />
In this scenario, you should use SSL to secure access to all pages (not just the<br />
logon page) to ensure that the authentication cookie, generated as a result on<br />
the initial authentication process, remains secure throughout the lifetime of the<br />
client’s browser session with the application.<br />
●<br />
You are using Basic authentication and need to secure the (Base64 encoded) clear<br />
text credentials.<br />
You should use SSL to secure access to all pages (not just the initial log on), as<br />
Basic authentication sends the clear text credentials to the Web server with all<br />
requests to the application (not just the initial one).<br />
Note: Base64 is used to encode binary data as printable ASCII text. Unlike encryption, it<br />
does not provide message integrity or privacy.<br />
●<br />
Your application passes sensitive data between the browser and Web server (and<br />
vice-versa); for example, credit card numbers or bank account details.
Chapter 4: <strong>Secure</strong> Communication 61<br />
Web Server to Remote Application Server<br />
The transport channel between a Web server and a remote application server should<br />
be secured by using IPSec, SSL or RPC Encryption. The choice depends on the<br />
transport protocols, environmental factors (operating system versions, firewalls,<br />
and so on).<br />
● Enterprise Services. If your remote server hosts one or more serviced components<br />
(in an Enterprise Services server application) and you are communicating<br />
directly with them (and as a result using DCOM), use RPC Packet Privacy<br />
encryption.<br />
For more information about how to configure RPC encryption between a Web<br />
application and remote serviced component, see Chapter 9, “Enterprise Services<br />
Security.”<br />
●<br />
Web Services. If your remote server hosts a Web Service, you can choose<br />
between IPSec and SSL.<br />
You should generally use SSL because the Web service already uses the HTTP<br />
transport. SSL also allows you to only encrypt the data sent to and from the Web<br />
service (and not all traffic sent between the two computers). IPSec results in the<br />
encryption of all traffic sent between the two computers.<br />
Note: Message level security (including data encryption) is addressed by the Global XML<br />
Web Services Architecture (GXA) initiative and specifically the WS-Security specification.<br />
Microsoft provides the Web Services Development Toolkit to allow you to develop message<br />
level security solutions. This is available for download at http://msdn.microsoft.com<br />
/webservices/building/wsdk/.<br />
●<br />
.<strong>NET</strong> Components (using .<strong>NET</strong> Remoting). If your remote server hosts one or<br />
more .<strong>NET</strong> components and you connect to them over the TCP channel, you can<br />
use IPSec to provide a secure communication link. If you host the .<strong>NET</strong> components<br />
within <strong>ASP</strong>.<strong>NET</strong>, you can use SSL (configured using IIS).<br />
Application Server to Database Server<br />
To secure the data sent between an application server and database server, you can<br />
use IPSec. If your database server runs SQL Server 2000 (and the SQL Server 2000<br />
network libraries are installed on the application server), you can use SSL. This<br />
latter option requires a server authentication certificate to be installed in the database<br />
server’s machine store.
62<br />
<strong>Building</strong> <strong>Secure</strong> <strong>ASP</strong>.<strong>NET</strong> <strong>Applications</strong><br />
You may need to secure the link to the database server in the following situations:<br />
●<br />
You are connecting to the database server and are not using Windows authentication.<br />
For example, you may be using SQL authentication to SQL Server or you<br />
may be connecting to a non-SQL Server database. In these cases, the credentials<br />
are passed in clear text, which can represent a significant security concern.<br />
Note: One of the key benefits of using Windows authentication to SQL Server is that it<br />
means that the credentials are never passed across the network. For more information<br />
about Windows and SQL authentication, see Chapter 12, “Data Access Security.”<br />
●<br />
Your application may be submitting and retrieving sensitive data to and from the<br />
database (for example, payroll data).<br />
Using SSL to SQL Server<br />
Consider the following points if you use SSL to secure the channel to a SQL Server<br />
database:<br />
● For SSL to work, you must install a server authentication certificate in the machine<br />
store on the database server computer. The client computer must also have<br />
a root Certificate Authority certificate from the same (or trusting) authority that<br />
issued the server certificate.<br />
● Clients must have the SQL Server 2000 connectivity libraries installed. Earlier<br />
versions or generic libraries will not work.<br />
● SSL only works for TCP/IP (the recommended communication protocol for SQL<br />
Server) and named pipes.<br />
● You can configure the server to force the use of encryption for all connections<br />
(from all clients).<br />
● On the client, you can:<br />
● Force the use of encryption for all outgoing connections.<br />
● Allow client applications to choose whether or not to use encryption on a perconnection<br />
basis, by using the connection string.<br />
● Unlike IPSec, configuration changes are not required if the client or server IP<br />
addresses change.<br />
More Information<br />
For more information about using SSL to SQL Server, see the following resources:<br />
● “How To: Use SSL to <strong>Secure</strong> Communication with SQL Server 2000” in the<br />
Reference section of this guide.<br />
● Webcast: “Microsoft SQL Server 2000: How to Configure SSL Encryption (April<br />
23, 2002)”
Chapter 4: <strong>Secure</strong> Communication 63<br />
Choosing Between IPSec and SSL<br />
Consider the following points when choosing between IPSec and SSL:<br />
●<br />
●<br />
●<br />
●<br />
●<br />
●<br />
IPSec can used to secure all IP traffic between computers; SSL is specific to<br />
an individual application.<br />
IPSec is a computer-wide setting and does not support the encryption of<br />
specific network connections. However, sites can be partitioned to use or<br />
not use SSL. Also, when you use SSL to connect to SQL Server, you can<br />
choose on a per connection basis (from the client application) whether or<br />
not to use SSL.<br />
IPSec is transparent to applications, so it can be used with secure protocols<br />
that run on top of IP such as HTTP, FTP, and SMTP. However, SSL/TLS is<br />
closely tied to the application.<br />
IPSec can be used for computer authentication in addition to encryption.<br />
This is particularly significant for trusted subsystem scenarios, where the<br />
database authorizes a fixed identity from a specific application (running<br />
on a specific computer). IPSec can be used to ensure that only the specific<br />
application server can connect to the database server, in order to prevent<br />
attacks from other computers.<br />
IPSec requires that both computers run Windows 2000 or later.<br />
SSL can work through a NAT-based firewall; IPSec cannot.<br />
Farming and Load Balancing<br />
If you use SSL in conjunction with multiple virtual Web sites, you need to use<br />
unique IP addresses or unique port numbers. You cannot use multiple sites with<br />
the same IP address and port number. If the IP address is combined with a server<br />
affinity setting in a load balancer, this will work fine.<br />
More Information<br />
For more information, see Q187504, “HTTP 1.1 Host Headers Are Not Supported<br />
When You Use SSL,” in the Microsoft Knowledge Base.<br />
Summary<br />
This chapter described how a combination of SSL, IPSec, and RPC encryption can<br />
be used to provide an end-to-end secure communication solution for your distributed<br />
application. To summarize:<br />
● Channel security is a concern for data passed over the Internet and on the corporate<br />
intranet.
64<br />
<strong>Building</strong> <strong>Secure</strong> <strong>ASP</strong>.<strong>NET</strong> <strong>Applications</strong><br />
●<br />
●<br />
●<br />
●<br />
●<br />
●<br />
●<br />
Consider the security requirements of the Web browser to Web server, Web<br />
server to application server, and application server to database server links.<br />
<strong>Secure</strong> communication provides privacy and integrity. It does not protect you<br />
from non-repudiation (for this use, client certificates)<br />
Channel security options include SSL, IPSec, and RPC Encryption. The latter<br />
option applies when your application uses DCOM to communicate with remote<br />
serviced components.<br />
If you use SSL to communicate with SQL Server, the application can choose (on a<br />
per-connection basis) whether or not to encrypt the connection.<br />
IPSec encrypts all IP traffic that flows between two computers.<br />
The choice of security mechanism is dependent upon transport protocol, operating<br />
system versions, and network considerations (including firewalls).<br />
There is always a trade-off between secure communication and performance.<br />
Choose the level of security that is appropriate to your application requirements.
5<br />
Intranet Security<br />
Access to intranet applications is restricted to a limited group of authorized users<br />
(such as employees that belong to a domain). While an intranet setting limits the<br />
exposure of your application, you may still face several challenges when you<br />
develop authentication, authorization, and secure communication strategies. For<br />
example, you may have non-trusting domains, which make it difficult to flow a<br />
caller’s security context and identity through to the back-end resources within your<br />
system. You may also be operating within a heterogeneous environment with mixed<br />
browser types. This makes it more difficult to use a common authentication<br />
mechanism.<br />
If you have a homogenous intranet where all computers run the Microsoft®<br />
Windows® 2000 operating system or later and you have a domain where users are<br />
trusted for delegation, delegation of the original caller’s security context to the back<br />
end becomes an option.<br />
You must also consider secure communication. Despite the fact that your application<br />
runs in an intranet environment, you cannot consider the data sent over the<br />
network secure. It is likely that you will need to secure the data sent between<br />
browsers and the Web server in addition to data sent between application servers<br />
and databases.<br />
The following common intranet scenarios are used in this chapter to illustrate key<br />
authentication, authorization, and secure communication techniques:<br />
● <strong>ASP</strong>.<strong>NET</strong> to SQL Server<br />
● <strong>ASP</strong>.<strong>NET</strong> to Enterprise Services to SQL Server<br />
● <strong>ASP</strong>.<strong>NET</strong> to Web Services to SQL Server<br />
● <strong>ASP</strong>.<strong>NET</strong> to Remoting to SQL Server<br />
In addition, this chapter describes a Windows 2000 delegation scenario (Flowing the<br />
Original Caller to the Database), in which the original caller’s security context and<br />
identity flows at the operating system level from browser to database using intermediate<br />
Web and application servers.
66<br />
<strong>Building</strong> <strong>Secure</strong> <strong>ASP</strong>.<strong>NET</strong> <strong>Applications</strong><br />
Note: Several scenarios described in this chapter either replace the default <strong>ASP</strong><strong>NET</strong> account<br />
used to run <strong>ASP</strong>.<strong>NET</strong> applications or change its password to allow duplicated accounts to be<br />
created on remote computers. These scenarios update the element of<br />
Machine.config. This results in credentials being stored in clear text within machine.config. For<br />
a detailed discussion of this topic, see “Accessing Network Resources” in Chapter 8, “<strong>ASP</strong>.<strong>NET</strong><br />
Security.”<br />
<strong>ASP</strong>.<strong>NET</strong> to SQL Server<br />
In this scenario, a HR database serves per-user data securely on a homogenous<br />
intranet. The application uses a trusted subsystem model and executes calls on<br />
behalf of the original callers. The application authenticates callers by using Integrated<br />
Windows authentication and makes calls to the database using the <strong>ASP</strong>.<strong>NET</strong><br />
process identity. Due to the sensitive nature of the data, SSL is used between the<br />
Web server and clients.<br />
The basic model for this application scenario is shown in Figure 5.1.<br />
Web Server<br />
Database Server<br />
IIS<br />
<strong>ASP</strong>.<strong>NET</strong><br />
SQL<br />
Server<br />
Figure 5.1<br />
<strong>ASP</strong>.<strong>NET</strong> to SQL Server<br />
Characteristics<br />
This scenario has the following characteristics:<br />
●<br />
●<br />
●<br />
●<br />
●<br />
●<br />
Clients have Internet Explorer.<br />
User accounts are in Microsoft Active <strong>Directory</strong>® directory service.<br />
The application provides sensitive, per-user data.<br />
Only authenticated clients should access the application.<br />
The database trusts the application to authenticate users properly (that is, the<br />
application makes calls to the database on behalf of the users).<br />
Microsoft SQL Server is using a single database user role for authorization.
Chapter 5: Intranet Security 67<br />
<strong>Secure</strong> the Scenario<br />
In this scenario, the Web server authenticates the caller and restricts access to local<br />
resources by using the caller’s identity. You don’t have to impersonate within the<br />
Web application in order to restrict access to resources against the original caller.<br />
The database authenticates against the <strong>ASP</strong>.<strong>NET</strong> default process identity, which is a<br />
least privileged account (that is, the database trusts the <strong>ASP</strong>.<strong>NET</strong> application).<br />
Table 5.1: Security measures<br />
Category<br />
Details<br />
Authentication ● Provide strong authentication at the Web server to authenticate<br />
original callers by using Integrated Windows authentication in IIS.<br />
● Use Windows authentication within <strong>ASP</strong>.<strong>NET</strong> (no impersonation).<br />
● <strong>Secure</strong> connections to the database using SQL Server configured<br />
for Windows authentication.<br />
● The database trusts the <strong>ASP</strong>.<strong>NET</strong> worker process to make calls.<br />
Authenticate the <strong>ASP</strong>.<strong>NET</strong> process identity at the database.<br />
Authorization ● Configure resources on the Web server using ACLs tied to the<br />
original callers. For easier administration, users are added to<br />
Windows groups and groups are used within the ACLs.<br />
● The Web application performs .<strong>NET</strong> role checks against the original<br />
caller to restrict access to pages.<br />
<strong>Secure</strong> Communication ● <strong>Secure</strong> sensitive data sent between the Web server and the<br />
database<br />
● <strong>Secure</strong> sensitive data sent between the original callers and the<br />
Web application<br />
The Result<br />
Figure 5.2 shows the recommended security configuration for this scenario.<br />
NTFS<br />
Permissions<br />
(Authorization)<br />
File Authorization<br />
.<strong>NET</strong> Roles<br />
(Authorization)<br />
SQL Permissions<br />
Database Roles<br />
(Authorization)<br />
Alice<br />
Mary<br />
Bob<br />
SSL<br />
(Privacy/<br />
Integrity)<br />
IIS<br />
Integrated<br />
Windows<br />
Authentication<br />
Alice<br />
Mary<br />
Bob<br />
Web Server<br />
<strong>ASP</strong>.<strong>NET</strong><br />
Windows<br />
Authentication<br />
<strong>ASP</strong>.<strong>NET</strong><br />
Process Identity<br />
IPSec<br />
(Privacy/Integrity)<br />
SQL<br />
Server<br />
Database<br />
Server<br />
Windows<br />
Authentication<br />
Figure 5.2<br />
The recommended security configuration for the <strong>ASP</strong>.<strong>NET</strong> to SQL Server intranet scenario
68<br />
<strong>Building</strong> <strong>Secure</strong> <strong>ASP</strong>.<strong>NET</strong> <strong>Applications</strong><br />
Security Configuration Steps<br />
Before you begin, you’ll want to see the following:<br />
●<br />
●<br />
●<br />
●<br />
Creating custom <strong>ASP</strong>.<strong>NET</strong> accounts (see “How To: Create a Custom Account to<br />
Run <strong>ASP</strong>.<strong>NET</strong>” in the Reference section of this guide)<br />
Creating a least privileged database account (see Chapter 12, “Data Access<br />
Security”)<br />
Configuring SSL on a Web server (see “How To: Set Up SSL on a Web Server” in<br />
the Reference section of this guide)<br />
Configuring IPSec (see “How To: Use IPSec to Provide <strong>Secure</strong> Communication<br />
Between Two Servers” in the Reference section of this guide)<br />
Configuring IIS<br />
Step<br />
Disable Anonymous access<br />
for your Web application’s<br />
virtual root directory<br />
Enable Integrated Windows<br />
Authentication<br />
More Information<br />
To work with IIS authentication settings, use the IIS MMC<br />
snap-in. Right-click your application’s virtual directory, and then<br />
click Properties.<br />
Click the <strong>Directory</strong> Security tab, and then click Edit within the<br />
Anonymous access and authentication control group.<br />
Configuring <strong>ASP</strong>.<strong>NET</strong><br />
Step<br />
Change the <strong>ASP</strong><strong>NET</strong><br />
password to a known strong<br />
password value<br />
More Information<br />
<strong>ASP</strong><strong>NET</strong> is a least privileged local account used by default to run<br />
<strong>ASP</strong>.<strong>NET</strong> Web applications.<br />
Set the <strong>ASP</strong><strong>NET</strong> account’s password to a known value by using<br />
Local Users and Groups.<br />
Edit Machine.config located in %windir%\Microsoft.<strong>NET</strong><br />
\Framework\ v1.0.3705\CONFIG<br />
and reconfigure the password attribute on the <br />
element<br />
Default<br />
<br />
Becomes<br />
<br />
Configure your <strong>ASP</strong>.<strong>NET</strong> Web<br />
application to use Windows<br />
authentication<br />
Edit Web.config in your application’s virtual directory root<br />
Set the element to:<br />
Chapter 5: Intranet Security 69<br />
Step<br />
Make sure impersonation is<br />
off<br />
More Information<br />
Impersonation is off by default; however, double check to<br />
ensure that it’s turned off in Web.config, as follows:<br />
<br />
The same effect can be achieved by removing the <br />
element.<br />
Configuring SQL Server<br />
Step<br />
Create a Windows account<br />
on your SQL Server computer<br />
that matches the <strong>ASP</strong>.<strong>NET</strong><br />
process account (<strong>ASP</strong><strong>NET</strong>)<br />
Configure SQL Server for<br />
Windows authentication<br />
Create a SQL Server Login<br />
for the local <strong>ASP</strong><strong>NET</strong> account<br />
Create a new database user<br />
and map the login name to<br />
the database user<br />
Create a new user-defined<br />
database role and add the<br />
database user to the role<br />
Establish database<br />
permissions for the<br />
database role<br />
More Information<br />
The user name and password must match the <strong>ASP</strong><strong>NET</strong> account.<br />
Give the account the following privileges:<br />
- Access this computer from the network<br />
- Deny logon locally<br />
- Log on as a batch job<br />
This grants access to the SQL Server<br />
This grants access to the specified database<br />
Grant minimum permissions<br />
For more information, see Chapter 12, “Data Access Security.”<br />
Configuring <strong>Secure</strong> Communication<br />
Step<br />
More Information<br />
Configure the Web site for See “How To: Set Up SSL on a Web Server” in the Reference<br />
SSL<br />
section of this guide.<br />
Configure IPSec between See “How To: Use IPSec to Provide <strong>Secure</strong> Communication<br />
Web server and database Between Two Servers” in the Reference section of this guide.<br />
server
70<br />
<strong>Building</strong> <strong>Secure</strong> <strong>ASP</strong>.<strong>NET</strong> <strong>Applications</strong><br />
Analysis<br />
●<br />
●<br />
●<br />
Integrated Windows authentication in IIS is ideal in this scenario because all<br />
users have Windows accounts and are using Microsoft Internet Explorer. The<br />
benefit of Integrated Windows authentication is that the user’s password is<br />
never sent over the network. Additionally, the logon is transparent for the user<br />
because Windows uses the current interactive user’s logon session.<br />
<strong>ASP</strong>.<strong>NET</strong> is running as least privileged account, so potential damage from<br />
compromise is mitigated.<br />
You don’t need to impersonate in <strong>ASP</strong>.<strong>NET</strong> to perform .<strong>NET</strong> role checks or to<br />
secure resources within Windows ACLs against the original caller. To perform<br />
.<strong>NET</strong> role checks against the original caller, the WindowsPrincipal object that<br />
represents the original caller is retrieved from the HTTP context as follows:<br />
WindowsPrincipal wp = (HttpContext.Current.User as WindowsPrincipal);<br />
if ( wp.IsInRole("Manager") )<br />
{<br />
// User is authorized to perform manager-specific functionality<br />
}<br />
●<br />
●<br />
●<br />
●<br />
The <strong>ASP</strong>.<strong>NET</strong> FileAuthorizationModule provides ACL checks against the<br />
original caller for <strong>ASP</strong>.<strong>NET</strong> file types that are mapped within IIS to the<br />
aspnet_isapi.dll. For static file types such as .jpg, .gif, and .htm files, IIS acts as<br />
the gatekeeper and performs access checks using the original caller’s identity,<br />
based on the NTFS permissions associated with the file.<br />
Using Windows authentication to SQL Server means that you avoid storing<br />
credentials in files and passing credentials over the network to the database<br />
server.<br />
The use of a duplicated Windows account on the database server (one that<br />
matches the <strong>ASP</strong><strong>NET</strong> local account) results in increased administration. If a<br />
password is changed on one computer, it must be synchronized and updated on<br />
the other. In some scenarios, you may be able to use a least-privileged domain<br />
account for easier administration.<br />
The duplicated local account approach also works in the presence of a firewall<br />
where the ports required for Windows authentication may not be open. The use<br />
of Windows authentication and domain accounts may not work in this scenario.<br />
You’ll need to ensure that your Windows groups are as granular as your security<br />
needs. Because .<strong>NET</strong> role-based security is based on Windows group membership<br />
this solution relies on Windows groups being set up at the correct level of<br />
granularity to match the categories of users (sharing the same security privileges)<br />
who access the application. The Windows groups that you use here to<br />
manage roles could be local to that computer or domain groups
Chapter 5: Intranet Security 71<br />
●<br />
●<br />
SQL Server database user roles are preferred to SQL server application roles to<br />
avoid the associated password management and connection pooling issues<br />
associated with the use of SQL application roles.<br />
<strong>Applications</strong> activate SQL application roles by calling a built-in stored procedure<br />
with a role name and a password. Therefore, the password must be stored<br />
securely. Database connection pooling must also be disabled when you use SQL<br />
application roles, which severely impacts application scalability.<br />
For more information about SQL Server database user roles and SQL Server<br />
application roles, see Chapter 12, “Data Access Security.”<br />
The database user is added to a database user role and permissions are assigned<br />
for the role so that if the database account changes; you don’t have to change the<br />
permissions on all database objects.<br />
Q&A<br />
●<br />
●<br />
Why can’t I enable impersonation for the Web application, so that I can secure<br />
the resources accessed by my Web application using ACLs configured against<br />
the original caller?<br />
If you enable impersonation, the impersonated security context will not have<br />
network credentials (assuming delegation is not enabled and you are using<br />
Integrated Windows authentication). Therefore, the remote call to SQL Server<br />
will use a NULL session, which will result in a failed call. With impersonation<br />
disabled, the remote request will use the <strong>ASP</strong>.<strong>NET</strong> process identity.<br />
The preceding scenario uses the <strong>ASP</strong>.<strong>NET</strong> FileAuthorizationModule, which<br />
performs authorization using Windows ACLs against the original caller identity<br />
and does not require impersonation.<br />
If you use Basic authentication instead of Integrated Windows authentication<br />
(NTLM) and you do enable impersonation, each call to the database would use<br />
the original caller’s security context. Each user account (or the Windows groups<br />
to which the user belongs) would require SQL Server logins. Permissions on<br />
database objects would need to be secured against the Windows group (or<br />
original caller).<br />
The database doesn’t know who the original caller is. How can I create an<br />
audit trail?<br />
Audit end user activity within the Web application or pass the identity of the<br />
user explicitly as a parameter of the data access call.
72<br />
<strong>Building</strong> <strong>Secure</strong> <strong>ASP</strong>.<strong>NET</strong> <strong>Applications</strong><br />
Related Scenarios<br />
Non-Internet Explorer Browsers<br />
Integrated Windows authentication to IIS requires Internet Explorer. In a mixed<br />
browser environment, your typical options would include:<br />
● Basic authentication and SSL. Basic authentication is supported by most browsers.<br />
Since the user’s credentials are passed over the network, you must use SSL to<br />
secure the scenario.<br />
● Client certificates. Individual client certificates can either be mapped to a<br />
unique Windows account or a single Windows account can be used to represent<br />
all clients. The use of client certificates also requires SSL.<br />
● Forms Authentication. Forms authentication can validate credentials against<br />
a custom data store such as a database or against Active <strong>Directory</strong>.<br />
If you authenticate against Active <strong>Directory</strong>, make sure that you retrieve only the<br />
necessary groups that are pertinent to your application. Just like you shouldn’t<br />
issue queries against a database using SELECT * clauses, you shouldn’t blindly<br />
retrieve all groups from Active <strong>Directory</strong>.<br />
If you authenticate against a database, you need to carefully parse the input used<br />
in SQL commands to protect against SQL injection attacks, and you should store<br />
password hashes (with salt) in the database instead of clear text or encrypted<br />
passwords.<br />
For more information about using SQL Server as a credential store and storing<br />
passwords in the database, see Chapter 12, “Data Access Security.”<br />
Notice that in all cases, if you don’t use Integrated Windows authentication, where<br />
the platform manages credentials for you, you end up using SSL. However, this<br />
benefit pertains strictly to the authentication process. If you are passing security<br />
sensitive data over the network, you must still use IPSec or SSL.<br />
SQL Authentication to the Database<br />
In some scenarios you may be forced to use SQL authentication instead of the<br />
preferred Windows authentication. For example, there may be a firewall between<br />
the Web application and database, or the Web server may not be a member of your<br />
domain for security reasons. This also prevents Windows authentication. In this<br />
case, you might use SQL authentication between the database and Web server. To<br />
secure this scenario, you should:<br />
● Use the Data Protection API (DPAPI) to secure database connection strings that<br />
contain usernames and passwords. For more information, see the following<br />
resources:
Chapter 5: Intranet Security 73<br />
●<br />
●<br />
●<br />
●<br />
●<br />
“Storing Database Connection Strings <strong>Secure</strong>ly”, in Chapter 12, “Data Access<br />
Security”<br />
“How To: Use DPAPI (Machine Store) from <strong>ASP</strong>.<strong>NET</strong>” in the Reference section<br />
of this guide<br />
“How To Use DPAPI (User Store) from <strong>ASP</strong>.<strong>NET</strong> with Enterprise Services” in<br />
the Reference section of this guide<br />
“How To: Create a DPAPI Library” in the Reference section of this guide<br />
Use IPSec or SSL between the Web server and database server to protect the clear<br />
text credentials passed over the network.<br />
Flowing the Original Caller to the Database<br />
In this scenario, calls are made from the Web application to the database using the<br />
security context of the original caller. With this approach, it’s important to note the<br />
following:<br />
● If you choose this approach, you need to use either Kerberos authentication<br />
(with accounts configured for delegation) or Basic authentication.<br />
A delegation scenario is discussed in the “Flowing the Original Caller to the<br />
Database” section later in this chapter.<br />
●<br />
●<br />
●<br />
You must also enable impersonation in <strong>ASP</strong>.<strong>NET</strong>. This means that local system<br />
resource access is performed using the original caller’s security context and as<br />
a result, ACLs on local resources such as the registry and event log require<br />
appropriate configuration.<br />
Database connection pooling is limited because original callers won’t be able<br />
to share connections. Each connection is associated with the caller’s security<br />
context.<br />
An alternate approach to flowing the user’s security context is to flow the<br />
original caller’s identity at the application level (for example, by using method<br />
and stored procedure parameters).<br />
<strong>ASP</strong>.<strong>NET</strong> to Enterprise Services to SQL Server<br />
In this scenario, <strong>ASP</strong>.<strong>NET</strong> pages call business components hosted in an Enterprise<br />
Services application that in turn connects to a database. As an example, consider an<br />
internal purchase order system that uses transactions over the intranet and allows<br />
internal departments to place orders. This scenario is shown in Figure 5.3 on the<br />
next page.
74<br />
<strong>Building</strong> <strong>Secure</strong> <strong>ASP</strong>.<strong>NET</strong> <strong>Applications</strong><br />
Web Server<br />
IIS<br />
<strong>ASP</strong>.<strong>NET</strong><br />
Database Server<br />
Enterprise<br />
Services<br />
SQL<br />
Server<br />
Figure 5.3<br />
<strong>ASP</strong>.<strong>NET</strong> calls a component within Enterprise Services which calls the database<br />
Characteristics<br />
This scenario has the following characteristics:<br />
● Users have Internet Explorer.<br />
● Components are deployed on the Web server.<br />
● The application handles sensitive data which must be secured while in transit.<br />
● Business components connect to SQL Server using Windows authentication.<br />
● Business functionality within these components is restricted based on the<br />
identity of the caller.<br />
● Serviced components are configured as a server application (out-of-process).<br />
● Components connect to the database using the server application’s process<br />
identity.<br />
● Impersonation is enabled within <strong>ASP</strong>.<strong>NET</strong> (to facilitate Enterprise Services rolebased<br />
security).<br />
<strong>Secure</strong> the Scenario<br />
In this scenario, the Web server authenticates the original caller and flows the<br />
caller’s security context to the serviced component. The serviced component authorizes<br />
access to business functionality based on the original caller’s identity. The<br />
database authenticates against the Enterprise Service application’s process identity<br />
(that is,. the database trusts the serviced components within the Enterprise Services<br />
application). When the serviced component makes calls to the database, it passes<br />
the user’s identity at the application level (by using trusted query parameters).
Chapter 5: Intranet Security 75<br />
Table 5.2: Security measures<br />
Category<br />
Detail<br />
Authentication ● Provide strong authentication at the Web server using Integrated<br />
Windows authentication.<br />
● Flow the original caller’s security context to the serviced<br />
component to support Enterprise Services (COM+) role checks.<br />
● <strong>Secure</strong> connections to the database use Windows<br />
authentication.<br />
● The database trusts the serviced component’s identity to make<br />
the database calls. The database authenticates the Enterprise<br />
Services application process identity.<br />
Authorization ● Authorize access to business logic using Enterprise Services<br />
(COM+) roles.<br />
<strong>Secure</strong> Communication ● <strong>Secure</strong> sensitive data sent between the users and the Web<br />
application by using SSL.<br />
● <strong>Secure</strong> sensitive data sent between the Web server and the<br />
database by using IPSec.<br />
The Result<br />
Figure 5.4 shows the recommended security configuration for this scenario.<br />
A<br />
B<br />
C<br />
SSL<br />
(Privacy/<br />
Integrity)<br />
NTFS<br />
Permissions<br />
(Authorization)<br />
IIS<br />
Integrated<br />
Windows<br />
Authentication<br />
A<br />
B<br />
C<br />
RPC Packet<br />
Privacy<br />
(Authentication/<br />
Privacy/Integrity)<br />
Web Server<br />
File Authorization<br />
(Authorization)<br />
<strong>ASP</strong>.<strong>NET</strong><br />
A B C<br />
Enterprise<br />
Services<br />
COM+ Roles<br />
(Authorization)<br />
Windows<br />
Authentication<br />
+ Impersonation<br />
Enterprise<br />
Services<br />
Process Identity<br />
IPSec<br />
(Privacy/Integrity)<br />
SQL Permissions<br />
Database Roles<br />
(Authorization)<br />
SQL<br />
Server<br />
Database<br />
Server<br />
Windows<br />
Authentication<br />
Figure 5.4<br />
The recommended security configuration for the <strong>ASP</strong>.<strong>NET</strong> to local Enterprise Services to SQL Server<br />
intranet scenario
76<br />
<strong>Building</strong> <strong>Secure</strong> <strong>ASP</strong>.<strong>NET</strong> <strong>Applications</strong><br />
Security Configuration Steps<br />
Before you begin, you’ll want to see the following:<br />
●<br />
●<br />
●<br />
●<br />
Creating a least privileged database account (see Chapter 12, “Data Access<br />
Security”)<br />
Configuring SSL on a Web server (see “How To: Set Up SSL on a Web Server” in<br />
the Reference section of this guide)<br />
Configuring IPSec (see “How To: Use IPSec to Provide <strong>Secure</strong> Communication<br />
Between Two Servers” in the Reference section of this guide)<br />
Configuring Enterprise Services security (see “How To: Use Role-Based Security<br />
with Enterprise Services” in the Reference section of this guide)<br />
Configuring IIS<br />
Step<br />
Disable Anonymous access<br />
for your Web application’s<br />
virtual root directory<br />
More Information<br />
Enable Integrated Windows<br />
Authentication<br />
Configuring <strong>ASP</strong>.<strong>NET</strong><br />
Step<br />
Configure your <strong>ASP</strong>.<strong>NET</strong> Web<br />
application to use Windows<br />
authentication<br />
More Information<br />
Edit Web.config in your application’s virtual directory root<br />
Set the element to:<br />
<br />
Configure your <strong>ASP</strong>.<strong>NET</strong> Web<br />
application for impersonation<br />
Edit Web.config in your Web application’s virtual directory<br />
Set the element to:<br />
<br />
Configure <strong>ASP</strong>.<strong>NET</strong> DCOM<br />
security to ensure that calls<br />
to Enterprise Services<br />
support caller impersonation<br />
Edit Machine.config and locate the element.<br />
Confirm that the comImpersonationLevel attribute is set to<br />
Impersonate (this is the default setting)<br />
Chapter 5: Intranet Security 77<br />
Configuring Enterprise Services<br />
Step<br />
Create a custom account for<br />
running Enterprise Services<br />
Configure the Enterprise<br />
Services application as a<br />
server application<br />
More Information<br />
Note: If you use a local account, you must also create a<br />
duplicate account on the SQL Server computer.<br />
This can be configured using the Component Services tool, or<br />
via the following .<strong>NET</strong> attribute placed in the service component<br />
assembly.<br />
[assembly:<br />
ApplicationActivation(ActivationOption.Server)]<br />
Configure Enterprise<br />
Services (COM+) roles<br />
Use the Component Services tool or script to add Windows<br />
users and/or groups to roles.<br />
Roles can be defined using .<strong>NET</strong> attributes within the serviced<br />
component assembly.<br />
Configure Enterprise<br />
Services to run as your<br />
custom account<br />
Configuring SQL Server<br />
Step<br />
Create a Windows account<br />
on your SQL Server<br />
computer that matches the<br />
Enterprise Services process<br />
account<br />
Configure SQL Server for<br />
Windows authentication<br />
Create a SQL Server Login<br />
for your Enterprise Services<br />
account<br />
Create a new database user<br />
and map the login name to<br />
the database user<br />
Create a new database user<br />
role and add the database<br />
user to the role<br />
Establish database<br />
permissions for the<br />
database user role<br />
This must be configured using the Component Services tool or<br />
script. You cannot use .<strong>NET</strong> attributes within the serviced<br />
component assembly.<br />
More Information<br />
The user name and password must match your custom<br />
Enterprise Services account.<br />
Give the account the following privileges:<br />
- Access this computer from the network<br />
- Deny logon locally<br />
- Log on as a batch job<br />
This grants access to the SQL Server.<br />
This grants access to the specified database.<br />
Grant minimum permissions<br />
For details, see Chapter 12, “Data Access Security”
78<br />
<strong>Building</strong> <strong>Secure</strong> <strong>ASP</strong>.<strong>NET</strong> <strong>Applications</strong><br />
Configuring <strong>Secure</strong> Communication<br />
Step<br />
More Information<br />
Configure the Web site for See “How To: Set Up SSL on a Web Server” in the Reference<br />
SSL<br />
section of this guide.<br />
Configure IPSec between See “How To: Use IPSec to Provide <strong>Secure</strong> Communication<br />
Web server and database Between Two Servers” in the Reference section of this guide.<br />
server<br />
Analysis<br />
●<br />
●<br />
●<br />
●<br />
●<br />
<strong>ASP</strong>.<strong>NET</strong> and Enterprise Services are running as least privileged accounts, so<br />
potential damage from compromise is mitigated. If either process identity were<br />
compromised, the account’s limited privileges reduce the scope of damage. Also,<br />
in the case of <strong>ASP</strong>.<strong>NET</strong>, if malicious script were injected, potential damage is<br />
constrained.<br />
The <strong>ASP</strong>.<strong>NET</strong> application must be configured for impersonation in order to flow<br />
the security context of the original caller to the Enterprise Services components<br />
(to support Enterprise Services (COM+) role-based authorization). If you do not<br />
impersonate, role checks are made against the process identity (that is, the<br />
<strong>ASP</strong>.<strong>NET</strong> worker process). Impersonation affects who you authorize resources<br />
against.<br />
Without impersonation, system resource checks are against the <strong>ASP</strong>.<strong>NET</strong> process<br />
identity. With impersonation, system resource checks are made against the<br />
original caller. For more information about accessing system resources from<br />
<strong>ASP</strong>.<strong>NET</strong>, see “Accessing System Resources” in Chapter 8, “<strong>ASP</strong>.<strong>NET</strong> Security.”<br />
By using Enterprise Services (COM+) roles, access checks are pushed to the<br />
middle tier, where the business logic is located. In this case, callers are checked at<br />
the gate, mapped to roles, and calls to business logic are based on roles. This<br />
avoids unnecessary calls to the back end. Another advantage of Enterprise<br />
Services (COM+) roles is that you can create and administer roles at deployment<br />
rime, using the Component Services Manager.<br />
Windows authentication to SQL means you avoid storing credentials in files and<br />
sending them across the network.<br />
The use of a local account to run the Enterprise Services application, together<br />
with a duplicated account on the database server, also works in the presence of a<br />
firewall where the ports required for Windows authentication may not be open.<br />
The use of Windows authentication and domain accounts may not work in this<br />
scenario.
Chapter 5: Intranet Security 79<br />
Pitfalls<br />
●<br />
●<br />
The use of a duplicated Windows account on the database server (one that matches<br />
the Enterprise Services process account) results in increased administration.<br />
Passwords should be manually updated and synchronized on a periodic basis.<br />
Because .<strong>NET</strong> role-based security is based on Windows group membership, this<br />
solution relies on Windows groups being set up at the correct level of granularity<br />
to match the categories of users (sharing the same security privileges) who access<br />
the application.<br />
<strong>ASP</strong>.<strong>NET</strong> to Web Services to SQL Server<br />
In this scenario, a Web server that runs <strong>ASP</strong>.<strong>NET</strong> pages connects to a Web service<br />
on a remote server. This server in turn connects to a remote database server. As an<br />
example, consider a HR Web application that provides sensitive data specific to a<br />
user. The application relies on the Web service for data retrieval. The basic model<br />
for this application scenario is shown in Figure 5.5.<br />
Web Server<br />
Application<br />
Server<br />
Database Server<br />
IIS<br />
<strong>ASP</strong>.<strong>NET</strong><br />
Web<br />
Service<br />
SQL<br />
Server<br />
Figure 5.5<br />
<strong>ASP</strong>.<strong>NET</strong> to remote Web Service to SQL Server<br />
The Web service exposes a method that allows an individual employee to retrieve<br />
his or her own personal details. Details must be provided only to authenticated<br />
individuals using the Web application. The Web service also provides a method that<br />
supports the retrieval of any employee details. This functionality must be available<br />
only to members of the HR or payroll department. In this scenario, employees are<br />
categorized into three Windows groups:<br />
● HRDept (members of the HR department)<br />
Members of this group can retrieve details about any employee.<br />
● PayrollDept (members of the Payroll department)<br />
Members of this group can retrieve details about any employee.<br />
● Employees (all employees)<br />
Members of this group can only retrieve their own details.<br />
Due to the sensitive nature of the data, the traffic between all nodes should be secure.
80<br />
<strong>Building</strong> <strong>Secure</strong> <strong>ASP</strong>.<strong>NET</strong> <strong>Applications</strong><br />
Characteristics<br />
●<br />
●<br />
●<br />
●<br />
●<br />
●<br />
●<br />
Users have Internet Explorer 5.x or later.<br />
All computers run Windows 2000 or later.<br />
User accounts are in Active <strong>Directory</strong> within a single forest.<br />
The application flows the original caller’s security context all the way to the<br />
database.<br />
All tiers use Windows authentication.<br />
Domain user accounts are configured for delegation.<br />
The database does not support delegation.<br />
<strong>Secure</strong> the Scenario<br />
In this scenario, the Web server that hosts the <strong>ASP</strong>.<strong>NET</strong> Web application authenticates<br />
the original caller’s identity and flows their security context to the remote<br />
server that hosts the Web service. This enables authorization checks to be applied to<br />
Web methods to either allow or deny access to the original caller. The database<br />
authenticates against the Web service process identity (the database trusts the Web<br />
service). The Web service in turn makes calls to the database and passes the user’s<br />
identity at the application level using stored procedure parameters.<br />
Table 5.3: Security measures<br />
Category<br />
Detail<br />
Authentication ● The Web application authenticates users by using Integrated<br />
Windows authentication from IIS.<br />
● The Web service uses Integrated Windows authentication from IIS.<br />
It authenticates the original caller’s security context delegated by<br />
the Web application.<br />
● The Kerberos authentication protocol is used to flow the original<br />
caller security context from the Web application to the Web service<br />
using delegation.<br />
● Windows authentication is used to connect to the database using<br />
the <strong>ASP</strong>.<strong>NET</strong> process account.<br />
Authorization ● The Web application performs role checks against the original<br />
caller to restrict access to pages.<br />
● Access to the Web service methods is controlled by using .<strong>NET</strong><br />
roles based on the original caller’s Windows group membership.<br />
<strong>Secure</strong> Communication ● Sensitive data sent between the original callers and the Web<br />
application and Web service is secured by using SSL.<br />
● Sensitive data sent between the Web service and the database is<br />
secure by using IPSec.
Chapter 5: Intranet Security 81<br />
The Result<br />
Figure 5.6 shows the recommended security configuration for this scenario.<br />
NTFS<br />
Permissions<br />
(Authorization)<br />
File Authorization<br />
(Authorization)<br />
NTFS<br />
Permissions<br />
(Authorization)<br />
File Authorization<br />
.<strong>NET</strong> Roles<br />
(Authorization)<br />
Alice<br />
Mary<br />
Bob<br />
SSL<br />
(Privacy/<br />
Integrity)<br />
IIS<br />
Alice<br />
Mary<br />
Bob<br />
Web Server<br />
Integrated Windows<br />
Authentication<br />
(Kerberos)<br />
<strong>ASP</strong>.<strong>NET</strong><br />
(Web App)<br />
Windows<br />
Authentication<br />
+ Impersonation<br />
Alice<br />
Mary<br />
Bob<br />
SSL<br />
(Privacy/<br />
Integrity)<br />
IIS<br />
Integrated<br />
Windows<br />
Authentication<br />
Application Server<br />
<strong>ASP</strong>.<strong>NET</strong><br />
Identity<br />
<strong>ASP</strong>.<strong>NET</strong><br />
(Web<br />
Service)<br />
Windows<br />
Authentication<br />
IPSec<br />
(Privacy/<br />
Integrity)<br />
Windows<br />
Authentication<br />
SQL<br />
Server<br />
Database Server<br />
Figure 5.6<br />
The recommended security configuration for the <strong>ASP</strong>.<strong>NET</strong> to Web Service to SQL Server intranet<br />
scenario<br />
Security Configuration Steps<br />
Before you begin, you’ll want to see the following:<br />
●<br />
●<br />
Configuring SSL on a Web server (see “How To: Set Up SSL on a Web Server” in<br />
the Reference section of this guide)<br />
Configuring IPSec (see “How To: Use IPSec to Provide <strong>Secure</strong> Communication<br />
Between Two Servers” in the Reference section of this guide)
82<br />
<strong>Building</strong> <strong>Secure</strong> <strong>ASP</strong>.<strong>NET</strong> <strong>Applications</strong><br />
Configuring the Web Server (that Hosts the Web Application)<br />
Configure IIS<br />
Step<br />
Disable Anonymous access<br />
for your Web application’s<br />
virtual root directory<br />
Enable Windows Integrated<br />
Authentication for your Web<br />
application’s virtual root<br />
More Information<br />
Configure <strong>ASP</strong> .<strong>NET</strong><br />
Step<br />
Configure your <strong>ASP</strong>.<strong>NET</strong> Web<br />
application to use Windows<br />
authentication<br />
Configure your <strong>ASP</strong>.<strong>NET</strong> Web<br />
application for impersonation<br />
More Information<br />
Edit Web.config in your Web application’s virtual directory<br />
Set the element to:<br />
<br />
Edit Web.config in your Web application’s virtual directory<br />
Set the element to:<br />
<br />
Configuring the Application Server (that Hosts the Web Service)<br />
Configure IIS<br />
Step<br />
Disable Anonymous access<br />
for your Web service’s virtual<br />
root directory<br />
Enable Windows Integrated<br />
Authentication for your Web<br />
service’s virtual root directory<br />
More Information
Chapter 5: Intranet Security 83<br />
Configure <strong>ASP</strong> .<strong>NET</strong><br />
Step<br />
Change the <strong>ASP</strong><strong>NET</strong><br />
password to a known value<br />
More Information<br />
<strong>ASP</strong><strong>NET</strong> is a least privileged local account used by default to run<br />
the <strong>ASP</strong>.<strong>NET</strong> Web applications.<br />
Set the <strong>ASP</strong><strong>NET</strong> account’s password to a know value by using<br />
Local Users and Groups.<br />
Edit Machine.config located in<br />
%windir%\Microsoft.<strong>NET</strong>\Framework\ v1.0.3705\CONFIG<br />
and reconfigure the password attribute on the<br />
element:<br />
Default<br />
<br />
Becomes<br />
<br />
Configure your <strong>ASP</strong>.<strong>NET</strong> Web<br />
service to use Windows<br />
authentication<br />
Make sure impersonation is<br />
off<br />
Edit Web.config in your Web service’s virtual directory<br />
Set the element to:<br />
<br />
Impersonation is off by default; however, double check to ensure<br />
that it’s turned off in Web.config, as follows:<br />
<br />
Note that because impersonation is disabled by default, the<br />
same effect can be achieved by removing the <br />
element.<br />
Configure SQL Server<br />
Step<br />
Create a Windows account<br />
on your SQL Server<br />
computer that matches the<br />
<strong>ASP</strong>.<strong>NET</strong> process account<br />
used to run the Web service<br />
Configure SQL Server for<br />
Windows authentication<br />
More Information<br />
The user name and password must match your custom <strong>ASP</strong>.<strong>NET</strong><br />
account.<br />
Give the account the following privileges:<br />
- Access this computer from the network<br />
- Deny logon locally<br />
- Log on as a batch job<br />
(continued)
84<br />
<strong>Building</strong> <strong>Secure</strong> <strong>ASP</strong>.<strong>NET</strong> <strong>Applications</strong><br />
Configure SQL Server (continued)<br />
Step<br />
Create a SQL Server Login<br />
for your custom <strong>ASP</strong>.<strong>NET</strong><br />
account<br />
Create a new database user<br />
and map the login name to<br />
the database user<br />
Create a new database user<br />
role and add the database<br />
user to the role<br />
Establish database<br />
permissions for the<br />
database user role<br />
More Information<br />
This grants access to the SQL Server.<br />
This grants access to the specified database.<br />
Grant minimum permissions<br />
Configuring <strong>Secure</strong> Communication<br />
Step<br />
More Information<br />
Configure the Web site on See “How To: Set Up SSL on a Web Server” in the Reference<br />
the Web server for SSL section of this guide.<br />
Configure IPSec between See “How To: Use IPSec to Provide <strong>Secure</strong> Communication<br />
Web server and database Between Two Servers” in the Reference section of this guide.<br />
server<br />
Analysis<br />
●<br />
●<br />
●<br />
●<br />
Integrated Windows authentication in IIS is ideal in this scenario because all<br />
users are using Windows 2000 or later, Internet Explorer 5.x or later, and have<br />
accounts in Active <strong>Directory</strong>, which makes it possible to use the Kerberos authentication<br />
protocol (which supports delegation). This allows you to flow the security<br />
context of the user across computer boundaries.<br />
End user accounts must be NOT marked as “Sensitive and cannot be delegated”<br />
in Active <strong>Directory</strong>. The Web server computer account must be marked as<br />
“Trusted for delegation” in Active <strong>Directory</strong>. For more details, see “How To:<br />
Implement Kerberos Delegation for Windows 2000” in the Reference section of<br />
this guide.<br />
<strong>ASP</strong>.<strong>NET</strong> on the Web server and application server runs with a least privileged<br />
local account (the local <strong>ASP</strong><strong>NET</strong> account), so potential damage from compromise<br />
is mitigated.<br />
The Web service and Web application are both configured for Windows authentication.<br />
IIS on both computers is configured for Integrated Windows authentication.
Chapter 5: Intranet Security 85<br />
●<br />
When making a call to the Web service from the Web application, no credentials<br />
are passed by default. They are required in order to respond to the network<br />
authentication challenge issued by IIS on the downstream Web server. You must<br />
specify this explicitly by setting the Credentials property of the Web service<br />
proxy as shown in the following:<br />
wsproxy.Credentials = CredentialCache.DefaultCredentials;<br />
●<br />
●<br />
For more information about calling Web services with credentials, see Chapter<br />
10, “Web Services Security.”<br />
The Web application is configured for impersonation. As a result, calls from the<br />
Web application to the Web service flow the original caller’s security context and<br />
allow the Web service to authenticate (and authorize) the original caller.<br />
.<strong>NET</strong> roles are used within the Web service to authorize the users based on the<br />
Windows group to which they belong (HRDept, PayrollDept and Employees).<br />
Members of HRDept and PayrollDept can retrieve employee details for any<br />
employee, while members of the Employees group are authorized to retrieve<br />
only their own details.<br />
Web methods can be annotated with the PrincipalPermissionAttribute class to<br />
demand specific role membership, as shown in the following code sample.<br />
Notice that PrincipalPermission can be used instead of<br />
PrincipalPermissionAttribute. This is a common feature of all .<strong>NET</strong> attribute<br />
types.<br />
[WebMethod]<br />
[PrincipalPermission(SecurityAction.Demand,<br />
Role=@"DomainName\HRDept)]<br />
public DataSet RetrieveEmployeeDetails()<br />
{<br />
}<br />
●<br />
●<br />
The attribute shown in the preceding code means that only members<br />
of the DomainName\HRDept Windows group are allowed to call the<br />
RetrieveEmployeeDetails method. If any nonmember attempts to call<br />
the method, a security exception is thrown.<br />
<strong>ASP</strong>.<strong>NET</strong> File Authorization (within the Web application and Web service)<br />
performs ACL checks against the caller for any file type for which a mapping<br />
exists in the IIS Metabase that maps the file type to Aspnet_isapi.dll. Static file<br />
types (such as .jpg, .gif, .htm, and so on), for which an ISAPI mapping does not<br />
exist are checked by IIS (again using the ACL attached to the file).<br />
Because the Web application is configured for impersonation, resources accessed<br />
by the application itself must be configured with an ACL that grants at least read<br />
access to the original caller.
86<br />
<strong>Building</strong> <strong>Secure</strong> <strong>ASP</strong>.<strong>NET</strong> <strong>Applications</strong><br />
●<br />
●<br />
●<br />
●<br />
The Web service does not impersonate or delegate; therefore, it accesses local<br />
system resources and the database using the <strong>ASP</strong>.<strong>NET</strong> process identity. As a<br />
result, all calls are made using the single process account. This enables database<br />
connection pooling to be used. If the database doesn’t support delegations (such<br />
as SQL Server 7.0 or earlier), this scenario is a good option.<br />
Windows authentication to SQL Server means you avoid storing credentials on<br />
the Web server and it also means that credentials are not sent across the network<br />
to the SQL Server computer.<br />
SSL between the original caller and Web server protects the data passed to and<br />
from the Web application.<br />
IPSec between the downstream Web server and database protects the data<br />
passed to and from the database.<br />
Pitfalls<br />
●<br />
●<br />
●<br />
The use of a duplicated Windows account on the database server (one that<br />
matches the <strong>ASP</strong>.<strong>NET</strong> process account) results in increased administration.<br />
Passwords should be manually updated and synchronized on a periodic basis.<br />
As an alternative, consider using least-privileged domain accounts. For more<br />
information about choosing an <strong>ASP</strong>.<strong>NET</strong> process identity, see Chapter 9,<br />
“<strong>ASP</strong>.<strong>NET</strong> Security.”<br />
Because .<strong>NET</strong> role-based security is based on Windows group membership, this<br />
solution relies on Windows groups being set up at the correct level of granularity<br />
to match the categories of users (sharing the same security privileges) who will<br />
access the application.<br />
Kerberos delegation is unrestricted and as a result you must carefully control<br />
which applications identities run on the Web server. To raise the bar on security,<br />
limit the scope of the domain account’s reach by removing the account from<br />
Domain Users group and provide access only from appropriate computers. For<br />
more information, see “Default Access Control Settings” white paper.<br />
Q&A<br />
● The database doesn’t know who the original caller is. How can I create an<br />
audit trail?<br />
Audit end user activity within the Web service or pass the identity of the user<br />
explicitly as a parameter of the data access call.<br />
Related Scenarios<br />
If you need to connect to non SQL Server databases, or you currently use SQL<br />
authentication, you must pass database account credentials explicitly using the<br />
connection string. If you do so, make sure that you securely store the connection<br />
string.
Chapter 5: Intranet Security 87<br />
For more information, see “Storing Database Connection Strings <strong>Secure</strong>ly” within<br />
Chapter 12, “Data Access Security.”<br />
<strong>ASP</strong>.<strong>NET</strong> to Remoting to SQL Server<br />
In this scenario, a Web server that runs <strong>ASP</strong>.<strong>NET</strong> pages makes secure connections to<br />
a remote component on a remote application server. The Web server communicates<br />
with the component by using .<strong>NET</strong> Remoting over the HTTP channel. The remote<br />
component is hosted by <strong>ASP</strong>.<strong>NET</strong>. This is shown in Figure 5.7.<br />
Web Server<br />
Application Server<br />
Database Server<br />
IIS<br />
<strong>ASP</strong>.<strong>NET</strong><br />
IIS<br />
<strong>ASP</strong>.<strong>NET</strong><br />
SQL<br />
Server<br />
.<strong>NET</strong> Remoting<br />
Figure 5.7<br />
<strong>ASP</strong>.<strong>NET</strong> to remoting using .<strong>NET</strong> Remoting to SQL Server<br />
Characteristics<br />
●<br />
●<br />
●<br />
●<br />
●<br />
Users have various types of Web browser.<br />
The remote component is hosted by <strong>ASP</strong>.<strong>NET</strong>.<br />
The Web application communicates with the remote component using the HTTP<br />
channel.<br />
The <strong>ASP</strong>.<strong>NET</strong> application calls the .<strong>NET</strong> remote component and passes the<br />
original caller’s credentials for authentication. These are available from Basic<br />
authentication.<br />
The data is sensitive and therefore must be secured between processes and<br />
computers.<br />
<strong>Secure</strong> the Scenario<br />
In this scenario, the Web server that hosts the <strong>ASP</strong>.<strong>NET</strong> Web application authenticates<br />
the original callers. The Web application is able to retrieve the caller’s authentication<br />
credentials (user name and password) from HTTP server variables. It can<br />
then use them to connect to the application server that hosts the remote component,<br />
by configuring the remote component proxy. The database uses Windows authentication<br />
to authenticate against the <strong>ASP</strong>.<strong>NET</strong> process identity (that is, the database<br />
trusts the remote component). The remote component in turn calls the database and<br />
passes the original caller’s identity at the application level using stored procedure<br />
parameters.
88<br />
<strong>Building</strong> <strong>Secure</strong> <strong>ASP</strong>.<strong>NET</strong> <strong>Applications</strong><br />
Table 5.4: Security measures<br />
Category<br />
Detail<br />
Authentication ● Authenticate users using Basic authentication from IIS (in addition<br />
to SSL).<br />
● Use Windows authentication from remote component (<strong>ASP</strong>.<strong>NET</strong>/IIS).<br />
● Use Windows authentication to connect to the database using a<br />
least privileged <strong>ASP</strong>.<strong>NET</strong> account.<br />
Authorization ● ACL checks against original caller on the Web server.<br />
● Role checks within the remote component against original caller.<br />
● Database permissions against the <strong>ASP</strong>.<strong>NET</strong> (remote component)<br />
identity.<br />
<strong>Secure</strong> Communication ● <strong>Secure</strong> sensitive data sent between the users and the Web<br />
application and remote objects hosted in IIS using SSL.<br />
● <strong>Secure</strong> sensitive data sent between the Web server and the<br />
database using IPSec.<br />
The Result<br />
Figure 5.8 shows the recommended security configuration for this scenario.<br />
NTFS<br />
Permissions<br />
(Authorization)<br />
File Authorization<br />
(Authorization)<br />
NTFS<br />
Permissions<br />
(Authorization)<br />
File Authorization<br />
.<strong>NET</strong> Roles<br />
(Authorization)<br />
Alice<br />
Mary<br />
Bob<br />
IIS<br />
Alice<br />
Mary<br />
Bob<br />
<strong>ASP</strong>.<strong>NET</strong><br />
Alice<br />
Mary<br />
Bob<br />
IIS<br />
<strong>ASP</strong>.<strong>NET</strong><br />
Component<br />
SSL<br />
(Privacy/<br />
Integrity)<br />
Basic<br />
Authentication<br />
Web Server<br />
Windows<br />
Authentication<br />
SSL<br />
(Privacy/<br />
Integrity)<br />
Integrated<br />
Windows<br />
Authentication<br />
Application Server<br />
<strong>ASP</strong>.<strong>NET</strong><br />
Identity<br />
IPSec<br />
(Privacy/<br />
Integrity)<br />
Windows<br />
Authentication<br />
SQL<br />
Server<br />
Database<br />
Permissions<br />
(Authorization)<br />
Database Server<br />
Figure 5.8<br />
The recommended security configuration for the <strong>ASP</strong>.<strong>NET</strong> to remote Web Service to SQL Server<br />
intranet scenario
Chapter 5: Intranet Security 89<br />
Security Configuration Steps<br />
Before you begin, you’ll want to see the following:<br />
●<br />
●<br />
●<br />
Creating a least privileged database account (see Chapter 12, “Data Access<br />
Security”)<br />
Configuring SSL on a Web server (see “How To: Set Up SSL on a Web Server” in<br />
the Reference section of this guide)<br />
Configuring IPSec (see “How To: Use IPSec to Provide <strong>Secure</strong> Communication<br />
Between Two Servers” in the Reference section of this guide)<br />
Configuring the Web Server<br />
Configure IIS<br />
Step<br />
Disable Anonymous access<br />
for your Web application’s<br />
virtual root directory<br />
More Information<br />
Enable Basic authentication<br />
Configure <strong>ASP</strong>.<strong>NET</strong><br />
Step<br />
Configure your <strong>ASP</strong>.<strong>NET</strong> Web<br />
application to use Windows<br />
authentication<br />
Use SSL to protect the Basic authentication credentials.<br />
More Information<br />
Edit Web.config in your application’s virtual directory root<br />
Set the element to:<br />
<br />
Configure the Application Server<br />
Configure IIS<br />
Step<br />
More Information<br />
Disable Anonymous access<br />
for your Web application’s<br />
virtual root directory<br />
Enable Integrated Windows<br />
authentication
90<br />
<strong>Building</strong> <strong>Secure</strong> <strong>ASP</strong>.<strong>NET</strong> <strong>Applications</strong><br />
Configure <strong>ASP</strong> .<strong>NET</strong><br />
Step<br />
Configure your remote<br />
component (within <strong>ASP</strong>.<strong>NET</strong>)<br />
to use Windows authentication<br />
Change the <strong>ASP</strong><strong>NET</strong><br />
password to a known value<br />
More Information<br />
Edit Web.config in your remote component’s virtual directory<br />
root<br />
Set the element to:<br />
<br />
<strong>ASP</strong><strong>NET</strong> is a least privileged local account used by default to run<br />
<strong>ASP</strong>.<strong>NET</strong> Web applications (and in this case the remote component<br />
host process).<br />
Set the <strong>ASP</strong><strong>NET</strong> account’s password to a know value by using<br />
Local Users and Groups.<br />
Edit Machine.config located in<br />
%windir%\Microsoft.<strong>NET</strong>\Framework\ v1.0.3705\CONFIG<br />
and reconfigure the password attribute on the <br />
element<br />
Default<br />
<br />
Becomes<br />
<br />
Make sure impersonation is<br />
off<br />
Impersonation is off by default; however, double check to ensure<br />
that it’s turned off in web.config, as shown below:<br />
<br />
The same effect can be achieved by removing the <br />
element.<br />
Configure SQL Server<br />
Step<br />
Create a Windows account<br />
on your SQL Server<br />
computer that matches the<br />
<strong>ASP</strong>.<strong>NET</strong> process account<br />
used to run the Web<br />
service<br />
Configure SQL Server for<br />
Windows authentication<br />
More Information<br />
The user name and password must match your custom <strong>ASP</strong>.<strong>NET</strong><br />
account.<br />
Give the account the following privileges:<br />
- Access this computer from the network<br />
- Deny logon locally<br />
- Log on as a batch job
Chapter 5: Intranet Security 91<br />
Step<br />
Create a SQL Server Login<br />
for your custom <strong>ASP</strong>.<strong>NET</strong><br />
account<br />
Create a new database<br />
user and map the login<br />
name to the database user<br />
Create a new database<br />
user role and add the<br />
database user to the role<br />
Establish database<br />
permissions for the<br />
database user role<br />
More Information<br />
This grants access to the SQL Server<br />
This grants access to the specified database<br />
Grant minimum permissions<br />
Configuring <strong>Secure</strong> Communication<br />
Step<br />
More Information<br />
Configure the Web site on See “How To: Set Up SSL on a Web Server” in the Reference<br />
the Web server for SSL section of this guide.<br />
Configure the Web site on See “How To: Set Up SSL on a Web Server” in the Reference<br />
the application server for section of this guide.<br />
SSL<br />
Configure IPSec between See “How To: Use IPSec to Provide <strong>Secure</strong> Communication<br />
application server and Between Two Servers in the Reference section of this guide.”<br />
database server<br />
Analysis<br />
●<br />
●<br />
<strong>ASP</strong>.<strong>NET</strong> on the Web server and application sever is running as a least privileged<br />
local account, so potential damage from compromise is mitigated. The default<br />
<strong>ASP</strong><strong>NET</strong> account is used in both cases.<br />
Use of the <strong>ASP</strong><strong>NET</strong> local account (duplicated on the SQL Server computer)<br />
further reduces the potential security risk. A duplicated Windows account on<br />
the database server allows the remote component to run with a least privilege<br />
<strong>ASP</strong>.<strong>NET</strong> account on the application server.<br />
Basic authentication at the Web server allows the user’s credentials to be used by<br />
the Web application to respond to Windows authentication challenges from the<br />
application server.<br />
To call the remote component using the caller’s credentials, the Web application<br />
configures the remote component proxy as shown in the code fragment on the<br />
next page.
92<br />
<strong>Building</strong> <strong>Secure</strong> <strong>ASP</strong>.<strong>NET</strong> <strong>Applications</strong><br />
string pwd = Request.ServerVariables["AUTH_PASSWORD"];<br />
string uid = Request.ServerVariables["AUTH_USER"];<br />
IDictionary channelProperties =<br />
ChannelServices.GetChannelSinkProperties(proxy);<br />
NetworkCredential credentials;<br />
credentials = new NetworkCredential(uid, pwd);<br />
ObjRef objectReference = RemotingServices.Marshal(proxy);<br />
Uri objectUri = new Uri(objectReference.URI);<br />
CredentialCache credCache = new CredentialCache();<br />
credCache.Add(objectUri, "Negotiate", credentials);<br />
channelProperties["credentials"] = credCache;<br />
channelProperties["preauthenticate"] = true;<br />
●<br />
●<br />
●<br />
●<br />
●<br />
●<br />
For more information about flowing security credentials to a remote component,<br />
see Chapter 11, “.<strong>NET</strong> Remoting Security.”<br />
Impersonation is not enabled within the <strong>ASP</strong>.<strong>NET</strong> Web application, because the<br />
remoting proxy is specifically configured using the user’s credentials obtained<br />
by Basic authentication. Any other resource accessed by the Web application uses<br />
the security context provided by the <strong>ASP</strong>.<strong>NET</strong> process account.<br />
SSL between the user and Web server protects the data passed to and from the<br />
Web server and also protects the Basic credentials passed in clear text during the<br />
authentication process.<br />
Integrated Windows authentication at the application server provides .<strong>NET</strong> role<br />
checks against the original caller. The roles correspond to Windows groups.<br />
Role-based checks can be performed, even without impersonation.<br />
<strong>ASP</strong>.<strong>NET</strong> File Authorization performs ACL checks against the caller for any file<br />
type for which a mapping exists in the IIS Metabase that maps the file type to<br />
aspnet_isapi.dll. IIS performs access checks for static files (not mapped to an<br />
ISAPI extension within IIS).<br />
Because impersonation is not enabled on the application server, any local or<br />
remote resource access performed by the remote component does so using the<br />
<strong>ASP</strong><strong>NET</strong> security context. ACLs should be set accordingly.<br />
Windows authentication to SQL Server means you avoid storing credentials on<br />
the application server and it also means that credentials are not sent across the<br />
network to the SQL Server computer.<br />
Pitfalls<br />
●<br />
●<br />
The use of a duplicated Windows account on the database server (one that<br />
matches the <strong>ASP</strong>.<strong>NET</strong> process account) results in increased administration.<br />
Passwords should be manually updated and synchronized on a periodic basis.<br />
Because .<strong>NET</strong> role-based security is based on Windows group membership, this<br />
solution relies on Windows groups being set up at the correct level of granularity<br />
to match the categories of users (sharing the same security privileges) who will<br />
access the application.
Chapter 5: Intranet Security 93<br />
Related Scenarios<br />
The Web server uses Kerberos to authenticate callers. Kerberos delegation is used to<br />
flow the original caller’s security context across to the remote component on the<br />
application server.<br />
This approach requires that all user accounts be configured for delegation. The Web<br />
application would also be configured for impersonation and would use<br />
DefaultCredentials to configure the remote component proxy. This technique is<br />
discussed further in the “Flowing the Original Caller” section of Chapter 11, “.<strong>NET</strong><br />
Remoting Security.”<br />
Flowing the Original Caller to the Database<br />
The scenarios discussed earlier have used the trusted subsystem model and in all<br />
cases the database has trusted the application server or Web server to correctly<br />
authenticate and authorize users. While the trusted subsystem model offers many<br />
advantages, some scenarios (perhaps for auditing reasons) may require you to use<br />
the impersonation/delegation model and flow the original caller’s security context<br />
across computer boundaries all the way to the database.<br />
Typical reasons why you may need to flow the original caller to the database<br />
include:<br />
● You need granular access in the database and permissions are restricted by object.<br />
Specific users or groups can read, while others can write to individual objects.<br />
This is in contrast to less granular task-based authorization, where role membership<br />
determines read and write capabilities for specific objects.<br />
● You may want to use the auditing capabilities of the platform, rather than flow<br />
identity and perform auditing at the application level.<br />
If you do choose an impersonation/delegation model (or are required to do so due<br />
to corporate security policy) and flow the original caller’s context through the tiers<br />
of your application to the back end, you must design with delegation and network<br />
access in mind (which is nontrivial when spanning multiple computers). The<br />
pooling of shared resources (such as database connections) also becomes a key issue<br />
and can significantly reduce application scalability.<br />
This section shows you how to implement the impersonation/delegation for two of<br />
the most common application scenarios:<br />
● <strong>ASP</strong>.<strong>NET</strong> to SQL Server<br />
● <strong>ASP</strong>.<strong>NET</strong> to Enterprise Services to SQL Server<br />
For more information about the trusted subsystem and impersonation/delegation<br />
models and their relative merits, see Chapter 3, “Authentication and Authorization.”
94<br />
<strong>Building</strong> <strong>Secure</strong> <strong>ASP</strong>.<strong>NET</strong> <strong>Applications</strong><br />
<strong>ASP</strong>.<strong>NET</strong> to SQL Server<br />
In this scenario, calls to the database are made using the security context of the<br />
original caller. Authentication options described in this section include Basic and<br />
Integrated Windows authentication. A Kerberos delegation scenario is described<br />
within the “<strong>ASP</strong>.<strong>NET</strong> to Enterprise Services to SQL Server” section.<br />
Using Basic Authentication at the Web Server<br />
The following configuration settings for Basic authentication enable you to flow the<br />
original caller all the way to the database.<br />
Table 5.5: Security measures<br />
Category<br />
Detail<br />
Authentication ● Authenticate users by using Basic authentication from IIS.<br />
● Use Windows authentication within <strong>ASP</strong>.<strong>NET</strong>.<br />
● Turn on impersonation in <strong>ASP</strong>.<strong>NET</strong>.<br />
● Use Windows authentication to communicate with SQL Server.<br />
Authorization ● Use ACL checks against the original caller on the Web server.<br />
● If the original callers are mapped to Windows groups (based on<br />
application requirements, for example, Managers, Tellers, and so<br />
on) then you can use .<strong>NET</strong> role checks against the original caller<br />
to restrict access to methods.<br />
<strong>Secure</strong> Communication ● <strong>Secure</strong> the clear text credentials sent between the Web server<br />
and the database by using SSL.<br />
● To secure all sensitive data sent between the Web application<br />
and database, use IPSec.<br />
With this approach, it’s important to note the following points:<br />
●<br />
●<br />
Basic authentication prompts the user with a pop-up dialog box into which they<br />
can type credentials (user name and password).<br />
The database must recognize the original caller. If the Web server and database<br />
are in different domains, appropriate trust relationships must be enabled to<br />
allow it to authenticate the original caller.<br />
Using Integrated Windows Authentication at the Web Server<br />
Integrated Windows authentication results in either NTLM or Kerberos authentication<br />
and is dependent upon the client and server computer configurations.<br />
NTLM authentication does not support delegation and as a result does not allow<br />
you to flow the original caller’s security context from the Web server to a physically<br />
remote database. The single network hop allowed for NTLM authentication is used
Chapter 5: Intranet Security 95<br />
between the browser and Web server. To use NTLM authentication, the SQL Server<br />
must be installed on the Web server, which is likely to be appropriate only for very<br />
small intranet applications.<br />
<strong>ASP</strong>.<strong>NET</strong> to Enterprise Services to SQL Server<br />
In this scenario, <strong>ASP</strong>.<strong>NET</strong> pages call business components hosted in a remote<br />
Enterprise Services application that in turn talk to a database. The original caller’s<br />
security context flows all the way from the browser to the database. This is shown<br />
in Figure 5.9.<br />
Web Server<br />
Application<br />
Server<br />
Database Server<br />
IIS<br />
<strong>ASP</strong>.<strong>NET</strong><br />
Enterprise<br />
Services<br />
SQL<br />
Server<br />
Figure 5.9<br />
<strong>ASP</strong>.<strong>NET</strong> calls a component within Enterprise Services which calls the database<br />
Characteristics<br />
● Users have Internet Explorer 5.x or later.<br />
● All computers are Windows 2000 or later.<br />
● User accounts are maintained in Active <strong>Directory</strong> within a single forest.<br />
● The application flows the original caller’s security context (at the operating<br />
system level) all the way to the database.<br />
● All tiers use Windows authentication.<br />
● Domain user accounts are configured for delegation and the account used to run<br />
the Enterprise Services application must be marked as “Trusted for delegation”<br />
within Active <strong>Directory</strong>.<br />
<strong>Secure</strong> the Scenario<br />
In this scenario, the Web server authenticates the caller. You must then configure<br />
<strong>ASP</strong>.<strong>NET</strong> for impersonation in order to flow the original caller’s security context to<br />
the remote Enterprise Services application. Within the Enterprise Services application,<br />
component code must explicitly impersonate the caller (using<br />
CoImpersonateClient) in order to ensure the caller’s context flows to the database.
96<br />
<strong>Building</strong> <strong>Secure</strong> <strong>ASP</strong>.<strong>NET</strong> <strong>Applications</strong><br />
Table 5.6: Security measures<br />
Category<br />
Detail<br />
Authentication ● All tiers support Kerberos authentication (the Web server, the<br />
application server, and database server).<br />
Authorization ● Authorization checks are performed in the middle tier with<br />
Enterprise Services (COM+) roles against the original caller’s<br />
identity.<br />
<strong>Secure</strong> Communication ● SSL is used between the browser and the Web server to secure<br />
sensitive data.<br />
● RPC Packet Privacy (providing encryption) is used between <strong>ASP</strong>.<strong>NET</strong><br />
and the serviced components within the remote Enterprise<br />
Services application.<br />
● IPSec is used between the serviced components and the<br />
database.<br />
The Result<br />
Figure 5.10 shows the recommended security configuration for this scenario.<br />
Integrated<br />
Windows<br />
(Kerberos)<br />
(Authentication)<br />
Windows<br />
(Authentication)<br />
A<br />
A<br />
Internet<br />
Explorer<br />
B<br />
C<br />
IIS<br />
B<br />
C<br />
<strong>ASP</strong>.<strong>NET</strong><br />
Impersonation<br />
Clients<br />
SSL<br />
(Privacy/<br />
Integrity)<br />
Web Server<br />
A B C<br />
RPC Packet Windows<br />
Privacy (Authentication)<br />
(Privacy/Integrity)<br />
Enterprise Services<br />
(COM+) Roles<br />
(Authorization)<br />
Windows<br />
(Authentication)<br />
Enterprise Services<br />
Application Server<br />
A<br />
B<br />
C<br />
SQL<br />
Server<br />
Database<br />
Server<br />
Impersonation IPSec Database Permissions<br />
(Programmatic) (Privacy/ Integrity) (Authorization)<br />
Figure 5.10<br />
<strong>ASP</strong>.<strong>NET</strong> calls a component within Enterprise Services which calls the database. The original caller’s<br />
security context flows to the database.
Chapter 5: Intranet Security 97<br />
Security Configuration Steps<br />
Before you begin, you should be aware of the following configuration issues:<br />
●<br />
●<br />
●<br />
●<br />
●<br />
The Enterprise Services process account must be marked “Trusted for delegation”<br />
in Active <strong>Directory</strong> and end user accounts must not be marked “Sensitive<br />
and cannot be delegated.” For more information, see “How To: Implement<br />
Kerberos Delegation for Windows 2000” in the Reference section of this guide.<br />
Windows 2000 or later is required on all computers. This includes client<br />
(browser) computers and all servers.<br />
All computers must be in the Active <strong>Directory</strong> and must be part of a single<br />
forest.<br />
The application server that hosts Enterprise Services must be running Windows<br />
2000 SP3.<br />
If you are using Internet Explorer 6.0 on Windows 2000, it defaults to NTLM<br />
authentication instead of the required Kerberos authentication. To enable<br />
Kerberos delegation, see article Q299838, “Can’t Negotiate Kerberos Authentication<br />
After Upgrading to Internet Explorer 6,” in the Microsoft Knowledge Base.<br />
Configure the Web Server (IIS)<br />
Step<br />
Disable Anonymous access<br />
for your Web application’s<br />
virtual root directory<br />
More Information<br />
Enable Windows Integrated<br />
authentication<br />
Configure the Web Server (<strong>ASP</strong>.<strong>NET</strong>)<br />
Step<br />
More Information<br />
Configure your <strong>ASP</strong>.<strong>NET</strong> Web Edit Web.config in your Web application’s virtual directory root<br />
application to use Windows Set the element to:<br />
authentication<br />
<br />
Configure your <strong>ASP</strong>.<strong>NET</strong> Web<br />
application for impersonation<br />
Edit Web.config in your Web application’s virtual directory<br />
Set the element to:<br />
<br />
(continued)
98<br />
<strong>Building</strong> <strong>Secure</strong> <strong>ASP</strong>.<strong>NET</strong> <strong>Applications</strong><br />
Configure the Web Server (<strong>ASP</strong>.<strong>NET</strong>) (continued)<br />
Step<br />
More Information<br />
Configure the DCOM<br />
impersonation level used by<br />
the <strong>ASP</strong>.<strong>NET</strong> Web application<br />
for outgoing calls<br />
The <strong>ASP</strong>.<strong>NET</strong> Web application calls the remote serviced<br />
components over DCOM. The default impersonation level used<br />
for outgoing calls from <strong>ASP</strong>.<strong>NET</strong> is Impersonate. This must be<br />
changed to Delegate in Machine.config.<br />
Edit Machine.config, locate the element, and<br />
set the comImpersonateLevel attribute to “Delegate” as shown<br />
below.<br />
Chapter 5: Intranet Security 99<br />
Configure Serviced Components (and the Application Server)<br />
Step<br />
More Information<br />
Configure the Enterprise This can be configured using the Component Services tool, or<br />
Services application as a via the following .<strong>NET</strong> attribute placed in the service component<br />
server application<br />
assembly.<br />
[assembly:<br />
ApplicationActivation(ActivationOption.Server)]<br />
Configure the Enterprise Add the following .<strong>NET</strong> attribute to the serviced component<br />
Services application to use assembly.<br />
packet privacy authentication<br />
(to provide secure communi- [assembly: ApplicationAccessControl(<br />
cation with encryption) Authentication =<br />
AuthenticationOption.Privacy)]<br />
Configure the Enterprise To configure role checks at the process and component level<br />
Services application for (including interfaces and classes) use the following attribute.<br />
component level role-based<br />
security<br />
[assembly: ApplicationAccessControl(AccessChecksLevel=<br />
AccessChecksLevelOption. ApplicationComponent)]<br />
Decorate classes with the following attribute:<br />
[ComponentAccessControl(true)]<br />
For more information about configuring interface and method<br />
level role checks, see “Configuring Security” in Chapter 9,<br />
“Enterprise Services Security.”<br />
Create a custom account for<br />
running Enterprise Services<br />
and mark it as Trusted for<br />
delegation in Active <strong>Directory</strong><br />
Configure Enterprise<br />
Services to run as your<br />
custom account<br />
The Enterprise Services application needs to run as domain<br />
account marked as Trusted for Delegation in Active <strong>Directory</strong>.<br />
For more information, see “How To: Implement Kerberos<br />
Delegation for Windows 2000” in the Reference section of this<br />
guide.<br />
This must be configured using the Component Services tool or<br />
script. You can not use .<strong>NET</strong> attributes within the serviced<br />
component assembly.
100<br />
<strong>Building</strong> <strong>Secure</strong> <strong>ASP</strong>.<strong>NET</strong> <strong>Applications</strong><br />
Configure the Database Server (SQL Server)<br />
Step<br />
More Information<br />
Configure SQL Server for<br />
Windows authentication<br />
Create SQL Server Logins<br />
for the Windows groups that<br />
the users belong to.<br />
Create new database users<br />
for each SQL Server login<br />
Establish database<br />
permissions for the database<br />
users<br />
This grants access to the SQL Server.<br />
The access control policy treats Windows groups as roles. For<br />
example, you may have groups such as Employees, HRDept<br />
and PayrollDept.<br />
This grants access to the specified database.<br />
Grant minimum permissions<br />
For more information, see Chapter 12, “Data Access Security.”<br />
Analysis<br />
●<br />
●<br />
●<br />
The key to flowing the original caller’s security context is Kerberos authentication,<br />
which generates a delegate-level token. After the server process (IIS) receives<br />
the delegate-level token, it can pass it to any other process, running under<br />
any account on the same computer, without changing its delegation level. It does<br />
not matter whether the worker process is running as a local or domain account.<br />
It does matter what IIS is running as. If it’s running as something other than<br />
LocalSystem, the account it is running under needs to be marked as “Trusted for<br />
delegation” in Active <strong>Directory</strong>.<br />
If IIS is running as LocalSystem, the computer account must be marked as<br />
“Trusted for delegation”. For more information, see “How To: Implement<br />
Kerberos Delegation for Windows 2000” in the Reference section of this guide.<br />
Integrated Windows authentication (with Kerberos) in IIS is ideal in this scenario<br />
because all users have Windows accounts and they are using Internet Explorer<br />
5.x or later. The benefit of Integrated Windows authentication is that the user’s<br />
password is never sent over the wire. Additionally, the logon will be transparent<br />
because Windows will use the current interactive user’s logon session.<br />
<strong>ASP</strong>.<strong>NET</strong> constructs a WindowsPrincipal object and attaches it to the current<br />
Web request context (HttpContext.User). If you need to perform authorization<br />
checks within the Web application you can use the following code.<br />
WindowsPrincipal wp = (HttpContext.Current.User as WindowsPrincipal);<br />
if ( wp.IsInRole("Manager") )<br />
{<br />
// User is authorized to perform manager-specific functionality<br />
}
Chapter 5: Intranet Security 101<br />
●<br />
The <strong>ASP</strong>.<strong>NET</strong> FileAuthorizationModule provides ACL checks against the<br />
original caller for <strong>ASP</strong>.<strong>NET</strong> file types that are mapped within IIS to the<br />
Aspnet_isapi.dll. For static file types such as .jpg, .gif and .htm files, IIS acts as<br />
the gatekeeper and performs access checks using the original caller’s identity.<br />
By using Windows authentication to SQL, you avoid storing credentials in files<br />
on the application server and avoid passing them across the network. For<br />
example include the Trusted_Connection attribute in the connection string:<br />
ConStr="server=YourServer; database=yourdatabase; Trusted_Connection=Yes;"<br />
●<br />
The original caller’s context flows across all tiers, which makes auditing<br />
extremely easy. You can use platform-level auditing (for example, auditing<br />
features provided by Windows and SQL Server).<br />
Pitfalls<br />
●<br />
●<br />
●<br />
Summary<br />
If you are using Internet Explorer 6.0 on Windows 2000, the default authentication<br />
mechanism that is negotiated is NTLM (and not Kerberos). For more information,<br />
see article Q299838, “Can’t Negotiate Kerberos Authentication After<br />
Upgrading to Internet Explorer 6,” in the Microsoft Knowledge Base.<br />
Delegating users across tiers is expensive in terms of performance and application<br />
scalability compared to using the trusted subsystem model. You cannot take<br />
advantage of connection pooling to the database, because connections to the<br />
database are tied to original caller’s security context and therefore cannot be<br />
efficiently pooled.<br />
This approach also relies on the granularity of Windows groups matching your<br />
application’s security needs. That is, Windows groups must be set up at the<br />
correct level of granularity to match the categories of users (sharing the same<br />
security privileges) who access the application.<br />
This chapter has described how to secure a set of common intranet application<br />
scenarios.<br />
For Extranet and Internet application scenarios, see Chapter 6, “Extranet Security”<br />
and Chapter 7, “Internet Security.”
6<br />
Extranet Security<br />
Extranet applications are those that share resources or applications across two<br />
different companies or divisions. The applications and resources are exposed over<br />
the Internet. One of the main challenges associated with extranet applications is<br />
developing an authentication approach that both parties agree to. Your choices may<br />
be limited in this respect because you may need to interoperate with existing<br />
authentication mechanisms.<br />
Extranet applications generally share some common characteristics:<br />
● You have tighter control over user accounts, compared to Internet scenarios.<br />
● You may have a higher level of trust for the user accounts, compared to applications<br />
that have Internet users.<br />
The scenarios presented in this chapter that are used to illustrate recommended<br />
authentication, authorization, and secure communication techniques include:<br />
● Exposing a Web Service<br />
● Exposing a Web Application<br />
Exposing a Web Service<br />
Consider a business to business partner exchange scenario where a publisher<br />
company publishes and sells its services over the Internet. It exposes information<br />
to selected partner companies using a Web service. Users within each partner<br />
company access the Web service using an Intranet-based internal Web application.<br />
This scenario is shown in Figure 6.1 on the next page.
104<br />
<strong>Building</strong> <strong>Secure</strong> <strong>ASP</strong>.<strong>NET</strong> <strong>Applications</strong><br />
Partner Company<br />
Publisher Company<br />
IIS<br />
<strong>ASP</strong>.<strong>NET</strong><br />
(Web App)<br />
Internet<br />
IIS<br />
<strong>ASP</strong>.<strong>NET</strong><br />
(Web<br />
Sevice)<br />
SQL<br />
Server<br />
Figure 6.1<br />
Extranet Web service business to business partner exchange<br />
Characteristics<br />
This scenario has the following characteristics:<br />
●<br />
●<br />
●<br />
●<br />
●<br />
●<br />
●<br />
The publisher company exposes a Web service over the Internet.<br />
Partner company (not individual user) credentials (X.509 client certificates) are<br />
validated by the publisher to authorize access to resources. The publisher does<br />
not need to know about the user’s individual logins in the partner company.<br />
Client certificates are mapped to Active <strong>Directory</strong>® directory service accounts<br />
within the publisher company.<br />
The extranet contains a separate Active <strong>Directory</strong> from the (internal) corporate<br />
Active <strong>Directory</strong>. The extranet Active <strong>Directory</strong> is in a separate forest, which<br />
provides a separate trust boundary.<br />
Web service authorization is based on the mapped Active <strong>Directory</strong> account. You<br />
can use separate authorization decisions based on partner company identity<br />
(represented by separate Active <strong>Directory</strong> accounts per company).<br />
The database is accessed by a single trusted connection that corresponds to the<br />
<strong>ASP</strong>.<strong>NET</strong> Web service process identity.<br />
The data retrieved from the Web service is sensitive and must be secured while<br />
in transit (internally within the publisher company and externally while flowing<br />
over the Internet).
Chapter 6: Extranet Security 105<br />
<strong>Secure</strong> the Scenario<br />
In this scenario, each partner company’s internal Web application retrieves data<br />
from the publisher company through the Web service and then presents the retrieved<br />
data to its users. The publisher requires a secure mechanism to authenticate<br />
partner companies, although the identity of individual users within partner companies<br />
is not relevant.<br />
Due to the sensitive nature of the data sent between the two companies over the<br />
Internet, it must be secured using SSL while in transit.<br />
A firewall that permits only inbound connections from the IP address of extranet<br />
partner companies is used to prevent other unauthorized Internet users from<br />
opening network connections to the Web service server.<br />
Table 6.1: Security measures<br />
Category<br />
Detail<br />
Authentication ● Partner applications use client certificates with each request to<br />
the Web service.<br />
● Client certificates from partner companies are mapped to<br />
individual Active <strong>Directory</strong> accounts.<br />
● Windows® authentication is used at the database. The <strong>ASP</strong>.<strong>NET</strong><br />
Web service process identity is used to connect. The database<br />
trusts the Web service.<br />
Authorization ● The Web service uses .<strong>NET</strong> role-based authorization to check that<br />
authenticated Active <strong>Directory</strong> accounts are members of a Partner<br />
group.<br />
<strong>Secure</strong> Communication ● SSL is used to secure the communication between the partner<br />
Web application and publisher’s Web service.<br />
● IPSec is used to secure all communication between the Web<br />
service and the database.<br />
The Result<br />
Figure 6.2 on the next page shows the recommended security configuration for this<br />
scenario.
106<br />
<strong>Building</strong> <strong>Secure</strong> <strong>ASP</strong>.<strong>NET</strong> <strong>Applications</strong><br />
IIS<br />
Partner Company<br />
<strong>ASP</strong>.<strong>NET</strong><br />
(Web App)<br />
NTFS<br />
Permissions<br />
(Authorization)<br />
File<br />
authorization<br />
.<strong>NET</strong> Roles<br />
(Authorization)<br />
Publisher Company<br />
Certificate<br />
Mapping<br />
Enterprise<br />
Services<br />
Internet<br />
IIS<br />
<strong>ASP</strong>.<strong>NET</strong><br />
(Web<br />
Service)<br />
Active<br />
<strong>Directory</strong><br />
Firewalls<br />
SSL<br />
(Privacy/Integrity)<br />
Certificate<br />
Authentication<br />
<strong>ASP</strong>.<strong>NET</strong><br />
Identity<br />
IPSec<br />
(Privacy/<br />
Integrity)<br />
Windows<br />
Authentication<br />
User-defined<br />
Database Roles<br />
(Authorization)<br />
SQL<br />
Server<br />
Figure 6.2<br />
The recommended security configuration for the Web service business to business partner exchange<br />
scenario<br />
Security Configuration Steps<br />
Before you begin, you’ll want to see the following:<br />
●<br />
●<br />
●<br />
●<br />
●<br />
Creating custom <strong>ASP</strong>.<strong>NET</strong> accounts (see “How To: Create a Custom Account to<br />
Run <strong>ASP</strong>.<strong>NET</strong>” in the Reference section of this guide)<br />
Creating a least privileged database account (see Chapter 12, “Data Access<br />
Security”)<br />
Configuring SSL on a Web server (see “How To: Set Up SSL on a Web Server” in<br />
the Reference section of this guide)<br />
Configuring IPSec (see “How To: Use IPSec to Provide <strong>Secure</strong> Communication<br />
Between Two Servers” in the Reference section of this guide)<br />
Configuring IPSec through firewalls (see article Q233256, “How to Enable IPSec<br />
Traffic Through a Firewall,” in the Microsoft Knowledge Base).
Chapter 6: Extranet Security 107<br />
●<br />
●<br />
Calling a Web service using SSL (see “How To: Call a Web Service Using SSL” in<br />
the Reference section of this guide); this solution technique is required within the<br />
partner company<br />
The discussion of certificate management and the infrastructure is beyond the<br />
scope of this topic, for more information search for “Certificates and<br />
Authenticode” on Microsoft TechNet.<br />
Configuring the Partner Application<br />
This chapter does not go into details about the partner application and its security<br />
configuration. However, the following points needs to be considered to facilitate<br />
communication between the partner application and Web service:<br />
● The partner company’s Web application can choose an authentication mechanism<br />
that allows it to authenticate and authorize its internal users. Those users<br />
are not passed to the Web service for further authentication.<br />
● The partner company’s Web application makes calls on behalf of its user to the<br />
Web service. Users cannot directly call the Web service.<br />
● The partner company’s Web application uses a client certificate to prove its<br />
identity to the Web service.<br />
● If the partner application is an <strong>ASP</strong>.<strong>NET</strong> Web application, then it must use an<br />
intermediate out of process component (an Enterprise Services application or<br />
Windows service) to load the certificate and forward it to the Web service.<br />
For more information about why this is necessary and the steps to achieve this,<br />
see “How to call a Web service using client certificates from <strong>ASP</strong>.<strong>NET</strong>” in the<br />
Reference section of this guide.<br />
Configuring the Extranet Web Server<br />
Configure IIS<br />
Step<br />
More Information<br />
Disable Anonymous access<br />
for the Web service’s virtual<br />
root directory<br />
To work with IIS authentication settings, use the IIS MMC<br />
snap-in. Select your application’s virtual directory, right-click<br />
and then click Properties.<br />
Click the <strong>Directory</strong> Security tab, and then click Edit within the<br />
Anonymous access and authentication control group.<br />
Enable certificate<br />
Authentication for your Web<br />
application’s and Web<br />
service’s virtual root<br />
See “How To: Set Up SSL on a Web Server” in the Reference<br />
section of this guide.<br />
See “How To: Call a Web Service Using Client Certificates from<br />
<strong>ASP</strong>.<strong>NET</strong>” in the Reference section of this guide.
108<br />
<strong>Building</strong> <strong>Secure</strong> <strong>ASP</strong>.<strong>NET</strong> <strong>Applications</strong><br />
Configure Active <strong>Directory</strong> (Extranet)<br />
Step<br />
More Information<br />
Set up Active <strong>Directory</strong> A separate extranet Active <strong>Directory</strong> is used. This is located in<br />
accounts to represent its own forest, and is completely separate from the corporate<br />
partner companies<br />
Active <strong>Directory</strong>.<br />
Configure certificate<br />
mapping<br />
See the “Step-by-Step Guide to Mapping Certificates to User<br />
Accounts” on Microsoft TechNet.<br />
Also see article Q313070, “HOW TO: Configure Client Certificate<br />
Mappings in IIS 5.0,” in the Microsoft Knowledge Base.<br />
Configure <strong>ASP</strong>.<strong>NET</strong> (Web Service)<br />
Step<br />
More Information<br />
Configure the <strong>ASP</strong>.<strong>NET</strong> Web Edit Web.config in the Web service’s virtual root directory<br />
service to use Windows Set the element to:<br />
authentication<br />
<br />
Reset the password of the<br />
<strong>ASP</strong><strong>NET</strong> account (used to<br />
run <strong>ASP</strong>.<strong>NET</strong>) to a known<br />
strong password<br />
This allows you to create a duplicate local account (with the<br />
same username and password) on the database server. This is<br />
required to allow the <strong>ASP</strong><strong>NET</strong> account to respond to network<br />
authentication challenges from the database server when it<br />
connects using Windows authentication.<br />
An alternative here is to use a least privileged domain account<br />
(if Windows authentication is permitted through the firewall).<br />
For more information, see “Process Identity for <strong>ASP</strong>.<strong>NET</strong>” in<br />
Chapter 8, “<strong>ASP</strong>.<strong>NET</strong> Security.”<br />
Edit Machine.config located in<br />
%windir%\Microsoft.<strong>NET</strong>\Framework\v1.0.3705\CONFIG<br />
Set your custom account username and password attributes on<br />
the element<br />
Default<br />
<br />
Becomes<br />
Chapter 6: Extranet Security 109<br />
Configuring SQL Server<br />
Step<br />
Create a Windows account<br />
on the computer running<br />
Microsoft SQL Server that<br />
matches the <strong>ASP</strong>.<strong>NET</strong><br />
process account used to<br />
run the Web service (by<br />
default <strong>ASP</strong><strong>NET</strong>)<br />
Configure SQL Server for<br />
Windows authentication<br />
Create a SQL Server Login<br />
for the <strong>ASP</strong><strong>NET</strong> account<br />
Create a new database user<br />
and map the login name to<br />
the database user<br />
Create a new user-defined<br />
database role within the<br />
database and place the database<br />
user into the role<br />
Establish database<br />
permissions for the<br />
database role<br />
More Information<br />
The user name and password must match your <strong>ASP</strong>.<strong>NET</strong> process<br />
account.<br />
Give the account the following privileges:<br />
- Access this computer from the network<br />
- Deny logon locally<br />
- Log on as a batch job<br />
This grants access to the SQL Server.<br />
This grants access to the specified database.<br />
Grant minimum permissions<br />
See Chapter 12, “Data Access Security.”<br />
Configuring <strong>Secure</strong> Communication<br />
Step<br />
More Information<br />
Configure the Web site on See “How To: Set Up SSL on a Web Server” in the Reference<br />
the Web server for SSL section of this guide.<br />
Configure IPSec between See “How To: Use IPSec to Provide <strong>Secure</strong> Communication<br />
Web server and database Between Two Servers” in the Reference section of this guide.<br />
server<br />
Analysis<br />
●<br />
●<br />
<strong>ASP</strong>.<strong>NET</strong> on the Web server is running as a least privileged local account (the<br />
default <strong>ASP</strong><strong>NET</strong> account), so potential damage from compromise is mitigated.<br />
The <strong>ASP</strong>.<strong>NET</strong> Web applications within the partner companies use Windows<br />
Integrated authentication and perform authorization to determine who can<br />
access the Web service.
110<br />
<strong>Building</strong> <strong>Secure</strong> <strong>ASP</strong>.<strong>NET</strong> <strong>Applications</strong><br />
●<br />
●<br />
●<br />
●<br />
●<br />
●<br />
The <strong>ASP</strong>.<strong>NET</strong> Web application within the partner company uses an intermediate<br />
Enterprise Services application to retrieve client certificates and make calls to the<br />
Web service.<br />
The publisher company uses the partner organization name (contained in the<br />
certificate) to perform certificate mapping within IIS.<br />
The Web service uses the mapped Active <strong>Directory</strong> account to perform authorization,<br />
using PrincipalPermission demands and .<strong>NET</strong> role checks.<br />
Windows authentication to SQL Server means you avoid storing credentials on<br />
the Web server and it also means that credentials are not sent across the internal<br />
network to the SQL Server computer. If you use SQL authentication, it is important<br />
to secure the connection string (containing a user name and password)<br />
within the application and as it is passed across the network. Use DPAPI or one<br />
of the alternative secure storage strategies discussed in Chapter 12, “Data Access<br />
Security,” to store connection strings and use IPSec to protect the connection<br />
string (and sensitive application data) as it is passed between the Web service<br />
and database.<br />
SSL between partner companies and Web service protects the data passed across<br />
the Internet.<br />
IPSec between the Web service and database protects the data passed to and<br />
from the database on the corporate network. In some scenarios where the partner<br />
and publisher communicate over a private network, it may be possible to use<br />
IPSec for machine authentication in addition to secure communication.<br />
Pitfalls<br />
●<br />
●<br />
The use of a duplicated local Windows account on the database server (one that<br />
matches the <strong>ASP</strong>.<strong>NET</strong> process account local to IIS) results in increased administration.<br />
Passwords must be manually updated and synchronized on a periodic<br />
basis.<br />
Because .<strong>NET</strong> role-based security is based on Windows group membership, this<br />
solution relies on Windows groups being set up at the correct level of granularity<br />
to match the categories of users (sharing the same security privileges) who will<br />
access the application. In this scenario, Active <strong>Directory</strong> accounts must be a<br />
member of a Partner group.<br />
Q&A<br />
●<br />
The database doesn’t know who the original caller is. How can I create an<br />
audit trail?<br />
Audit end user (partner company) activity within the Web service. Pass the<br />
partner company identity at the application level to the database using stored<br />
procedure parameters.
Chapter 6: Extranet Security 111<br />
Related Scenarios<br />
The publisher company might publish non sensitive data such as soft copies of<br />
magazines, newspapers, and so on. In this scenario, the publisher can provide a<br />
unique username and password for each partner to connect with to retrieve the<br />
data from the Web service.<br />
In this related scenario, the publisher’s Web site is configured to authenticate users<br />
with Basic authentication. The partner application uses the username and password<br />
to explicitly set the credentials for the Web service proxy.<br />
More Information<br />
For more information about configuring Web service proxies, see Chapter 10, “Web<br />
Services Security.”<br />
Exposing a Web Application<br />
In this scenario the publisher company gives its partners exclusive access to its<br />
application over the Internet and provides a partner-portal application; for example,<br />
to sell services, keep partners updated with product information, and<br />
provide online collaboration and so on. This scenario is shown in Figure 6.3.<br />
Partner<br />
Company<br />
Browser<br />
Internet<br />
IIS<br />
Publisher Company<br />
<strong>ASP</strong>.<strong>NET</strong><br />
(Web<br />
Application)<br />
SQL<br />
Server<br />
Figure 6.3<br />
Partner portal scenario<br />
Scenario Characteristics<br />
This scenario has the following characteristics:<br />
● The partner Web application accepts credentials either by using a Forms login<br />
page or it presents a login dialog using Basic authentication in IIS.
112<br />
<strong>Building</strong> <strong>Secure</strong> <strong>ASP</strong>.<strong>NET</strong> <strong>Applications</strong><br />
●<br />
●<br />
●<br />
●<br />
The credentials are validated against a separate Active <strong>Directory</strong> within the<br />
extranet perimeter network (also known as DMZ, demilitarized zone, and<br />
screened subnet). The extranet Active <strong>Directory</strong> is in a separate forest, which<br />
provides a separate trust boundary.<br />
The database is accessed by a single trusted connection that corresponds to the<br />
<strong>ASP</strong>.<strong>NET</strong> Web application process identity.<br />
Web application authorization is based on either a GenericPrincipal object<br />
(created as part of the Forms authentication process) or a WindowsPrincipal<br />
object (if Basic authentication is used).<br />
The data retrieved from the Web application is sensitive and must be secured<br />
while in transit (internally within the publisher company and externally while<br />
flowing over the Internet).<br />
<strong>Secure</strong> the Scenario<br />
Due to the sensitive nature of the data sent between the two companies over the<br />
Internet, it must be secured using SSL while in transit.<br />
A firewall that permits only inbound connections from the IP address of extranet<br />
partner companies is used to prevent other unauthorized Internet users from<br />
opening network connections to the Web server.<br />
Table 6.2: Security measures<br />
Category<br />
Detail<br />
Authentication ● Users within partner companies are authenticated by the Web<br />
application using either Basic or Forms authentication against the<br />
extranet Active <strong>Directory</strong>.<br />
● Windows authentication is used at the database. The <strong>ASP</strong>.<strong>NET</strong><br />
Web application process identity is used to connect. The<br />
database trusts the Web application.<br />
Authorization ● The Web application uses .<strong>NET</strong> role-based authorization to<br />
check that the authenticated user (represented by either a<br />
GenericPrincipal object or a WindowsPrincipal object, for Forms<br />
and Basic authentication respectively) are members of a Partner<br />
group.<br />
<strong>Secure</strong> Communication ● SSL is used to secure the communication between the partner<br />
Web browser and publisher’s Web application.<br />
● IPSec is used to secure all communication between the Web<br />
application and the database.
Chapter 6: Extranet Security 113<br />
The Result<br />
Figure 6.4 shows the recommended security configuration for this scenario.<br />
NTFS<br />
Permissions<br />
(Authorization)<br />
File<br />
authorization<br />
.<strong>NET</strong> Roles<br />
(Authorization)<br />
Publisher Company<br />
Partner<br />
Company<br />
Browser<br />
Internet<br />
Internet<br />
IIS<br />
<strong>ASP</strong>.<strong>NET</strong><br />
(Web App)<br />
Active<br />
<strong>Directory</strong><br />
Firewalls<br />
SSL<br />
(Privacy/Integrity)<br />
Windows or<br />
Forms<br />
Authentication<br />
Basic or<br />
Anonymous<br />
Authentication<br />
<strong>ASP</strong>.<strong>NET</strong><br />
Identity<br />
IPSec<br />
(Privacy/<br />
Integrity)<br />
User-defined<br />
Database Roles<br />
(Authorization)<br />
SQL<br />
Server<br />
Windows<br />
Authentication<br />
Figure 6.4<br />
The recommended security configuration for the partner portal scenario<br />
Configuring the Extranet Web Server<br />
Configure IIS<br />
Step<br />
More Information<br />
To use Forms authentication,<br />
enable Anonymous access<br />
for the Web application’s<br />
virtual root directory<br />
- or -<br />
To use Basic authentication,<br />
disable Anonymous access<br />
and select Basic<br />
authentication<br />
(continued)
114<br />
<strong>Building</strong> <strong>Secure</strong> <strong>ASP</strong>.<strong>NET</strong> <strong>Applications</strong><br />
Configure Active <strong>Directory</strong> (Extranet)<br />
Step<br />
More Information<br />
Set up Active <strong>Directory</strong> A separate extranet Active <strong>Directory</strong> is used. This is located in<br />
accounts to represent its own forest and is completely separate from the corporate<br />
partner users<br />
Active <strong>Directory</strong>.<br />
Configure <strong>ASP</strong>.<strong>NET</strong><br />
Step<br />
Configure the <strong>ASP</strong>.<strong>NET</strong> Web<br />
More Information<br />
Edit Web.config in the Web service’s virtual root directory<br />
Set the element to either:<br />
application to use Windows<br />
authentication (for IIS Basic)<br />
- or - <br />
Configure <strong>ASP</strong>.<strong>NET</strong> to use<br />
Forms authentication - or -<br />
<br />
Reset the password of the<br />
<strong>ASP</strong><strong>NET</strong> account (used to<br />
run <strong>ASP</strong>.<strong>NET</strong>) to a known<br />
strong password<br />
This allows you to create a duplicate local account (with the<br />
same user name and password) on the database server. This is<br />
required to enable the <strong>ASP</strong><strong>NET</strong> account to respond to network<br />
authentication challenges from the database server, when it<br />
connects using Windows authentication.<br />
An alternative here is to use a least privileged domain account<br />
(if Windows authentication is permitted through the firewall).<br />
For more information, see “Process Identity for <strong>ASP</strong>.<strong>NET</strong>” in<br />
Chapter 8, “<strong>ASP</strong>.<strong>NET</strong> Security.”<br />
Edit Machine.config located in<br />
%windir%\Microsoft.<strong>NET</strong>\Framework\v1.0.3705\CONFIG<br />
Set your custom account username and password attributes on<br />
the element<br />
Default<br />
<br />
Becomes<br />
Chapter 6: Extranet Security 115<br />
Configuring SQL Server<br />
Step<br />
Create a Windows account<br />
on the SQL Server computer<br />
that matches the <strong>ASP</strong>.<strong>NET</strong><br />
process account used to run<br />
the Web service (by default<br />
<strong>ASP</strong><strong>NET</strong>)<br />
Configure SQL Server for<br />
Windows authentication<br />
Create a SQL Server Login<br />
for the <strong>ASP</strong><strong>NET</strong> account<br />
Create a new database user<br />
and map the login name to<br />
the database user<br />
Create a new user-defined<br />
database role within the<br />
database and place the database<br />
user into the role<br />
Establish database<br />
permissions for the database<br />
role<br />
More Information<br />
The user name and password must match your <strong>ASP</strong>.<strong>NET</strong> process<br />
account.<br />
Give the account the following privileges:<br />
- Access this computer from the network<br />
- Deny logon locally<br />
- Log on as a batch job<br />
This grants access to the SQL Server.<br />
This grants access to the specified database.<br />
Grant minimum permissions<br />
See Chapter 12, “Data Access Security.”<br />
Configuring <strong>Secure</strong> Communication<br />
Step<br />
More Information<br />
Configure the Web site on See “How To: Set Up SSL on a Web Server” in the Reference<br />
the Web server for SSL section of this guide.<br />
Configure IPSec between See “How To: Use IPSec to Provide <strong>Secure</strong> Communication<br />
Web server and database Between Two Servers” in the Reference section of this guide.<br />
server<br />
Analysis<br />
●<br />
●<br />
<strong>ASP</strong>.<strong>NET</strong> on the Web server is running as a least privileged local account (the<br />
default <strong>ASP</strong><strong>NET</strong> account), so potential damage from compromise is mitigated.<br />
SSL is used between browser and Web application to protect the Forms or Basic<br />
authentication credentials (both passed in clear text, although Basic uses Base64<br />
encoding). SSL also protects the application-specific data returned from the Web<br />
application.
116<br />
<strong>Building</strong> <strong>Secure</strong> <strong>ASP</strong>.<strong>NET</strong> <strong>Applications</strong><br />
●<br />
●<br />
For Forms authentication, SSL is used on all pages (not just the logon page) to<br />
protect the authentication cookie passed on all subsequent Web requests after the<br />
initial authentication.<br />
If SSL is used only on the initial logon page to encrypt the credentials passed<br />
for authentication, you should ensure that the Forms authentication ticket<br />
(contained within a cookie) is protected, because it is passed between client and<br />
server on each subsequent Web request. To encrypt the Forms authentication<br />
ticket, configure the protection attribute of the element as shown below<br />
and use the Encrypt method of the FormsAuthentication class to encrypt the<br />
ticket.<br />
<br />
<br />
<br />
<br />
The protection=”All” attribute specifies that when the application calls<br />
FormsAuthentication.Encrypt, the ticket should be validated (integrity checked)<br />
and encrypted. Call this method when you create the authentication ticket,<br />
typically within the application’s Login button event handler.<br />
string encryptedTicket = FormsAuthentication.Encrypt(authTicket);<br />
●<br />
●<br />
●<br />
●<br />
●<br />
For more information about Forms authentication and ticket encryption, see<br />
Chapter 8, “<strong>ASP</strong>.<strong>NET</strong> Security.”<br />
Similarly, SSL is used on all pages for Basic authentication because the Basic<br />
credentials are passed on all Web page requests and not just the initial one where<br />
the Basic credentials are supplied by the user.<br />
For Basic authentication, <strong>ASP</strong>.<strong>NET</strong> automatically creates a WindowsPrincipal<br />
object to represent the authenticated caller and associates it with the current Web<br />
request (HttpContext.User) where it is used by .<strong>NET</strong> authorization including<br />
PrincipalPermission demands and .<strong>NET</strong> roles.<br />
For Forms authentication, you must develop code to validate the supplied<br />
credentials against Active <strong>Directory</strong> and construct a GenericPrincipal to represent<br />
the authenticated user.<br />
Windows authentication to SQL Server means you avoid storing credentials on<br />
the Web server and it also means that credentials are not sent across the internal<br />
network to the SQL Server computer.<br />
IPSec between the Web service and database protects the data passed to and<br />
from the database on the corporate network.
Chapter 6: Extranet Security 117<br />
Pitfalls<br />
●<br />
●<br />
The use of a duplicated local Windows account on the database server (one that<br />
matches the <strong>ASP</strong>.<strong>NET</strong> process account local to IIS) results in increased administration.<br />
Passwords must be manually updated and synchronized on a periodic<br />
basis.<br />
Basic authentication results in a pop-up dialog within the browser. To provide<br />
a more seamless logon experience, use Forms authentication.<br />
Related Scenarios<br />
No Connectivity from Extranet to Corporate Network<br />
For additional security, the extranet application can be built to require no connectivity<br />
back into the corporate network. In this scenario:<br />
● A separate SQL Server database is located in the extranet and replication of data<br />
occurs from the internal database to the extranet database.<br />
● Routers are used to refuse connections from the extranet to the corporate network.<br />
Connections can be established the other way using specific high ports.<br />
● Connections from the corporate network to the extranet should always be performed<br />
through a dedicated server that has strong auditing and logging and<br />
through which users must authenticate before accessing the extranet.<br />
More Information<br />
● See the following Microsoft TechNet articles:<br />
● “Extending Your Network to Business Partners”<br />
●<br />
●<br />
“Deploying SharePoint Portal Server in an Extranet Environment”<br />
For more information about using Forms authentication with Active <strong>Directory</strong>,<br />
see “How To: Use Forms Authentication with Active <strong>Directory</strong>” in the Reference<br />
section of this guide.<br />
Summary<br />
This chapter has described how to secure two common extranet application<br />
scenarios.<br />
For intranet and Internet application scenarios, see Chapter 5, “Intranet Security,”<br />
and Chapter 7, “Internet Security.”
7<br />
Internet Security<br />
Internet applications have large audiences, many potential uses, and varied security<br />
requirements. They range from portal applications that require no user authentication,<br />
through Web applications that provide content for registered users, to large<br />
scale e-commerce applications that require full authentication, authorization, credit<br />
card validation, and secure communication of sensitive data over public and internal<br />
networks.<br />
As Internet application developers, you face a challenge to ensure that your application<br />
uses appropriate defense mechanisms and is designed to be scalable, high<br />
performance, and secure. Some of the challenges you face include:<br />
● Choosing an appropriate user credential store, for example, a custom database or<br />
Active <strong>Directory</strong>® directory service.<br />
●<br />
●<br />
●<br />
●<br />
●<br />
●<br />
Making your application work through firewalls.<br />
Flowing security credentials across the multiple tiers of your application.<br />
Performing authorization.<br />
Ensuring the integrity and privacy of data as it flows across public and internal<br />
networks.<br />
Securing your application’s state with a database.<br />
Ensuring the integrity of your application’s data.<br />
● Implementing a solution that can scale to potentially huge numbers of users.<br />
The two common Internet application scenarios presented in this chapter, which are<br />
used to illustrate recommended authentication, authorization, and secure communication<br />
techniques are:<br />
● <strong>ASP</strong>.<strong>NET</strong> to SQL Server<br />
● <strong>ASP</strong>.<strong>NET</strong> to Remote Enterprise Services to SQL Server
120<br />
<strong>Building</strong> <strong>Secure</strong> <strong>ASP</strong>.<strong>NET</strong> <strong>Applications</strong><br />
<strong>ASP</strong>.<strong>NET</strong> to SQL Server<br />
In this scenario with two physical tiers, registered users securely log in to the Webbased<br />
application using a Web browser. The <strong>ASP</strong>.<strong>NET</strong>-based Web application makes<br />
secure connections to a Microsoft® SQL Server database to manage predominantly<br />
data retrieval tasks. An example is a portal application that provides news<br />
content to registered subscribers. This is shown in Figure 7.1.<br />
Web Server<br />
Database<br />
Server<br />
IIS<br />
<strong>ASP</strong>.<strong>NET</strong><br />
SQL<br />
Server<br />
Firewall<br />
DMZ<br />
Firewall<br />
Figure 7.1<br />
An <strong>ASP</strong>.<strong>NET</strong> Web application to SQL Server Internet scenario<br />
Characteristics<br />
This scenario has the following characteristics:<br />
●<br />
●<br />
●<br />
●<br />
●<br />
●<br />
Users have a number of different browser types.<br />
Anonymous users can browse the application’s unrestricted pages.<br />
Users must register or log on (through an HTML form) before being allowed to<br />
view restricted pages.<br />
User credentials are validated against a SQL Server database.<br />
All user input (such as user credentials) that is used in database queries is<br />
validated to mitigate the threat of SQL injection attacks.<br />
The front-end Web application is located within a perimeter network (also<br />
known as DMZ, demilitarized zone, and screened subnet), with firewalls<br />
separating it from the Internet and the internal corporate network (and the<br />
SQL Server database).
Chapter 7: Internet Security 121<br />
●<br />
●<br />
●<br />
●<br />
The application requires strong security, high levels of scalability, and detailed<br />
auditing.<br />
The database trusts the application to authenticate users properly (that is, the<br />
application makes calls to the database on behalf of the users).<br />
The Web application connects to the database by using the <strong>ASP</strong>.<strong>NET</strong> process<br />
account.<br />
A single user-defined database role is used within SQL Server for database<br />
authorization.<br />
<strong>Secure</strong> the Scenario<br />
In this scenario, the Web application presents a logon page to accept credentials.<br />
Successfully validated users are allowed to proceed, all others are denied access.<br />
The database authenticates against the <strong>ASP</strong>.<strong>NET</strong> default process identity, which is<br />
a least privileged account (that is, the database trusts the <strong>ASP</strong>.<strong>NET</strong> application).<br />
Table 7.1: Security summary<br />
Category<br />
Detail<br />
Authentication ● IIS is configured to allow anonymous access; the <strong>ASP</strong>.<strong>NET</strong> Web<br />
application authenticates users with Forms authentication to<br />
acquire credentials. Validation is against a SQL Server database.<br />
● Users’ passwords are not stored in the database. Instead password<br />
hashes with salt values are stored. The salt mitigates the<br />
threat associated with dictionary attacks.<br />
● Windows® authentication is used to connect to the database using<br />
the least privileged Windows account used to run the <strong>ASP</strong>.<strong>NET</strong> Web<br />
application.<br />
Authorization ● The <strong>ASP</strong>.<strong>NET</strong> process account is authorized to access system<br />
resources on the Web server. Resources are protected with<br />
Windows ACLs.<br />
● Access to the database is authorized using the <strong>ASP</strong>.<strong>NET</strong> application<br />
identity.<br />
<strong>Secure</strong> Communication ● <strong>Secure</strong> sensitive data sent between the users and the Web<br />
application by using SSL.<br />
● <strong>Secure</strong> sensitive data sent between the Web server and the<br />
database server by using IPSec.
122<br />
<strong>Building</strong> <strong>Secure</strong> <strong>ASP</strong>.<strong>NET</strong> <strong>Applications</strong><br />
The Result<br />
Figure 7.2 shows the recommended security configuration for this scenario.<br />
NTFS<br />
Permissions<br />
(Authorization)<br />
URL authorization<br />
.<strong>NET</strong> Roles<br />
(Authorization)<br />
User-Defined<br />
Role<br />
(Authorization)<br />
Alice<br />
Mary<br />
Bob<br />
IIS<br />
<strong>ASP</strong>.<strong>NET</strong><br />
<strong>ASP</strong><strong>NET</strong><br />
(Process<br />
Identity)<br />
SQL<br />
Server<br />
SSL<br />
(Privacy/Integrity)<br />
Anonymous<br />
Authentication<br />
Forms<br />
Authentication<br />
IPSec<br />
(Privacy/<br />
Integrity)<br />
Windows<br />
Authentication<br />
Figure 7.2<br />
The recommended security configuration for the <strong>ASP</strong>.<strong>NET</strong> to SQL Server Internet scenario<br />
Security Configuration Steps<br />
Before you begin, you’ll want to see the following:<br />
●<br />
●<br />
●<br />
●<br />
Creating custom <strong>ASP</strong>.<strong>NET</strong> accounts (see “How To: Create a Custom Account to<br />
Run <strong>ASP</strong>.<strong>NET</strong>” in the Reference section of this guide)<br />
Creating a least privileged database account (see Chapter 12, “Data Access<br />
Security”)<br />
Configuring SSL on a Web server (see “How To: Set Up SSL on a Web Server” in<br />
the Reference section of this guide)<br />
Configuring IPSec (see “How To: Use IPSec to Provide <strong>Secure</strong> Communication<br />
Between Two Servers” in the Reference section of this guide)<br />
Configure the Web Server<br />
Configure IIS<br />
Step<br />
Enable Anonymous access<br />
for your Web application’s<br />
virtual root directory<br />
More Information<br />
To work with IIS authentication settings, use the IIS MMC<br />
snap-in. Right-click your application’s virtual directory, and then<br />
click Properties.<br />
Click the <strong>Directory</strong> Security tab, and then click Edit within the<br />
Anonymous access and authentication control group.
Chapter 7: Internet Security 123<br />
Configure <strong>ASP</strong>.<strong>NET</strong><br />
Step<br />
Reset the password of the<br />
<strong>ASP</strong><strong>NET</strong> account (used to<br />
run <strong>ASP</strong>.<strong>NET</strong>) to a known<br />
strong password<br />
More Information<br />
This allows you to create a duplicate local account (with the<br />
same user name and password) on the database server. This is<br />
required to allow the <strong>ASP</strong><strong>NET</strong> account to respond to network<br />
authentication challenges from the database server when it<br />
connects using Windows authentication.<br />
An alternative here is to use a least privileged domain account<br />
(if Windows authentication is permitted through the firewall).<br />
For more information, see “Process Identity for <strong>ASP</strong>.<strong>NET</strong>” in<br />
Chapter 8, “<strong>ASP</strong>.<strong>NET</strong> Security.”<br />
Edit Machine.config located in<br />
%windir%\Microsoft.<strong>NET</strong>\Framework\v1.0.3705\CONFIG<br />
Set your custom account user name and password attributes on<br />
the element<br />
Default<br />
<br />
Becomes<br />
<br />
Configure your <strong>ASP</strong>.<strong>NET</strong> Edit Web.config in your application’s virtual directory root<br />
Web application to use Set the element to:<br />
Forms authentication<br />
(with SSL) <br />
<br />
<br />
<br />
For more information about using Forms authentication against<br />
a SQL Server database, see “How To: Use Forms Authentication<br />
with SQL Server 2000” in the Reference section of this guide.
124<br />
<strong>Building</strong> <strong>Secure</strong> <strong>ASP</strong>.<strong>NET</strong> <strong>Applications</strong><br />
Configuring SQL Server<br />
Step<br />
Create a Windows account<br />
on your SQL Server computer<br />
that matches the <strong>ASP</strong>.<strong>NET</strong><br />
process account<br />
Configure SQL Server for<br />
Windows authentication<br />
Create a SQL Server Login<br />
for your custom <strong>ASP</strong>.<strong>NET</strong><br />
application account<br />
Create a new database user<br />
and map the login name to<br />
the database user<br />
Create a new user-defined<br />
database role within the<br />
database and place the database<br />
user into the role<br />
Establish database<br />
permissions for the<br />
database role<br />
More Information<br />
The user name and password must match your custom <strong>ASP</strong>.<strong>NET</strong><br />
application account or must be <strong>ASP</strong><strong>NET</strong> if you are using the<br />
default account.<br />
This grants access to SQL Server.<br />
This grants access to the specified database.<br />
Grant minimum permissions. For more information, see Chapter<br />
12, “Data Access Security.”<br />
Configuring <strong>Secure</strong> Communication<br />
Step<br />
More Information<br />
Configure the Web site for See “How To: Setup SSL on a Web Server” in the Reference<br />
SSL<br />
section of this guide.<br />
Configure IPSec between See “How To: Use IPSec to Provide <strong>Secure</strong> Communication<br />
application server and Between Two Servers” in the Reference section of this guide.<br />
database server<br />
Analysis<br />
●<br />
Forms authentication is ideal in this scenario because the users do not have<br />
Windows accounts. The Forms login page is used to acquire user credentials.<br />
Credential validation must be performed by application code. Any data store can<br />
be used. A SQL Server database is the most common solution, although Active<br />
<strong>Directory</strong> provides an alternate credential store.
Chapter 7: Internet Security 125<br />
●<br />
With Forms authentication, you must protect the initial logon credentials with<br />
SSL. The Forms authentication ticket (passed as a cookie on subsequent Web<br />
requests from the authenticated client) must also be protected. You could use SSL<br />
for all pages in order to protect the ticket, or alternatively you can encrypt the<br />
Forms authentication ticket by configuring the protection attribute of the<br />
element (to All or Encrypt) and use the Encrypt method of the<br />
FormsAuthentication class to encrypt the ticket.<br />
The protection=”All” attribute specifies that when the application calls<br />
FormsAuthentication.Encrypt, the ticket should be validated (integrity checked)<br />
and encrypted. Call this method when you create the authentication ticket,<br />
typically within the application’s Login button event handler.<br />
string encryptedTicket = FormsAuthentication.Encrypt(authTicket);<br />
●<br />
●<br />
●<br />
●<br />
●<br />
●<br />
●<br />
For more information about Forms authentication and ticket encryption, see<br />
Chapter 8, “<strong>ASP</strong>.<strong>NET</strong> Security.”<br />
<strong>ASP</strong>.<strong>NET</strong> runs as the least privileged local <strong>ASP</strong><strong>NET</strong> account, so potential damage<br />
from compromise is mitigated.<br />
URL authorization on the Web server allows unauthenticated users to browse<br />
unrestricted Web pages and forces authentication for restricted pages.<br />
Because impersonation is not enabled, any local or remote resource access<br />
performed by the Web-based application is performed using the <strong>ASP</strong><strong>NET</strong><br />
account security context. Windows ACLs on secure resources should be set<br />
accordingly.<br />
User credentials are validated against a custom SQL Server database. Password<br />
hashes (with salt) are stored within the database. For more information, see<br />
“Authenticating Users against a Database” in Chapter 12, “Data Access Security.”<br />
By using Windows authentication to SQL Server, you avoid storing credentials in<br />
files on the Web server and also passing them over the network.<br />
If your application currently uses SQL authentication, you must securely store<br />
the database connection string as it contains user names and passwords. Consider<br />
using DPAPI. For more details, see “Storing Database Connection Strings<br />
<strong>Secure</strong>ly”, in Chapter 12, “Data Access Security.”<br />
The use of a duplicated Windows account on the database server (one that<br />
matches the <strong>ASP</strong>.<strong>NET</strong> process account) results in increased administration. If a<br />
password is changed on one computer, it must be synchronized and updated on<br />
all computers. In some scenarios, you may be able to use a least-privileged<br />
domain account for easier administration.
126<br />
<strong>Building</strong> <strong>Secure</strong> <strong>ASP</strong>.<strong>NET</strong> <strong>Applications</strong><br />
●<br />
●<br />
●<br />
IPSec between the Web server and database server ensures the privacy of the<br />
data sent to and from the database.<br />
SSL between browser and Web server protects credentials and any other security<br />
sensitive data such as credit card numbers.<br />
If you use a Web farm, ensure that the encryption keys, for example those used<br />
to encrypt the Forms authentication ticket (and specified by the <br />
element in Machine.config), are consistent across all servers in the farm. See<br />
Chapter 8, “<strong>ASP</strong>.<strong>NET</strong> Security,” for further details about using <strong>ASP</strong>.<strong>NET</strong> in a<br />
Web farm scenario.<br />
Pitfalls<br />
The application must flow the original caller’s identity to the database to support<br />
auditing requirements. Caller identity may be passed using stored procedure<br />
parameters.<br />
Related Scenarios<br />
Forms Authentication against Active <strong>Directory</strong><br />
The user credentials that are accepted from the Forms login page can be authenticated<br />
against various stores. Active <strong>Directory</strong> is an alternate to using a SQL Server<br />
database.<br />
More Information<br />
For more information, see “How To: Use Forms Authentication with Active <strong>Directory</strong>”<br />
in the Reference section of this guide.<br />
.<strong>NET</strong> Roles for Authorization<br />
The preceding scenario doesn’t take into consideration the different types of users<br />
accessing the application. For example, a portal server could have different subscription<br />
levels such as Standard, Premier, and Enterprise.<br />
If role information is maintained in the user store (SQL Server database), the application<br />
can create a GenericPrincipal object in which role and identity information<br />
can be stored. After the GenericPrincipal is created and added to the Web request<br />
context (using HttpContext.User), you can add programmatic role checks to<br />
method code or you can decorate methods and pages with PrincipalPermission<br />
attributes to demand role membership.<br />
More Information<br />
● For more information about creating GenericPrincipal objects that contain role<br />
lists, see “How To: Use Forms Authentication with GenericPrincipal Objects” in<br />
the Reference section of this guide.
Chapter 7: Internet Security 127<br />
●<br />
For more information about PrincipalPermission demands and programmatic<br />
role checks, see Chapter 8, “<strong>ASP</strong>.<strong>NET</strong> Security.”<br />
Using a Domain Anonymous Account at the Web Server<br />
In this scenario variation, the default anonymous Internet user account (a local<br />
account called IUSR_MACHINE) is replaced by a domain account. The domain<br />
account is configured with the minimum privileges necessary to run the application<br />
(you can start with no privilege and incrementally add privileges). If you have<br />
multiple Web-based applications, you can use different domain accounts (one for<br />
each Web-based application or virtual directory).<br />
In order to flow the security context of the anonymous domain account from IIS to<br />
<strong>ASP</strong>.<strong>NET</strong>, turn on impersonation for the Web-based application by using the following<br />
web.config file setting<br />
<br />
If the Web-based application communicates with a remote resource such as a database,<br />
the domain account must be granted the necessary permissions to the resource.<br />
For example, if the application accesses a remote file system, ACLs must be<br />
configured appropriately to give (at minimum) read access to the domain account.<br />
If the application accesses a SQL Server database, the domain account must be<br />
mapped using a SQL login to a database login.<br />
As the security context that flows through the application is that of the anonymous<br />
account, the original caller’s identity (captured through Forms authentication) must<br />
be passed at the application level from tier to tier; for example, through method and<br />
stored procedure parameters.<br />
More Information<br />
● For more information regarding this approach, see “Using the Anonymous<br />
Internet User Account” within Chapter 8, “<strong>ASP</strong>.<strong>NET</strong> Security.”<br />
●<br />
Before implementing this scenario, see article Q259353, “Must Enter Password<br />
Manually After You Set Password Synchronization” in the Microsoft Knowledge<br />
Base.<br />
<strong>ASP</strong>.<strong>NET</strong> to Remote Enterprise Services to SQL Server<br />
In this scenario, a Web server running <strong>ASP</strong>.<strong>NET</strong> pages makes secure connections to<br />
serviced components, located on a remote application server that in turn connects to<br />
a SQL Server database. In common with many Internet application infrastructures,<br />
the Web server and application server are separated by a firewall (and the Web<br />
server is located within a perimeter network). Serviced components make secure<br />
connections to SQL Server.
128<br />
<strong>Building</strong> <strong>Secure</strong> <strong>ASP</strong>.<strong>NET</strong> <strong>Applications</strong><br />
As an example, consider an Internet banking application that provides sensitive<br />
data, (for example, private financial details) to users. All banking transactions from<br />
the client to the database must be secured and data integrity is critical. Not only<br />
does the traffic to and from the user need to be secured but the traffic to and from<br />
the database needs to be secured as well. This is shown in Figure 7.3.<br />
Web Server<br />
Application Server<br />
Database<br />
Server<br />
IIS<br />
<strong>ASP</strong>.<strong>NET</strong><br />
SOAP<br />
Web<br />
Service<br />
Enterprise<br />
Services<br />
SQL<br />
Server<br />
Firewall<br />
DMZ<br />
Firewall<br />
Figure 7.3<br />
An <strong>ASP</strong>.<strong>NET</strong> to remote Enterprise Services to SQL Server Internet scenario<br />
Characteristics<br />
●<br />
●<br />
●<br />
●<br />
●<br />
●<br />
●<br />
●<br />
●<br />
Users have a number of different browser types.<br />
Anonymous users can browse the application’s unrestricted pages.<br />
Users must register or log on (through an HTML form) before being allowed to<br />
view restricted pages.<br />
The front-end Web-based application is located within a perimeter network, with<br />
firewalls separating it from the Internet and the internal corporate network (and<br />
the application server).<br />
The application requires strong security, high levels of scalability, and detailed<br />
auditing.<br />
The Web-based application uses SOAP to connect to a Web services layer, which<br />
provides an interface to the serviced components that run within an Enterprise<br />
Services application on the application server. SOAP is preferred to DCOM due<br />
to firewall restrictions.<br />
SQL Server is using a single user-defined database role for authorization.<br />
Data is security sensitive and integrity and privacy must be secured over the<br />
network and in all persistent data stores.<br />
Enterprise Services (COM+) transactions are used to enforce data integrity.
Chapter 7: Internet Security 129<br />
<strong>Secure</strong> the Scenario<br />
In this scenario, the Web service accepts credentials from a Forms login page and<br />
then authenticates the caller against a SQL Server database. The login page uses SSL<br />
to protect the user’s credentials passed over the Internet.<br />
The Web-based application communicates with a Web service, which provides an<br />
interface to the business services implemented within serviced components. The<br />
Web service trusts the Web-based application (inside the perimeter network) and<br />
authenticates the <strong>ASP</strong>.<strong>NET</strong> process identity. The user’s identity is passed through all<br />
tiers at the application level using method and stored procedure parameters. This<br />
information is used for auditing the users’ actions across the tiers.<br />
Table 7.2: Security measures<br />
Category<br />
Detail<br />
Authentication ● Provide strong authentication at the Web server.<br />
● Authenticate the Enterprise Services application identity at the<br />
database.<br />
● IIS is configured for anonymous access and the Web-based<br />
application authenticates users with Forms authentication<br />
(against a SQL Server database).<br />
● The Web service’s virtual directory is configured for Integrated<br />
Windows authentication. Web services authenticate the<br />
Web-based application’s process identity.<br />
● Windows authentication is used to connect to the database. The<br />
database authenticates the least privileged Windows account<br />
used to run the Enterprise Services application.<br />
Authorization ● The trusted subsystem model is used and per-user authorization<br />
occurs only within the Web application.<br />
● User access to pages on the Web server is controlled with URL<br />
authorization.<br />
● The <strong>ASP</strong>.<strong>NET</strong> process account is authorized to access system<br />
resources on the Web server. Resources are protected with ACLs.<br />
● Permissions within the database are controlled by a user-defined<br />
role. The Enterprise Services application identity is a member of<br />
the role.<br />
● The Enterprise Services process account is authorized to access<br />
system resources on the application server. Resources are<br />
protected ACLs.<br />
<strong>Secure</strong> Communication ● Sensitive data sent between the users and the Web-based<br />
application is secured with SSL.<br />
● Sensitive data sent between the Web server and Web service<br />
is secured with SSL.<br />
● Sensitive data sent between serviced components and the data<br />
base is secured with IPSec.
130<br />
<strong>Building</strong> <strong>Secure</strong> <strong>ASP</strong>.<strong>NET</strong> <strong>Applications</strong><br />
The Result<br />
Figure 7.4 shows the recommended security configuration for this scenario.<br />
Alice<br />
Mary<br />
Bob<br />
NTFS<br />
Permissions<br />
(Authorization)<br />
IIS<br />
Web Server<br />
URL<br />
Authorization<br />
(Authorization)<br />
<strong>ASP</strong>.<strong>NET</strong><br />
<strong>ASP</strong><strong>NET</strong><br />
(Process<br />
Identity)<br />
Integrated Windows<br />
(Authentication)<br />
Require SSL<br />
(Privacy/Integrity)<br />
SOAP<br />
IIS<br />
Application Server<br />
Windows<br />
(Authentication)<br />
<strong>ASP</strong>.<strong>NET</strong><br />
(Web<br />
Services<br />
Façade)<br />
SSL<br />
(Privacy/Integrity)<br />
Anonymous<br />
Authentication<br />
Forms<br />
Authentication<br />
SSL<br />
(Privacy/<br />
Integrity)<br />
Enterprise Services<br />
Server Application<br />
(dllhost.exe)<br />
ES Process<br />
Identity<br />
IPSec<br />
(Privacy/<br />
Integrity)<br />
User defined<br />
database roles<br />
(Authorization)<br />
SQL<br />
Server<br />
Windows<br />
Authentication<br />
Database Server<br />
Figure 7.4<br />
The recommended security configuration for the <strong>ASP</strong>.<strong>NET</strong> to remote Enterprise Services to SQL Server<br />
Internet scenario<br />
Security Configuration Steps<br />
Before you begin, you’ll want to see the following:<br />
●<br />
●<br />
●<br />
●<br />
Creating a least privileged database account (see Chapter 12, “Data Access<br />
Security”)<br />
Configuring SSL on a Web server (see “How To: Set Up SSL on a Web Server” in<br />
the Reference section of this guide)<br />
Configuring IPSec (see “How To: Use IPSec to Provide <strong>Secure</strong> Communication<br />
Between Two Servers” in the Reference section of this guide)<br />
Configuring Enterprise Services security (see “How To: Use Role-based Security<br />
with Enterprise Services” in the Reference section of this guide)
Chapter 7: Internet Security 131<br />
Configure the Web Server<br />
Configure IIS<br />
Step<br />
Enable Anonymous access<br />
for your Web-based<br />
application’s virtual root<br />
directory<br />
More Information<br />
Configure <strong>ASP</strong>.<strong>NET</strong><br />
Step<br />
Reset the password of the<br />
<strong>ASP</strong><strong>NET</strong> account (used to<br />
run <strong>ASP</strong>.<strong>NET</strong>) to a known<br />
strong password<br />
More Information<br />
This allows you to create a duplicate local account (with the<br />
same user name and password) on the application server. This<br />
is required to enable the <strong>ASP</strong><strong>NET</strong> account to respond to network<br />
authentication challenges from the application server.<br />
An alternative is to use a least privileged domain account (if<br />
Windows authentication is permitted through the firewall).<br />
For more information, see “Process Identity for <strong>ASP</strong>.<strong>NET</strong>” in<br />
Chapter 8, “<strong>ASP</strong>.<strong>NET</strong> Security.”<br />
Edit Machine.config located in<br />
%windir%\Microsoft.<strong>NET</strong>\Framework\v1.0.3705\CONFIG<br />
Set your custom account username and password attributes<br />
on the element.<br />
Default<br />
<br />
Becomes<br />
<br />
(continued)
132<br />
<strong>Building</strong> <strong>Secure</strong> <strong>ASP</strong>.<strong>NET</strong> <strong>Applications</strong><br />
Configure <strong>ASP</strong>.<strong>NET</strong> (continued)<br />
Step<br />
Configure your Web-based<br />
application to use Forms<br />
authentication (with SSL)<br />
More Information<br />
Edit Web.config in your application’s virtual directory root<br />
Set the element to:<br />
<br />
<br />
<br />
<br />
For more information about using Forms authentication against<br />
a SQL Server database, see “How To: Use Forms Authentication<br />
with SQL Server 2000” in the Reference section of this guide.<br />
Configure the Application Server<br />
Configure IIS<br />
Step<br />
Disable anonymous access<br />
Configure Integrated<br />
Windows authentication<br />
More Information<br />
IIS authenticates the <strong>ASP</strong>.<strong>NET</strong> process identity from the Webbased<br />
application on the Web server.<br />
Configure <strong>ASP</strong>.<strong>NET</strong><br />
Step<br />
Use Windows authentication<br />
More Information<br />
Edit Web.config in your Web service’s virtual directory root.<br />
Set the element to:<br />
<br />
Configure Enterprise Services<br />
Step<br />
Create a least privileged<br />
custom account for running<br />
the Enterprise Services<br />
server application<br />
Configure the Enterprise<br />
Services application to use<br />
the custom account<br />
Enable role-based access<br />
checking<br />
More Information<br />
Note: If you use a local account, you must also create<br />
a duplicate account on the database server computer.<br />
Refer to “Configuring Security” within Chapter 9, “Enterprise<br />
Services Security.”<br />
Refer to “Configuring Security” within Chapter 9, “Enterprise<br />
Services Security.”
Chapter 7: Internet Security 133<br />
Configure Enterprise Services<br />
Step<br />
Add a single Enterprise<br />
Services (COM+) role to the<br />
application called (for<br />
example Trusted Web<br />
Service)<br />
Add the local <strong>ASP</strong><strong>NET</strong><br />
account to the Trusted Web<br />
Service role<br />
Configuring SQL Server<br />
Step<br />
More Information<br />
Full end-user authorization is performed by the Web-based<br />
application. The Web service (and serviced components) only<br />
allows access to members of the Trusted Web Service role.<br />
Refer to “Configuring Security” within Chapter 9, “Enterprise<br />
Services Security.”<br />
More Information<br />
The user name and password must match your custom Enter-<br />
prise Services account.<br />
This grants access to the SQL Server.<br />
This grants access to the specified database.<br />
Create a Windows account<br />
on your SQL Server<br />
computer that matches the<br />
Enterprise Services<br />
application account<br />
Configure SQL Server for<br />
Windows authentication<br />
Create a SQL Server Login<br />
for your custom Enterprise<br />
Services account<br />
Create a new database user<br />
and map the login name to<br />
the database user<br />
Create a new user-defined<br />
database role and add the<br />
database user to the role<br />
Establish database permissions<br />
for the database role<br />
Grant minimum permissions<br />
For details, see Chapter 12, “Data Access Security.”<br />
Configuring <strong>Secure</strong> Communication<br />
Step<br />
More Information<br />
Configure the Web site for See “How To: Setup SSL on a Web Server” in the Reference<br />
SSL<br />
section of this guide.<br />
Configure SSL between the See “How To: Call a Web Service Using SSL” in the Reference<br />
Web server and application section of this guide.<br />
server.<br />
Configure IPSec between See “How To: Use IPSec to Provide <strong>Secure</strong> Communication<br />
application server and Between Two Servers” in the Reference section of this guide.<br />
database server
134<br />
<strong>Building</strong> <strong>Secure</strong> <strong>ASP</strong>.<strong>NET</strong> <strong>Applications</strong><br />
Analysis<br />
●<br />
●<br />
●<br />
●<br />
●<br />
●<br />
●<br />
●<br />
Forms authentication is ideal in this scenario because the users do not have<br />
Windows accounts. The Forms login page is used to acquire user credentials.<br />
Credential validation must be performed by application code. Any data store<br />
can be used. A SQL Server database is the most common solution, although<br />
Active <strong>Directory</strong> provides an alternate credential store.<br />
The Web-based application is running as the least privileged local <strong>ASP</strong><strong>NET</strong><br />
account, so potential damage from compromise is mitigated.<br />
URL authorization on the Web server allows unauthenticated users to browse<br />
unrestricted Web pages and forces authentication for restricted pages.<br />
Because impersonation is not enabled, any local or remote resource access<br />
performed by the Web-based application does so using the <strong>ASP</strong><strong>NET</strong> account<br />
security context. ACLs should be configured accordingly.<br />
User credentials are validated against a custom SQL Server database. Password<br />
hashes (with salt) are stored within the database. For more information, see<br />
“Authenticating Users against a Database” in Chapter 12, “Data Access Security.”<br />
Windows authentication to SQL Server means you avoid storing credentials in<br />
files on the application server and avoid passing them across the network.<br />
The use of a duplicated Windows account on the database server (one that<br />
matches the Enterprise Services process account) results in increased administration.<br />
If a password is changed on one computer, it must be synchronized and<br />
updated on all computers. In some scenarios, you may be able to use a leastprivileged<br />
domain account for easier administration.<br />
When the Web application calls the Web service, it must configure the Web<br />
service proxy using DefaultCredentials (that is, the <strong>ASP</strong>.<strong>NET</strong> process account;<br />
<strong>ASP</strong><strong>NET</strong>).<br />
proxy.Credentials = System.Net.CredentialCache.DefaultCredentials;<br />
●<br />
●<br />
For more information, see “Passing Credentials For Authentication to Web<br />
Services” in Chapter 10, “Web Services Security.”<br />
SSL between the Web server and Web service layer (that fronts the serviced<br />
components on the application server) ensures the privacy of the data sent<br />
between the two servers.<br />
The Enterprise Services application is configured for application-level role-based<br />
security. The configuration permits only the local <strong>ASP</strong><strong>NET</strong> account (used to run<br />
the Web service) to access the serviced components.
Chapter 7: Internet Security 135<br />
●<br />
●<br />
IPSec between the application server and database server ensures the privacy of<br />
the data sent to and from the database.<br />
SSL between browser and Web server protects credentials and bank account<br />
details.<br />
Pitfalls<br />
The application must flow the original caller’s identity to the database to support<br />
auditing requirements. Caller identity may be passed using stored procedure<br />
parameters.<br />
Related Scenarios<br />
Forms Authentication Against Active <strong>Directory</strong><br />
The user credentials that are accepted from the Forms login page can be authenticated<br />
against various stores. Active <strong>Directory</strong> is an alternate to using a SQL Server<br />
database.<br />
More Information<br />
For more information, see “How To: Use Forms Authentication with Active <strong>Directory</strong>”<br />
in the Reference section of this guide.<br />
Using DCOM<br />
Windows 2000 (SP3 or SP2 with QFE 18.1) or Windows .<strong>NET</strong> Server allows you<br />
to configure Enterprise Services applications to use a static endpoint. If a firewall<br />
separates the client from the server, this means that you need to open only two<br />
ports in the firewall. Specifically, you must open port 135 for RPC and a port for<br />
your Enterprise Services application.<br />
This enhancement to DCOM makes it a valid choice of communication protocol<br />
between Web server and application server and removes the requirement to have<br />
a Web services layer.<br />
Important: If your application requires distributed transactions to flow between the two<br />
servers, DCOM must be used. Transactions cannot flow over SOAP. In the SOAP scenario,<br />
transactions must be initiated by the serviced components on the application server.<br />
More Information<br />
For more information, see Chapter 9, “Enterprise Services Security.”
136<br />
<strong>Building</strong> <strong>Secure</strong> <strong>ASP</strong>.<strong>NET</strong> <strong>Applications</strong><br />
Using .<strong>NET</strong> Remoting<br />
Remoting can be a valid choice when you don’t need services provided by Enterprise<br />
Services such as transactions, queued components, object pooling, and so on.<br />
.<strong>NET</strong> Remoting solutions also support network load balancing at the middle tier.<br />
Note the following when you use .<strong>NET</strong> Remoting:<br />
● For ultimate performance, use the TCP channel and host in a Windows service.<br />
Note that this channel provides no authentication and authorization mechanism<br />
by default. The TCP channel is designed for trusted subsystem scenarios. You<br />
can use an IPSec policy to establish a secure channel and to ensure that only the<br />
Web server communicates with the application server.<br />
● If you need authentication and authorization checks using IPrincipal objects,<br />
you should host the remote objects in <strong>ASP</strong>.<strong>NET</strong> and use the HTTP channel. This<br />
allows you use the IIS and <strong>ASP</strong>.<strong>NET</strong> security features.<br />
● The remote object can connect to the database using Windows authentication<br />
and can use the host process identity (either <strong>ASP</strong>.<strong>NET</strong> or a Windows service<br />
identity).<br />
More Information<br />
For more information about .<strong>NET</strong> Remoting security, see Chapter 11, “.<strong>NET</strong><br />
Remoting Security.”<br />
Summary<br />
This chapter has described how to secure a set of common Internet application<br />
scenarios.<br />
For Intranet and extranet application scenarios, see Chapter 5, “Intranet Security,”<br />
and Chapter 6, “Extranet Security.”
8<br />
<strong>ASP</strong>.<strong>NET</strong> Security<br />
<strong>ASP</strong>.<strong>NET</strong> Security Architecture<br />
<strong>ASP</strong>.<strong>NET</strong> works in conjunction with IIS, the .<strong>NET</strong> Framework, and the underlying<br />
security services provided by the operating system, to provide a range of authentication<br />
and authorization mechanisms. These are summarized in Figure 8.1.<br />
4<br />
Authenticated caller’s access token<br />
(or IUSR_MACHINE access token)<br />
1<br />
HTTP<br />
Requests<br />
SSL<br />
(Privacy/<br />
Integrity)<br />
2<br />
Authentication<br />
Anonymous<br />
Basic<br />
Digest<br />
Integrated<br />
Certificate<br />
Web Server<br />
IIS<br />
(inetinfo.exe)<br />
3<br />
Authorization<br />
Web Permissions<br />
NTFS Permissions<br />
IP Address<br />
Restrictions<br />
5<br />
Authentication<br />
Windows<br />
Forms<br />
Passport<br />
None<br />
<strong>ASP</strong>.<strong>NET</strong> Process<br />
Original Caller<br />
Fixed Proxy Identity<br />
<strong>ASP</strong>.<strong>NET</strong><br />
(aspnet_wp.exe)<br />
Authorization<br />
File AuthZ<br />
URL AuthZ<br />
.<strong>NET</strong> Roles<br />
Identity<br />
7<br />
6<br />
Local or<br />
Remote<br />
Resource<br />
Figure 8.1<br />
<strong>ASP</strong>.<strong>NET</strong> security services
138<br />
<strong>Building</strong> <strong>Secure</strong> <strong>ASP</strong>.<strong>NET</strong> <strong>Applications</strong><br />
Figure 8.1 illustrates the authentication and authorization mechanisms provided by<br />
IIS and <strong>ASP</strong>.<strong>NET</strong>. When a client issues a Web request, the following sequence of<br />
authentication and authorization events occurs:<br />
1. The HTTP(S) Web request is received from the network. SSL can be used to<br />
ensure the server identity (using server certificates) and, optionally, the client<br />
identity.<br />
Note: SSL also provides a secure channel to protect sensitive data passed between client<br />
and server (and vice-versa).<br />
2. IIS authenticates the caller by using Basic, Digest, Integrated (NTLM or<br />
Kerberos), or Certificate authentication. If all or part of your site does not require<br />
authenticated access, IIS can be configured for anonymous authentication. IIS<br />
creates a Windows access token for each authenticated user. If anonymous<br />
authentication is selected, IIS creates an access token for the anonymous Internet<br />
user account (which, by default, is IUSR_MACHINE).<br />
3. IIS authorizes the caller to access the requested resource. NTFS permissions<br />
defined by ACLs attached to the requested resource are used to authorize access.<br />
IIS can also be configured to accept requests only from client computers with<br />
specific IP addresses.<br />
4. IIS passes the authenticated caller’s Windows access token to <strong>ASP</strong>.<strong>NET</strong> (this may<br />
be the anonymous Internet user’s access token, if anonymous authentication is<br />
being used).<br />
5. <strong>ASP</strong>.<strong>NET</strong> authenticates the caller.<br />
If <strong>ASP</strong>.<strong>NET</strong> is configured for Windows authentication, no additional authentication<br />
occurs at this point. <strong>ASP</strong>.<strong>NET</strong> will accept any token it receives from IIS.<br />
If <strong>ASP</strong>.<strong>NET</strong> is configured for Forms authentication, the credentials supplied by<br />
the caller (using an HTML form) are authenticated against a data store; typically<br />
a Microsoft® SQL Server database or Active <strong>Directory</strong>® directory service. If<br />
<strong>ASP</strong>.<strong>NET</strong> is configured for Passport authentication, the user is redirected to a<br />
Passport site and the Passport authentication service authenticates the user.<br />
6. <strong>ASP</strong>.<strong>NET</strong> authorizes access to the requested resource or operation.<br />
The UrlAuthorizationModule (a system provided HTTP module) uses authorization<br />
rules configured in Web.config (specifically, the element)<br />
to ensure that the caller can access the requested file or folder.<br />
With Windows authentication, the FileAuthorizationModule (another HTTP<br />
module) checks that the caller has the necessary permission to access the requested<br />
resource. The caller’s access token is compared against the ACL that<br />
protects the resource.<br />
.<strong>NET</strong> roles can also be used (either declaratively or programmatically) to ensure<br />
that the caller is authorized to access the requested resource or perform the<br />
requested operation.
Chapter 8: <strong>ASP</strong>.<strong>NET</strong> Security 139<br />
7. Code within your application accesses local and/or remote resources by using a<br />
particular identity. By default, <strong>ASP</strong>.<strong>NET</strong> performs no impersonation and as a<br />
result, the configured <strong>ASP</strong>.<strong>NET</strong> process account provides the identity. Alternate<br />
options include the original caller’s identity (if impersonation is enabled), or a<br />
configured service identity.<br />
Gatekeepers<br />
The authorization points (or gatekeepers) within an <strong>ASP</strong>.<strong>NET</strong> Web application are<br />
provided by IIS and <strong>ASP</strong>.<strong>NET</strong>:<br />
IIS<br />
With anonymous authentication turned off, IIS permits requests only from users<br />
that it can authenticate either in its domain or in a trusted domain.<br />
For static file types (for example .jpg, .gif and .htm files — files that are not mapped<br />
to an ISAPI extension), IIS uses the NTFS permissions associated with the requested<br />
file to perform access control.<br />
<strong>ASP</strong>.<strong>NET</strong><br />
The <strong>ASP</strong>.<strong>NET</strong> gatekeepers include the UrlAuthorizationModule,<br />
FileAuthorizationModule and Principal permission demands and role checks.<br />
UrlAuthorizationModule<br />
You can configure elements within your application’s Web.config<br />
file to control which users and groups of users should have access to the application.<br />
Authorization is based on the IPrincipal object stored in HttpContext.User.<br />
FileAuthorizationModule<br />
For file types mapped by IIS to the <strong>ASP</strong>.<strong>NET</strong> ISAPI extension (Aspnet_isapi.dll),<br />
automatic access checks are performed using the authenticated user’s Windows<br />
access token (which may be IUSR_MACHINE) against the ACL attached to the<br />
requested <strong>ASP</strong>.<strong>NET</strong> file.<br />
Note: Impersonation is not required for file authorization to work.<br />
The FileAuthorizationModule class only performs access checks against the requested<br />
file, and not for files accessed by the code in the requested page, although<br />
these are access checked by IIS.<br />
For example, if you request Default.aspx and it contains an embedded user control<br />
(Usercontrol.ascx), which in turn includes an image tag (pointing to Image.gif), the<br />
FileAuthorizationModule performs an access check for Default.aspx and<br />
Usercontrol.ascx, because these file types are mapped by IIS to the <strong>ASP</strong>.<strong>NET</strong> ISAPI<br />
extension.
140<br />
<strong>Building</strong> <strong>Secure</strong> <strong>ASP</strong>.<strong>NET</strong> <strong>Applications</strong><br />
The FileAuthorizationModule does not perform a check for Image.gif, because this<br />
is a static file handled internally by IIS. However, as access checks for static files are<br />
performed by IIS, the authenticated user must still be granted read permission to<br />
the file with an appropriately configured ACL.<br />
This scenario is shown in Figure 8.2.<br />
Note to system administrators: The authenticated user requires NTFS read permissions to all<br />
of the files involved in the scenario. The only variable is regarding which gatekeeper is used to<br />
enforce access control. The <strong>ASP</strong>.<strong>NET</strong> process account only requires read access to the <strong>ASP</strong>.<strong>NET</strong><br />
registered file types.<br />
Authenticated<br />
User<br />
(Bob)<br />
Request for<br />
default.aspx<br />
FileAuthorizationModule<br />
Gatekeeper<br />
(Files handled by <strong>ASP</strong>.<strong>NET</strong><br />
ISAPI including .aspx and<br />
.ascx files)<br />
default.aspx<br />
UserControl.ascx<br />
IIS<br />
Gatekeeper<br />
(Static files<br />
including .gif<br />
files)<br />
image.gif<br />
default.aspx<br />
<strong>ASP</strong><strong>NET</strong>:R<br />
Bob:R<br />
Required NTFS Permissions<br />
UserControl.aspx<br />
<strong>ASP</strong><strong>NET</strong>:R<br />
Bob:R<br />
image.gif<br />
Bob:R<br />
<strong>ASP</strong><strong>NET</strong> does not<br />
require permissions<br />
Figure 8.2<br />
IIS and <strong>ASP</strong>.<strong>NET</strong> gatekeepers working together<br />
In this scenario you can prevent access at the file gate. If you configure the ACL<br />
attached to Default.aspx and deny access to a particular user, the user control or<br />
any embedded images will not get a chance to be sent to the client by the code in<br />
Default.aspx. If the user requests the images directly, IIS performs the access checks<br />
itself.<br />
Principal Permission Demands and Explicit Role Checks<br />
In addition to the IIS and <strong>ASP</strong>.<strong>NET</strong> configurable gatekeepers, you can also use<br />
principal permission demands (declaratively or programmatically) as an additional<br />
fine-grained access control mechanism. Principal permission checks (performed by<br />
the PrincipalPermissionAttribute class) allow you to control access to classes,<br />
methods, or individual code blocks based on the identity and group membership of<br />
individual users, as defined by the IPrincipal object attached to the current thread.
Chapter 8: <strong>ASP</strong>.<strong>NET</strong> Security 141<br />
Note: Principal permission demands used to demand role membership are different from<br />
calling IPrincipal.IsInRole to test role membership; the former results in an exception if the<br />
caller is not a member of the specified role, while the latter simply returns a Boolean value<br />
to confirm role membership.<br />
With Windows authentication, <strong>ASP</strong>.<strong>NET</strong> automatically attaches a WindowsPrincipal<br />
object that represents the authenticated user to the current Web request (using<br />
HttpContext.User). Forms and Passport authentication create a GenericPrincipal<br />
object with the appropriate identity and no roles and attaches it to the<br />
HttpContext.User.<br />
More Information<br />
●<br />
●<br />
For more information about configuring security, see “Configuring Security”<br />
later in this chapter.<br />
For more information about programming security (and IPrincipal objects), see<br />
“Programming Security” later in this chapter.<br />
Authentication and Authorization Strategies<br />
<strong>ASP</strong>.<strong>NET</strong> provides a number of declarative and programmatic authorization mechanisms<br />
that can be used in conjunction with a variety of authentication schemes. This<br />
allows you to develop an in depth authorization strategy and one that can be configured<br />
to provide varying degrees of granularity; for example, per-user or per-user<br />
group (role-based).<br />
This section shows you which authorization options (both configurable and programmatic)<br />
are available for a set of commonly used authentication options.<br />
The authentication options that follow are summarized here:<br />
● Windows authentication with impersonation<br />
● Windows authentication without impersonation<br />
● Windows authentication using a fixed identity<br />
● Forms authentication<br />
● Passport authentication<br />
Available Authorization Options<br />
The following table shows you the set of available authorization options. For each<br />
one the table indicates whether or not Windows authentication and/or impersonation<br />
are required. If Windows authentication is not required, the particular authorization<br />
option is available for all other authentication types. Use the table to help<br />
refine your authentication/authorization strategy.
142<br />
<strong>Building</strong> <strong>Secure</strong> <strong>ASP</strong>.<strong>NET</strong> <strong>Applications</strong><br />
Table 8.1: Windows authentication and impersonation requirements<br />
Authorization Option Requires Windows Requires Impersonation<br />
Authentication<br />
FileAuthorizationModule Yes No<br />
UrlAuthorizationModule No No<br />
Principal Permission Demands No No<br />
.<strong>NET</strong> Roles No No<br />
Enterprise Services Roles Yes Yes (within the <strong>ASP</strong>.<strong>NET</strong> Web<br />
application)<br />
NTFS Permissions (for directly N/A – These files are not No (IIS performs the access<br />
requested static files types; not handled by <strong>ASP</strong>.<strong>NET</strong>. check.)<br />
mapped to an ISAPI extension) With any (non-Anonymous)<br />
IIS authentication mechanism,<br />
permissions should be<br />
configured for individual<br />
authenticated users.<br />
With Anonymous authentication,<br />
permissions should<br />
be configured for<br />
IUSR_MACHINE.<br />
NTFS Permissions (for files No No<br />
accessed by Web application<br />
If impersonating, configure<br />
code)<br />
ACLs against the impersonated<br />
Windows identity, which<br />
is either the original caller or<br />
the identity specified on the<br />
element in<br />
Web.config*.<br />
* The impersonated identity may be the original caller or the identity specified on<br />
the element in Web.config. Consider the following two <br />
elements.<br />
<br />
<br />
The first configuration results in the impersonation of the original caller (as authenticated<br />
by IIS), while the second results in the identity Bob. The second configuration<br />
is not recommended for two reasons:<br />
● It requires that you grant the <strong>ASP</strong>.<strong>NET</strong> process identity the “Act as part of the<br />
operating system” privilege on the Microsoft Windows® 2000 operating system.<br />
● It also requires you to include a plain text password in Web.config.<br />
Both of these restrictions will be lifted in the next release of the .<strong>NET</strong> Framework.
Chapter 8: <strong>ASP</strong>.<strong>NET</strong> Security 143<br />
Windows Authentication with Impersonation<br />
The following configuration elements show you how to enable Windows (IIS)<br />
authentication and impersonation declaratively in Web.config or Machine.config.<br />
Note: You should configure authentication on a per-application basis in each application’s<br />
Web.config file.<br />
<br />
<br />
With this configuration, your <strong>ASP</strong>.<strong>NET</strong> application code impersonates the IISauthenticated<br />
caller.<br />
Configurable Security<br />
When you use Windows authentication together with impersonation, the following<br />
authorization options are available to you:<br />
● Windows ACLs<br />
●<br />
●<br />
Client Requested Resources. The <strong>ASP</strong>.<strong>NET</strong> FileAuthorizationModule<br />
performs access checks for requested file types that are mapped to the<br />
<strong>ASP</strong>.<strong>NET</strong> ISAPI. It uses the original caller’s access token and ACL attached<br />
to requested resources in order to perform access checks.<br />
For static files types (not mapped to an ISAPI extension), IIS performs access<br />
checks using the caller’s access token and ACL attached to the file.<br />
● Resources Accessed by Your Application. You can configure Windows ACLs<br />
on resources accessed by your application (files, folders, registry keys, Active<br />
<strong>Directory</strong> objects, and so on) against the original caller.<br />
URL Authorization. Configure URL authorization in Web.config. With Windows<br />
authentication, user names take the form DomainName\UserName and roles<br />
map one-to-one with Windows groups.<br />
<br />
<br />
<br />
<br />
●<br />
Enterprise Services (COM+) Roles. Roles are maintained in the COM+ catalog.<br />
You can configure roles with the Component Services administration tool or<br />
script.
144<br />
<strong>Building</strong> <strong>Secure</strong> <strong>ASP</strong>.<strong>NET</strong> <strong>Applications</strong><br />
Programmatic Security<br />
Programmatic security refers to security checks located within your Web application<br />
code. The following programmatic security options are available when you use<br />
Windows authentication and impersonation:<br />
● PrincipalPermission Demands<br />
● Imperative (in-line within a method’s code)<br />
PrincipalPermission permCheck = new PrincipalPermission(<br />
null, @"DomainName\WindowsGroup");<br />
permCheck.Demand();<br />
●<br />
Declarative (attributes preceding interfaces, classes and methods)<br />
[PrincipalPermission(SecurityAction.Demand,<br />
Role=@"DomainName\WindowsGroup)]<br />
●<br />
Explicit Role Checks. You can perform role checking using the IPrincipal<br />
interface.<br />
IPrincipal.IsInRole(@"DomainName\WindowsGroup");<br />
●<br />
Enterprise Services (COM+) Roles. You can perform role checking programmatically<br />
using the ContextUtil class.<br />
ContextUtil.IsCallerInRole("Manager")<br />
When to Use<br />
Use Windows authentication and impersonation when:<br />
●<br />
●<br />
●<br />
Your application’s users have Windows accounts that can be authenticated by<br />
the server.<br />
You need to flow the original caller’s security context to the middle tier and/or<br />
data tier of your Web application to support fine-grained (per-user) authorization.<br />
You need to flow the original caller’s security context to the downstream tiers to<br />
support operating system level auditing.<br />
Before using impersonation within your application, make sure you understand the<br />
relative trade-offs of this approach in comparison to using the trusted subsystem<br />
model. These were elaborated upon in “Choosing a Resource Access Model” in<br />
Chapter 3, “Authentication and Authorization.”
Chapter 8: <strong>ASP</strong>.<strong>NET</strong> Security 145<br />
The disadvantages of impersonation include:<br />
●<br />
●<br />
●<br />
Reduced application scalability due to the inability to effectively pool database<br />
connections.<br />
Increased administration effort as ACLs on back-end resources need to be configured<br />
for individual users.<br />
Delegation requires Kerberos authentication and a suitably configured environment.<br />
More Information<br />
● For more information about Windows authentication, see “Windows Authentication”<br />
later in this chapter.<br />
● For more information about impersonation, see “Impersonation” later in this<br />
chapter.<br />
● For more information about URL authorization, see “URL Authorization Notes”<br />
later in this chapter.<br />
● For more information about Enterprise Services (COM+) roles, see Chapter 9,<br />
“Enterprise Services Security.”<br />
●<br />
For more information about PrincipalPermission demands, see “Identities and<br />
Principals” in Chapter 2, “Security Model for <strong>ASP</strong>.<strong>NET</strong> Application.”<br />
Windows Authentication without Impersonation<br />
The following configuration elements show how you enable Windows (IIS) authentication<br />
with no impersonation declaratively in Web.config.<br />
<br />
<br />
<br />
Configurable Security<br />
When you use Windows authentication without impersonation, the following<br />
authorization options are available to you:<br />
● Windows ACLs<br />
●<br />
Client Requested Resources. The <strong>ASP</strong>.<strong>NET</strong> FileAuthorizationModule<br />
performs access checks for requested file types that are mapped to the<br />
<strong>ASP</strong>.<strong>NET</strong> ISAPI. It uses the original caller’s access token and ACL attached to<br />
requested resources in order to perform access checks. Impersonation is not<br />
required.<br />
For static files types (not mapped to an ISAPI extension) IIS performs access<br />
checks using the caller’s access token and ACL attached to the file.
146<br />
<strong>Building</strong> <strong>Secure</strong> <strong>ASP</strong>.<strong>NET</strong> <strong>Applications</strong><br />
●<br />
● Resources accessed by your application. Configure Windows ACLs on<br />
resources accessed by your application (files, folders, registry keys, Active<br />
<strong>Directory</strong> objects) against the <strong>ASP</strong>.<strong>NET</strong> process identity.<br />
URL Authorization. Configure URL Authorization in Web.config. With Windows<br />
authentication, user names take the form DomainName\UserName and roles<br />
map one-to-one with Windows groups.<br />
<br />
<br />
<br />
<br />
Programmatic Security<br />
The following programmatic security options are available:<br />
● Principal Permission Demands<br />
● Imperative<br />
PrincipalPermission permCheck = new PrincipalPermission(<br />
null, @"DomainName\WindowsGroup");<br />
permCheck.Demand();<br />
●<br />
Declarative<br />
[PrincipalPermission(SecurityAction.Demand,<br />
Role=@"DomainName\WindowsGroup")]<br />
●<br />
Explicit Role Checks. You can perform role checking using the IPrincipal<br />
interface.<br />
IPrincipal.IsInRole(@"DomainName\WindowsGroup");<br />
When to Use<br />
Use Windows authentication without impersonation when:<br />
● Your application’s users have Windows accounts that can be authenticated by<br />
the server.<br />
● You want to use a fixed identity to access downstream resources (for example,<br />
databases) in order to support connection pooling.
Chapter 8: <strong>ASP</strong>.<strong>NET</strong> Security 147<br />
More Information<br />
●<br />
●<br />
●<br />
For more information about Windows authentication, see “Windows Authentication”<br />
later in this chapter.<br />
For more information about URL authorization, see “URL Authorization Notes”,<br />
later in this chapter.<br />
For more information about PrincipalPermission demands, see “Principals”<br />
within the “Getting Started” section of this guide.<br />
Windows Authentication Using a Fixed Identity<br />
The element in Web.config supports optional user name and password<br />
attributes, which allows you to configure a specific fixed identity for your application<br />
to impersonate. This is shown in the following configuration file fragment.<br />
<br />
When to Use<br />
This approach is not recommended for the current version (version 1) of the .<strong>NET</strong><br />
Framework in secure environments for two reasons:<br />
● User names and passwords should not be stored in plain text in configuration<br />
files, particularly configuration files stored in virtual directories.<br />
● On Windows 2000, this approach forces you to grant the <strong>ASP</strong>.<strong>NET</strong> process<br />
account the “Act as part of the operating system” privilege. This reduces the<br />
security of your Web application and increases the threat should an attacker<br />
compromise the Web application process.<br />
The .<strong>NET</strong> Framework version 1.1 will provide an enhancement for this scenario on<br />
Windows 2000:<br />
● The credentials will be encrypted.<br />
● The log on will be performed by the IIS process, so that <strong>ASP</strong>.<strong>NET</strong> does not<br />
required the “Act as part of the operating system” privilege.<br />
Forms Authentication<br />
The following configuration elements show how you enable Forms authentication<br />
declaratively in Web.config.<br />
<br />
<br />
<br />
148<br />
<strong>Building</strong> <strong>Secure</strong> <strong>ASP</strong>.<strong>NET</strong> <strong>Applications</strong><br />
Configurable Security<br />
When you use Forms authentication, the following authorization options are available<br />
to you:<br />
● Windows ACLs<br />
●<br />
● Client Requested Resources. Requested resources require ACLs that allow<br />
read access to the anonymous Internet user account. (IIS should be configured<br />
to allow anonymous access when you use Forms authentication).<br />
<strong>ASP</strong>.<strong>NET</strong> File authorization is not available because it requires Windows<br />
authentication.<br />
● Resources Accessed by Your Application. Configure Windows ACLs on<br />
resources accessed by your application (files, folders, registry keys, and<br />
Active <strong>Directory</strong> objects) against the <strong>ASP</strong>.<strong>NET</strong> process identity.<br />
URL Authorization<br />
Configure URL Authorization in Web.config. With Forms authentication, the<br />
format of user names is determined by your custom data store; a SQL Server<br />
database, or Active <strong>Directory</strong>.<br />
● If you are using a SQL Server data store:<br />
<br />
<br />
<br />
<br />
●<br />
If you are using Active <strong>Directory</strong> as your data store, user names, and group<br />
names appear in X.500 format:<br />
<br />
<br />
<br />
<br />
Programmatic Security<br />
The following programmatic security options are available:<br />
● Principal Permission Demands<br />
● Imperative<br />
PrincipalPermission permCheck = new PrincipalPermission(<br />
null, "Manager");<br />
permCheck.Demand();
Chapter 8: <strong>ASP</strong>.<strong>NET</strong> Security 149<br />
●<br />
Declarative<br />
[PrincipalPermission(SecurityAction.Demand,<br />
Role="Manager")]<br />
●<br />
Explicit Role Checks. You can perform role checking using the IPrincipal<br />
interface.<br />
IPrincipal.IsInRole("Manager");<br />
When to Use<br />
Forms authentication is most ideally suited to Internet applications. Use Forms<br />
authentication when:<br />
● Your application’s users do not have Windows accounts.<br />
●<br />
You want users to log on to your application by entering credentials using an<br />
HTML form.<br />
More Information<br />
● For more information about Forms authentication, see “Forms Authentication”<br />
later in this chapter.<br />
● For more information about URL authorization, see “URL Authorization Notes”<br />
later in this chapter.<br />
Passport Authentication<br />
The following configuration elements show how you enable Passport authentication<br />
declaratively in Web.config.<br />
<br />
When to Use<br />
Passport authentication is used on the Internet when application users do not have<br />
Windows accounts and you want to implement a single-sign-on solution. Users who<br />
have previously logged on with a Passport account at a participating Passport site<br />
will not have to log on to your site configured with Passport authentication.
150<br />
<strong>Building</strong> <strong>Secure</strong> <strong>ASP</strong>.<strong>NET</strong> <strong>Applications</strong><br />
Configuring Security<br />
This section shows you the practical steps required to configure security for an<br />
<strong>ASP</strong>.<strong>NET</strong> Web application. These are summarized in Figure 8.3.<br />
1. Configure IIS<br />
(IIS Metabase)<br />
Install server certificate (SSL)<br />
Set ISS Authentication<br />
Configure client certificate mapping<br />
(Optional)<br />
Internet Services Manager<br />
2. Configure <strong>ASP</strong>.<strong>NET</strong><br />
(web.config, machine.config)<br />
Set authentication mode<br />
Set impersonation<br />
Configure URL authorization<br />
XML Editor (or Notepad)<br />
3. <strong>Secure</strong> Resources<br />
(wWindows ACLs)<br />
<strong>Secure</strong> files, folders, registry keys<br />
<strong>Secure</strong> web and machine.config<br />
Log web.config settings<br />
Windows Explorer + Regedt32<br />
4. <strong>Secure</strong> Communication<br />
(IPSec/SSL)<br />
<strong>Secure</strong> communication links using a<br />
combination of IPSec and SSL<br />
Figure 8.3<br />
Configuring <strong>ASP</strong>.<strong>NET</strong> application security<br />
Security Policy and Configuration Tools
Chapter 8: <strong>ASP</strong>.<strong>NET</strong> Security 151<br />
Configure IIS Settings<br />
To configure IIS security, you must perform the following steps:<br />
1. Optionally install a Web server certificate (if you need SSL).<br />
For more information, see “How To: Set Up SSL on a Web Server” in the Reference<br />
section of this guide.<br />
2. Configure IIS authentication.<br />
3. Optionally configure client certificate mapping (if using certificate authentication).<br />
For more information about client certificate mapping, see article Q313070,<br />
“How to Configure Client Certificate Mappings in Internet Information Services<br />
(IIS) 5.0” in the Microsoft Knowledge Base.<br />
4. Set NTFS permissions on files and folders. Between them, IIS and the <strong>ASP</strong>.<strong>NET</strong><br />
FileAuthorizationModule check that the authenticated user (or the anonymous<br />
Internet user account) has the necessary access rights (based on ACL settings) to<br />
access the requested file.<br />
Configure <strong>ASP</strong>.<strong>NET</strong> Settings<br />
Application level configuration settings are maintained in Web.config files, which<br />
are located in your application’s virtual root directory and optionally within additional<br />
subfolders (these settings can sometimes override the parent folder settings).<br />
1. Configure authentication. This should be set on a per-application basis (not in<br />
Machine.config) in the Web.config file located in the application’s virtual root<br />
directory.<br />
<br />
2. Configure Impersonation. By default, <strong>ASP</strong>.<strong>NET</strong> applications do not impersonate.<br />
The applications runs using the configured <strong>ASP</strong>.<strong>NET</strong> process identity (usually<br />
<strong>ASP</strong><strong>NET</strong>) and all resource access performed by your application uses this<br />
identity. You only need impersonation in the following circumstances:<br />
● You are using Enterprise Services and you want to use Enterprise Services<br />
(COM+) roles to authorize access to functionality provided by serviced<br />
components.<br />
● IIS is configured for Anonymous authentication and you want to use the<br />
anonymous Internet user account for resource access. For details about this<br />
approach, see “Accessing Network Resources” later in this chapter.<br />
●<br />
●<br />
You need to flow the authenticated user’s security context to the next tier (for<br />
example, the database).<br />
You have ported a classic <strong>ASP</strong> application to <strong>ASP</strong>.<strong>NET</strong> and want the same<br />
impersonation behavior. Classic <strong>ASP</strong> impersonates the caller by default.
152<br />
<strong>Building</strong> <strong>Secure</strong> <strong>ASP</strong>.<strong>NET</strong> <strong>Applications</strong><br />
To configure <strong>ASP</strong>.<strong>NET</strong> impersonation use the following element in<br />
your application’s Web.config.<br />
<br />
3. Configure Authorization. URL authorization determines whether a user or role<br />
can issue specific HTTP verbs (for example, GET, HEAD, and POST) to a specific<br />
file. To implement URL authorization, you perform the following tasks.<br />
a. Add an element to the Web.config file located in your<br />
application’s virtual root directory.<br />
b. Restrict access to users and roles by using allow and deny attributes. The<br />
following example from Web.config uses Windows authentication and allows<br />
Bob and Mary access but denies everyone else.<br />
<br />
<br />
<br />
<br />
Important: You need to add either or at the<br />
end of the element, otherwise access is granted to all authenticated<br />
identities.<br />
URL Authorization Notes<br />
Take note of the following when you configure URL authorization:<br />
● “*” refers to all identities.<br />
●<br />
●<br />
●<br />
“?” refers to unauthenticated identities (that is, the anonymous identity).<br />
You don’t need to impersonate for URL authorization to work.<br />
Authorization settings in Web.config usually refer to all of the files in the current<br />
directory and all subdirectories (unless a subdirectory contains its own<br />
Web.config with an element. In this case the settings in the<br />
subdirectory override the parent directory settings).<br />
Note: URL authorization only applies to file types that are mapped by IIS to the <strong>ASP</strong>.<strong>NET</strong><br />
ISAPI extension, aspnet_isapi.dll.
Chapter 8: <strong>ASP</strong>.<strong>NET</strong> Security 153<br />
You can use the tag to apply authorization settings to an individual<br />
file or directory. The following example shows how you can apply authorization<br />
to a specific file (Page.aspx).<br />
<br />
<br />
<br />
<br />
<br />
<br />
●<br />
Users and roles for URL authorization are determined by your authentication<br />
settings:<br />
● When you have you are authorizing<br />
access to Windows user and group accounts.<br />
User names take the form “DomainName\WindowsUserName”<br />
Role names take the form “DomainName\WindowsGroupName”<br />
Note: The local administrators group is referred to as “BUILTIN\Administrators”. The<br />
local users group is referred to as “BUILTIN\Users”.<br />
●<br />
●<br />
When you have you are authorizing<br />
against the user and roles for the IPrincipal object that was stored in the<br />
current HTTP context. For example, if you used Forms to authenticate users<br />
against a database, you will be authorizing against the roles retrieved from<br />
the database.<br />
When you have you authorize against<br />
the Passport User ID (PUID) or roles retrieved from a store. For example, you<br />
can map a PUID to a particular account and set of roles stored in a SQL Server<br />
database or Active <strong>Directory</strong>.<br />
Note: This functionality will be built into the Microsoft Windows .<strong>NET</strong> Server 2003<br />
operating system.<br />
●<br />
When you have you may not be performing<br />
authorization. “None” specifies that you don’t want to perform any<br />
authentication or that you don’t want to use any of the .<strong>NET</strong> authentication<br />
modules and want to use your own custom mechanism.<br />
However, if you use custom authentication, you should create an IPrincipal<br />
object with roles and store it into the HttpContext.User. When you subsequently<br />
perform URL authorization, it is performed against the user and roles<br />
(no matter how they were retrieved) maintained in the IPrincipal object.
154<br />
<strong>Building</strong> <strong>Secure</strong> <strong>ASP</strong>.<strong>NET</strong> <strong>Applications</strong><br />
URL Authorization Examples<br />
The following list shows the syntax for some typical URL authorization examples:<br />
●<br />
Deny access to the anonymous account<br />
<br />
●<br />
Deny access to all users<br />
<br />
●<br />
Deny access to Manager role<br />
<br />
●<br />
Forms authentication example<br />
<br />
<br />
<br />
<br />
<br />
<br />
<br />
<br />
<br />
<br />
<br />
More Information<br />
The element works against the current IPrincipal object stored in<br />
HttpContext.User and also the HttpContext.Request.RequestType.<br />
<strong>Secure</strong> Resources<br />
1. Use Windows ACLs to secure resources that include files, folders, and registry<br />
keys.<br />
If you are not impersonating, any resource your application is required to access<br />
must have an ACL that grants at least read access to the <strong>ASP</strong>.<strong>NET</strong> process account.<br />
If you are impersonating, files and registry keys must have an ACL that grants at<br />
least read access to the authenticated user (or the anonymous Internet user<br />
account, if anonymous authentication is in effect).
Chapter 8: <strong>ASP</strong>.<strong>NET</strong> Security 155<br />
2. <strong>Secure</strong> Web.config and Machine.config:<br />
●<br />
Use the Correct ACLs. If <strong>ASP</strong>.<strong>NET</strong> is impersonating, the impersonated identity<br />
requires read access. Otherwise, the <strong>ASP</strong>.<strong>NET</strong> process identity requires<br />
read access. Use the following ACL on Web.config and Machine.config.<br />
System: Full Control<br />
Administrators: Full Control<br />
Process Identity or Impersonated Identity : Read<br />
If you are not impersonating the anonymous Internet user account<br />
(IUSR_MACHINE), you should deny access to this account.<br />
Note: If your application is mapped to a UNC share then the UNC identity requires read<br />
access to the configuration files as well.<br />
●<br />
Remove Unwanted HTTP Modules. Machine.config contains a set of default<br />
HTTP modules (within the element. These include:<br />
●<br />
●<br />
●<br />
●<br />
●<br />
●<br />
WindowsAuthenticationModule<br />
FormsAuthenticationModule<br />
PassportAuthenticationModule<br />
UrlAuthorizationModule<br />
FileAuthorizationModule<br />
OutputCacheModule<br />
● SessionStateModule<br />
If your application doesn’t use a specific module, remove it to prevent any<br />
potential future security issues associated with a particular module from<br />
being exploited within your application.<br />
3. Optionally, lock configuration settings by using the element together<br />
with the allowOverride=”false” attribute as described below.<br />
Locking Configuration Settings<br />
Configuration settings are hierarchical. Web.config file settings in subdirectories<br />
override Web.config settings in parent directories. Also, Web.config settings override<br />
Machine.config settings.<br />
You can lock configuration settings to prevent them being overridden at lower<br />
levels, by using the element coupled with the allowOverride attribute.<br />
For example:<br />
<br />
. . . arbitrary configuration settings . . .<br />
156<br />
<strong>Building</strong> <strong>Secure</strong> <strong>ASP</strong>.<strong>NET</strong> <strong>Applications</strong><br />
Note that the path may refer to a Web site or virtual directory and it applies to the<br />
nominated directory and all subdirectories. If you set allowOverride to false, you<br />
prevent any lower level configuration file from overriding the settings specified in<br />
the element. The ability to lock down configuration settings applies to<br />
all types of setting and not just security settings such as authentication modes.<br />
Preventing Files from Being Downloaded<br />
You can use the HttpForbiddenHandler class to prevent certain file types from<br />
being downloaded over the Web. This class is used internally by <strong>ASP</strong>.<strong>NET</strong> to prevent<br />
the download of certain system level files (for example, configuration files<br />
including web.config). For a complete list of file types restricted in this way, see the<br />
section in machine.config.<br />
You should consider using the HttpForbiddenHandler for files that your application<br />
uses internally, but are not intended for download.<br />
Note: You must also secure the files with Windows ACLs to control which users can access the<br />
files, when logged on to the Web server.<br />
<br />
To use the HttpForbiddenHandler to prevent a particular file type from being downloaded<br />
1. Create an application mapping in IIS for the specified file type to map it to<br />
Aspnet_isapi.dll.<br />
a. On the taskbar, click the Start button, click Programs, click Administrative<br />
Tools, and then select Internet Information Services.<br />
b. Select your application’s virtual directory, right-click, and then click Properties.<br />
c. Select Application Settings, click Configuration..<br />
d. Click Add to create a new application mapping.<br />
e. Click Browse, and select<br />
c:\winnt\Microsoft.<strong>NET</strong>\Framework\v1.0.3705\aspnet_isapi.dll.<br />
f. Enter the file extension for the file type you want to prevent being downloaded<br />
(for example, .abc) in the Extension field.<br />
g. Ensure All Verbs and Script engine is selected and Check that file exists is<br />
not selected.<br />
h. Click OK to close the Add/Edit Application Extension Mapping dialog box.<br />
i. Click OK to close the Application Configuration dialog box, and then click<br />
OK again to close the Properties dialog box.
Chapter 8: <strong>ASP</strong>.<strong>NET</strong> Security 157<br />
2. Add an mapping in Web.config for the specified file type.<br />
An example for the .abc file type is shown below.<br />
<br />
<br />
<br />
<strong>Secure</strong> Communication<br />
Use a combination of SSL and Internet Protocol Security (IPSec) to secure communication<br />
links.<br />
More information<br />
● For information about using SSL to secure the link to the database server, see<br />
“How To: Use SSL to <strong>Secure</strong> Communication with SQL Server 2000.”<br />
●<br />
For information about using IPSec between two computers, see “How To: Use<br />
IPSec to Provide <strong>Secure</strong> Communication Between Two Servers.”<br />
Programming Security<br />
After you establish your Web application’s configurable security settings, you need<br />
to further enhance and fine-tune your application’s authorization policy programmatically.<br />
This includes using declarative .<strong>NET</strong> attributes within your assemblies<br />
and performing imperative authorizing checks within code.<br />
This section highlights the key programming steps required to perform authorization<br />
within an <strong>ASP</strong>.<strong>NET</strong> Web application.<br />
An Authorization Pattern<br />
The following summarizes the basic pattern for authorizing users within your Web<br />
application:<br />
1. Retrieve credentials<br />
2. Validate credentials<br />
3. Put users in roles<br />
4. Create an IPrincipal object<br />
5. Put the IPrincipal object into the current HTTP context<br />
6. Authorize based on the user identity / role membership
158<br />
<strong>Building</strong> <strong>Secure</strong> <strong>ASP</strong>.<strong>NET</strong> <strong>Applications</strong><br />
Important: Steps 1 to 5 are performed automatically by <strong>ASP</strong>.<strong>NET</strong> if you have configured<br />
Windows authentication. For other authentication mechanisms (Forms, Passport and custom<br />
approaches), you must write code to perform these steps, as discussed below.<br />
Retrieve Credentials<br />
You must start by retrieving a set of credentials (user name and password) from the<br />
user. If your application does not use Windows authentication, you need to ensure<br />
that clear text credentials are properly secured on the network by using SSL.<br />
Validate Credentials<br />
If you have configured Windows authentication, credentials are validated automatically<br />
using the underlying services of the operating system.<br />
If you use an alternate authentication mechanism, you must write code to validate<br />
credentials against a data store such as a SQL Server database or Active <strong>Directory</strong>.<br />
For more information about how to securely store user credentials in a SQL Server<br />
database, see “Authenticating Users Against a Database” within Chapter 12, “Data<br />
Access Security.”<br />
Put Users in Roles<br />
Your user data store should also contain a list of roles for each user. You must write<br />
code to retrieve the role list for the validated user.<br />
Create an IPrincipal Object<br />
Authorization occurs against the authenticated user, whose identity and role list is<br />
maintained within an IPrincipal object (which flows in the context of the current<br />
Web request).<br />
If you have configured Windows authentication, <strong>ASP</strong>.<strong>NET</strong> automatically constructs<br />
a WindowsPrincipal object. This contains the authenticated user’s identity together<br />
with a role list, which equates to the list of Windows groups to which the user<br />
belongs.<br />
If you are using Forms, Passport, or custom authentication, you must write code<br />
within the Application_AuthenticateRequest event handler in Global.asax to create<br />
an IPrincipal object. The GenericPrincipal class is provided by the .<strong>NET</strong> Framework,<br />
and should be used in most scenarios.<br />
Put the IPrincipal Object into the Current HTTP Context<br />
Attach the IPrincipal object to the current HTTP context (using the<br />
HttpContext.User variable). <strong>ASP</strong>.<strong>NET</strong> does this automatically when you use<br />
Windows authentication. Otherwise, you must attach the object manually.
Chapter 8: <strong>ASP</strong>.<strong>NET</strong> Security 159<br />
Authorize Based on the User Identity and/or Role Membership<br />
Use .<strong>NET</strong> roles either declaratively (to obtain class or method level authorization),<br />
or imperatively within code if your application requires more fine-grained authorization<br />
logic.<br />
You can use declarative or imperative principal permission demands (using the<br />
PrincipalPermission class), or you can perform explicit role checks by calling the<br />
IPrincipal.IsInRole() method.<br />
The following example assumes Windows authentication and shows a declarative<br />
principal permission demand. The method that follows the attribute will only be<br />
executed if the authenticated user is a member of the Manager Windows group. If<br />
the caller is not a member of this group, a SecurityException is thrown.<br />
[PrincipalPermission(SecurityAction.Demand,<br />
Role=@"DomainName\Manager")]<br />
public void SomeMethod()<br />
{<br />
}<br />
The following example shows an explicit role check within code. This example<br />
assumes Windows authentication. If a non-Windows authentication mechanism is<br />
used, the code remains very similar. Instead of casting the User object to a<br />
WindowsPrincipal object, it should be cast to a GenericPrincipal object.<br />
// Extract the authenticated user from the current HTTP context.<br />
// The User variable is equivalent to HttpContext.Current.User if you are<br />
using // an .aspx or .asmx page<br />
WindowsPrincipal authenticatedUser = User as WindowsPrincipal;<br />
if (null != authenticatedUser)<br />
{<br />
// Note: To retrieve the authenticated user's username, use the<br />
// following line of code<br />
// string username = authenticatedUser.Identity.Name;<br />
// Perform a role check<br />
if (authenticatedUser.IsInRole(@"DomainName\Manager") )<br />
{<br />
// User is authorized to perform manager functionality<br />
}<br />
}<br />
else<br />
{<br />
// User is not authorized to perform manager functionality<br />
}<br />
More Information<br />
For a practical implementation of the above pattern for Forms authentication, see<br />
the “Forms Authentication” section later in this chapter.
160<br />
<strong>Building</strong> <strong>Secure</strong> <strong>ASP</strong>.<strong>NET</strong> <strong>Applications</strong><br />
Creating a Custom IPrincipal class<br />
The GenericPrincipal class provided by the .<strong>NET</strong> Framework should be used in<br />
most circumstances when you are using a non-Windows authentication mechanism.<br />
This provides role checks using the IPrincipal.IsInRole method.<br />
On occasion, you may need to implement your own IPrincipal class. Reasons for<br />
implementing your own IPrincipal class include:<br />
●<br />
You want extended role checking functionality. You might want methods that<br />
allow you to check whether a particular user is a member of multiple roles. For<br />
example:<br />
CustomPrincipal.IsInAllRoles( "Role", "Role2", "Role3" )<br />
CustomPrincipal.IsInAnyRole( "Role1", "Role2", "Role3" )<br />
●<br />
You may want to implement an extra method or property that returns a list of<br />
roles in an array. For example:<br />
string[] roles = CustomPrincipal.Roles;<br />
●<br />
You want your application to enforce role hierarchy logic. For example, a Senior<br />
Manager may be considered higher up in the hierarchy than a Manager. This<br />
could be tested using methods like the ones shown below.<br />
CustomPrincipal.IsInHigherRole("Manager");<br />
CustomPrincipal.IsInLowerRole("Manager");<br />
●<br />
●<br />
You may want to implement lazy initialization of the role lists. For example, you<br />
could dynamically load the role list only when a role check is requested.<br />
You may want to implement the IIdentity interface to have the user identified by<br />
an X509ClientCertificate. For example:<br />
CustomIdentity id = CustomPrincipal.Identity;<br />
X509ClientCertificate cert = id.ClientCertificate;<br />
More Information<br />
For more information about creating your own IPrincipal class, see “How To:<br />
Implement IPrincipal” in the Reference section of this guide.
Chapter 8: <strong>ASP</strong>.<strong>NET</strong> Security 161<br />
Windows Authentication<br />
Use Windows authentication when the users of your application have Windows<br />
accounts that can be authenticated by the server (for example, in intranet scenarios).<br />
If you configure <strong>ASP</strong>.<strong>NET</strong> for Windows authentication, IIS performs user authentication<br />
by using the configured IIS authentication mechanism. This is shown in<br />
Figure 8.4.<br />
HTTP<br />
Requests<br />
Web Server<br />
IIS<br />
(inetinfo.exe)<br />
aspnet_isapi.dll<br />
Authenticated<br />
caller’s access<br />
token (or<br />
IUSR_MACHINE<br />
access token)<br />
<strong>ASP</strong>.<strong>NET</strong><br />
(aspnet_wp.exe)<br />
IIS Authentication<br />
Basic<br />
Digest<br />
Integrated<br />
Certificate<br />
<br />
Figure 8.4<br />
<strong>ASP</strong>.<strong>NET</strong> Windows authentication uses IIS to authenticate callers<br />
The access token of the authenticated caller (which may be the Anonymous Internet<br />
user account if IIS is configured for Anonymous authentication) is made available to<br />
the <strong>ASP</strong>.<strong>NET</strong> application. Note the following:<br />
● This allows the <strong>ASP</strong>.<strong>NET</strong> FileAuthorizationModule to perform access checks<br />
against requested <strong>ASP</strong>.<strong>NET</strong> files using the original caller’s access token.<br />
Important: <strong>ASP</strong>.<strong>NET</strong> File authorization only performs access checks against file types that<br />
are mapped to Aspnet_isapi.dll.<br />
●<br />
File authorization does not require impersonation. With impersonation enabled<br />
any resource access performed by your application uses the impersonated<br />
caller’s identity. In this event, ensure that the ACLs attached to resources contain<br />
an Access Control Entry (ACE) that grants at least read access to the original<br />
caller’s identity.<br />
Identifying the Authenticated User<br />
<strong>ASP</strong>.<strong>NET</strong> associates a WindowsPrincipal object with the current Web request. This<br />
contains the identity of the authenticated Windows user together with a list of roles<br />
that the user belongs to. With Windows authentication, the role list consists of the<br />
set of Windows groups to which the user belongs.
162<br />
<strong>Building</strong> <strong>Secure</strong> <strong>ASP</strong>.<strong>NET</strong> <strong>Applications</strong><br />
The following code shows how to obtain the identity of the authenticated Windows<br />
user and to perform a simple role test for authorization.<br />
WindowsPrincipal user = User as WindowsPrincipal;<br />
if (null != user)<br />
{<br />
string username = user.Identity.Name;<br />
// Perform a role check<br />
if ( user.IsInRole(@"DomainName\Manager") )<br />
{<br />
// User is authorized to perform manager functionality<br />
}<br />
}<br />
else<br />
{<br />
// Throw security exception as we don't have a WindowsPrincipal<br />
}<br />
Forms Authentication<br />
When you are using Forms authentication, the sequence of events triggered by an<br />
unauthenticated user who attempts to access a secured file or resource (where URL<br />
authorization denies the user access), is shown in Figure 8.5.<br />
Web Browser IIS/<strong>ASP</strong>.<strong>NET</strong> Custom Data Store<br />
(SQL Server / Active <strong>Directory</strong>)<br />
1<br />
Get default.aspx<br />
302 Redirect<br />
Location: Login.aspx<br />
2<br />
3<br />
Post login.aspx<br />
(Credentials)<br />
4<br />
Application authentication<br />
(Validate credentials)<br />
(Retrieve roles)<br />
200 OK Set Cookie<br />
(inc auth ticket)<br />
5<br />
6<br />
Get default.aspx<br />
Cookie: auth ticket<br />
7<br />
Global.asax<br />
Application_AuthenticateRequest()<br />
Create Principal<br />
Retrieve identity + roles from ticket<br />
Attach Principal to HTTP Context<br />
Figure 8.5<br />
Forms authentication sequence of events
Chapter 8: <strong>ASP</strong>.<strong>NET</strong> Security 163<br />
The following describes the sequence of events shown in Figure 8.5:<br />
1. The user issues a Web request for Default.aspx.<br />
IIS allows the request because Anonymous access is enabled. <strong>ASP</strong>.<strong>NET</strong> checks the<br />
elements and finds a element.<br />
2. The user is redirected to the login page (Login.aspx) as specified by the LoginUrl<br />
attribute of the element.<br />
3. The user supplies credentials and submits the login form.<br />
4. The credentials are validated against a store (SQL Server or Active <strong>Directory</strong>)<br />
and roles are optionally retrieved. You must retrieve a role list if you want to use<br />
role-based authorization.<br />
5. A cookie is created with a FormsAuthenticationTicket and sent back to the<br />
client. Roles are optionally stored in the ticket. By storing the role list in the<br />
ticket, you avoid having to access the database to re-retrieve the list for each<br />
successive Web request from the same user.<br />
6. The user is redirected with client-side redirection to the originally requested<br />
page (Default.aspx).<br />
7. In the Application_AuthenticateRequest event handler (in Global.asax), the<br />
ticket is used to create an IPrincipal object and it is stored in HttpContext.User.<br />
<strong>ASP</strong>.<strong>NET</strong> checks the elements and finds a <br />
element. However, this time the user is authenticated.<br />
<strong>ASP</strong>.<strong>NET</strong> checks the elements to ensure the user is in the<br />
element.<br />
The user is granted access to Default.aspx.<br />
Development Steps for Forms Authentication<br />
The following list highlights the key steps that you must perform to implement<br />
Forms authentication:<br />
1. Configure IIS for anonymous access.<br />
2. Configure <strong>ASP</strong>.<strong>NET</strong> for Forms authentication.<br />
3. Create a logon Web form and validate the supplied credentials.<br />
4. Retrieve a role list from the custom data store.<br />
5. Create a Forms authentication ticket (store roles in the ticket).<br />
6. Create an IPrincipal object.<br />
7. Put the IPrincipal object into the current HTTP context.<br />
8. Authorize the user based on user name/role membership.
164<br />
<strong>Building</strong> <strong>Secure</strong> <strong>ASP</strong>.<strong>NET</strong> <strong>Applications</strong><br />
Configure IIS for Anonymous Access<br />
Your application’s virtual directory must be configured in IIS for anonymous access.<br />
<br />
To configure IIS for anonymous access<br />
1. Start the Internet Information Services administration tool.<br />
2. Select your application’s virtual directory, right-click, and then click Properties.<br />
3. Click <strong>Directory</strong> Security.<br />
4. In the Anonymous access and authentication control group, click Edit.<br />
5. Select Anonymous access.<br />
Configure <strong>ASP</strong>.<strong>NET</strong> for Forms Authentication<br />
A sample configuration is shown below.<br />
<br />
<br />
<br />
<br />
Create a Logon Web Form and Validate the Supplied Credentials<br />
Validate credentials against a SQL Server database, or Active <strong>Directory</strong>.<br />
More Information<br />
● See “How To: Use Forms Authentication with SQL Server 2000” in the Reference<br />
section of this guide.<br />
● See “How To: Use Forms Authentication with Active <strong>Directory</strong>” in the Reference<br />
section of this guide.<br />
Retrieve a Role List from the Custom Data Store<br />
Obtain roles from a table within a SQL Server database, or groups/distribution lists<br />
configured within Active <strong>Directory</strong>. Refer to the preceding resources for details.<br />
Create a Forms Authentication Ticket<br />
Store the retrieved roles in the ticket. This is illustrated in the following code.<br />
// This event handler executes when the user clicks the Logon button<br />
// having supplied a set of credentials<br />
private void Logon_Click(object sender, System.EventArgs e)<br />
{
Chapter 8: <strong>ASP</strong>.<strong>NET</strong> Security 165<br />
// Validate credentials against either a SQL Server database<br />
// or Active <strong>Directory</strong><br />
bool isAuthenticated = IsAuthenticated( txtUserName.Text,<br />
txtPassword.Text );<br />
if (isAuthenticated == true )<br />
{<br />
// Retrieve the set of roles for this user from the SQL Server<br />
// database or Active <strong>Directory</strong>. The roles are returned as a<br />
// string that contains pipe separated role names<br />
// for example "Manager|Employee|Sales|"<br />
// This makes it easy to store them in the authentication ticket<br />
string roles = RetrieveRoles( txtUserName.Text, txtPassword.Text );<br />
// Create the authentication ticket and store the roles in the<br />
// custom UserData property of the authentication ticket<br />
FormsAuthenticationTicket authTicket = new<br />
FormsAuthenticationTicket(<br />
1, // version<br />
txtUserName.Text,<br />
// user name<br />
DateTime.Now,<br />
// creation<br />
DateTime.Now.AddMinutes(20),// Expiration<br />
false,<br />
// Persistent<br />
roles );<br />
// User data<br />
// Encrypt the ticket.<br />
string encryptedTicket = FormsAuthentication.Encrypt(authTicket);<br />
// Create a cookie and add the encrypted ticket to the<br />
// cookie as data.<br />
HttpCookie authCookie =<br />
new HttpCookie(FormsAuthentication.FormsCookieName,<br />
encryptedTicket);<br />
}<br />
}<br />
// Add the cookie to the outgoing cookies collection.<br />
Response.Cookies.Add(authCookie);<br />
// Redirect the user to the originally requested page<br />
Response.Redirect( FormsAuthentication.GetRedirectUrl(<br />
txtUserName.Text,<br />
false ));<br />
Create an IPrincipal Object<br />
Create the IPrincipal object in the Application_AuthenticationRequest event<br />
handler in Global.asax. Use the GenericPrincipal class, unless you need extended<br />
role-based functionality. In this case create a custom class that implements<br />
IPrincipal.
166<br />
<strong>Building</strong> <strong>Secure</strong> <strong>ASP</strong>.<strong>NET</strong> <strong>Applications</strong><br />
Put the IPrincipal Object into the Current HTTP Context<br />
The creation of a GenericPrincipal object is shown below.<br />
protected void Application_AuthenticateRequest(Object sender, EventArgs e)<br />
{<br />
// Extract the forms authentication cookie<br />
string cookieName = FormsAuthentication.FormsCookieName;<br />
HttpCookie authCookie = Context.Request.Cookies[cookieName];<br />
if(null == authCookie)<br />
{<br />
// There is no authentication cookie.<br />
return;<br />
}<br />
FormsAuthenticationTicket authTicket = null;<br />
try<br />
{<br />
authTicket = FormsAuthentication.Decrypt(authCookie.Value);<br />
}<br />
catch(Exception ex)<br />
{<br />
// Log exception details (omitted for simplicity)<br />
return;<br />
}<br />
if (null == authTicket)<br />
{<br />
// Cookie failed to decrypt.<br />
return;<br />
}<br />
// When the ticket was created, the UserData property was assigned a<br />
// pipe delimited string of role names.<br />
string[] roles = authTicket.UserData.Split(new char[]{'|'});<br />
}<br />
// Create an Identity object<br />
FormsIdentity id = new FormsIdentity( authTicket );<br />
// This principal will flow throughout the request.<br />
GenericPrincipal principal = new GenericPrincipal(id, roles);<br />
// Attach the new principal object to the current HttpContext object<br />
Context.User = principal;<br />
Authorize the User Based on User Name or Role Membership<br />
Use declarative principal permission demands to restrict access to methods. Use<br />
imperative principal permission demands and/or explicit role checks<br />
(IPrincipal.IsInRole) to perform fine-grained authorization within methods.
Chapter 8: <strong>ASP</strong>.<strong>NET</strong> Security 167<br />
Forms Implementation Guidelines<br />
●<br />
●<br />
●<br />
●<br />
●<br />
●<br />
●<br />
●<br />
Use SSL when capturing credentials using an HTML form.<br />
In addition to using SSL for the login page, you should also use SSL for other<br />
pages, whenever the credentials or the authentication cookie is sent across the<br />
network. This is to mitigate the threat associated with cookie replay attacks.<br />
Authenticate users against a custom data store. Use SQL Server or Active<br />
<strong>Directory</strong>.<br />
Retrieve a role list from the custom data store and store a delimited list of roles<br />
within the UserData property of the FormsAuthenticationTicket class. This<br />
improves performance by eliminating repeated access to the data store for each<br />
Web request and also saves you from storing the user’s credentials in the authentication<br />
cookie.<br />
If the list of roles is extensive and there is a danger of exceeding the cookie size<br />
limit, store the role details in the <strong>ASP</strong>.<strong>NET</strong> cache object or database and retrieve<br />
them on each subsequent request.<br />
For each request after initial authentication:<br />
● Retrieve the roles from the ticket in the Application_AuthenticateRequest<br />
event handler.<br />
● Create an IPrincipal object and store it in the HTTP context<br />
(HttpContext.User). The .<strong>NET</strong> Framework also associates it with the current<br />
.<strong>NET</strong> thread (Thread.CurrentPrincipal).<br />
● Use the GenericPrincipal class unless you have a specific need to create a<br />
custom IPrincipal implementation; for example, to support enhanced rolebased<br />
operations.<br />
Use two cookies; one for personalization and one for secure authentication and<br />
authorization. Make the personalization cookie persistent (make sure it does not<br />
contain information that would permit a request to perform a restricted operation;<br />
for example, placing an order within a secure part of a site).<br />
Use a separate cookie name (using the Forms attribute of the element)<br />
and path for each Web application. This will ensure that users who are authenticated<br />
against one application are not treated as authenticated when using a<br />
second application hosted by the same Web server.<br />
Ensure cookies are enabled within client browsers. For a Forms authentication<br />
approach that does not require cookies, see “Cookieless Forms Authentication”<br />
later in this chapter.
168<br />
<strong>Building</strong> <strong>Secure</strong> <strong>ASP</strong>.<strong>NET</strong> <strong>Applications</strong><br />
More Information<br />
●<br />
●<br />
●<br />
See “How To: Use Forms Authentication with SQL Server 2000” in the Reference<br />
section of this guide.<br />
See “How To: Use Forms Authentication with Active <strong>Directory</strong>” in the Reference<br />
section of this guide.<br />
See “How To: Use Forms Authentication with GenericPrincipal Objects” in the<br />
Reference section of this guide.<br />
Hosting Multiple <strong>Applications</strong> Using Forms Authentication<br />
If you are hosting multiple Web applications that use Forms authentication on the<br />
same Web server, it is possible for a user who is authenticated in one application to<br />
make a request to another application without being redirected to that application’s<br />
logon page. The URL authorization rules within the second application may deny<br />
access to the user, without providing the opportunity to supply logon credentials<br />
using the logon form.<br />
This only happens if the name and path attributes on the element are<br />
the same across multiple applications and each application uses a common<br />
element in Web.config.<br />
More Information<br />
For more information about this issue, and for resolution techniques, see the following<br />
Knowledge Base articles:<br />
● Q313116, “PRB: Forms Authentication Requests Are Not Directed to loginUrl<br />
Page”<br />
●<br />
Q310415, “PRB: Mobile Forms Authentication and Different Web <strong>Applications</strong>”<br />
Cookieless Forms Authentication<br />
If you need a cookieless Forms authentication solution, consider using the approach<br />
used by the Microsoft Mobile Internet Toolkit. Mobile Forms Authentication builds<br />
upon Forms Authentication but uses the query string to convey the authentication<br />
ticket instead of a cookie.<br />
More Information<br />
For more information about Mobile Forms Authentication, see article Q311568,<br />
“INFO: How To Use Mobile Forms Authentication with Microsoft Mobile Internet<br />
Toolkit,” in the Microsoft Knowledge Base.
Chapter 8: <strong>ASP</strong>.<strong>NET</strong> Security 169<br />
Passport Authentication<br />
Use Passport authentication when the users of your application have Passport<br />
accounts and you want to implement a single-sign-on solution with other Passport<br />
enabled sites.<br />
When you configure <strong>ASP</strong>.<strong>NET</strong> for Passport authentication, the user is prompted to<br />
log in and then is redirected to the Passport site. After successful credential validation,<br />
the user is redirected back to your site.<br />
Configure <strong>ASP</strong>.<strong>NET</strong> for Passport authentication<br />
To configure <strong>ASP</strong>.<strong>NET</strong> for Passport authentication, use the following Web.config<br />
settings.<br />
<br />
<br />
<br />
<br />
<br />
<br />
<br />
Map a Passport Identity into Roles in Global.asax<br />
To map a Passport identity into roles, implement the<br />
PassportAuthentication_OnAuthentication event handler in Global.asax as shown<br />
below.<br />
void PassportAuthentication_OnAuthenticate(Object sender,<br />
PassportAuthenticationEventArgs e)<br />
{<br />
if(e.Identity.Name == "0000000000000001")<br />
{<br />
string[] roles = new String[]{"Developer", "Admin", "Tester"};<br />
Context.User = new GenericPrincipal(e.Identity, roles);<br />
}<br />
}<br />
Test Role Membership<br />
The following code fragment shows how to retrieve the authenticated Passport<br />
identity and check role membership within an aspx page.<br />
PassportIdentity passportId = Context.User.Identity as PassportIdentity;<br />
if (null == passportId)<br />
{<br />
Response.Write("Not a PassportIdentity");<br />
return;<br />
}<br />
Response.Write("IsInRole: Develeoper? " + Context.User.IsInRole("Developer"));
170<br />
<strong>Building</strong> <strong>Secure</strong> <strong>ASP</strong>.<strong>NET</strong> <strong>Applications</strong><br />
Custom Authentication<br />
If none of the authentication modules supplied with the .<strong>NET</strong> Framework meet<br />
your precise authentication needs, you can use custom authentication and implement<br />
your own authentication mechanism. For example, your company may<br />
already have a custom authentication strategy that is widely used by other applications.<br />
To implement custom authentication in <strong>ASP</strong>.<strong>NET</strong>:<br />
● Configure the authentication mode in Web.config as shown below. This notifies<br />
<strong>ASP</strong>.<strong>NET</strong> that it should not invoke any of its built-in authentication modules.<br />
<br />
●<br />
Create a class that implements the System.Web.IHttpModule interface to create<br />
a custom HTTP module. This module should hook into the<br />
HttpApplication.AuthenticateRequest event and provide a delegate to be called<br />
on each request to the application when authentication is required.<br />
An authentication module must:<br />
● Obtain credentials from the caller.<br />
● Validate the credentials against a store.<br />
● Create an IPrincipal object and store it in HttpContext.User.<br />
●<br />
●<br />
Create and protect an authentication token and send it back to the user<br />
(typically in a query string, cookie, or hidden form field).<br />
Obtain the authentication token on subsequent requests, validate it, and<br />
reissue it.<br />
More Information<br />
For more information about how to implement a custom HTTP Module, see article<br />
Q307996, “HOW TO: Create an <strong>ASP</strong>.<strong>NET</strong> HTTP Module Using Visual C# .<strong>NET</strong>,” in<br />
the Microsoft Knowledge Base.<br />
Process Identity for <strong>ASP</strong>.<strong>NET</strong><br />
Run <strong>ASP</strong>.<strong>NET</strong> (specifically the Aspnet_wp.exe worker process) by using a least<br />
privileged account.<br />
Use a Least Privileged Account<br />
Use a least privileged account to lessen the threat associated with a process compromise.<br />
If a determined attacker manages to compromise the <strong>ASP</strong>.<strong>NET</strong> process that<br />
runs your Web application, they can easily inherit and exploit the privileges and<br />
access rights granted to the process account. An account configured with minimum<br />
privileges restricts the potential damage that can be done.
Chapter 8: <strong>ASP</strong>.<strong>NET</strong> Security 171<br />
Avoid Running as SYSTEM<br />
Don’t use the highly-privileged SYSTEM account to run <strong>ASP</strong>.<strong>NET</strong> and don’t grant<br />
the <strong>ASP</strong>.<strong>NET</strong> process account the “Act as part of the operating system” privilege.<br />
You may be tempted to do one or the other to allow your code to call the<br />
LogonUser API to obtain a fixed identity (typically for network resource access).<br />
For alternate approaches, see “Accessing Network Resources” later in this chapter.<br />
Reasons for not running as SYSTEM, or granting the “Act as part of the operating<br />
system privilege” include:<br />
●<br />
●<br />
It significantly increases the damage that an attacker can do when the system is<br />
compromised, but it doesn’t affect the ability to be compromised.<br />
It defeats the principle of least privilege. The <strong>ASP</strong><strong>NET</strong> account has been specifically<br />
configured as a least privileged account designed to run <strong>ASP</strong>.<strong>NET</strong> Web<br />
applications.<br />
More Information<br />
For more information about the “Act as part of the operating system” privilege, see<br />
the Microsoft Systems Journal August 1999 Security Briefs column.<br />
Domain Controllers and the <strong>ASP</strong>.<strong>NET</strong> Process Account<br />
In general, it is not advisable to run your Web server on a domain controller, because<br />
a compromise of the server is a compromise of the domain. If you need to run<br />
<strong>ASP</strong>.<strong>NET</strong> on a domain controller, you need to give the <strong>ASP</strong>.<strong>NET</strong> process account<br />
appropriate privileges as outlined in article Q315158, “BUG: <strong>ASP</strong>.<strong>NET</strong> Does Not<br />
Work with the Default <strong>ASP</strong><strong>NET</strong> Account on a Domain Controller,” in the Microsoft<br />
Knowledge Base.<br />
Using the Default <strong>ASP</strong><strong>NET</strong> Account<br />
The local <strong>ASP</strong><strong>NET</strong> account has been configured specifically to run <strong>ASP</strong>.<strong>NET</strong> Web<br />
applications with the minimum possible set of privileges. Use <strong>ASP</strong><strong>NET</strong> whenever<br />
possible.<br />
By default, <strong>ASP</strong>.<strong>NET</strong> Web applications run using this account, as configured by the<br />
element within Machine.config.<br />
<br />
Note: The machine user name indicates the <strong>ASP</strong><strong>NET</strong> account. The account is created with a<br />
cryptographically strong password when you install the .<strong>NET</strong> Framework. In addition to being<br />
configured within the Security Account Manager (SAM) database, the password is stored within<br />
the Local System Authority (LSA) on the local computer. The system retrieves the password<br />
from the LSA, when it launches the <strong>ASP</strong>.<strong>NET</strong> worker process.
172<br />
<strong>Building</strong> <strong>Secure</strong> <strong>ASP</strong>.<strong>NET</strong> <strong>Applications</strong><br />
If your application accesses network resources, the <strong>ASP</strong><strong>NET</strong> account must be<br />
capable of being authenticated by the remote computer. You have two choices:<br />
● Reset the <strong>ASP</strong><strong>NET</strong> account’s password to a known value and then create a<br />
duplicate account (with the same name and password) on the remote computer.<br />
This approach is the only option in the following circumstances:<br />
● The Web server and remote computer are in separate domains with no trust<br />
relationship.<br />
● The Web server and remote computer are separated by a firewall and you do<br />
not want to open the necessary ports to support Windows authentication.<br />
● If ease of administration is your primary concern, use a least privileged, domain<br />
account.<br />
To avoid having to manually update and synchronize passwords, you can use<br />
a least privileged domain account to run <strong>ASP</strong>.<strong>NET</strong>. It is vital that the domain<br />
account is fully locked down to mitigate the process compromise threat. If an<br />
attacker manages to compromise the <strong>ASP</strong>.<strong>NET</strong> worker process, he or she will<br />
have the ability to access domain resources, unless the account is fully locked<br />
down.<br />
Note: If you use a local account and the account becomes compromised, the only computers<br />
subject to attack are the computers on which you have created duplicate accounts. If you use<br />
a domain account, the account is visible to each computer on the domain. However, the<br />
account still needs to have permission to access those computers.<br />
The Element<br />
The element in the Machine.config file contains the userName<br />
and password attributes which specify the account that should be used to run the<br />
<strong>ASP</strong>.<strong>NET</strong> worker process (Aspnet_wp.exe). You have a number of options for<br />
configuring this setting. For example:<br />
● “machine”. The worker process runs as the default least privileged <strong>ASP</strong><strong>NET</strong><br />
account. The account has network access but cannot be authenticated to any<br />
other computer on the network because the account is local to the computer and<br />
there is no authority to vouch for the account. On the network, this account is<br />
represented as “MachineName\<strong>ASP</strong><strong>NET</strong>”.<br />
● “system”. The worker process runs as the local SYSTEM account. This account<br />
has extensive privileges on the local computer and also has the ability to access<br />
the network using the credentials of the computer. On the network, this account<br />
is represented as “DomainName\MachineName$”.
Chapter 8: <strong>ASP</strong>.<strong>NET</strong> Security 173<br />
●<br />
Specific credentials. When you supply credentials for userName and password,<br />
remember the principle of least privilege. If you specify a local account, the Web<br />
application cannot be authenticated on the network unless you create a duplicate<br />
account on the remote computer. If you elect to use a least privileged domain<br />
account, ensure it is not an account that has permission to access more computers<br />
on the network than it needs to.<br />
In the .<strong>NET</strong> Framework version 1.1 you will have the ability to store encrypted<br />
userName and password attributes in the registry.<br />
Note: In contrast to the way classic <strong>ASP</strong> applications run, <strong>ASP</strong>.<strong>NET</strong> code never runs in the<br />
dllhost.exe process or as the IWAM_MACHINENAME account even when the application<br />
protection level is set to High (Isolated) in IIS.<br />
<strong>ASP</strong>.<strong>NET</strong> requests sent to IIS are directly routed to the <strong>ASP</strong>.<strong>NET</strong> worker process<br />
(Aspnet_wp.exe). The <strong>ASP</strong>.<strong>NET</strong> ISAPI extension, Aspnet_isapi.dll, runs in the IIS (Inetinfo.exe)<br />
process address space. (This is controlled by the InProcessIsapiApps Metabase entry, which<br />
should not be modified). The ISAPI extension is responsible for routing requests to the <strong>ASP</strong>.<strong>NET</strong><br />
worker process. <strong>ASP</strong>.<strong>NET</strong> applications then run in the <strong>ASP</strong>.<strong>NET</strong> worker process, where application<br />
domains provide isolation boundaries.<br />
In IIS 6, you will be able to isolate <strong>ASP</strong>.<strong>NET</strong> applications by configuring application pools, where<br />
each pool will have its own application instance.<br />
More Information<br />
● For more information about accessing network resources from <strong>ASP</strong>.<strong>NET</strong> Web<br />
applications, see “Accessing Network Resources,” later in this chapter.<br />
●<br />
For detailed information about how to create a custom account for running<br />
<strong>ASP</strong>.<strong>NET</strong>, see “How To: Create a Custom Account to Run <strong>ASP</strong>.<strong>NET</strong>” in the<br />
Reference section of this guide.<br />
Impersonation<br />
With the introduction of the FileAuthorizationModule, and with the efficient use of<br />
gatekeepers and trust boundaries, impersonation may prove more of a disadvantage<br />
than a benefit in <strong>ASP</strong>.<strong>NET</strong>.<br />
Impersonation and Local Resources<br />
If you use impersonation and access local resources from your Web application<br />
code, you must configure the ACLs attached to each secured resource to contain an<br />
ACE that grants at least read access to the authenticated user.
174<br />
<strong>Building</strong> <strong>Secure</strong> <strong>ASP</strong>.<strong>NET</strong> <strong>Applications</strong><br />
A better approach is to avoid impersonation, grant permissions to the <strong>ASP</strong>.<strong>NET</strong><br />
process account, and use URL authorization, File authorization, and a combination<br />
of declarative and imperative role-based checks.<br />
Impersonation and Remote Resources<br />
If you use impersonation and then access remote resources from your Web application<br />
code, the access will fail unless you are using Basic, Forms, or Kerberos authentication.<br />
If you use Kerberos authentication, user accounts must be suitably<br />
configured for delegation. They must be marked as “ Sensitive and cannot be<br />
delegated” within Active <strong>Directory</strong>.<br />
More Information<br />
For more information about how to configure Kerberos delegation, see:<br />
●<br />
●<br />
“Flowing the Original Caller to the Database” in Chapter 5, “Intranet Security.”<br />
“How To: Implement Kerberos Delegation for Windows 2000” in the Reference<br />
section of this guide.<br />
Impersonation and Threading<br />
If a thread that is impersonating creates a new thread, the new thread inherits the<br />
security context of the <strong>ASP</strong>.<strong>NET</strong> process account and not the impersonated account.<br />
Accessing System Resources<br />
<strong>ASP</strong>.<strong>NET</strong> performs no impersonation by default. As a result, if your Web application<br />
accesses local system resources, it does so using the security context associated<br />
with the Aspnet_wp.exe worker process. The security context is determined by the<br />
account used to run the worker process.<br />
Accessing the Event Log<br />
Least privileged accounts have sufficient permissions to be able to write records to<br />
the event log by using existing event sources. However, they do not have sufficient<br />
permissions to create new event sources, This requires a new entry to be placed<br />
beneath the following registry hive.<br />
HKEY_LOCAL_MACHINE\SYSTEM\CurrentControlSet\Services\Eventlog\<br />
To avoid this issue, create the event sources used by your application at installation<br />
time, when administrator privileges are available. A good approach is to use a .<strong>NET</strong><br />
installer class which can be instantiated by the Windows Installer (if you are using<br />
.msi deployment) or by the InstallUtil.exe system utility if you are not.
Chapter 8: <strong>ASP</strong>.<strong>NET</strong> Security 175<br />
If you are unable to create event sources at installation time, you must add permission<br />
to the following registry key and grant access to the <strong>ASP</strong>.<strong>NET</strong> process account<br />
(of any impersonated account if your application uses impersonation).<br />
HKEY_LOCAL_MACHINE\SYSTEM\CurrentControlSet\Services\Eventlog<br />
The account(s) must have the following minimum permissions:<br />
● Query key value<br />
● Set key value<br />
● Create subkey<br />
● Enumerate subkeys<br />
● Notify<br />
● Read<br />
The following code can be used to write to the Application event log from <strong>ASP</strong>.<strong>NET</strong><br />
once permissions have been applied to the registry:<br />
string source = "Your Application Source";<br />
string logToWriteTo = "Application";<br />
string eventText = "Sample Event";<br />
if (!EventLog.SourceExists(source))<br />
{<br />
EventLog.CreateEventSource(source, logToWriteTo);<br />
}<br />
EventLog.WriteEntry(source, eventText, EventLogEntryType.Warning, 234);<br />
Accessing the Registry<br />
Any registry key accessed by your application requires an ACE in the ACL that<br />
grants (at minimum) read access to the <strong>ASP</strong>.<strong>NET</strong> process account.<br />
More Information<br />
For more information about installer classes and the InstallUtil.exe utility, see the<br />
.<strong>NET</strong> Framework Tools on MSDN.<br />
Accessing COM Objects<br />
In classic <strong>ASP</strong>, requests are processed using threads from the Single Threaded<br />
Apartment (STA) thread pool. In <strong>ASP</strong>.<strong>NET</strong>, requests are processed using threads<br />
from the Multithreaded Apartment (MTA) thread pool. This has implications for<br />
<strong>ASP</strong>.<strong>NET</strong> Web applications that call Apartment model objects.
176<br />
<strong>Building</strong> <strong>Secure</strong> <strong>ASP</strong>.<strong>NET</strong> <strong>Applications</strong><br />
Apartment Model Objects<br />
When an <strong>ASP</strong>.<strong>NET</strong> Web application calls an Apartment model object (such as a<br />
Visual Basic 6 COM object) there are two issues to note:<br />
● You must mark your <strong>ASP</strong>.<strong>NET</strong> page with the AspCompat directive, as shown<br />
below.<br />
<br />
●<br />
Don’t create your COM objects outside of specific Page event handlers. Always<br />
create COM objects in Page event handlers (such as Page_Load and Page_Init).<br />
Don’t create COM objects in the page’s constructor.<br />
The AspCompat Directive is Required<br />
By default, <strong>ASP</strong>.<strong>NET</strong> uses MTA threads to process requests. This results in a threadswitch<br />
when an Apartment model object is called from <strong>ASP</strong>.<strong>NET</strong>, because the<br />
Apartment model object can’t be accessed directly by MTA threads (COM would<br />
use an STA thread).<br />
Specifying AspCompat causes the page to be processed by an STA thread. This<br />
avoids a thread switch from MTA to STA. This is important from a security perspective<br />
if your Web application is impersonating because a thread switch results in a<br />
lost impersonation token. The new thread would not have the impersonation token<br />
associated with it.<br />
The AspCompat directive is not supported for <strong>ASP</strong>.<strong>NET</strong> Web services. This means<br />
that when you call Apartment model objects from Web service code, a thread switch<br />
does occur and you lose the thread impersonation token. This typically results in an<br />
Access Denied exception.<br />
More Information<br />
● See the following Knowledge Base articles for more information:<br />
● Article Q303375, “INFO: XML Web Services and Apartment Objects”<br />
●<br />
●<br />
Article Q325791, “PRB: Access Denied Error Message Occurs When Impersonating<br />
in <strong>ASP</strong>.<strong>NET</strong> and Calling STA COM Components”<br />
For more information about how to determine the identity of the currently<br />
executing code, see the “Determining Identity” section of Chapter 13, “Troubleshooting<br />
Security Issues.”<br />
Don’t Create COM Objects Outside of Specific Page Events<br />
Don’t create COM object outside of specific Page event handlers. The following<br />
code fragment illustrates what not to do.
Chapter 8: <strong>ASP</strong>.<strong>NET</strong> Security 177<br />
<br />
<br />
// COM object created outside of Page events<br />
YourComObject obj = new apartmentObject();<br />
public void Page_Load()<br />
{<br />
obj.Foo()<br />
}<br />
<br />
When you use Apartment model objects, it is important to create the object within<br />
specific Page events such as Page_Load, as shown below.<br />
<br />
<br />
public void Page_Load()<br />
{<br />
YourComObject obj = new apartmentObject();<br />
obj.Foo()<br />
}<br />
<br />
More Information<br />
For more information, see article Q308095, “PRB: Creating STA Components in the<br />
Constructor in <strong>ASP</strong>.<strong>NET</strong> <strong>ASP</strong>COMPAT Mode Negatively Impacts Performance” in<br />
the Microsoft Knowledge Base.<br />
C# and VB .<strong>NET</strong> Objects in COM+<br />
Microsoft C#® development tool and Microsoft Visual Basic® .<strong>NET</strong> development<br />
system support all threading models (Free-threaded, Neutral, Both, and Apartment).<br />
By default, when hosted in COM+, C# and Visual Basic .<strong>NET</strong> objects are<br />
marked as Both. As a result, when they are called by <strong>ASP</strong>.<strong>NET</strong>, access is direct and<br />
you do not incur a thread switch.<br />
Accessing Network Resources<br />
Your application may need to access network resources. It is important to be able to<br />
identify:<br />
● The resources your application needs to access.<br />
For example, files on file shares, databases, DCOM servers, Active <strong>Directory</strong><br />
objects, and so on.<br />
● The identity used to perform the resource access.<br />
If your application accesses remote resources, this identity must be capable of<br />
being authenticated by the remote computer.
178<br />
<strong>Building</strong> <strong>Secure</strong> <strong>ASP</strong>.<strong>NET</strong> <strong>Applications</strong><br />
Note: For information specific to accessing remote SQL Server databases, see Chapter 12,<br />
“Data Access Security.”<br />
You can access remote resources from an <strong>ASP</strong>.<strong>NET</strong> application by using any of the<br />
following techniques:<br />
● Use the <strong>ASP</strong>.<strong>NET</strong> process identity.<br />
● Use a serviced component.<br />
● Use the Anonymous Internet user account (for example, IUSR_MACHINE).<br />
● Use the LogonUser API and impersonating a specific Windows identity.<br />
●<br />
Use the original caller.<br />
Using the <strong>ASP</strong>.<strong>NET</strong> Process Identity<br />
When the application is not configured for impersonation, the <strong>ASP</strong>.<strong>NET</strong> process<br />
identity provides the default identity when your application attempts to access<br />
remote resources. If you want to use the <strong>ASP</strong>.<strong>NET</strong> process account for remote<br />
resource access, you have three options:<br />
● Use mirrored accounts.<br />
This is the simplest approach. You create a local account with a matching user<br />
name and password on the remote computer. You must change the <strong>ASP</strong><strong>NET</strong><br />
account password in User Manager to a known value (always use a strong<br />
password). You must then explicitly set this on the element in<br />
Machine.config, and replace the existing “AutoGenerate” value.<br />
Important: If you change the <strong>ASP</strong><strong>NET</strong> password to a known value, the password in the LSA<br />
will no longer match the SAM account password. If you need to revert to the<br />
“AutoGenerate” default, you will need to do the following:<br />
Run Aspnet_regiis.exe, to reset <strong>ASP</strong>.<strong>NET</strong> to its default configuration. For more information,<br />
see article Q306005, “HOWTO: Repair IIS Mapping After You Remove and Reinstall IIS” in<br />
the Microsoft Knowledge Base.<br />
●<br />
●<br />
Create a custom, least privileged local account to run <strong>ASP</strong>.<strong>NET</strong> and create<br />
a duplicate account on the remote computer.<br />
Run <strong>ASP</strong>.<strong>NET</strong> using a least-privileged domain account.<br />
This assumes that client and server computers are in the same or trusting<br />
domains.<br />
More Information<br />
For more information about configuring an <strong>ASP</strong>.<strong>NET</strong> process account, see “How To:<br />
Create a Custom Account to Run <strong>ASP</strong>.<strong>NET</strong>” in the Reference section of this guide.
Chapter 8: <strong>ASP</strong>.<strong>NET</strong> Security 179<br />
Using a Serviced Component<br />
You can use an out of process serviced component, configured to run as a fixed<br />
identity to access network resources. This approach is shown in Figure 8.6.<br />
Web Server<br />
<strong>ASP</strong>.<strong>NET</strong><br />
(aspnet_wp.exe)<br />
Enterprise Services<br />
Server Application<br />
(dllhost.exe)<br />
Serviced<br />
Component<br />
Running as<br />
<strong>ASP</strong><strong>NET</strong><br />
Fixed Identity<br />
“MyServAccount”<br />
Remote<br />
Computer<br />
Remote<br />
Resource<br />
Running as “MyServAccount”<br />
(configured in the COM+ Catalog)<br />
Figure 8.6<br />
Using an out of process serviced component to provide a fixed identity for network resource access<br />
Using an out of process serviced component (in an Enterprise Services server<br />
application) has the following advantages:<br />
● Flexibility in terms of the identity used. You don’t just rely on the <strong>ASP</strong>.<strong>NET</strong><br />
identity.<br />
● Trusted or higher-privileged code can be isolated from your main Web<br />
application.<br />
● An additional process hop raises the bar from a security perspective. It makes it<br />
much tougher for an attacker to cross the process boundary to a process with<br />
raised privileges.<br />
● If you need to hand-craft impersonation with LogonUser API calls, you can do<br />
so in a process that is separated from your main Web application.<br />
Note: To call LogonUser you must give the Enterprise Services process-account the “Act as<br />
part of the operating system” privilege. Raising the privileges for a process that is separate<br />
from your Web application is less of a security concern.
180<br />
<strong>Building</strong> <strong>Secure</strong> <strong>ASP</strong>.<strong>NET</strong> <strong>Applications</strong><br />
Using the Anonymous Internet User Account<br />
You can use the anonymous Internet user account to access network resources if IIS<br />
is configured for Anonymous authentication. This is the case if one of the following<br />
is true:<br />
● Your application supports anonymous access.<br />
● Your application uses Forms, Passport, or Custom authentication (where IIS is<br />
configured for anonymous access).<br />
<br />
To use the anonymous account for remote resource access<br />
1. Configure IIS for Anonymous authentication. You can set the <strong>ASP</strong>.<strong>NET</strong> authentication<br />
mode to Windows, Forms, Passport, or None, depending upon the<br />
authentication requirements of your application.<br />
2. Configure <strong>ASP</strong>.<strong>NET</strong> for impersonation. Use the following setting in Web.config:<br />
<br />
3. Configure the anonymous account as a least privileged domain account,<br />
– or –<br />
Duplicate the anonymous account by using the same user name and password<br />
on the remote computer. This approach is necessary when you are making calls<br />
across non-trusting domains or through firewalls where the necessary ports to<br />
support Integrated Windows authentication are not open.<br />
To support this approach, you must also:<br />
a. Use Internet Services Manager to clear the Allow IIS to Control Password<br />
checkbox for the anonymous account.<br />
If you select this option, the logon session created using the specified anonymous<br />
account ends up with NULL network credentials (and therefore cannot<br />
be used to access network resources). If you don’t select this option, the logon<br />
session is an interactive logon session with network credentials.<br />
b. Set the account’s credentials both in User Manager and in Internet Services<br />
Manager.<br />
Important: If you impersonate the anonymous account (for example, IUSR_MACHINE),<br />
resources must be secured against this account (using appropriately configured ACLs).<br />
Resources that your application needs to access must grant read access (at minimum) to the<br />
anonymous account. All other resources should deny access to the anonymous account.
Chapter 8: <strong>ASP</strong>.<strong>NET</strong> Security 181<br />
Hosting Multiple Web <strong>Applications</strong><br />
You can use a separate anonymous Internet user account for each virtual root<br />
within your Web site. In a hosted environment, this allows you to separately authorize,<br />
track, and audit requests that originate from separate Web applications. This<br />
approach is shown in Figure 8.7.<br />
Web Server<br />
Remote Computer(s)<br />
IIS<br />
(inetinfo.exe)<br />
<strong>ASP</strong>.<strong>NET</strong><br />
(aspnet_wp.exe)<br />
v-dir1<br />
IUSR_1<br />
AppDomain1<br />
IUSR_1<br />
Remote Resource<br />
v-dir2<br />
IUSR_2<br />
AppDomain2<br />
IUSR_2<br />
Remote Resource<br />
v-dir3<br />
IUSR_3<br />
AppDomain3<br />
IUSR_3<br />
Remote Resource<br />
Anonymous<br />
Authentication<br />
Impersonation<br />
Figure 8.7<br />
Impersonating separate anonymous Internet user accounts per application (v-dir)<br />
<br />
To configure the anonymous Internet user account for a specific virtual directory<br />
1. Start Internet Services Manager from the Administrative Tools programs<br />
group.<br />
2. Select the virtual directory you want to configure, right-click, and then click<br />
Properties.<br />
3. Click the <strong>Directory</strong> Security tab.<br />
4. Click Edit within the Anonymous access and authentication control group.<br />
5. Select Anonymous access, and then click Edit.<br />
6. Enter the user name and password of the account that you want IIS to use when<br />
anonymous users connect to the site.<br />
7. Make sure that Allow IIS to control password is NOT selected.
182<br />
<strong>Building</strong> <strong>Secure</strong> <strong>ASP</strong>.<strong>NET</strong> <strong>Applications</strong><br />
Using LogonUser and Impersonating a Specific Windows Identity<br />
You can impersonate a specific identity by configuring user name and password<br />
attributes on the element in Web.config, or by calling the Win32®<br />
LogonUser API in your application code.<br />
Important: These approaches are not recommended. You should avoid them both on Windows<br />
2000 servers, because it forces you to grant the “Act as part of the operating system”<br />
privilege to the <strong>ASP</strong>.<strong>NET</strong> process account. This significantly reduces the security of your Web<br />
application.<br />
Windows .<strong>NET</strong> Server 2003 will lift this restriction.<br />
Using the Original Caller<br />
To use the original caller’s identity for remote resource access, you must be able to<br />
delegate the caller’s security context from the Web server to the remote computer.<br />
Scalability Warning: If you access the data services tier of your application using the original<br />
caller’s impersonated identity, you severely impact the application’s ability to scale, because<br />
database connection pooling is rendered ineffective. The security context for database<br />
connections is different for each user.<br />
The following authentication schemes support delegation:<br />
● Kerberos. For more information, see “How To: Implement Kerberos Delegation<br />
for Windows 2000” within the Reference section of this guide.<br />
●<br />
●<br />
Client certificates mapped to Windows accounts. The mapping must be performed<br />
by IIS.<br />
Basic. Basic authentication supports remote resource access because the original<br />
caller’s credentials are available in clear text at the Web server. These can be used<br />
to respond to authentication challenges from remote computers.<br />
Basic authentication must be used in conjunction with an interactive or batch<br />
logon session. The type of logon session that results from Basic authentication is<br />
configurable in the IIS Metabase. For more information, see the Platform SDK:<br />
Internet Information Services 5.1 on MSDN.<br />
Important: Basic authentication is the least secure of the approaches that support<br />
delegation. This is because a clear text user name and password are passed from the<br />
browser to the server over the network and they are cached in memory at the Web server.<br />
You can use SSL to protect credentials while in transit but you should avoid caching clear<br />
text credentials at the Web server where possible.
Chapter 8: <strong>ASP</strong>.<strong>NET</strong> Security 183<br />
<br />
To use the original caller for remote resource access<br />
1. Configure IIS for Integrated Windows (Kerberos), Certificate (with IIS certificate<br />
mapping), or Basic authentication.<br />
2. Configure <strong>ASP</strong>.<strong>NET</strong> for Windows authentication and impersonation.<br />
<br />
<br />
3. If you use Kerberos delegation, configure Active <strong>Directory</strong> accounts for<br />
delegation.<br />
More Information<br />
● For more information about configuring Kerberos delegation, see “How To:<br />
Implement Kerberos Delegation for Windows 2000” in the Reference section of<br />
this guide.<br />
● For more information about IIS certificate mapping, see http://www.microsoft.com<br />
/technet/treeview/default.asp?url=/technet/prodtechnol/ad/windows2000/howto<br />
/mapcerts.asp.<br />
●<br />
For more information about <strong>ASP</strong>.<strong>NET</strong> Impersonation, see the .<strong>NET</strong> Framework<br />
Developers Guide on MSDN.<br />
Accessing Files on a UNC File Share<br />
If your application needs to access files on a Universal Naming Convention (UNC)<br />
share using <strong>ASP</strong>.<strong>NET</strong>, it is important to add NTFS permissions to the share’s folder.<br />
You will also need to set the share’s permissions to grant at least read access to<br />
either the <strong>ASP</strong>.<strong>NET</strong> process account or the impersonated identity (if your application<br />
is configured for impersonation).<br />
Accessing Non-Windows Network Resources<br />
If your application needs to access non-Windows resources such as databases<br />
located on non-Windows platforms or mainframe applications, you need to consider<br />
the following questions:<br />
● What are the gatekeepers and trust boundaries associated with the resource?<br />
● What credentials are required for authentication?<br />
● Does the resource need to know the original caller identity, or does it trust the<br />
calling application (using a fixed process or service identity)?<br />
● What is the performance cost associated with establishing connections? If the<br />
cost is significant you may need to implement connection pooling; for example,<br />
by using the object pooling feature of Enterprise Services.
184<br />
<strong>Building</strong> <strong>Secure</strong> <strong>ASP</strong>.<strong>NET</strong> <strong>Applications</strong><br />
If the resource needs to be able to authenticate the original caller (and Windows<br />
authentication is not an option), you have the following options:<br />
● Pass credentials using (method call) parameters.<br />
● Pass credentials in a connection string. Use SSL or IPSec to secure clear text<br />
credentials passed over a network.<br />
Store credentials securely within your application, for example by using DPAPI.<br />
For more information about securely storing database connection strings, see<br />
“Storing Database Connection Strings <strong>Secure</strong>ly” in Chapter 12, “Data Access<br />
Security.”<br />
●<br />
Use a centralized data store for authentication that both platforms can access; for<br />
example, an LDAP directory.<br />
<strong>Secure</strong> Communication<br />
Use SSL to secure the communication link between browser and Web server. SSL<br />
provides message confidentiality and message integrity. Use SSL and/or IPSec to<br />
provide a secure channel from Web server to application server or database server.<br />
More Information<br />
For more information about secure communication, see “Chapter 4, “<strong>Secure</strong> Communication.”<br />
Storing Secrets<br />
Web applications often need to store secrets. These need to be secured against rogue<br />
administrators and malicious Web users, such as:<br />
● Rogue administrators. Administrators and other unscrupulous users should not<br />
be able to view privileged information. For example, the administrator of the<br />
Web server should not be able to read the password of a SQL Server login account<br />
on a SQL Server computer located across the network.<br />
● Malicious Web users. Even though there are components (such as the<br />
FileAuthorizationModule) that prevent users from accessing privileged files, if<br />
an attacker does gain access to a configuration file, the secret in the file should<br />
not be in plain text.<br />
Typical examples of secrets include:<br />
● SQL connection strings. A common mistake is to store the user name and<br />
password in plain text. The recommendation is to use Windows authentication<br />
instead of SQL authentication. If you can’t use Windows authentication, see the
Chapter 8: <strong>ASP</strong>.<strong>NET</strong> Security 185<br />
●<br />
●<br />
following sections in Chapter 12, “Data Access Security,” which present secure<br />
alternatives:<br />
● “Storing Database Connections <strong>Secure</strong>ly”<br />
●<br />
“<strong>Secure</strong> Communications”<br />
Credentials used for SQL application roles. SQL Application roles must be<br />
activated with a stored procedure that requires the role name and associated<br />
password. For more information, see “Authorization” in Chapter 12, “Data<br />
Access Security.”<br />
Fixed identities in Web.config. For example:<br />
<br />
●<br />
In the .<strong>NET</strong> Framework version 1.1, <strong>ASP</strong>.<strong>NET</strong> provides the ability to encrypt the<br />
username and password and store it safely in a registry key.<br />
Process identity in Machine.config. For example:<br />
<br />
●<br />
●<br />
By default <strong>ASP</strong>.<strong>NET</strong> manages the secret if you use the “Machine” user name and<br />
“AutoGenerate” password.<br />
In the .<strong>NET</strong> Framework version 1.1, <strong>ASP</strong>.<strong>NET</strong> provides the ability to encrypt the<br />
user name and password and store it safely in a registry key.<br />
Keys used to store data securely. It is impossible to safely store keys in software.<br />
However, certain tasks can mitigate the risk. An example is to create a<br />
custom configuration section handler which uses asymmetric encryption to<br />
encrypt a session key. The session key can then be stored in a configuration file.<br />
SQL Server session state. To use SQL server to manage <strong>ASP</strong>.<strong>NET</strong> Web application<br />
session state, use the following Web.config settings.<br />
<br />
●<br />
In the .<strong>NET</strong> Framework 1.1, <strong>ASP</strong>.<strong>NET</strong> provides the ability to encrypt this information.<br />
Passwords used for Forms authentication against a database.<br />
If your application validates authentication credentials against a database, don’t<br />
store passwords in the database. Use a hash of the password with a salt value<br />
and compare hashes.<br />
For more information, see “Authenticating Users against a Database” in Chapter<br />
12, “Data Access Security.”
186<br />
<strong>Building</strong> <strong>Secure</strong> <strong>ASP</strong>.<strong>NET</strong> <strong>Applications</strong><br />
Options for Storing Secrets in <strong>ASP</strong>.<strong>NET</strong><br />
A number of approaches are available to .<strong>NET</strong> Web application developers to store<br />
secrets. These include:<br />
● .<strong>NET</strong> cryptography classes. The .<strong>NET</strong> Framework includes classes that can be<br />
used for encryption and decryption. These approaches require that you safely<br />
store the encryption key.<br />
● Data Protection API (DPAPI). DPAPI is a pair of Win32 APIs that encrypt and<br />
decrypt data by using a key derived from the user’s password. When using<br />
DPAPI, you do not deal with key management. The operating system manages<br />
the key which is the user’s password.<br />
●<br />
●<br />
●<br />
COM+ Constructor Strings. If your application uses serviced components, you<br />
can store the secret in an object construction string. The string is stored in the<br />
COM+ catalog in a clear text form,<br />
CAPICOM. This is a Microsoft COM object which provides COM-based access<br />
to the underlying Crypto API.<br />
Crypto API. These are low level Win32 APIs that perform encryption and<br />
decryption.<br />
More Information<br />
For more information, see the entry for Cryptography, CryptoAPI and CAPICOM in<br />
the Platform SDK on MSDN.<br />
Consider Storing Secrets in Files on Separate Logical Volumes<br />
Consider installing Web application directories on a separate logical volume from<br />
the operating system (for example, E: instead of C:). This means that Machine.config<br />
(located under C:\WINNT\Microsoft.<strong>NET</strong>) and potentially other files that contain<br />
secrets such as, Universal Data Link (UDL) files, are located on a separate logical<br />
volume from the Web application directories.<br />
The rationale for this approach is to protect against possible file canonicalization<br />
and directory traversal bugs because:<br />
● File canonicalization bugs can expose files in the Web application folders.<br />
Note: File canonicalization routines return the canonical form of a file path. This is usually<br />
the absolute pathname in which all relative references and references to the current<br />
directory have been completely resolved.<br />
●<br />
<strong>Directory</strong> traversal bugs can expose files in other folders on the same logical<br />
volume.<br />
No bugs of the sort described above have yet been published that exposed files on<br />
other logical volumes.
Chapter 8: <strong>ASP</strong>.<strong>NET</strong> Security 187<br />
Securing Session and View State<br />
Web applications must manage various types of state including view state and<br />
session state. This section discusses secure state management for <strong>ASP</strong>.<strong>NET</strong> Web<br />
applications.<br />
Securing View State<br />
If your <strong>ASP</strong>.<strong>NET</strong> Web applications use view state:<br />
● Ensure the integrity of view state (to ensure it is not altered in any way while in<br />
transit) by setting the enableViewStateMac to true as shown below. This causes<br />
<strong>ASP</strong>.<strong>NET</strong> to generate a Message Authentication Code (MAC) on the page’s view<br />
state when the page is posted back from the client.<br />
<br />
●<br />
Configure the validation attribute on the element in<br />
Machine.config, to specify the type of encryption to use for data validation.<br />
Consider the following:<br />
● <strong>Secure</strong> Hash Algorithm 1 (SHA1) produces a larger hash size than Message<br />
Digest 5 (MD5) so it is considered more secure. However, view state protected<br />
with SHA1 or MD5 can be decoded in transit or on the client side and can<br />
potentially be viewed in plain text<br />
● Use 3 Data Encryption Standard (3DES) to detect changes in the view state<br />
and to also encrypt it while in transit. When in this state, even if view state is<br />
decoded, it cannot be viewed in plain text.<br />
Securing Cookies<br />
Cookies that contain authentication or authorization data or other sensitive<br />
data should be secured in transit by using SSL. For Forms authentication, the<br />
FormsAuthentication.Encrypt method can be used to encrypt the authentication<br />
ticket, passed between client and server in a cookie.<br />
Securing SQL Session State<br />
The default (in-process) <strong>ASP</strong>.<strong>NET</strong> session state handler has certain limitations. For<br />
example, it cannot work across computers in a Web farm. To overcome this limitation,<br />
<strong>ASP</strong>.<strong>NET</strong> allows session state to be stored in a SQL Server database.
188<br />
<strong>Building</strong> <strong>Secure</strong> <strong>ASP</strong>.<strong>NET</strong> <strong>Applications</strong><br />
SQL session state can be configured either in Machine.config or Web.config.<br />
The default setting in machine.config is shown below.<br />
<br />
By default, the SQL script InstallSqlState.sql, which is used for building the database<br />
used for SQL session state is installed at the following location:<br />
C:\WINNT\Microsoft.<strong>NET</strong>\Framework\v1.0.3705<br />
When you use SQL session state there are two problems to consider.<br />
● You must secure the database connection string.<br />
● You must secure the session state as it crosses the network.<br />
Securing the Database Connection String<br />
If you use SQL authentication to connect to the server, the user ID and password<br />
information is stored in plain text in web.config as shown below.<br />
<br />
By default the HttpForbiddenHandler protects configuration files from being<br />
downloaded. However, any user who has direct access to the folders where the<br />
configuration files are stored can still see the user name and password. A better<br />
practice is to use Windows authentication to SQL Server.<br />
<br />
To use Windows authentication, you can use the <strong>ASP</strong>.<strong>NET</strong> process identity (typically<br />
<strong>ASP</strong><strong>NET</strong>)<br />
1. Create a duplicate account (with the same name and password) on the database<br />
server.<br />
2. Create a SQL login for the account.<br />
3. Create a database user in the <strong>ASP</strong>State database and map the SQL login to the<br />
new user.<br />
The <strong>ASP</strong>State database is created by the InstallSQLState.sql script.
Chapter 8: <strong>ASP</strong>.<strong>NET</strong> Security 189<br />
5. Create a user defined database role and add the database user to the role.<br />
6. Configure permissions in the database for the database role.<br />
You can then change the connection string to use a trusted connection, as shown<br />
below:<br />
sqlConnectionString="server=127.0.0.1;<br />
database=StateDatabase;<br />
Integrated Security=SSPI;"<br />
Securing Session State Across the Network<br />
You may need to protect the session state as it crosses the network to the SQL Server<br />
database. This depends on how secure the network hosting the Web server and data<br />
servers is. If the database is physically secured in a trusted environment, you may<br />
be able to do without this extra security measure.<br />
You can use IPSec to protect all IP traffic between the Web servers and SQL Server,<br />
or alternatively, you can use SSL to secure the link to SQL Server. With this approach,<br />
you have the option of encrypting just the connection used for the session<br />
state, and not all traffic that passes between the computers.<br />
More Information<br />
● For more information about how to set up SQL Session State, see article Q317604,<br />
“HOW TO: Configure SQL Server to Store <strong>ASP</strong>.<strong>NET</strong> Session State,” in the<br />
Microsoft Knowledge Base.<br />
● For more information about using SSL to SQL Server, see “How To: Use SSL to<br />
<strong>Secure</strong> Communication with SQL Server 2000” in the Reference section of this<br />
guide.<br />
● For more information about using IPSec, see “How To: Use IPSec to Provide<br />
<strong>Secure</strong> Communication Between Two Servers” in the Reference section of this<br />
guide.<br />
Web Farm Considerations<br />
In a Web farm scenario, there is no guarantee that successive requests from the<br />
same client are serviced by the same Web server. This has implications for state<br />
management and for any encryption that relies on attributes maintained by the<br />
element in Machine.config.
190<br />
<strong>Building</strong> <strong>Secure</strong> <strong>ASP</strong>.<strong>NET</strong> <strong>Applications</strong><br />
Session State<br />
The default <strong>ASP</strong>.<strong>NET</strong> in-process session state handling (which mirrors previous <strong>ASP</strong><br />
functionality) results in server affinity and cannot be used in a Web farm scenario.<br />
For Web farm deployments, session state must be stored out of process in either the<br />
<strong>ASP</strong>.<strong>NET</strong> State service or a SQL Server database as described earlier.<br />
Note: You cannot rely on application state for maintaining global counters or unique values in<br />
Web farm (Web application configured to run on multiple servers) or Web garden (Web application<br />
configured to run on multiple processors) scenarios because application state is not<br />
shared across processes or computers.<br />
DPAPI<br />
DPAPI can work with either the machine store or user store (which requires a<br />
loaded user profile). If you use DPAPI with the machine store, the encrypted string<br />
is specific to a given computer and therefore you must generate the encrypted data<br />
on every computer. Do not copy the encrypted data across computers in a Web farm<br />
or cluster.<br />
If you use DPAPI with the user store, you can decrypt the data on any computer<br />
with a roaming user profile.<br />
More Information<br />
For more information about DPAPI, see Chapter 12, “Data Access Security.”<br />
Using Forms Authentication in a Web Farm<br />
If you are using Forms authentication, it is essential that all of the servers in the<br />
Web farm share a common machine key, which is used for encryption, decryption,<br />
and validation of the authentication ticket.<br />
The machine key is maintained by the element within<br />
Machine.config. The default setting is shown below.<br />
<br />
This setting results in every machine generating a different validation and<br />
decryption key. You must change the element and place common<br />
key values across all servers in the Web farm.
Chapter 8: <strong>ASP</strong>.<strong>NET</strong> Security 191<br />
The Element<br />
The element located in Machine.config is used to configure the keys<br />
used for encryption and decryption of Forms authentication cookie data and view<br />
state.<br />
When the FormsAuthentication.Encrypt or FormsAuthentication.Decrypt methods<br />
are called, and when view state is created or retrieved, the values in the<br />
element are consulted.<br />
<br />
The validationKey Attribute<br />
The value of the validationKey attribute is used to create and validate MAC codes<br />
for view state and Forms authentication tickets. The validation attribute signifies<br />
what algorithm to use when performing the MAC generation. Note the following:<br />
● With Forms authentication, this key works in conjunction with the <br />
protection attribute. When the protection attribute is set to Validation, and then<br />
when the FormsAuthentication.Encrypt method is called, the ticket value and<br />
the validationKey are used to compute a MAC which is appended to the cookie.<br />
When the FormsAuthentication.Decrypt method is called, the MAC is computed<br />
and compared to the MAC that is appended to the ticket.<br />
● With view state, the value of a control’s view state and the validationKey are<br />
used to compute a MAC, which is appended to the view state. When the view<br />
state is posted back from the client, the MAC is recomputed and compared to the<br />
MAC that is appended to the view state.<br />
The decryptionKey Attribute<br />
The value of the decryptionKey attribute is used to encrypt and decrypt Forms<br />
authentication tickets and view state. The DES or Triple DES (3DES) algorithms are<br />
used. The precise algorithm depends on whether or not the Windows 2000 High<br />
Encryption Pack is installed on the server. If it is installed 3DES is used, otherwise<br />
DES is used. Note the following:<br />
● With Forms authentication, the key works in conjunction with the <br />
protection attribute. When the protection attribute is set to Encryption, and the<br />
FormsAuthentication.Encrypt or Decrypt methods are called, the ticket value is<br />
encrypted or decrypted with the specified decryptionKey value.
192<br />
<strong>Building</strong> <strong>Secure</strong> <strong>ASP</strong>.<strong>NET</strong> <strong>Applications</strong><br />
●<br />
With view state, the value of a controls view state is encrypted with the<br />
decryptionKey value when sent to the client and is decrypted when the client<br />
posts the data back to the server.<br />
The Validation Attribute<br />
This attribute dictates what algorithm to use when validating, encrypting, or<br />
decrypting. It can take the values SHA1, MD5, or 3DES. The following describes<br />
these values:<br />
● SHA1. The HMACSHA1 algorithm is actually used when the setting is SHA1. It<br />
produces a 160 bit (20 byte) hash or digest of the input. HMACSHA1 is a keyed<br />
hashing algorithm. The key used as the input for this algorithm is specified by<br />
the validationKey attribute.<br />
SHA1 is a popular algorithm because of its larger digest size compared to other<br />
algorithms.<br />
● MD5. This produces a 20 byte hash using the MD5 algorithm.<br />
●<br />
3DES. This encrypts data using the Triple DES (3DES) algorithm.<br />
Note: When the validation attribute is set to 3DES, it is not actually used by Forms authentication.<br />
SHA1 is used instead.<br />
More Information<br />
● For information about how to create keys suitable for placing in Machine.config,<br />
see article Q312906, “HOW TO: Create Keys w/ C# .<strong>NET</strong> for Use in Forms<br />
Authentication,” in the Microsoft Knowledge Base.<br />
●<br />
For more information about the Windows 2000 High Encryption Pack, see http:<br />
//www.microsoft.com/windows2000/downloads/recommended/encryption/.<br />
Summary<br />
This chapter has described a variety of techniques and approaches for securing<br />
<strong>ASP</strong>.<strong>NET</strong> Web applications. Much of the guidance and many of the recommendations<br />
presented in this chapter also apply to the development of <strong>ASP</strong>.<strong>NET</strong> Web<br />
services and .<strong>NET</strong> Remoting objects hosted by <strong>ASP</strong>.<strong>NET</strong>. To summarize:<br />
● If your application uses Forms authentication and if performance is an issue<br />
when authenticating the user, retrieve a list of roles and store them in the authentication<br />
ticket.<br />
● If you use Forms authentication, always create a principal and store it in the<br />
context on each request.<br />
● If there are too many roles to store in an authentication cookie, then use the<br />
global application cache to store the roles.
Chapter 8: <strong>ASP</strong>.<strong>NET</strong> Security 193<br />
●<br />
●<br />
●<br />
●<br />
Don’t create a custom least privileged account to run <strong>ASP</strong>.<strong>NET</strong>. Instead, change<br />
the <strong>ASP</strong><strong>NET</strong> account password and create a duplicate account on any remote<br />
Windows server that your application needs to access.<br />
If you must create a custom account to run <strong>ASP</strong>.<strong>NET</strong>, use the principle of least<br />
privilege. For example:<br />
● Use a least privileged domain account if administration is the main concern.<br />
● If you use a local account. you must create a duplicated account on any<br />
remote computer that the Web application needs to access, You must use local<br />
accounts when your application needs to access resources in non-trusting<br />
domains, or where a firewall prevents Windows authentication.<br />
● Don’t run <strong>ASP</strong>.<strong>NET</strong> using the local SYSTEM account.<br />
●<br />
Don’t give the <strong>ASP</strong><strong>NET</strong> account “Act as part of the operating system” privilege.<br />
Use SSL when:<br />
●<br />
●<br />
Security sensitive information is passed between browser and Web server.<br />
When Basic authentication is used (to protect credentials).<br />
● When Forms authentication is used for authentication (as opposed to personalization).<br />
Avoid storing secrets in plain text.
9<br />
Enterprise Services Security<br />
Traditional COM+ services such as distributed transactions, just-in-time activation,<br />
object pooling, and concurrency management are available to .<strong>NET</strong> components.<br />
With .<strong>NET</strong>, such services are referred to as Enterprise Services. They are essential<br />
for many middle-tier .<strong>NET</strong> components running within .<strong>NET</strong> Web applications.<br />
To add services to a .<strong>NET</strong> component, you must derive the component class from<br />
the EnterpriseServices.ServicedComponent base class and then specify precise<br />
service requirements using .<strong>NET</strong> attributes compiled into the assembly that hosts<br />
the component.<br />
This chapter describes how to build secure serviced components and how to call<br />
them from <strong>ASP</strong>.<strong>NET</strong> Web applications.<br />
Security Architecture<br />
The authentication, authorization, and secure communication features supported by<br />
Enterprise Services applications are shown in Figure 9.1 on the next page. The client<br />
application shown in Figure 9.1 is an <strong>ASP</strong>.<strong>NET</strong> Web application.
196<br />
<strong>Building</strong> <strong>Secure</strong> <strong>ASP</strong>.<strong>NET</strong> <strong>Applications</strong><br />
Role List<br />
“Manager”<br />
“Senior Manager”<br />
“Employee”<br />
COM+<br />
Catalog<br />
Check role membership<br />
Bob<br />
Client Application<br />
(e.g. aspnet_wp.exe)<br />
Bob<br />
(DCOM)<br />
Access<br />
Check<br />
Serviced<br />
Component<br />
Interceptor<br />
Windows<br />
Authentication<br />
+ Impersonation<br />
Machine.config<br />
(DCOM client<br />
authentication and<br />
impersonation<br />
settings)<br />
RPC<br />
Packet Privacy<br />
Packet Integrity<br />
(Privacy/Integrity)<br />
Figure 9.1<br />
Enterprise Services role-based security architecture<br />
DCOM/RPC<br />
(Authentication)<br />
Enterprise Services<br />
(COM+) Roles<br />
(Authorization)<br />
None<br />
Connect<br />
Call<br />
Packet<br />
Packet Integrity<br />
Packet Privacy<br />
Enterprise Services<br />
Server Application<br />
(dllhost.exe)<br />
Notice that authentication and secure communication features are provided by the<br />
underlying RPC transport used by Distributed COM (DCOM). Authorization is<br />
provided by Enterprise Services (COM+) roles.<br />
The following summarizes the main elements of the Enterprise Services security<br />
architecture:<br />
● Enterprise Services applications use RPC authentication to authenticate callers.<br />
This means that unless you have taken specific steps to disable authentication,<br />
the caller is authenticated using either Kerberos or NTLM authentication.<br />
● Authorization is provided through Enterprise Services (COM+) roles, which can<br />
contain Microsoft® Windows® operating system group or user accounts. Role<br />
membership is defined within the COM+ catalog and is administered by using<br />
the Component Services tool.<br />
Note: If the Enterprise Services application uses impersonation, caller authorization using<br />
Windows ACLs on secured resources is also available.<br />
●<br />
When a client (for example, an <strong>ASP</strong>.<strong>NET</strong> Web application) calls a method on a<br />
serviced component, after the authentication process is complete, the Enterprise<br />
Services interception layer accesses the COM+ catalog to determine the client’s<br />
role membership. It then checks whether membership of the role or roles permits<br />
authorized access to the current application, component, interface, and method.
Chapter 9: Enterprise Services Security 197<br />
●<br />
If the client’s role membership permits access, the method is called. If the client<br />
doesn’t belong to an appropriate role, the call is rejected, and a security event is<br />
optionally generated to reflect the failed access attempt.<br />
Important: To implement meaningful role-based authorization within an Enterprise Services<br />
application called by an <strong>ASP</strong>.<strong>NET</strong> Web application, Windows authentication and impersonation<br />
must be used within the <strong>ASP</strong>.<strong>NET</strong> Web application in order to ensure that the original<br />
caller’s security context flows through to the serviced component.<br />
●<br />
To secure the DCOM communication link between client and server applications,<br />
either the RPC Packet Integrity authentication level can be used (to provide<br />
message integrity), or the RPC Packet Privacy authentication level can be used<br />
(to provide message confidentiality).<br />
Gatekeepers and Gates<br />
The Enterprise Services runtime acts as the gatekeeper for serviced components.<br />
The individual gates (authorization points) within an Enterprise Services application<br />
are shown in Figure 9.2. You configure these gates by using Enterprise Services<br />
roles, which you must populate with the appropriate Windows group and user<br />
accounts.<br />
Note: You must also ensure that access checking (role-based security) is enabled for your<br />
Enterprise Services application and that the appropriate level of authentication is being used.<br />
For more information about how to configure security, see “Configuring Security” later in this<br />
chapter.<br />
1<br />
COM<br />
SCM<br />
dllhost.exe<br />
3<br />
Serviced<br />
Component C<br />
Library Application<br />
Client<br />
2<br />
3<br />
Serviced<br />
Component A<br />
Serviced<br />
Component B<br />
Server Application<br />
Figure 9.2<br />
Gatekeepers within an Enterprise Services application
198<br />
<strong>Building</strong> <strong>Secure</strong> <strong>ASP</strong>.<strong>NET</strong> <strong>Applications</strong><br />
There are three distinct access checks performed in response to a client issuing<br />
a method call on a serviced component. These are illustrated in Figure 9.2 and<br />
described below:<br />
1. An initial access check is performed by the subsystem responsible for activating<br />
Enterprise Services applications — the COM Service Control Manager (SCM)—<br />
when a call to a serviced component results in an activation request (and the<br />
creation of a new instance of the COM+ surrogate process, Dllhost.exe).<br />
To successfully pass this access check, the caller must be a member of at least one<br />
role defined within the application.<br />
2. A second access check is performed when the client’s call enters the Dllhost.exe<br />
process instance.<br />
Once again, if the caller is a member of at least one role defined within the<br />
application, this access check succeeds.<br />
3. The final access check occurs when the client’s call enters either a server or<br />
library application.<br />
To successfully pass this access check, the caller must be a member of a role that<br />
is associated with either, the interface, class, or method that is the target of the<br />
client’s call.<br />
Important: After a call invokes a method on a serviced component, no further access checks<br />
are made if the component communicates with other components located in the same application.<br />
However, access checks do occur if a component calls another component within a<br />
separate application (library or server).<br />
Use Server <strong>Applications</strong> for Increased Security<br />
If your application needs to enforce an authentication level, for example because it<br />
requires encryption to ensure that the data sent to a serviced component remains<br />
confidential and tamper proof while in transit across the network, you should use<br />
a server application.<br />
The authentication level can be enforced for a server application, while library<br />
applications inherit their authentication level from the host process.<br />
To configure the activation type of an Enterprise Services application, use the<br />
assembly level ApplicationActivation attribute as shown below.<br />
[assembly: ApplicationActivation(ActivationOption.Server)]<br />
This is equivalent to setting the Activation Type to Server application on the<br />
Activation page of the application’s Properties dialog within Component Services.
Chapter 9: Enterprise Services Security 199<br />
Security for Server and Library <strong>Applications</strong><br />
Role-based security works in a similar fashion for in-process library applications<br />
and out-of-process server applications.<br />
Note the following differences for library applications:<br />
● Privileges. The privileges of a library application are determined by the privileges<br />
of the client (host) process. For example, if the client process runs with<br />
administrator privileges, the library application will also have administrator<br />
privileges.<br />
● Impersonation. The impersonation level of a library application is inherited<br />
from the client process and cannot be set explicitly.<br />
● Authentication. The authentication level of a library application is inherited<br />
from the client process. With library applications, you can explicitly enable or<br />
disable authentication. This option is available on the Security page of a library<br />
application’s Properties dialog box.<br />
This option is typically used to support unauthenticated call-backs from other<br />
out-of-process COM components.<br />
Assign Roles to Classes, Interfaces, or Methods<br />
With library applications you should always assign roles at the class, interface, or<br />
method level. This is also best practice for server applications.<br />
Users that are defined within library application roles cannot be added to the<br />
security descriptor of the client process. This means that you must use at least classlevel<br />
security to allow a library application to perform role-based authorization.<br />
Code Access Security Requirements<br />
Code Access Security (CAS) requires that code have particular permissions to be<br />
able to perform certain operations and access restricted resources. CAS is most<br />
useful in a client environment where code is downloaded from the Internet. In this<br />
type of situation it is unlikely that the code is fully trusted.<br />
Typically, applications that use serviced components are fully trusted, and as a<br />
result CAS has limited use. However, Enterprise Services does demand that the<br />
calling code have the necessary permission to call unmanaged code. This implies<br />
the following:<br />
● Unmanaged code permission is required to activate and perform cross context<br />
calls on serviced components.<br />
● If the client of a serviced component is an <strong>ASP</strong>.<strong>NET</strong> Web application, this application<br />
must have unmanaged code permission.<br />
● If a reference to a serviced component is passed to untrusted code, methods<br />
defined on the serviced component cannot be called from the untrusted code.
200<br />
<strong>Building</strong> <strong>Secure</strong> <strong>ASP</strong>.<strong>NET</strong> <strong>Applications</strong><br />
Configuring Security<br />
This section shows you how to configure security for:<br />
●<br />
●<br />
A serviced component running in an Enterprise Services server (out-of-process)<br />
application.<br />
An <strong>ASP</strong>.<strong>NET</strong> Web application client.<br />
Configuring a Server Application<br />
The steps required to configure an Enterprise Services server application are shown<br />
in Figure 9.3.<br />
Development Configuration<br />
(COM+ Catalog)<br />
1. Configure authentication<br />
2. Configure authorization<br />
(component-level access checks)<br />
3. Create and assign roles<br />
Attributes<br />
Visual Studio.<strong>NET</strong><br />
4. Register Serviced Component (gacutil.exe + regsvcs.exe)<br />
Deployment Configuration<br />
(COM+ Catalog)<br />
5. Populate roles<br />
6. Configure identity<br />
Catalog Settings<br />
Component Services<br />
Figure 9.3<br />
Configuring Enterprise Services security
Chapter 9: Enterprise Services Security 201<br />
Development Time vs. Deployment Time Configuration<br />
You can configure most security settings within the COM+ catalog at development<br />
time by using .<strong>NET</strong> attributes within the assembly that contains the serviced component.<br />
These attributes are used to populate the COM+ catalog when the serviced<br />
component is registered with COM+ by using the Regsvcs.exe tool.<br />
Other configuration steps such as populating roles with Windows group and user<br />
accounts and configuring a run-as identity for the server application (Dllhost.exe<br />
instance) must be configured using the Component Services administration tool (or<br />
programmatically using script) at deployment time.<br />
Configure Authentication<br />
To set the application authentication level declaratively, use the<br />
ApplicationAccessControl assembly level attribute as shown below.<br />
[assembly: ApplicationAccessControl(<br />
Authentication = AuthenticationOption.Call)]<br />
This is equivalent to setting the Authentication Level for Calls value on the Security<br />
page of the application’s Properties dialog within Component Services.<br />
Note: The client’s authentication level also affects the authentication level used by the<br />
Enterprise Services application, because a process of high-water mark negotiation is employed,<br />
which always results in the higher of the two settings being used.<br />
For more information about configuring the DCOM authentication level used by an <strong>ASP</strong>.<strong>NET</strong><br />
client application, see “Configuring an <strong>ASP</strong>.<strong>NET</strong> Client Application,” later in this section.<br />
For more information about DCOM authentication levels and authentication level negotiation,<br />
see the “Security Concepts” section of this chapter.<br />
Configure Authorization (Component-Level Access Checks)<br />
To enable fine-grained authorization at the component, interface, or method level<br />
you must:<br />
● Enable access checks at the application level.<br />
Use the following .<strong>NET</strong> attribute to enable application-wide access checks.<br />
[assembly: ApplicationAccessControl(true)]<br />
This is equivalent to selecting the Enforce access checks for this application<br />
check box on the Security page of the application’s Properties dialog box within<br />
Component Services.
202<br />
<strong>Building</strong> <strong>Secure</strong> <strong>ASP</strong>.<strong>NET</strong> <strong>Applications</strong><br />
Important: Failure to set this attribute results in no access checks being performed.<br />
●<br />
Configure the application’s security level at the process and component level.<br />
For meaningful role-based security, enable access checking at the process and<br />
component levels by using the following .<strong>NET</strong> attribute.<br />
[assembly: ApplicationAccessControl(AccessChecksLevel=<br />
AccessChecksLevelOption. ApplicationComponent)]<br />
This is equivalent to selecting the Perform access checks at the process and<br />
component levels check box on the Security page of the application’s Properties<br />
dialog box within Component Services.<br />
Note: Always enable access checking at the process and component level for library<br />
applications.<br />
●<br />
Enable component level access checks.<br />
To enable component-level access checks, use the ComponentAccessControl<br />
class-level attribute as shown below.<br />
[ComponentAccessControl(true)]<br />
public class MyServicedComponent : ServicedComponent<br />
{<br />
}<br />
This is equivalent to selecting the Enforce Component Level Access Checks<br />
check box on the Security page of the component Properties dialog box within<br />
Component Services.<br />
Note: This setting is effective only if you have enabled application-level access checking<br />
and have configured process and component level access checks, as described previously.<br />
Create and Assign Roles<br />
Roles can be created and assigned at the application, component (class), interface,<br />
and method levels.<br />
Adding Roles to an Application<br />
To add roles to an application, use the SecurityRole assembly level attribute as<br />
shown below.<br />
[assembly:SecurityRole("Employee")]<br />
[assembly:SecurityRole("Manager")]<br />
This is equivalent to adding roles to an application by using the Component Services<br />
tool.
Chapter 9: Enterprise Services Security 203<br />
Note: Using the SecurityRole attribute at the assembly level is equivalent to adding roles to<br />
the application, but not assigning them to individual components, interfaces, or methods. The<br />
result is that the members of these roles determine the composition of the security descriptor<br />
attached to the application. This is used solely to determine who is allowed to access (and<br />
launch) the application.<br />
For more effective role-based authorization, always apply roles to components, interfaces, and<br />
methods as described below.<br />
Adding Roles to a Component (Class)<br />
To add roles to a component apply the SecurityRole attribute above the class<br />
definition, as shown below.<br />
[SecurityRole("Manager")]<br />
public class Transfer : ServicedComponent<br />
{<br />
}<br />
Adding Roles to an Interface<br />
To apply roles at the interface level, you must create an interface definition and then<br />
implement it within your serviced component class. You can then associate roles<br />
with the interface by using the SecurityRole attribute.<br />
Important: At development time, you must also annotate the class with the <strong>Secure</strong>Method<br />
attribute. This informs Enterprise Services that method level security services may be used.<br />
At deployment time, administrators must also add users to the system defined Marshaler role,<br />
which is automatically created within the COM+ catalog, when a class that is marked with<br />
<strong>Secure</strong>Method is registered with Component Services.<br />
Use of the Marshaler role is discussed further in the next section.<br />
The following example shows how to add the Manager role to a particular<br />
interface.<br />
[SecurityRole("Manager")]<br />
public interface ISomeInterface<br />
{<br />
void Method1( string message );<br />
void Method2( int parm1, int parm2 );<br />
}<br />
[ComponentAccessControl]<br />
[<strong>Secure</strong>Method]<br />
public class MyServicedComponent : ServicedComponent, ISomeInterface<br />
{<br />
public void Method1( string message )<br />
{
204<br />
<strong>Building</strong> <strong>Secure</strong> <strong>ASP</strong>.<strong>NET</strong> <strong>Applications</strong><br />
// Implementation<br />
}<br />
public void Method2( int parm1, int parm2 )<br />
{<br />
// Implementation<br />
}<br />
}<br />
Adding Roles to a Method<br />
To ensure that the public methods of a class appear in the COM+ catalog, you must<br />
explicitly implement an interface that defines the methods. Then, to secure the<br />
methods, you must use the <strong>Secure</strong>Method attribute on the class, or the<br />
<strong>Secure</strong>Method or SecurityRole attribute at the method level.<br />
Note: The <strong>Secure</strong>Method and SecurityRole attributes must appear above the method implementation<br />
and not within the interface definition.<br />
To enable method level security, perform the following steps:<br />
1. Define an interface that contains the methods you want to secure. For example:<br />
public interface ISomeInterface<br />
{<br />
void Method1( string message );<br />
void Method2( int parm1, int parm2 );<br />
}<br />
2. Implement the interface on the serviced component class:<br />
[ComponentAccessControl]<br />
public class MyServicedComponent : ServicedComponent, ISomeInterface<br />
{<br />
public void Method1( string message )<br />
{<br />
// Implementation<br />
}<br />
public void Method2( int parm1, int parm2 )<br />
{<br />
// Implementation<br />
}<br />
}<br />
3. If you want to configure roles administratively by using the Component Services<br />
tool, you must annotate the class with the <strong>Secure</strong>Method attribute, as shown<br />
below.<br />
[ComponentAccessControl]<br />
[<strong>Secure</strong>Method]
Chapter 9: Enterprise Services Security 205<br />
public class MyServicedComponent : ServicedComponent, ISomeInterface<br />
{<br />
}<br />
4. Alternatively, if you want to add roles to methods at development time by using<br />
.<strong>NET</strong> attributes, apply the SecurityRole attribute at the method level. In this<br />
event, you do not need to apply the <strong>Secure</strong>Method attribute at the class level<br />
(although the ComponentAccessControl attribute must still be present to configure<br />
component level access checks).<br />
In the following example only members of the Manager role can call Method1,<br />
while members of the Manager and Employee roles can call Method2.<br />
[ComponentAccessControl]<br />
public class MyServicedComponent : ServicedComponent, ISomeInterface<br />
{<br />
[SecurityRole("Manager")]<br />
public void Method1( string message )<br />
{<br />
// Implementation<br />
}<br />
[SecurityRole("Manager")]<br />
[SecurityRole("Employee")]<br />
public void Method2( int parm1, int parm2 )<br />
{<br />
// Implementation<br />
}<br />
}<br />
5. At deployment time, administrators must add any user that requires access to<br />
methods or interfaces of the class to the predefined Marshaler role.<br />
Note: The Enterprise Services infrastructure uses a number of system-level interfaces that<br />
are exposed by all serviced components. These include IManagedObject, IDisposable, and<br />
IServiceComponentInfo. If access checks are enabled at the interface or method levels,<br />
the Enterprise Services infrastructure is denied access to these interfaces.<br />
As a result, Enterprise Services creates a special role called Marshaler and associates the<br />
role with these interfaces. You can view this role (and the aforementioned interfaces) with<br />
the Component Services tool.<br />
At deployment time, application administrators need to add all users to the Marshaler role<br />
who needs to access any methods or interface of the class. You can automate this in two<br />
different ways:<br />
● Write a script that uses the Component Services object model to copy all users from<br />
other roles to the Marshaler role.<br />
● Write a script which assigns all other roles to these three special interfaces and delete<br />
the Marshaler role.
206<br />
<strong>Building</strong> <strong>Secure</strong> <strong>ASP</strong>.<strong>NET</strong> <strong>Applications</strong><br />
Register Serviced Components<br />
Register serviced components in:<br />
●<br />
The Global Assembly Cache. Serviced components hosted in COM+ server<br />
applications require installation in the global assembly cache, while library<br />
applications do not.<br />
To register a serviced component in the global assembly cache, run the<br />
Gacutil.exe command line utility. To register an assembly called<br />
MyServicedComponent.dll in the global assembly cache, run the following<br />
command.<br />
gacutil –i MyServicedComponent.dll<br />
Note: You can also use the Microsoft .<strong>NET</strong> Framework Configuration Tool from the Administrative<br />
Tools program group to view and manipulate the contents of the global assembly<br />
cache.<br />
●<br />
The COM+ Catalog. To register an assembly called MyServicedComponent.dll<br />
in the COM+ catalog, run the following command.<br />
regsvcs.exe MyServicedComponent.dll<br />
This command results in the creation of a COM+ application. The .<strong>NET</strong> attributes<br />
present within the assembly are used to populate the COM+ catalog.<br />
Populate Roles<br />
Populate roles by using the Component Services tool, or by using script to program<br />
the COM+ catalog using the COM+ administration objects.<br />
Use Windows Groups<br />
Add Windows 2000 group accounts to Enterprise Services roles for maximum<br />
flexibility. By using Windows groups, you can effectively use one administration<br />
tool (the Users and Computers Administration tool) to administer both Windows<br />
and Enterprise Services security.<br />
● Create a Windows group for each role in the Enterprise Services application.<br />
● Assign each group to its respective role.<br />
For example, if you have a role called Manager, create a Windows group called<br />
Managers. Assign the Managers group to the Manager role.<br />
● After you assign groups to roles, use the Users and Computers Administration<br />
tool to add and remove users in each group.
Chapter 9: Enterprise Services Security 207<br />
For example, adding a Windows 2000 user account named David to the<br />
Windows 2000 group Managers effectively maps David to the Manager role.<br />
<br />
To assign Windows groups to Enterprise Services roles by using Component Services<br />
1. Using the Component Services tool, expand the application that contains the<br />
roles to which you want to add Windows 2000 groups.<br />
2. Expand the Roles folder and the specific role to which you want to assign<br />
Windows groups.<br />
3. Select the Users folder under the specific role.<br />
4. Right-click the folder, point to New, and then click User.<br />
5. In the Select Users or Groups dialog box, add groups (or users) to the role.<br />
More Information<br />
For more information about programming the COM+ catalog by using the COM+<br />
administration objects, see “Automating COM+ Administration” within the Component<br />
Development section of the MSDN Library.<br />
Configure Identity<br />
Use the Component Services tool (or script) to configure the identity of the Enterprise<br />
Services application. The identity property determines the account used to run<br />
the instance of Dllhost.exe that hosts the application.<br />
<br />
To configure identity<br />
1. Using the Component Services tool, select the relevant application.<br />
2. Right-click the name of the application, and then click Properties.<br />
3. Click the Identity tab.<br />
4. Click This user and specify the configured service account used to run the<br />
application.<br />
More Information<br />
For more information about choosing an appropriate identity to run an Enterprise<br />
Services application, see “Choosing a Process Identity” later in this chapter.<br />
Configuring an <strong>ASP</strong>.<strong>NET</strong> Client Application<br />
You must configure the DCOM authentication level and impersonation levels used<br />
by client applications when communicating with serviced components using<br />
DCOM.
208<br />
<strong>Building</strong> <strong>Secure</strong> <strong>ASP</strong>.<strong>NET</strong> <strong>Applications</strong><br />
Configure Authentication<br />
To configure the default authentication level used by an <strong>ASP</strong>.<strong>NET</strong> Web application<br />
when it communicates with a serviced component, edit the<br />
comAuthenticationLevel attribute on the element in<br />
Machine.config.<br />
Machine.config is located in the following folder.<br />
%windir%\Microsoft.<strong>NET</strong>\Framework\v1.0.3705\CONFIG<br />
Set the comAuthenticationLevel attribute to one of the following values.<br />
comAuthenticationLevel=<br />
"[Default|None|Connect|Call|Pkt|PktIntegrity|PktPrivacy]"<br />
More Information<br />
For more information about DCOM authentication levels, see “Authentication”<br />
within the “Security Concepts” section later in this chapter.<br />
Configure Impersonation<br />
The impersonation level set by the client determines the impersonation level<br />
capabilities of the server. To configure the default impersonation level used by<br />
a Web-based application when it communicates with a serviced component,<br />
edit the comImpersonationLevel attribute on the element in<br />
Machine.config. Set it to one of the following values.<br />
comImpersonationLevel="[Default|Anonymous|Identify|Impersonate|Delegate]"<br />
More Information<br />
For more information about DCOM impersonation levels, see “Impersonation”<br />
within the “Security Concepts” section later in this chapter.<br />
Configuring Impersonation Levels for an Enterprise Services<br />
Application<br />
If a serviced component in one application needs to call a serviced component<br />
within a second (server) application, you may need to configure the impersonation<br />
level for the client application.
Chapter 9: Enterprise Services Security 209<br />
Important: The impersonation level configured for an Enterprise Services application (on the<br />
Security page of the application’s Properties dialog box) is the impersonation level used by<br />
outgoing calls made by components within the application. It does not affect whether or not<br />
serviced components within the application perform impersonation. To impersonate clients<br />
within a serviced component, you must use programmatic impersonation techniques, as<br />
described in “Flowing the Original Caller,” later in this chapter.<br />
To set the application impersonation level declaratively, use the<br />
ApplicationAccessControl assembly level attribute as shown below.<br />
[assembly: ApplicationAccessControl(<br />
ImpersonationLevel=ImpersonationLevelOption.Identify)]<br />
This is equivalent to setting the Impersonation Level value on the Security page of<br />
the application’s Properties dialog within Component Services.<br />
Programming Security<br />
The Enterprise Services security features are available to .<strong>NET</strong> components using<br />
the ContextUtil, SecurityCallContext, and SecurityIdentity classes.<br />
Programmatic Role-Based Security<br />
For fine grained authorization decisions, you can programmatically test role membership<br />
using the IsCallerInRole method of the ContextUtil class. Prior to calling<br />
this method, always check that component-level access checks are enabled, as<br />
shown in the following code fragment. If security is disabled, IsCallerInRole<br />
always returns true.<br />
public void Transfer(string fromAccount, string toAccount, double amount)<br />
{<br />
// Check that security is enabled<br />
if (ContextUtil.IsSecurityEnabled)<br />
{<br />
// Only Managers are allowed to transfer sums of money in excess of $1000<br />
if (amount > 1000)<br />
{<br />
if (ContextUtil.IsCallerInRole("Manager"))<br />
{<br />
// Caller is authorized<br />
}<br />
else<br />
{<br />
// Caller is unauthorized<br />
}<br />
}<br />
}
210<br />
<strong>Building</strong> <strong>Secure</strong> <strong>ASP</strong>.<strong>NET</strong> <strong>Applications</strong><br />
Identifying Callers<br />
The following example shows how to identify all upstream callers from within a<br />
serviced component.<br />
[ComponentAccessControl]<br />
public class MyServicedComponent : ServicedComponent<br />
{<br />
public void ShowCallers()<br />
{<br />
SecurityCallContext context = SecurityCallContext.CurrentCall;<br />
SecurityCallers callers = context.Callers;<br />
foreach(SecurityIdentity id in callers)<br />
{<br />
Console.WriteLine(id.AccountName);<br />
}<br />
}<br />
}<br />
Note: The original caller identity is available via the SecurityCallContext.OriginalCaller<br />
property.<br />
Choosing a Process Identity<br />
Server activated Enterprise Services applications run within an instance of the<br />
Dllhost.exe process. You must configure the account used to run the process in the<br />
COM+ catalog by using the Component Services tool.<br />
Note: You cannot specify the run as identity by using a .<strong>NET</strong> attribute.<br />
Never Run as the Interactive User<br />
Do not run server applications using the identity of the interactively logged on user<br />
(this is the default setting). There are two main reasons to avoid this:<br />
● The privileges and access rights of the application will vary and will be dependent<br />
upon who is currently logged on interactively at the server. If an administrator<br />
happens to be logged on, the application will have administrator<br />
privileges.<br />
● If the application is launched while a user is interactively logged on and then the<br />
user logs off, the server application will be shut down. It will not be able to<br />
restart until another user logs on interactively.
Chapter 9: Enterprise Services Security 211<br />
The interactive user setting is designed for developers to use at development time,<br />
and should not be considered a deployment setting.<br />
Use a Least-Privileged Custom Account<br />
Create a least privileged account to mitigate the threat associated with a process<br />
compromise. If a determined attacker manages to compromise the server process,<br />
he or she will easily be able to inherit the privileges and access rights granted to the<br />
process account. An account configured with minimum privileges restricts the<br />
potential damage that can be done.<br />
If you need to access network resources with the process account, the remote computer<br />
must be able to authenticate the process account. In this scenario, you have<br />
two options:<br />
● You can use a domain account if the two computers are in the same or trusting<br />
domains.<br />
● You can use a local account and then create a duplicate account (with the same<br />
user name and password) on the remote computer. With this option, you must<br />
ensure that the passwords of the two accounts remain synchronized.<br />
You may be forced to use the duplicated local account approach if the remote<br />
computer is located in a separate domain (with no trust relationship), or if<br />
the remote computer is behind a firewall (where closed ports do not permit<br />
Windows authentication).<br />
Accessing Network Resources<br />
Your serviced components may need to access remote resources. It is important to<br />
be able to identify the following:<br />
● The resources the components need to access. For example, files on file shares,<br />
databases, other DCOM servers, Active <strong>Directory</strong>® directory service objects, and<br />
so on.<br />
● The identity used to perform the resource access. If your serviced component<br />
accesses remote resources, the identity used (which by default is the process<br />
identity) must be capable of being authenticated by the remote computer.<br />
Note: For information specific to accessing remote SQL Server databases, see Chapter 12,<br />
“Data Access Security.”
212<br />
<strong>Building</strong> <strong>Secure</strong> <strong>ASP</strong>.<strong>NET</strong> <strong>Applications</strong><br />
You can access remote resources from a component within an Enterprise Services<br />
application by using any of the following identities:<br />
● The original caller (if you are explicitly impersonating by using<br />
CoImpersonateClient)<br />
●<br />
●<br />
The current process identity (configured in the COM+ catalog for server applications)<br />
A specific service account<br />
Using the Original Caller<br />
To use the original caller’s identity for remote resource access, you must:<br />
●<br />
●<br />
Programmatically impersonate the original caller by calling<br />
CoImpersonateClient.<br />
Be able to delegate the caller’s security context from the application server<br />
hosting the Enterprise Services application to the remote computer. This assumes<br />
that you are using Kerberos authentication between your Enterprise Services<br />
application and client application.<br />
Scalability Warning: If you access the data services tier of your application using the original<br />
caller’s impersonated identity, you severely impact the application’s ability to scale, because<br />
you prevent database connection pooling from working efficiently; it doesn’t work efficiently<br />
because the security context of each database connection is tied to many individual callers.<br />
More Information<br />
For more information about impersonating callers, see “Flowing the Original<br />
Caller,” later in this chapter.<br />
Using the Current Process Identity<br />
If your application is configured to run as a server application, you can use the<br />
configured process identity for remote resource access (this is the default case).<br />
If you want to use the server process account for remote resource access, you must<br />
either:<br />
● Run the server application using a least-privileged domain account. This assumes<br />
that client and server computers are in the same or trusting domains.<br />
● Duplicate the process account using the same username and password on the<br />
remote computer.<br />
If ease of administration is your primary concern, you should use a least-privileged<br />
domain account.
Chapter 9: Enterprise Services Security 213<br />
If your application is configured to run as a library application, the process identity<br />
is inherited from the host process (which will often be a Web-based application). For<br />
more information about using the <strong>ASP</strong>.<strong>NET</strong> process identity for remote resource<br />
access, see Chapter 8, “<strong>ASP</strong>.<strong>NET</strong> Security.”<br />
Using a Specific Service Account<br />
Your Enterprise Services application could access remote resources by using a<br />
specifically configured service account (that is, a non-user Windows account).<br />
However, this approach is not recommended on Windows 2000 because it relies on<br />
you calling the LogonUser API.<br />
The use of LogonUser on Windows 2000, forces you to grant the “Act as part of the<br />
operating system” privilege to the Enterprise Services process account. This significantly<br />
reduces the security of your application.<br />
Note: Microsoft Windows .<strong>NET</strong> Server 2003 will lift this restriction.<br />
Flowing the Original Caller<br />
By default, outgoing calls issued by serviced components (for example, to access<br />
local or remote resources) are made using the security context obtained from the<br />
host process. For server applications, this is the configured run-as identity. For<br />
library applications, this is the identity of the (host) client process (for example,<br />
Aspnet_wp.exe when an <strong>ASP</strong>.<strong>NET</strong> Web application is the client).<br />
<br />
To flow the original caller’s context through an Enterprise Services application<br />
1. Call CoImpersonateClient.<br />
This creates and attaches a thread impersonation token to the current thread.<br />
2. Perform operation (access local or remote resource).<br />
As impersonation is enabled, the outgoing call is made using the client’s security<br />
context (as defined by the impersonation token).<br />
If local resources are accessed, the caller (client process) must have specified at<br />
least Impersonate level impersonation. If remote resources are accessed, the<br />
caller must have specified Delegate level impersonation.<br />
If the caller is an <strong>ASP</strong>.<strong>NET</strong> Web application, the default impersonation level for<br />
the <strong>ASP</strong>.<strong>NET</strong> worker process is Impersonate. Therefore, to flow the original caller<br />
to a downstream remote computer, you must change this default to Delegate (on<br />
the element of Machine.config on the client computer).
214<br />
<strong>Building</strong> <strong>Secure</strong> <strong>ASP</strong>.<strong>NET</strong> <strong>Applications</strong><br />
Note: To use the original caller’s security context to access remote resources you must use<br />
Kerberos authentication, with accounts configured for delegation. The account used to run<br />
the Enterprise Services server application must also be marked in Active <strong>Directory</strong> as<br />
“Trusted for delegation.”<br />
3. Cease impersonation by calling CoRevertToSelf.<br />
This removes the impersonation token. Any subsequent call from the current<br />
method uses the process security context. If you fail to call CoRevertToSelf, it<br />
is called implicitly by the runtime when the method ends.<br />
Note: The identity of the original caller automatically flows to an Enterprise Services application<br />
and is available using SecurityCallContext.OriginalCaller. This can be useful for auditing<br />
purposes.<br />
Calling CoImpersonateClient<br />
CoImpersonateClient (and CoRevertToSelf) are located within OLE32.dll. You<br />
must import their definitions by using the DllImport attribute in order to be able to<br />
call them through P/Invoke. This is illustrated in the following code fragment.<br />
class COMSec<br />
{<br />
[DllImport("OLE32.DLL", CharSet=CharSet.Auto)]<br />
public static extern uint CoImpersonateClient();<br />
[DllImport("OLE32.DLL", CharSet=CharSet.Auto)]<br />
public static extern uint CoRevertToSelf();<br />
}<br />
. . .<br />
void SomeMethod()<br />
{<br />
// To flow the original caller's security context and use it to access local<br />
// or remote resources, start impersonation<br />
COMSec.CoImpersonateClient();<br />
// Perform operations as the caller<br />
// Code here uses the context of the caller – not the context of the process<br />
. . .<br />
COMSec.CoRevertToSelf();<br />
// Code here reverts to using the process context<br />
}<br />
More Information<br />
For more information about how to configure a complete Kerberos delegation<br />
scenario that shows how to flow the original caller’s security context through an<br />
<strong>ASP</strong>.<strong>NET</strong> Web application, an Enterprise Services application, and onto a database,<br />
see the “Flowing the Original Caller” section of Chapter 5, “Intranet Security.”
Chapter 9: Enterprise Services Security 215<br />
RPC Encryption<br />
To secure the data sent from a client application to a remote serviced component<br />
over DCOM, use the RPC Packet Privacy authentication level between client and<br />
server. This provides message confidentiality and integrity.<br />
You must configure the authentication level at the client and server.<br />
To configure <strong>ASP</strong>.<strong>NET</strong> (where an <strong>ASP</strong>.<strong>NET</strong> Web application is the client), set the<br />
comAuthenticationLevel attribute on the element in<br />
machine.config to PktPrivacy.<br />
To configure an Enterprise Services server application, set the application-level<br />
authentication level either by using the Component Services tool or the following<br />
.<strong>NET</strong> attribute within the serviced component assembly.<br />
[assembly: ApplicationAccessControl(<br />
Authentication = AuthenticationOption.Privacy)]<br />
More Information<br />
●<br />
●<br />
●<br />
For more information about configuring security (including authentication<br />
levels), see “Configuring Security” earlier in this chapter.<br />
For more information about RPC/DCOM authentication levels, see “Authentication”<br />
later in this chapter.<br />
For more information about authentication-level negotiation, see “Authentication<br />
Level Negotiation” later in this chapter.<br />
<strong>Building</strong> Serviced Components<br />
For a step-by-step walkthrough that shows you how to build a serviced component,<br />
see “ How To: Use Role-based Security with Enterprise Services” in the Reference<br />
section of this guide.<br />
DLL Locking Problems<br />
When you rebuild a serviced component, if the DLL is locked:<br />
● Use Component Services to shut down the COM+ server application.<br />
● If you are developing a library application, the application may still be loaded<br />
into the Aspnet_wp.exe process. Run IISReset from a command prompt or use<br />
Task Manager to stop the Aspnet_wp.exe process.<br />
● Use the FileMon.exe tool from www.sysinternals.com to help troubleshoot file<br />
locking problems.
216<br />
<strong>Building</strong> <strong>Secure</strong> <strong>ASP</strong>.<strong>NET</strong> <strong>Applications</strong><br />
Versioning<br />
The default AssemblyVersion attribute that is generated by Microsoft Visual<br />
Studio® .<strong>NET</strong> development system when you create a new project is shown below.<br />
[assembly: AssemblyVersion("1.0.*")]<br />
Each time you rebuild the project, a new assembly version is generated. This also<br />
results in the generation of a new class identifier (CLSID) to identify the serviced<br />
component classes. If you repeatedly register the assembly with component services<br />
using Regsvcs.exe, you will see duplicated components (strictly classes) with<br />
different CLSIDs listed beneath the Components folder.<br />
While this complies with strict COM versioning semantics and will prevent existing<br />
managed and unmanaged clients from breaking, it can be an annoyance during<br />
development.<br />
During test and development, consider setting an explicit version by using the<br />
assembly level AssemblyVersion attribute shown below.<br />
[assembly: AssemblyVersion("1.0.0.1")]<br />
This setting will prevent a new CLSID being generated with each successive project<br />
build. You may also want to fix the interface identifiers (IIDs). If your class implements<br />
explicit interfaces, you can fix the IID for a given interface by using the GUID<br />
attribute as shown below.<br />
[Guid("E1FBF27E-9F11-474d-8DF6-58916F798E9D")]<br />
public interface IMyInterface<br />
{<br />
}<br />
<br />
To generate new GUIDs<br />
1. On the Tools menu of Visual Studio .<strong>NET</strong>, click Create GUID.<br />
2. Click Registry Format<br />
3. Click New GUID.<br />
4. Click Copy.<br />
5. Paste the GUID from the clipboard into your source code.<br />
Important: Prior to deploying your serviced component assembly for test and production,<br />
remove any fixed GUIDs and revert to an automated assembly versioning mechanism (for<br />
example, by using “1.0.*”). Failure to do so increases the likelihood that a new release of your<br />
component will break existing clients.
Chapter 9: Enterprise Services Security 217<br />
More Information<br />
For more information about versioning for deployment, see Understanding Enterprise<br />
Services (COM+) in .<strong>NET</strong> on MSDN.<br />
QueryInterface Exceptions<br />
If you see a QueryInterface call for the IRoleSecurity interface failing, this indicates<br />
that you have updated an interface definition within your assembly, but have<br />
not re-registered the assembly with Component Services using Regsvcs.exe.<br />
Important: Each time you run Regsvcs.exe you will need to reconfigure a server application’s<br />
run-as identity and will also need to add users to groups again. You can create a simple script<br />
to automate this task.<br />
DCOM and Firewalls<br />
Windows 2000 (SP3 or QFE 18.1) or Windows .<strong>NET</strong> Server 2003 allow you to configure<br />
Enterprise Services applications to use a static endpoint. If a firewall separates<br />
the client from the server, you only need to open two ports in the firewall. Specifically,<br />
you must open port 135 for RPC and a port for your Enterprise Services<br />
application.<br />
As an alternative to this approach consider exposing your Enterprise Services<br />
application as a Web service. This allows you to activate and call serviced components<br />
by using SOAP over port 80. The main issue with this approach is that it<br />
doesn’t allow you to flow transaction context from client to server. You would need<br />
to initiate your transaction at the remote serviced component.<br />
More Information<br />
For more information, see the following Knowledge Base articles:<br />
● Article Q312960, “Cannot Set Fixed Endpoint for a COM+ Application”<br />
●<br />
●<br />
Article Q259011, “SAMPLE: A Simple DCOM Client Server Test Application”<br />
Article Q248809, “PRB: DCOM Does Not Work over NAT-Based Firewall”<br />
● Article Q250367, “INFO: Configuring Microsoft Distributed Transaction Coordinator<br />
(DTC) to Work Through a Firewall”<br />
● Article Q154596, “HOWTO: Configure RPC Dynamic Port Allocation to Work w/<br />
Firewall”
218<br />
<strong>Building</strong> <strong>Secure</strong> <strong>ASP</strong>.<strong>NET</strong> <strong>Applications</strong><br />
Calling Serviced Components from <strong>ASP</strong>.<strong>NET</strong><br />
This section highlights the main issues you will encounter when an <strong>ASP</strong>.<strong>NET</strong><br />
application calls a serviced component.<br />
Caller’s Identity<br />
When you call a serviced component from an <strong>ASP</strong>.<strong>NET</strong> application, the security<br />
identity for the call is obtained from the application’s Win32® thread identity. If the<br />
Web application is configured to impersonate the caller, this is the caller’s identity.<br />
Otherwise, this is the <strong>ASP</strong>.<strong>NET</strong> process identity (by default, <strong>ASP</strong><strong>NET</strong>).<br />
From an <strong>ASP</strong>.<strong>NET</strong> application, you can retrieve the current Win32 thread identity<br />
by calling WindowsIdentity.GetCurrent().<br />
From a serviced component, you can retrieve the original caller identity by using<br />
SecurityCallContext.OriginalCaller.<br />
Use Windows Authentication and Impersonation Within the Web-based<br />
Application<br />
To enable meaningful role-based security within your Enterprise Services application,<br />
you must use Windows authentication and enable impersonation. This ensures<br />
that the serviced components are able to authenticate the original callers and make<br />
authorization decisions based on the original caller’s identity.<br />
Configure Authentication and Impersonation within Machine.config<br />
DCOM authentication levels are negotiated between client (for example, the Webbased<br />
application) and server (the Enterprise Services application). The higher of<br />
the two security settings is used.<br />
Configure <strong>ASP</strong>.<strong>NET</strong> authentication levels by using the comAuthenitcation attribute<br />
on the element of Machine.config.<br />
Impersonation levels are controlled by the client (for example, a Web-based application).<br />
The client can determine the degree of impersonation that it is willing to<br />
allow the server to use.<br />
Configure <strong>ASP</strong>.<strong>NET</strong> impersonation levels (for all outgoing DCOM calls), by using<br />
the comImpersonationLevel attribute on the element of<br />
Machine.config.<br />
Configuring Interface Proxies<br />
The security settings that apply to individual interface proxies are usually obtained<br />
from the default process level security settings. In the case of <strong>ASP</strong>.<strong>NET</strong>, default<br />
security settings such as the impersonation level and authentication level are<br />
configured in Machine.config, as described earlier.
Chapter 9: Enterprise Services Security 219<br />
If necessary, you can alter the security settings used by an individual interface<br />
proxy. For example, if your <strong>ASP</strong>.<strong>NET</strong> application communicates with a serviced<br />
component that exposes two interfaces and sensitive data is passed through only<br />
one interface, you may choose to use the encryption support provided by the packet<br />
privacy authentication level only on the sensitive interface and to use, for example,<br />
packet authentication on the other interface. This means that you do not experience<br />
the performance hit associated with encryption on both interfaces.<br />
Collectively, the set of security settings that apply to an interface proxy are referred<br />
to as the security blanket. COM provides the following functions to allow you to<br />
query and manipulate security blanket settings on an individual interface proxy:<br />
● CoQueryProxyBlanket<br />
● CoSetProxyBlanket<br />
● CoCopyProxy<br />
You must use P/Invoke to call these functions from an <strong>ASP</strong>.<strong>NET</strong> Web application<br />
(the DCOM client), The following code shows how to configure a specific interface<br />
to use the Packet Privacy authentication level (which provides encryption). This<br />
code can be used from an <strong>ASP</strong>.<strong>NET</strong> Web application that communicates with a<br />
remote serviced component.<br />
// Define a wrapper class for the P/Invoke call to CoSetProxyBlanket<br />
class COMSec<br />
{<br />
// Constants required for the call to CoSetProxyBlanket<br />
public const uint RPC_C_AUTHN_DEFAULT<br />
= 0xFFFFFFFF;<br />
public const uint RPC_C_AUTHZ_DEFAULT<br />
= 0xFFFFFFFF;<br />
public const uint RPC_C_AUTHN_LEVEL_PKT_PRIVACY = 6;<br />
public const uint RPC_C_IMP_LEVEL_DEFAULT = 0;<br />
public const uint COLE_DEFAULT_AUTHINFO<br />
= 0xFFFFFFFF;<br />
public const uint COLE_DEFAULT_PRINCIPAL = 0;<br />
public const uint EOAC_DEFAULT = 0x800;<br />
// HRESULT CoSetProxyBlanket( IUnknown * pProxy,<br />
// DWORD dwAuthnSvc,<br />
// DWORD dwAuthzSvc,<br />
// WCHAR * pServerPrincName,<br />
// DWORD dwAuthnLevel,<br />
// DWORD dwImpLevel,<br />
// RPC_AUTH_IDENTITY_HANDLE pAuthInfo,<br />
// DWORD dwCapabilities );<br />
[DllImport("OLE32.DLL", CharSet=CharSet.Auto)]<br />
public unsafe static extern uint CoSetProxyBlanket(<br />
IntPtr pProxy,<br />
uint dwAuthnSvc,<br />
uint dwAuthzSvc,<br />
IntPtr pServerPrincName,<br />
uint dwAuthnLevel,<br />
uint dwImpLevel,<br />
IntPtr pAuthInfo,<br />
uint dwCapababilities);<br />
} // end class COMSec
220<br />
<strong>Building</strong> <strong>Secure</strong> <strong>ASP</strong>.<strong>NET</strong> <strong>Applications</strong><br />
// Code to call CoSetProxyBlanket<br />
void CallComponent()<br />
{<br />
// This is the interface to configure<br />
Guid IID_I<strong>Secure</strong>Interface = new Guid("c720ff19-bec1-352c-bb4b-e2de10b858ba");<br />
IntPtr pI<strong>Secure</strong>Interface;<br />
}<br />
// Instantiate the serviced component<br />
CreditCardComponent comp = new CreditCardComponent();<br />
// Get its IUnknown pointer<br />
IntPtr pIUnk = Marshal.GetIUnknownForObject(comp);<br />
// Get the interface to configure<br />
Marshal.QueryInterface(pIUnk, ref IID_I<strong>Secure</strong>Interface,<br />
out pI<strong>Secure</strong>Interface);<br />
try<br />
{<br />
// Configure the interface proxy and set packet privacy authentication<br />
uint hr = COMSec.CoSetProxyBlanket( pI<strong>Secure</strong>Interface,<br />
COMSec.RPC_C_AUTHN_DEFAULT,<br />
COMSec.RPC_C_AUTHZ_DEFAULT,<br />
IntPtr.Zero,<br />
COMSec.RPC_C_AUTHN_LEVEL_PKT_PRIVACY,<br />
COMSec.RPC_C_IMP_LEVEL_DEFAULT,<br />
IntPtr.Zero,<br />
COMSec.EOAC_DEFAULT );<br />
I<strong>Secure</strong>Interface secure = (I<strong>Secure</strong>Interface)comp;<br />
// The following call will be encrypted as I<strong>Secure</strong>Interface is configured<br />
// for packet privacy authentication. Other interfaces use the process<br />
// level defaults (normally packet authentication).<br />
secure.ValidateCreditCard("123456789");<br />
}<br />
catch (Exception ex)<br />
{<br />
}<br />
More Information<br />
● For more information about configuring an <strong>ASP</strong>.<strong>NET</strong> client application to call<br />
serviced components, see “Configuring an <strong>ASP</strong>.<strong>NET</strong> Client Application,” earlier<br />
in this chapter.<br />
● For more information about DCOM authentication levels, see “Authentication,”<br />
later in this chapter.<br />
● For more information about DCOM impersonation levels, see “Impersonation,”<br />
later in this chapter.<br />
● For more information about using Windows authentication and enabling impersonation<br />
within a Web-based application, see Chapter 8, “<strong>ASP</strong>.<strong>NET</strong> Security.”
Chapter 9: Enterprise Services Security 221<br />
Security Concepts<br />
This section provides a brief overview of Enterprise Services security concepts. If<br />
you are already experienced with COM+, many of the concepts will be familiar.<br />
For background information on Enterprise Services, see the MSDN article “Understanding<br />
Enterprise Services (COM+) in .<strong>NET</strong>.”<br />
The following are summaries of key security concepts that you should understand:<br />
● Security settings for serviced components and Enterprise Services applications<br />
are maintained within the COM+ catalog. Most settings can be configured using<br />
.<strong>NET</strong> attributes. All settings can be configured by using the Component Services<br />
administration tool or Microsoft Visual Basic® Scripting Edition development<br />
system scripts.<br />
● Authorization is provided by Enterprise Services (COM+) roles, which can<br />
contain Windows group or user accounts. These are not the same as .<strong>NET</strong> roles.<br />
● Role-based security can be applied at the application, interface, class, and<br />
method levels.<br />
● Imperative role checks can be performed programmatically within methods<br />
by using the IsCallerInRole method of the ContextUtil class.<br />
●<br />
●<br />
●<br />
●<br />
Effective role-based authorization within an Enterprise Services application<br />
relies on a Windows identity being used to call serviced components.<br />
● This may require you to use Windows authentication coupled with impersonation<br />
within an <strong>ASP</strong>.<strong>NET</strong> Web application — if the Web application calls<br />
serviced components that rely on Enterprise Services (COM+) roles.<br />
● When you call a serviced component from an <strong>ASP</strong>.<strong>NET</strong> Web application or<br />
Web service, the identity used for the outgoing DCOM call is determined by<br />
the Win32 thread identity as defined by WindowsIdentity.GetCurrent().<br />
Serviced components can run in server or library applications.<br />
●<br />
●<br />
●<br />
Server applications run in separate instances of Dllhost.exe.<br />
Library applications run in the client’s process address space.<br />
Role-based authorization works in a similar fashion for server and library<br />
applications, although there are some subtle differences between library and<br />
server applications from a security perspective. For details, see “Security for<br />
Server and Library <strong>Applications</strong>” earlier in this chapter.<br />
Authentication is provided by the underlying services of DCOM and RPC. The<br />
client and server’s authentication level combined to determine the resulting<br />
authentication level used for communication with the serviced component.<br />
Impersonation is configured within the client application. It determines the<br />
impersonation capabilities of the server.
222<br />
<strong>Building</strong> <strong>Secure</strong> <strong>ASP</strong>.<strong>NET</strong> <strong>Applications</strong><br />
Enterprise Services (COM+) Roles and .<strong>NET</strong> Roles<br />
Enterprise Services (COM+) roles are used to represent common categories of users<br />
who share the same security privileges within an application. While conceptually<br />
similar to .<strong>NET</strong> roles, they are completely independent.<br />
Enterprise Services (COM+) roles contain Windows user and group accounts (unlike<br />
.<strong>NET</strong> roles which can contain arbitrary non-Windows user identities). Because<br />
of this, Enterprise Services (COM+) roles are only an effective authorization mechanism<br />
for applications that use Windows authentication and impersonation (in order<br />
to flow the caller’s security context to the Enterprise Services application).<br />
Table 9.1: Comparing Enterprise Services (COM+) roles with .<strong>NET</strong> roles<br />
Feature Enterprise Services .<strong>NET</strong> Roles<br />
(COM+) Roles<br />
Administration Component Services Custom<br />
Administration Tool<br />
Data Store COM+ Catalog Custom data store (for example, SQL<br />
Server or Active <strong>Directory</strong>)<br />
Declarative Yes Yes<br />
[SecurityRole(“Manager”)] [PrincipalPermission(<br />
SecurityAction.Demand,<br />
Role=”Manager”)]<br />
Imperative Yes Yes<br />
ContextUtil.IsCallerInRole() IPrincipal.IsInRole<br />
Class, Interface, Yes Yes<br />
and Method Level<br />
Granularity<br />
Extensible No Yes<br />
(using custom IPrincipal implementation)<br />
Available to all Only for components that Yes<br />
.<strong>NET</strong><br />
derive from ServicedComponent<br />
components base class<br />
Role Roles contain Windows group When using WindowsPrincipals,<br />
Membership or user accounts roles ARE Windows groups — no extra<br />
level of abstraction<br />
Requires Yes No<br />
explicit<br />
To obtain method level<br />
Interface<br />
authorization, an interface<br />
implementation must be explicitly defined and<br />
implemented
Chapter 9: Enterprise Services Security 223<br />
Authentication<br />
Because Enterprise Services rely on the underlying infrastructure provided by<br />
COM+ and DCOM/RPC, the authentication level settings available to Enterprise<br />
Services applications are those defined by RPC (and used by DCOM).<br />
Table 9.2: Enterprise Services applications authentication settings<br />
Authentication Level<br />
Default<br />
None<br />
Connect<br />
Call<br />
Packet<br />
Packet Integrity<br />
Packet Privacy<br />
Description<br />
Choose authentication level using normal negotiation rules<br />
No authentication<br />
Only authenticate credentials when the client initially connects to the<br />
server<br />
Authenticate at the start of each remote procedure call<br />
Authenticate all data received from the client<br />
Authenticate all data and verify that none of the transferred data has<br />
been modified<br />
Authenticate all data and encrypt parameter state for each remote<br />
procedure call<br />
Authentication Level Promotion<br />
You should be aware that certain authentication levels are silently promoted. For<br />
example:<br />
● If the User Data Protocol (UDP) datagram transport is used, Connect and Call<br />
levels are promoted to Packet, because the aforementioned authentication levels<br />
only make sense over a connection oriented transport such as TCP.<br />
Note: Windows 2000 defaults to RPC over TCP for DCOM communications.<br />
●<br />
For inter-process calls on a single computer, all authentication levels are always<br />
promoted to Packet Privacy. However, in a single computer scenario, data is not<br />
encrypted for confidentiality (because the data doesn’t cross the network).<br />
Authentication Level Negotiation<br />
The authentication level used by Enterprise Services to authenticate a client is<br />
determined by two settings:<br />
● The process level authentication level. For a server-activated application<br />
(running within Dllhost.exe), the authentication level is configured within the<br />
COM+ catalog.
224<br />
<strong>Building</strong> <strong>Secure</strong> <strong>ASP</strong>.<strong>NET</strong> <strong>Applications</strong><br />
●<br />
The client authentication level. The configured authentication level of the client<br />
process that communicates with the serviced component also affects the authentication<br />
level that is used.<br />
The default authentication level for an <strong>ASP</strong>.<strong>NET</strong> Web application is defined by<br />
the comAuthenticationLevel attribute on the element in<br />
Machine.config.<br />
The higher of the two (client and server) authentication level is always chosen. This<br />
is illustrated in the Figure 9.4.<br />
Client Process 1 (Privacy)<br />
Privacy<br />
Server Process 1 (Packet)<br />
Privacy<br />
Client Process 2 (None)<br />
Packet<br />
Packet<br />
Server Process 2 (None)<br />
None<br />
None<br />
Figure 9.4<br />
Authentication level negotiation<br />
More Information<br />
For information about how to configure authentication levels for an Enterprise<br />
Service application, see “Configuring Security” earlier in this chapter.<br />
Impersonation<br />
The impersonation level defined for an Enterprise Services application determines<br />
the impersonation level to be used for all outgoing DCOM calls made by serviced<br />
components within the application.<br />
Important: It does NOT determine whether or the not serviced components within the application<br />
impersonate their callers. By default, serviced components do not impersonate callers. To<br />
do so, the service component must call CoImpersonateClient, as described in “Flowing the<br />
Original Caller” earlier in this chapter.
Chapter 9: Enterprise Services Security 225<br />
Impersonation is a client-side setting. It offers a degree of protection to the client as<br />
it allows the client to restrict the impersonation capabilities of the server.<br />
Table 9.3: Available impersonation levels<br />
Impersonation Level<br />
Identify<br />
Impersonate<br />
Delegate<br />
Description<br />
Allows the server to identify the client and perform access checks<br />
using the client’s access token<br />
Allows the server to access local resources using the client’s<br />
credentials<br />
Allows the server to access remote resources using the client’s<br />
credentials (this requires Kerberos and specific account configuration)<br />
The default impersonation level used by a Web-based application when it communicates<br />
with serviced components (or any component using DCOM) is determined<br />
by the comImpersonationLevel attribute on the element in<br />
Machine.config.<br />
Cloaking<br />
Cloaking determines precisely how client identity is projected through a COM<br />
object proxy to a server during impersonation. There are two forms of cloaking:<br />
● Dynamic Cloaking. Enterprise Services server applications use dynamic cloaking<br />
(this is not configurable). Cloaking for library applications is determined by<br />
the host process, for example the <strong>ASP</strong>.<strong>NET</strong> worker process (Aspnet_wp.exe).<br />
Web-based applications also use dynamic cloaking — again this is not<br />
configurable.<br />
Dynamic cloaking causes the thread impersonation token to be used to represent<br />
the client’s identity during impersonation. This means that if you call<br />
CoImpersonateClient within a serviced component, the client’s identity is<br />
assumed for subsequent outgoing calls made by the same method, until either<br />
CoRevertToSelf is called or the method ends (where CoRevertToSelf is implicitly<br />
called).<br />
● Static Cloaking. With static cloaking, the server sees the credentials that are used<br />
on the first call from client to server (irrespective of whether or not a thread is<br />
impersonating during an outgoing call).<br />
More Information<br />
● For information about how to configure impersonation levels for Enterprise<br />
Service applications, see “Configuring Security”, earlier in this chapter.<br />
● For more information about cloaking, see the Platform SDK information on<br />
“Cloaking” on MSDN.
226<br />
<strong>Building</strong> <strong>Secure</strong> <strong>ASP</strong>.<strong>NET</strong> <strong>Applications</strong><br />
Summary<br />
This chapter has described how to build secure serviced components within an<br />
Enterprise Services application. You have also seen how to configure an <strong>ASP</strong>.<strong>NET</strong><br />
Web-based client application that calls serviced components. To summarize:<br />
● Use server activated Enterprise Services applications for increased security.<br />
Additional process hops raise security.<br />
● Use least-privileged, local accounts to run server applications.<br />
● Use Packet Privacy level authentication (which must be configured at the server<br />
and client) if you need to secure the data sent to and from a serviced component<br />
across a network from a client application.<br />
● Enable component-level access checks for a meaningful role-based security<br />
implementation.<br />
● Use Windows authentication and enable impersonation in an <strong>ASP</strong>.<strong>NET</strong> Web<br />
application prior to calling a component within an Enterprise Services application<br />
that relies on role-based security.<br />
● Use secured gateway classes as entry points into Enterprise Service applications.<br />
By reducing the number of gateway classes that provide entry points for clients<br />
into your Enterprise Service applications, you reduce the number of classes that<br />
need to have roles assigned. Other internal helper classes should have role-based<br />
checks enabled but should have no roles assigned to them. This means that<br />
external clients will not be able to call them directly, while gateway classes in the<br />
same application will have direct access.<br />
● Call IsSecurityEnabled immediately prior to checking role membership programmatically.<br />
● Avoid impersonation in the middle tier because this prevents the effective use of<br />
database connection pooling and dramatically reduces the scalability of your<br />
application.<br />
● Add Windows groups to Enterprise Services (COM+) roles for increased flexibility<br />
and easier administration
10<br />
Web Services Security<br />
This chapter describes how to develop and apply authentication, authorization, and<br />
secure communication techniques to secure <strong>ASP</strong>.<strong>NET</strong> Web services and Web service<br />
messages. It describes security from the Web service perspective and shows you<br />
how to authenticate and authorize callers and how to flow security context through<br />
a Web service. It also explains, from a client-side perspective, how to call Web<br />
services with credentials and certificates to support server-side authentication.<br />
Web Service Security Model<br />
Web service security can be applied at three levels:<br />
● Platform/transport level (point-to-point) security<br />
● Application level (custom) security<br />
● Message level (end-to-end) security<br />
Each approach has different strengths and weaknesses, and these are elaborated<br />
upon below. The choice of approach is largely dependent upon the characteristics of<br />
the architecture and platforms involved in the message exchange.<br />
Note: Note that this chapter focuses on platform and application level security. Message<br />
level security is addressed by the Global XML Web Services Architecture (GXA) initiative and<br />
specifically the WS-Security specification. At the time of writing, Microsoft has just released<br />
a technology preview version of the Web Services Development Kit. This allows you to develop<br />
message level security solutions that conform to the WS-Security specification. For more<br />
information, see http://msdn.microsoft.com/webservices/building/wsdk/.
228<br />
<strong>Building</strong> <strong>Secure</strong> <strong>ASP</strong>.<strong>NET</strong> <strong>Applications</strong><br />
Platform/Transport Level (Point-to-Point) Security<br />
The transport channel between two endpoints (Web service client and Web service)<br />
can be used to provide point-to-point security. This is illustrated in Figure 10.1.<br />
Platform Level Security<br />
Client<br />
XML<br />
Transport<br />
Platform and Transport<br />
provides security<br />
Caller authentication<br />
Message Integrity<br />
Message Confidentiality<br />
<strong>Secure</strong> Transport<br />
Service<br />
XML<br />
Transport<br />
Figure 10.1<br />
Platform/transport level security<br />
When you use platform security, which assumes a tightly-coupled Microsoft®<br />
Windows® operating system environment, for example, on corporate intranets:<br />
●<br />
●<br />
●<br />
The Web server (IIS) provides Basic, Digest, Integrated, and Certificate authentication.<br />
The <strong>ASP</strong>.<strong>NET</strong> Web service inherits some of the <strong>ASP</strong>.<strong>NET</strong> authentication and<br />
authorization features.<br />
SSL and/or IPSec may be used to provide message integrity and confidentiality.<br />
When to Use<br />
The transport level security model is simple, well understood, and adequate for<br />
many (primarily intranet-based) scenarios, in which the transport mechanisms and<br />
endpoint configuration can be tightly controlled.<br />
The main issues with transport level security are:<br />
● Security becomes tightly coupled to, and dependant upon, the underlying<br />
platform, transport mechanism, and security service provider (NTLM, Kerberos,<br />
and so on).<br />
● Security is applied on a point to point basis, with no provision for multiple hops<br />
and routing through intermediate application nodes.
Chapter 10: Web Services Security 229<br />
Application Level Security<br />
With this approach, the application takes over security and uses custom security<br />
features. For example:<br />
● An application can use a custom SOAP header to pass user credentials to authenticate<br />
the user with each Web service request. A common approach is to pass a<br />
ticket (or user name or license) in the SOAP header.<br />
● The application has the flexibility to generate its own IPrincipal object that<br />
contains roles. This might be a custom class or the GenericPrincipal class<br />
provided by the .<strong>NET</strong> Framework.<br />
● The application can selectively encrypt what it needs to, although this requires<br />
secure key storage and developers must have knowledge of the relevant cryptography<br />
APIs.<br />
An alternative technique is to use SSL to provide confidentiality and integrity<br />
and combine it with custom SOAP headers to perform authentication.<br />
When to Use<br />
Use this approach when:<br />
● You want to take advantage of an existing database schema of users and roles<br />
that is used within an existing application.<br />
● You want to encrypt parts of a message, rather than the entire data stream.<br />
Message Level (End-to-End) Security<br />
This represents the most flexible and powerful approach and is the one used by the<br />
GXA initiative, specifically within the WS-Security specification. Message level<br />
security is illustrated in Figure 10.2.<br />
Message Level Security<br />
Client<br />
XML<br />
XML messages convey<br />
security information<br />
Credentials<br />
Digital signaures<br />
Messages can be<br />
encrypted<br />
Service<br />
XML<br />
Transport<br />
Figure 10.2<br />
Message level security<br />
XML<br />
Any Transport<br />
Security is independent<br />
from transport protocol<br />
XML<br />
Transport
230<br />
<strong>Building</strong> <strong>Secure</strong> <strong>ASP</strong>.<strong>NET</strong> <strong>Applications</strong><br />
WS-Security specifications describe enhancements to SOAP messaging that provide<br />
message integrity, message confidentiality, and single message authentication.<br />
● Authentication is provided by security tokens, which flow in SOAP headers. No<br />
specific type of token is required by WS-Security. The security tokens may<br />
include Kerberos tickets, X.509 certificates, or a custom binary token.<br />
● <strong>Secure</strong> communication is provided by digital signatures to ensure message<br />
integrity and XML encryption for message confidentiality.<br />
When to Use<br />
WS-Security can be used to construct a framework for exchanging secure messages<br />
in a heterogeneous Web services environment. It is ideally suited to heterogeneous<br />
environments and scenarios where you are not in direct control of the configuration<br />
of both endpoints and intermediate application nodes.<br />
Message level security:<br />
● Can be independent from the underlying transport.<br />
● Enables a heterogeneous security architecture.<br />
● Provides end-to-end security and accommodates message routing through<br />
intermediate application nodes.<br />
● Supports multiple encryption technologies.<br />
● Supports non-repudiation.<br />
The Web Services Development Kit<br />
The Web Services Development Kit provides the necessary APIs to manage security<br />
in addition to other services such as routing and message-level referrals. This<br />
toolkit conforms to the latest Web service standards such as WS-Security and as<br />
a result enables interoperability with other vendors who follow the same<br />
specifications.<br />
More Information<br />
● For the latest news about the Web Services Development Kit and WS-Security<br />
specifications, see the XML Developer Center page on MSDN at http://<br />
msdn.microsoft.com/webservices/.<br />
● For more information about the WS-Specification, see the WS-Security Specification<br />
Index Page at http://msdn.microsoft.com/webservices/default.asp?pull=/library<br />
/en-us/dnglobspec/html/wssecurspecindex.asp.<br />
● For more information about GXA, see the article “Understanding GXA” on<br />
MSDN.<br />
● For discussions on this topic, refer to the GXA Interoperability Newsgroup on<br />
MSDN.
Chapter 10: Web Services Security 231<br />
Platform/Transport Security Architecture<br />
The <strong>ASP</strong>.<strong>NET</strong> Web services platform security architecture is shown in Figure 10.3.<br />
Authentication<br />
SOAP Header<br />
(optional<br />
credentials)<br />
SOAP Body<br />
1<br />
IIS<br />
2<br />
(inetinfo.exe)<br />
3<br />
Authentication<br />
Anonymous<br />
Basic<br />
Digest<br />
Integrated<br />
Certificate<br />
Authentication<br />
Windows<br />
None<br />
(Custom)<br />
<strong>ASP</strong>.<strong>NET</strong> Web Service<br />
(aspnet_wp.exe)<br />
Authorization<br />
NTFS Permissions<br />
IP Address<br />
Restrictions<br />
Authorization<br />
File AuthZ<br />
URL AuthZ<br />
.<strong>NET</strong> Roles<br />
5 6<br />
Identity<br />
7<br />
Web Server<br />
4<br />
Authenticated caller’s<br />
access token (or<br />
IUSR_MACHINE<br />
access token)<br />
Locator<br />
Remote<br />
Resource<br />
<strong>ASP</strong>.<strong>NET</strong> Process<br />
Original Caller<br />
Fixed Service Identity<br />
Figure 10.3<br />
Web services security architecture<br />
Figure 10.3 illustrates the authentication and authorization mechanisms provided<br />
by <strong>ASP</strong>.<strong>NET</strong> Web services. When a client calls a Web service, the following sequence<br />
of authentication and authorization events occurs:<br />
1. The SOAP request is received from the network. This may or may not contain<br />
authentication credentials depending upon the type of authentication being<br />
used.<br />
2. IIS optionally authenticates the caller by using Basic, Digest, Integrated (NTLM<br />
or Kerberos), or Certificate authentication. In heterogeneous environments where<br />
IIS (Windows) authentication is not possible, IIS is configured for anonymous<br />
authentication. In this scenario, the client may be authenticated by using message<br />
level attributes such as tickets passed in the SOAP header.<br />
3. IIS can also be configured to accept requests only from client computers with<br />
specific IP addresses.
232<br />
<strong>Building</strong> <strong>Secure</strong> <strong>ASP</strong>.<strong>NET</strong> <strong>Applications</strong><br />
4. IIS passes the authenticated caller’s Windows access token to <strong>ASP</strong>.<strong>NET</strong> (this may<br />
be the anonymous Internet user’s access token, if the Web service is configured<br />
for anonymous authentication).<br />
5. <strong>ASP</strong>.<strong>NET</strong> authenticates the caller. If <strong>ASP</strong>.<strong>NET</strong> is configured for Windows authentication,<br />
no additional authentication occurs at this point; IIS authenticates the<br />
caller.<br />
If a non-Windows authentication method is being used, the <strong>ASP</strong>.<strong>NET</strong> authentication<br />
mode is set to None to allow custom authentication.<br />
Note: Forms and Passport authentication are not currently supported for Web services.<br />
6. <strong>ASP</strong>.<strong>NET</strong> authorizes access to the requested Web service (.asmx file) by using<br />
URL authorization and File authorization, which uses NTFS permissions associated<br />
with the .asmx file to determine whether or not access should be granted to<br />
the authenticated caller.<br />
Note: File authorization is only supported for Windows authentication.<br />
For fine-grained authorization, .<strong>NET</strong> roles can also be used (either declaratively<br />
or programmatically) to ensure that the caller is authorized to access the requested<br />
Web method.<br />
7. Code within the Web service may access local and/or remote resources by using<br />
a particular identity. By default, <strong>ASP</strong>.<strong>NET</strong> Web services perform no impersonation<br />
and, as a result, the configured <strong>ASP</strong>.<strong>NET</strong> process account provides the<br />
identity. Alternate options include the original caller’s identity, or a configured<br />
service identity.<br />
Gatekeepers<br />
The gatekeepers within an <strong>ASP</strong>.<strong>NET</strong> Web service are:<br />
● IIS<br />
● If IIS anonymous authentication is disabled IIS only allows requests from<br />
authenticated users.<br />
● IP Address Restrictions<br />
IIS can be configured to only allow requests from computers with specific IP<br />
addresses.<br />
● <strong>ASP</strong>.<strong>NET</strong><br />
● The File authorization HTTP Module (for Windows authentication only)<br />
● The URL authorization HTTP Module<br />
● Principal Permission Demands and Explicit Role Checks
Chapter 10: Web Services Security 233<br />
More Information<br />
● For more information about the gatekeepers, see “Gatekeepers” in Chapter 8,<br />
“<strong>ASP</strong>.<strong>NET</strong> Security.”<br />
●<br />
For more information about configuring security, see “Configuring Security”<br />
later in this chapter.<br />
Authentication and Authorization Strategies<br />
This section explains which authorization options (configurable and programmatic)<br />
are available for a set of commonly used authentication schemes.<br />
The following authentication schemes are summarized here:<br />
● Windows authentication with impersonation<br />
● Windows authentication without impersonation<br />
● Windows authentication using a fixed identity<br />
Windows Authentication with Impersonation<br />
The following configuration elements show you how to enable Windows (IIS)<br />
authentication and impersonation declaratively in Web.config or Machine.config.<br />
Note: You should configure authentication on a per-Web service basis in each Web service’s<br />
Web.config file.<br />
<br />
<br />
With this configuration, your Web service code impersonates the IIS-authenticated<br />
caller. To impersonate the original caller, you must turn off anonymous access in IIS.<br />
With anonymous access, the Web service code impersonates the anonymous Internet<br />
user account (which by default is IUSR_MACHINE).<br />
Configurable Security<br />
When you use Windows authentication together with impersonation, the following<br />
authorization options are available to you:<br />
● Windows Access Control Lists (ACLs)<br />
● Web service (.asmx) file. File authorization performs access checks for requested<br />
<strong>ASP</strong>.<strong>NET</strong> resources (which includes the .asmx Web service file) using<br />
the original caller’s security context. The original caller must be granted at<br />
least read access to the .asmx file.
234<br />
<strong>Building</strong> <strong>Secure</strong> <strong>ASP</strong>.<strong>NET</strong> <strong>Applications</strong><br />
●<br />
● Resources accessed by your Web service. Windows ACLs on resources<br />
accessed by your Web service (files, folders, registry keys, Active <strong>Directory</strong>®<br />
directory service objects and so on) must include an Access Control Entry<br />
(ACE) that grants read access to the original caller (because the Web service<br />
thread used for resource access is impersonating the caller).<br />
URL Authorization. This is configured in Machine.config and/or Web.config.<br />
With Windows authentication, user names take the form<br />
DomainName\UserName and roles map one-to-one with Windows groups.<br />
<br />
<br />
<br />
<br />
Programmatic Security<br />
Programmatic security refers to security checks located within your Web service<br />
code. The following programmatic security options are available when you use<br />
Windows authentication and impersonation:<br />
● Principal Permission Demands<br />
● Imperative (in-line within a method’s code)<br />
PrincipalPermission permCheck = new PrincipalPermission(<br />
null, @"DomainName\WindowsGroup");<br />
permCheck.Demand();<br />
●<br />
Declarative (these attributes can precede Web methods or Web classes)<br />
// Demand that the caller is a member of a specific role (for Windows<br />
// authentication this is the same as a Windows group)<br />
[PrincipalPermission(SecurityAction.Demand,<br />
Role=@"DomainName\WindowsGroup")]<br />
// Demand that the caller is a specific user<br />
[PrincipalPermission(SecurityAction.Demand,<br />
Name=@"DomainName\UserName")]<br />
●<br />
Explicit Role Checks. You can perform role checking using the IPrincipal<br />
interface.<br />
IPrincipal.IsInRole(@"DomainName\WindowsGroup");
Chapter 10: Web Services Security 235<br />
When to Use<br />
Use Windows authentication and impersonation when:<br />
●<br />
●<br />
●<br />
The clients of the Web service can be identified by using Windows accounts,<br />
which can be authenticated by the server.<br />
You need to flow the original caller’s security context through the Web service<br />
and onto the next tier. For example, a set of serviced components that use Enterprise<br />
Services (COM+) roles, or onto a data tier that requires fine-grained (peruser)<br />
authorization.<br />
You need to flow the original caller’s security context to the downstream tiers to<br />
support operating system level auditing.<br />
Important: Using impersonation can reduce scalability, because it impacts database connection<br />
pooling. As an alternative approach, consider using the trusted subsystem model where<br />
the Web service authorizes callers and then uses a fixed identity for database access. You can<br />
flow the caller’s identity at the application level; for example, by using stored procedure<br />
parameters.<br />
More Information<br />
● For more information about Windows authentication and impersonation, see<br />
Chapter 8, “<strong>ASP</strong>.<strong>NET</strong> Security.”<br />
●<br />
For more information about URL authorization, see “URL Authorization Notes”<br />
in Chapter 8, “<strong>ASP</strong>.<strong>NET</strong> Security.”<br />
Windows Authentication without Impersonation<br />
The following configuration elements show how you enable Windows (IIS) authentication<br />
with no impersonation declaratively in Web.config.<br />
<br />
<br />
<br />
Configurable Security<br />
When you use Windows authentication without impersonation, the following<br />
authorization options are available to you:<br />
● Windows ACLs<br />
● Web Service (.asmx) file. File authorization performs access checks for<br />
requested <strong>ASP</strong>.<strong>NET</strong> resources (which includes the .asmx Web service file)<br />
using the original caller. Impersonation is not required.
236<br />
<strong>Building</strong> <strong>Secure</strong> <strong>ASP</strong>.<strong>NET</strong> <strong>Applications</strong><br />
●<br />
● Resources accessed by your application. Windows ACLs on resources accessed<br />
by your application (files, folders, registry keys, Active <strong>Directory</strong><br />
objects) must include an ACE that grants read access to the <strong>ASP</strong>.<strong>NET</strong> process<br />
identity (the default identity used by the Web service thread when accessing<br />
resources).<br />
URL Authorization<br />
This is configured in Machine.config and Web.config. With Windows authentication,<br />
user names take the form DomainName\UserName and roles map one-toone<br />
with Windows groups.<br />
<br />
<br />
<br />
<br />
Programmatic Security<br />
Programmatic security refers to security checks located within your Web service<br />
code. The following programmatic security options are available when you use<br />
Windows authentication without impersonation:<br />
● Principal Permission Demands<br />
● Imperative<br />
PrincipalPermission permCheck = new PrincipalPermission(<br />
null, @"DomainName\WindowsGroup");<br />
permCheck.Demand();<br />
●<br />
Declarative<br />
// Demand that the caller is a member of a specific role (for Windows<br />
// authentication this is the same as a Windows group)<br />
[PrincipalPermission(SecurityAction.Demand,<br />
Role=@"DomainName\WindowsGroup")]<br />
// Demand that the caller is a specific user<br />
[PrincipalPermission(SecurityAction.Demand,<br />
Name=@"DomainName\UserName")]<br />
●<br />
Explicit Role Checks. You can perform role checking using the IPrincipal<br />
interface.<br />
IPrincipal.IsInRole(@"DomainName\WindowsGroup");
Chapter 10: Web Services Security 237<br />
When to Use<br />
Use Windows authentication without impersonation when:<br />
●<br />
●<br />
The clients of the Web service can be identified by using Windows accounts,<br />
which can be authenticated by the server.<br />
You want to use the trusted subsystem model and authorize clients within the<br />
Web service and then use a fixed identity to access downstream resources (for<br />
example, databases) in order to support connection pooling.<br />
More Information<br />
● For more information about Windows authentication and impersonation, see<br />
Chapter 8, “<strong>ASP</strong>.<strong>NET</strong> Security.”<br />
●<br />
For more information about URL authorization, see “URL Authorization Notes”<br />
in Chapter 8, “<strong>ASP</strong>.<strong>NET</strong> Security.”<br />
Windows Authentication Using a Fixed Identity<br />
The element within Web.config supports optional user name and password<br />
attributes which allows you to configure a specific fixed identity for your Web<br />
service to impersonate. This is shown in the following configuration file fragment.<br />
<br />
When to Use<br />
This approach is not recommended in secure environments for two reasons:<br />
● User names and passwords should not be stored in plain text in configuration<br />
files.<br />
● On Windows 2000, this approach forces you to grant the <strong>ASP</strong>.<strong>NET</strong> process<br />
account the “Act as part of the operating system” privilege. This reduces the<br />
security of your Web service and increases the threat should an attacker compromise<br />
the Web service process (Aspnet_wp.exe)<br />
More Information<br />
● For more information about Windows authentication and impersonation, see<br />
Chapter 8, “<strong>ASP</strong>.<strong>NET</strong> Security.”<br />
● For more information about URL authorization, see “URL Authorization Notes”<br />
in Chapter 8, “<strong>ASP</strong>.<strong>NET</strong> Security.”
238<br />
<strong>Building</strong> <strong>Secure</strong> <strong>ASP</strong>.<strong>NET</strong> <strong>Applications</strong><br />
Configuring Security<br />
This section shows you the practical steps required to configure security for an<br />
<strong>ASP</strong>.<strong>NET</strong> Web service. These are summarized in Figure 10.4.<br />
Authentication<br />
SOAP Header<br />
(optional<br />
credentials)<br />
SOAP Body<br />
1<br />
IIS<br />
2<br />
(inetinfo.exe)<br />
3<br />
Authentication<br />
Anonymous<br />
Basic<br />
Digest<br />
Integrated<br />
Certificate<br />
Authentication<br />
Windows<br />
None<br />
(Custom)<br />
<strong>ASP</strong>.<strong>NET</strong> Web Service<br />
(aspnet_wp.exe)<br />
Authorization<br />
NTFS Permissions<br />
IP Address<br />
Restrictions<br />
Authorization<br />
File AuthZ<br />
URL AuthZ<br />
.<strong>NET</strong> Roles<br />
5 6<br />
Identity<br />
7<br />
Web Server<br />
4<br />
Authenticated caller’s<br />
access token (or<br />
IUSR_MACHINE<br />
access token)<br />
Locator<br />
Remote<br />
Resource<br />
<strong>ASP</strong>.<strong>NET</strong> Process<br />
Original Caller<br />
Fixed Service Identity<br />
Figure 10.4<br />
Configuring <strong>ASP</strong>.<strong>NET</strong> Web service security<br />
Configure IIS Settings<br />
For detailed information about how to configure IIS security settings, see “Configuring<br />
Security” in Chapter 8, “<strong>ASP</strong>.<strong>NET</strong> Security,” because the information is also<br />
applicable to <strong>ASP</strong>.<strong>NET</strong> Web services.
Chapter 10: Web Services Security 239<br />
Configure <strong>ASP</strong> .<strong>NET</strong> Settings<br />
Application level configuration settings are maintained in Web.config files, which<br />
are located in your Web service’s virtual root directory. Configure the following<br />
settings:<br />
1. Configure Authentication. This should be set on a per-Web service basis (not in<br />
Machine.config) in the Web.config file located in the Web service’s virtual root<br />
directory.<br />
<br />
Note: Web services do not currently support Passport or Forms authentication. For custom<br />
and message-level authentication, set the mode to None.<br />
2. Configure Impersonation and Authorization. For detailed information, see<br />
“Configuring Security” in Chapter 8, “<strong>ASP</strong>.<strong>NET</strong> Security.”<br />
More Information<br />
For more information about URL authorization, see “URL Authorization Notes” in<br />
Chapter 8, “<strong>ASP</strong>.<strong>NET</strong> Security.”<br />
<strong>Secure</strong> Resources<br />
You should use the same techniques to secure Web resources as presented in Chapter<br />
8, “<strong>ASP</strong>.<strong>NET</strong> Security.” In addition, however, for Web services consider removing<br />
the HTTP-GET and HTTP-POST protocol from Machine.config on production<br />
servers.<br />
Disable HTTP-GET, HTTP-POST<br />
By default, clients can communicate with <strong>ASP</strong>.<strong>NET</strong> Web services, using three<br />
protocols: HTTP-GET, HTTP-POST, and SOAP over HTTP. You should disable<br />
support for both the HTTP-GET and HTTP-POST protocols at the machine level on<br />
production machines that do not require them. This is to avoid a potential security<br />
breach that could allow a malicious Web page to access an internal Web service<br />
running behind a firewall.<br />
Note: Disabling these protocols means that a new client will not be able to test an XML Web<br />
service using the Invoke button on the Web service test page. Instead, you must create a test<br />
client program by adding a reference to the Web service using Microsoft Visual Studio® .<strong>NET</strong><br />
development system. You may want to leave these protocols enabled on development computers<br />
to allow developers to use the test page.
240<br />
<strong>Building</strong> <strong>Secure</strong> <strong>ASP</strong>.<strong>NET</strong> <strong>Applications</strong><br />
<br />
To disable the HTTP-GET and HTTP-POST protocols for an entire computer<br />
1. Edit Machine.config.<br />
2. Comment out the lines within the element that add support for<br />
HTTP-GET and HTTP-POST. After doing so, Machine.config should appear as<br />
follows.<br />
<br />
<br />
<br />
<br />
<br />
<br />
<br />
<br />
3. Save Machine.config.<br />
Note: For special cases where you have Web service clients that communicate with a Web<br />
service using either HTTP-GET or HTTP-POST, you can add support for those protocols in the<br />
application’s Web.config file, by creating a and adding support for these<br />
protocols with the and elements, as shown earlier.<br />
More Information<br />
For detailed Information about securing resources, see “<strong>Secure</strong> Resources” within<br />
Chapter 8, “<strong>ASP</strong>.<strong>NET</strong> Security.”<br />
<strong>Secure</strong> Communication<br />
Use a combination of SSL and IPSec to secure communication links.<br />
More information<br />
● For information about calling a Web service using SSL, see “How To: Call a Web<br />
Service Using SSL” in the Reference section of this guide.<br />
●<br />
For information about using IPSec between two computers, see “How To: Use<br />
IPSec to Provide <strong>Secure</strong> Communication between Two Servers” in the Reference<br />
section of this guide.<br />
Passing Credentials for Authentication to Web Services<br />
When you call a Web service, you do so by using a Web service proxy; a local<br />
object that exposes the same set of methods as the target Web service.
Chapter 10: Web Services Security 241<br />
You can generate a Web service proxy by using the Wsdl.exe command line utility.<br />
Alternatively, if you are using Visual Studio .<strong>NET</strong> you can generate the proxy by<br />
adding a Web reference to the project.<br />
Note: If the Web service for which you want to generate a proxy is configured to require client<br />
certificates, you must temporarily switch off that requirement while you add the reference, or<br />
an error occurs. After you add the reference, you must remember to reconfigure the service to<br />
require certificates.<br />
An alternate approach would be to keep an offline Web Services Description Language (WSDL)<br />
file available to consumer applications. You must remember to update this if your Web service<br />
interface changes.<br />
Specifying Client Credentials for Windows Authentication<br />
If you are using Windows authentication , you must specify the credentials to be<br />
used for authentication using the Credentials property of the Web service proxy. If<br />
you do not explicitly set this property, the Web service is called without any credentials.<br />
If Windows authentication is required, this will result in an HTTP status 401,<br />
access denied response.<br />
Using DefaultCredentials<br />
Client credentials do not flow implicitly. The Web service consumer must set the<br />
credentials and authentication details on the proxy. To flow the security context of<br />
the client’s Windows security context (either from an impersonating thread token or<br />
process token) to a Web service you can set the Credentials property of the Web<br />
service proxy to CredentialCache.DefaultCredentials as shown below.<br />
proxy.Credentials = System.Net.CredentialCache.DefaultCredentials;<br />
Consider the following points before you use this approach:<br />
●<br />
●<br />
●<br />
This flows the client credentials only when you use NTLM, Kerberos, or Negotiate<br />
authentication.<br />
If a client-side application (for example, a Windows Forms application) calls the<br />
Web service, the credentials are obtained from the user’s interactive logon<br />
session.<br />
Server-side applications, such as <strong>ASP</strong>.<strong>NET</strong> Web applications, use the process<br />
identity, unless impersonation is configured in which case the impersonated<br />
caller’s identity is used.
242<br />
<strong>Building</strong> <strong>Secure</strong> <strong>ASP</strong>.<strong>NET</strong> <strong>Applications</strong><br />
Using Specific Credentials<br />
To use a specific set of credentials for authentication when you call a Web service,<br />
use the following code.<br />
CredentialCache cache = new CredentialCache();<br />
cache.Add( new Uri(proxy.Url), // Web service URL<br />
"Negotiate", // Kerberos or NTLM<br />
new NetworkCredential("username", "password", "domainname") );<br />
proxy.Credentials = cache;<br />
In the above example, the requested Negotiate authentication type results in either<br />
Kerberos or NTLM authentication.<br />
Always Request a Specific Authentication Type<br />
You should always request a specific authentication type as illustrated above. Avoid<br />
direct use of the NetworkCredential class as shown in the following code.<br />
proxy.Credentials = new<br />
NetworkCredential("username", "password", "domainname");<br />
This should be avoided in production code because you have no control over the<br />
authentication mechanism used by the Web service and as a result you have no<br />
control over how the credentials are used.<br />
For example, you may expect a Kerberos or NTLM authentication challenge from<br />
the server but instead you may receive a Basic challenge. In this case, the supplied<br />
user name and password will be sent to the server in clear text form.<br />
Set the PreAuthenticate Property<br />
The proxy’s PreAuthenticate property can be set to true or false. Set it to true to<br />
supply specific authentication credentials to cause a WWW-authenticate HTTP<br />
header to be passed with the Web request. This saves the Web server denying access<br />
on the request, and performing authentication on the subsequent retry request.<br />
Note: Pre-authentication only applies after the Web service successfully authenticates the first<br />
time. Pre-authentication has no impact on the first Web request.<br />
private void ConfigureProxy( WebClientProtocol proxy,<br />
string domain, string username,<br />
string password )<br />
{<br />
// To improve performance, force pre-authentication<br />
proxy.PreAuthenticate = true;<br />
// Set the credentials<br />
CredentialCache cache = new CredentialCache();
Chapter 10: Web Services Security 243<br />
}<br />
cache.Add( new Uri(proxy.Url),<br />
"Negotiate",<br />
new NetworkCredential(username, password, domain) );<br />
proxy.Credentials = cache;<br />
proxy.ConnectionGroupName = username;<br />
Using the ConnectionGroupName Property<br />
Notice that the above code sets the ConnectionGroupName property of the Web<br />
service proxy. This is only required if the security context used to connect to the<br />
Web service varies from one request to the next as described below.<br />
If you have an <strong>ASP</strong>.<strong>NET</strong> Web application that connects to a Web service and flows<br />
the security context of the original caller (by using DefaultCredentials or by setting<br />
explicit credentials, as shown above), you should set the ConnectionGroupName<br />
property of the Web service proxy within the Web application. This is to prevent a<br />
new, unauthenticated client from reusing an old, authenticated TCP connection to<br />
the Web service that is associated with a previous client’s authentication credentials.<br />
Connection reuse can occur as a result of HTTP KeepAlives and authentication<br />
persistence which is enabled for performance reasons within IIS.<br />
Set the ConnectionGroupName property to an identifier (such as the caller’s user<br />
name) that distinguishes one caller from the next as shown in the previous code<br />
fragment.<br />
Note: If the original caller’s security context does not flow through the Web application and<br />
onto the Web service, and instead the Web application connects to the Web service using a<br />
fixed identity (such as the Web application’s <strong>ASP</strong>.<strong>NET</strong> process identity), you do not need to set<br />
the ConnectionGroupName property. In this scenario, the connection security context remains<br />
constant from one caller to the next.<br />
Calling Web Services from Non-Windows Clients<br />
There are a number of authentication approaches that work for cross-browser<br />
scenarios. These include:<br />
● Certificate Authentication. Using cross platform X.509 certificates.<br />
●<br />
●<br />
●<br />
Basic Authentication. For an example of how to use Basic authentication against<br />
a custom data store (without requiring Active <strong>Directory</strong>), see http://<br />
www.rassoc.com/gregr/weblog/stories/2002/06/26/<br />
webServicesSecurityHttpBasicAuthenticationWithoutActive<strong>Directory</strong>.html.<br />
GXA Message Level Approaches. Use the Web Services Development Toolkit to<br />
implement GXA (WS-Security) solutions.<br />
Custom Approaches. For example, flow credentials in SOAP headers.
244<br />
<strong>Building</strong> <strong>Secure</strong> <strong>ASP</strong>.<strong>NET</strong> <strong>Applications</strong><br />
Proxy Server Authentication<br />
Proxy server authentication is not supported by the Visual Studio .<strong>NET</strong> Add Web<br />
Reference dialog box (although it will be supported with the next version of Visual<br />
Studio .<strong>NET</strong>). As a result you might receive an HTTP status 407: “Proxy Authentication<br />
Required” response when you attempt to add a Web reference.<br />
Note: You may not see this error when you view the .asmx file from a browser, because the<br />
browser automatically sends credentials.<br />
To work around this issue, you can use the Wsdl.exe command line utility (instead<br />
of the Add Web Reference dialog) as shown below.<br />
wsdl.exe /proxy:http:// /pu: /pp: /<br />
pd: http://www.YouWebServer.com/YourWebService/YourService.asmx<br />
If you need to programmatically set the proxy server authentication information,<br />
use the following code.<br />
YourWebServiceProxy.Proxy.Credentials = CredentialsCache.DefaultCredentials;<br />
Flowing the Original Caller<br />
This section describes how you can flow the original caller’s security context<br />
through an <strong>ASP</strong>.<strong>NET</strong> Web application and onto a Web service located on a remote<br />
application server. You may need to do this in order to support per-user authorization<br />
within the Web service or within subsequent downstream subsystems (for<br />
example, databases, where you want to authorize original callers to individual<br />
database objects).<br />
In Figure 10.5, the security context of the original caller (Alice) flows through the<br />
front-end Web server that hosts an <strong>ASP</strong>.<strong>NET</strong> Web application, onto the remote<br />
object, hosted by <strong>ASP</strong>.<strong>NET</strong> on a remote application server and finally through to a<br />
backend database server.<br />
Web Server<br />
Application Server<br />
Database Server<br />
Alice<br />
IIS<br />
<strong>ASP</strong>.<strong>NET</strong><br />
(Web<br />
Application)<br />
Alice<br />
IIS<br />
<strong>ASP</strong>.<strong>NET</strong><br />
(Web<br />
Service)<br />
Alice<br />
SQL<br />
Server<br />
Figure 10.5<br />
Flowing the original caller’s security context
Chapter 10: Web Services Security 245<br />
In order to flow credentials to a Web service, the Web service client (the <strong>ASP</strong>.<strong>NET</strong><br />
Web application in this scenario) must configure the Web service proxy and explicitly<br />
set the proxy’s Credentials property, as described in “Passing Credentials for<br />
Authentication to Web Services” earlier in this chapter.<br />
There are two ways to flow the caller’s context.<br />
●<br />
●<br />
Pass default credentials and use Kerberos authentication (and delegation).<br />
This approach requires that you impersonate within the <strong>ASP</strong>.<strong>NET</strong> Web application<br />
and configure the remote object proxy with DefaultCredentials obtained<br />
from the impersonated caller’s security context.<br />
Pass explicit credentials and use Basic or Forms authentication. This approach<br />
does not require impersonation within the <strong>ASP</strong>.<strong>NET</strong> Web application. Instead,<br />
you programmatically configure the Web service proxy with explicit credentials<br />
obtained from either server variables (with Basic authentication) or HTML form<br />
fields (with Forms authentication) that are available to the Web application. With<br />
Basic or Forms authentication, the user name and password are available to the<br />
server in clear text.<br />
Default Credentials with Kerberos Delegation<br />
To use Kerberos delegation, all computers (servers and clients) must be running<br />
Windows 2000 or later. Additionally, client accounts that are to be delegated must<br />
be stored in Active <strong>Directory</strong> and must not be marked as “Sensitive and cannot be<br />
delegated.”<br />
The following tables show the configuration steps required on the Web server, and<br />
application server.<br />
Configuring the Web Server<br />
Configure IIS<br />
Step<br />
More Information<br />
Disable Anonymous access<br />
for your Web application’s<br />
virtual root directory<br />
Enable Windows Integrated<br />
Authentication for the Web<br />
application’s virtual root<br />
Kerberos authentication will be negotiated assuming clients and<br />
server are running Windows 2000 or later.<br />
Note: If you are using Internet Explorer 6 on Windows 2000, it<br />
defaults to NTLM authentication instead of the required Kerberos<br />
authentication. To enable Kerberos delegation, see article<br />
Q299838, “Unable to Negotiate Kerberos Authentication after<br />
upgrading to Internet Explorer 6,” in the Microsoft Knowledge<br />
Base.
246<br />
<strong>Building</strong> <strong>Secure</strong> <strong>ASP</strong>.<strong>NET</strong> <strong>Applications</strong><br />
Configure <strong>ASP</strong> .<strong>NET</strong><br />
Step<br />
Configure your <strong>ASP</strong>.<strong>NET</strong> Web<br />
application to use Windows<br />
authentication<br />
Configure your <strong>ASP</strong>.<strong>NET</strong> Web<br />
application for impersonation<br />
More Information<br />
Edit Web.config in your Web application’s virtual directory<br />
Set the element to:<br />
<br />
Edit Web.config in your Web application’s virtual directory<br />
Set the element to:<br />
<br />
Configure the Web Service Proxy<br />
Step<br />
More Information<br />
Set the credentials property See “Using DefaultCredentials” earlier in this chapter for a code<br />
of the Web service proxy to sample.<br />
DefaultCredentials.<br />
Configuring the Remote Application Server<br />
Configure IIS<br />
Step<br />
Disable Anonymous access<br />
for your Web service’s virtual<br />
root directory<br />
Enable Windows Integrated<br />
Authentication for the Web<br />
application’s virtual root<br />
More Information<br />
Configure <strong>ASP</strong>.<strong>NET</strong> (Web Service Host)<br />
Step<br />
More Information<br />
Configure <strong>ASP</strong>.<strong>NET</strong> to use Edit Web.config in the Web service’s virtual directory.<br />
Windows authentication Set the element to:<br />
Chapter 10: Web Services Security 247<br />
Configure <strong>ASP</strong>.<strong>NET</strong> (Web Service Host)<br />
Step<br />
More Information<br />
Configure <strong>ASP</strong>.<strong>NET</strong> for<br />
Edit Web.config in the Web service’s virtual directory.<br />
impersonation<br />
Set the element to:<br />
<br />
Note: This step is only required if you want to flow the original<br />
caller’s security context through the Web service and onto the<br />
next downstream, subsystem (for example, a database). With<br />
impersonation enabled here, resource access (local and remote)<br />
uses the impersonated original caller’s security context.<br />
If your requirement is simply to allow per-user authorization<br />
checks in the Web service, you do not need to impersonate here.<br />
More Information<br />
For more information about configuring Kerberos delegation, see “How To: Implement<br />
Kerberos Delegation for Windows 2000” in the Reference section of this guide.<br />
Explicit Credentials with Basic or Forms Authentication<br />
As an alternative to Kerberos delegation, you can use Basic or Forms authentication<br />
at the Web application to capture the client’s credentials and then use Basic (or<br />
Integrated Windows) authentication to the Web service.<br />
With this approach, the client’s clear text credentials are available to the Web application.<br />
These can be passed to the Web service through the Web service proxy. For<br />
this, you must write code in the Web application to retrieve the client’s credentials<br />
and configure the proxy.<br />
Basic Authentication<br />
With Basic authentication, the original caller’s credentials are available to the Web<br />
application in server variables. The following code shows how to retrieve them and<br />
configure the Web service proxy.<br />
// Retrieve client's credentials (available with Basic authentication)<br />
string pwd = Request.ServerVariables["AUTH_PASSWORD"];<br />
string uid = Request.ServerVariables["AUTH_USER"];<br />
// Associate the credentials with the Web service proxy<br />
// To improve performance, force preauthentication<br />
proxy.PreAuthenticate = true;<br />
// Set the credentials<br />
CredentialCache cache = new CredentialCache();<br />
cache.Add( new Uri(proxy.Url),<br />
"Basic",<br />
new NetworkCredential(uid, pwd, domain) );<br />
proxy.Credentials = cache;
248<br />
<strong>Building</strong> <strong>Secure</strong> <strong>ASP</strong>.<strong>NET</strong> <strong>Applications</strong><br />
Forms Authentication<br />
With Forms authentication, the original caller’s credentials are available to the Web<br />
application in form fields (rather than server variables). In this case, use the following<br />
code.<br />
// Retrieve client's credentials from the logon form<br />
string pwd = txtPassword.Text;<br />
string uid = txtUid.Text;<br />
// Associate the credentials with the Web service proxy<br />
// To improve performance, force preauthentication<br />
proxy.PreAuthenticate = true;<br />
// Set the credentials<br />
CredentialCache cache = new CredentialCache();<br />
cache.Add( new Uri(proxy.Url),<br />
"Basic",<br />
new NetworkCredential(uid, pwd, domain) );<br />
proxy.Credentials = cache;<br />
The following tables show the configuration steps required on the Web server, and<br />
application server.<br />
Configuring the Web Server<br />
Configure IIS<br />
Step<br />
More Information<br />
To use Basic authentication,<br />
disable Anonymous access<br />
for your Web application’s<br />
virtual root directory and<br />
select Basic authentication<br />
- or -<br />
Both Basic and Forms authentication should be used in<br />
conjunction with SSL to protect the clear text credentials sent<br />
over the network. If you use Basic authentication, SSL should be<br />
used for all pages (not just the initial logon page), as Basic<br />
credentials are transmitted with every request.<br />
To use Forms authentication,<br />
enable anonymous access<br />
Similarly, SSL should be used for all pages if you use Forms<br />
authentication, to protect the clear text credentials on the initial<br />
log on and to protect the authentication ticket passed on<br />
subsequent requests.
Chapter 10: Web Services Security 249<br />
Configure <strong>ASP</strong>.<strong>NET</strong><br />
Step<br />
If you use Basic authenti-<br />
More Information<br />
Edit Web.config in your Web application’s virtual directory<br />
Set the element to:<br />
cation, configure your<br />
<strong>ASP</strong>.<strong>NET</strong> Web application to<br />
use Windows authentication <br />
- or -<br />
If you use Forms authentication,<br />
configure your<br />
<strong>ASP</strong>.<strong>NET</strong> Web application to<br />
use Forms authentication<br />
Disable impersonation within<br />
the <strong>ASP</strong>.<strong>NET</strong> Web application<br />
- or -<br />
Edit Web.config in your Web application’s virtual directory<br />
Set the element to:<br />
<br />
Edit Web.config in your Web application’s virtual directory.<br />
Set the element to:<br />
<br />
Note: This is equivalent to having no element.<br />
Impersonation is not required, as the user’s credentials will be<br />
passed explicitly to the Web service through the proxy.<br />
Configure the Web Service Proxy<br />
Step<br />
More Information<br />
Write code to capture and Refer to the code fragments shown earlier in the Basic<br />
explicitly set the credentials Authentication and Forms Authentication sections.<br />
on the Web Service proxy<br />
Configuring the Application Server<br />
Configure IIS<br />
Step<br />
More Information<br />
Disable Anonymous access<br />
for your application’s virtual<br />
root directory<br />
Enable Basic authentication<br />
Note: Basic authentication at the (Web service) application<br />
server, allows the Web service to flow the original caller’s<br />
security context to the database (as the caller’s user name and<br />
password are available in clear text and can be used to respond<br />
to network authentication challenges from the database server).<br />
If you don’t need to flow the original caller’s security context<br />
beyond the Web service, consider configuring IIS at the application<br />
server to use Windows Integrated authentication, as this<br />
provides tighter security — credentials are not passed across<br />
the network and are not available to the Web service.
250<br />
<strong>Building</strong> <strong>Secure</strong> <strong>ASP</strong>.<strong>NET</strong> <strong>Applications</strong><br />
Configure <strong>ASP</strong>.<strong>NET</strong> (Web Service)<br />
Step<br />
More Information<br />
Configure <strong>ASP</strong>.<strong>NET</strong> to use Edit Web.config in the Web service’s virtual directory.<br />
Windows authentication Set the element to:<br />
<br />
Configure your <strong>ASP</strong>.<strong>NET</strong> Web<br />
service for impersonation<br />
Edit Web.config in the Web service’s virtual directory.<br />
Set the element to:<br />
<br />
Note: This step is only required if you want to flow the original<br />
caller’s security context through the Web service and onto the<br />
next downstream, subsystem (for example, a database). With<br />
impersonation enabled here, resource access (local and remote)<br />
uses the impersonated original caller’s security context.<br />
If your requirement is simply to allow per-user authorization<br />
checks in the Web service, you do not need to impersonate here.<br />
Trusted Subsystem<br />
The trusted subsystem model provides an alternative (and simpler to implement)<br />
approach to flowing the original caller’s security context. In this model a trust<br />
boundary exists between the Web service and Web application. The Web service<br />
trusts the Web application to properly authenticate and authorize callers, prior to<br />
letting requests proceed to the Web service. No authentication of the original callers<br />
occurs at the Web service. The Web service authenticates the fixed trusted identity<br />
used by the Web application to communicate with the Web service. In most cases,<br />
this is the process identity of the <strong>ASP</strong>.<strong>NET</strong> worker process.<br />
The trusted subsystem model is shown in Figure 10.6.<br />
Alice<br />
IIS<br />
Web Server<br />
<strong>ASP</strong>.<strong>NET</strong><br />
(Web<br />
Application)<br />
Fixed<br />
“trusted”<br />
identity<br />
(<strong>ASP</strong><strong>NET</strong>)<br />
Application Server<br />
IIS<br />
<strong>ASP</strong>.<strong>NET</strong><br />
(Web<br />
Service)<br />
<strong>ASP</strong><strong>NET</strong><br />
Database Server<br />
SQL<br />
Server<br />
Trust Boundary<br />
Trust Boundary<br />
Figure 10.6<br />
The trusted subsystem model
Chapter 10: Web Services Security 251<br />
Flowing the Caller’s Identity<br />
If you use the trusted subsystem model, you may still need to flow the original<br />
caller’s identity (name, not security context), for example, for auditing purposes at<br />
the database.<br />
You can flow the identity at the application level by using method and stored<br />
procedure parameters and trusted query parameters (as shown in the following<br />
example) can be used to retrieve user-specific data from the database.<br />
SELECT x,y,z FROM SomeTable WHERE UserName = "Alice"<br />
Configuration Steps<br />
The following tables show the configuration steps required on the Web server, and<br />
application server.<br />
Configuring the Web Server<br />
Configure IIS<br />
Step<br />
More Information<br />
Configure IIS authentication<br />
The Web application can use any form of authentication to<br />
authenticate the original callers.<br />
Configure <strong>ASP</strong>.<strong>NET</strong><br />
Step<br />
Configure authentication and<br />
make sure impersonation is<br />
disabled<br />
More Information<br />
Edit Web.config in your Web application’s virtual directory.<br />
Set the element to “Windows”, “Forms” or<br />
“Passport.”<br />
<br />
Set the element to:<br />
<br />
(OR remove the element)<br />
Reset the password of the<br />
<strong>ASP</strong><strong>NET</strong> account used to run<br />
<strong>ASP</strong>.<strong>NET</strong> OR create a least<br />
privileged domain account to<br />
run <strong>ASP</strong>.<strong>NET</strong> and specify<br />
account details on the<br />
element<br />
within Web.config<br />
For more information about how to access network resources<br />
(including Web services) from <strong>ASP</strong>.<strong>NET</strong> and about choosing and<br />
configuring a process account for <strong>ASP</strong>.<strong>NET</strong>, see “Accessing<br />
Network Resources” and “Process Identity for <strong>ASP</strong>.<strong>NET</strong>” in<br />
Chapter 8, “<strong>ASP</strong>.<strong>NET</strong> Security.”
252<br />
<strong>Building</strong> <strong>Secure</strong> <strong>ASP</strong>.<strong>NET</strong> <strong>Applications</strong><br />
Configure Web Service Proxy<br />
Step<br />
More Information<br />
Configure the Web service Use the following line of code:<br />
proxy to use default<br />
credentials for all calls to proxy.Credentials = DefaultCredentials;<br />
the Web service<br />
Configuring the Application Server<br />
Configure IIS<br />
Step<br />
More Information<br />
Disable Anonymous access<br />
for your Web service’s virtual<br />
root directory<br />
Enable Windows Integrated<br />
authentication<br />
Configure <strong>ASP</strong>.<strong>NET</strong><br />
Step<br />
Configure <strong>ASP</strong>.<strong>NET</strong> to use<br />
Windows authentication<br />
More Information<br />
Edit Web.config in the Web service’s virtual directory.<br />
Set the element to:<br />
<br />
Disable impersonation<br />
Edit Web.config in the application’s virtual directory.<br />
Set the element to:<br />
<br />
Accessing System Resources<br />
For details about accessing system resources (for example the event log and the<br />
registry) from <strong>ASP</strong>.<strong>NET</strong> Web services, see “Accessing System Resources” within<br />
Chapter 8, “<strong>ASP</strong>.<strong>NET</strong> Security.” The approaches and restrictions discussed in<br />
Chapter 8 also apply to <strong>ASP</strong>.<strong>NET</strong> Web services.<br />
Accessing Network Resources<br />
When you access network resources from a Web service, you need to consider the<br />
identity that is used to respond to network authentication challenges from the<br />
remote computer. You have three options:
Chapter 10: Web Services Security 253<br />
●<br />
●<br />
●<br />
The process identity (determined by the account used to run the <strong>ASP</strong>.<strong>NET</strong><br />
worker process)<br />
A service identity (for example, one created by calling LogonUser)<br />
The original caller identity (with the Web service configured for impersonation)<br />
For details about the relative merits of each of these approaches, together with<br />
configuration details, see “Accessing Network Resources” in Chapter 8, “<strong>ASP</strong>.<strong>NET</strong><br />
Security.”<br />
Accessing COM Objects<br />
The AspCompat directive (used by Web applications when they call apartment<br />
threaded COM objects) is not available to Web services. This means that when you<br />
call apartment model objects from Web services, a thread switch occurs. This results<br />
in a slight performance hit, and if your Web service is impersonating, your impersonation<br />
token will be lost when calling the COM component. This typically results<br />
in an Access Denied exception.<br />
More Information<br />
●<br />
●<br />
●<br />
For more information about access denied exceptions when calling apartment<br />
threaded COM objects, see article Q325791,”PRB: Access Denied Error Message<br />
Occurs When Impersonating in <strong>ASP</strong>.<strong>NET</strong> and Calling STA COM Components,”<br />
in the Microsoft Knowledge Base.<br />
For more information about accessing COM objects and using the AspCompat<br />
attribute, see “Accessing COM Objects” within Chapter 8, “<strong>ASP</strong>.<strong>NET</strong> Security.”<br />
For more information about calling apartment threaded COM objects from Web<br />
services, see article Q303375, “INFO: XML Web Services and Apartment Objects,”<br />
in the Microsoft Knowledge Base.<br />
Using Client Certificates with Web Services<br />
This section describes techniques for using X.509 client certificates for Web service<br />
authentication.<br />
You can use client certificate authentication within a Web service to authenticate:<br />
● Other Web services.<br />
● <strong>Applications</strong> that communicate directly with the Web service (for example,<br />
server-based or client-side desktop applications).
254<br />
<strong>Building</strong> <strong>Secure</strong> <strong>ASP</strong>.<strong>NET</strong> <strong>Applications</strong><br />
Authenticating Web Browser Clients with Certificates<br />
A Web service cannot use client certificates to authenticate callers if they interact<br />
with an intermediate Web application, because it is not possible to forward the<br />
original caller’s certificate through the Web application and onto the Web service.<br />
While the Web application can authenticate its clients with certificates, the same<br />
certificates cannot then be used by the Web service for authentication.<br />
The reason that this server-to-server scenario fails is that the Web application does<br />
not have access to the client’s certificate (specifically its private key) in its certificate<br />
store. This problem is illustrated in Figure 10.7.<br />
Bob<br />
(Browser)<br />
Alice<br />
(WinForm)<br />
Bob’s<br />
Certificate<br />
Alice’s<br />
Certificate<br />
Web<br />
Application<br />
Server<br />
Bob or Alice’s<br />
Certificate<br />
Can’t use client<br />
certificate to authenticate<br />
against the Web service.<br />
Web<br />
Service<br />
Center<br />
Figure 10.7<br />
Web service client certificate authentication<br />
Using the Trusted Subsystem Model<br />
To address this restriction, and to support certificate authentication at the Web service,<br />
you must use a trusted-subsystem model. With this approach, the Web service<br />
authenticates the Web application using the Web application’s certificate (and not<br />
the original caller’s certificate). The Web service must trust the Web application<br />
to authenticate its users and to perform the necessary authorization to ensure that<br />
only authorized callers are able to access the data and functionality exposed by the<br />
Web service.<br />
This approach is shown in Figure 10.8.
Chapter 10: Web Services Security 255<br />
Bob<br />
Alice<br />
Bob’s<br />
Certificate<br />
Alice’s<br />
Certificate<br />
Web<br />
Application<br />
Server<br />
(Gatekeeper)<br />
Web Application’s<br />
Certificate<br />
Web<br />
Service<br />
Center<br />
Browser<br />
Clients<br />
Trust Boundary<br />
SSL/IPSec<br />
(Privacy/Integrity)<br />
Unauthorized<br />
Agent<br />
IPSec blocks access<br />
AND authentication<br />
fails<br />
Figure 10.8<br />
The Web service authenticates the trusted Web application<br />
If the authorization logic within the Web service requires multiple roles, the Web<br />
application can send different certificates based upon the role membership of the<br />
caller. For example, one certificate may be used for members of an Administrators<br />
group (who are allowed to update data within a back-end database) and another<br />
certificate may be used for all other users (who are authorized only for read<br />
operations).<br />
Note: In scenarios such as these, a local certificate server (accessible only by the two servers)<br />
can be used to manage all the Web application certificates.<br />
In this scenario:<br />
● The Web application authenticates its users by using client certificates.<br />
● The Web application acts as a gatekeeper and authorizes its users and controls<br />
access to the Web service.<br />
● The Web application calls the Web service and passes a different certificate that<br />
represents the application (or possibly a range of certificates based on the role<br />
membership of the caller).<br />
● The Web service authenticates the Web application and it trusts the application<br />
to perform the necessary client authorization.<br />
● IPSec is used between the Web application server and Web service server to<br />
provide additional access control. Unauthorized access attempts from other<br />
computers are prevented by IPSec. Certificate authentication at the Web service<br />
server also prevents unauthorized access.
256<br />
<strong>Building</strong> <strong>Secure</strong> <strong>ASP</strong>.<strong>NET</strong> <strong>Applications</strong><br />
Solution Implementation<br />
To use certificate authentication at the Web service in this scenario, use a separate<br />
process to call the Web service and pass the certificate. You cannot manipulate the<br />
certificates directly from the <strong>ASP</strong>.<strong>NET</strong> Web application because it does not have a<br />
loaded user profile and associated certificate store. The separate process must be<br />
configured to run using an account that has an associated user profile (and certificate<br />
store). You have two main options:<br />
● You can use an Enterprise Services server application<br />
● You can use a Windows service.<br />
Figure 10.9 illustrates this scenario with an Enterprise Services server application.<br />
Browser Clients<br />
IIS<br />
<strong>ASP</strong>.<strong>NET</strong><br />
Web App<br />
aspnet_wp.exe<br />
2<br />
1<br />
Certificate<br />
(Authentication)<br />
Custom Run<br />
As Identity<br />
(Account has<br />
User Profile)<br />
3<br />
Enterprise<br />
Services<br />
Application<br />
dllhost.exe<br />
5<br />
IIS<br />
Web Server 2<br />
(Web Service Host)<br />
<strong>ASP</strong>.<strong>NET</strong><br />
Web Service<br />
Web Server 1<br />
(Web App Host)<br />
Certificate<br />
Store<br />
4<br />
SSL<br />
(Privacy/<br />
Integrity)<br />
Require Client<br />
Certificates<br />
(Authentication)<br />
Figure 10.9<br />
Client certificate authentication with Web services<br />
The following summarizes the sequence of events illustrated by Figure 10.9:<br />
1. The original caller is authenticated by the Web application using client certificates.<br />
2. The Web application is the gatekeeper and is responsible for authorizing access<br />
to specific areas of functionality (including those that involve interaction with<br />
the Web service).<br />
3. The Web application calls a serviced component running in an out-of-process<br />
Enterprise Services application.
Chapter 10: Web Services Security 257<br />
4. The account used to run the Enterprise Services application has an associated<br />
user profile. The component accesses a client certificate from its certificate store,<br />
which is used by the Web service to authenticate the Web application.<br />
5. The serviced component calls the Web service, passing the client certificate on<br />
each method request. The Web service authenticates the Web application using<br />
this certificate and trusts the Web application to correctly authorize original<br />
callers.<br />
Why Use an Additional Process?<br />
An additional process is required (rather than using the Aspnet_wp.exe Web process<br />
to contact the Web service) due to the fact that a user profile (containing a<br />
certificate store) is required.<br />
A Web application that runs using the <strong>ASP</strong><strong>NET</strong> account does not have access to<br />
any certificates on the Web server. This is because certificate stores are maintained<br />
within user profiles associated with interactive user accounts. User profiles are only<br />
created for interactive accounts when you physically log on using the account. The<br />
<strong>ASP</strong><strong>NET</strong> account is not intended to be an interactive user account and is configured<br />
with the “Deny interactive logon” privilege for added security.<br />
Important: Do not reconfigure the <strong>ASP</strong><strong>NET</strong> account to remove this privilege and turn the<br />
account into an interactive logon account. Use a separate process with a configured service<br />
account to access certificates, as described earlier in this chapter.<br />
More Information<br />
● For more information about how to implement this approach, see “How To: Call<br />
a Web Service Using Client Certificates from <strong>ASP</strong><strong>NET</strong>” in the Reference section<br />
of this guide.<br />
● For more information about configuring IPSec, see “How To: Use IPSec to Provide<br />
<strong>Secure</strong> Communication between Two Servers” in the Reference section of<br />
this guide.<br />
<strong>Secure</strong> Communication<br />
<strong>Secure</strong> communication is concerned with guaranteeing the integrity and confidentiality<br />
of Web service messages as they flow from application to application across<br />
the network. There are two approaches to this problem; transport level options and<br />
message level options.
258<br />
<strong>Building</strong> <strong>Secure</strong> <strong>ASP</strong>.<strong>NET</strong> <strong>Applications</strong><br />
Transport Level Options<br />
Transport level options include:<br />
●<br />
SSL<br />
● IPSec<br />
These options may be appropriate if the following conditions are met:<br />
● You are sending a message directly from your application to a Web service and<br />
the message will not be routed through intermediate systems.<br />
● You can control the configuration of both endpoints involved in the message<br />
transfer.<br />
Message Level Options<br />
Message level approaches can be used to guarantee the confidentiality and integrity<br />
of messages as they pass through an arbitrary number of intermediate systems.<br />
Messages can be signed to provide integrity. For confidentiality, you can choose<br />
between encrypting the entire message or part of a message.<br />
Use a message level approach if the following conditions are met:<br />
● You are sending a message to a Web service and the message is likely to be<br />
forwarded to other Web services or may be routed through intermediate systems.<br />
● You do not control the configuration of both endpoints; for example, because you<br />
are sending messages from one company to another.<br />
More Information<br />
● The Web Service Development Toolkit will provide message encryption<br />
functionality in accordance with the WS-Security specification.<br />
● For more information about SSL and IPSec, see Chapter 4, “<strong>Secure</strong><br />
Communication.”<br />
Summary<br />
This chapter has focused on platform/transport level (point-to-point) Web service<br />
security provided by the underlying services of <strong>ASP</strong>.<strong>NET</strong>, IIS, and the operating<br />
system. While platform level security provides secure solutions for tightly-coupled<br />
intranet scenarios, it is not suited to heterogeneous scenarios. For this, message<br />
level security provided by the GXA WS-Security specification is required. Use the<br />
Web Services Development Kit to build message level Web service security solutions.
Chapter 10: Web Services Security 259<br />
For tightly-coupled Windows domain environments:<br />
●<br />
If you want to flow the original caller’s identity from an <strong>ASP</strong>.<strong>NET</strong> Web application<br />
to a remote Web service, the <strong>ASP</strong>.<strong>NET</strong> Web application should use Kerberos<br />
authentication (with accounts configured for delegation), Basic authentication, or<br />
Forms authentication.<br />
● With Kerberos authentication, enable impersonation with the Web application<br />
and configure the Credentials property of the Web service proxy using<br />
DefaultCredentials.<br />
● With Basic or Forms authentication, capture the caller’s credentials and set<br />
the Credentials property of the Web service proxy by adding a new<br />
CredentialCache object.<br />
For Web-service to Web-service scenarios:<br />
● Use Basic or Kerberos authentication and set credentials in the client proxy.<br />
● Use an out of process Enterprise Services application or a Windows service to<br />
manipulate X.509 certificates from Web applications.<br />
● As far as possible, use system level authorization checks such as File and URL<br />
authorization.<br />
● For granular authorization (for example, at the Web method level) use .<strong>NET</strong> roles<br />
(declaratively and imperatively).<br />
● Authorize non-Windows users by using .<strong>NET</strong> roles (based on a GenericPrincipal<br />
object that contains roles).<br />
● Disable HTTP-GET and HTTP-POST protocols on product servers.<br />
● Use transport level security if you are not worried about passing messages<br />
securely through intermediary systems.<br />
● Use transport level security if SSL performance is acceptable.<br />
● Use WS-Security and the Web Services Development Kit to develop messagelevel<br />
solutions.
11<br />
.<strong>NET</strong> Remoting Security<br />
The .<strong>NET</strong> Framework provides a remoting infrastructure that allows clients to<br />
communicate with objects, hosted in remote application domains and processes, or<br />
on remote computers. This chapter shows you how to implement secure .<strong>NET</strong><br />
Remoting solutions.<br />
.<strong>NET</strong> Remoting Architecture<br />
Figure 11.1 on the next page shows the basic .<strong>NET</strong> Remoting architecture when a<br />
remote object is hosted within <strong>ASP</strong>.<strong>NET</strong>. An <strong>ASP</strong>.<strong>NET</strong> host, coupled with the HTTP<br />
channel for communication, is the recommended approach if security is the key<br />
concern, because it allows the remote object to utilize the underlying security<br />
services provided by <strong>ASP</strong>.<strong>NET</strong> and IIS.<br />
For more information about the range of possible host and channel types, together<br />
with comparison information, see “Choosing a Host Process” later in this chapter.
262<br />
<strong>Building</strong> <strong>Secure</strong> <strong>ASP</strong>.<strong>NET</strong> <strong>Applications</strong><br />
Client<br />
Proxy<br />
Host Process<br />
Object<br />
Formatter Sink<br />
Formatter Sink<br />
Custom Sink<br />
Custom Sink<br />
Sink<br />
Sink<br />
Transport Sink<br />
Channel<br />
Channel<br />
Transport Sink<br />
Channel<br />
Figure 11.1<br />
The .<strong>NET</strong> remoting architecture<br />
The client communicates with an in-process proxy object. Credentials for authentication<br />
(for example, user names, passwords, certificates, and so on) can be set<br />
through the remote object proxy. The method call proceeds through a chain of sinks<br />
(you can implement your own custom sinks, for example, to perform data encryption)<br />
and onto a transport sink that is responsible for sending the data across the<br />
network. At the server side, the call passes through the same pipeline after which<br />
the call is dispatched to the object.<br />
Note: The term proxy used throughout this chapter refers to the client-side, in-process proxy<br />
object through which clients communicate with the remote object. Do not confuse this with the<br />
term proxy server.<br />
Remoting Sinks<br />
.<strong>NET</strong> Remoting uses transport channels sinks, custom channel sinks, and formatter<br />
channel sinks when a client invokes a method call on a remote object.<br />
Transport Channel Sinks<br />
Transport channel sinks pass method calls across the network between the client<br />
and the server. .<strong>NET</strong> supplies the HttpChannel and the TcpChannel classes,<br />
although the architecture is fully extensible and you can plug in your own custom<br />
implementations.
Chapter 11: .<strong>NET</strong> Remoting Security 263<br />
●<br />
●<br />
●<br />
HttpChannel. This channel is designed to be used when you host a remote object<br />
in <strong>ASP</strong>.<strong>NET</strong>. This channel uses the HTTP protocol to send messages between the<br />
client and the server.<br />
TcpChannel. This channel is designed to be used when you host a remote object<br />
in a Microsoft® Windows® operating system service or other executable. This<br />
channel uses TCP sockets to send messages between the client and the server.<br />
Custom channels. A custom transport channel can use any underlying transport<br />
protocol to send messages between the client and server. For example, a custom<br />
channel may use named pipes or mail slots.<br />
Comparing Transport Channel Sinks<br />
The following table provides a comparison of the two main transport channel sinks.<br />
Table 11.1: Comparison of TcpChannel and HttpChannel<br />
Feature TCP Channel HTTP Channel Comments<br />
Authentication No Yes The HTTP channel uses the authentication<br />
features provided by IIS and <strong>ASP</strong>.<strong>NET</strong>,<br />
although Passport and Forms authentication<br />
is not supported.<br />
Authorization No Yes The HTTP channel supports the authorization<br />
features provided by IIS and<br />
<strong>ASP</strong>.<strong>NET</strong>. These include NTFS<br />
permissions, URL authorization and File<br />
authorization.<br />
<strong>Secure</strong> Yes Yes Use IPSec with the TCP channel. Use<br />
Communication<br />
SSL and/or IPSec with the HTTP channel.<br />
Custom Sinks<br />
Custom channels sinks can be used at different locations within the channel sink<br />
pipeline to modify the messages sent between the client and the server. A channel<br />
sink that provides encryption and decryption is an example of a custom channel sink.<br />
Formatter Sinks<br />
Formatter sinks take method calls and serialize them into a stream capable of being<br />
sent across the network. .<strong>NET</strong> supplies two formatter sinks:<br />
● Binary Formatter. This uses the BinaryFormatter class to package method calls<br />
into a serialized binary stream, which is subsequently posted (using an HTTP<br />
POST) to send the data to the server. The binary formatter sets the content-type<br />
in the HTTP request to “application/octet-stream.”
264<br />
<strong>Building</strong> <strong>Secure</strong> <strong>ASP</strong>.<strong>NET</strong> <strong>Applications</strong><br />
●<br />
The binary formatter offers superior performance in comparison to the SOAP<br />
formatter.<br />
SOAP Formatter. This uses the SoapFormatter class to package method calls into<br />
a SOAP message. The content type is set to “text/xml” in the HTTP request and<br />
is posted to the server with an HTTP POST.<br />
Anatomy of a Request When Hosting in <strong>ASP</strong>.<strong>NET</strong><br />
Remote object endpoints are addressed by URLs that end with the .rem or .soap file<br />
name extension, for example http://someserver/vDir/remoteobject.soap. When a<br />
request for a remote object (with the extension .rem or .soap), is received by IIS, it is<br />
mapped (within IIS) to the <strong>ASP</strong>.<strong>NET</strong> ISAPI extension (Aspnet_isapi.dll). The ISAPI<br />
extension forwards the request to an application domain within the <strong>ASP</strong>.<strong>NET</strong><br />
worker process (Aspnet_wp.exe). The sequence of events is shown in Figure 11.2.<br />
Firewall<br />
HTTP<br />
Request<br />
(.rem/ .soap)<br />
1<br />
IIS<br />
(inetinfo.exe)<br />
2<br />
ISAPI<br />
Mapping<br />
aspnet_isapi.dll<br />
3<br />
<strong>ASP</strong>.<strong>NET</strong><br />
(aspnet_wp.exe)<br />
App Domain<br />
System.Runtime<br />
.Remoting<br />
6<br />
5<br />
4<br />
Object<br />
Web Server<br />
Web.config<br />
Figure 11.2<br />
Server-side processing<br />
Figure 11.2 shows the following sequence of events:<br />
1. A .soap or .rem request is received over HTTP and is mapped to a specific virtual<br />
directory on the Web server.<br />
2. IIS checks the .soap/.rem mapping and maps the file extension to the <strong>ASP</strong>.<strong>NET</strong><br />
ISAPI extension, Aspnet_isapi.dll.<br />
3. The ISAPI extension transfers the request to an application domain inside the<br />
<strong>ASP</strong>.<strong>NET</strong> worker process (Aspnet_wp.exe). If this is the first request directed at<br />
this application, a new application domain is created.
Chapter 11: .<strong>NET</strong> Remoting Security 265<br />
4. The HttpRemotingHandlerFactory handler is invoked and the remoting infrastructure<br />
reads the section in the Web.config that<br />
controls the server-side object configuration (for example, single-call or singleton<br />
parameters) and authorization parameters (from the element).<br />
5. The remoting infrastructure locates the assembly that contains the remote object<br />
and instantiates it.<br />
6. The remoting infrastructure reads the HTTP headers and the data stream, and<br />
then invokes the method on the remote object.<br />
Note: During this process, <strong>ASP</strong>.<strong>NET</strong> calls the normal sequence of event handlers. You can<br />
optionally implement one or more of these in Global.asax. For example, BeginRequest,<br />
AuthenticationRequest, AuthorizeRequest, and so on. By the time the request reaches the<br />
remote object method, the IPrincipal object that represents the authenticated user is<br />
stored in HttpContext.User (and Thread.CurrentPrincipal) and is available for authorization.<br />
For example, by using principal permission demands and programmatic role checks.<br />
<strong>ASP</strong>.<strong>NET</strong> and the HTTP Channel<br />
Remoting does not have its own security model. Authentication and authorization<br />
between the client (proxy) and server (remote object) is performed by the channel<br />
and host process. You can use the following combination of hosts and channels:<br />
● A custom executable and the TCP Channel. This combination does not provide<br />
any inbuilt security features.<br />
● <strong>ASP</strong>.<strong>NET</strong> and the HTTP Channel. This combination provides authentication<br />
and authorization through the underlying <strong>ASP</strong>.<strong>NET</strong> and IIS security features.<br />
Objects hosted within <strong>ASP</strong>.<strong>NET</strong> benefit from the underlying security features of<br />
<strong>ASP</strong>.<strong>NET</strong> and IIS. These include:<br />
● Authentication Features. Windows authentication is configured within<br />
Web.config:<br />
<br />
The settings in IIS control what type of HTTP authentication is used.<br />
Common HTTP headers are used to authenticate requests. You can supply<br />
credentials for the client by configuring the remote object proxy or you can use<br />
default credentials.<br />
You cannot use Forms or Passport authentication because the channel does not<br />
provide a way to allow the client to access cookies, which is a requirement for<br />
both of these authentication mechanisms. Also, Forms and Passport require a<br />
redirect to a logon page that requires client interaction. Remote, server side<br />
objects are designed for non-interactive use.
266<br />
<strong>Building</strong> <strong>Secure</strong> <strong>ASP</strong>.<strong>NET</strong> <strong>Applications</strong><br />
●<br />
●<br />
Authorization Features. Clients are authorized using standard <strong>ASP</strong>.<strong>NET</strong> authorization<br />
techniques.<br />
Configurable authorization options include:<br />
● URL authorization.<br />
● File authorization (this requires specific configuration, as described in<br />
Using File Authorization later in this chapter).<br />
Programmatic authorization options include:<br />
● Principal permission demands (declarative and imperative).<br />
●<br />
Explicit role checks using IPrincipal.IsInRole.<br />
<strong>Secure</strong> Communication Features. SSL (and/or IPSec) should be used to secure<br />
the transport of data between the client and server.<br />
More Information<br />
● For more information about the authentication and authorization features<br />
provided by <strong>ASP</strong>.<strong>NET</strong> and IIS, see Chapter 8, “<strong>ASP</strong>.<strong>NET</strong> Security.”<br />
● For information about how to host an object in <strong>ASP</strong>.<strong>NET</strong>/IIS, see article Q312107,<br />
“HOW TO: Host a Remote Object in Microsoft Internet Information Services,” in<br />
the Microsoft Knowledge Base.<br />
.<strong>NET</strong> Remoting Gatekeepers<br />
The authorization points (or gatekeepers) available to a remote object hosted by<br />
<strong>ASP</strong>.<strong>NET</strong> are:<br />
● IIS. With anonymous authentication turned off, IIS only permits requests from<br />
users that it can authenticate either in its domain or in a trusted domain. IIS also<br />
provides IP address and DNS filtering.<br />
● <strong>ASP</strong>.<strong>NET</strong><br />
● UrlAuthorizationModule. You can configure elements<br />
within your application’s Web.config to control which users and groups of<br />
users should have access to the application. Authorization is based on the<br />
IPrincipal object stored in HttpContext.User.<br />
●<br />
FileAuthorizationModule. The FileAuthorizationModule is available to<br />
remote components, although this requires specific configuration, as described<br />
in “Using File Authorization” later in this chapter.<br />
Note: Impersonation is not required for File authorization to work.
Chapter 11: .<strong>NET</strong> Remoting Security 267<br />
●<br />
The FileAuthorizationModule class only performs access checks against the<br />
requested file or URI (for example .rem and .soap), and not for files accessed<br />
by code within the remote object.<br />
Principal Permission Demands and Explicit Role Checks. In addition to the IIS<br />
and <strong>ASP</strong>.<strong>NET</strong> configurable gatekeepers, you can also use principal permission<br />
demands (declaratively or imperatively) as an additional fine-grained access<br />
control mechanism. Principal permission checks allow you to control access to<br />
classes, methods, or individual code blocks based on the identity and group<br />
membership of individual users, as defined by the IPrincipal object attached to<br />
the current thread.<br />
Note: Principal permission checks used to demand role membership are different from<br />
calling IPrincipal.IsInRole to test role membership. The former results in an exception if<br />
the caller is not a member of the specified role, while the latter simply returns a Boolean<br />
value to confirm role membership.<br />
With Windows authentication, <strong>ASP</strong>.<strong>NET</strong> automatically attaches a<br />
WindowsPrincipal object that represents the authenticated user to the current<br />
Web request (using HttpContext.User).<br />
Authentication<br />
When you use remoting in conjunction with an <strong>ASP</strong>.<strong>NET</strong> Web application client,<br />
authentication occurs within the Web application and at the remote object host.<br />
The available authentication options for the remote object host depend on the type<br />
of host.<br />
Hosting in <strong>ASP</strong>.<strong>NET</strong><br />
When objects are hosted in <strong>ASP</strong>.<strong>NET</strong> the HTTP channel is used to communicate<br />
method calls between the client-side proxy and the server. The HTTP channel uses<br />
the HTTP protocol to authenticate the remote object proxy to the server.<br />
The following list shows the range of authentication options available when you<br />
host inside <strong>ASP</strong>.<strong>NET</strong>:<br />
● IIS Authentication Options. Anonymous, Basic, Digest, Windows Integrated<br />
and Certificate.<br />
● <strong>ASP</strong>.<strong>NET</strong> Authentication Options. Windows authentication or None (for custom<br />
authentication implementations).
268<br />
<strong>Building</strong> <strong>Secure</strong> <strong>ASP</strong>.<strong>NET</strong> <strong>Applications</strong><br />
Note: Forms and Passport authentication cannot be used directly by .<strong>NET</strong> Remoting. Calls<br />
to remote objects are designed to be non-interactive. If the client of the remote object is a<br />
.<strong>NET</strong> Web application, the Web application can use Forms and Passport authentication and<br />
pass credentials explicitly to the remote object. This type of scenario is discussed further<br />
in the “Flowing the Original Caller” section later in this chapter.<br />
Hosting in a Windows Service<br />
When objects are hosted in a Windows service, the TCP channel is used to communicate<br />
method calls between the client and server. This uses raw socket-based<br />
communications. Because there is no authentication provided with sockets, there<br />
is no way for the server to authenticate the client.<br />
In this scenario, the remote object must use custom authentication.<br />
Custom Authentication<br />
For simple custom authentication, the remote object can expose a Login method<br />
which accepts a user name and password. The credentials can be validated against<br />
a store, a list of roles retrieved, and a token sent back to the client to use on subsequent<br />
requests. When the token is retrieved at the server it is used to create an<br />
IPrincipal object (with roles) which is stored in Thread.CurrentPrincipal, where it<br />
is used for authorization purposes.<br />
Other examples of custom authentication include creating a custom transport<br />
channel sink that uses an inter-process communication channel that provides<br />
authentication, such as named pipes, or creating a channel sink that performs<br />
authentication using the Windows Security Service Provider Interface (SSPI).<br />
More Information<br />
● For information about how to host an object in a Windows service, see “How To:<br />
Host a Remote Object in a Windows Service” in the Reference section of this<br />
guide.<br />
● For more information about sinks and sink chains, search for see the section of<br />
the .<strong>NET</strong> Framework on “Sinks and Sink Chains” in the MSDN Library.<br />
●<br />
For more information about how to create a custom authentication solution that<br />
uses SSPI, see the MSDN article “.<strong>NET</strong> Remoting Security Solution, Part 1:<br />
Microsoft.Samples.Security.SSPI Assembly” at http://msdn.microsoft.com/library<br />
/en-us/dndotnet/html/remsspi.asp.<br />
Note: The implementation in this article is a sample and not a product tested and supported<br />
by Microsoft.
Chapter 11: .<strong>NET</strong> Remoting Security 269<br />
Authorization<br />
When objects are hosted by <strong>ASP</strong>.<strong>NET</strong> and the HTTP channel is used for communication,<br />
the client can be authenticated and authorization can be controlled by the<br />
following mechanisms:<br />
● URL authorization<br />
● File authorization<br />
● Principal permission demands (declarative and imperative)<br />
● IPrincipal.IsInRole checks in code<br />
When objects are hosted in a Windows service, there is no authentication provided<br />
by the TCP channel. As a result, you must perform custom authentication and then<br />
perform authorization by creating an IPrincipal object and storing it in<br />
Thread.CurrentPrincipal.<br />
You can then annotate your remote object’s methods with declarative principal<br />
permission demand checks, like the one shown below.<br />
[PrincipalPermission(SecurityAction.Demand,<br />
Role="Manager")]<br />
void SomeMethod()<br />
{<br />
}<br />
Within your object’s method code, imperative principal permission demands and<br />
explicit role checks using IPrincipal.IsInRole can also be used.<br />
Using File Authorization<br />
You may want to use built-in Windows access control to secure the remote object as<br />
a securable Windows resource. Without File authorization (using Windows ACLs),<br />
you only have URL authorization.<br />
To use the FileAuthorizationModule to authorize access to remote object endpoints<br />
(identified with .rem or .soap URLs), you must create a physical file with the .rem<br />
or .soap extension within your application’s virtual directory.<br />
Note: The .rem and .soap extensions are used by IIS to map requests for object endpoints to<br />
the <strong>ASP</strong>.<strong>NET</strong> ISAPI extension (aspnet_isapi.dll). They do not usually exist as physical files.<br />
<br />
To configure File authorization for .<strong>NET</strong> Remoting<br />
1. Create a file with the same name as the objectUri (for example,<br />
RemoteMath.rem) in the root of the application’s virtual directory.
270<br />
<strong>Building</strong> <strong>Secure</strong> <strong>ASP</strong>.<strong>NET</strong> <strong>Applications</strong><br />
2. Add the following line to the top of the file and save the file.<br />
<br />
3. Add an appropriately configured ACL to the file using Windows Explorer.<br />
Note: You can obtain the objectUri from the web.config file used to configure the remote<br />
object on the server. Look for the element, as shown in the following<br />
example.<br />
<br />
More Information<br />
● For more information about these authorization mechanisms, see Chapter 8,<br />
“<strong>ASP</strong>.<strong>NET</strong> Security.”<br />
● For more information about principal permission demands, see Chapter 8,<br />
“<strong>ASP</strong>.<strong>NET</strong> Security.”<br />
Authentication and Authorization Strategies<br />
In many applications that use .<strong>NET</strong> Remoting, the remote objects are used to provide<br />
business functionality within the application’s middle tier and this functionality<br />
is called by <strong>ASP</strong>.<strong>NET</strong> Web applications. This arrangement is shown in Figure 11.3.<br />
Web Server<br />
Application Server<br />
Database<br />
Server<br />
<strong>ASP</strong>.<strong>NET</strong><br />
IIS<br />
<strong>ASP</strong>.<strong>NET</strong><br />
IIS<br />
SQL<br />
Server<br />
.<strong>NET</strong> Remoting<br />
Figure 11.3<br />
Remote objects called by an <strong>ASP</strong>.<strong>NET</strong> Web application<br />
In this scenario, the IIS and <strong>ASP</strong>.<strong>NET</strong> gatekeepers available to the Web application<br />
can be used to secure access to the client-side proxy, and the IIS and <strong>ASP</strong>.<strong>NET</strong><br />
gatekeepers available to the <strong>ASP</strong>.<strong>NET</strong> host on the remote application server are<br />
available to secure access to the remote object.
Chapter 11: .<strong>NET</strong> Remoting Security 271<br />
There are essentially two authentication and authorization strategies for remote<br />
objects that are accessed by .<strong>NET</strong> Web applications.<br />
● You can authenticate and authorize callers at the Web server and then flow the<br />
caller’s security context to the remote object by using impersonation. This is the<br />
impersonation/delegation model.<br />
With this approach you use an IIS authentication mechanism that allows you to<br />
delegate the caller’s security context, such as Kerberos, Basic, or Forms authentication<br />
(the latter two allow the Web application to access the caller’s credentials)<br />
and explicitly flow credentials to the remote object using the remote object’s<br />
proxy.<br />
The <strong>ASP</strong>.<strong>NET</strong> configurable and programmatic gatekeepers (including URL<br />
authorization, File authorization, principal permission demands, and .<strong>NET</strong> roles)<br />
are available to authorize individual callers within the remote object.<br />
● You can authenticate and authorize callers at the Web server and then use a<br />
trusted identity to communicate with the remote object. This is the trusted<br />
subsystem model.<br />
This model relies on the Web application to authenticate and properly authorize<br />
callers before invoking the remote object. Any requests received by the remote<br />
object from the trusted identity projected from the Web application are allowed<br />
to proceed.<br />
More Information<br />
●<br />
●<br />
●<br />
For more information about the impersonation/delegation and trusted subsystem<br />
models, see “Resource Access Models” in Chapter 3, “Authentication and<br />
Authorization.”<br />
For more information about using the original caller model with remoting, see<br />
“Flowing the Original Caller” later in this chapter.<br />
For more information about using the trusted subsystem model with remoting,<br />
see “Trusted Subsystem” later in this chapter.<br />
Accessing System Resources<br />
For details about accessing system resources (for example, the event log and the<br />
registry) from a remote object hosted by <strong>ASP</strong>.<strong>NET</strong>, see “Accessing System Resources”<br />
in Chapter 8, “<strong>ASP</strong>.<strong>NET</strong> Security.” The approaches and restrictions discussed<br />
in Chapter 8 also apply to remote objects hosted by <strong>ASP</strong>.<strong>NET</strong>.
272<br />
<strong>Building</strong> <strong>Secure</strong> <strong>ASP</strong>.<strong>NET</strong> <strong>Applications</strong><br />
Accessing Network Resources<br />
When you access network resources from a remote object, you need to consider the<br />
identity that is used to respond to network authentication challenges from the<br />
remote computer. You have three options:<br />
● The Process Identity (this is the default). If you host within <strong>ASP</strong>.<strong>NET</strong>, the<br />
identity used to run the <strong>ASP</strong>.<strong>NET</strong> worker process and defined by the<br />
element in Machine.config determines the security context<br />
used for resource access.<br />
If you host within a Windows service, the identity used to run the service process<br />
(configured with the Services MMC snap-in) determines the security context<br />
used for resource access.<br />
● A Fixed Service Identity. For example, one created by calling LogonUser.<br />
Note: Don’t confuse this service identity with the identity used to run a Windows service. A<br />
fixed service identity refers to a Windows user account created specifically for the purposes<br />
of accessing resources from an application.<br />
●<br />
The Original Caller Identity. With <strong>ASP</strong>.<strong>NET</strong> configured for impersonation, or<br />
programmatic impersonation used within a Windows service.<br />
For details about the relative merits of each of these approaches, together with<br />
configuration details, see “Accessing Network Resources” in Chapter 8, “<strong>ASP</strong>.<strong>NET</strong><br />
Security.”<br />
Passing Credentials for Authentication to Remote Objects<br />
When a client process calls a remote object, it does so by using a proxy. This is a<br />
local object that exposes the same set of methods as the target object.<br />
Specifying Client Credentials<br />
If the remote object is hosted within <strong>ASP</strong>.<strong>NET</strong> and is configured for Windows<br />
authentication, you must specify the credentials to be used for authentication using<br />
the credentials property of the channel. If you do not explicitly set credentials, the<br />
remote object is called without any credentials. If Windows authentication is required,<br />
this will result in an HTTP status 401, which is an access denied response.<br />
Using DefaultCredentials<br />
If you want to use the credentials of the process that hosts the remote object proxy<br />
(or the current thread token, if the thread that calls the proxy is impersonating), you<br />
should set the credentials property of the channel to the DefaultCredentials maintained<br />
by the process credential cache.
Chapter 11: .<strong>NET</strong> Remoting Security 273<br />
You can either specify the use of DefaultCredentials in a configuration file or set<br />
the credentials programmatically.<br />
Explicit Configuration<br />
Within the client application configuration file (Web.config, if the client application<br />
is an <strong>ASP</strong>.<strong>NET</strong> Web application) set the useDefaultCredentials attribute on the<br />
element to true in order to specify that the proxy should use<br />
DefaultCredentials when it communicates with the remote object.<br />
<br />
Programmatic Configuration<br />
For programmatic configuration, use the following code to establish the use of<br />
DefaultCredentials programmatically.<br />
IDictionary channelProperties;<br />
channelProperties = ChannelServices.GetChannelSinkProperties(proxy);<br />
channelProperties ["credentials"] = CredentialCache.DefaultCredentials;<br />
Using Specific Credentials<br />
To use a specific set of credentials for authentication when you call a remote object,<br />
disable the use of default credentials within the configuration file, by using the<br />
following setting.<br />
<br />
Note: Programmatic settings always override the settings in the configuration file.<br />
Then, use the following code to configure the proxy to use specific credentials.<br />
IDictionary channelProperties =<br />
ChannelServices.GetChannelSinkProperties(proxy);<br />
NetworkCredential credentials;<br />
credentials = new NetworkCredential("username", "password", "domain");<br />
ObjRef objectReference = RemotingServices.Marshal(proxy);<br />
Uri objectUri = new Uri(objectReference.URI);<br />
CredentialCache credCache = new CredentialCache();<br />
// Substitute "authenticationType" with "Negotiate", "Basic", "Digest",<br />
// "Kerberos" or "NTLM"<br />
credCache.Add(objectUri, "authenticationType", credentials);<br />
channelProperties["credentials"] = credCache;<br />
channelProperties["preauthenticate"] = true;
274<br />
<strong>Building</strong> <strong>Secure</strong> <strong>ASP</strong>.<strong>NET</strong> <strong>Applications</strong><br />
Always Request a Specific Authentication Type<br />
You should always request a specific authentication type by using the<br />
CredentialCache.Add method, as illustrated above. Avoid direct use of the<br />
NetworkCredential class as shown in the following code.<br />
IDictionary providerData = ChannelServices.GetChannelSinkProperties(yourProxy);<br />
providerData["credentials"] = new NetworkCredential(uid, pwd);<br />
This should be avoided in production code because you have no control over the<br />
authentication mechanism used by the remote object host and as a result you have<br />
no control over how the credentials are used.<br />
For example, you may expect a Kerberos or NTLM authentication challenge from<br />
the server but instead you may receive a Basic challenge. In this case, the supplied<br />
user name and password will be sent to the server in clear text form.<br />
Set the preauthenticate Property<br />
The proxy’s preauthenticate property can be set to true or false. Set it to true (as<br />
shown in the above code) to supply specific authentication credentials to cause a<br />
WWW-Authenticate HTTP header to be passed with the initial request. This stops<br />
the Web server denying access on the initial request, and performing authentication<br />
on the subsequent request.<br />
Using the connectiongroupname Property<br />
If you have an <strong>ASP</strong>.<strong>NET</strong> Web application that connects to a remote component<br />
(hosted by <strong>ASP</strong>.<strong>NET</strong>) and flows the security context of the original caller (by using<br />
DefaultCredentials and impersonation or by setting explicit credentials, as shown<br />
above), you should set the connectiongroupname property of the channel within<br />
the Web application. This is to prevent a new, unauthenticated client from reusing<br />
an old, authenticated connection to the remote component that is associated with a<br />
previous client’s authentication credentials. Connection reuse can occur as a result<br />
of HTTP KeepAlives and authentication persistence which is enabled for performance<br />
reasons within IIS.<br />
Set the connectiongroupname property to an identifier (such as the caller’s user<br />
name) that distinguishes one caller from the next.<br />
channelProperties["connectiongroupname"] = userName;
Chapter 11: .<strong>NET</strong> Remoting Security 275<br />
Note: You do not need to set the connectiongroupname property if the original caller’s security<br />
context does not flow through the Web application and onto the remote component but<br />
connects to the remote component using a fixed identity (such as the Web application’s<br />
<strong>ASP</strong>.<strong>NET</strong> process identity),. In this scenario, the connection security context remains constant<br />
from one caller to the next.<br />
The next version of the .<strong>NET</strong> Framework will support connection pooling based on the SID of<br />
the thread that calls the proxy object, which will help to address the problem described above,<br />
if the Web application is impersonating the caller. Pooling will be supported for .<strong>NET</strong> Remoting<br />
clients and not for Web services clients.<br />
Flowing the Original Caller<br />
This section describes how you can flow the original caller’s security context<br />
through an <strong>ASP</strong>.<strong>NET</strong> Web application and onto a remote component hosted by<br />
<strong>ASP</strong>.<strong>NET</strong> on a remote application server. You may need to do this in order to support<br />
per-user authorization within the remote object or within subsequent downstream<br />
subsystems (for example databases).<br />
In Figure 11.4, the security context of the original caller (Bob) flows through the<br />
front-end Web server that hosts an <strong>ASP</strong>.<strong>NET</strong> Web application, onto the remote<br />
object, hosted by <strong>ASP</strong>.<strong>NET</strong> on a remote application server, and finally through<br />
to a back-end database server.<br />
Web Server<br />
Application Server<br />
Database Server<br />
Bob<br />
IIS<br />
<strong>ASP</strong>.<strong>NET</strong><br />
(Web<br />
Application)<br />
Bob<br />
IIS<br />
<strong>ASP</strong>.<strong>NET</strong><br />
(Remote<br />
Object)<br />
Bob<br />
SQL<br />
Server<br />
Figure 11.4<br />
Flowing the original caller’s security context<br />
In order to flow credentials to a remote object, the remote object client (the <strong>ASP</strong>.<strong>NET</strong><br />
Web application in this scenario) must configure the object’s proxy and explicitly set<br />
the proxy’s credentials property, as described in “Passing Credentials for Authentication<br />
to Remote Objects” earlier in this chapter.<br />
Note: IPrincipal objects do not flow across .<strong>NET</strong> Remoting boundaries.
276<br />
<strong>Building</strong> <strong>Secure</strong> <strong>ASP</strong>.<strong>NET</strong> <strong>Applications</strong><br />
There are two ways to flow the caller’s context:<br />
●<br />
●<br />
Pass default credentials and use Kerberos authentication (and delegation).<br />
This approach requires that you impersonate within the <strong>ASP</strong>.<strong>NET</strong> Web application<br />
and configure the remote object proxy with DefaultCredentials obtained<br />
from the impersonated caller’s security context.<br />
Pass explicit credentials and use Basic or Forms authentication. This approach<br />
does not require impersonation within the <strong>ASP</strong>.<strong>NET</strong> Web application. Instead,<br />
you programmatically configure the remote object proxy with explicit credentials<br />
obtained from either, server variables (with Basic authentication), or HTML form<br />
fields (with Forms authentication) that are available to the Web application. With<br />
Basic or Forms authentication, the username and password are available to the<br />
server in clear text.<br />
Default Credentials with Kerberos Delegation<br />
To use Kerberos delegation, all computers (servers and clients) must be running<br />
Windows 2000 or later. Additionally, client accounts that are to be delegated must<br />
be stored in Active <strong>Directory</strong> directory service and must not be marked as “Sensitive<br />
and cannot be delegated.”<br />
The following tables show the configuration steps required on the Web server and<br />
application server.<br />
Configuring the Web Server<br />
Configure IIS<br />
Step<br />
More Information<br />
Disable Anonymous access<br />
for your Web application’s<br />
virtual root directory<br />
Enable Windows Integrated<br />
Authentication for the Web<br />
application’s virtual root<br />
Kerberos authentication will be negotiated assuming clients and<br />
server are running Windows 2000 or above.<br />
Note: If you are using Microsoft Internet Explorer 6 on Windows<br />
2000, it defaults to NTLM authentication instead of the required<br />
Kerberos authentication. To enable Kerberos delegation, see<br />
article Q299838, “Unable to Negotiate Kerberos Authentication<br />
after upgrading to Internet Explorer 6,” in the Microsoft Knowledge<br />
Base.
Chapter 11: .<strong>NET</strong> Remoting Security 277<br />
Configure <strong>ASP</strong>.<strong>NET</strong><br />
Step<br />
Configure your <strong>ASP</strong>.<strong>NET</strong> Web<br />
application to use Windows<br />
authentication<br />
Configure your <strong>ASP</strong>.<strong>NET</strong> Web<br />
application for impersonation<br />
More Information<br />
Edit Web.config in your Web application’s virtual directory.<br />
Set the element to:<br />
<br />
Edit Web.config in your Web application’s virtual directory.<br />
Set the element to:<br />
<br />
Configure Remoting (Client Side Proxy)<br />
Step<br />
More Information<br />
Configure the remote object Add the following entry to Web.config:<br />
proxy to use default<br />
credentials for all calls to <br />
Credentials will be obtained from the Web application’s thread<br />
impersonation token.<br />
Configuring the Remote Application Server<br />
Configure IIS<br />
Step<br />
Disable Anonymous access<br />
for your Web application’s<br />
virtual root directory<br />
Enable Windows Integrated<br />
Authentication for the Web<br />
application’s virtual root<br />
More Information
278<br />
<strong>Building</strong> <strong>Secure</strong> <strong>ASP</strong>.<strong>NET</strong> <strong>Applications</strong><br />
Configure <strong>ASP</strong>.<strong>NET</strong> (Remote Object Host)<br />
Step<br />
More Information<br />
Configure <strong>ASP</strong>.<strong>NET</strong> to use Edit Web.config in the application’s virtual directory.<br />
Windows authentication Set the element to:<br />
<br />
Configure <strong>ASP</strong>.<strong>NET</strong> for<br />
impersonation<br />
Edit Web.config in the application’s virtual directory.<br />
Set the element to:<br />
<br />
Note: This step is only required if you want to flow the original<br />
caller’s security context through the remote object and onto the<br />
next, downstream subsystem (for example, database). With<br />
impersonation enabled here, resource access (local and remote)<br />
uses the impersonated original caller’s security context.<br />
If your requirement is simply to allow per-user authorization<br />
checks in the remote object, you do not need to impersonate<br />
here.<br />
More Information<br />
For more information about Kerberos delegation, see “How To: Implement<br />
Kerberos Delegation for Windows 2000” in the Reference section of this guide.<br />
Explicit Credentials with Basic or Forms Authentication<br />
As an alternative to Kerberos delegation, you can use Basic or Forms authentication<br />
at the Web application to capture the client’s credentials and then use Basic (or<br />
Integrated Windows) authentication to the remote object.<br />
With this approach, the client’s clear text credentials are available to the Web application.<br />
These can be passed to the remote object through the remote object proxy.<br />
For this, you must include code in the Web application to retrieve the client’s<br />
credentials and configure the remote object proxy.<br />
Basic Authentication<br />
With Basic authentication, the original caller’s credentials are available to the Web<br />
application in server variables. The following code shows how to retrieve them and<br />
configure the remote object proxy.<br />
// Retrieve client's credentials (available with Basic authentication)<br />
string pwd = Request.ServerVariables["AUTH_PASSWORD"];<br />
string uid = Request.ServerVariables["AUTH_USER"];<br />
// Associate the credentials with the remote object proxy<br />
IDictionary channelProperties =
Chapter 11: .<strong>NET</strong> Remoting Security 279<br />
ChannelServices.GetChannelSinkProperties(proxy);<br />
NetworkCredential credentials;<br />
credentials = new NetworkCredential(uid, pwd);<br />
ObjRef objectReference = RemotingServices.Marshal(proxy);<br />
Uri objectUri = new Uri(objectReference.URI);<br />
CredentialCache credCache = new CredentialCache();<br />
credCache.Add(objectUri, "Basic", credentials);<br />
channelProperties["credentials"] = credCache;<br />
channelProperties["preauthenticate"] = true;<br />
Note: The NetworkCredential constructor shown in the above code is supplied with the user<br />
ID and password. To avoid hard coding the domain name, a default domain can be configured<br />
at the Web server within IIS when you configure Basic authentication.<br />
Forms Authentication<br />
With Forms authentication, the original caller’s credentials are available to the Web<br />
application in form fields (rather than server variables). In this case, use the following<br />
code.<br />
// Retrieve client's credentials from the logon form<br />
string pwd = txtPassword.Text;<br />
string uid = txtUid.Text;<br />
// Associate the credentials with the remote object proxy<br />
IDictionary channelProperties =<br />
ChannelServices.GetChannelSinkProperties(proxy);<br />
NetworkCredential credentials;<br />
credentials = new NetworkCredential(uid, pwd);<br />
ObjRef objectReference = RemotingServices.Marshal(proxy);<br />
Uri objectUri = new Uri(objectReference.URI);<br />
CredentialCache credCache = new CredentialCache();<br />
credCache.Add(objectUri, "Basic", credentials);<br />
channelProperties["credentials"] = credCache;<br />
channelProperties["preauthenticate"] = true;<br />
The following tables show the configuration steps required on the Web server and<br />
application server.
280<br />
<strong>Building</strong> <strong>Secure</strong> <strong>ASP</strong>.<strong>NET</strong> <strong>Applications</strong><br />
Configuring the Web Server<br />
Configure IIS<br />
Step<br />
To use Basic authentication,<br />
disable Anonymous access<br />
for your Web application’s<br />
virtual root directory and<br />
select Basic authentication<br />
- or -<br />
More Information<br />
Both Basic and Forms authentication should be used in<br />
conjunction with SSL to protect the clear text credentials sent<br />
over the network. If you use Basic authentication, SSL should be<br />
used for all pages (not just the initial logon page) because Basic<br />
credentials are transmitted with every request.<br />
To use Forms authentication,<br />
enable anonymous access<br />
Similarly, SSL should be used for all pages if you use Forms<br />
authentication to protect the clear text credentials on the initial<br />
logon and to protect the authentication ticket passed on<br />
subsequent requests.<br />
Configure <strong>ASP</strong>.<strong>NET</strong><br />
Step<br />
If you use Basic authentica-<br />
More Information<br />
Edit Web.config in your Web application’s virtual directory.<br />
Set the element to:<br />
tion, configure your <strong>ASP</strong>.<strong>NET</strong><br />
Web application to use<br />
Windows authentication <br />
- or - - or -<br />
If you use Forms authenti- Edit Web.config in your Web application’s virtual directory.<br />
cation, configure your<br />
Set the element to:<br />
<strong>ASP</strong>.<strong>NET</strong> Web application to<br />
use Forms authentication <br />
Disable impersonation within<br />
the <strong>ASP</strong>.<strong>NET</strong> Web application<br />
Edit Web.config in your Web application’s virtual directory.<br />
Set the element to:<br />
<br />
Note: This is equivalent to having no element.<br />
Impersonation is not required because the user’s credentials will<br />
be passed explicitly to the remote object through the remote<br />
object proxy.
Chapter 11: .<strong>NET</strong> Remoting Security 281<br />
Configure Remoting<br />
(Client Side Proxy)<br />
Step<br />
More Information<br />
Configure the remoting proxy Add the following entry to Web.config:<br />
to not use default credentials<br />
for all calls to the remote <br />
You do not want default credentials to be used (because the<br />
Web application is configured not to impersonate; this would<br />
result in the security context of the <strong>ASP</strong>.<strong>NET</strong> process identity<br />
being used).<br />
Write code to capture and<br />
explicitly set the credentials<br />
on the remote object proxy<br />
Refer to the code fragments shown earlier.<br />
Configuring the Application Server<br />
Configure IIS<br />
Step<br />
More Information<br />
Disable Anonymous access<br />
for your application’s virtual<br />
root directory<br />
Enable Basic authentication<br />
Note: Basic authentication at the application server (remote<br />
object), allows the remote object to flow the original caller’s<br />
security context to the database (because the caller’s user<br />
name and password are available in clear text and can be used<br />
to respond to network authentication challenges from the<br />
database server).<br />
If you don’t need to flow the original caller’s security context<br />
beyond the remote object, consider configuring IIS at the<br />
application server to use Windows Integrated authentication<br />
because this provides tighter security — credentials are not<br />
passed across the network and are not available to the<br />
application.
282<br />
<strong>Building</strong> <strong>Secure</strong> <strong>ASP</strong>.<strong>NET</strong> <strong>Applications</strong><br />
Configure <strong>ASP</strong>.<strong>NET</strong> (Remote Object Host)<br />
Step<br />
More Information<br />
Configure <strong>ASP</strong>.<strong>NET</strong> to use<br />
Windows authentication<br />
Configure <strong>ASP</strong>.<strong>NET</strong> for<br />
impersonation<br />
Edit Web.config in the application’s virtual directory.<br />
Set the element to:<br />
<br />
Edit Web.config in the application’s virtual directory.<br />
Set the element to:<br />
<br />
Note: This step is only required if you want to flow the original<br />
caller’s security context through the remote object and onto the<br />
next, downstream subsystem (for example, database). With<br />
impersonation enabled here, resource access (local and remote)<br />
uses the impersonated original caller’s security context.<br />
If your requirement is simply to allow per-user authorization<br />
checks in the remote object, you do not need to impersonate<br />
here.<br />
Trusted Subsystem<br />
The trusted subsystem model provides an alternative (and simpler to implement)<br />
approach to flowing the original caller’s security context. In this model, a trust<br />
boundary exists between the remote object host and Web application. The remote<br />
object trusts the Web application to properly authenticate and authorize callers,<br />
prior to letting requests proceed to the remote object. No authentication of the<br />
original caller occurs within the remote object host. The remote object host authenticates<br />
the fixed, trusted identity used by the Web application to communicate with<br />
the remote object. In most cases, this is the process identity of the <strong>ASP</strong>.<strong>NET</strong> Web<br />
application.<br />
The trusted subsystem model is shown in Figure 11.5. This diagram also shows two<br />
possible configurations. The first uses the <strong>ASP</strong>.<strong>NET</strong> host and the HTTP channel,<br />
while the second uses a Windows service host and the TCP channel.
Chapter 11: .<strong>NET</strong> Remoting Security 283<br />
Bob<br />
IIS<br />
Web Server<br />
<strong>ASP</strong>.<strong>NET</strong><br />
(Web<br />
Application)<br />
Fixed<br />
trusted<br />
identity<br />
(<strong>ASP</strong><strong>NET</strong>)<br />
Application Server<br />
IIS<br />
<strong>ASP</strong>.<strong>NET</strong><br />
(Remote<br />
Object)<br />
<strong>ASP</strong><strong>NET</strong><br />
Database Server<br />
SQL<br />
Server<br />
Trust Boundary<br />
HTTPChannel<br />
Trust Boundary<br />
Bob<br />
IIS<br />
Web Server<br />
<strong>ASP</strong>.<strong>NET</strong><br />
(Web<br />
Application)<br />
Fixed<br />
trusted<br />
identity<br />
(<strong>ASP</strong><strong>NET</strong>)<br />
Application Server<br />
Windows Service<br />
(Remote Object)<br />
Service<br />
RunAs<br />
Identity<br />
Database Server<br />
SQL<br />
Server<br />
Trust Boundary<br />
TCPChannel<br />
IPSec<br />
(Computer authentication)<br />
Trust Boundary<br />
Figure 11.5<br />
The trusted subsystem model<br />
Flowing the Caller’s Identity<br />
If you use the trusted subsystem model, you may still need to flow the original<br />
caller’s identity (name, not security context), for example, for auditing purposes at<br />
the database.<br />
You can flow the identity at the application level by using method and stored<br />
procedure parameters and trusted query parameters (as shown in the following<br />
example) can be used to retrieve user-specific data from the database.<br />
SELECT x,y,z FROM SomeTable WHERE UserName = "Bob"
284<br />
<strong>Building</strong> <strong>Secure</strong> <strong>ASP</strong>.<strong>NET</strong> <strong>Applications</strong><br />
Choosing a Host<br />
The trusted subsystem model means that the remote object host does not authenticate<br />
the original callers. However, it must still authenticate (and authorize) its<br />
immediate client (the <strong>ASP</strong>.<strong>NET</strong> Web application in this scenario), to prevent unauthorized<br />
applications issuing requests to the remote object.<br />
If you host within <strong>ASP</strong>.<strong>NET</strong> and use the HTTP channel, you can use Windows<br />
Integrated authentication to authenticate the <strong>ASP</strong>.<strong>NET</strong> Web application process<br />
identity.<br />
If you host within a Windows service, you can use the TCP channel which offers<br />
superior performance but no authentication capabilities. In this scenario, you can<br />
use IPSec between the Web server and application server. An IPSec policy can be<br />
established that only allows the Web server to communicate with the application<br />
server.<br />
Configuration Steps<br />
The following tables show the configuration steps required on the Web server and<br />
application server.<br />
Configuring the Web Server<br />
Configure IIS<br />
Step<br />
More Information<br />
Configure IIS authentication<br />
The Web application can use any form of authentication to<br />
authenticate the original callers.<br />
Configure <strong>ASP</strong>.<strong>NET</strong><br />
Step<br />
Configure authentication<br />
and make sure impersonation<br />
is disabled<br />
More Information<br />
Edit Web.config in your Web application’s virtual directory.<br />
Set the element to “Windows”, “Forms”<br />
or “Passport.”<br />
<br />
Set the element to:<br />
<br />
(OR remove the element)
Chapter 11: .<strong>NET</strong> Remoting Security 285<br />
Configure <strong>ASP</strong>.<strong>NET</strong><br />
Step<br />
Reset the password of the<br />
<strong>ASP</strong><strong>NET</strong> account used to<br />
run <strong>ASP</strong>.<strong>NET</strong> OR create a<br />
least privileged domain<br />
account to run <strong>ASP</strong>.<strong>NET</strong><br />
and specify account details<br />
on the <br />
More Information<br />
For more information about how to access network resources<br />
(including remote objects) from <strong>ASP</strong>.<strong>NET</strong> and about choosing and<br />
configuring a process account for <strong>ASP</strong>.<strong>NET</strong>, see “Accessing<br />
Network Resources” and “Process Identity for <strong>ASP</strong>.<strong>NET</strong>” in<br />
Chapter 8, “<strong>ASP</strong>.<strong>NET</strong> Security.”<br />
Configure Remoting (Client Side Proxy<br />
Step<br />
More Information<br />
Configure the remoting proxy Add the following entry to Web.config:<br />
to use default credentials<br />
for all calls to the remote <br />
Because the Web application is not impersonating, using default<br />
credentials results in the use of the <strong>ASP</strong>.<strong>NET</strong> process identity for<br />
all calls to the remote object.<br />
Configuring the Application Server<br />
The following steps apply if you are using an <strong>ASP</strong>.<strong>NET</strong> host.<br />
Configure IIS<br />
Step<br />
Disable Anonymous access<br />
for your application’s virtual<br />
root directory<br />
More Information<br />
Enable Windows Integrated<br />
authentication<br />
Configure <strong>ASP</strong>.<strong>NET</strong> (Remote Object Host)<br />
Step<br />
More Information<br />
Configure <strong>ASP</strong>.<strong>NET</strong> to use Edit Web.config in the application’s virtual directory.<br />
Windows authentication Set the element to:<br />
<br />
Disable impersonation<br />
Edit Web.config in the application’s virtual directory.<br />
Set the element to:<br />
286<br />
<strong>Building</strong> <strong>Secure</strong> <strong>ASP</strong>.<strong>NET</strong> <strong>Applications</strong><br />
Using a Windows Service Host<br />
If you are using a Windows service host process, you must create a Windows<br />
account to run the service. This security context provided by this account will be<br />
used by the remote object for all local and remote resource access.<br />
To access a remote Microsoft SQL Server database (using Windows authentication),<br />
you can use a least privileged domain account, or use a least privileged local<br />
account and then create a duplicated account (with the same user name and password)<br />
on the database server.<br />
<strong>Secure</strong> Communication<br />
<strong>Secure</strong> communication is related to guaranteeing the integrity and confidentiality of<br />
messages as they flow across the network. You can use a platform-based approach<br />
to secure communication and use SSL or IPSec, or you can use a message-level<br />
approach and develop a custom encryption sink to encrypt the entire message, or<br />
selected parts of a message.<br />
Platform Level Options<br />
The two platform-level options to consider for securing the data passed between a<br />
client and remote component are:<br />
● SSL<br />
● IPSec<br />
If you host remote objects in <strong>ASP</strong>.<strong>NET</strong>, you can use SSL to secure the communication<br />
channel between client and server. This requires a server authentication certificate<br />
on the computer that hosts the remote object.<br />
If you host remote objects in a Windows service, you can use IPSec between the<br />
client and host (server) computers, or develop a custom encryption sink.<br />
Message Level Options<br />
Due to the extensible nature of the .<strong>NET</strong> Remoting architecture, you can develop<br />
your own custom sinks and plug them into the processing pipeline. To provide<br />
secure communication, you can develop a custom sink that encrypts and decrypts<br />
the message data sent to and from the remote object.<br />
The advantage of this approach is that it allows you to selectively encrypt parts of<br />
a message. This is in contrast to the platform-level approaches that encrypt all the<br />
data sent between client and server.<br />
More Information<br />
For more information about SSL and IPSec, see Chapter 4, “<strong>Secure</strong> Communication”
Chapter 11: .<strong>NET</strong> Remoting Security 287<br />
Choosing a Host Process<br />
Objects that are to be accessed remotely must run in a host executable. The host<br />
listens for incoming requests and dispatches calls to objects. The type of host selected<br />
influences the message transport mechanism called a channel. The type of<br />
channel that you select influences the authentication, authorization, secure communication,<br />
and performance characteristics of your solution.<br />
The HTTP channel provides better security options, but the TCP channel provides<br />
superior performance.<br />
You have the following main options for hosting remote objects:<br />
● Host in <strong>ASP</strong>.<strong>NET</strong><br />
● Host in a Windows Service<br />
● Host in a Console Application<br />
Recommendation<br />
To take advantage of the security infrastructure provided by <strong>ASP</strong>.<strong>NET</strong> and IIS, it is<br />
recommended from a security standpoint to host remote objects in <strong>ASP</strong>.<strong>NET</strong>. This<br />
requires clients to communicate with the remote objects over the HTTP channel.<br />
<strong>ASP</strong>.<strong>NET</strong> and IIS authentication, authorization, and secure communication features<br />
are available to remote objects that are hosted in <strong>ASP</strong>.<strong>NET</strong>.<br />
If performance (and not security) is the primary concern, consider hosting remote<br />
objects in Windows services.<br />
Hosting in <strong>ASP</strong>.<strong>NET</strong><br />
When you host a remote object in <strong>ASP</strong>.<strong>NET</strong>:<br />
● The object is accessed using the HTTP protocol.<br />
● It has an endpoint that is accessible by a URL.<br />
● It exists in an application domain inside the Aspnet_wp.exe worker process.<br />
● It inherits the security features offered by IIS and <strong>ASP</strong>.<strong>NET</strong>.<br />
Advantages<br />
If you host remote objects in IIS, you benefit from the following advantages:<br />
● Authentication, authorization, and secure communication features provided by<br />
IIS and <strong>ASP</strong>.<strong>NET</strong> are immediately available.<br />
● You can use the auditing features of IIS.<br />
● The <strong>ASP</strong>.<strong>NET</strong> worker process is always running.
288<br />
<strong>Building</strong> <strong>Secure</strong> <strong>ASP</strong>.<strong>NET</strong> <strong>Applications</strong><br />
●<br />
●<br />
You have a high degree of control over the hosting executable through the<br />
element in Machine.config. You can control thread management,<br />
fault tolerance, memory management, and so on.<br />
You can create a Web services façade layer in front of the remote object.<br />
Disadvantages<br />
If you use <strong>ASP</strong>.<strong>NET</strong> to host remote objects, you should be aware of the following<br />
disadvantages:<br />
● It requires the use of the HTTP channel which is slower than the TCP channel.<br />
● User profiles are not loaded by <strong>ASP</strong>.<strong>NET</strong>. Various encryption techniques (including<br />
DPAPI) may require user profiles.<br />
● If the object is being accessed from code running in an <strong>ASP</strong>.<strong>NET</strong> Web application,<br />
you may have to use Basic authentication.<br />
Hosting in a Windows Service<br />
When you host a remote object in a Windows service, the remote object lives in an<br />
application domain contained within the service process. You cannot use the HTTP<br />
channel and must use the TCP channel. The TCP channel supports the following<br />
security features:<br />
● Authentication Features<br />
You must provide a custom authentication solution. Options include:<br />
● Using the underlying authentication services of the SSPI. You can create a<br />
channel sink that uses the Windows SSPI credential and context management<br />
APIs to authenticate the caller and optionally impersonate the caller. The<br />
channel-sink sits on top of the TCP channel. The SSPI in conjunction with the<br />
TCP channel allows the client and server to exchange authentication information.<br />
After authentication the client and server can send messages ensuring<br />
confidentiality and integrity.<br />
● Using an underlying transport that supports authentication, for example,<br />
named pipes. The named pipe channel uses named pipes as the transport<br />
mechanism. This provides authentication of the caller and also introduces<br />
Windows ACL-based security on the pipe and also impersonation of the<br />
caller.<br />
● Authorization Features<br />
Authorization is possible only if you implement a custom authentication<br />
solution.<br />
● If you are able to impersonate the user (for example, by using an underlying<br />
named pipe transport), you can use WindowsPrincipal.IsInRole.
Chapter 11: .<strong>NET</strong> Remoting Security 289<br />
●<br />
●<br />
If you are able to create an IPrincipal object to represent the authenticated<br />
client, you can use .<strong>NET</strong> roles (through principal permission demands and<br />
explicit role checking using IPrincipal.IsInRole)<br />
<strong>Secure</strong> Communication Features<br />
You have two options:<br />
● Use IPSec to secure the transport of data between the client and server.<br />
● Create a custom channel sink that performs asymmetric encryption. This<br />
option is discussed later in this chapter.<br />
Advantages<br />
If you host remote objects in Windows services, you benefit from the following<br />
advantages:<br />
● High degree of activation control over the host process<br />
● Inherits the benefits of Windows service architecture<br />
● No need to introduce IIS on your application’s middle tier<br />
●<br />
●<br />
User profiles are automatically loaded<br />
Performance is good as clients communicate over the TCP channel using binary<br />
encoded data<br />
Disadvantages<br />
If you use a Windows service to host remote objects, you should be aware of the<br />
following disadvantages:<br />
● You must provide custom authentication and authorization solutions.<br />
● You must provide secure communication solutions.<br />
● You must provide auditing solutions.<br />
Hosting in a Console Application<br />
When you host a remote object in a console application, the remote object lives in an<br />
application domain contained within the console application process. You cannot<br />
use the HTTP channel and must use the TCP channel.<br />
This approach is not recommended for production solutions.<br />
Advantages<br />
There are very few advantages to this approach, although it does mean that IIS is<br />
not required on the middle tier. However, this approach is only recommended for<br />
development and testing and not for production environments.
290<br />
<strong>Building</strong> <strong>Secure</strong> <strong>ASP</strong>.<strong>NET</strong> <strong>Applications</strong><br />
Disadvantages<br />
If you host remote objects in a custom executable, you should be aware of the<br />
following disadvantages:<br />
● The host must be manually started and runs under the interactive logon session<br />
(which is not recommended).<br />
● There is no fault tolerance.<br />
● You must provide custom authentication and authorization.<br />
● There is no auditing capability.<br />
Remoting vs. Web Services<br />
.<strong>NET</strong> offers many different techniques to allow clients to communicate with remote<br />
objects including the use of Web services.<br />
If you need interoperability between heterogeneous systems, a Web services approach<br />
that uses open standards such as SOAP, XML, and HTTP is the right choice.<br />
On the other hand, if you are creating server to server intranet-based solutions,<br />
remoting offers the following features:<br />
● Rich object fidelity because any .<strong>NET</strong> type (including custom types created using<br />
Microsoft C#® development tool and Microsoft Visual Basic® .<strong>NET</strong> development<br />
system) can be remoted.<br />
This includes classes, class hierarchies, interfaces, fields, properties, methods and<br />
delegates, datasets, hash tables, and so on.<br />
● Objects may be marshaled by value and by reference.<br />
● Object lifetime management is lease-based.<br />
● High performance, particularly with the TCP channel and binary formatter.<br />
● It allows you to construct load balanced middle tiers, using network load<br />
balancing.<br />
Table 11.2: The major differences between remoting and Web services<br />
Remoting<br />
State full or stateless, lease-based<br />
object lifetime management<br />
No need for IIS<br />
(Although hosting in IIS/<strong>ASP</strong>.<strong>NET</strong> is<br />
recommended for security)<br />
All managed types are supported<br />
Web Services<br />
All method calls are stateless<br />
Must have IIS installed on the server<br />
Limited data types are supported. For more<br />
information about the types supported by <strong>ASP</strong>.<strong>NET</strong><br />
Web services, see the “.<strong>NET</strong> Framework Developer’s<br />
Guide” on MSDN.
Chapter 11: .<strong>NET</strong> Remoting Security 291<br />
Remoting<br />
Objects can be passed by reference or<br />
by value<br />
Contains an extensible architecture not<br />
limited to HTTP or TCP transports<br />
Can plug custom processing sinks into<br />
the message processing pipeline<br />
SOAP implementation is limited and can<br />
only use RPC encoding<br />
Tightly coupled<br />
Web Services<br />
Objects cannot be passed<br />
Limited to XML over HTTP<br />
No ability to modify messages<br />
SOAP implementation can use RPC or document<br />
encoding and can fully interoperate with other Web<br />
service platforms. For more information, see the<br />
“Message Formatting and Encoding” section of the<br />
“Distributed Application Communication” article on<br />
MSDN.<br />
Loosely coupled<br />
Summary<br />
.<strong>NET</strong> Remoting does not provide its own security model. However, by hosting<br />
remote objects in <strong>ASP</strong>.<strong>NET</strong> and by using the HTTP channel for communication,<br />
remote objects can benefit from the underlying security services provided by IIS<br />
and <strong>ASP</strong>.<strong>NET</strong>. In comparison, the TCP channel and a custom host executable offers<br />
improved performance, but this combination provides no built-in security.<br />
● If you want to authenticate the client, use the HTTP channel, host in <strong>ASP</strong>.<strong>NET</strong>,<br />
and disable Anonymous access in IIS.<br />
● Use the TCP channel for better performance and if you don’t care about authenticating<br />
the client.<br />
● Use IPSec to secure the communication channel between client and server if you<br />
use the TCP channel. Use SSL to secure the HTTP channel.<br />
● If you need to make trusted calls to a remote resource, host the component in<br />
Windows service and not a console application.<br />
● IPrincipal objects are not passed across .<strong>NET</strong> Remoting boundaries. You could<br />
consider implementing your own IPrincipal class that can be serialized. If you<br />
do so, be aware that it would be relatively easy for a rogue client to spoof an<br />
IPrincipal object and send it to your remote object. Also, be careful of<br />
IlogicalThreadAffinitive if you implement your own IPrincipal class for<br />
remoting.<br />
● Never expose remote objects to the Internet. Use Web services for this scenario.<br />
.<strong>NET</strong> Remoting should be used on the intranet only. Objects should be accessed<br />
from Web applications internally. Even if an object is hosted in <strong>ASP</strong>.<strong>NET</strong>, don’t<br />
expose them to Internet clients, as clients would need to be .<strong>NET</strong> clients.
12<br />
Data Access Security<br />
When you build Web-based applications, it is essential that you use a secure<br />
approach to accessing and storing data. This chapter addresses some of the key<br />
data access issues. It will help you:<br />
● Choose between Microsoft® Windows® operating system authentication and<br />
SQL authentication when connecting to SQL Server.<br />
●<br />
Store connection strings securely.<br />
● Decide whether to flow the original caller’s security context through to the<br />
database.<br />
● Take advantage of connection pooling.<br />
● Protect against SQL injection attacks.<br />
● Store credentials securely within a database.<br />
The chapter also presents various trade offs that relate to the use of roles, for<br />
example, roles in the database versus role logic applied in the middle tier. Finally,<br />
a set of core recommendations for data access are presented.<br />
Introducing Data Access Security<br />
Figure 12.1 on the next page shows key security issues associated with data access.
294<br />
<strong>Building</strong> <strong>Secure</strong> <strong>ASP</strong>.<strong>NET</strong> <strong>Applications</strong><br />
4<br />
Windows or SQL<br />
(Authentication)<br />
Client<br />
Identity<br />
Client<br />
Application<br />
(for example<br />
<strong>ASP</strong>.<strong>NET</strong>)<br />
2<br />
Data<br />
Access<br />
Identity<br />
SQL<br />
Server<br />
SQL Server<br />
1<br />
<strong>Secure</strong><br />
Connection<br />
String Storage<br />
3<br />
SSL or IPSec<br />
(Privacy/Integrity)<br />
5<br />
Database<br />
Permissions<br />
(Authorization)<br />
Figure 12.1<br />
Key data access security issues<br />
The key issues shown in Figure 12.1 and discussed throughout the remainder of this<br />
chapter are summarized below:<br />
1. Storing database connection strings securely. This is particularly significant if<br />
your application uses SQL authentication to connect to SQL Server or connects to<br />
non-Microsoft databases that require explicit logon credentials. In these cases,<br />
connection strings include clear text usernames and passwords.<br />
2. Using an appropriate identity or identities to access the database. Data access<br />
may be performed by using the process identity of the calling process, one or<br />
more service identities, or the original caller’s identity (with impersonation/<br />
delegation). The choice is determined by your data access model — trusted<br />
subsystem or impersonation/delegation.<br />
3. Securing data that flows across the network. For example, securing login<br />
credentials and sensitive data passed to and from SQL Server.<br />
Note: Login credentials are only exposed on the network if you use SQL authentication, not<br />
Windows authentication.<br />
SQL Server 2000 supports SSL, with server certificates. IPSec can also be used to<br />
encrypt traffic between the client computer (for example, a Web or application<br />
server) and database server.<br />
4. Authenticating callers at the database. SQL Server supports Windows authentication<br />
(using NTLM or Kerberos) and SQL authentication (using SQL Server’s<br />
built-in authentication mechanism).<br />
5. Authorizing callers at the database. Permissions are associated with individual<br />
database objects. Permissions can be associated with users, groups, or roles.
Chapter 12: Data Access Security 295<br />
SQL Server Gatekeepers<br />
Figure 12.2 highlights the key gatekeepers for SQL server data access.<br />
Client<br />
Identity<br />
Client Application<br />
(for example<br />
<strong>ASP</strong>.<strong>NET</strong>)<br />
Data<br />
Access<br />
Identity<br />
G<br />
Server<br />
Login<br />
SQL Server<br />
G<br />
Database<br />
Login<br />
G<br />
Database<br />
Objects<br />
G<br />
<strong>Secure</strong><br />
Connection<br />
String Storage<br />
G<br />
= Gatekeeper<br />
Figure 12.2<br />
SQL Server gatekeepers<br />
The key gatekeepers are:<br />
●<br />
●<br />
●<br />
●<br />
The chosen data store used to maintain the database connection string.<br />
The SQL Server login (as determined by the server name specified in the connection<br />
string).<br />
The database login (as determined by the database name specified in the connection<br />
string).<br />
Permissions attached to individual database objects.<br />
Permissions may be assigned to users, groups, or roles.<br />
Trusted Subsystem vs. Impersonation/Delegation<br />
Granularity of access to the database is a key factor to consider. You must consider<br />
whether you need user-level authorization at the database (which requires the<br />
impersonation/delegation model), or whether you can use application role logic<br />
within the middle tier of your application to authorize users (which implies the<br />
trusted subsystem model).<br />
If your database requires user-level authorization, you need to impersonate the<br />
original caller. While this impersonation/delegation model is supported, you are<br />
encouraged to use the trusted subsystem model, where the original caller is checked<br />
at the IIS/<strong>ASP</strong>.<strong>NET</strong> gate, mapped to a role, and then authorized based on role<br />
membership. System resources for the application are then authorized at the application<br />
or role level using service accounts, or using the application’s process identity<br />
(such as the <strong>ASP</strong><strong>NET</strong> account).
296<br />
<strong>Building</strong> <strong>Secure</strong> <strong>ASP</strong>.<strong>NET</strong> <strong>Applications</strong><br />
Figure 12.3 shows the two models.<br />
Web Server<br />
Application Server<br />
(Middle Tier)<br />
Database<br />
Server<br />
A<br />
B<br />
C<br />
D<br />
E<br />
A<br />
B<br />
C<br />
D<br />
E<br />
Role-Based<br />
Authorization<br />
Trusted<br />
Service<br />
Identity<br />
SQL<br />
Server<br />
Trusted Subsystem Model<br />
Trust Boundary<br />
Database trusts the middle tier,<br />
middle tier authorizes users<br />
Impersonation / Delegation Model<br />
A<br />
A<br />
B<br />
B<br />
C<br />
C<br />
D<br />
D<br />
E<br />
E<br />
A<br />
B<br />
C<br />
D<br />
E<br />
SQL<br />
Server<br />
Caller Impersonation/Delegation<br />
Figure 12.3<br />
The trusted sub-system and impersonation/delegation models for database access<br />
There are a number of key factors that you should consider when connecting to SQL<br />
Server for data access. These are summarized below and elaborated upon in subsequent<br />
sections:<br />
● What type of authentication should you use? Windows authentication offers<br />
improved security, but firewalls and non-trusting domain issues may force you<br />
to use SQL authentication. If so, you should ensure that your application’s use of<br />
SQL authentication is as secure as possible, as discussed in the “SQL Authentication”<br />
section later in this chapter.<br />
● Single user role versus multiple user roles. Does your application need to<br />
access SQL using a single account with a fixed set of permissions within the<br />
database, or are multiple (role-based) accounts required depending on the user<br />
of the application?
Chapter 12: Data Access Security 297<br />
●<br />
●<br />
Caller identity. Does the database need to receive the identity of the original<br />
caller through the call context either to perform authorization or to perform<br />
auditing, or can you use one or more trusted connections and pass the original<br />
caller identity at the application level?<br />
For the operating system to flow the original caller’s identity, it requires impersonation/delegation<br />
in the middle tier. This dramatically reduces the effectiveness<br />
of connection pooling. Connection pooling is still enabled, but it results in<br />
many small pools (for each separate security context), with little if any reuse of<br />
connections.<br />
Are you sending sensitive data to and from the database server? While Windows<br />
authentication means that you do not pass user credentials over the network to<br />
the database server, if your application’s data is sensitive (for example, employee<br />
details or payroll data), then this should be secured using IPSec or SSL.<br />
Authentication<br />
This section discusses how you should authenticate clients to SQL Server and how<br />
you choose an identity to use for database access within client applications, prior to<br />
connecting to SQL Server.<br />
Windows Authentication<br />
Windows authentication is more secure than SQL authentication for the following<br />
reasons:<br />
● Credentials are managed for you and the credentials are not transmitted over the<br />
network.<br />
● You avoid embedding user names and passwords in connection strings.<br />
● Logon security improves through password expiration periods, minimum<br />
lengths, and account lockout after multiple invalid logon requests. This mitigates<br />
the threat from dictionary attacks.<br />
Use Windows authentication in the following scenarios:<br />
● You have used the trusted subsystem model and you connect to SQL Server<br />
using a single fixed identity. If you are connecting from <strong>ASP</strong>.<strong>NET</strong>, this assumes<br />
that the Web application is not configured for impersonation.<br />
In this scenario, use the <strong>ASP</strong>.<strong>NET</strong> process identity or a serviced component<br />
identity (obtained from the account used to run an Enterprise Services server<br />
application).<br />
● You are intentionally delegating the original caller’s security context by using<br />
delegation (and are prepared to sacrifice application scalability by foregoing<br />
database connection pooling).
298<br />
<strong>Building</strong> <strong>Secure</strong> <strong>ASP</strong>.<strong>NET</strong> <strong>Applications</strong><br />
Consider the following key points when you use Windows authentication to connect<br />
to SQL Server:<br />
● Use the principle of least privilege for the <strong>ASP</strong>.<strong>NET</strong> process account. Avoid<br />
giving the <strong>ASP</strong>.<strong>NET</strong> process account the “Act as part of the operating system”<br />
privilege to enable LogonUser API calls.<br />
●<br />
Determine which code requires additional privileges, and place it within serviced<br />
components that run in out-of-process Enterprise Services applications.<br />
More Information<br />
For more information about accessing network resources from <strong>ASP</strong>.<strong>NET</strong> and choosing<br />
and configuring an appropriate account to run <strong>ASP</strong>.<strong>NET</strong>, see Chapter 8,<br />
“<strong>ASP</strong>.<strong>NET</strong> Security.”<br />
Using Windows Authentication<br />
You have the following options when you use Windows authentication to connect to<br />
SQL Server from an <strong>ASP</strong>.<strong>NET</strong> application (or Web service, or remote component<br />
hosted by <strong>ASP</strong>.<strong>NET</strong>):<br />
● Use the <strong>ASP</strong>.<strong>NET</strong> process identity.<br />
● Use fixed identities within <strong>ASP</strong>.<strong>NET</strong>.<br />
● Use serviced components.<br />
● Use the LogonUser API and impersonating a specific identity.<br />
●<br />
●<br />
Use the original caller’s identity.<br />
Use the anonymous Internet User account.<br />
Recommendation<br />
The recommendation is to configure the local <strong>ASP</strong>.<strong>NET</strong> process identity by changing<br />
the password to a known value on the Web server and create a mirrored account on<br />
the database server by creating a local user with the same name and password.<br />
Further details for this and the other approaches are presented below.<br />
Using the <strong>ASP</strong>.<strong>NET</strong> Process Identity<br />
If you connect to SQL Server directly from an <strong>ASP</strong>.<strong>NET</strong> application (or Web service,<br />
or remote component hosted by <strong>ASP</strong>.<strong>NET</strong>), use the <strong>ASP</strong>.<strong>NET</strong> process identity. This is<br />
a common approach and the application defines the trust boundary, that is, the<br />
database trusts the <strong>ASP</strong>.<strong>NET</strong> account to access database objects.
Chapter 12: Data Access Security 299<br />
You have three options:<br />
●<br />
●<br />
●<br />
Use mirrored <strong>ASP</strong><strong>NET</strong> local accounts.<br />
Use mirrored, custom local accounts.<br />
Use a custom domain account.<br />
Use Mirrored <strong>ASP</strong><strong>NET</strong> Local Accounts<br />
This is the simplest approach and is the one generally used when you own the<br />
target database (and can control the administration of local database-server<br />
accounts). With this option, you use the <strong>ASP</strong><strong>NET</strong> least-privileged, local account<br />
to run <strong>ASP</strong>.<strong>NET</strong> and then create a duplicated account on the database server.<br />
Note: This approach has the added advantages that it works across non-trusting domains and<br />
through firewalls. The firewall may not open sufficient ports to support Windows authentication.<br />
Use Mirrored, Custom Local Accounts<br />
This approach is the same as the previous approach except that you don’t use the<br />
default <strong>ASP</strong><strong>NET</strong> account. This means two things:<br />
● You will need to create a custom local account with appropriate permissions and<br />
privileges.<br />
For more information, see “How To: Create a Custom Account to Run <strong>ASP</strong>.<strong>NET</strong>”<br />
in the Reference section of this guide.<br />
● You are no longer using the default account created by the .<strong>NET</strong> Framework<br />
installation process. Your company may have a policy not to use default installation<br />
accounts. This can potentially raise the security bar of your application.<br />
For more information, see the Sans Top 20, “G2— Accounts with No Passwords<br />
or Weak Passwords” (http://www.sans.org/top20.htm).<br />
Use a Custom Domain Account<br />
This approach is similar to the previous one except that you use a least-privileged<br />
domain account instead of a local account. This approach assumes that client and<br />
server computers are in the same or trusting domains. The main benefit is that<br />
credentials are not shared across machines; the machines simply give access to the<br />
domain account. Also, administration is easier with domain accounts.<br />
Implementing Mirrored <strong>ASP</strong><strong>NET</strong> Process Identity<br />
In order to use mirrored accounts to connect from <strong>ASP</strong>.<strong>NET</strong> to a database, you need<br />
to perform the following actions:<br />
● Use User Manager on the Web server to reset the <strong>ASP</strong><strong>NET</strong> account’s password to<br />
a known strong password value.
300<br />
<strong>Building</strong> <strong>Secure</strong> <strong>ASP</strong>.<strong>NET</strong> <strong>Applications</strong><br />
Important: If you change the <strong>ASP</strong><strong>NET</strong> password to a known value, the password in the<br />
Local Security Authority (LSA) on the local computer will no longer match the account<br />
password stored in the Windows Security Account Manager (SAM) database. If you need to<br />
revert to the AutoGenerate default, you must do the following:<br />
Run Aspnet_regiis.exe to reset <strong>ASP</strong>.<strong>NET</strong> to its default configuration. For more information,<br />
see article Q306005, “HOWTO: Repair IIS Mapping After You Remove and Reinstall IIS,” in<br />
the Microsoft Knowledge Base. When you do this, you get a new account and a new<br />
Windows Security Identifier (SID). The permissions for this account are set to their default<br />
values. As a result, you need to explicitly reapply permissions and privileges that you had<br />
originally set for the old <strong>ASP</strong><strong>NET</strong> account.<br />
●<br />
Explicitly set the password in Machine.config.<br />
Chapter 12: Data Access Security 301<br />
Using Fixed Identities within <strong>ASP</strong>.<strong>NET</strong><br />
With this approach, you configure your <strong>ASP</strong>.<strong>NET</strong> application to impersonate a<br />
specified, fixed identity, by using the following element in Web.config.<br />
<br />
This becomes the default identity that is used when you connect to network resources,<br />
including databases.<br />
This approach is not recommended with the .<strong>NET</strong> Framework version 1.0 for two<br />
reasons:<br />
● User names and passwords are in clear text in the Web space (that is, in<br />
Web.config in a virtual directory).<br />
● <strong>ASP</strong>.<strong>NET</strong> (on Windows 2000) requires the “Act as part of the operating system”<br />
privilege. This restriction does not apply for Microsoft Windows .<strong>NET</strong> Server<br />
2003.<br />
For more information about this strong privilege, see the Security Briefs column<br />
in the August 99 copy of Microsoft Systems Journal (http://msdn.microsoft.com<br />
/library/default.asp?url=/library/en-us/dnmsj99/html/security0899.asp).<br />
The .<strong>NET</strong> Framework version 1.1 will provide an enhancement for this scenario on<br />
Windows 2000. Specifically:<br />
● The credentials will be encrypted.<br />
● The logon will be performed by the IIS process, so that <strong>ASP</strong>.<strong>NET</strong> does not require<br />
the “Act as part of the operating system” privilege.<br />
Using Serviced Components<br />
You can develop a serviced component specifically to contain data access code.<br />
With serviced components, you can access the database by either hosting your<br />
component in an Enterprise Services (COM+) server application running under a<br />
specific identity, or you can write code that uses the LogonUser API to perform<br />
impersonation.<br />
Using out of process serviced components raises the security bar because process<br />
hops make an attacker’s job more difficult, particularly if the processes run with<br />
different identities. The other advantage is that you can isolate code that requires<br />
more privilege from the rest of the application.
302<br />
<strong>Building</strong> <strong>Secure</strong> <strong>ASP</strong>.<strong>NET</strong> <strong>Applications</strong><br />
Calling LogonUser and Impersonating a Specific Windows Identity<br />
You should not call LogonUser directly from <strong>ASP</strong>.<strong>NET</strong>. In Windows 2000, this<br />
approach requires you to give the <strong>ASP</strong>.<strong>NET</strong> process identity “Act as part of the<br />
operating system”.<br />
A preferred approach is to call LogonUser outside of the <strong>ASP</strong>.<strong>NET</strong> process using a<br />
serviced component in an Enterprise Services server application, as discussed<br />
above.<br />
Using the Original Caller’s Identity<br />
For this approach to work, you need to use Kerberos delegation and impersonate<br />
the caller to the database, either directly from <strong>ASP</strong>.<strong>NET</strong> or from a serviced component.<br />
From <strong>ASP</strong>.<strong>NET</strong> add the following to your application’s Web.config.<br />
<br />
From a serviced component, call CoImpersonateClient.<br />
Using the Anonymous Internet User Account<br />
As a variation of the previous approach, for scenarios where your application uses<br />
Forms or Passport authentication (which implies IIS anonymous authentication),<br />
you can enable impersonation within your application’s web.config in order to use<br />
the anonymous Internet user account for database access.<br />
<br />
With IIS configured for anonymous authentication, this configuration results in<br />
your Web application’s code running using the anonymous Internet user’s impersonation<br />
token. In a Web hosting environment, this has the advantage of allowing<br />
you to separately audit and track database access from multiple Web applications.<br />
More Information<br />
● For more information and implementation details about using the original<br />
caller’s identity, see “Flowing the Original Caller to the Database” in Chapter 5,<br />
“Intranet Security.”<br />
● For more information about how to configure IIS to use anonymous user account<br />
refer to Chapter 8, “<strong>ASP</strong>.<strong>NET</strong> Security.”
Chapter 12: Data Access Security 303<br />
When Can’t You Use Windows Authentication?<br />
Certain application scenarios may prevent the use of Windows authentication. For<br />
example:<br />
● Your database client and database server are separated by a firewall which<br />
prevents Windows authentication.<br />
● Your application needs to connect to one or more databases using multiple<br />
identities.<br />
● You are connecting to databases other than SQL Server.<br />
● You don’t have a secure way within <strong>ASP</strong>.<strong>NET</strong> to run code as a specific Windows<br />
user. Either you can’t (or won’t) forward the original caller’s security context,<br />
and/or you want to use a dedicated service account rather than grant logons to<br />
end users.<br />
Specifying a user name and password in Machine.config (on the<br />
element) or in Web.config (on the element) in order<br />
to run the <strong>ASP</strong>.<strong>NET</strong> worker process or your application is less secure than taking<br />
explicit steps to protect standard SQL credentials.<br />
In these scenarios, you will have to use SQL authentication (or the database’s native<br />
authentication mechanism), and you must:<br />
● Protect database user credentials on the application server.<br />
● Protect database user credentials while in transit from the server to the database.<br />
If you do use SQL authentication, there are various ways in which you can make<br />
SQL authentication more secure. These are highlighted in the next section.<br />
SQL Authentication<br />
If your application needs to use SQL authentication, you need to consider the<br />
following key points:<br />
● Use a least-privileged account to connect to SQL.<br />
● Credentials are passed over the wire so they must be secured.<br />
● The SQL connection string (which contains credentials) must be secured.<br />
Connection String Types<br />
If you connect to a SQL Server database using credentials (user name and password)<br />
then your connection string looks like this:<br />
SqlConnectionString = "Server=YourServer;<br />
Database=YourDatabase;<br />
uid=YourUserName;pwd=YourStrongPassword;"
304<br />
<strong>Building</strong> <strong>Secure</strong> <strong>ASP</strong>.<strong>NET</strong> <strong>Applications</strong><br />
If you need to connect to a specific instance of SQL Server (a feature available only<br />
in SQL Server 2000 or later) installed on the same computer then your connection<br />
string looks like this:<br />
SqlConnectionString = "Server=YourServer\Instance;<br />
Database=YourDatabase;uid=YourUserName;<br />
pwd=YourStrongPassword;"<br />
If you want to connect to SQL Server using your network credentials, use the<br />
Integrated Security attribute (or Trusted Connection attribute) and omit the username<br />
and password:<br />
SqlConnectionString = "Server=YourServer;<br />
Database=YourDatabase;<br />
Integrated Security=SSPI;"<br />
- or -<br />
SqlConnectionString = "Server=YourServer;<br />
Database=YourDatabase;<br />
Trusted_Connection=Yes;"<br />
If you are connecting to an Oracle database by using explicit credentials (user name<br />
and password) then your connection string looks like this:<br />
SqlConnectionString = "Provider=MSDAORA;Data Source=YourDatabaseAlias;<br />
User ID=YourUserName;Password=YourPassword;"<br />
More Information<br />
For more information about using Universal Data Link (UDL) files for your connection,<br />
see article Q308426, “HOW TO: Use Data Link Files with the OleDbConnection<br />
Object in Visual C# .<strong>NET</strong>,” in the Microsoft Knowledge Base.<br />
Choosing a SQL Account for Your Connections<br />
Don’t use the built-in sa or db_owner accounts for data access. Instead, use leastprivileged<br />
accounts with a strong password.<br />
Avoid the following connection string:<br />
SqlConnectionString = "Server=YourServer\Instance;<br />
Database=YourDatabase; uid=sa; pwd=;"
Chapter 12: Data Access Security 305<br />
Use least privileged accounts with a strong password, for example:<br />
SqlConnectionString= "Server=YourServer\Instance;<br />
Database=YourDatabase;<br />
uid=YourStrongAccount;<br />
pwd=YourStrongPassword;"<br />
Note that this does not address the issue of storing credentials in plain text in your<br />
Web.config files. All you’ve done so far is limit the scope of damage possible in the<br />
event of a compromise, by using a least-privileged account. To further raise the<br />
security bar, you should encrypt the credentials.<br />
Note: If you selected a case-sensitive sort order when you installed SQL Server, your login ID<br />
is also case-sensitive.<br />
Passing Credentials over the Network<br />
When you connect to SQL Server with SQL authentication, the user name and<br />
password are sent across the network in clear text. This can represent a significant<br />
security concern. For more information about how to secure the channel between an<br />
application or Web server and database server, see “<strong>Secure</strong> Communication” later in<br />
this chapter.<br />
Securing SQL Connection Strings<br />
User names and passwords should not be stored in clear text in configuration files.<br />
For details about how to store connection strings securely, see “Storing Database<br />
Connection Strings” later in this chapter.<br />
Authenticating Against Non-SQL Server Databases<br />
The typical issues you may encounter when connecting to non-SQL databases are<br />
similar to scenarios where you need to use SQL authentication. You may need to<br />
supply explicit credentials if the target resources do not support Windows authentication.<br />
To secure this type of scenario, you must store the connection string securely<br />
and you must also secure the communication over the network (to prevent interception<br />
of credentials).<br />
More Information<br />
● For more information about storing database connection strings, see “Storing<br />
Database Connection Strings <strong>Secure</strong>ly” later in this chapter.<br />
● For more information about securing the channel to the database server, see<br />
“<strong>Secure</strong> Communications” later in this chapter.
306<br />
<strong>Building</strong> <strong>Secure</strong> <strong>ASP</strong>.<strong>NET</strong> <strong>Applications</strong><br />
Authorization<br />
SQL Server provides a number of role-based approaches for authorization. These<br />
revolve around the following thee types of roles supported by SQL Server:<br />
● User-defined Database Roles. These are used to group together users who have<br />
the same security privileges within the database. You add Windows user or<br />
group accounts to user database roles and establish permissions on individual<br />
database objects (stored procedures, tables, views, and so on) using the roles.<br />
● Application Roles. These are similar to user database roles in that they are used<br />
when establishing object permissions. However, unlike user database roles, they<br />
do not contain users or groups. Instead, they must are activated by an application<br />
using a built-in stored procedure. Once active, the permissions granted to<br />
the role determine the data access capabilities of the application.<br />
Application roles allow database administrators to grant selected applications<br />
access to specified database objects. This is in contrast to granting permissions to<br />
users.<br />
● Fixed Database Roles. SQL Server also provides fixed server roles such as<br />
db_datareader and db_datawriter. These built-in roles are present in all databases<br />
and can be used to quickly give a user read specific (and other commonly<br />
used) sets of permissions within the database.<br />
For more information about these various role types (and also fixed server roles<br />
which are similar to fixed database roles but apply at the server level instead of the<br />
database level), see SQL Server Books Online (http://www.microsoft.com/sql/techinfo<br />
/productdoc/2000/books.asp).<br />
Using Multiple Database Roles<br />
If your application has multiple categories of users, and the users within each<br />
category require the same permissions within the database, your application requires<br />
multiple roles.<br />
Each role requires a different set of permissions within the database. For example,<br />
members of an Internet User role may require read-only permissions to the majority<br />
of tables within a database, while members of an Administrator or Operator role<br />
may require read/write permissions.
Chapter 12: Data Access Security 307<br />
Options<br />
To accommodate these scenarios, you have two main options for role-based authorization<br />
within SQL Server:<br />
● User-defined SQL Server Database Roles. These are used to assign permissions<br />
to database objects for groups of users who have the same security permissions<br />
within the database.<br />
When you use user-defined database roles, you check at the gate, map users to<br />
roles, (for example, in an <strong>ASP</strong>.<strong>NET</strong> Web application or in a middle-tier serviced<br />
component in an Enterprise Services server application) and use multiple identities<br />
to connect to the database, each of which maps to a user-defined database<br />
role.<br />
● SQL Application Roles. These are similar to user-defined database roles in that<br />
they are used when you assign permissions to database objects. However, unlike<br />
user-defined database roles, they do not contain members and are activated from<br />
individual applications by using a built-in stored procedure.<br />
When you use application roles, you check at the gate, map users to roles, connect<br />
to the database using a single, trusted, service identity, and activate the<br />
appropriate SQL application role.<br />
User-Defined Database Roles<br />
If you elect to use user-defined database roles, you must:<br />
● Create multiple service accounts to use for database access.<br />
● Map each account to a user-defined database role.<br />
● Establish the necessary database permissions for each role within the database.<br />
● Authorize users within your application (<strong>ASP</strong>.<strong>NET</strong> Web application, Web service,<br />
or middle tier component) and then use application logic within your data access<br />
layer to determine which account to connect to the database with. This is based<br />
on the role-membership of the caller.<br />
Declaratively, you can configure individual methods to allow only those users<br />
that belong to a set of roles. You then add imperative role-checks within method<br />
code to determine precise role membership, which determines the connection<br />
to use.<br />
Figure 12.4 on the next page illustrates this approach.
308<br />
<strong>Building</strong> <strong>Secure</strong> <strong>ASP</strong>.<strong>NET</strong> <strong>Applications</strong><br />
Web Server Application Server Database Server<br />
A<br />
B<br />
C<br />
D<br />
E<br />
A<br />
B<br />
C<br />
D<br />
E<br />
Role<br />
1<br />
Role<br />
2<br />
Connection for Role1<br />
(ServiceIdentity1)<br />
Connection for Role2<br />
(ServiceIdentity2)<br />
SQL<br />
Server<br />
Callers mapped to a “trusted”<br />
connection based on (Enterprise<br />
Services) role membership<br />
Permissions based on<br />
User Database Roles<br />
(Authorization)<br />
Figure 12.4<br />
Connecting to SQL Server using multiple SQL user database roles<br />
To use the preferred Windows authentication for this scenario, you develop code<br />
(using the LogonUser API) in an out of process serviced component to impersonate<br />
one of a set of Windows identities.<br />
With SQL authentication, you use a different connection string (containing different<br />
user names and passwords) depending upon role-based logic within your application.<br />
More Information<br />
For more information about securely storing database connection strings, see<br />
“Storing Database Connection Strings <strong>Secure</strong>ly” later in this chapter.<br />
Application Roles<br />
With SQL application roles, you must:<br />
● Create a single service account to use for database access (this may be the process<br />
account used to run the <strong>ASP</strong>.<strong>NET</strong> worker process, or an Enterprise Services<br />
application).<br />
● Create a set of SQL application roles within the database.<br />
● Establish the necessary database permissions for each role within the database.<br />
● Authorize users within your application (<strong>ASP</strong>.<strong>NET</strong> Web application, Web service<br />
or middle tier component), and use application logic within your data access<br />
layer to determine which application role to activate within the database. This is<br />
based on the role-membership of the caller.<br />
Figure 12.5 illustrates this approach.
Chapter 12: Data Access Security 309<br />
A<br />
B<br />
C<br />
D<br />
E<br />
Web Server Application Server Database Server<br />
A<br />
B<br />
C<br />
D<br />
E<br />
Role<br />
1<br />
Role<br />
2<br />
ServiceIdentity1<br />
sp_setapprole(<br />
“AppRole1”, “Str0ngPassW0rd1”)<br />
ServiceIdentity1<br />
sp_setapprole(<br />
“AppRole2”, “Str0ngPassW0rd2”)<br />
SQL<br />
Server<br />
Callers mapped to a SQL Application<br />
Role based on (Enterprise Services)<br />
role membership<br />
Figure 12.5<br />
Using multiple SQL application roles<br />
Permissions based on<br />
Application Database Roles<br />
(Authorization)<br />
In Figure 12.5, the identity ServiceIdentity1 that is used to access the database is<br />
usually obtained from the <strong>ASP</strong>.<strong>NET</strong> worker process or from an Enterprise Services<br />
server application process identity.<br />
With this approach, the same service identity (and therefore the same connection) is<br />
used to connect to SQL Server. SQL application roles are activated with the<br />
sp_setapprole built-in stored procedure, based on the role membership of the caller.<br />
This stored procedure requires the role name and a password.<br />
If you use this approach, you must securely store the role name and password<br />
credentials. For further advice and secret storage techniques, see “Storing Database<br />
Connection Strings <strong>Secure</strong>ly” later in this chapter.<br />
Limitations of SQL Application Roles<br />
The following are the key points that you must be aware of before you choose to use<br />
SQL application roles:<br />
● You need to manage credentials for the SQL application roles. You must call the<br />
sp_setapprole stored procedure passing a role name and password for each<br />
connection. If you are activating a SQL application role from managed code then<br />
having a clear text password embedded in the assembly is not safe.<br />
● SQL application role credentials are passed to the database in clear text. You<br />
should secure them on the network by using IPSec or SSL between the application<br />
server and database server.<br />
● After a SQL application role is activated on a connection it cannot be deactivated.<br />
It remains active until the connection closes. Also, you cannot switch between<br />
two or more roles on the same connection.<br />
● Use SQL application roles only when your application uses a single, fixed identity<br />
to connect to the database. In other words, use them only when your application<br />
uses the trusted subsystem model.
310<br />
<strong>Building</strong> <strong>Secure</strong> <strong>ASP</strong>.<strong>NET</strong> <strong>Applications</strong><br />
If the security context of the connection changes (as it would if the original<br />
caller’s context were use to connect to the database), then SQL application roles<br />
do not work in conjunction with connection pooling.<br />
For more information, see article Q229564, “PRB: SQL Application Role Errors<br />
with OLE DB Resource Pooling,” in the Microsoft Knowledge Base.<br />
<strong>Secure</strong> Communication<br />
In most application scenarios you need to secure the communication link between<br />
your application server and database. You need to be able to guarantee:<br />
● Message Confidentiality. The data must be encrypted to ensure that it remains<br />
private.<br />
● Message Integrity. The data must be signed to ensure that it remains unaltered.<br />
In some scenarios, all of the data passed between application server and database<br />
server must be secured, while in other scenarios, selected items of data sent over<br />
specific connections must be secured. For example:<br />
● In an intranet Human Resources application, some of the employee details<br />
passed between client and the database server are sensitive.<br />
● In Internet scenarios, such as secure banking applications, all of the data passed<br />
between the application server and database server must be secured.<br />
● If you are using SQL authentication, you should also secure the communication<br />
link to ensure that user names and passwords can not be compromised with<br />
network monitoring software.<br />
The Options<br />
You have two options for securing the network link between an application server<br />
and database server:<br />
● IPSec<br />
● SSL (Using a server certificate on the SQL Server computer)<br />
Note: You must be running SQL Server 2000 to support the use of SSL. Earlier versions do<br />
not support it. The client must have the SQL Server 2000 client libraries installed.<br />
Choosing an Approach<br />
Whether or not you should use IPSec or SSL depends on a number of primarily<br />
environmental factors, such as firewall considerations, operating system and database<br />
versions, and so on.
Chapter 12: Data Access Security 311<br />
Note: IPSec is not intended as a replacement for application-level security. Today it is used as<br />
a defense in depth mechanism, or to secure insecure applications without changing them, and<br />
to secure non-TLS (for example, SSL) protocols from network-wire attacks.<br />
More Information<br />
● For more information about configuring IPSec, see “How To: Use IPSec to Provide<br />
<strong>Secure</strong> Communication between Two Servers” in the Reference section of<br />
this guide.<br />
● For more information about configuring SSL, see “How To: Use SSL to <strong>Secure</strong><br />
Communication with SQL Server 2000” in the Reference section of this guide.<br />
●<br />
For more information about SSL and IPSec in general, see Chapter 4, “<strong>Secure</strong><br />
Communication.”<br />
Connecting with Least Privilege<br />
Connecting to the database with least privilege means that the connection you<br />
establish only has the minimum privileges that you need within the database.<br />
Simply put, you don’t connect to your database using the sa or database owner<br />
accounts. Ideally, if the current user is not authorized to add or update records, then<br />
the corresponding account used for their connection (which may be aggregated to<br />
an identity that represents a particular role) cannot add or update records in the<br />
database.<br />
When you connect to SQL Server, your approach needs to support the necessary<br />
granularity that your database authorization requires. You need to consider what<br />
the database trusts. It can trust:<br />
● The application.<br />
● Application defined roles.<br />
● The original caller.<br />
The Database Trusts the Application<br />
Consider a finance application that you authorize to use your database. The finance<br />
application is responsible for managing user authentication and authorizing access.<br />
In this case, you can manage your connections through a single trusted account<br />
(which corresponds to either a SQL login or a Windows account mapped to a SQL<br />
login). If you’re using Windows authentication, this would typically mean allowing<br />
the process identity of the calling application (such as the <strong>ASP</strong>.<strong>NET</strong> worker process,<br />
or an Enterprise Services server application identity) to access the database.
312<br />
<strong>Building</strong> <strong>Secure</strong> <strong>ASP</strong>.<strong>NET</strong> <strong>Applications</strong><br />
From an authorization standpoint, this approach is very coarse-grained, because the<br />
connection runs as an identity that has access to all database objects and resources<br />
needed by the application. The benefits of this approach are that you can use connection<br />
pooling and you simplify administration because you are authorizing a<br />
single account. The downside is that all of your users run with the same connection<br />
privileges.<br />
The Database Trusts Different Roles<br />
You can use pools of separate, trusted connections to the database that correspond<br />
to the roles defined by your application, for example, one connection that is for<br />
tellers, another for managers, and so on.<br />
These connections may or may not use Windows authentication. The advantage of<br />
Windows authentication is that it handles credential management and doesn’t send<br />
the credentials over the network. However, while Windows authentication is<br />
possible at the process or application level (as when you use a single connection to<br />
the database), there are additional challenges presented by the fact you need multiple<br />
identities (one per role).<br />
Many applications use the LogonUser API to establish a Windows access token. The<br />
problem with this approach is two-fold:<br />
● You now have a credential management issue (your application has to securely<br />
store the account user name and password).<br />
● The LogonUser API requires that the calling process account have the “Act as<br />
part of the operating system” privilege. This means that you are forced to give<br />
the <strong>ASP</strong>.<strong>NET</strong> process account this privilege, which is not recommended. An<br />
alternative is to use SQL Authentication, but then you need to protect the credentials<br />
on the server and over the network.<br />
Note: This LogonUser restriction is lifted in Windows .<strong>NET</strong> Server 2003.<br />
The Database Trusts the Original Caller<br />
In this case, you need to flow the original caller through multiple tiers to the database.<br />
This means that your clients need network credentials to be able to hop from<br />
one computer to the next. This requires Kerberos delegation.<br />
Although this solution provides a fine-grained level of authorization within the<br />
database, because you know the identity of the original caller and can establish per<br />
user permissions on database objects, it impacts application performance and<br />
scalability. Connection pooling (although still enabled) becomes ineffective.
Chapter 12: Data Access Security 313<br />
Creating a Least Privilege Database Account<br />
The following steps are provided as a simple example to show you how to create a<br />
least privilege database account. While most database administrators are already<br />
familiar with these steps, many developers may not be and resort to using the sa or<br />
database owner account to force their applications to work.<br />
This can create difficulties when moving from a development environment, to a test<br />
environment, and then to a production environment because the application moves<br />
from an environment that’s wide open into a more tightly controlled setting, which<br />
prevents the application from functioning correctly.<br />
You start by creating a SQL login for either a SQL account or a Windows account<br />
(user or group). You then add that login to a database user role and assign permissions<br />
to that role.<br />
<br />
To set up a data access account for SQL<br />
1. Create a new user account and add the account to a Windows group. If you are<br />
managing multiple users, you would use a group. If you are dealing with a<br />
single application account (such as a duplicated <strong>ASP</strong>.<strong>NET</strong> process account), you<br />
may choose not to add the account to a Windows group.<br />
2. Create a SQL Server login for the user/group.<br />
a. Start Enterprise Manager, locate your database server, and then expand the<br />
Security folder.<br />
b. Right-click Logins, and then click New Login.<br />
c. Enter the Windows group name into the Name field, and then click OK to<br />
close the SQL Server Login Properties dialog box.<br />
3. Create a new database user in the database of interest that is mapped to the SQL<br />
server login.<br />
a. Use Enterprise Manager and expand the Databases folder, and then expand<br />
the required database for which the login requires access.<br />
b. Right-click Users, and then click New Database User.<br />
c. Select the previously created Login name.<br />
d. Specify a user name.<br />
e Configure permissions as discussed below.<br />
4. Grant the database user Select permissions on the tables that need to be accessed<br />
and Execute permissions on any relevant stored procedures.
314<br />
<strong>Building</strong> <strong>Secure</strong> <strong>ASP</strong>.<strong>NET</strong> <strong>Applications</strong><br />
Note: If the stored procedure and the table are owned by the same person, and access the<br />
table only through the stored procedure (and do not need to access the table directly), it is<br />
sufficient to grant execute permissions on the stored procedure alone. This is because of<br />
the concept of ownership chaining. For more information, see SQL Server Books online.<br />
5. If you want the user account to have access to all the views and tables in the<br />
database, add them to the db_datareader role.<br />
Storing Database Connection Strings <strong>Secure</strong>ly<br />
There are a number of possible locations and approaches for storing database connection<br />
strings, each with varying degrees of security and configuration flexibility.<br />
The Options<br />
The following list represents the main options for storing connection strings:<br />
● Encrypted with DPAPI<br />
● Clear text in Web.config or Machine.config<br />
● UDL files<br />
● Custom text files<br />
● Registry<br />
● COM+ catalog<br />
Using DPAPI<br />
Windows 2000 and later operating systems provide the Win32® Data Protection API<br />
(DPAPI) for encrypting and decrypting data. DPAPI is part of the Cryptography<br />
API (Crypto API) and is implemented in Crypt32.dll. It consists of two methods —<br />
CryptProtectData and CryptUnprotectData.<br />
DPAPI is particularly useful in that it can eliminate the key management problem<br />
exposed to applications that use cryptography. While encryption ensures the data is<br />
secure, you must take additional steps to ensure the security of the key. DPAPI uses<br />
the password of the user account associated with the code that calls the DPAPI<br />
functions in order to derive the encryption key. As a result the operating system<br />
(and not the application) manages the key.
Chapter 12: Data Access Security 315<br />
Why Not LSA?<br />
Many applications use the Local Security Authority (LSA) to store secrets. DPAPI<br />
has the following advantages over the LSA approach:<br />
● To use the LSA, a process requires administrative privileges. This is a security<br />
concern because it greatly increases the potential damage that can be done by an<br />
attacker who manages to compromise the process.<br />
● The LSA provides only a limited number of slots for secret storage, many of<br />
which are already used by the system.<br />
Machine Store vs. User Store<br />
DPAPI can work with either the machine store or user store (which requires a<br />
loaded user profile). DPAPI defaults to the user store, although you can specify that<br />
the machine store be used by passing the CRYPTPROTECT_LOCAL_MACHINE<br />
flag to the DPAPI functions.<br />
The user profile approach affords an additional layer of security because it limits<br />
who can access the secret. Only the user who encrypts the data can decrypt the<br />
data. However, use of the user profile requires additional development effort when<br />
DPAPI is used from an <strong>ASP</strong>.<strong>NET</strong> Web application because you need to take explicit<br />
steps to load and unload a user profile (<strong>ASP</strong>.<strong>NET</strong> does not automatically load a user<br />
profile).<br />
The machine store approach is easier to develop because it does not require user<br />
profile management. However, unless an additional entropy parameter is used, it is<br />
less secure because any user on the computer can decrypt data. (Entropy is a random<br />
value designed to make deciphering the secret more difficult). The problem<br />
with using an additional entropy parameter is that this must be securely stored by<br />
the application, which presents another key management issue.<br />
Note: If you use DPAPI with the machine store, the encrypted string is specific to a given<br />
computer and therefore you must generate the encrypted data on every computer. Do not copy<br />
the encrypted data across computers in a farm or cluster.<br />
If you use DPAPI with the user store, you can decrypt the data on any computer with a roaming<br />
user profile.
316<br />
<strong>Building</strong> <strong>Secure</strong> <strong>ASP</strong>.<strong>NET</strong> <strong>Applications</strong><br />
DPAPI Implementation Solutions<br />
This section presents two implementation solutions that show you how to use<br />
DPAPI from an <strong>ASP</strong>.<strong>NET</strong> Web application to secure a connection string (or a secret<br />
of any type). The implementation solutions described in this section are:<br />
● Using DPAPI from Enterprise Services. This solution allows you to use DPAPI<br />
with the user store.<br />
● Using DPAPI Directly from <strong>ASP</strong>.<strong>NET</strong>. This solution allows you to use DPAPI<br />
with the machine store, which makes the solution easier to develop as DPAPI can<br />
be called directly from an <strong>ASP</strong>.<strong>NET</strong> Web application.<br />
Using DPAPI from Enterprise Services<br />
An <strong>ASP</strong>.<strong>NET</strong> Web application can’t call DPAPI and use the user store because this<br />
requires a loaded user profile. The <strong>ASP</strong><strong>NET</strong> account usually used to run Web<br />
applications is a non-interactive account and as such does not have a user profile.<br />
Furthermore, if the <strong>ASP</strong>.<strong>NET</strong> application is impersonating, the Web application<br />
thread runs as the currently authenticated user, which can vary from one request to<br />
the next.<br />
This presents the following issues for an <strong>ASP</strong>.<strong>NET</strong> Web application that wants to use<br />
DPAPI:<br />
● Calls to DPAPI from an <strong>ASP</strong>.<strong>NET</strong> application running under the default <strong>ASP</strong><strong>NET</strong><br />
account will fail. This is because the <strong>ASP</strong><strong>NET</strong> account does not have a user<br />
profile, as it is not used for interactive logons.<br />
● If an <strong>ASP</strong>.<strong>NET</strong> Web application is configured to impersonate its callers, the<br />
<strong>ASP</strong>.<strong>NET</strong> application thread has an associated thread impersonation token. The<br />
logon session associated with this impersonation token is a network logon<br />
session (used on the server to represent the caller). Network logon sessions do<br />
not result in user profiles being loaded.<br />
To overcome this issue, you can create a serviced component (within an out-ofprocess<br />
Enterprise Services (COM+) server application) to call DPAPI. You can<br />
ensure that the account used to run the component has a user profile and you can<br />
use a Win32 service to automatically load the profile.<br />
Note: It is possible to avoid the use of a Win32 service by placing calls to Win32 profile<br />
management functions (LoadUserProfile and UnloadUserProfile) within the serviced component.<br />
There are two drawbacks to this approach. First, calls to these APIs on a per-request basis<br />
would severely impact performance. Second, these APIs require that the calling code have<br />
administrative privileges on the local computer, which defeats the principle of least privilege for<br />
the Enterprise Services process account.
Chapter 12: Data Access Security 317<br />
Figure 12.6 shows the Enterprise Services DPAPI solution.<br />
<strong>ASP</strong>.<strong>NET</strong><br />
Web<br />
Application<br />
4<br />
6<br />
3 5<br />
Encrypted<br />
Connection<br />
String<br />
Enterprise Services (COM+)<br />
Server Application<br />
Serviced<br />
Component<br />
DPAPI<br />
Crypto API<br />
P/Invoke<br />
2<br />
Launch<br />
1<br />
Win32<br />
Service<br />
Start and<br />
load user<br />
profile<br />
Service Control<br />
Manager<br />
web.config<br />
Figure 12.6<br />
The <strong>ASP</strong>.<strong>NET</strong> Web application uses a COM+ server application to interact with DPAPI<br />
In Figure 12.6, the runtime sequence of events is as follows:<br />
1. The Windows service control manager starts the Win32 service and automatically<br />
loads the user profile associated with the account under which the service<br />
runs. The same Windows account is used to run the Enterprise Services application.<br />
2. The Win32 service calls a launch method on the serviced component that starts<br />
the Enterprise Services application and loads the serviced component.<br />
3. The Web application retrieves the encrypted string from the Web.config file.<br />
You can store the encrypted string by using an element within<br />
Web.config as shown below. This element supports arbitrary key-value pairs.<br />
<br />
<br />
<br />
<br />
<br />
You can retrieve the encrypted string with the following line of code:<br />
string connString = ConfigurationSettings.AppSettings["SqlConnString"];
318<br />
<strong>Building</strong> <strong>Secure</strong> <strong>ASP</strong>.<strong>NET</strong> <strong>Applications</strong><br />
Note: You can use Web.config or Machine.config to store encrypted connection strings.<br />
Machine.config is preferred as it is in a system directory outside of a virtual directory. This<br />
is discussed further in the next section, “Using Web.config and Machine.config.”<br />
4. The application calls a method on the serviced component to decrypt the connection<br />
string.<br />
5. The serviced component interacts with DPAPI using P/Invoke to call the Win32<br />
DPAPI functions.<br />
6. The decrypted string is returned to the Web application.<br />
Note: To store encrypted connection strings in the Web.config file in the first place, write a<br />
utility application that takes the connection strings and calls the serviced component’s<br />
EncryptData method to obtain the encrypted string. It is essential that you run the utility<br />
application while logged on with the same account that you use to run the Enterprise Services<br />
server application.<br />
Using DPAPI Directly from <strong>ASP</strong>.<strong>NET</strong><br />
If you use the machine store (and call the DPAPI functions with the<br />
CRYPTPROTECT_LOCAL_MACHINE flag) you can call the DPAPI functions<br />
directly from an <strong>ASP</strong>.<strong>NET</strong> Web application (because you don’t need a user profile).<br />
However, because you are using the machine store, any Windows account that can<br />
log on to the computer has access to the secret. A mitigating approach is to add<br />
entropy but this requires additional key management.<br />
As alternatives to using entropy with the machine store, consider the following<br />
options:<br />
● Use Windows ACLs to restrict access to the encrypted data (whether the data is<br />
stored in the file system or registry).<br />
● Consider hard-coding the entropy parameter into your application to avoid the<br />
key management issue.<br />
More Information<br />
● For more information about creating a DPAPI library for use with .<strong>NET</strong> Web<br />
applications, see “How To: Create a DPAPI Library” in the Reference section of<br />
this guide.<br />
● For a detailed implementation walkthrough that shows you how to use DPAPI<br />
directly from <strong>ASP</strong>.<strong>NET</strong>, see “How To: Use DPAPI (Machine Store) from<br />
<strong>ASP</strong>.<strong>NET</strong>” in the Reference section of this guide.<br />
● For a detailed implementation walkthrough that shows you how to use DPAPI<br />
from Enterprise Services, see “How To: Use DPAPI (User Store) from <strong>ASP</strong>.<strong>NET</strong><br />
with Enterprise Services” in the Reference section of this guide.
Chapter 12: Data Access Security 319<br />
●<br />
For more information about Windows Data Protection with DPAPI, see the<br />
MSDN article, “Windows Data Protection.”<br />
Using Web.config and Machine.config<br />
Storing plain text passwords in Web.config is not recommended. By default, the<br />
HttpForbiddenHandler protects the file from being downloading and viewed by<br />
malicious users. However, users who have access directly to the folders that contain<br />
the configuration files can still see the user name and password.<br />
Machine.config is considered a more secure storage location than Web.config<br />
because it is located in a system directory (with ACLs) outside of a Web<br />
application’s virtual directory. Always lock down Machine.config with ACLs.<br />
More Information<br />
For more information about securing Machine.config, see Chapter 8, “<strong>ASP</strong>.<strong>NET</strong><br />
Security.”<br />
Using UDL Files<br />
The OLE DB .<strong>NET</strong> Data Provider supports UDL file names in its connection string.<br />
To reference a UDL file, use “File Name=name.udl” within the connection string.<br />
Important: This option is only available if you use the OLE DB .<strong>NET</strong> Data Provider to connect to<br />
the database. The SQL Server .<strong>NET</strong> Data Provider does not use UDL files.<br />
It is not recommended to store UDL files in a virtual directory along with other<br />
application files. You should store them outside the Web application’s virtual<br />
directory hierarchy and then secure the file or the folder containing the file with<br />
Windows ACLs. You should also consider storing UDL files on a separate logical<br />
volume from the operating system to protect against possible file canonicalization<br />
and directory traversal bugs.<br />
ACL Granularity<br />
UDL files (or indeed any text file) offer added granularity when you apply ACLs in<br />
comparison to Machine.config. The default ACLs associated with Machine.config<br />
grant access to a wide variety of local and remote users. For example,<br />
Machine.config has the following default ACLs:<br />
MachineName\<strong>ASP</strong><strong>NET</strong>:R<br />
BUILTIN\Users:R<br />
BUILTIN\Power Users:C<br />
BUILTIN\Administrators:F<br />
NT AUTHORITY\SYSTEM:F
320<br />
<strong>Building</strong> <strong>Secure</strong> <strong>ASP</strong>.<strong>NET</strong> <strong>Applications</strong><br />
By contrast, you can lock down your own application’s UDL file much further. For<br />
example, you can restrict access to Administrators, the System account, and the<br />
<strong>ASP</strong>.<strong>NET</strong> process account (which requires read access) as shown below.<br />
BUILTIN\Administrators:F<br />
MachineName\<strong>ASP</strong><strong>NET</strong>:R<br />
NT AUTHORITY\SYSTEM:F<br />
Note: Because UDL files can be modified externally to any ADO.<strong>NET</strong> client application, connection<br />
strings that contain references to UDL files are parsed every time the connection is<br />
opened. This can impact performance and it is therefore recommended, for best performance,<br />
that you use a static connection string that does not include a UDL file.<br />
<br />
To create a new UDL file<br />
1. Use Windows Explorer and navigate to the folder in which you want to create<br />
the UDL file.<br />
2. Right-click within the folder, point to New, and then click Text Document.<br />
3. Supply a file name with a .udl file extension.<br />
4. Double-click the new file to display the UDL Properties dialog box.<br />
More Information<br />
For more information about using UDL files from Microsoft C#® development tool<br />
programs, see article Q308426, “HOW TO: Use Data Link Files with<br />
OleDbConnection Object in VC#,” in the Microsoft Knowledge Base.<br />
Using Custom Text Files<br />
Many applications use custom text files to store connection strings. If you do adopt<br />
this approach consider the following recommendations:<br />
● Store custom files outside of your application’s virtual directory hierarchy.<br />
●<br />
●<br />
●<br />
Consider storing files on a separate logical volume from the operating system to<br />
protect against possible file canonicalization and directory traversal bugs.<br />
Protect the file with a restricted ACL that grants read access to your application’s<br />
process account.<br />
Avoid storing the connection string in clear text in the file. Instead, consider<br />
using DPAPI to store an encrypted string.
Chapter 12: Data Access Security 321<br />
Using the Registry<br />
You can use a custom key in the Windows registry to store the connection string.<br />
This information stored can either be stored in the HKEY_LOCAL_MACHINE<br />
(HKLM) or HKEY_CURRENT_USER (HKCU) registry hive. For process identities,<br />
such as the <strong>ASP</strong><strong>NET</strong> account, that do not have user profiles, the information must<br />
be stored in HKLM in order to allow <strong>ASP</strong>.<strong>NET</strong> code to retrieve it.<br />
If you do use this approach, you should:<br />
● Use ACLs to protect the registry key using Regedt32.exe.<br />
● Encrypt the data prior to storage.<br />
More Information<br />
For more information about encrypting data for storage in the registry, see “How<br />
To: Store an Encrypted Connection String in the Registry” in the Reference section<br />
of this guide.<br />
Using the COM+ Catalog<br />
If your Web application includes serviced components, you can store connection<br />
strings in the COM+ catalog as constructor strings. These are easily administered<br />
(by using the Component Services tool) and are easily retrieved by component code.<br />
Enterprise Services calls an object’s Construct method immediately after instantiating<br />
the object, and passes the configured construction string.<br />
The COM+ catalog doesn’t provide a high degree of security, because the information<br />
is not encrypted; however, it raises the security bar in comparison to configuration<br />
files because of the additional process hop.<br />
To prevent access to the catalog through the Component Services tool, include only<br />
the desired list of users in the Administrator and Reader roles in the System application.<br />
The following example shows how to retrieve an object constructor string from a<br />
serviced component.<br />
[ConstructionEnabled(Default="Default Connection String")]<br />
public class YourClass : ServicedComponent<br />
{<br />
private string _ConnectionString;<br />
override protected void Construct(string s)<br />
{<br />
_ConnectionString = s;<br />
}<br />
}
322<br />
<strong>Building</strong> <strong>Secure</strong> <strong>ASP</strong>.<strong>NET</strong> <strong>Applications</strong><br />
For added security, you can add code to encrypt the construction string prior to<br />
storage and decrypt it within the serviced component.<br />
More Information<br />
● For more information on using connection strings, see article Q271284,<br />
“HOWTO: Access COM+ Object Constructor String in a VB Component,” in the<br />
Microsoft Knowledge Base.<br />
● For a complete code sample provided by the .<strong>NET</strong> Framework SDK, see the<br />
object constructor sample located in \Program Files\Microsoft Visual Studio<br />
.<strong>NET</strong>\FrameworkSDK\Samples\Technologies\ComponentServices\ObjectConstruction.<br />
Authenticating Users Against a Database<br />
If you are building an application that needs to validate user credentials against a<br />
database store, consider the following points:<br />
● Store one-way password hashes (with a random salt value).<br />
● Avoid SQL injection when validating user credentials.<br />
Store One-way Password Hashes (with Salt)<br />
Web applications that use Forms authentication often need to store user credentials<br />
(including passwords) in a database. For security reasons, you should not store<br />
passwords (clear text or encrypted) in the database.<br />
You should avoid storing encrypted passwords because it raises key management<br />
issues — you can secure the password with encryption, but you then have to consider<br />
how to store the encryption key. If the key becomes compromised, an attacker<br />
can decrypt all the passwords within your data store.<br />
The preferred approach is to:<br />
● Store a one way hash of the password. Re-compute the hash when the password<br />
needs to be validated.<br />
● Combine the password hash with a salt value (a cryptographically strong<br />
random number). By combining the salt with the password hash, you mitigate<br />
the threat associated with dictionary attacks.<br />
Creating a Salt Value<br />
The following code shows how to generate a salt value by using random number<br />
generation functionality provided by the RNGCryptoServiceProvider class within<br />
the System.Security.Cryptography namespace.
Chapter 12: Data Access Security 323<br />
public static string CreateSalt(int size)<br />
{<br />
RNGCryptoServiceProvider rng = new RNGCryptoServiceProvider();<br />
byte[] buff = new byte[size];<br />
rng.GetBytes(buff);<br />
return Convert.ToBase64String(buff);<br />
}<br />
Creating a Hash Value (with Salt)<br />
The following code fragment shows how to generate a hash value from a supplied<br />
password and salt value.<br />
public static string CreatePasswordHash(string pwd, string salt)<br />
{<br />
string saltAndPwd = string.Concat(pwd, salt);<br />
string hashedPwd =<br />
FormsAuthentication.HashPasswordForStoringInConfigFile(<br />
saltAndPwd, "SHA1");<br />
return hashedPwd;<br />
}<br />
More Information<br />
For the full implementation details of this approach, see “How To: Use Forms<br />
Authentication with SQL Server 2000” in the Reference section of this guide.<br />
SQL Injection Attacks<br />
If you’re using Forms authentication against a SQL database, you should take the<br />
precautions discussed in this section to avoid SQL injection attacks. SQL injection is<br />
the act of passing additional (malicious) SQL code into an application which is<br />
typically appended to the legitimate SQL code contained within the application. All<br />
SQL databases are susceptible to SQL injection to varying degrees, but the focus in<br />
this chapter is on SQL Server<br />
You should pay particular attention to the potential for SQL injection attacks when<br />
you process user input that forms part of a SQL command. If your authentication<br />
scheme is based on validating users against a SQL database, for example, if you’re<br />
using Forms authentication against SQL Server, then you must guard against SQL<br />
injection attacks.<br />
If you build SQL strings using unfiltered input, your application may be subject to<br />
malicious user input (remember, never trust user input). The risk is that when you<br />
insert user input into a string that becomes an executable statement, a malicious<br />
user can append SQL commands to your intended SQL statements by using escape<br />
characters.
324<br />
<strong>Building</strong> <strong>Secure</strong> <strong>ASP</strong>.<strong>NET</strong> <strong>Applications</strong><br />
The code fragments in the following sections use the Pubs database that is supplied<br />
with SQL Server to illustrate examples of SQL injection.<br />
The Problem<br />
Your application may be susceptible to SQL injection attacks when you incorporate<br />
user input or other unknown data into database queries. For example, both of the<br />
following code fragments are susceptible to attack.<br />
● You build SQL statements with unfiltered user input.<br />
SqlDataAdapter myCommand = new SqlDataAdapter(<br />
"SELECT au_lname, au_fname FROM authors WHERE au_id = '" +<br />
Login.Text + "'", myConnection);<br />
●<br />
You call a stored procedure by building a single string that incorporates unfiltered<br />
user input.<br />
SqlDataAdapter myCommand = new SqlDataAdapter("LoginStoredProcedure '" +<br />
Login.Text + "'", myConnection);<br />
Anatomy of a SQL Script Injection Attack<br />
When you accept unfiltered user input values (as shown above) in your application,<br />
a malicious user can use escape characters to append their own commands.<br />
Consider a SQL query that expects the user’s input to be in the form of a Social<br />
Security Number, such as 172-32-xxxx, which results in a query like this:<br />
SELECT au_lname, au_fname FROM authors WHERE au_id = '172-32-xxxx'<br />
A malicious user can enter the following text into your application’s input field (for<br />
example a text box control).<br />
' ; INSERT INTO jobs (job_desc, min_lvl, max_lvl) VALUES ('Important Job', 25,<br />
100) -<br />
In this example, an INSERT statement is injected (but any statement that is permitted<br />
for the account that’s used to connect to SQL Server could be executed). The<br />
code can be especially damaging if the account is a member of the sysadmin role<br />
(this allows shell commands using xp_cmdshell) and SQL Server is running under a<br />
domain account with access to other network resources.
Chapter 12: Data Access Security 325<br />
The command above results in the following combined SQL string:<br />
SELECT au_lname, au_fname FROM authors WHERE au_id = '';INSERT INTO jobs<br />
(job_desc, min_lvl, max_lvl) VALUES ('Important Job', 25, 100) --<br />
In this case, the ' (single quotation mark) character that starts the rogue input<br />
terminates the current string literal in your SQL statement. It closes the current<br />
statement only if the following parsed token doesn’t make sense as a continuation<br />
of the current statement, but does make sense as the start of a new statement.<br />
SELECT au_lname, au_fname FROM authors WHERE au_id = ' '<br />
The ; (semicolon) character tells SQL that you’re starting a new statement, which is<br />
then followed by the malicious SQL code:<br />
; INSERT INTO jobs (job_desc, min_lvl, max_lvl) VALUES ('Important Job', 25, 100)<br />
Note: The semicolon is not necessarily required to separate SQL statements. This is vendor/<br />
implementation dependent, but SQL Server does not require them. For example, SQL Server<br />
will parse the following as two separate statements:<br />
SELECT * FROM MyTable DELETE FROM MyTable<br />
Finally, the -- (double dash) sequence of characters is a SQL comment that tells SQL<br />
to ignore the rest of the text, which in this case, ignores the closing ' (single quote)<br />
character (which would otherwise cause a SQL parser error).<br />
The full text that SQL executes as a result of the statement shown above is:<br />
SELECT au_lname, au_fname FROM authors WHERE au_id = '' ; INSERT INTO jobs<br />
(job_desc, min_lvl, max_lvl) VALUES ('Important Job', 25, 100) --'<br />
The Solution<br />
The following approaches can be used to call SQL safely from your application.<br />
● Use the Parameters collection when building your SQL statements.<br />
SqlDataAdapter myCommand = new SqlDataAdapter(<br />
"SELECT au_lname, au_fname FROM Authors WHERE au_id= @au_id",<br />
myConnection);<br />
SqlParameter parm = myCommand.SelectCommand.Parameters.Add(<br />
"@au_id",<br />
SqlDbType.VarChar, 11);<br />
parm.Value= Login.Text;
326<br />
<strong>Building</strong> <strong>Secure</strong> <strong>ASP</strong>.<strong>NET</strong> <strong>Applications</strong><br />
●<br />
Use the Parameters collection when you call a stored procedure.<br />
// AuthorLogin is a stored procedure that accepts a parameter named Login<br />
SqlDataAdapter myCommand = new SqlDataAdapter("AuthorLogin", myConnection);<br />
myCommand.SelectCommand.CommandType = CommandType.StoredProcedure;<br />
SqlParameter parm = myCommand.SelectCommand.Parameters.Add(<br />
"@LoginId", SqlDbType.VarChar,11);<br />
parm.Value=Login.Text;<br />
●<br />
If you use the Parameters collection, no matter what a malicious user includes as<br />
input, the input is treated as a literal. An additional benefit of using the Parameters<br />
collection is that you can enforce type and length checks. Values outside of<br />
the range trigger an exception. This is a healthy example of defense in depth.<br />
Filter user input for SQL characters. The following method shows how to ensure<br />
that any string literal used in a simple SQL comparison statement (equal to, less<br />
than, greater than) is safe. It does this by ensuring that any apostrophe used in<br />
the string is escaped with an additional apostrophe. Within a SQL string literal,<br />
two consecutive apostrophes are treated as an instance of the apostrophe character<br />
within the string rather than as delimiters.<br />
private string SafeSqlLiteral(string inputSQL)<br />
{<br />
return inputSQL.Replace("'", "''");<br />
}<br />
…<br />
string safeSQL = SafeSqlLiteral(Login.Text);<br />
SqlDataAdapter myCommand = new SqlDataAdapter(<br />
"SELECT au_lname, au_fname FROM authors WHERE au_id = '" +<br />
safeSQL + "'", myConnection);<br />
Additional Best Practices<br />
The following are some additional measures you can take to limit the chance of<br />
exploit, as well as limit the scope of potential damage:<br />
● Prevent invalid input at the gate (the front-end application) by limiting the size<br />
and type of input. By limiting the size and type of input, you significantly reduce<br />
the potential for damage. For example, if your database lookup field is eleven<br />
characters long and comprised entirely of numeric characters, enforce it.<br />
● Run SQL code with a least privileged account. This significantly reduces the<br />
potential damage that can be done.<br />
For example, if a user were to inject SQL to DROP a table from the database,<br />
but the SQL connection used an account that didn’t have appropriate permissions,<br />
the SQL code would fail. This is another reason not to use the sa account<br />
or database owner account for your application’s SQL connections.
Chapter 12: Data Access Security 327<br />
●<br />
When an exception occurs in your SQL code, do not expose the SQL errors raised<br />
by the database to the end user. Log error information and show only user<br />
friendly information. This prevents exposing unnecessary detail that could help<br />
an attacker.<br />
Protecting Pattern Matching Statements<br />
If input is to be used within string literals in a ‘LIKE’ clause, characters other than<br />
apostrophe also take on special meaning for pattern matching.<br />
For example, in a LIKE clause the % character means “match zero or more characters.”<br />
In order to treat such characters in the input as literal characters without<br />
special meaning, they also need to be escaped. If they are not handled specially, the<br />
query can return incorrect results; a non-escaped pattern matching character at or<br />
near the beginning of the string could also defeat indexing.<br />
For SQL Server, the following method should be used to ensure valid input:<br />
private string SafeSqlLikeClauseLiteral(string inputSQL)<br />
{<br />
// Make the following replacements:<br />
// ' becomes ''<br />
// [ becomes [[]<br />
// % becomes [%]<br />
// _ becomes [_]<br />
}<br />
string s = inputSQL;<br />
s = inputSQL.Replace("'", "''");<br />
s = s.Replace("[", "[[]");<br />
s = s.Replace("%", "[%]");<br />
s = s.Replace("_", "[_]");<br />
return s;<br />
Auditing<br />
Auditing of logons is not on by default within SQL Server. You can configure this<br />
either through SQL Server Enterprise Manager or in the registry. The dialog box in<br />
Figure 12.7 on the next page shows auditing enabled for both the success and failure<br />
of user logons.<br />
Log entries are written to SQL log files which are by default located in C:\Program<br />
Files\Microsoft SQL Server\MSSQL\LOG. You can use any text reader, such as<br />
Notepad, to view them.
328<br />
<strong>Building</strong> <strong>Secure</strong> <strong>ASP</strong>.<strong>NET</strong> <strong>Applications</strong><br />
Figure 12.7<br />
SQL Server Properties dialog with Audit level settings<br />
You can also enable SQL Server auditing in the registry. To enable SQL Server<br />
auditing, create the following AuditLevel key within the registry and set its value<br />
to one of the REG_DWORD values specified below.<br />
HKEY_LOCAL_MACHINE\SOFTWARE\Microsoft\MSSQLServer\AuditLevel<br />
You can choose from one of the following values, which allow you to capture the<br />
level of detail you want:<br />
3—captures both success and failed login attempts<br />
2—captures only failed login attempts<br />
1—captures only success login attempts<br />
0—captures no logins<br />
It is recommended that you turn on failed login auditing because this is a way to<br />
determine if someone is attempting a brute attack into SQL Server. The performance<br />
impacts of logging failed audit attempts are minimal unless you are being attacked,<br />
in which case you need to know anyway.<br />
You can also script against SQL Database Management Objects (DMO). The following<br />
code fragment shows some sample VBScript code.
Chapter 12: Data Access Security 329<br />
Sub SetAuditLevel(Server As String, NewAuditLevel As SQLDMO_AUDIT_TYPE)<br />
Dim objServer As New SQLServer2<br />
objServer.Login<strong>Secure</strong> = True 'Use integrated security<br />
objServer.Connect Server 'Connect to the target SQL Server<br />
'Set the audit level<br />
objServer.IntegratedSecurity.AuditLevel = NewAuditLevel<br />
Set objServer = Nothing<br />
End Sub<br />
From SQL Server Books online, the members of the enumerated type,<br />
SQLDMO_AUDIT_TYPE are:<br />
SQLDMOAudit_All 3 Log all authentication attempts regardless of success<br />
or failure<br />
SQLDMOAudit_Failure 2 Log failed authentication<br />
SQLDMOAudit_Success 1 Log successful authentication<br />
SQLDMOAudit_None 0 Do not log authentication attempts<br />
Process Identity for SQL Server<br />
Summary<br />
Run SQL Server using a least privileged domain account. When you install SQL<br />
Server, you have the option of running the SQL Server service using the local<br />
SYSTEM account, or a specified account.<br />
Don’t use the SYSTEM account or an administrator account. Instead, use a least<br />
privileged domain account. You do not need to grant this account any specific<br />
privileges, as the installation process (or SQL Server Enterprise Manager, if you are<br />
reconfiguring the SQL Service after installation) grants the specified account the<br />
necessary privileges.<br />
The following is a summary that highlights the recommendation for data access in<br />
your .<strong>NET</strong> Web applications:<br />
● Use Windows authentication to SQL Server when possible.<br />
● Use accounts with least privilege in the database.<br />
● Use least privileged, local accounts for running <strong>ASP</strong>.<strong>NET</strong>/Enterprise Services<br />
when connecting to SQL Server.<br />
● If you are using SQL authentication, take the following steps to improve security:<br />
● Use custom accounts with strong passwords.<br />
● Limit the permissions of each account within SQL Server using database roles.
330<br />
<strong>Building</strong> <strong>Secure</strong> <strong>ASP</strong>.<strong>NET</strong> <strong>Applications</strong><br />
●<br />
●<br />
●<br />
●<br />
●<br />
●<br />
Add ACLs to any files used to store connection strings.<br />
Encrypt connection strings.<br />
Consider DPAPI for credential storage.<br />
When you use Forms authentication against SQL, take precautions to avoid SQL<br />
injection attacks.<br />
Don’t store user passwords in databases for user validation. Instead, store<br />
password hashes with a salt instead of clear text or encrypted passwords.<br />
Protect sensitive data sent over the network to and from SQL Server.<br />
● Windows authentication protects credentials, but not application data.<br />
● Use IPSec or SSL.
13<br />
Troubleshooting Security Issues<br />
This chapter presents a process for troubleshooting and provides a range of techniques<br />
and tools that can be used to help diagnose security related problems.<br />
Process for Troubleshooting<br />
The following approach has proven to be helpful for resolving security and security<br />
context related issues.<br />
1. Start by describing the problem very clearly. Make sure you know precisely what<br />
is supposed to happen, what is actually happening, and most importantly, the<br />
detailed steps required to reproduce the problem.<br />
2. Isolate the problem as accurately as you can. Try to determine at which stage<br />
during the processing of a request the problem occurs. Is it a client or server<br />
related issue? Does it appear to be a configuration or code related error? Try to<br />
isolate the problem by stripping away application layers. For example, consider<br />
building a simple console-based test client application to take the place of more<br />
complex client applications.<br />
3. Analyze error messages and stack traces (if they are available). Always start by<br />
consulting the Windows event and security logs.<br />
4. Check the Microsoft Knowledge Base to see if the problem has been documented<br />
as a Knowledge Base article.<br />
5. Many security related problems relate to the identity used to run code; these are<br />
not always the identities you imagine are running the code. Use the code<br />
samples presented in the “Determining Identity” subsection of the “<strong>ASP</strong>.<strong>NET</strong>”<br />
section in this chapter to retrieve and diagnose identity information. If the<br />
identities appear incorrect, check the configuration settings in web.config and<br />
machine.config and also check the IIS authentication settings for your
332<br />
<strong>Building</strong> <strong>Secure</strong> <strong>ASP</strong>.<strong>NET</strong> <strong>Applications</strong><br />
application’s virtual directory. Factors that can affect identity within an <strong>ASP</strong>.<strong>NET</strong><br />
Web application include:<br />
● The element in machine.config used to determine the<br />
process identity of the <strong>ASP</strong>.<strong>NET</strong> worker process (aspnet_wp.exe).<br />
● Authentication settings in IIS.<br />
● Authentication settings in web.config.<br />
● Impersonation settings in web.config.<br />
6. Even if it appears that the correct settings are being used and displayed, you<br />
may want to explicitly configure a web.config file for your application (in the<br />
application’s virtual directory) to make sure it is not inheriting settings from a<br />
higher level application (perhaps from a web.config in a higher-level virtual<br />
directory) or from machine.config.<br />
7. Use some of the troubleshooting tools listed in the “Troubleshooting Tools”<br />
section later in this chapter to capture additional diagnostics.<br />
8. Attempt to reproduce the problem on another computer. This can help isolate<br />
environmental related problems and can indicate whether or not the problem is<br />
in your application’s code or configuration.<br />
9. If your application is having problems accessing a remote resource, you may be<br />
running into impersonation/delegation related problems. Identify the security<br />
context being used for the remote resource access, and if you are using Windows<br />
authentication, verify that the account providing the context (for example, a<br />
process account), should be able to be authenticated by the remote computer.<br />
10. <strong>Search</strong> newsgroups to see if the problem has already been reported. If not, post<br />
the problem to the newsgroup to see if anyone within the development community<br />
can provide assistance.<br />
The online newsgroup for <strong>ASP</strong>.<strong>NET</strong> is located at: http://communities.microsoft.com<br />
/newsgroups/default.asp?icp=mscom&slcid=US&newsgroup=microsoft.public.dotnet<br />
.framework.aspnet<br />
11. Call the Microsoft Support Center. For details, see the Microsoft Knowledge<br />
Base.<br />
<strong>Search</strong>ing for Implementation Solutions<br />
If you have a specific issue and need to understand the best way to tackle the<br />
problem, use the following approach.<br />
● <strong>Search</strong> in Chapters 5, 6, and 7of this guide for your scenario or a similar scenarios.<br />
● Consult the MSDN library documentation and samples.
Chapter 13: Troubleshooting Security Issues 333<br />
●<br />
●<br />
●<br />
●<br />
Refer to one of the many <strong>ASP</strong>.<strong>NET</strong> information Web sites, such as:<br />
●<br />
●<br />
●<br />
www.asp.net<br />
www.gotdotnet.com<br />
www.asptoday.com<br />
<strong>Search</strong> the Microsoft Knowledge Base for an appropriate How To article.<br />
Post questions to newsgroups.<br />
Call the Microsoft Support Center.<br />
Troubleshooting Authentication Issues<br />
The first step when troubleshooting authentication issues is to distinguish between<br />
IIS and <strong>ASP</strong>.<strong>NET</strong> authentication failure messages.<br />
● If you are receiving an IIS error message you will not see an <strong>ASP</strong>.<strong>NET</strong> error code.<br />
Check the IIS authentication settings for your application’s virtual directory.<br />
Create a simple HTML test page to remove <strong>ASP</strong>.<strong>NET</strong> from the solution.<br />
● If you are receiving an <strong>ASP</strong>.<strong>NET</strong> error message, review the <strong>ASP</strong>.<strong>NET</strong> authentication<br />
settings within your application’s web.config file.<br />
IIS Authentication Issues<br />
Because the authentication process starts with IIS, make sure IIS is configured<br />
correctly.<br />
● Make sure a user is being authenticated. Consider enabling just Basic authentication<br />
and manually log in to ensure you know what principal is being authenticated.<br />
Log in with a user name of the form “domain\username”.<br />
●<br />
●<br />
●<br />
Restart IIS to ensure log on sessions aren’t being cached. (Run IISReset.exe to<br />
restart IIS).<br />
Close your browser between successive tests to ensure the browser isn’t caching<br />
credentials.<br />
If you are using Integrated Windows authentication, check browser settings as<br />
described below.<br />
● Click Tools from the Internet Options menu and then click the Advanced tab.<br />
Select Enable Integrated Windows Authentication (requires restart). Then<br />
restart the browser.<br />
● Click Tools from the Internet Options menu, and then click the Security tab.<br />
Select the appropriate Web content zone and click Custom Level. Within User<br />
Authentication ensure the Logon setting is set correctly for your application.<br />
You may want to select Prompt for user name and password to ensure that<br />
for each test you are providing explicit credentials and that nothing is being<br />
cached.
334<br />
<strong>Building</strong> <strong>Secure</strong> <strong>ASP</strong>.<strong>NET</strong> <strong>Applications</strong><br />
●<br />
● If the browser prompts you for credentials this could mean you are currently<br />
logged into a domain that the server doesn’t recognize (for example, you may<br />
be logged in as administrator on the local machine).<br />
● When you browse to an application on your local computer, your interactive<br />
logon token is used, as you are interactively logged onto the Web server.<br />
Test with a simple Web page that displays security context information. A sample<br />
page is provided later in this chapter.<br />
If this fails, enable auditing on the requested file and check the Security event<br />
log. You must also enable auditing using Group Policy (through either the Local<br />
Security Policy tool, or the Domain Security Policy tool). Examine the log for<br />
invalid usernames or invalid object access attempts.<br />
● If your Web application is having problems accessing a remote resource,<br />
enable auditing on the remote resource.<br />
● An invalid username and/or password usually means that the account used<br />
to run <strong>ASP</strong>.<strong>NET</strong> on your Web server is failing to be correctly authenticated at<br />
the remote computer. If you are attempting to access remote resources with<br />
the default <strong>ASP</strong><strong>NET</strong> local account, check that you have duplicated the account<br />
(and password) on the remote computer.<br />
● If you see an error message that indicates that the login has failed for NT<br />
AUTHORITY\ANONYMOUS this indicates that the identity on Web server<br />
does not have any network credentials and is attempting to access the remote<br />
computer.<br />
Identify which account is being used by the Web application for remote<br />
resource access and confirm that it has network credentials. If the Web application<br />
is impersonating, this requires either Kerberos delegation (with suitably<br />
configured accounts) or Basic authentication at the Web server.<br />
Using Windows Authentication<br />
If the element in your application’s web.config is configured for<br />
Windows authentication, use the following code in your Web application to check<br />
whether anonymous access is being used (and the authenticated user is the anonymous<br />
Internet user account [IUSR_MACHINE]).<br />
WindowsIdentity winId = HttpContext.Current.User.Identity as WindowsIdentity;<br />
if (null != winId)<br />
{<br />
Response.Write(winId.IsAnonymous.ToString());<br />
}
Chapter 13: Troubleshooting Security Issues 335<br />
Using Forms Authentication<br />
Make sure that the cookie name specified in the element is being retrieved<br />
in the global.asax event handler correctly (Application_AuthenticateRequest).<br />
Also, make sure the cookie is being created. If the client is continuously sent back to<br />
the login page (specified by the loginUrl attribute on the element) this<br />
indicates that the cookie is not being created for some reason or an authenticated<br />
identity is not being placed into the context (HttpContext.User)<br />
Kerberos Troubleshooting<br />
Use the following tools to help troubleshoot Kerberos related authentication and<br />
delegation issues.<br />
● Kerbtray.exe. This utility can be used to view the Kerberos tickets in the cache on<br />
the current computer. It is part of the Windows 2000 Resource Kit and can be<br />
downloaded from http://www.microsoft.com/downloads/search.asp. <strong>Search</strong> for<br />
“Kerbtray.exe”.<br />
●<br />
●<br />
Klist.exe. This is a command line tool similar to Kerbtray, but it also allows you<br />
to view and delete Kerberos tickets. Once again, it is part of the Windows 2000<br />
Resource Kit and can be downloaded from http://www.microsoft.com/downloads<br />
/search.asp. <strong>Search</strong> for “Klist.exe”<br />
Setspn.exe. This is a command-line tool that allows you to manage the Service<br />
Principal Names (SPN) directory property for an Active <strong>Directory</strong> service account.<br />
SPNs are used to locate a target principal name for running a service.<br />
It is part of the Windows 2000 Resource Kit and can be downloaded from<br />
http://www.microsoft.com/downloads/search.asp. <strong>Search</strong> for “setspn.exe”.<br />
Troubleshooting Authorization Issues<br />
Check Windows ACLs<br />
If your application is having problems accessing a file or registry key (or any<br />
securable Windows object protected with ACLs), check the ACLs to ensure that the<br />
Web application identity has at least read access.<br />
Check Identity<br />
Also make sure you know which identity is being used for resource access by the<br />
<strong>ASP</strong>.<strong>NET</strong> Web application. This is likely to be:<br />
● The <strong>ASP</strong>.<strong>NET</strong> process identity (as configured on the element in<br />
web.config.
336<br />
<strong>Building</strong> <strong>Secure</strong> <strong>ASP</strong>.<strong>NET</strong> <strong>Applications</strong><br />
●<br />
This defaults to the local <strong>ASP</strong><strong>NET</strong> account specified with the username “machine”<br />
and password “AutoGenerate”.<br />
The authenticated caller’s identity (if impersonation is enabled within<br />
web.config) as shown below.<br />
<br />
●<br />
If you have not disabled anonymous access in IIS, this will be IUSR_MACHINE.<br />
A specified impersonation identity as shown below (although this is not recommended)<br />
<br />
More Information<br />
For more information about the identity used to run <strong>ASP</strong>.<strong>NET</strong> and the identity used<br />
to access local and network resources, see Chapter 8, “<strong>ASP</strong>.<strong>NET</strong> Security”.<br />
Check the Element<br />
Confirm that the and elements are configured correctly.<br />
●<br />
●<br />
If you have and you are using Forms authentication and/or<br />
IIS anonymous authentication, you must explicitly place an IPrincipal object into<br />
HttpContext.User or you will receive an access denied 401 response.<br />
Make sure the authenticated user is in the roles specified in and <br />
elements.<br />
<strong>ASP</strong>.<strong>NET</strong><br />
Enable Tracing<br />
<strong>ASP</strong>.<strong>NET</strong> provides quick and simple tracing to show the execution of events within<br />
a page and the values of common variables. This can be a very effective diagnostic<br />
aid. Use the page level Trace directive to turn on tracing, as shown below:<br />
<br />
More Information<br />
For more information on the new tracing feature in <strong>ASP</strong>.<strong>NET</strong> see the Knowledge<br />
Base article Q306731, “INFO: New Tracing Feature in <strong>ASP</strong>.<strong>NET</strong>”.
Chapter 13: Troubleshooting Security Issues 337<br />
Configuration Settings<br />
Most application settings should be placed in web.config. The following list shows<br />
main security related settings that can be placed in web.config.<br />
<br />
<br />
<br />
<br />
The following setting which controls the identity used to run the <strong>ASP</strong>.<strong>NET</strong> worker<br />
process (aspnet_wp.exe) must be located in machine.config.<br />
<br />
Configuration settings for an application are always retrieved from the application’s<br />
web.config file first and these override any equivalent settings within<br />
machine.config. If you want a particular setting to be applied to your application,<br />
explicitly configure the setting in the application’s web.config file.<br />
The main (and often only) web.config file for a particular application lives in its<br />
virtual directory root. Subdirectories can also contain web.config files. Settings in<br />
these files override the settings from web.config files in parent directories.<br />
Determining Identity<br />
Many security and access denied problems relate to the identity used for resource<br />
access. The following code samples presented in this section can be used to help<br />
determine identity in Web pages, COM objects, and Web services.<br />
For more information about .<strong>NET</strong> identity variables, see “<strong>ASP</strong>.<strong>NET</strong> Identity Matrix”<br />
in the Reference section of this guide.<br />
Determining Identity in a Web Page<br />
The following script can be used to gather security context related information and<br />
indicates the identity being used to run a Web page.<br />
To use this code, copy and paste it to create a file with a .aspx file extension. Copy<br />
the file to an IIS virtual directory and view the page from a browser.<br />
<br />
<br />
<br />
<br />
<br />
WhoAmI
338<br />
<strong>Building</strong> <strong>Secure</strong> <strong>ASP</strong>.<strong>NET</strong> <strong>Applications</strong><br />
<br />
<br />
<br />
<br />
<br />
<br />
HttpContext.Current.User.Identity<br />
<br />
<br />
Name<br />
<br />
<br />
<br />
IsAuthenticated<br />
<br />
<br />
<br />
AuthenticationType<br />
<br />
<br />
<br />
<br />
<br />
<br />
WindowsIdentity.GetCurrent()<br />
<br />
<br />
Name<br />
<br />
<br />
<br />
IsAuthenticated<br />
<br />
<br />
<br />
AuthenticationType<br />
<br />
<br />
<br />
<br />
<br />
<br />
Thread.CurrentPrincipal.Identity<br />
<br />
<br />
Name<br />
<br />
<br />
<br />
IsAuthenticated
Chapter 13: Troubleshooting Security Issues 339<br />
<br />
<br />
<br />
AuthenticationType<br />
<br />
<br />
<br />
<br />
<br />
<br />
<br />
void Page_Load(Object sender, EventArgs e)<br />
{<br />
IIdentity id = HttpContext.Current.User.Identity;<br />
if(null != id)<br />
{<br />
contextName.Text = id.Name;<br />
contextIsAuth.Text = id.IsAuthenticated.ToString();<br />
contextAuthType.Text = id.AuthenticationType;<br />
}<br />
id = Thread.CurrentPrincipal.Identity;<br />
if(null != id)<br />
{<br />
threadName.Text = id.Name;<br />
threadIsAuthenticated.Text = id.IsAuthenticated.ToString();<br />
threadAuthenticationType.Text = id.AuthenticationType;<br />
}<br />
id = WindowsIdentity.GetCurrent();<br />
windowsName.Text = id.Name;<br />
windowsIsAuth.Text = id.IsAuthenticated.ToString();<br />
windowsAuthType.Text = id.AuthenticationType;<br />
}<br />
<br />
Determining Identity in a Web service<br />
The following code can be used within a Web service to obtain identity information.<br />
[WebMethod]<br />
public string GetDotNetThreadIdentity()<br />
{<br />
return Thread.CurrentPrincipal.Identity.Name;<br />
}<br />
[WebMethod]<br />
public string GetWindowsThreadIdentity()<br />
{<br />
return WindowsIdentity.GetCurrent().Name;<br />
}<br />
[WebMethod]<br />
public string GetUserIdentity()<br />
{<br />
return User.Identity.Name;
340<br />
<strong>Building</strong> <strong>Secure</strong> <strong>ASP</strong>.<strong>NET</strong> <strong>Applications</strong><br />
}<br />
[WebMethod]<br />
public string GetHttpContextUserIdentity()<br />
{<br />
return HttpContext.Current.User.Identity.Name;<br />
}<br />
More Information<br />
● For a list of all security related Knowledge Base articles<br />
● For a list of security related articles that deal with frequently seen error messages,<br />
use the following link go to the Microsoft Knowledge Base and use the<br />
following search keywords:<br />
prb kbsecurity kbaspnet<br />
Determining Identity in a Visual Basic 6 COM Object<br />
The following method can be used to return the identity of a Visual Basic 6 COM<br />
object. You can call Visual Basic 6.0 COM objects directly from <strong>ASP</strong>.<strong>NET</strong> applications<br />
through COM interop. The following method can be helpful when you need to<br />
troubleshoot access denied errors from your component when it attempts to access<br />
resources.<br />
Private Declare Function GetUserName Lib "advapi32.dll" _<br />
Alias "GetUserNameA" (ByVal lpBuffer As String, nSize As Long) As Long<br />
Public Function WhoAmI()<br />
Dim sBuff As String<br />
Dim lConst As Long<br />
Dim lRet As Long<br />
Dim sName As String<br />
lConst = 199<br />
sBuff = Space$(200)<br />
lRet = GetUserName(sBuff, lConst)<br />
WhoAmI = Trim$(Left$(sBuff, lConst))<br />
End Function<br />
.<strong>NET</strong> Remoting<br />
If a remote object is hosted in <strong>ASP</strong>.<strong>NET</strong>, and is configured for Windows<br />
authentication, you must specify the credentials to be used for authentication<br />
through the credentials property of the channel. If you do not explicitly set<br />
credentials, the remote object is called without any credentials. If Windows<br />
authentication is required, this will result in an HTTP status 401, access denied<br />
response.
Chapter 13: Troubleshooting Security Issues 341<br />
To use the credentials associated with the current thread impersonation token (if the<br />
client thread is impersonating), or the process token (with no impersonation), use<br />
default credentials. This can be configured in the client-side configuration file using<br />
the following setting:<br />
<br />
If an <strong>ASP</strong>.<strong>NET</strong> Web application calls a remote component and the Web application is<br />
configured for impersonation, the Web application must be using Kerberos or Basic<br />
authentication. All other authentication types can not be used in delegation scenarios.<br />
If the Web application is not configured for impersonation, the process identity of<br />
the <strong>ASP</strong>.<strong>NET</strong> worker process is used. This is specified on the <br />
element of machine.config and defaults to the local <strong>ASP</strong><strong>NET</strong> account.<br />
Note: Ensure the process in running under an account that can be authenticated by the remote<br />
computer.<br />
More Information<br />
For more information about setting client-side credentials when calling remote<br />
components, see Chapter 11, “.<strong>NET</strong> Remoting Security.”<br />
SSL<br />
To troubleshoot SSL related problems:<br />
●<br />
●<br />
●<br />
Confirm whether you can telnet to port 443 on the IP addresses of the client and<br />
server computer. If you cannot, this usually signifies that the sspifilt.dll is not<br />
loaded, or is the wrong version, or perhaps conflicts with other ISAPI extensions.<br />
Examine the certificate. If you can telnet to 443, check the certificates attribute<br />
using the browser’s View Certificate dialog box. Check the certificates effective<br />
and expiration dates, whether the common name is correct, and also what the<br />
Authority Information Access (AIA) or Certificate Revocation List (CRL) distribution<br />
point is.<br />
Confirm that you can browse directory to those AIA/CRL points successfully.<br />
If you are using a custom client application (and not a Web browser) to access an<br />
SSL-enabled Web site that requires client certificates, check that the client certificate<br />
is located in the correct store that the client application accesses.
342<br />
<strong>Building</strong> <strong>Secure</strong> <strong>ASP</strong>.<strong>NET</strong> <strong>Applications</strong><br />
When you use a browser, the certificate must be in the interactive user’s user<br />
store. Services or custom applications may load the client certificate from the<br />
machine store or a store associated with a service account’s profile. Use the<br />
Services MMC snap-in (available when Certificate Services is installed), from the<br />
Administrative Tools program group to examine the contents of certificate stores.<br />
More Information<br />
See the following SSL related Knowledge Base articles.<br />
● Q257591, “Description of the <strong>Secure</strong> Sockets Layer (SSL) Handshake”<br />
●<br />
●<br />
●<br />
●<br />
Q257586, “Description of the Client Authentication Process During the SSL<br />
Handshake”<br />
Q257587, “Description of the Server Authentication Process During the SSL<br />
Handshake”<br />
Q301429, “HOWTO: Install Client Certificate on IIS Server for ServerXMLHTTP<br />
Request Object”<br />
Q295070, “SSL (https) Connection Slow with One Certificate but Faster with<br />
Others”<br />
IPSec<br />
The following articles in the Knowledge Base provide steps for troubleshooting<br />
IPSec issues.<br />
● Q259335, “Basic L2TP/IPSec Troubleshooting in Windows”<br />
● Q257225, “Basic IPSec Troubleshooting in Windows 2000”<br />
Auditing and Logging<br />
Windows Security Logs<br />
Consult the Windows event and security logs early on in the problem diagnostic<br />
process.<br />
More Information<br />
For more information on how to enable auditing and monitoring events, see the<br />
Knowledge Base and article Q300958, “HOW TO: Monitor for Unauthorized User<br />
Access in Windows 2000”.
Chapter 13: Troubleshooting Security Issues 343<br />
<br />
<br />
SQL Server Auditing<br />
By default, logon auditing is disabled. You can configure this either through SQL<br />
Server Enterprise Manager or by changing the registry.<br />
SQL Server log files are by default located in the following directory. They are textbased<br />
and can be read with any text editor such as Notepad.<br />
C:\Program Files\Microsoft SQL Server\MSSQL\LOG<br />
To enable logon auditing with Enterprise Manager<br />
1. Start Enterprise Manager.<br />
2. Select the required SQL Server in the left hand tree control, right-click and then<br />
click Properties.<br />
3. Click the Security tab.<br />
4. Select the relevant Audit level – Failure, Success or All.<br />
To enable logon auditing using a registry setting<br />
1. Create the following AuditLevel key within the registry and set its value to one<br />
of the REG_DWORD values specified below.<br />
HKEY_LOCAL_MACHINE\SOFTWARE\Microsoft\MSSQLServer\AuditLevel<br />
2. Set the value of this key to one of the following numeric values, which allow you<br />
to capture the relevant level of detail.<br />
3—captures both success and failed login attempts<br />
2—captures only failed login attempts<br />
1—captures only success login attempts<br />
0—captures no logins<br />
It is recommended that you turn on failed login auditing as this is a way to determine<br />
if someone is attempting a brute force attack into SQL Server. The performance<br />
impacts of logging failed audit attempts are minimal unless you are being<br />
attacked, in which case you need to know anyway.<br />
You can also set audit levels by using script against the SQL Server DMO (Database<br />
Management Objects), as shown in the following code fragment.<br />
Sub SetAuditLevel(Server As String, NewAuditLevel As SQLDMO_AUDIT_TYPE)<br />
Dim objServer As New SQLServer2<br />
objServer.Login<strong>Secure</strong> = True 'Use integrated security<br />
objServer.Connect Server 'Connect to the target SQL Server<br />
'Set the audit level<br />
objServer.IntegratedSecurity.AuditLevel = NewAuditLevel<br />
Set objServer = Nothing<br />
End Sub
344<br />
<strong>Building</strong> <strong>Secure</strong> <strong>ASP</strong>.<strong>NET</strong> <strong>Applications</strong><br />
From SQL Server Books online, the members of the enumerated type,<br />
SQLDMO_AUDIT_TYPE are:<br />
SQLDMOAudit_All 3 Log all authentication attempts - success or failure<br />
SQLDMOAudit_Failure 2 Log failed authentication<br />
SQLDMOAudit_None 0 Do not log authentication attempts<br />
SQLDMOAudit_Success 1 Log successful authentication<br />
Sample Log Entries<br />
The following list shows some sample log entries for successful and failed entries in<br />
the SQL Server logs.<br />
Successful login using Integrated Windows authentication:<br />
2002-07-06 22:54:32.42 logon Login succeeded for user 'SOMEDOMAIN\Bob'.<br />
Connection: Trusted.<br />
Successful login using SQL standard authentication:<br />
2002-07-06 23:13:57.04 logon Login succeeded for user 'SOMEDOMAIN\Bob'.<br />
Connection: Non-Trusted.<br />
Failed Login:<br />
2002-07-06 23:21:15.35 logon Login failed for user 'SOMEDOMAIN\BadGuy'.<br />
IIS Logging<br />
IIS logging can be set to different formats. If you use W3C Extended Logging, then<br />
you can take advantage of some additional information. For example, you can turn<br />
on Time Taken to log how long a page takes to be served. This can be helpful for<br />
isolating slow pages on your production Web site. You can also enable URI Query<br />
which will log Query String parameters, which can be helpful for troubleshooting<br />
GET operations against your Web pages. The figure below shows the Extended<br />
Properties dialog box for IIS logging.
Chapter 13: Troubleshooting Security Issues 345<br />
Figure 13.1<br />
IIS extended logging properties<br />
Troubleshooting Tools<br />
The list of tools presented in this section can prove invaluable and will help you<br />
diagnose both security and non-security related problems.<br />
File Monitor (FileMon.exe)<br />
This tool allows you to monitor files and folders for access attempts. It is extremely<br />
useful to deal with file access permission issues. It is available from<br />
www.sysinternals.com.<br />
More Information<br />
For more information see the Knowledge Base article Q286198, “HOWTO: Track<br />
‘Permission Denied’ Errors on DLL Files”.<br />
Fusion Log Viewer (Fuslogvw.exe)<br />
Fusion Log Viewer is provided with the .<strong>NET</strong> Framework SDK. It is a utility that<br />
can be used to track down problems with Fusion binding (see the .<strong>NET</strong> Framework<br />
documentation for more information).
346<br />
<strong>Building</strong> <strong>Secure</strong> <strong>ASP</strong>.<strong>NET</strong> <strong>Applications</strong><br />
To create Fusion logs for <strong>ASP</strong>.<strong>NET</strong>, you need to provide a log path in the registry<br />
and you need to enable the log failures option through the Fusion Log Viewer<br />
utility.<br />
To provide a log path for your log files, use regedit.exe and add a directory location,<br />
such as e:\MyLogs, to the following registry key:<br />
[HKLM\Software\Microsoft\Fusion\LogPath]<br />
ISQL.exe<br />
ISQL can be used to test SQL from a command prompt. This can be helpful when<br />
you want to efficiently test different logins for different users. You run ISQL by<br />
typing isql.exe at a command prompt on a computer with SQL Server installed.<br />
Connecting Using SQL Authentication<br />
You can pass a user name by using the –U switch and you can optionally specify the<br />
password with the –P switch. If you don’t specify a password, ISQL will prompt<br />
you for one. The following command, issued from a Windows command prompt,<br />
results in a password prompt. The advantage of this approach (rather than using<br />
the –P switch) is that the password doesn’t appear on screen.<br />
C:\ >isql -S YourServer -d pubs -U YourUser<br />
Password:<br />
Connecting Using Windows Authentication<br />
You can use the –E switch to use a trusted connection which uses the security<br />
context of the current interactively logged on user.<br />
C:\ >isql -S YourServer -d pubs -E<br />
Running a Simple Query<br />
Once you are logged in, you can run a simple query, such as the one shown below.<br />
1> use pubs<br />
2> SELECT au_lname, au_fname FROM authors<br />
3> go<br />
To quit ISQL, type quit at the command prompt.<br />
Windows Task Manager<br />
Windows Task Manager on Windows XP and Windows .<strong>NET</strong> Server allows you to<br />
display the identity being used to run a process.
Chapter 13: Troubleshooting Security Issues 347<br />
<br />
To view the identity under which a process is running<br />
1. Start Task Manager.<br />
2. Click the Processes tab.<br />
3. From the View menu, click Select Columns.<br />
4. Select User Name, and click OK.<br />
The user name (process identity) is now displayed.<br />
Network Monitor (NetMon.exe)<br />
NetMon is used to capture and monitor network traffic.<br />
More Information<br />
See the following Knowledge Base articles:<br />
● Q243270, “HOW TO: Install Network Monitor in Windows 2000”<br />
●<br />
●<br />
Q148942, “HOW TO: Capture Network Traffic with Network Monitor”<br />
Q252876, “HOW TO: View HTTP Data Frames Using Network Monitor”<br />
● Q294818, “Frequently Asked Questions About Network Monitor”<br />
There are a couple of additional tools to capture the network trace when the client<br />
and the server are on the same machine (this can’t be done with Netmon):<br />
●<br />
●<br />
tcptrace.exe. Available from www.pocketsoap.com. This is particularly useful<br />
for Web services since you can set it up to record and show traffic while your<br />
application runs. You can switch to Basic authentication and use tcptrace to<br />
see what credentials are being sent to the Web service.<br />
packetmon.exe. Available from www.analogx.com. This is a cut down version<br />
of Network Monitor, but much easier to configure.<br />
Registry Monitor (regmon.exe)<br />
This tool allows you to monitor registry access. It can be used to show read accesses<br />
and updates either from all processes or from a specified set of processes. This tool<br />
is very useful when you need to troubleshoot registry permission issues. It is available<br />
from www.sysinternals.com.<br />
WFetch.exe<br />
This tool is useful for troubleshooting connectivity issues between IIS and Web<br />
clients. In this scenario, you may need to view data that is not displayed in the Web<br />
browser, such as the HTTP headers that are included in the request and response<br />
packets.
348<br />
<strong>Building</strong> <strong>Secure</strong> <strong>ASP</strong>.<strong>NET</strong> <strong>Applications</strong><br />
More Information<br />
For more information about this tool and the download, see the Knowledge Base<br />
article Q284285, “How to Use Wfetch.exe to Troubleshoot HTTP Connections”.<br />
Visual Studio .<strong>NET</strong> Tools<br />
The Microsoft .<strong>NET</strong> Framework SDK security tools can be found at<br />
http://msdn.microsoft.com/library/default.asp?url=/library/en-us/cptools/html<br />
/cpconnetframeworktools.asp<br />
More Information<br />
See the following Knowledge Base articles:<br />
● Q316365, “INFO: ROADMAP for How to Use the .<strong>NET</strong> Performance Counters”<br />
●<br />
●<br />
Q308626, “INFO: Roadmap for Debugging in .<strong>NET</strong> Framework and Visual<br />
Studio”<br />
Q317297, “INFO: Roadmap for Debugging Hangs, Memory Leaks in VB .<strong>NET</strong>”<br />
WebServiceStudio<br />
This tool can be used as a generic client to test the functionality of your Web service.<br />
It captures and displays the SOAP response and request packets.<br />
You can download the tool from http://www.gotdotnet.com/team/tools/web_svc<br />
/default.aspx<br />
Windows 2000 Resource Kit<br />
Available from http://www.microsoft.com/windows2000/techinfo/reskit/default.asp<br />
For a complete tools list, see http://www.microsoft.com/windows2000/techinfo/reskit<br />
/tools/default.asp
How To:<br />
Index<br />
<strong>ASP</strong>.<strong>NET</strong><br />
<strong>Building</strong> <strong>Secure</strong> <strong>ASP</strong>.<strong>NET</strong> <strong>Applications</strong> includes a series of How Tos that provide stepby-step<br />
instructions to help you learn and implement various key procedures used<br />
to develop secure solutions. This index lists the How Tos that are included.<br />
How To: Create a Custom Account to Run <strong>ASP</strong>.<strong>NET</strong><br />
How To: Use Forms Authentication with Active <strong>Directory</strong><br />
How To: Use Forms Authentication with SQL Server 2000<br />
How To: Use Forms Authentication with GenericPrincipal Objects<br />
Authentication and Authorization<br />
How To: Implement Kerberos Delegation in Windows 2000<br />
How To: Implement IPrincipal<br />
Cryptography<br />
How To: Create a DPAPI Library<br />
How To: Use DPAPI (Machine Store) from <strong>ASP</strong>.<strong>NET</strong><br />
How To: Use DPAPI (User Store) from <strong>ASP</strong>.<strong>NET</strong> with Enterprise Services<br />
How To: Create an Encryption Library<br />
How To: Store Encrypted Connection Strings in the Registry<br />
Enterprise Services Security<br />
How To: Use Role-based Security with Enterprise Services
350<br />
<strong>Building</strong> <strong>Secure</strong> <strong>ASP</strong>.<strong>NET</strong> <strong>Applications</strong><br />
Web Services Security<br />
How To: Call a Web Service Using Client Certificates from <strong>ASP</strong>.<strong>NET</strong><br />
How To: Call a Web Service Using SSL<br />
Remoting Security<br />
How To: Host a Remote Object in a Windows Service<br />
<strong>Secure</strong> Communication<br />
How To: Set Up SSL on a Web Server<br />
How To: Set Up Client Certificates<br />
How To: Use IPSec to <strong>Secure</strong> Communication Between Two Servers<br />
How To: Use SSL to <strong>Secure</strong> Communication with SQL Server 2000
How To:<br />
Create a Custom Account<br />
to Run <strong>ASP</strong>.<strong>NET</strong><br />
This How To describes how to create a least privileged local account to run the<br />
<strong>ASP</strong>.<strong>NET</strong> worker process (aspnet_wp.exe) or for impersonated identities in virtual<br />
directories. Although the procedures in this How To create a local account, the<br />
same concepts apply to a domain account.<br />
<strong>ASP</strong>.<strong>NET</strong> Worker Process Identity<br />
The default account for running <strong>ASP</strong>.<strong>NET</strong>, created at installation time, is a least<br />
privileged local account and is specified in machine.config as follows:<br />
<br />
This account is identified as <strong>ASP</strong><strong>NET</strong> under Local Users and Groups, and has a<br />
strong password secured in the Local System Authority (LSA).<br />
When you need to access network resources, such as a database, using the <strong>ASP</strong>.<strong>NET</strong><br />
process identity, you can do one of the following:<br />
● Use a domain account.<br />
● Use “mirrored” local accounts (that is, accounts with matching usernames and<br />
passwords on two computers). You need to use this approach when the computers<br />
are in separate domains with no trust relationship or when the computers are<br />
separated by a firewall and you cannot open the ports required for NTLM or<br />
Kerberos authentication.<br />
The simplest approach is to change the <strong>ASP</strong><strong>NET</strong> account’s password to a known<br />
value on the Web server and then create an account named <strong>ASP</strong><strong>NET</strong> with the<br />
same password on the target computer. On the Web server, you must first<br />
change the <strong>ASP</strong><strong>NET</strong> account password in Local Users and Groups and then<br />
replace “AutoGenerate” with the new password in machine.config.<br />
<br />
You can use the steps presented in this How To to create a least privileged local<br />
account.
352<br />
<strong>Building</strong> <strong>Secure</strong> <strong>ASP</strong>.<strong>NET</strong> <strong>Applications</strong><br />
Impersonating Fixed Identities<br />
You can set fixed identities for specific virtual directories by using the following<br />
setting in web.config.<br />
<br />
This approach is typically used when you have multiple Web sites on the same Web<br />
server that need to run under different identities; for example, in application hosting<br />
scenarios.<br />
This How To describes how to create a least privileged local account. If administration<br />
is your primary concern, you can use a least privileged, constrained domain<br />
account with a strong password.<br />
Notes<br />
When considering the account used to run <strong>ASP</strong>.<strong>NET</strong>, remember the following:<br />
● <strong>ASP</strong>.<strong>NET</strong> does not impersonate by default. As a result, any resource access<br />
performed by your Web application uses the <strong>ASP</strong>.<strong>NET</strong> process identity. In this<br />
event, Windows resources must have an access control list (ACL) that grants<br />
access to the <strong>ASP</strong>.<strong>NET</strong> process account.<br />
● If you enable impersonation, your application accesses resources using the<br />
original caller’s security context, or the anonymous Internet user account (by<br />
default IUSR_MACHINE), if IIS is configured for anonymous authentication.<br />
In this event, resources must have ACLs based on the original caller identity<br />
(or IUSR_MACHINE).<br />
● Always adhere to the principle of least privilege when creating a custom<br />
account — give the minimum set of required privileges and permissions only.<br />
●<br />
●<br />
Summary<br />
Avoid running <strong>ASP</strong>.<strong>NET</strong> using the SYSTEM account.<br />
Avoid granting the account the “Act as part of the operating system” privilege.<br />
This How To includes the following procedures:<br />
1. Create a New Local Account<br />
2. Assign Minimum Privileges<br />
3. Assign NTFS Permissions<br />
4. Configure <strong>ASP</strong>.<strong>NET</strong> to Run Using the New Account
How To: Create a Custom Account to Run <strong>ASP</strong>.<strong>NET</strong> 353<br />
1. Create a New Local Account<br />
This procedure creates a new local account. By default, it will be added to the local<br />
Users group.<br />
<br />
To create a new local account<br />
1. Create a local account (for example, “Custom<strong>ASP</strong><strong>NET</strong>”).<br />
Make sure you use a strong password for the account. Strong password should<br />
include at least seven characters, and use a mixture of uppercase and lowercase<br />
letters, numbers, and other characters such as *, ?, or $.<br />
2. Clear the User must change password at next logon option.<br />
3. Select the Password never expires option.<br />
2. Assign Minimum Privileges<br />
This procedure assigns the minimum set of privileges necessary to run <strong>ASP</strong>.<strong>NET</strong>.<br />
<br />
To assign minimum privileges<br />
1. From the Administrative Tools programs group, start the Local Security Policy<br />
tool.<br />
2. Expand Local Policies, and then select User Rights Assignment.<br />
A list of privileges is displayed in the right pane.<br />
3. Assign the following privileges to the new account:<br />
● Access this computer from the network<br />
● Deny logon locally<br />
● Log on as a batch job<br />
● Log on as a service<br />
Note: To assign a privilege to an account, double-click the privilege, and then click Add to<br />
select the required account.<br />
4. Close the tool.<br />
3. Assign NTFS Permissions<br />
This procedure grants the custom <strong>ASP</strong>.<strong>NET</strong> account required NTFS permissions<br />
within the local file system.<br />
Note: The steps in this procedure apply to the file system on the Web server (and not on<br />
a remote computer, where you may be duplicating the account, for network authentication<br />
purposes).
354<br />
<strong>Building</strong> <strong>Secure</strong> <strong>ASP</strong>.<strong>NET</strong> <strong>Applications</strong><br />
<br />
To assign NTFS permissions<br />
1. Start Windows Explorer and assign the appropriate permissions to the folders<br />
specified in Table 1.<br />
The fixed impersonation account referred to in Table 1 refers to the account that<br />
can be optionally configured using the element in web.config as<br />
shown below.<br />
<br />
Table 1: Required NTFS permissions<br />
Folder Required Account Comments<br />
Permission<br />
C:\WINNT\Microsoft.<strong>NET</strong>\ Full Control Process and This is the <strong>ASP</strong>.<strong>NET</strong> dynamic<br />
Framework\\ fixed compilation location. Application<br />
Temporary <strong>ASP</strong>.<strong>NET</strong> Files impersonation code is generated in a discrete<br />
accounts directory for each application<br />
beneath this folder.<br />
The tempdir attribute on the<br />
element can be<br />
used to change this default<br />
location.<br />
C:\WINNT\temp Read/Write/ Process Location used by Web services<br />
Delete<br />
to generate serialization proxies.<br />
Note that the Delete permission<br />
is set using the Advanced<br />
button on the Security page of<br />
the Windows Explorer folder<br />
properties dialog box.<br />
Application folder Read Process The location of your Web<br />
application files (that is, your<br />
application’s virtual root<br />
directory: for example,<br />
c:\inetpub\wwwroot\webapp1).<br />
By default, the Users group has<br />
the appropriate access rights.
How To: Create a Custom Account to Run <strong>ASP</strong>.<strong>NET</strong> 355<br />
Folder Required Account Comments<br />
Permission<br />
%installroot% hierarchy Read Process and <strong>ASP</strong>.<strong>NET</strong> must be able to access<br />
(C:\WINNT\Microsoft.Net\ fixed .<strong>NET</strong> Framework assemblies.<br />
Framework\v1.0.3705) impersonation By default, the Users group has<br />
accounts the appropriate access rights.<br />
C:\WINNT\assembly Read Process and This is the global assembly<br />
fixed<br />
cache. You cannot directly use<br />
impersonation Windows Explorer to edit ACLs<br />
accounts for this folder. Instead, use a<br />
command Windows and run the<br />
following command:<br />
cacls %windir%\assembly /e /t<br />
/p domain\useraccount:R<br />
Alternatively, prior to using<br />
Windows explorer, unregister<br />
shfusion.dll with the following<br />
command:<br />
regsvr32 –u shfusion.dll<br />
After setting permissions with<br />
Windows explorer, re-register<br />
shfusion.dll with the following<br />
command:<br />
regsvr32 shfusion.dll<br />
Web site root: Read Process <strong>ASP</strong>.<strong>NET</strong> reads configuration<br />
C:\inetpub\<br />
files and monitors for file<br />
wwwroot or the path that<br />
changes in this folder.<br />
the default Web site<br />
points to<br />
C:\WINNT\system32 Read Process For system DLLs loaded by the<br />
Framework.<br />
Parent directories of List Folder/ Process For file change<br />
context Read notifications and the C#<br />
compiler.
356<br />
<strong>Building</strong> <strong>Secure</strong> <strong>ASP</strong>.<strong>NET</strong> <strong>Applications</strong><br />
4. Configure <strong>ASP</strong>.<strong>NET</strong> to Run Using the New Account<br />
This procedure edits machine.config to configure <strong>ASP</strong>.<strong>NET</strong> to run using the new<br />
account.<br />
<br />
To configure <strong>ASP</strong>.<strong>NET</strong> to run using the new account<br />
1. Open machine.config using Visual Studio.<strong>NET</strong> or Notepad.<br />
Machine.config is located in the following folder:<br />
C:\WINNT\Microsoft.<strong>NET</strong>\Framework\v1.0.3705\CONFIG<br />
2. Locate the element and set the user name and password attributes<br />
to match your new custom account.<br />
Default: <br />
Becomes: <br />
3. Save the changes to machine.config<br />
Note: With the current release of the .<strong>NET</strong> Framework, there is no way to avoid storing the<br />
password in clear text. While storing clear text credentials is not recommended, the<br />
machine.config file is considered more secure because it is located outside the Web<br />
space. You should secure machine.config against unnecessary access by using an appropriately<br />
configured ACL.<br />
In Windows .<strong>NET</strong> Server, the credentials will be encrypted for greater protection.
How To:<br />
Use Forms Authentication<br />
with Active <strong>Directory</strong><br />
<strong>ASP</strong>.<strong>NET</strong> Forms authentication allows users to identify themselves by entering<br />
credentials (a user name and password) into a Web Form. Upon receipt of these<br />
credentials, the Web application can authenticate the user by checking the user<br />
name and password combination against a data source.<br />
This How To describes how to authenticate users against the Microsoft® Active<br />
<strong>Directory</strong>® directory service by using the Lightweight <strong>Directory</strong> Access Protocol<br />
(LDAP). It also describes how to retrieve a list of security groups and distribution<br />
lists that the user belongs to, to store this information in a GenericPrincipal object,<br />
and to store this into the HttpContext.Current.User property that flows with the<br />
request through the <strong>ASP</strong>.<strong>NET</strong> Web application. This can subsequently be used for<br />
.<strong>NET</strong> role-based authorization.<br />
Requirements<br />
Summary<br />
The following items describe the recommended hardware, software, network<br />
infrastructure, skills and knowledge, and service packs you will need.<br />
● Microsoft Windows® 2000 operating system<br />
● Microsoft Visual Studio® .<strong>NET</strong> development system<br />
The procedures in this How To also require that you have knowledge of the<br />
Microsoft Visual C# development tool.<br />
This How To includes the following procedures:<br />
1. Create a Web Application with a Logon Page<br />
2. Configure the Web Application for Forms Authentication<br />
3. Develop LDAP Authentication Code to Look Up the User in Active <strong>Directory</strong><br />
4. Develop LDAP Group Retrieval Code to Look Up the User’s Group Membership<br />
5. Authenticate the User and Create a Forms Authentication Ticket<br />
6. Implement an Authentication Request Handler to Construct a GenericPrincipal<br />
Object<br />
7. Test the Application
358<br />
How To: Use Forms Authentication with Active <strong>Directory</strong><br />
1. Create a Web Application with a Logon Page<br />
This procedure creates a simple C# Web application that contains a logon page that<br />
allows a user to enter a user name and password and a default page that displays<br />
the identity name and group membership information associated with the current<br />
Web request.<br />
<br />
To create a Web application with a logon page<br />
1. Start Visual Studio .<strong>NET</strong> and create a new C# <strong>ASP</strong>.<strong>NET</strong> Web Application called<br />
FormsAuthAD.<br />
2. Use Solution Explorer to rename WebForm1.aspx to Logon.aspx.<br />
3. Add a new assembly reference to System.<strong>Directory</strong>Services.dll. This provides<br />
access to the System.<strong>Directory</strong>Services namespace that contains managed types<br />
to help with Active <strong>Directory</strong> querying and manipulation.<br />
4. Add the controls listed in Table 1 to Logon.aspx to create a simple logon form.<br />
Table 1: Logon.aspx controls<br />
Control Type Text ID<br />
Label Domain Name: -<br />
Label User Name: -<br />
Label Password -<br />
Text Box - txtDomainName<br />
Text Box - txtUserName<br />
Text Box - txtPassword<br />
Button Log On btnLogon<br />
Label<br />
lblError<br />
5. Set the TextMode property of txtPassword to Password.<br />
6. In Solution Explorer, right-click FormsAuthAd, point to Add, and then click Add<br />
Web Form.<br />
7. In the Name field, type default.aspx, and then click Open.<br />
8. In Solution Explorer, right-click default.aspx, and then click Set As Start Page.<br />
9. Double-click default.aspx to display the page load event handler.<br />
10. Add the following code to the event handler to display the identity name<br />
associated with the current Web request.<br />
Response.Write( HttpContext.Current.User.Identity.Name );
How To: Use Forms Authentication with Active <strong>Directory</strong> 359<br />
2. Configure the Web Application for Forms Authentication<br />
This procedure edits the application’s Web.config file to configure the application<br />
for Forms authentication.<br />
<br />
To configure the Web application for forms authentication<br />
1. Use Solution Explorer to open Web.config.<br />
2. Locate the element and change the mode attribute to Forms.<br />
3. Add the following element as a child of the authentication element and<br />
set the loginUrl, name, timeout, and path attributes as shown in the following.<br />
<br />
<br />
<br />
<br />
4. Add the following element beneath the <br />
element. This will allow only authenticated users to access the application. The<br />
previously establish loginUrl attribute of the element will<br />
redirect unauthenticated requests to the logon.aspx page.<br />
<br />
<br />
<br />
<br />
5. Save Web.config.<br />
6. Start the IIS Microsoft Management Console (MMC) snap-in.<br />
7. Right-click the application’s virtual directory, and then click Properties.<br />
8. Click the <strong>Directory</strong> Security tab, and then click the Edit button in the Anonymous<br />
access and authentication control group.<br />
9. Select the Anonymous access check box and clear the Allow IIS to control<br />
password check box.<br />
10. Because the default anonymous account IUSR_MACHINE does not have permission<br />
to access Active <strong>Directory</strong>, create a new least privileged account and enter<br />
the account details in the Authentication Methods dialog box.<br />
11. Click OK, and then click OK again to close the Properties dialog box.<br />
12. Return to Visual Studio .<strong>NET</strong> and add an element beneath the<br />
element in Web.config and set the impersonate attribute to true.<br />
This causes <strong>ASP</strong>.<strong>NET</strong> to impersonate the anonymous account specified earlier.<br />
360<br />
How To: Use Forms Authentication with Active <strong>Directory</strong><br />
As a result of this configuration, all requests to the application will run under<br />
the security context of the configured anonymous account. The user will provide<br />
credentials through the Web form to authenticate against Active <strong>Directory</strong>, but<br />
the account used to access Active <strong>Directory</strong> will be the configured anonymous<br />
account.<br />
3. Develop LDAP Authentication Code to Look Up the User in<br />
Active <strong>Directory</strong><br />
This procedure adds a new helper class to the Web application to encapsulate the<br />
LDAP code. The class will initially provide an IsAuthenticated method to validate<br />
a supplied domain, user name, and password against an Active <strong>Directory</strong> user<br />
object.<br />
<br />
To develop LDAP authentication code to look up the user in Active <strong>Directory</strong><br />
1. Add a new C# class file called LdapAuthentication.cs.<br />
2. Add a reference to the System.<strong>Directory</strong>Services.dll assembly.<br />
3. Add the following using statements to the top of LdapAuthentication.cs.<br />
using System.Text;<br />
using System.Collections;<br />
using System.<strong>Directory</strong>Services;<br />
4. Rename the existing namespace as FormsAuthAD.<br />
5. Add two private strings to the LdapAuthentication class; one to hold the LDAP<br />
path to Active <strong>Directory</strong> and the other to hold a filter attribute used for searching<br />
Active <strong>Directory</strong>.<br />
private string _path;<br />
private string _filterAttribute;<br />
6. Add a public constructor that can be used to initialize the Active <strong>Directory</strong> path.<br />
public LdapAuthentication(string path)<br />
{<br />
_path = path;<br />
}<br />
7. Add the following IsAuthenticated method that accepts a domain name, user<br />
name and password as parameters and returns bool to indicate whether or not<br />
the user with a matching password exists within Active <strong>Directory</strong>. The method<br />
initially attempts to bind to Active <strong>Directory</strong> using the supplied credentials. If<br />
this is successful, the method uses the <strong>Directory</strong><strong>Search</strong>er managed class to
How To: Use Forms Authentication with Active <strong>Directory</strong> 361<br />
search for the specified user object. If located, the _path member is updated to<br />
point to the user object and the _filterAttribute member is updated with the<br />
common name attribute of the user object.<br />
public bool IsAuthenticated(string domain, string username, string pwd)<br />
{<br />
string domainAndUsername = domain + @"\" + username;<br />
<strong>Directory</strong>Entry entry = new <strong>Directory</strong>Entry( _path,<br />
domainAndUsername, pwd);<br />
}<br />
try<br />
{<br />
// Bind to the native AdsObject to force authentication.<br />
Object obj = entry.NativeObject;<br />
<strong>Directory</strong><strong>Search</strong>er search = new <strong>Directory</strong><strong>Search</strong>er(entry);<br />
search.Filter = "(SAMAccountName=" + username + ")";<br />
search.PropertiesToLoad.Add("cn");<br />
<strong>Search</strong>Result result = search.FindOne();<br />
if(null == result)<br />
{<br />
return false;<br />
}<br />
// Update the new path to the user in the directory<br />
_path = result.Path;<br />
_filterAttribute = (String)result.Properties["cn"][0];<br />
}<br />
catch (Exception ex)<br />
{<br />
throw new Exception("Error authenticating user. " + ex.Message);<br />
}<br />
return true;<br />
4. Develop LDAP Group Retrieval Code to Look Up the User’s<br />
Group Membership<br />
This procedure extends the LdapAuthentication class to provide a GetGroups<br />
method which will retrieve the list of groups that the current user is a member of.<br />
The GetGroups method will return the group list as a pipe separated string, as in<br />
the following.<br />
"Group1|Group2|Group3|"
362<br />
How To: Use Forms Authentication with Active <strong>Directory</strong><br />
<br />
To develop LDAP group retrieval code to look up the user’s group membership<br />
1. Add the following implementation of the GetGroups method to the<br />
LdapAuthentication class.<br />
public string GetGroups()<br />
{<br />
<strong>Directory</strong><strong>Search</strong>er search = new <strong>Directory</strong><strong>Search</strong>er(_path);<br />
search.Filter = "(cn=" + _filterAttribute + ")";<br />
search.PropertiesToLoad.Add("memberOf");<br />
StringBuilder groupNames = new StringBuilder();<br />
try<br />
{<br />
<strong>Search</strong>Result result = search.FindOne();<br />
int propertyCount = result.Properties["memberOf"].Count;<br />
String dn;<br />
int equalsIndex, commaIndex;<br />
for( int propertyCounter = 0; propertyCounter < propertyCount;<br />
propertyCounter++)<br />
{<br />
dn = (String)result.Properties["memberOf"][propertyCounter];<br />
equalsIndex = dn.IndexOf("=", 1);<br />
commaIndex = dn.IndexOf(",", 1);<br />
if (-1 == equalsIndex)<br />
{<br />
return null;<br />
}<br />
groupNames.Append(dn.Substring((equalsIndex + 1),<br />
(commaIndex - equalsIndex) - 1));<br />
groupNames.Append("|");<br />
}<br />
}<br />
catch(Exception ex)<br />
{<br />
throw new Exception("Error obtaining group names. " + ex.Message);<br />
}<br />
return groupNames.ToString();<br />
}<br />
5. Authenticate the User and Create a Forms Authentication<br />
Ticket<br />
This procedure implements the btnLogon_Click event handler to authenticate<br />
users. For authenticated users, you will then create a Forms authentication ticket<br />
that contains the user’s group list. You will then redirect the user to the original<br />
page that they requested (before being redirected to the logon page).
How To: Use Forms Authentication with Active <strong>Directory</strong> 363<br />
<br />
To authenticate the user and create a forms authentication ticket<br />
1. Return to the Logon.aspx form and double-click the Log On button to create an<br />
empty btnLogon_Click event handler.<br />
2. At the top of the file add the following using statement beneath the existing<br />
using statements. This provides access to the FormsAuthentication methods.<br />
using System.Web.Security;<br />
3. Add code to create a new instance of the LdapAuthentication class initialized to<br />
point to your LDAP Active <strong>Directory</strong>, as shown in the following code. Remember<br />
to change the path to point to your Active <strong>Directory</strong> server.<br />
// Path to you LDAP directory server.<br />
// Contact your network administrator to obtain a valid path.<br />
string adPath = "LDAP://yourCompanyName.com/DC=yourCompanyName,DC=com";<br />
LdapAuthentication adAuth = new LdapAuthentication(adPath);<br />
4. Add the code that follows to perform the following steps:<br />
a. Authenticate the caller against Active <strong>Directory</strong>.<br />
b. Retrieve the list of groups that the user is a member of.<br />
c. Create a FormsAuthenticationTicket that contains the group list.<br />
d. Encrypt the ticket.<br />
e. Create a new cookie that contains the encrypted ticket.<br />
f. Add the cookie to the list of cookies returned to the user’s browser.<br />
try<br />
{<br />
if(true == adAuth.IsAuthenticated(txtDomainName.Text,<br />
txtUserName.Text,<br />
txtPassword.Text))<br />
{<br />
// Retrieve the user's groups<br />
string groups = adAuth.GetGroups();<br />
// Create the authetication ticket<br />
FormsAuthenticationTicket authTicket =<br />
new FormsAuthenticationTicket(1, // version<br />
txtUserName.Text,<br />
DateTime.Now,<br />
DateTime.Now.AddMinutes(60),<br />
false, groups);<br />
// Now encrypt the ticket.<br />
string encryptedTicket = FormsAuthentication.Encrypt(authTicket);<br />
// Create a cookie and add the encrypted ticket to the<br />
// cookie as data.<br />
HttpCookie authCookie =<br />
new HttpCookie(FormsAuthentication.FormsCookieName,<br />
encryptedTicket);
364<br />
How To: Use Forms Authentication with Active <strong>Directory</strong><br />
// Add the cookie to the outgoing cookies collection.<br />
Response.Cookies.Add(authCookie);<br />
// Redirect the user to the originally requested page<br />
Response.Redirect(<br />
FormsAuthentication.GetRedirectUrl(txtUserName.Text,<br />
false));<br />
}<br />
else<br />
{<br />
lblError.Text =<br />
"Authentication failed, check username and password.";<br />
}<br />
}<br />
catch(Exception ex)<br />
{<br />
lblError.Text = "Error authenticating. " + ex.Message;<br />
}<br />
6. Implement an Authentication Request Handler to Construct<br />
a GenericPrincipal Object<br />
<br />
This procedure implements the Application_AuthenticateRequest event handler<br />
within global.asax and creates a GenericPrincipal object for the currently authenticated<br />
user. This will contain the list of groups that the user is a member of, retrieved<br />
from the FormsAuthenticationTicket contained in the authentication cookie.<br />
Finally, you will associate the GenericPrincipal object with the current HttpContext<br />
object that is created for each Web request.<br />
To implement an authentication request handler to construct a GenericPricipal object<br />
1. Use Solution Explorer to open global.asax.cs.<br />
2. Add the following using statements to the top of the file.<br />
using System.Web.Security;<br />
using System.Security.Principal;<br />
3. Locate the Application_AuthenticateRequest event handler and add the following<br />
code to obtain the cookie that contains the encrypted<br />
FormsAuthenticationTicket, from the cookie collection passed with the request.<br />
// Extract the forms authentication cookie<br />
string cookieName = FormsAuthentication.FormsCookieName;<br />
HttpCookie authCookie = Context.Request.Cookies[cookieName];<br />
if(null == authCookie)<br />
{
How To: Use Forms Authentication with Active <strong>Directory</strong> 365<br />
}<br />
// There is no authentication cookie.<br />
return;<br />
4. Add the following code to extract and decrypt the FormsAuthenticationTicket<br />
from the cookie.<br />
FormsAuthenticationTicket authTicket = null;<br />
try<br />
{<br />
authTicket = FormsAuthentication.Decrypt(authCookie.Value);<br />
}<br />
catch(Exception ex)<br />
{<br />
// Log exception details (omitted for simplicity)<br />
return;<br />
}<br />
if (null == authTicket)<br />
{<br />
// Cookie failed to decrypt.<br />
return;<br />
}<br />
5. Add the following code to parse out the pipe separate list of group names<br />
attached to the ticket when the user was originally authenticated.<br />
// When the ticket was created, the UserData property was assigned a<br />
// pipe delimited string of group names.<br />
String[] groups = authTicket.UserData.Split(new char[]{'|'});<br />
6. Add the following code to create a GenericIdentity object with the user name<br />
obtained from the ticket name and a GenericPrincipal object that contains this<br />
identity together with the user’s group list.<br />
// Create an Identity object<br />
GenericIdentity id = new GenericIdentity(authTicket.Name,<br />
"LdapAuthentication");<br />
// This principal will flow throughout the request.<br />
GenericPrincipal principal = new GenericPrincipal(id, groups);<br />
// Attach the new principal object to the current HttpContext object<br />
Context.User = principal;
366<br />
How To: Use Forms Authentication with Active <strong>Directory</strong><br />
7. Test the Application<br />
This procedure uses the Web application to request the default.aspx page. You will<br />
be redirected to the logon page for authentication. Upon successful authentication,<br />
your browser will be redirected to the originally requested default.aspx page. This<br />
will extract and display the list of groups that the authenticated user belongs to<br />
from the GenericPrincipal object that has been associated with the current request<br />
by the authentication process.<br />
<br />
To test the application<br />
1. On the Build menu, click Build Solution.<br />
2. In Solution Explorer, right-click default.aspx, and then click View in Browser.<br />
3. Enter a valid domain name, user name, and password and then click Log On.<br />
4. If you are successfully authenticated, you should be redirected back to<br />
default.aspx. The code on this page should display the user name of the authenticated<br />
user.<br />
To see the list of groups the authenticated user is a member of, add the following<br />
code at the end of the Application_AuthenticateRequest event handler in the<br />
global.aspx.cs file.<br />
Response.Write("Groups: " + authTicket.UserData + "");
How To:<br />
Use Forms Authentication<br />
with SQL Server 2000<br />
Web applications that use Forms authentication often store user credentials (user<br />
names and passwords) together with associated role or group lists in Microsoft®<br />
SQL Server 2000.<br />
This How To describes how to securely look up user names and validate passwords<br />
against SQL Server 2000. There are two key concepts for storing user credentials<br />
securely:<br />
● Storing password digests. For security reasons, passwords should not be<br />
stored in clear text in the database. This How To describes how to create and<br />
store a one-way hash of a user’s password rather than the password itself. This<br />
approach is preferred to storing an encrypted version of the user’s password<br />
in order to avoid the key management issues associated with encryption<br />
techniques.<br />
For added security and to mitigate the threat associated with dictionary attacks,<br />
the approach described in this How To combines a salt (a cryptographically<br />
generated random number) with the password, prior to creating the password<br />
hash.<br />
Important: The one drawback of not storing passwords in the database is that if a user<br />
forgets a password, it cannot be recovered. As a result, your application should use<br />
password hints and store them alongside the password digest within the database.<br />
●<br />
Validating user input. Where user input is passed to SQL commands, for example<br />
as string literals in comparison or pattern matching statements, great care<br />
should be taken to validate the input, to ensure that the resulting commands do<br />
not contain syntax errors and also to ensure that a hacker cannot cause your<br />
application to run arbitrary SQL commands. Validating the supplied user name<br />
during a logon process is particularly vital as your application’s security model<br />
is entirely dependent on being able to correctly and securely authenticate users.<br />
For more information about validating user input for SQL commands and for<br />
validation functions, see “SQL Injection Attacks” in Chapter 12, “Data Access<br />
Security.”
368<br />
<strong>Building</strong> <strong>Secure</strong> <strong>ASP</strong>.<strong>NET</strong> <strong>Applications</strong><br />
Requirements<br />
The following items describe the recommended hardware, software, network<br />
infrastructure, skills and knowledge, and service packs you will need.<br />
● Microsoft Windows® 2000 operating system<br />
●<br />
Microsoft Visual Studio® .<strong>NET</strong> development system<br />
● Microsoft SQL Server 2000<br />
The procedures in this How To also require that you have knowledge of Web<br />
development with the Microsoft Visual C# development tool.<br />
Summary<br />
This How To includes the following procedures:<br />
1. Create a Web Application with a Logon Page<br />
2. Configure the Web Application for Forms Authentication<br />
3. Develop Functions to Generate a Hash and Salt value<br />
4. Create a User Account Database<br />
5. Use ADO.<strong>NET</strong> to Store Account Details in the Database<br />
6. Authenticate User Credentials against the Database<br />
7. Test the Application<br />
1. Create a Web Application with a Logon Page<br />
This procedure creates a simple C# Web application that contains a logon page that<br />
allows a user to enter a username and password.<br />
<br />
To create a Web application with a logon page<br />
1. Start Visual Studio .<strong>NET</strong> and create a new C# <strong>ASP</strong>.<strong>NET</strong> Web application called<br />
FormsAuthSQL.<br />
2. Use Solution Explorer to rename WebForm1.aspx to Logon.aspx<br />
3. Add the controls listed in Table 1 to Logon.aspx to create a simple logon form.
How To: Use Forms Authentication with SQL Server 2000 369<br />
Table 1: Logon.aspx controls<br />
Control Type Text ID<br />
Label User Name: -<br />
Label Password -<br />
Text Box - txtUserName<br />
Text Box - txtPassword<br />
Button Register btnRegister<br />
Button Logon btnLogon<br />
Label - lblMessage<br />
Your Web page should resemble the one illustrated in Figure 1.<br />
Figure 1<br />
Logon page Web form<br />
4. Set the TextMode property of the txtPassword to Password.<br />
2. Configure the Web Application for Forms Authentication<br />
This procedure edits the application’s Web.config file to configure the application<br />
for Forms authentication.<br />
<br />
To configure the Web application for Forms authentication<br />
1. Use Solution Explorer to open Web.config.<br />
2. Locate the element and change the mode attribute to Forms.<br />
3. Add the following element as a child of the element<br />
and set the loginUrl, name, timeout, and path attributes as follows.<br />
<br />
<br />
<br />
370<br />
<strong>Building</strong> <strong>Secure</strong> <strong>ASP</strong>.<strong>NET</strong> <strong>Applications</strong><br />
4. Add the following element beneath the <br />
element. This will allow only authenticated users to access the application. The<br />
previously established loginUrl attribute of the element will<br />
redirect unauthenticated requests to the logon.aspx page.<br />
<br />
<br />
<br />
<br />
3. Develop Functions to Generate a Hash and Salt value<br />
This procedure adds two utility methods to your Web application; one to generate a<br />
random salt value, and one to create a hash based on a supplied password and salt<br />
value.<br />
<br />
To develop functions to generate a hash and salt value<br />
1. Open Logon.aspx.cs and add the following using statements to the top of the file<br />
beneath the existing using statements.<br />
using System.Security.Cryptography;<br />
using System.Web.Security;<br />
2. Add the following static method to the WebForm1 class to generate a random<br />
salt value and return it as a Base 64 encoded string.<br />
private static string CreateSalt(int size)<br />
{<br />
// Generate a cryptographic random number using the cryptographic<br />
// service provider<br />
RNGCryptoServiceProvider rng = new RNGCryptoServiceProvider();<br />
byte[] buff = new byte[size];<br />
rng.GetBytes(buff);<br />
// Return a Base64 string representation of the random number<br />
return Convert.ToBase64String(buff);<br />
}<br />
3. Add the following static method to generate a hash value based on a supplied<br />
password and salt value.<br />
private static string CreatePasswordHash(string pwd, string salt)<br />
{<br />
string saltAndPwd = String.Concat(pwd, salt);<br />
string hashedPwd =<br />
FormsAuthentication.HashPasswordForStoringInConfigFile(<br />
saltAndPwd, "SHA1");<br />
return hashedPwd;<br />
}
How To: Use Forms Authentication with SQL Server 2000 371<br />
4. Create a User Account Database<br />
<br />
This procedure creates a new user account database in SQL Server that contains<br />
a single users table and a stored procedure used to query the user database.<br />
To create a user account database<br />
1. On the Microsoft SQL Server programs menu, click Query Analyzer, and then<br />
connect to your local SQL Server.<br />
2. Enter the following SQL script. Note that you must replace “LocalMachine” with<br />
your own computer name towards the end of the script.<br />
USE master<br />
GO<br />
-- create a database for the security information<br />
IF EXISTS (SELECT * FROM master..sysdatabases WHERE name = 'UserAccounts')<br />
DROP DATABASE UserAccounts<br />
GO<br />
CREATE DATABASE UserAccounts<br />
GO<br />
USE UserAccounts<br />
GO<br />
CREATE TABLE [Users] (<br />
[UserName] [varchar] (255) NOT NULL ,<br />
[PasswordHash] [varchar] (40) NOT NULL ,<br />
[salt] [varchar] (10) NOT NULL,<br />
CONSTRAINT [PK_Users] PRIMARY KEY CLUSTERED<br />
(<br />
[UserName]<br />
) ON [PRIMARY]<br />
) ON [PRIMARY]<br />
GO<br />
-- create stored procedure to register user details<br />
CREATE PROCEDURE RegisterUser<br />
@userName varchar(255),<br />
@passwordHash varchar(40),<br />
@salt varchar(10)<br />
AS<br />
INSERT INTO Users VALUES(@userName, @passwordHash, @salt)<br />
GO<br />
-- create stored procedure to retrieve user details<br />
CREATE PROCEDURE LookupUser<br />
@userName varchar(255)<br />
AS<br />
SELECT PasswordHash, salt<br />
FROM Users<br />
WHERE UserName = @userName<br />
GO<br />
-- Add a login for the local <strong>ASP</strong><strong>NET</strong> account<br />
-- In the following statements, replace LocalMachine with your<br />
-- local machine name
372<br />
<strong>Building</strong> <strong>Secure</strong> <strong>ASP</strong>.<strong>NET</strong> <strong>Applications</strong><br />
exec sp_grantlogin [LocalMachine\<strong>ASP</strong><strong>NET</strong>]<br />
-- Add a database login for the UserAccounts database for the <strong>ASP</strong><strong>NET</strong> account<br />
exec sp_grantdbaccess [LocalMachine\<strong>ASP</strong><strong>NET</strong>]<br />
-- Grant execute permissions to the LookupUser and RegisterUser stored procs<br />
grant execute on LookupUser to [LocalMachine\<strong>ASP</strong><strong>NET</strong>]<br />
grant execute on RegisterUser to [LocalMachine\<strong>ASP</strong><strong>NET</strong>]<br />
3. Run the query to create the UserAccounts database.<br />
4. Exit Query Manager.<br />
5. Use ADO.<strong>NET</strong> to Store Account Details in the Database<br />
This procedure modifies the Web application code to store the supplied user name,<br />
generated password hash and salt value in the database.<br />
<br />
To use ADO.<strong>NET</strong> to store account details in the database<br />
1. Return to Visual Studio .<strong>NET</strong> and double-click the Register button on the Web<br />
form to create a button click event handler.<br />
2. Add the following code to the method.<br />
string salt = CreateSalt(5);<br />
string passwordHash = CreatePasswordHash(txtPassword.Text,salt);<br />
try<br />
{<br />
StoreAccountDetails( txtUserName.Text, passwordHash, salt);<br />
}<br />
catch(Exception ex)<br />
{<br />
lblMessage.Text = ex.Message;<br />
}<br />
3. Add the following using statement at the top of the file, beneath the existing<br />
using statements.<br />
using System.Data.SqlClient;<br />
4. Add the StoreAccountDetails utility method using the following code. This code<br />
uses ADO.<strong>NET</strong> to connect to the UserAccounts database and stores the supplied<br />
username, password hash and salt value in the Users table.<br />
private void StoreAccountDetails( string userName,<br />
string passwordHash,<br />
string salt )<br />
{
How To: Use Forms Authentication with SQL Server 2000 373<br />
}<br />
// See "How To Use DPAPI (Machine Store) from <strong>ASP</strong>.<strong>NET</strong>" for information<br />
// about securely storing connection strings.<br />
SqlConnection conn = new SqlConnection( "Server=(local);" +<br />
"Integrated Security=SSPI;" +<br />
"database=UserAccounts");<br />
SqlCommand cmd = new SqlCommand("RegisterUser", conn );<br />
cmd.CommandType = CommandType.StoredProcedure;<br />
SqlParameter sqlParam = null;<br />
sqlParam = cmd.Parameters.Add("@userName", SqlDbType.VarChar, 255);<br />
sqlParam.Value = userName;<br />
sqlParam = cmd.Parameters.Add("@passwordHash ", SqlDbType.VarChar, 40);<br />
sqlParam.Value = passwordHash;<br />
sqlParam = cmd.Parameters.Add("@salt", SqlDbType.VarChar, 10);<br />
sqlParam.Value = salt;<br />
try<br />
{<br />
conn.Open();<br />
cmd.ExecuteNonQuery();<br />
}<br />
catch( Exception ex )<br />
{<br />
// Code to check for primary key violation (duplicate account name)<br />
// or other database errors omitted for clarity<br />
throw new Exception("Exception adding account. " + ex.Message);<br />
}<br />
finally<br />
{<br />
conn.Close();<br />
}<br />
6. Authenticate User Credentials Against the Database<br />
This procedure develops ADO.<strong>NET</strong> code to look up the supplied user name in the<br />
database and validate the supplied password, by matching password hashes.<br />
Note: In many Forms authentication scenarios where you are using .<strong>NET</strong> role-based authorization,<br />
you may also retrieve the roles that the user belongs to from the database at this point.<br />
These can subsequently be used to generate a GenericPrincipal object that can be associated<br />
with authenticated Web requests, for .<strong>NET</strong> authorization purposes.<br />
For more information about constructing a Forms authentication ticket incorporating a user’s<br />
role details, see “How To: Use Forms Authentication with GenericPrincipal Objects” in the<br />
Reference section of this guide.
374<br />
<strong>Building</strong> <strong>Secure</strong> <strong>ASP</strong>.<strong>NET</strong> <strong>Applications</strong><br />
<br />
To authenticate user credentials against the database<br />
1. Return to the Logon.aspx.cs and add the VerifyPassword private helper method<br />
as shown in the following code.<br />
private bool VerifyPassword(string suppliedUserName,<br />
string suppliedPassword )<br />
{<br />
bool passwordMatch = false;<br />
// Get the salt and pwd from the database based on the user name.<br />
// See "How To: Use DPAPI (Machine Store) from <strong>ASP</strong>.<strong>NET</strong>," "How To: Use DPAPI<br />
// (User Store) from Enterprise Services," and "How To: Create a DPAPI<br />
// Library" for more information about how to use DPAPI to securely store<br />
// connection strings.<br />
SqlConnection conn = new SqlConnection( "Server=(local);" +<br />
"Integrated Security=SSPI;" +<br />
"database=UserAccounts");<br />
SqlCommand cmd = new SqlCommand( "LookupUser", conn );<br />
cmd.CommandType = CommandType.StoredProcedure;<br />
}<br />
SqlParameter sqlParam = cmd.Parameters.Add("@userName",<br />
SqlDbType.VarChar, 255);<br />
sqlParam.Value = suppliedUserName;<br />
try<br />
{<br />
conn.Open();<br />
SqlDataReader reader = cmd.ExecuteReader();<br />
reader.Read(); // Advance to the one and only row<br />
// Return output parameters from returned data stream<br />
string dbPasswordHash = reader.GetString(0);<br />
string salt = reader.GetString(1);<br />
reader.Close();<br />
// Now take the salt and the password entered by the user<br />
// and concatenate them together.<br />
string passwordAndSalt = String.Concat(suppliedPassword, salt);<br />
// Now hash them<br />
string hashedPasswordAndSalt =<br />
FormsAuthentication.HashPasswordForStoringInConfigFile(<br />
passwordAndSalt, "SHA1");<br />
// Now verify them.<br />
passwordMatch = hashedPasswordAndSalt.Equals(dbPasswordHash);<br />
}<br />
catch (Exception ex)<br />
{<br />
throw new Exception("Execption verifying password. " + ex.Message);<br />
}<br />
finally<br />
{<br />
conn.Close();<br />
}<br />
return passwordMatch;
How To: Use Forms Authentication with SQL Server 2000 375<br />
7. Test the Application<br />
This procedure tests the application. You will register a user, which results in the<br />
user name, password hash and salt value being added to the Users table in the<br />
UserAccounts database. You will then log on the same user to ensure the correct<br />
operation of the password verification routines.<br />
<br />
To test the application<br />
1. Return to the Logon form and double-click the Logon button to create a button<br />
click event handler.<br />
2. Add the following code to the Logon button click event handler to call the<br />
VerifyPassword method and display a message based on whether or not the<br />
supplied user name and password are valid.<br />
bool passwordVerified = false;<br />
try<br />
{<br />
passwordVerified = VerifyPassword(txtUserName.Text,txtPassword.Text);<br />
}<br />
catch(Exception ex)<br />
{<br />
lblMessage.Text = ex.Message;<br />
return;<br />
}<br />
if (passwordVerified == true )<br />
{<br />
// The user is authenticated<br />
// At this point, an authentication ticket is normally created<br />
// This can subsequently be used to generate a GenericPrincipal<br />
// object for .<strong>NET</strong> authorization purposes<br />
// For details, see "How To: Use Forms authentication with GenericPrincipal<br />
// objects<br />
lblMessage.Text = "Logon successful: User is authenticated";<br />
}<br />
else<br />
{<br />
lblMessage.Text = "Invalid username or password";<br />
}<br />
3. On the Build menu, click Build Solution.<br />
4. In Solution Explorer, right-click logon.aspx, and then click View in Browser.<br />
5. Enter a user name and password, and then click Register.<br />
6. Use SQL Server Enterprise Manager to view the contents of the Users table. You<br />
should see a new row for the new user name together with a generated password<br />
hash.
376<br />
<strong>Building</strong> <strong>Secure</strong> <strong>ASP</strong>.<strong>NET</strong> <strong>Applications</strong><br />
7. Return to the Logon Web page, re-enter the password, and then click Logon. You<br />
should see the message “Logon successful: User is authenticated.”<br />
8. Now enter an invalid password (leaving the user name the same). You should<br />
see the message “Invalid username or password.”<br />
9. Close Internet Explorer.<br />
Additional Resources<br />
For more information, see the following:<br />
●<br />
●<br />
●<br />
“How To: Use DPAPI (Machine Store) from <strong>ASP</strong>.<strong>NET</strong>”<br />
“How To: Use Forms Authentication with GenericPrincipal Objects”<br />
“SQL Injection Attacks” in Chapter 12, “Data Access Security”
How To:<br />
Create GenericPrincipal Objects<br />
with Forms Authentication<br />
<strong>Applications</strong> that use Forms authentication will often want to use the<br />
GenericPrincipal class (in conjunction with the FormsIdentity class), to create a<br />
non-Windows specific authorization scheme, independent of a Windows domain.<br />
For example, an application may:<br />
● Use Forms authentication to obtain user credentials (user name and password).<br />
● Validate the supplied credentials against a data store; for example, a database or<br />
Microsoft® Active <strong>Directory</strong>® directory service.<br />
●<br />
Create GenericPrincipal and FormsIdentity objects based on values retrieved<br />
from the data store. These may include a user’s role membership details.<br />
● Use these objects to make authorization decisions.<br />
This How To describes how to create a Forms-based Web application that authenticates<br />
users and creates a custom Forms authentication ticket that contains user and<br />
role information. It also shows you how to map this information into<br />
GenericPrincipal and FormsIdentity objects and associate the new objects with the<br />
HTTP Web request context, allowing them to be used for authorization logic within<br />
your application.<br />
This How To focuses on the construction of the GenericPrincipal and<br />
FormsIdentity objects together with the processing of the forms authentication<br />
ticket. For details about how to authenticate users against Active <strong>Directory</strong> and SQL<br />
Server 2000, see the following related How Tos in the Reference section of this<br />
guide:<br />
● “How to use Forms authentication with Active <strong>Directory</strong>”<br />
● “How to use Forms authentication with SQL Server 2000”
378<br />
<strong>Building</strong> <strong>Secure</strong> <strong>ASP</strong>.<strong>NET</strong> <strong>Applications</strong><br />
Requirements<br />
The following items describe the recommended hardware, software, network<br />
infrastructure, skills and knowledge, and service packs you will need.<br />
● Microsoft SQL Server 2000<br />
● Microsoft Visual Studio® .<strong>NET</strong> development system<br />
The procedures in this article also require that you have knowledge of <strong>ASP</strong>.<strong>NET</strong><br />
Web development with the Microsoft Visual C# development tool.<br />
Summary<br />
This How To includes the following procedures:<br />
1. Create a Web Application with a Logon Page<br />
2. Configure the Web Application for Forms Authentication<br />
3. Generate an Authentication Ticket for Authenticated Users<br />
4. Construct GenericPrincipal and FormsIdentity Objects<br />
5. Test the Application<br />
1. Create a Web Application with a Logon Page<br />
This procedure creates a new <strong>ASP</strong>.<strong>NET</strong> Web application. The application will<br />
contain two pages; a default page that only authenticated users are allowed to<br />
access, and a logon page used to collect user credentials.<br />
<br />
To create a Web application with a logon page<br />
1. Start Visual Studio .<strong>NET</strong> and create a new C# <strong>ASP</strong>.<strong>NET</strong> Web Application called<br />
GenericPrincipalApp.<br />
2. Rename WebForm1.aspx to Logon.aspx.<br />
3. Add the following controls to Logon.aspx to create a logon form.<br />
Table 1: Logon.aspx controls<br />
Control Type Text ID<br />
Label User Name: -<br />
Label Password -<br />
Text Box - txtUserName<br />
Text Box - txtPassword<br />
Button Logon btnLogon
How To: Create GenericPrincipal Objects with Forms Authentication 379<br />
4. Set the TextMode property of the password Text Box control to Password.<br />
5. In Solution Explorer, right-click GenericPrincipalApp, point to Add, and then<br />
click Add Web Form.<br />
6. Enter default.aspx as the new form’s name, and then click Open.<br />
2. Configure the Web Application for Forms Authentication<br />
<br />
To edit the application’s Web.config file to configure the application for Forms<br />
authentication<br />
1. Use Solution Explorer to open Web.config.<br />
2. Locate the element and change the mode attribute to Forms.<br />
3. Add the following element as a child of the element<br />
and set the loginUrl, name, timeout, and path attributes as follows:<br />
<br />
<br />
<br />
<br />
4. Add the following element beneath the <br />
element. This allows only authenticated users to access the application. The<br />
previously established loginUrl attribute of the element<br />
redirects unauthenticated requests to the Logon.aspx page.<br />
<br />
<br />
<br />
<br />
3. Generate an Authentication Ticket for Authenticated Users<br />
This procedure writes code to generate an authentication ticket for authenticated<br />
users. The authentication ticket is a type of cookie used by the <strong>ASP</strong>.<strong>NET</strong><br />
FormsAuthenticationModule.<br />
The authentication code typically involves looking up the supplied user name and<br />
password against either a custom database or against Active <strong>Directory</strong>.<br />
For information about performing these lookups, see the following How To articles<br />
in the Reference section of this guide:<br />
● “How To: Use Forms Authentication with Active <strong>Directory</strong>”<br />
● “How To: Use Forms Authentication with SQL Server 2000”
380<br />
<strong>Building</strong> <strong>Secure</strong> <strong>ASP</strong>.<strong>NET</strong> <strong>Applications</strong><br />
<br />
To generate an authentication ticket for authenticated users<br />
1. Open the Logon.aspx.cs file and the following using statement to the top of the<br />
file beneath the existing using statements:<br />
using System.Web.Security;<br />
2. Add the following private helper method to the WebForm1 class called<br />
IsAuthenticated, which is used to validate user names and passwords to authenticate<br />
users. This code assumes that all user name and password combinations<br />
are valid.<br />
private bool IsAuthenticated( string username, string password )<br />
{<br />
// Lookup code omitted for clarity<br />
// This code would typically validate the user name and password<br />
// combination against a SQL database or Active <strong>Directory</strong><br />
// Simulate an authenticated user<br />
return true;<br />
}<br />
3. Add the following private helper method called GetRoles, which is used to<br />
obtain the set of roles that the user belongs to.<br />
private string GetRoles( string username, string password )<br />
{<br />
// Lookup code omitted for clarity<br />
// This code would typically look up the role list from a database table.<br />
// If the user was being authenticated against Active <strong>Directory</strong>, the<br />
// Security groups and/or distribution lists that the user belongs to may be<br />
// used instead<br />
}<br />
// This GetRoles method returns a pipe delimited string containing roles<br />
// rather than returning an array, because the string format is convenient<br />
// for storing in the authentication ticket / cookie, as user data<br />
return "Senior Manager|Manager|Employee";<br />
4. Display the Logon.aspx form in Designer mode and double-click the Logon<br />
button to create a click event handler.<br />
5. Add a call to the IsAuthenticated method, supplying the user name and password<br />
captured through the logon form. Assign the return value to a variable of<br />
type bool, which indicates whether or not the user is authenticated.<br />
bool isAuthenticated = IsAuthenticated( txtUserName.Text,<br />
txtPassword.Text );
How To: Create GenericPrincipal Objects with Forms Authentication 381<br />
6. If the user is authenticated, add a call to the GetRoles method to obtain the<br />
user’s role list.<br />
if (isAuthenticated == true )<br />
{<br />
string roles = GetRoles( txtUserName.Text, txtPassword.Text );<br />
7. Create a new forms authentication ticket that contains the user name, an expiration<br />
time, and the list of roles that the user belongs to. Note that the user data<br />
property of the authentication ticket is used to store the user’s role list. Also note<br />
that the following code creates a non-persistent ticket, although whether or not<br />
the ticket / cookie is persistent is dependent upon your application scenario.<br />
// Create the authentication ticket<br />
FormsAuthenticationTicket authTicket = new<br />
FormsAuthenticationTicket(1,<br />
// version<br />
txtUserName.Text,<br />
// user name<br />
DateTime.Now,<br />
// creation<br />
DateTime.Now.AddMinutes(60),// Expiration<br />
false,<br />
// Persistent<br />
roles );<br />
// User data<br />
8. Add code to create an encrypted string representation of the ticket and store it as<br />
data within an HttpCookie object.<br />
// Now encrypt the ticket.<br />
string encryptedTicket = FormsAuthentication.Encrypt(authTicket);<br />
// Create a cookie and add the encrypted ticket to the<br />
// cookie as data.<br />
HttpCookie authCookie =<br />
new HttpCookie(FormsAuthentication.FormsCookieName,<br />
encryptedTicket);<br />
9. Add the cookie to the cookies collection returned to the user’s browser.<br />
// Add the cookie to the outgoing cookies collection.<br />
Response.Cookies.Add(authCookie);<br />
10. Redirect the user to the originally requested page<br />
}<br />
// Redirect the user to the originally requested page<br />
Response.Redirect( FormsAuthentication.GetRedirectUrl(<br />
txtUserName.Text,<br />
false ));
382<br />
<strong>Building</strong> <strong>Secure</strong> <strong>ASP</strong>.<strong>NET</strong> <strong>Applications</strong><br />
4. Construct GenericPrincipal and FormsIdentity Objects<br />
This procedure implements an application authentication event handler and<br />
constructs GenericPrincipal and FormsIdentity objects based on information<br />
contained within the authentication ticket.<br />
<br />
To construct GenericPrincipal and FormsIdentity objects<br />
1. From Solution Explorer, open global.asax.<br />
2. Switch to code view and add the following using statements to the top of the<br />
file:<br />
using System.Web.Security;<br />
using System.Security.Principal;<br />
3. Locate the Application_AuthenticateRequest event handler and add the following<br />
code to obtain the forms authentication cookie from the cookie collection<br />
passed with the request.<br />
// Extract the forms authentication cookie<br />
string cookieName = FormsAuthentication.FormsCookieName;<br />
HttpCookie authCookie = Context.Request.Cookies[cookieName];<br />
if(null == authCookie)<br />
{<br />
// There is no authentication cookie.<br />
return;<br />
}<br />
4. Add the following code to extract and decrypt the authentication ticket from the<br />
forms authentication cookie.<br />
FormsAuthenticationTicket authTicket = null;<br />
try<br />
{<br />
authTicket = FormsAuthentication.Decrypt(authCookie.Value);<br />
}<br />
catch(Exception ex)<br />
{<br />
// Log exception details (omitted for simplicity)<br />
return;<br />
}<br />
if (null == authTicket)<br />
{<br />
// Cookie failed to decrypt.<br />
return;<br />
}
How To: Create GenericPrincipal Objects with Forms Authentication 383<br />
5. Add the following code to parse out the pipe separate list of role names attached<br />
to the ticket when the user was originally authenticated.<br />
// When the ticket was created, the UserData property was assigned a<br />
// pipe delimited string of role names.<br />
string[] roles = authTicket.UserData.Split(new char[]{'|'});<br />
6. Add the following code to create a FormsIdentity object with the user name<br />
obtained from the ticket name and a GenericPrincipal object that contains this<br />
identity together with the user’s role list.<br />
// Create an Identity object<br />
FormsIdentity id = new FormsIdentity( authTicket );<br />
// This principal will flow throughout the request.<br />
GenericPrincipal principal = new GenericPrincipal(id, roles);<br />
// Attach the new principal object to the current HttpContext object<br />
Context.User = principal;<br />
5. Test the Application<br />
This procedure adds code to the default.aspx page to display information from the<br />
GenericPrincipal object attached to the current HttpContext object, to confirm that<br />
the object has been correctly constructed and assigned to the current Web request.<br />
You will then build and test the application.<br />
<br />
To test the application<br />
1. In Solution Explorer, double-click default.aspx.<br />
2. Double-click the default.aspx Web form to display the page load event handler.<br />
3. Scroll to the top of the file and add the following using statement beneath the<br />
existing using statements.<br />
using System.Security.Principal;<br />
4. Return to the page load event handler and add the following code to display the<br />
identity name attached to the GenericPrincipal associated with the current Web<br />
request.<br />
IPrincipal p = HttpContext.Current.User;<br />
Response.Write( "Authenticated Identity is: " +<br />
p.Identity.Name );<br />
Response.Write( "" );
384<br />
<strong>Building</strong> <strong>Secure</strong> <strong>ASP</strong>.<strong>NET</strong> <strong>Applications</strong><br />
5. Add the following code to test role membership for the current authenticated<br />
identity.<br />
if ( p.IsInRole("Senior Manager") )<br />
Response.Write( "User is in Senior Manager role" );<br />
else<br />
Response.Write( "User is not in Senior Manager role" );<br />
if ( p.IsInRole("Manager") )<br />
Response.Write( "User is in Manager role" );<br />
else<br />
Response.Write( "User is not in Manager role" );<br />
if ( p.IsInRole("Employee") )<br />
Response.Write( "User is in Employee role" );<br />
else<br />
Response.Write( "User is not in Employee role" );<br />
if ( p.IsInRole("Sales") )<br />
Response.Write( "User is in Sales role" );<br />
else<br />
Response.Write( "User is not in Sales role" );<br />
6. In Solution Explorer, right-click default.aspx, and then click Set As Start Page.<br />
7. On the Build menu, click Build Solution. Eliminate any build errors.<br />
8. Press Ctrl+F5 to run the application. Because default.aspx is configured as the<br />
start up page, this is the initially requested page.<br />
9. When you are redirected to the logon page (because you do not initially have an<br />
authentication ticket), enter a user name and password (any will do), and then<br />
click Logon.<br />
10. Confirm that you are redirected to default.aspx and that the user identity and the<br />
correct role details are displayed. The user should be a member of the Senior<br />
Manager, Manager, and Employee role, but not a member of the Sales role.<br />
Additional Resources<br />
For more information, see the following related How Tos in the Reference section of<br />
this guide:<br />
● “How To: Use Forms Authentication with Active <strong>Directory</strong>”<br />
● “How To: Use Forms Authentication with SQL Server 2000”
How To:<br />
Implement Kerberos Delegation<br />
for Windows 2000<br />
By default, the Microsoft® Windows® 2000 operating system uses the Kerberos<br />
protocol for authentication. This How To describes how to configure Kerberos<br />
delegation, a powerful feature that allows a server, while impersonating a client,<br />
to access remote resources on behalf of the client.<br />
Important: Delegation is a very powerful feature and is unconstrained on Windows 2000. It<br />
should be used with caution. Computers that are configured to support delegation should be<br />
under controlled access to prevent misuse of this feature.<br />
Windows .<strong>NET</strong> Server will support a constrained delegation feature.<br />
When a server impersonates a client, Kerberos authentication generates a delegatelevel<br />
token (capable of being used to respond to network authentication challenges<br />
from remote computers) if the following conditions are met:<br />
1. The client account that is being impersonated is not marked as sensitive and<br />
cannot be delegated in Microsoft Active <strong>Directory</strong>® directory service.<br />
2. The server process account (the user account under which the server process is<br />
running, or the computer account if the process is running under the local<br />
SYSTEM account) is marked as trusted for delegation in Active <strong>Directory</strong>.<br />
Notes<br />
●<br />
●<br />
For Kerberos delegation to be successful, all computers (clients and servers)<br />
must be part of a single Active <strong>Directory</strong> forest.<br />
If you impersonate within serviced components and want to flow the callers<br />
context through an Enterprise Services application, the application server that<br />
hosts Enterprise Services must have Hotfix Rollup 18.1 or greater.<br />
For more information, see INFO: Availability of Windows 2000 Post-Service Pack<br />
2 COM+ Hotfix Rollup Package 18.1.
386<br />
<strong>Building</strong> <strong>Secure</strong> <strong>ASP</strong>.<strong>NET</strong> <strong>Applications</strong><br />
Requirements<br />
The following items describe the recommended hardware, software, network<br />
infrastructure, skills and knowledge and service packs you will need: Windows<br />
2000 Server with Active <strong>Directory</strong>.<br />
Summary<br />
This How To includes the following procedures:<br />
1. Confirm that the Client Account is Configured for Delegation<br />
2. Confirm that the Server Process Account is Trusted for Delegation<br />
1. Confirm that the Client Account is Configured for Delegation<br />
This procedure ensures that the client account is capable of being delegated.<br />
<br />
To confirm that the client account is configured for delegation<br />
1. Log onto the domain controller using an administrator account.<br />
2. On the taskbar, click the Start button, point to Programs, point to Administrative<br />
Tools, and then click Active <strong>Directory</strong> Users and Computers.<br />
3. Under your domain, click the Users folder.<br />
4. Right-click the user account that is to be delegated, and then click Properties.<br />
5. Click the Account tab.<br />
6. Within the Account options list, make sure Account is sensitive and cannot be<br />
delegated is not selected.<br />
7. Click OK to close the Properties dialog box.<br />
2. Confirm that the Server Process Account is Trusted<br />
for Delegation<br />
This procedure ensures that the account used to run the server process (the process<br />
that performs impersonation) is allowed to delegate client accounts. You must<br />
configure the user account under which the server process runs, or if the process<br />
runs under the local SYSTEM account, you must configure the computer account.<br />
Perform the appropriate procedure that follows, depending on if your server<br />
process runs under a Windows account or a local SYSTEM account.
How To: Implement Kerberos Delegation for Windows 2000 387<br />
<br />
<br />
To confirm that the server process account is trusted for delegation if the server process<br />
runs under a Windows user account<br />
1. Within the Users folder of Active <strong>Directory</strong> Users and Computers, right-click<br />
the user account that is used to run the server process that will impersonate the<br />
client, and then click Properties.<br />
2. Click the Account tab.<br />
3. Within the Account options list, click Account is trusted for delegation.<br />
To confirm that the server process account is trusted for delegation if the server process<br />
runs under the local SYSTEM account<br />
1. Right-click the Computers folder within Active <strong>Directory</strong> Users and Computers,<br />
and then click Properties.<br />
2. Right-click the server computer (where the process that impersonates the client<br />
will be running), and then click Properties.<br />
3. On the General page, click Trust computer for delegation.<br />
References<br />
● For a list of the files that are affected by the Windows 2000 Post-Service Pack 2<br />
(SP2) COM+ hotfix package 18.1, see article Q313582, “INFO: Availability of<br />
Windows 2000 Post-Service Pack 2 COM+ Hotfix Rollup Package 18.1,” in the<br />
Microsoft Knowledge Base.<br />
● To see how to configure a complete delegation scenario, involving <strong>ASP</strong>.<strong>NET</strong>,<br />
Enterprise Services and SQL Server, see “Flowing the Original Caller to the<br />
Database” in Chapter 5, “Intranet Security.”
How To:<br />
Implement IPrincipal<br />
The .<strong>NET</strong> Framework provides the WindowsPrincipal and GenericPrincipal<br />
classes, which provide basic role-checking functionality for Windows and non-<br />
Windows authentication mechanisms respectively. Both classes implement the<br />
IPrincipal interface. To be used for authorization, <strong>ASP</strong>.<strong>NET</strong> requires that these<br />
objects are stored in HttpContext.User. For Windows-based applications, they<br />
must be stored in Thread.CurrentPrincipal.<br />
The functionality offered by these classes is sufficient for most application scenarios.<br />
<strong>Applications</strong> can explicitly call the IPrincipal.IsInRole method to perform programmatic<br />
role checks. The Demand method of the PrincipalPermission class,<br />
when used to demand that a caller belong to a particular role (either declaratively<br />
or imperatively) also results in a call to IPrincipal.IsInRole.<br />
In some circumstances, you might need to develop your own principal implementations<br />
by creating a class that implements the IPrincipal interface. Any class that<br />
implements IPrincipal can be used for .<strong>NET</strong> authorization.<br />
Reasons for implementing your own IPrincipal class include:<br />
●<br />
You want extended role checking functionality. You might want methods that<br />
allow you to check whether a particular user is a member of multiple roles. For<br />
example:<br />
CustomPrincipal.IsInAllRoles( "Role1", "Role2", "Role3" )<br />
CustomPrincipal.IsInAnyRole( "Role1", "Role2", "Role3" )<br />
●<br />
You want to implement an extra method or property that returns a list of roles in<br />
an array. For example:<br />
string[] roles = CustomPrincipal.Roles;<br />
●<br />
You want your application to enforce role hierarchy logic. For example, a Senior<br />
Manager may be considered higher up in the hierarchy than a Manager. This<br />
could be tested using methods like the following.<br />
CustomPrincipal.IsInHigherRole("Manager");<br />
CustomPrincipal.IsInLowerRole("Manager");
390<br />
<strong>Building</strong> <strong>Secure</strong> <strong>ASP</strong>.<strong>NET</strong> <strong>Applications</strong><br />
●<br />
You want to implement lazy initialization of the role lists. For example, you<br />
could dynamically load the role list only when a role check is requested.<br />
This How To describes how to implement a custom IPrincipal class and use it for<br />
role-based authorization in an <strong>ASP</strong>.<strong>NET</strong> application that uses Forms authentication.<br />
Requirements<br />
The following items describe the recommended hardware, software, network<br />
infrastructure, skills and knowledge, and service packs you will need:<br />
● Microsoft® Visual Studio® .<strong>NET</strong> development system<br />
The procedures in this article also require that you have knowledge of <strong>ASP</strong>.<strong>NET</strong><br />
Web development with the Microsoft Visual C# development tool.<br />
Summary<br />
This How To includes the following procedures:<br />
1. Create a Simple Web Application<br />
2. Configure the Web Application for Forms Authentication<br />
3. Generate an Authentication Ticket for Authenticated Users<br />
4. Create a Class that Implements and Extends IPrincipal<br />
5. Create the CustomPrincipal Object<br />
6. Test the Application<br />
1. Create a Simple Web Application<br />
This procedure creates a new <strong>ASP</strong>.<strong>NET</strong> Web application. The application will<br />
contain two pages, a default page that only authenticated users are allowed to<br />
access and a logon page used to collect user credentials.<br />
<br />
To create a simple Web application<br />
1. Start Visual Studio .<strong>NET</strong> and create a new C# <strong>ASP</strong>.<strong>NET</strong> Web Application called<br />
CustomPrincipalApp.<br />
2. Rename WebForm1.aspx to Logon.aspx.<br />
3. Add the controls listed in Table 1 to Logon.aspx to create a logon form.
How To: Implement IPrincipal 391<br />
Table 1: Logon.aspx controls<br />
Control Type Text ID<br />
Label User Name: -<br />
Label Password -<br />
Text Box - txtUserName<br />
Text Box - txtPassword<br />
Button Logon btnLogon<br />
4. Set the TextMode property of the password Text Box control to Password.<br />
5. In Solution Explorer, right-click CustomPrincipalApp, point to Add, and then<br />
click Add Web Form.<br />
6. Enter default.aspx as the new form’s name, and then click Open.<br />
2. Configure the Web Application for Forms Authentication<br />
<br />
To edit the application’s Web.config file to configure the application for Forms<br />
authentication<br />
1. Use Solution Explorer to open Web.config.<br />
2. Locate the element and change the mode attribute to Forms.<br />
3. Add the following element as a child of the element<br />
and set the loginUrl, name, timeout, and path attributes as follows:<br />
<br />
<br />
<br />
<br />
4. Add the following element beneath the <br />
element. This allows only authenticated users to access the application. The<br />
previously established loginUrl attribute of the element<br />
redirects unauthenticated requests to the Logon.aspx page.<br />
<br />
<br />
<br />
392<br />
<strong>Building</strong> <strong>Secure</strong> <strong>ASP</strong>.<strong>NET</strong> <strong>Applications</strong><br />
3. Generate an Authentication Ticket for Authenticated Users<br />
This procedure writes code to generate an authentication ticket for authenticated<br />
users. The authentication ticket is a type of cookie used by the <strong>ASP</strong>.<strong>NET</strong><br />
FormsAuthenticationModule.<br />
The authentication code typically involves looking up the supplied user name and<br />
password against either a custom database or against Microsoft Active <strong>Directory</strong>®<br />
directory service.<br />
For information about performing these lookups, see the following How To articles<br />
in the Reference section of this guide:<br />
● “How To: Use Forms Authentication with Active <strong>Directory</strong>”<br />
● “How To: Use Forms Authentication with SQL Server 2000”<br />
<br />
To generate an authentication ticket for authenticated users<br />
1. Open the Logon.aspx.cs file and the following using statement to the top of the<br />
file beneath the existing using statements.<br />
using System.Web.Security;<br />
2. Add the following private helper method to the WebForm1 class called<br />
IsAuthenticated, which is used to validate user names and passwords to authenticate<br />
users. This code assumes that all user name and password combinations<br />
are valid.<br />
private bool IsAuthenticated( string username, string password )<br />
{<br />
// Lookup code omitted for clarity<br />
// This code would typically validate the user name and password<br />
// combination against a SQL database or Active <strong>Directory</strong><br />
// Simulate an authenticated user<br />
return true;<br />
}<br />
3. Add the following private helper method called GetRoles, which is used to<br />
obtain the set of roles that the user belongs to.<br />
private string GetRoles( string username, string password )<br />
{<br />
// Lookup code omitted for clarity<br />
// This code would typically look up the role list from a database table.<br />
// If the user was being authenticated against Active <strong>Directory</strong>, the<br />
// Security groups and/or distribution lists that the user belongs to may be<br />
// used instead<br />
// This GetRoles method returns a pipe delimited string containing roles
How To: Implement IPrincipal 393<br />
}<br />
// rather than returning an array, because the string format is convenient<br />
// for storing in the authentication ticket / cookie, as user data<br />
return "Senior Manager|Manager|Employee";<br />
4. Display the Logon.aspx form in Designer mode, and then double-click the Logon<br />
button to create a click event handler.<br />
5. Add a call to the IsAuthenticated method, supplying the user name and password<br />
captured through the logon form. Assign the return value to a variable of<br />
type bool, which indicates whether or not the user is authenticated.<br />
bool isAuthenticated = IsAuthenticated( txtUserName.Text,<br />
txtPassword.Text );<br />
6. If the user is authenticated, add a call to the GetRoles method to obtain the<br />
user’s role list.<br />
if (isAuthenticated == true )<br />
{<br />
string roles = GetRoles( txtUserName.Text, txtPassword.Text );<br />
7. Create a new forms authentication ticket that contains the user name, an expiration<br />
time, and the list of roles that the user belongs to. Note that the user data<br />
property of the authentication ticket is used to store the user’s role list. Also note<br />
that the following code creates a non-persistent ticket, although whether or not<br />
the ticket / cookie is persistent is dependent upon your application scenario.<br />
// Create the authentication ticket<br />
FormsAuthenticationTicket authTicket = new<br />
FormsAuthenticationTicket(1,<br />
// version<br />
txtUserName.Text,<br />
// user name<br />
DateTime.Now,<br />
// creation<br />
DateTime.Now.AddMinutes(60),// Expiration<br />
false,<br />
// Persistent<br />
roles );<br />
// User data<br />
8. Add code to create an encrypted string representation of the ticket and store it as<br />
data within an HttpCookie object.<br />
// Now encrypt the ticket.<br />
string encryptedTicket = FormsAuthentication.Encrypt(authTicket);<br />
// Create a cookie and add the encrypted ticket to the<br />
// cookie as data.<br />
HttpCookie authCookie =<br />
new HttpCookie(FormsAuthentication.FormsCookieName,<br />
encryptedTicket);
394<br />
<strong>Building</strong> <strong>Secure</strong> <strong>ASP</strong>.<strong>NET</strong> <strong>Applications</strong><br />
9. Add the cookie to the cookies collection returned to the user’s browser.<br />
// Add the cookie to the outgoing cookies collection.<br />
Response.Cookies.Add(authCookie);<br />
10. Redirect the user to the originally requested page.<br />
}<br />
// Redirect the user to the originally requested page<br />
Response.Redirect( FormsAuthentication.GetRedirectUrl(<br />
txtUserName.Text,<br />
false ));<br />
4. Create a Class that Implements and Extends IPrincipal<br />
This procedure creates a class that implements the IPrincipal interface. It also adds<br />
additional methods and properties to the class to provide additional role-based<br />
authorization functionality.<br />
<br />
To create a class that implements and extends IPrincipal<br />
1. Add a new class called CustomPrincipal to the current project.<br />
2. Add the following using statement to the top of CustomPrincipal.cs.<br />
using System.Security.Principal;<br />
3. Derive the CustomPrincipal class from the IPrincipal interface.<br />
public class CustomPrincipal : IPrincipal<br />
4. Add the following private member variables to the class to maintain the<br />
IIdentity object associated with the current principal and the principal’s role list.<br />
private IIdentity _identity;<br />
private string [] _roles;<br />
5. Modify the class’ default constructor to accept an IIdentity object and array of<br />
roles. Use the supplied values to initialize the private member variables as<br />
shown below.<br />
public CustomPrincipal(IIdentity identity, string [] roles)<br />
{<br />
_identity = identity;<br />
_roles = new string[roles.Length];<br />
roles.CopyTo(_roles, 0);<br />
Array.Sort(_roles);<br />
}
How To: Implement IPrincipal 395<br />
6. Implement the IsInRole method and Identity property defined by the IPrincipal<br />
interface as shown below.<br />
// IPrincipal Implementation<br />
public bool IsInRole(string role)<br />
{<br />
return Array.Binary<strong>Search</strong>( _roles, role ) > 0 ? true : false;<br />
}<br />
public IIdentity Identity<br />
{<br />
get<br />
{<br />
return _identity;<br />
}<br />
}<br />
7. Add the following two public methods which provide extended role-based<br />
checking functionality.<br />
// Checks whether a principal is in all of the specified set of roles<br />
public bool IsInAllRoles( params string [] roles )<br />
{<br />
foreach (string searchrole in roles )<br />
{<br />
if (Array.Binary<strong>Search</strong>(_roles, searchrole) < 0 )<br />
return false;<br />
}<br />
return true;<br />
}<br />
// Checks whether a principal is in any of the specified set of roles<br />
public bool IsInAnyRoles( params string [] roles )<br />
{<br />
foreach (string searchrole in roles )<br />
{<br />
if (Array.Binary<strong>Search</strong>(_roles, searchrole ) > 0 )<br />
return true;<br />
}<br />
return false;<br />
}<br />
5. Create the CustomPrincipal Object<br />
This procedure implements an application authentication event handler and constructs<br />
a CustomPrincipal object to represent the authenticated user based on<br />
information contained within the authentication ticket.<br />
<br />
To construct the CustomPrincipal object<br />
1. From Solution Explorer, open global.asax.
396<br />
<strong>Building</strong> <strong>Secure</strong> <strong>ASP</strong>.<strong>NET</strong> <strong>Applications</strong><br />
2. Switch to code view, and then add the following using statements to the top of<br />
the file.<br />
using System.Web.Security;<br />
using System.Security.Principal;<br />
3. Locate the Application_AuthenticateRequest event handler and add the following<br />
code to obtain the forms authentication cookie from the cookie collection<br />
passed with the request.<br />
// Extract the forms authentication cookie<br />
string cookieName = FormsAuthentication.FormsCookieName;<br />
HttpCookie authCookie = Context.Request.Cookies[cookieName];<br />
if(null == authCookie)<br />
{<br />
// There is no authentication cookie.<br />
return;<br />
}<br />
4. Add the following code to extract and decrypt the authentication ticket from the<br />
forms authentication cookie.<br />
FormsAuthenticationTicket authTicket = null;<br />
try<br />
{<br />
authTicket = FormsAuthentication.Decrypt(authCookie.Value);<br />
}<br />
catch(Exception ex)<br />
{<br />
// Log exception details (omitted for simplicity)<br />
return;<br />
}<br />
if (null == authTicket)<br />
{<br />
// Cookie failed to decrypt.<br />
return;<br />
}<br />
5. Add the following code to parse out the pipe separate list of role names attached<br />
to the ticket when the user was originally authenticated.<br />
// When the ticket was created, the UserData property was assigned a<br />
// pipe delimited string of role names.<br />
string[] roles = authTicket.UserData.Split('|');
How To: Implement IPrincipal 397<br />
6. Add the following code to create a FormsIdentity object with the user name<br />
obtained from the ticket name and a CustomPrincipal object that contains this<br />
identity together with the user’s role list.<br />
// Create an Identity object<br />
FormsIdentity id = new FormsIdentity( authTicket );<br />
// This principal will flow throughout the request.<br />
CustomPrincipal principal = new CustomPrincipal(id, roles);<br />
// Attach the new principal object to the current HttpContext object<br />
Context.User = principal;<br />
5. Test the Application<br />
This procedure adds code to the default.aspx page to display information from the<br />
CustomPrincipal object attached to the current HttpContext object, to confirm that<br />
the object has been correctly constructed and assigned to the current Web request. It<br />
also tests the role-based functionality supported by the new class.<br />
<br />
To test the application<br />
1. In Solution Explorer, double-click default.aspx.<br />
2. Double-click the default.aspx Web form to display the page load event handler.<br />
3. Scroll to the top of the file and add the following using statement beneath the<br />
existing using statements.<br />
using System.Security.Principal;<br />
4. Return to the page load event handler and add the following code to display the<br />
identity name attached to the CustomPrincipal associated with the current Web<br />
request.<br />
CustomPrincipal cp = HttpContext.Current.User as CustomPrincipal;<br />
Response.Write( "Authenticated Identity is: " +<br />
cp.Identity.Name );<br />
Response.Write( "" );<br />
5. Add the following code to test role membership for the current authenticated<br />
identity, using the standard IsInRole method and the additional IsInAnyRoles<br />
and IsInAllRoles methods supported by the CustomPrincipal class.<br />
if ( cp.IsInRole("Senior Manager") )<br />
{<br />
Response.Write( cp.Identity.Name + " is in the " + "Senior Manager Role" );<br />
Response.Write( "" );<br />
}
398<br />
<strong>Building</strong> <strong>Secure</strong> <strong>ASP</strong>.<strong>NET</strong> <strong>Applications</strong><br />
if ( cp.IsInAnyRoles("Senior Manager", "Manager", "Employee", "Sales") )<br />
{<br />
Response.Write( cp.Identity.Name + " is in one of the specified roles");<br />
Response.Write( "" );<br />
}<br />
if ( cp.IsInAllRoles("Senior Manager", "Manager", "Employee", "Sales") )<br />
{<br />
Response.Write( cp.Identity.Name + " is in ALL of the specified roles" );<br />
Response.Write( "" );<br />
}<br />
else<br />
{<br />
Response.Write( cp.Identity.Name +<br />
" is not in ALL of the specified roles" );<br />
Response.Write("");<br />
}<br />
if ( cp.IsInRole("Sales") )<br />
Response.Write( "User is in Sales role" );<br />
else<br />
Response.Write( "User is not in Sales role" );<br />
6. In Solution Explorer, right-click default.aspx, and then click Set As Start Page.<br />
7. On the Build menu, click Build Solution.<br />
8. Press CTRL+F5 to run the application. Because default.aspx is configured as the<br />
start up page, this is the initially requested page.<br />
9. When you are redirected to the logon page (because you do not initially have an<br />
authentication ticket), enter a user name and password (any will do), and then<br />
click Logon.<br />
10. Confirm that you are redirected to default.aspx and that the user identity and the<br />
correct role details are displayed. The user is a member of the Senior Manager,<br />
Manager and Employee roles, but not a member of the Sales role.<br />
Additional Resources<br />
For more information about Forms based authentication, see the following How Tos<br />
in the Reference section of this guide:<br />
● “How To: Use Forms Authentication with GenericPrincipal Objects”<br />
●<br />
“How To: Use Forms Authentication with Active <strong>Directory</strong>”<br />
● “How To: Use Forms Authentication with SQL Server 2000”
How To:<br />
Create a DPAPI Library<br />
Web applications often need to store security sensitive data, such as database<br />
connection strings and service account credentials in application configuration files.<br />
For security reasons, this type of information should never be stored in plain text<br />
and should always be encrypted prior to storage.<br />
This How To describes how to create a managed class library that encapsulates calls<br />
to the Data Protection API (DPAPI) to encrypt and decrypt data. This library can<br />
then be used from other managed applications such as <strong>ASP</strong>.<strong>NET</strong> Web applications,<br />
Web services and Enterprise Services applications.<br />
For related How To articles that use the DPAPI library created in this article, see the<br />
following articles in the Reference section of this guide:<br />
● “How To: Use DPAPI (Machine Store) from <strong>ASP</strong>.<strong>NET</strong>”<br />
●<br />
“How To: Use DPAPI (User Store) from <strong>ASP</strong>.<strong>NET</strong> with Enterprise Services”<br />
Notes<br />
●<br />
●<br />
●<br />
●<br />
Microsoft® Windows® 2000 operating system and later operating systems<br />
provide the Win32® Data Protection API (DPAPI) for encrypting and decrypting<br />
data.<br />
DPAPI is part of the Cryptography API (Crypto API) and is implemented in<br />
crypt32.dll. It consists of two methods, CryptProtectData and<br />
CryptUnprotectData.<br />
DPAPI is particularly useful in that it can eliminate the key management problem<br />
exposed to applications that use cryptography. While encryption ensures the<br />
data is secure, you must take additional steps to ensure the security of the key.<br />
DPAPI uses the password of the user account associated with the code that calls<br />
the DPAPI functions in order to derive the encryption key. As a result, the operating<br />
system (and not the application) manages the key.<br />
DPAPI can work with either the machine store or user store (which requires a<br />
loaded user profile). DPAPI defaults to the user store, although you can specify<br />
that the machine store be used by passing the<br />
CRYPTPROTECT_LOCAL_MACHINE flag to the DPAPI functions.
400<br />
<strong>Building</strong> <strong>Secure</strong> <strong>ASP</strong>.<strong>NET</strong> <strong>Applications</strong><br />
●<br />
●<br />
The user profile approach affords an additional layer of security because it limits<br />
who can access the secret. Only the user who encrypts the data can decrypt the<br />
data. However, use of the user profile requires additional development effort<br />
when DPAPI is used from an <strong>ASP</strong>.<strong>NET</strong> Web application because you need to take<br />
explicit steps to load and unload a user profile (<strong>ASP</strong>.<strong>NET</strong> does not automatically<br />
load a user profile).<br />
The machine store approach is easier to develop because it does not require user<br />
profile management. However, unless an additional entropy parameter is used, it<br />
is less secure because any user on the computer can decrypt data. (Entropy is a<br />
random value designed to make deciphering the secret more difficult). The<br />
problem with using an additional entropy parameter is that this must be securely<br />
stored by the application, which presents another key management issue.<br />
Note: If you use DPAPI with the machine store, the encrypted string is specific to a given<br />
computer and therefore you must generate the encrypted data on every computer. Do not<br />
copy the encrypted data across computers in a farm or cluster.<br />
If you use DPAPI with the user store, you can decrypt the data on any computer with a<br />
roaming user profile.<br />
Requirements<br />
The following items describe the recommended hardware, software, network<br />
infrastructure, skills and knowledge, and service packs you will need:<br />
● Microsoft Windows 2000<br />
● Microsoft Visual Studio® .<strong>NET</strong> development system<br />
The procedures in this How To also require that you have knowledge of the<br />
Microsoft Visual C# development tool.<br />
Summary<br />
This How To includes the following procedures:<br />
1. Create a C# Class Library<br />
2. Strong Name the Assembly (Optional)<br />
1. Create a C# Class Library<br />
This procedure creates a C# class library that exposes Encrypt and Decrypt methods.<br />
It encapsulates calls to the Win32 DPAPI functions.
How To: Create a DPAPI Library 401<br />
<br />
To create a C# class library<br />
1. Start Visual Studio .<strong>NET</strong> and create a new Visual C# Class Library project called<br />
DataProtection.<br />
2. Use Solution Explorer to rename class1.cs as DataProtection.cs.<br />
3. Within DataProtection.cs, rename class1 as DataProtector and rename the default<br />
constructor accordingly.<br />
4. In Solution Explorer, right-click DataProtection, and then click Properties.<br />
5. Click the Configuration Properties folder and set Allow unsafe code blocks to<br />
True.<br />
6. Click OK to close the Properties dialog box.<br />
7. Add the following using statements to the top of DataProtection.cs beneath the<br />
existing using statement.<br />
using System.Text;<br />
using System.Runtime.InteropServices;<br />
8. Add the following DllImport statements to the top of the DataProtector class to<br />
allow the Win32 DPAPI functions together with the FormatMessage utility<br />
function to be called through P/Invoke.<br />
[DllImport("Crypt32.dll", SetLastError=true,<br />
CharSet=System.Runtime.InteropServices.CharSet.Auto)]<br />
private static extern bool CryptProtectData(<br />
ref DATA_BLOB pDataIn,<br />
String szDataDescr,<br />
ref DATA_BLOB pOptionalEntropy,<br />
IntPtr pvReserved,<br />
ref CRYPTPROTECT_PROMPTSTRUCT pPromptStruct,<br />
int dwFlags,<br />
ref DATA_BLOB pDataOut);<br />
[DllImport("Crypt32.dll", SetLastError=true,<br />
CharSet=System.Runtime.InteropServices.CharSet.Auto)]<br />
private static extern bool CryptUnprotectData(<br />
ref DATA_BLOB pDataIn,<br />
String szDataDescr,<br />
ref DATA_BLOB pOptionalEntropy,<br />
IntPtr pvReserved,<br />
ref CRYPTPROTECT_PROMPTSTRUCT pPromptStruct,<br />
int dwFlags,<br />
ref DATA_BLOB pDataOut);<br />
[DllImport("kernel32.dll",<br />
CharSet=System.Runtime.InteropServices.CharSet.Auto)]<br />
private unsafe static extern int FormatMessage(int dwFlags,<br />
ref IntPtr lpSource,<br />
int dwMessageId,<br />
int dwLanguageId,<br />
ref String lpBuffer, int nSize,<br />
IntPtr *Arguments);
402<br />
<strong>Building</strong> <strong>Secure</strong> <strong>ASP</strong>.<strong>NET</strong> <strong>Applications</strong><br />
9. Add the following structure definitions and constants used by the DPAPI functions.<br />
[StructLayout(LayoutKind.Sequential, CharSet=CharSet.Unicode)]<br />
internal struct DATA_BLOB<br />
{<br />
public int cbData;<br />
public IntPtr pbData;<br />
}<br />
[StructLayout(LayoutKind.Sequential, CharSet=CharSet.Unicode)]<br />
internal struct CRYPTPROTECT_PROMPTSTRUCT<br />
{<br />
public int cbSize;<br />
public int dwPromptFlags;<br />
public IntPtr hwndApp;<br />
public String szPrompt;<br />
}<br />
static private IntPtr NullPtr = ((IntPtr)((int)(0)));<br />
private const int CRYPTPROTECT_UI_FORBIDDEN = 0x1;<br />
private const int CRYPTPROTECT_LOCAL_MACHINE = 0x4;<br />
10. Add a public enumerated type called Store to the class. This is used to indicate<br />
whether DPAPI should be used in conjunction with the machine or user stores.<br />
public enum Store {USE_MACHINE_STORE = 1, USE_USER_STORE};<br />
11. Add a private member variable of type Store to the class.<br />
private Store store;<br />
12. Replace the class’ default constructor with the following constructor that accepts<br />
a Store parameter and places the supplied value in the store private member<br />
variable.<br />
public DataProtector(Store tempStore)<br />
{<br />
store = tempStore;<br />
}<br />
13. Add the following public Encrypt method to the class.<br />
public byte[] Encrypt(byte[] plainText, byte[] optionalEntropy)<br />
{<br />
bool retVal = false;<br />
DATA_BLOB plainTextBlob = new DATA_BLOB();<br />
DATA_BLOB cipherTextBlob = new DATA_BLOB();<br />
DATA_BLOB entropyBlob = new DATA_BLOB();
How To: Create a DPAPI Library 403<br />
CRYPTPROTECT_PROMPTSTRUCT prompt = new CRYPTPROTECT_PROMPTSTRUCT();<br />
InitPromptstruct(ref prompt);<br />
int dwFlags;<br />
try<br />
{<br />
try<br />
{<br />
int bytesSize = plainText.Length;<br />
plainTextBlob.pbData = Marshal.AllocHGlobal(bytesSize);<br />
if(IntPtr.Zero == plainTextBlob.pbData)<br />
{<br />
throw new Exception("Unable to allocate plaintext buffer.");<br />
}<br />
plainTextBlob.cbData = bytesSize;<br />
Marshal.Copy(plainText, 0, plainTextBlob.pbData, bytesSize);<br />
}<br />
catch(Exception ex)<br />
{<br />
throw new Exception("Exception marshalling data. " + ex.Message);<br />
}<br />
if(Store.USE_MACHINE_STORE == store)<br />
{//Using the machine store, should be providing entropy.<br />
dwFlags = CRYPTPROTECT_LOCAL_MACHINE|CRYPTPROTECT_UI_FORBIDDEN;<br />
//Check to see if the entropy is null<br />
if(null == optionalEntropy)<br />
{//Allocate something<br />
optionalEntropy = new byte[0];<br />
}<br />
try<br />
{<br />
int bytesSize = optionalEntropy.Length;<br />
entropyBlob.pbData = Marshal.AllocHGlobal(optionalEntropy.Length);;<br />
if(IntPtr.Zero == entropyBlob.pbData)<br />
{<br />
throw new Exception("Unable to allocate entropy data buffer.");<br />
}<br />
Marshal.Copy(optionalEntropy, 0, entropyBlob.pbData, bytesSize);<br />
entropyBlob.cbData = bytesSize;<br />
}<br />
catch(Exception ex)<br />
{<br />
throw new Exception("Exception entropy marshalling data. " +<br />
ex.Message);<br />
}<br />
}<br />
else<br />
{//Using the user store<br />
dwFlags = CRYPTPROTECT_UI_FORBIDDEN;<br />
}<br />
retVal = CryptProtectData(ref plainTextBlob, "", ref entropyBlob,<br />
IntPtr.Zero, ref prompt, dwFlags,<br />
ref cipherTextBlob);
404<br />
<strong>Building</strong> <strong>Secure</strong> <strong>ASP</strong>.<strong>NET</strong> <strong>Applications</strong><br />
}<br />
if(false == retVal)<br />
{<br />
throw new Exception("Encryption failed. " +<br />
GetErrorMessage(Marshal.GetLastWin32Error()));<br />
}<br />
}<br />
catch(Exception ex)<br />
{<br />
throw new Exception("Exception encrypting. " + ex.Message);<br />
}<br />
byte[] cipherText = new byte[cipherTextBlob.cbData];<br />
Marshal.Copy(cipherTextBlob.pbData, cipherText, 0, cipherTextBlob.cbData);<br />
return cipherText;<br />
14. Add the following public Decrypt method to the class.<br />
public byte[] Decrypt(byte[] cipherText, byte[] optionalEntropy)<br />
{<br />
bool retVal = false;<br />
DATA_BLOB plainTextBlob = new DATA_BLOB();<br />
DATA_BLOB cipherBlob = new DATA_BLOB();<br />
CRYPTPROTECT_PROMPTSTRUCT prompt = new CRYPTPROTECT_PROMPTSTRUCT();<br />
InitPromptstruct(ref prompt);<br />
try<br />
{<br />
try<br />
{<br />
int cipherTextSize = cipherText.Length;<br />
cipherBlob.pbData = Marshal.AllocHGlobal(cipherTextSize);<br />
if(IntPtr.Zero == cipherBlob.pbData)<br />
{<br />
throw new Exception("Unable to allocate cipherText buffer.");<br />
}<br />
cipherBlob.cbData = cipherTextSize;<br />
Marshal.Copy(cipherText, 0, cipherBlob.pbData, cipherBlob.cbData);<br />
}<br />
catch(Exception ex)<br />
{<br />
throw new Exception("Exception marshalling data. " + ex.Message);<br />
}<br />
DATA_BLOB entropyBlob = new DATA_BLOB();<br />
int dwFlags;<br />
if(Store.USE_MACHINE_STORE == store)<br />
{//Using the machine store, should be providing entropy.<br />
dwFlags = CRYPTPROTECT_LOCAL_MACHINE|CRYPTPROTECT_UI_FORBIDDEN;<br />
//Check to see if the entropy is null<br />
if(null == optionalEntropy)<br />
{//Allocate something<br />
optionalEntropy = new byte[0];<br />
}<br />
try<br />
{
How To: Create a DPAPI Library 405<br />
}<br />
int bytesSize = optionalEntropy.Length;<br />
entropyBlob.pbData = Marshal.AllocHGlobal(bytesSize);<br />
if(IntPtr.Zero == entropyBlob.pbData)<br />
{<br />
throw new Exception("Unable to allocate entropy buffer.");<br />
}<br />
entropyBlob.cbData = bytesSize;<br />
Marshal.Copy(optionalEntropy, 0, entropyBlob.pbData, bytesSize);<br />
}<br />
catch(Exception ex)<br />
{<br />
throw new Exception("Exception entropy marshalling data. " +<br />
ex.Message);<br />
}<br />
}<br />
else<br />
{//Using the user store<br />
dwFlags = CRYPTPROTECT_UI_FORBIDDEN;<br />
}<br />
retVal = CryptUnprotectData(ref cipherBlob, null, ref entropyBlob,<br />
IntPtr.Zero, ref prompt, dwFlags,<br />
ref plainTextBlob);<br />
if(false == retVal)<br />
{<br />
throw new Exception("Decryption failed. " +<br />
GetErrorMessage(Marshal.GetLastWin32Error()));<br />
}<br />
//Free the blob and entropy.<br />
if(IntPtr.Zero != cipherBlob.pbData)<br />
{<br />
Marshal.FreeHGlobal(cipherBlob.pbData);<br />
}<br />
if(IntPtr.Zero != entropyBlob.pbData)<br />
{<br />
Marshal.FreeHGlobal(entropyBlob.pbData);<br />
}<br />
}<br />
catch(Exception ex)<br />
{<br />
throw new Exception("Exception decrypting. " + ex.Message);<br />
}<br />
byte[] plainText = new byte[plainTextBlob.cbData];<br />
Marshal.Copy(plainTextBlob.pbData, plainText, 0, plainTextBlob.cbData);<br />
return plainText;<br />
15. Add the following private helper methods to the class.<br />
private void InitPromptstruct(ref CRYPTPROTECT_PROMPTSTRUCT ps)<br />
{<br />
ps.cbSize = Marshal.SizeOf(typeof(CRYPTPROTECT_PROMPTSTRUCT));<br />
ps.dwPromptFlags = 0;
406<br />
<strong>Building</strong> <strong>Secure</strong> <strong>ASP</strong>.<strong>NET</strong> <strong>Applications</strong><br />
}<br />
ps.hwndApp = NullPtr;<br />
ps.szPrompt = null;<br />
private unsafe static String GetErrorMessage(int errorCode)<br />
{<br />
int FORMAT_MESSAGE_ALLOCATE_BUFFER = 0x00000100;<br />
int FORMAT_MESSAGE_IGNORE_INSERTS = 0x00000200;<br />
int FORMAT_MESSAGE_FROM_SYSTEM = 0x00001000;<br />
int messageSize = 255;<br />
String lpMsgBuf = "";<br />
int dwFlags = FORMAT_MESSAGE_ALLOCATE_BUFFER | FORMAT_MESSAGE_FROM_SYSTEM |<br />
FORMAT_MESSAGE_IGNORE_INSERTS;<br />
IntPtr ptrlpSource = new IntPtr();<br />
IntPtr prtArguments = new IntPtr();<br />
int retVal = FormatMessage(dwFlags, ref ptrlpSource, errorCode, 0,<br />
ref lpMsgBuf, messageSize, &prtArguments);<br />
if(0 == retVal)<br />
{<br />
throw new Exception("Failed to format message for error code " +<br />
errorCode + ". ");<br />
}<br />
return lpMsgBuf;<br />
}<br />
16. On the Build menu, click Build Solution.<br />
2. Strong Name the Assembly (Optional)<br />
If the managed DPAPI class library is to be called by an Enterprise Services application<br />
(which must be strong named), then the DPAPI class library must also be<br />
strong named. This procedure creates a strong name for the class library.<br />
If the managed DPAPI class library is to be called directly from an <strong>ASP</strong>.<strong>NET</strong> Web<br />
application (which is not strong named), you can skip this procedure.<br />
<br />
To strong name the assembly<br />
1. Open a command window and change directory to the DataProtection project<br />
folder.<br />
2. Use the sn.exe utility to generate a key pair used to sign the assembly.<br />
sn -k dataprotection.snk<br />
3. Return to Visual Studio .<strong>NET</strong> and open Assemblyinfo.cs.
How To: Create a DPAPI Library 407<br />
4. Locate the AssemblyKeyFile attribute and add a path to the key file within the<br />
project folder.<br />
[assembly: AssemblyKeyFile(@"..\..\dataprotection.snk")]<br />
5. On the Build menu, click Build Solution.<br />
References<br />
For more information, see the following related How Tos:<br />
●<br />
●<br />
“How To: Use DPAPI (Machine Store) from <strong>ASP</strong>.<strong>NET</strong>” in the Reference section of<br />
this guide<br />
“How To: Use DPAPI (User Store) from <strong>ASP</strong>.<strong>NET</strong> with Enterprise Services” in the<br />
Reference section of this guide
How To:<br />
Use DPAPI (Machine Store)<br />
from <strong>ASP</strong>.<strong>NET</strong><br />
Web applications often need to store security-sensitive data, such as database<br />
connection strings and service account credentials in application configuration files.<br />
For security reasons, this type of information should never is stored in plain text<br />
and should always be encrypted prior to storage.<br />
This How To describes how to use DPAPI from <strong>ASP</strong>.<strong>NET</strong>. This includes <strong>ASP</strong>.<strong>NET</strong><br />
Web applications, Web services, and .<strong>NET</strong> Remoting components that are hosted in<br />
<strong>ASP</strong>.<strong>NET</strong>.<br />
The code in this How To references DPAPI through a managed class library, the<br />
creation of which is described in “How To: Create a DPAPI Library” in the Reference<br />
section of this guide.<br />
Notes<br />
●<br />
●<br />
●<br />
DPAPI can work with either the machine store or user store (which requires a<br />
loaded user profile). DPAPI defaults to the user store, although you can specify<br />
that the machine store be used by passing the<br />
CRYPTPROTECT_LOCAL_MACHINE flag to the DPAPI functions.<br />
The user profile approach affords an additional layer of security because it limits<br />
who can access the secret. Only the user who encrypts the data can decrypt the<br />
data. However, use of the user profile requires additional development effort<br />
when DPAPI is used from an <strong>ASP</strong>.<strong>NET</strong> Web application because you need to take<br />
explicit steps to load and unload a user profile (<strong>ASP</strong>.<strong>NET</strong> does not automatically<br />
load a user profile).<br />
The machine store approach (adopted in this How To) is easier to develop<br />
because it does not require user profile management. However, unless an<br />
additional entropy parameter is used, it is less secure because any user on the<br />
computer can decrypt data. (Entropy is a random value designed to make<br />
deciphering the secret more difficult.) The problem with using an additional<br />
entropy parameter is that this must be securely stored by the application,<br />
which presents another key management issue.
410<br />
<strong>Building</strong> <strong>Secure</strong> <strong>ASP</strong>.<strong>NET</strong> <strong>Applications</strong><br />
Note: If you use DPAPI with the machine store, the encrypted string is specific to a given<br />
computer and therefore you must generate the encrypted data on every computer. Do not<br />
copy the encrypted data across computers in a farm or cluster.<br />
●<br />
For a related article that shows how to use DPAPI with the user store from an<br />
<strong>ASP</strong>.<strong>NET</strong> Web application (by using a serviced component within an Enterprise<br />
Services application), see “How To: Use DPAPI (User Store) from <strong>ASP</strong>.<strong>NET</strong> with<br />
Enterprise Services” within the Reference section of this guide.<br />
Requirements<br />
The following items describe the recommended hardware, software, network<br />
infrastructure, skills and knowledge, and service packs you will need.<br />
● Microsoft® Windows® 2000 operating system<br />
● Microsoft Visual Studio® .<strong>NET</strong> development system<br />
The procedures in this How To also require that you have knowledge of building<br />
<strong>ASP</strong>.<strong>NET</strong> Web applications with Microsoft Visual C# development tool.<br />
Before working through this How To, you must perform the steps described in<br />
“How To: Create a DPAPI Library” in order to create the DPAPI managed class<br />
library used by code in this How To.<br />
Summary<br />
This How To includes the following steps:<br />
1. Create an <strong>ASP</strong>.<strong>NET</strong> Client Web Application<br />
2. Test the Application<br />
3. Modify the Web Application to Read an Encrypted Connection String from<br />
Web.Config<br />
1. Create an <strong>ASP</strong>.<strong>NET</strong> Client Web Application<br />
This procedure creates an <strong>ASP</strong>.<strong>NET</strong> client Web application that will call the DPAPI<br />
class library to encrypt and decrypt data stored within the Web.config file.<br />
<br />
To create an <strong>ASP</strong>.<strong>NET</strong> client Web application<br />
1. Start Visual Studio .<strong>NET</strong> and create a new C# <strong>ASP</strong>.<strong>NET</strong> Web application called<br />
DPAPIClientWeb.<br />
2. Add a reference to the DataProtector.dll assembly, previously created in “How<br />
To: Create a DPAPI Library.”
How To: Use DPAPI (Machine Store) from <strong>ASP</strong>.<strong>NET</strong> 411<br />
3. Open WebForm1.aspx.cs and add the following using statements to the top of<br />
the file beneath the existing using statements.<br />
using System.Text;<br />
using DataProtection;<br />
4. Add the controls listed in Table 1 to WebForm1.aspx.<br />
Table 1: WebForm1.aspx controls<br />
Control Type Text ID<br />
Button Encrypt btnEncrypt<br />
Button Decrypt btnDecrypt<br />
TextBox<br />
txtDataToEncrypt<br />
TextBox<br />
txtEncryptedData<br />
TextBox<br />
txtDecryptedData<br />
Label<br />
lblError<br />
Label<br />
Data To Encrypt<br />
Label<br />
Encrypted Data<br />
Label<br />
Decrypted Data<br />
Your Web form should look similar to Figure 1.<br />
Figure 1<br />
DPAPIClientWeb Web Form<br />
5. Double-click the Encrypt button to create a button click event handler.<br />
DataProtector dp = new DataProtector( DataProtector.Store.USE_MACHINE_STORE );<br />
try<br />
{<br />
byte[] dataToEncrypt = Encoding.ASCII.GetBytes(txtDataToEncrypt.Text);<br />
// Not passing optional entropy in this example<br />
// Could pass random value (stored by the application) for added security
412<br />
<strong>Building</strong> <strong>Secure</strong> <strong>ASP</strong>.<strong>NET</strong> <strong>Applications</strong><br />
// when using DPAPI with the machine store.<br />
txtEncryptedData.Text =<br />
Convert.ToBase64String(dp.Encrypt(dataToEncrypt,null));<br />
}<br />
catch(Exception ex)<br />
{<br />
lblError.ForeColor = Color.Red;<br />
lblError.Text = "Exception." + ex.Message;<br />
return;<br />
}<br />
lblError.Text = "";<br />
6. Return to the Web form and double-click the Decrypt button. Add the following<br />
code to the button click event handler.<br />
DataProtector dp = new DataProtector(DataProtector.Store.USE_MACHINE_STORE);<br />
try<br />
{<br />
byte[] dataToDecrypt = Convert.FromBase64String(txtEncryptedData.Text);<br />
// Optional entropy parameter is null.<br />
// If entropy was used within the Encrypt method, the same entropy parameter<br />
// must be supplied here<br />
txtDecryptedData.Text =<br />
Encoding.ASCII.GetString(dp.Decrypt(dataToDecrypt,null));<br />
}<br />
catch(Exception ex)<br />
{<br />
lblError.ForeColor = Color.Red;<br />
lblError.Text = "Exception." + ex.Message;<br />
return;<br />
}<br />
lblError.Text = "";<br />
7. On the Build menu, click Build Solution.<br />
2. Test the Application<br />
<br />
This procedure tests the Web application to confirm that data is successfully encrypted<br />
and decrypted.<br />
To test the application<br />
1. Press Ctrl+F5 to run the Web application.<br />
2. Enter a string in the Data to Encrypt text box and click Encrypt.<br />
Confirm that encrypted data (in Base64 encoded format) is displayed in the<br />
Encrypted Data text box.<br />
3. Click the Decrypt button.<br />
Confirm that the encrypted data is successfully decrypted and displayed in the<br />
Decrypted Data text box.
How To: Use DPAPI (Machine Store) from <strong>ASP</strong>.<strong>NET</strong> 413<br />
3. Modify the Web Application to Read an Encrypted Connection<br />
String from Web.Config<br />
This procedure takes an encrypted database connection string and places the<br />
encrypted cipher text into the application’s Web.config file within an<br />
element. You will then add code to read and decrypt this string from<br />
the configuration file.<br />
<br />
To modify the Web application to read an encrypted connection string from Web.config<br />
1. Return to Visual Studio .<strong>NET</strong> and display the WebForm1.aspx in Designer mode.<br />
2. Add another button to the form. Set its Text property to Decrypt string from<br />
config file and its ID property to btnDecryptConfig.<br />
3. Double-click the button to create a button click event handler.<br />
4. Add the following using statement to the top of the file beneath the existing<br />
using statements.<br />
using System.Configuration;<br />
5. Return to the btnDecryptConfig_Click event handler and add the following<br />
code to retrieve a database connection string from the section of<br />
the Web.config file.<br />
DataProtector dp = new DataProtector(DataProtector.Store.USE_MACHINE_STORE);<br />
try<br />
{<br />
string appSettingValue =<br />
ConfigurationSettings.AppSettings["connectionString"];<br />
byte[] dataToDecrypt = Convert.FromBase64String(appSettingValue);<br />
string connStr = Encoding.ASCII.GetString(<br />
dp.Decrypt(dataToDecrypt,null));<br />
txtDecryptedData.Text = connStr;<br />
}<br />
catch(Exception ex)<br />
{<br />
lblError.ForeColor = Color.Red;<br />
lblError.Text = "Exception." + ex.Message;<br />
return;<br />
}<br />
lblError.Text = "";<br />
6. On the Build menu, click Build Solution to rebuild the projects.<br />
7. Right-click WebForm1.aspx, and then click View in Browser.<br />
8. Enter a database connection string such as the one that follows into the Data to<br />
Encrypt field.<br />
server=(local);Integrated Security=SSPI; database=Northwind
414<br />
<strong>Building</strong> <strong>Secure</strong> <strong>ASP</strong>.<strong>NET</strong> <strong>Applications</strong><br />
9. Click the Encrypt button.<br />
10. Select the encrypted cipher text and copy it to the clipboard.<br />
11. Switch to Visual Studio .<strong>NET</strong>, open Web.config and add the following<br />
element outside of the element. Assign the encrypted<br />
connection string currently on the clipboard to the value attribute.<br />
<br />
<br />
<br />
12. Save Web.config.<br />
13. Click the Decrypt string from config file button and confirm that the encrypted<br />
database connection string is successfully read from the Web.config file and that<br />
the decrypted connection string is successfully displayed in the Decrypted data<br />
field.<br />
References<br />
For more information, see the following related How Tos in the Reference section of<br />
this guide:<br />
● “How To: Create a DPAPI Library” in the Reference section of this guide.<br />
● “How To: Use DPAPI (User Store) from <strong>ASP</strong>.<strong>NET</strong> with Enterprise Services” in the<br />
Reference section of this guide.
How To:<br />
Use DPAPI (User Store) from<br />
<strong>ASP</strong>.<strong>NET</strong> with Enterprise Services<br />
Web applications often need to store security-sensitive data, such as database<br />
connection strings and service account credentials in application configuration files.<br />
For security reasons, this type of information should never is stored in plain text<br />
and should always be encrypted prior to storage.<br />
This How To describes how to use Data Protection API (DPAPI) from an <strong>ASP</strong>.<strong>NET</strong><br />
application with Enterprise Services.<br />
Notes<br />
●<br />
●<br />
●<br />
DPAPI can work with either the machine store or user store (which requires a<br />
loaded user profile). DPAPI defaults to the user store, although you can specify<br />
that the machine store be used by passing the<br />
CRYPTPROTECT_LOCAL_MACHINE flag to the DPAPI functions.<br />
The user profile approach (adopted by this How To) affords an additional layer<br />
of security because it limits who can access the secret. Only the user who encrypts<br />
the data can decrypt the data. However, use of the user profile requires<br />
additional development effort when DPAPI is used from an <strong>ASP</strong>.<strong>NET</strong> Web<br />
application because you need to take explicit steps to load and unload a user<br />
profile (<strong>ASP</strong>.<strong>NET</strong> does not automatically load a user profile).<br />
For a related article that shows how to use DPAPI with the machine store<br />
(directly) from an <strong>ASP</strong>.<strong>NET</strong> Web application (without requiring an Enterprise<br />
Services application), see “How To: Use DPAPI (Machine Store) from <strong>ASP</strong>.<strong>NET</strong>”<br />
within the Reference section of this guide.<br />
The approach described in this How To uses a .<strong>NET</strong> serviced component running in<br />
an Enterprise Services (COM+) server application to perform the DPAPI processing<br />
for the reasons outlined in the following section, “Why Use Enterprise Services?”<br />
It also uses a Windows service for the reasons in the “Why use a Windows Service?”<br />
section. The solution configuration is shown in Figure 1 on the next page.
416<br />
<strong>Building</strong> <strong>Secure</strong> <strong>ASP</strong>.<strong>NET</strong> <strong>Applications</strong><br />
<strong>ASP</strong>.<strong>NET</strong><br />
Web<br />
Application<br />
4<br />
6<br />
3 5<br />
Encrypted<br />
Connection<br />
String<br />
Enterprise Services (COM+)<br />
Server Application<br />
Serviced<br />
Component<br />
DPAPI<br />
Crypto API<br />
P/Invoke<br />
2<br />
Launch<br />
1<br />
Win32<br />
Service<br />
Start and<br />
load user<br />
profile<br />
Service Control<br />
Manager<br />
web.config<br />
Figure 1<br />
<strong>ASP</strong>.<strong>NET</strong> Web application uses a serviced component in an Enterprise Services server application to<br />
interact with DPAPI<br />
In Figure1, the sequence of events is as follows:<br />
1. The Windows service control manager starts the Win32 service and automatically<br />
loads the user profile associated with the account under which the service runs.<br />
The same Windows account is used to run the Enterprise Services application.<br />
2. The Win32 service calls a launch method on the serviced component, which<br />
starts the Enterprise Services application and loads the serviced component.<br />
3. The Web application retrieves the encrypted string from the Web.config file.<br />
4. The application calls a method on the serviced component to decrypt the connection<br />
string.<br />
5. The serviced component interacts with DPAPI using P/Invoke to call the Win32<br />
DPAPI functions.<br />
6. The decrypted string is returned to the Web application.<br />
Why Use Enterprise Services?<br />
DPAPI requires a Windows account password in order to derive an encryption key.<br />
The account that DPAPI uses is obtained either from the current thread token (if the<br />
thread that calls DPAPI is currently impersonating), or the process token. Furthermore,<br />
using DPAPI with the user store requires that the user profile associated with<br />
the account is loaded. This presents the following issues for an <strong>ASP</strong>.<strong>NET</strong> Web<br />
application that wants to use DPAPI with the user store:<br />
● Calls to DPAPI from an <strong>ASP</strong>.<strong>NET</strong> application running under the default <strong>ASP</strong><strong>NET</strong><br />
account will fail. This is because the <strong>ASP</strong><strong>NET</strong> account does not have a loaded<br />
user profile.
How To: Use DPAPI (User Store) from <strong>ASP</strong>.<strong>NET</strong> with Enterprise Services 417<br />
●<br />
If an <strong>ASP</strong>.<strong>NET</strong> Web application is configured to impersonate its callers, the<br />
<strong>ASP</strong>.<strong>NET</strong> application thread has an associated thread impersonation token.<br />
The logon session associated with this impersonation token is a network logon<br />
session (used on the server to represent the caller). Network logon sessions do<br />
not result in user profiles being loaded and it would also not be possible to<br />
derive an encryption key from the password because the server does not have the<br />
impersonated user’s password (unless the application uses Basic authentication).<br />
To overcome these limitations, you can use a serviced component within an Enterprise<br />
Services server application (with a fixed process identity) to provide encryption<br />
and decryption services using DPAPI.<br />
Why Use a Windows Service?<br />
A Windows service is used in this solution in order to ensure that a user profile is<br />
automatically loaded. When the Windows Service Control Manager (SCM) starts a<br />
service, the SCM also loads the profile of the account the service is configured to<br />
run as.<br />
The service is then used to load the serviced component, which causes the Enterprise<br />
Services server application (in an instance of Dllhost.exe) to start.<br />
Due to the fact that the Windows service and the serviced component are configured<br />
to both run using the same least privileged account, the serviced component<br />
has access to the loaded user profile and as a result can call DPAPI functions to<br />
encrypt and decrypt data.<br />
If the service component is not launched from a Windows service (and the service is<br />
taken out of the picture) the user profile will not automatically be loaded. While<br />
there is a Win32 API that can be called to load a user profile (LoadUserProfile), it<br />
requires the calling code to be part of the Administrators group, which would<br />
defeat the principle of running with least privilege.<br />
The service must be running whenever the Encrypt and Decrypt methods of the<br />
serviced component are called. When Windows services are stopped, the configured<br />
profile is automatically unloaded. At this point, the DPAPI methods within the<br />
serviced component would cease to work.<br />
Requirements<br />
The following items describe the recommended hardware, software, network<br />
infrastructure, skills and knowledge, and service packs you will need:<br />
● Microsoft® SQL Server 2000 or Microsoft Windows® XP operating system<br />
●<br />
Microsoft Visual Studio® .<strong>NET</strong> development system<br />
The procedures in this article also require that you have knowledge of <strong>ASP</strong>.<strong>NET</strong><br />
Web development with Microsoft Visual C# development tool.
418<br />
<strong>Building</strong> <strong>Secure</strong> <strong>ASP</strong>.<strong>NET</strong> <strong>Applications</strong><br />
Summary<br />
This How To includes the following procedures:<br />
1. Create a Serviced Component that Provides Encrypt and Decrypt Methods<br />
2. Call the Managed DPAPI Class Library<br />
3. Create a Dummy Class Used to Launch the Serviced Component<br />
4. Create a Windows Account to Run the Enterprise Services Application and<br />
Windows Service<br />
5. Configure, Strong Name, and Register the Serviced Component<br />
6. Create a Windows Service Application to Launch the Serviced Component<br />
7. Install and Start the Windows Service<br />
8. Write a Web Application to Test the Encryption and Decryption Routines<br />
9. Modify the Web Application to Read an Encrypted Connection String from an<br />
Application Configuration File<br />
1. Create a Serviced Component that Provides Encrypt and<br />
Decrypt Methods<br />
This procedure creates a serviced component that exposes Encrypt and Decrypt<br />
methods. In a later procedure, these will be called by an <strong>ASP</strong>.<strong>NET</strong> Web application<br />
when it requires encryption services.<br />
<br />
To create a serviced component that provides Encrypt and Decrypt methods<br />
1. Start Visual Studio .<strong>NET</strong> and create a new C# class library project called<br />
DPAPIComp.<br />
2. Use Solution Explorer to rename Class1.cs as DataProtectorComp.cs.<br />
3. Within DataProtectorComp.cs, rename Class1 as DataProtectorComp and<br />
rename the default constructor accordingly.<br />
4. Add an assembly reference to the System.EnterpriseServices.dll assembly.<br />
5. Add the following using statements to the top of DataProtectorComp.cs.<br />
using System.EnterpriseServices;<br />
using System.Security.Principal;<br />
using System.Runtime.InteropServices;
How To: Use DPAPI (User Store) from <strong>ASP</strong>.<strong>NET</strong> with Enterprise Services 419<br />
6. Derive the DataProtectorComp class from the ServicedComponent class.<br />
public class DataProtectorComp : ServicedComponent<br />
7. Add the following two empty public methods to the DataProtectorComp class.<br />
public byte[] Encrypt(byte[] plainText)<br />
{}<br />
public byte[] Decrypt(byte[] cipherText)<br />
{}<br />
2. Call the Managed DPAPI Class Library<br />
This procedure calls the managed DPAPI class library to encrypt and decrypt data.<br />
This class library encapsulates the calls to the Win32 DPAPI functions. If you have<br />
not yet created this class library, refer to “How To: Create a DPAPI Library” in the<br />
Reference section of this guide.<br />
<br />
To call the managed DPAPI class library<br />
1. Add a file reference to the DataProtection.dll assembly.<br />
2. Add the following using statement beneath the existing using statements in<br />
DataProtectorComp.cs.<br />
using DataProtection;<br />
3. Add the following code to the Encrypt method to encrypt the supplied data.<br />
DataProtector dp = new DataProtector( DataProtector.Store.USE_USER_STORE );<br />
byte[] cipherText = null;<br />
try<br />
{<br />
cipherText = dp.Encrypt(plainText, null);<br />
}<br />
catch(Exception ex)<br />
{<br />
throw new Exception("Exception encrypting. " + ex.Message);<br />
}<br />
return cipherText;
420<br />
<strong>Building</strong> <strong>Secure</strong> <strong>ASP</strong>.<strong>NET</strong> <strong>Applications</strong><br />
4. Add the following code to the Decrypt method to decrypt the supplied cipher<br />
text.<br />
DataProtector dp = new DataProtector( DataProtector.Store.USE_USER_STORE );<br />
byte[] plainText = null;<br />
try<br />
{<br />
plainText = dp.Decrypt(cipherText,null);<br />
}<br />
catch(Exception ex)<br />
{<br />
throw new Exception("Exception decrypting. " + ex.Message);<br />
}<br />
return plainText;<br />
3. Create a Dummy Class that will Launch the Serviced<br />
Component<br />
This procedure creates a dummy class that exposes a single Launch method. This<br />
will be called from the Windows service to start the Enterprise Services application<br />
that hosts the serviced component.<br />
<br />
To create a dummy class that will launch the serviced component<br />
1. Add a new C# class to the project and name it Launcher.cs.<br />
2. Add the following method to the class. This method will be called by the service<br />
when the service starts.<br />
public bool Launch()<br />
{<br />
return true;<br />
}<br />
3. On the Build menu, click Build Solution.<br />
4. Create a Windows Account to Run the Enterprise Services<br />
Application and Windows Service<br />
This procedure creates a Windows account that you will use to run the Enterprise<br />
Services application that hosts the DataProtectorComp serviced component and the<br />
Windows service. It also results in the creation of a user profile for the new account.<br />
This is required by DPAPI when it uses the user store.
How To: Use DPAPI (User Store) from <strong>ASP</strong>.<strong>NET</strong> with Enterprise Services 421<br />
<br />
<br />
To create a Windows account to run the Enterprise Services application and Windows<br />
service<br />
1. Create a new local user account called DPAPIAccount. Enter a password, clear<br />
the User must change password at next logon check box, and then select the<br />
Password never expires check box.<br />
2. Use the Local Security Policy tool in the Administrative Tools programs group<br />
to give the account the Log on locally and Log on as a batch job privileges.<br />
To create a user profile for the new account<br />
1. Log off Windows.<br />
2. Log back on using the new DPAPIAccount.<br />
This results in the creation of a user profile for this account.<br />
3. Log off Windows and log back on as your normal developer account.<br />
5. Configure, Strong Name, and Register the Serviced<br />
Component<br />
This procedure signs the serviced component assembly to give it a strong name.<br />
This is a mandatory requirement for assemblies containing serviced components.<br />
You will then add assembly level attributes to the serviced component assembly<br />
used to configure the serviced component within the COM+ catalog. After that, you<br />
will use the Regsvcs.exe utility to register the serviced component and create a host<br />
COM+ server application. Finally, you will set the COM+ application’s “run as”<br />
identity to the service account created in the previous procedure.<br />
<br />
To configure, strong name, and register the serviced component<br />
1. Open a command window and change directory to the DPAPIComp project<br />
folder.<br />
2. Use the sn.exe utility to generate a key pair used to sign the assembly.<br />
sn -k dpapicomp.snk<br />
3. Return to Visual Studio .<strong>NET</strong> and open Assemblyinfo.cs.<br />
4. Locate the AssemblyKeyFile attribute and add a path to the key file within the<br />
project folder.<br />
[assembly: AssemblyKeyFile(@"..\..\dpapicomp.snk")]<br />
5. Add the following using statement to the top of the file.<br />
using System.EnterpriseServices;
422<br />
<strong>Building</strong> <strong>Secure</strong> <strong>ASP</strong>.<strong>NET</strong> <strong>Applications</strong><br />
6. Add the following assembly level attributes to configure the COM+ application<br />
as a server application, and to specify the application’s name.<br />
[assembly: ApplicationActivation(ActivationOption.Server)]<br />
[assembly: ApplicationName("DPAPI Helper Application")]<br />
7. On the Build menu, click Build Solution to build the serviced component<br />
project.<br />
8. Open a command window and go to the project output directory that contains<br />
the DPAPIComp.dll file.<br />
9. Use regsvcs.exe to register the serviced component and create the COM+ application.<br />
regsvcs DPAPIComp.dll<br />
10. Start the Component Services Microsoft Management Console (MMC) snap-in.<br />
11. Expand the Component Services, Computers, My Computer, and COM+<br />
<strong>Applications</strong> folders.<br />
12. Locate and right-click DPAPI Helper Application, and then click Properties.<br />
13. Click the Activation tab and confirm that the application type is set to Server<br />
application.<br />
14. Click the Identity tab, and then click the This user radio button.<br />
15. Enter DPAPIAccount as the user, enter the appropriate password, and then click<br />
OK to close the Properties dialog box.<br />
6. Create a Windows Service Application that will Launch the<br />
Serviced Component<br />
This procedure creates a simple Windows service application that will launch the<br />
serviced component when it starts. This ensures that the profile of the configured<br />
account is loaded and that the serviced component is available to encrypt and<br />
decrypt data.<br />
<br />
To create a Windows service application that will launch the serviced component<br />
1. Start a new instance of Visual Studio .<strong>NET</strong> and create a new C# Windows service<br />
project called DPAPIService.<br />
2. Use Solution Explorer to rename Service1.cs as DPAPIService.cs.<br />
3. Within DPAPIService.cs, rename Service1 as DPAPIService and rename the<br />
default constructor accordingly.
How To: Use DPAPI (User Store) from <strong>ASP</strong>.<strong>NET</strong> with Enterprise Services 423<br />
4. Within DPAPIService.cs, locate the InitializedComponent method and change<br />
the service name to DPAPIService.<br />
5. Set a reference to the System.EnterpriseServices.dll and<br />
System.Configuration.Install.dll assemblies.<br />
6. Set a file reference to the DPAPIComp assembly.<br />
7. Add the following using statement to the top of DPAPIService.cs beneath the<br />
existing using statements.<br />
using DPAPIComp;<br />
8. Locate the Main method and replace the following code<br />
ServicesToRun = new System.ServiceProcess.ServiceBase[]{new Service1()};<br />
with the following line.<br />
ServicesToRun = new System.ServiceProcess.ServiceBase[]{new DPAPIService()};<br />
9. Locate the OnStart method and add the following code, which will launch the<br />
DPAPIComp component whenever the service starts.<br />
Launcher launchComponent = new Launcher();<br />
launchComponent.Launch();<br />
10. Add a new C# class file to the project and name it DPAPIServiceInstaller.<br />
11. Add the following using statements to the top of DPAPIServiceInstaller beneath<br />
the existing using statement.<br />
using System.ComponentModel;<br />
using System.ServiceProcess;<br />
using System.Configuration.Install;<br />
12. Derive the DPAPIServiceInstaller class from the Installer class.<br />
public class DPAPIServiceInstaller : Installer<br />
13. Add the RunInstaller attribute at the class level as follows.<br />
[RunInstaller(true)]<br />
public class DPAPIServiceInstaller : Installer<br />
14. Add the following two private member variables to the DPAPIServiceInstaller<br />
class. The objects will be used when installing the service.<br />
private ServiceInstaller dpApiInstaller;<br />
private ServiceProcessInstaller dpApiProcessInstaller;
424<br />
<strong>Building</strong> <strong>Secure</strong> <strong>ASP</strong>.<strong>NET</strong> <strong>Applications</strong><br />
15. Add the following code to the constructor of the DPAPIServiceInstaller class.<br />
dpApiInstaller = new ServiceInstaller();<br />
dpApiInstaller.StartType = System.ServiceProcess.ServiceStartMode.Manual;<br />
dpApiInstaller.ServiceName = "DPAPIService";<br />
dpApiInstaller.DisplayName = "DPAPI Service";<br />
Installers.Add (dpApiInstaller);<br />
dpApiProcessInstaller = new ServiceProcessInstaller();<br />
dpApiProcessInstaller.Account = ServiceAccount.User;<br />
Installers.Add (dpApiProcessInstaller);<br />
16. On the Build menu, click Build Solution.<br />
7. Install and Start the Windows Service Application<br />
This procedure installs the Windows service using the installutil.exe utility and then<br />
starts the service.<br />
<br />
To install and start the Windows service application<br />
1. Open a command window and change directory to the Bin\Debug directory<br />
beneath the DPAPIService project folder.<br />
2. Run the installutil.exe utility to install the service.<br />
Installutil.exe DPAPIService.exe<br />
3. In the Set Service Login dialog box, enter the user name and password of the<br />
account created earlier in Procedure 4, “Create a Windows Account to Run the<br />
Enterprise Services Application and Windows Service,” and then click OK.<br />
The user name must be of the form “authority\username.”<br />
View the output from the installutil.exe utility and confirm that the service is<br />
installed correctly.<br />
4. Start the Services MMC snap-in from the Administrative Tools program group.<br />
5. Start the DPAPI service.<br />
8. Write a Web Application to Test the Encryption and<br />
Decryption Routines<br />
This procedure develops a simple Web application that you will use to test the<br />
encryption and decryption routines. Later, you will also use it to decrypt encrypted<br />
data maintained within the Web.config file.
How To: Use DPAPI (User Store) from <strong>ASP</strong>.<strong>NET</strong> with Enterprise Services 425<br />
<br />
To write a Web application to test the encryption and decryption routines<br />
1. Add a new C# Web application project called DPAPIWeb to the existing<br />
DPAPIComp solution.<br />
2. Add an assembly reference to System.EnterpriseServices and add a project<br />
reference to the DPAPIComp project.<br />
3. Open WebForm1.aspx in Design mode and create a form similar to the one<br />
shown in Figure 2. Use the IDs listed in Table 1 for the individual controls.<br />
Table 1: WebForm1.aspx control IDs<br />
Control<br />
Data To Encrypt Text Box<br />
ID<br />
txtDataToEncrypt<br />
Encrypted Data<br />
Decrypted Data<br />
Encrypt Button<br />
Decrypt Button<br />
Error Label<br />
txtEncryptedData<br />
txtDecryptedData<br />
btnEncrypt<br />
btnDecrypt<br />
lblError<br />
Figure 2<br />
DPAPIWeb Web Form<br />
4. Double-click the Encrypt button to display the button click event handler.<br />
5. Add the following using statements to the top of the file beneath the existing<br />
using statements.<br />
using System.Text;<br />
using DPAPIComp;
426<br />
<strong>Building</strong> <strong>Secure</strong> <strong>ASP</strong>.<strong>NET</strong> <strong>Applications</strong><br />
6. Return to the Encrypt button click event handler and add the following code to<br />
call the DataProtectorComp serviced component to encrypt the data entered via<br />
the Web form.<br />
DataProtectorComp dp = new DataProtectorComp();<br />
try<br />
{<br />
byte[] dataToEncrypt = Encoding.ASCII.GetBytes(txtDataToEncrypt.Text);<br />
txtEncryptedData.Text = Convert.ToBase64String(<br />
dp.Encrypt(dataToEncrypt));<br />
}<br />
catch(Exception ex)<br />
{<br />
lblError.ForeColor = Color.Red;<br />
lblError.Text = "Exception." + ex.Message;<br />
return;<br />
}<br />
lblError.Text = "";<br />
7. Display the Web form again and double-click the Decrypt button to create a<br />
button click event handler.<br />
8. Add the following code to call the DataProtectorComp services component to<br />
decrypt the previous encrypted data contained within the txtEncryptedData<br />
field.<br />
DataProtectorComp dp = new DataProtectorComp();<br />
try<br />
{<br />
byte[] dataToDecrypt = Convert.FromBase64String(txtEncryptedData.Text);<br />
txtDecryptedData.Text = Encoding.ASCII.GetString(<br />
dp.Decrypt(dataToDecrypt));<br />
}<br />
catch(Exception ex)<br />
{<br />
lblError.ForeColor = Color.Red;<br />
lblError.Text = "Exception." + ex.Message;<br />
return;<br />
}<br />
lblError.Text = "";<br />
9. On the Build menu, click Build Solution.<br />
10. Right-click WebForm1.aspx, and then click View in Browser.<br />
11. Enter a text string into the Data to Encrypt field.<br />
12. Click the Encrypt button. This results in a call to the DataProtector serviced<br />
component within the COM+ application. The encrypted data should be displayed<br />
in the Encrypted Data field.
How To: Use DPAPI (User Store) from <strong>ASP</strong>.<strong>NET</strong> with Enterprise Services 427<br />
13. Click the Decrypt button and confirm that the original text string is displayed in<br />
the Decrypted Data field.<br />
14. Close the browser window.<br />
Note: If an access denied error message appears that indicates that the component’s ProgID<br />
cannot be read from HKEY_CLASSES_ROOT, you probably need to re-run Regsvcs.exe to reregister<br />
the serviced component.<br />
This error message appears if you have recompiled the serviced component assembly but not<br />
reregistered the assembly. Because the assembly version changes on each build (due to the<br />
default “1.0.*” assembly version attribute), a new CLSID is generated on each successive build.<br />
The error is due to the fact that <strong>ASP</strong>.<strong>NET</strong> cannot access this CLSID in the registry as it doesn’t<br />
exist yet. Rerun Regsvcs.exe and restart the Web application to resolve the problem.<br />
9. Modify the Web Application to Read an Encrypted Connection<br />
String from an Application Configuration File<br />
This procedure takes an encrypted database connection string and places the encrypted<br />
cipher text into the application’s Web.config file within an <br />
element. You will then add code to read and decrypt this string from the configuration<br />
file.<br />
<br />
To modify the Web application to read an encrypted connection string from an application<br />
configuration file<br />
1. Return to Visual Studio .<strong>NET</strong> and display the WebForm1.aspx in Designer mode.<br />
2. Add another button to the form. Set its Text property to Decrypt string from<br />
config file and its ID property to btnDecryptConfig,<br />
3. Double-click the button to create a button click event handler.<br />
4. Add the following using statement to the top of the file beneath the existing using<br />
statements.<br />
using System.Configuration;<br />
5. Return to the btnDecryptConfig_Click event handler and add the following code<br />
to retrieve a database connection string from the section of the<br />
Web.config file.<br />
DataProtectorComp dec = new DataProtectorComp();<br />
try<br />
{<br />
string appSettingValue =<br />
ConfigurationSettings.AppSettings["connectionString"];<br />
byte[] dataToDecrypt = Convert.FromBase64String(appSettingValue);<br />
string connStr = Encoding.ASCII.GetString(<br />
dec.Decrypt(dataToDecrypt));
428<br />
<strong>Building</strong> <strong>Secure</strong> <strong>ASP</strong>.<strong>NET</strong> <strong>Applications</strong><br />
txtDecryptedData.Text = connStr;<br />
}<br />
catch(Exception ex)<br />
{<br />
lblError.ForeColor = Color.Red;<br />
lblError.Text = "Exception." + ex.Message;<br />
return;<br />
}<br />
lblError.Text = "";<br />
6. On the Build menu, click Build Solution to rebuild the projects.<br />
7. Right-click WebForm1.aspx, and then click View in Browser.<br />
8. In the Data to Encrypt field, enter a database connection string such as the one<br />
that follows.<br />
server=(local);Integrated Security=SSPI; database=Northwind<br />
9. Click the Encrypt button.<br />
10. Select the encrypted cipher text and copy it to the clipboard.<br />
11. Switch to Visual Studio .<strong>NET</strong>, open Web.config and add the following<br />
element outside of the element. Assign the encrypted<br />
connection string currently on the clipboard to the value attribute.<br />
<br />
<br />
<br />
12. Save Web.config.<br />
13. Click the Decrypt string from config file button and confirm that the encrypted<br />
database connection string is successfully read from the Web.config file and that<br />
the decrypted connection string is successfully displayed in the Decrypted data<br />
field.<br />
References<br />
●<br />
●<br />
●<br />
“Windows Data Protection” on MSDN (http://msdn.microsoft.com/library<br />
/default.asp?url=/library/en-us/dnsecure/html/windataprotection-dpapi.asp)<br />
“How To: Create a DPAPI Library” in the Reference section of this guide.<br />
“How To: Use DPAPI (Machine Store) from <strong>ASP</strong>.<strong>NET</strong>” in the Reference section of<br />
this guide.
How To:<br />
Create an Encryption Library<br />
This How To describes how to create a generic encryption library that can be used<br />
to encrypt and decrypt data using the following algorithms:<br />
● DES (Digital Encryption Standard)<br />
● Triple DES<br />
● Rijndael<br />
● RC2<br />
For an example application that uses the class library created in this How To, see<br />
“How To: Store Encrypted Connection Strings in the Registry” in the Reference<br />
section of this guide.<br />
Requirements<br />
The following items describe the recommended hardware, software, network<br />
infrastructure, skills and knowledge, and service packs you will need.<br />
● Microsoft® Windows® 2000 operating system<br />
● Microsoft Visual Studio® .<strong>NET</strong> development system<br />
The procedures in this article also require that you have knowledge of the Microsoft<br />
Visual C# development tool.<br />
Summary<br />
This How To includes the following procedures:<br />
1. Create a C# Class Library<br />
2. Create a Console Test Application
430<br />
<strong>Building</strong> <strong>Secure</strong> <strong>ASP</strong>.<strong>NET</strong> <strong>Applications</strong><br />
1. Create a C# Class Library<br />
This procedure creates a C# class library, which will provide encryption and<br />
decryption functionality.<br />
<br />
To create a C# class library<br />
1. Start Visual Studio .<strong>NET</strong> and create a new C# Class Library project called<br />
Encryption.<br />
2. Use Solution Explorer to rename class1.cs as EncryptTransformer.cs.<br />
3. In EncryptTransformer.cs, rename Class1 as EncryptTransformer.<br />
4. Change the scope of the class from public to internal.<br />
internal class EncryptTransformer<br />
5. Add the following using statement at the top of the file.<br />
using System.Security.Cryptography;<br />
6. Add the following enumerated type within the Encryption namespace.<br />
public enum EncryptionAlgorithm {Des = 1, Rc2, Rijndael, TripleDes};<br />
7. Add the following private member variables to the EncryptTransformer class.<br />
private EncryptionAlgorithm algorithmID;<br />
private byte[] initVec;<br />
private byte[] encKey;<br />
8. Replace the default constructor with the following constructor.<br />
internal EncryptTransformer(EncryptionAlgorithm algId)<br />
{<br />
//Save the algorithm being used.<br />
algorithmID = algId;<br />
}<br />
9. Add the following method to the class.<br />
internal ICryptoTransform GetCryptoServiceProvider(byte[] bytesKey)<br />
{<br />
// Pick the provider.<br />
switch (algorithmID)<br />
{<br />
case EncryptionAlgorithm.Des:<br />
{<br />
DES des = new DESCryptoServiceProvider();<br />
des.Mode = CipherMode.CBC;
How To: Create an Encryption Library 431<br />
// See if a key was provided<br />
if (null == bytesKey)<br />
{<br />
encKey = des.Key;<br />
}<br />
else<br />
{<br />
des.Key = bytesKey;<br />
encKey = des.Key;<br />
}<br />
// See if the client provided an initialization vector<br />
if (null == initVec)<br />
{ // Have the algorithm create one<br />
initVec = des.IV;<br />
}<br />
else<br />
{ //No, give it to the algorithm<br />
des.IV = initVec;<br />
}<br />
return des.CreateEncryptor();<br />
}<br />
case EncryptionAlgorithm.TripleDes:<br />
{<br />
TripleDES des3 = new TripleDESCryptoServiceProvider();<br />
des3.Mode = CipherMode.CBC;<br />
// See if a key was provided<br />
if (null == bytesKey)<br />
{<br />
encKey = des3.Key;<br />
}<br />
else<br />
{<br />
des3.Key = bytesKey;<br />
encKey = des3.Key;<br />
}<br />
// See if the client provided an IV<br />
if (null == initVec)<br />
{ //Yes, have the alg create one<br />
initVec = des3.IV;<br />
}<br />
else<br />
{ //No, give it to the alg.<br />
des3.IV = initVec;<br />
}<br />
return des3.CreateEncryptor();<br />
}<br />
case EncryptionAlgorithm.Rc2:<br />
{<br />
RC2 rc2 = new RC2CryptoServiceProvider();<br />
rc2.Mode = CipherMode.CBC;<br />
// Test to see if a key was provided<br />
if (null == bytesKey)<br />
{
432<br />
<strong>Building</strong> <strong>Secure</strong> <strong>ASP</strong>.<strong>NET</strong> <strong>Applications</strong><br />
encKey = rc2.Key;<br />
}<br />
else<br />
{<br />
rc2.Key = bytesKey;<br />
encKey = rc2.Key;<br />
}<br />
// See if the client provided an IV<br />
if (null == initVec)<br />
{ //Yes, have the alg create one<br />
initVec = rc2.IV;<br />
}<br />
else<br />
{ //No, give it to the alg.<br />
rc2.IV = initVec;<br />
}<br />
return rc2.CreateEncryptor();<br />
}<br />
case EncryptionAlgorithm.Rijndael:<br />
{<br />
Rijndael rijndael = new RijndaelManaged();<br />
rijndael.Mode = CipherMode.CBC;<br />
// Test to see if a key was provided<br />
if(null == bytesKey)<br />
{<br />
encKey = rijndael.Key;<br />
}<br />
else<br />
{<br />
rijndael.Key = bytesKey;<br />
encKey = rijndael.Key;<br />
}<br />
// See if the client provided an IV<br />
if(null == initVec)<br />
{ //Yes, have the alg create one<br />
initVec = rijndael.IV;<br />
}<br />
else<br />
{ //No, give it to the alg.<br />
rijndael.IV = initVec;<br />
}<br />
return rijndael.CreateEncryptor();<br />
}<br />
default:<br />
{<br />
throw new CryptographicException("Algorithm ID '" + algorithmID +<br />
"' not supported.");<br />
}<br />
}<br />
}
How To: Create an Encryption Library 433<br />
10. Add the following properties to the class.<br />
internal byte[] IV<br />
{<br />
get{return initVec;}<br />
set{initVec = value;}<br />
}<br />
internal byte[] Key<br />
{<br />
get{return encKey;}<br />
}<br />
11. Add a new class called DecryptTransformer to the project.<br />
12. Add the following using statement at the top of the DecryptTransformer.cs file.<br />
using System.Security.Cryptography;<br />
13. Change the class scope from public to internal.<br />
14. Replace the default constructor with the following constructor.<br />
internal DecryptTransformer(EncryptionAlgorithm deCryptId)<br />
{<br />
algorithmID = deCryptId;<br />
}<br />
15. Add the following private variables to the class.<br />
private EncryptionAlgorithm algorithmID;<br />
private byte[] initVec;<br />
16. Add the following method to the class.<br />
internal ICryptoTransform GetCryptoServiceProvider(byte[] bytesKey)<br />
{<br />
// Pick the provider.<br />
switch (algorithmID)<br />
{<br />
case EncryptionAlgorithm.Des:<br />
{<br />
DES des = new DESCryptoServiceProvider();<br />
des.Mode = CipherMode.CBC;<br />
des.Key = bytesKey;<br />
des.IV = initVec;<br />
return des.CreateDecryptor();<br />
}<br />
case EncryptionAlgorithm.TripleDes:<br />
{<br />
TripleDES des3 = new TripleDESCryptoServiceProvider();<br />
des3.Mode = CipherMode.CBC;<br />
return des3.CreateDecryptor(bytesKey, initVec);<br />
}
434<br />
<strong>Building</strong> <strong>Secure</strong> <strong>ASP</strong>.<strong>NET</strong> <strong>Applications</strong><br />
case EncryptionAlgorithm.Rc2:<br />
{<br />
RC2 rc2 = new RC2CryptoServiceProvider();<br />
rc2.Mode = CipherMode.CBC;<br />
return rc2.CreateDecryptor(bytesKey, initVec);<br />
}<br />
case EncryptionAlgorithm.Rijndael:<br />
{<br />
Rijndael rijndael = new RijndaelManaged();<br />
rijndael.Mode = CipherMode.CBC;<br />
return rijndael.CreateDecryptor(bytesKey, initVec);<br />
}<br />
default:<br />
{<br />
throw new CryptographicException("Algorithm ID '" + algorithmID +<br />
"' not supported.");<br />
}<br />
}<br />
} //end GetCryptoServiceProvider<br />
17. Add the following property to the class.<br />
internal byte[] IV<br />
{<br />
set{initVec = value;}<br />
}<br />
18. Add a new class called Encryptor to the project.<br />
19. Add the following using statements at the top of Encryptor.cs.<br />
using System.Security.Cryptography;<br />
using System.IO;<br />
20. Replace the default constructor with the following constructor.<br />
public Encryptor(EncryptionAlgorithm algId)<br />
{<br />
transformer = new EncryptTransformer(algId);<br />
}<br />
21. Add the following private member variables to the class.<br />
private EncryptTransformer transformer;<br />
private byte[] initVec;<br />
private byte[] encKey;<br />
22. Add the following Encrypt method to the class.<br />
public byte[] Encrypt(byte[] bytesData, byte[] bytesKey)<br />
{
How To: Create an Encryption Library 435<br />
//Set up the stream that will hold the encrypted data.<br />
MemoryStream memStreamEncryptedData = new MemoryStream();<br />
transformer.IV = initVec;<br />
ICryptoTransform transform = transformer.GetCryptoServiceProvider(bytesKey);<br />
CryptoStream encStream = new CryptoStream(memStreamEncryptedData,<br />
transform,<br />
CryptoStreamMode.Write);<br />
try<br />
{<br />
//Encrypt the data, write it to the memory stream.<br />
encStream.Write(bytesData, 0, bytesData.Length);<br />
}<br />
catch(Exception ex)<br />
{<br />
throw new Exception("Error while writing encrypted data to the stream: \n"<br />
+ ex.Message);<br />
}<br />
//Set the IV and key for the client to retrieve<br />
encKey = transformer.Key;<br />
initVec = transformer.IV;<br />
encStream.FlushFinalBlock();<br />
encStream.Close();<br />
//Send the data back.<br />
return memStreamEncryptedData.ToArray();<br />
}//end Encrypt<br />
23. Add the following properties to the class.<br />
public byte[] IV<br />
{<br />
get{return initVec;}<br />
set{initVec = value;}<br />
}<br />
public byte[] Key<br />
{<br />
get{return encKey;}<br />
}<br />
24. Add a new class called Decryptor to the project.<br />
25. Add the following using statements at the top of Decryptor.cs<br />
using System.Security.Cryptography;<br />
using System.IO;
436<br />
<strong>Building</strong> <strong>Secure</strong> <strong>ASP</strong>.<strong>NET</strong> <strong>Applications</strong><br />
26. Replace the default constructor with the following constructor.<br />
public Decryptor(EncryptionAlgorithm algId)<br />
{<br />
transformer = new DecryptTransformer(algId);<br />
}<br />
27. Add the following private member variables to the class.<br />
private DecryptTransformer transformer;<br />
private byte[] initVec;<br />
28. Add the following Decrypt method to the class.<br />
public byte[] Decrypt(byte[] bytesData, byte[] bytesKey)<br />
{<br />
//Set up the memory stream for the decrypted data.<br />
MemoryStream memStreamDecryptedData = new MemoryStream();<br />
//Pass in the initialization vector.<br />
transformer.IV = initVec;<br />
ICryptoTransform transform = transformer.GetCryptoServiceProvider(bytesKey);<br />
CryptoStream decStream = new CryptoStream(memStreamDecryptedData,<br />
transform,<br />
CryptoStreamMode.Write);<br />
try<br />
{<br />
decStream.Write(bytesData, 0, bytesData.Length);<br />
}<br />
catch(Exception ex)<br />
{<br />
throw new Exception("Error while writing encrypted data to the stream: \n"<br />
+ ex.Message);<br />
}<br />
decStream.FlushFinalBlock();<br />
decStream.Close();<br />
// Send the data back.<br />
return memStreamDecryptedData.ToArray();<br />
} //end Decrypt<br />
29. Add the following property to the class.<br />
public byte[] IV<br />
{<br />
set{initVec = value;}<br />
}<br />
30. On the Build menu, click Build Solution.
How To: Create an Encryption Library 437<br />
2. Create a Console Test Application<br />
This procedure creates a simple console test application to test the encryption and<br />
decryption functionality.<br />
<br />
To create a console test application<br />
1. Add a new C# Console application called EncryptionTester to the current<br />
solution.<br />
2. In Solution Explorer, right-click the EncryptionTester project, and then click Set<br />
as StartUp Project.<br />
3. Use Solution Explorer to rename class1.cs as EncryptionTest.cs.<br />
4. In EncryptionTest.cs, rename Class1 as EncryptionTest.<br />
5. Add a project reference to the Encryption project.<br />
6. Add the following using statements at the top of EncryptionTest.cs.<br />
using System.Text;<br />
using Encryption;<br />
7. Add the following code to the Main method.<br />
// Set the required algorithm<br />
EncryptionAlgorithm algorithm = EncryptionAlgorithm.Des;<br />
// Init variables.<br />
byte[] IV = null;<br />
byte[] cipherText = null;<br />
byte[] key = null;<br />
try<br />
{ //Try to encrypt.<br />
//Create the encryptor.<br />
Encryptor enc = new Encryptor(EncryptionAlgorithm.Des);<br />
byte[] plainText = Encoding.ASCII.GetBytes("Test String");<br />
if ((EncryptionAlgorithm.TripleDes == algorithm) ||<br />
(EncryptionAlgorithm.Rijndael == algorithm))<br />
{ //3Des only work with a 16 or 24 byte key.<br />
key = Encoding.ASCII.GetBytes("password12345678");<br />
if (EncryptionAlgorithm.Rijndael == algorithm)<br />
{ // Must be 16 bytes for Rijndael.<br />
IV = Encoding.ASCII.GetBytes("init vec is big.");<br />
}<br />
else<br />
{<br />
IV = Encoding.ASCII.GetBytes("init vec");<br />
}<br />
}<br />
else
438<br />
<strong>Building</strong> <strong>Secure</strong> <strong>ASP</strong>.<strong>NET</strong> <strong>Applications</strong><br />
References<br />
{ //Des only works with an 8 byte key. The others uses variable length keys.<br />
//Set the key to null to have a new one generated.<br />
key = Encoding.ASCII.GetBytes("password");<br />
IV = Encoding.ASCII.GetBytes("init vec");<br />
}<br />
// Uncomment the next lines to have the key or IV generated for you.<br />
// key = null;<br />
// IV = null;<br />
enc.IV = IV;<br />
// Perform the encryption.<br />
cipherText = enc.Encrypt(plainText, key);<br />
// Retrieve the intialization vector and key. You will need it<br />
// for decryption.<br />
IV = enc.IV;<br />
key = enc.Key;<br />
// Look at your cipher text and initialization vector.<br />
Console.WriteLine(" Cipher text: " +<br />
Convert.ToBase64String(cipherText));<br />
Console.WriteLine("Initialization vector: " + Convert.ToBase64String(IV));<br />
Console.WriteLine("<br />
Key: " + Convert.ToBase64String(key));<br />
}<br />
catch(Exception ex)<br />
{<br />
Console.WriteLine("Exception encrypting. " + ex.Message);<br />
return;<br />
}<br />
try<br />
{ //Try to decrypt.<br />
//Set up your decryption, give it the algorithm and initialization vector.<br />
Decryptor dec = new Decryptor(algorithm);<br />
dec.IV = IV;<br />
// Go ahead and decrypt.<br />
byte[] plainText = dec.Decrypt(cipherText, key);<br />
// Look at your plain text.<br />
Console.WriteLine(" Plain text: " +<br />
Encoding.ASCII.GetString(plainText));<br />
}<br />
catch(Exception ex)<br />
{<br />
Console.WriteLine("Exception decrypting. " + ex.Message);<br />
return;<br />
}<br />
8. On the Build menu, click Build Solution.<br />
9. Run the test application to verify the operation of the Encryptor and Decryptor<br />
classes.<br />
For more information, see “How To: Store an Encrypted Connection String in the<br />
Registry” in the Reference section of this guide.
How To:<br />
Store an Encrypted Connection<br />
String in the Registry<br />
The registry represents one possible location for an application to store database<br />
connection strings. Although individual registry keys can be secured with Windows<br />
access control lists (ACLs), for added security you should store encrypted connection<br />
strings.<br />
This How To describes how to store an encrypted database connection string in<br />
the registry and retrieve it from an <strong>ASP</strong>.<strong>NET</strong> Web application. It uses the generic<br />
encryption and decryption managed class library created in “How to: Create<br />
an Encryption Library,” which can be found in Reference section of this guide.<br />
If you have not already created the encryption class library assembly, do so before<br />
continuing with the current How To.<br />
For more information about other locations and ways of securely storing database<br />
connection strings, see “Storing Database Connection Strings <strong>Secure</strong>ly” in Chapter<br />
12, “Data Access Security.”<br />
Notes<br />
●<br />
●<br />
The connection string, initialization vector and key used for encryption will be<br />
stored in the registry as named values beneath the following registry key.<br />
HKEY_LOCAL_MACHINE\Software\TestApplication<br />
The initialization vector and key must be stored in order to allow the connection<br />
string to be decrypted.<br />
Requirements<br />
The following items describe the recommended hardware, software, network<br />
infrastructure, skills and knowledge, and service packs you will need.<br />
● Microsoft® Windows® 2000 operating system<br />
●<br />
Microsoft Visual Studio® .<strong>NET</strong> development system<br />
The procedures in this article also require that you have knowledge of the Microsoft<br />
Visual C# development tool.
440<br />
<strong>Building</strong> <strong>Secure</strong> <strong>ASP</strong>.<strong>NET</strong> <strong>Applications</strong><br />
Summary<br />
This How To includes the following procedures:<br />
1. Store the Encrypted Data in the Registry<br />
2. Create an <strong>ASP</strong>.<strong>NET</strong> Web Application<br />
1. Store the Encrypted Data in the Registry<br />
This procedure creates a Windows application that will be used to encrypt a sample<br />
database string and store it in the registry.<br />
<br />
To store the encrypted data in the registry<br />
1. Start Visual Studio .<strong>NET</strong> and create a new C# Windows project called<br />
EncryptionTestApp.<br />
2. Add an assembly reference to the Encryption.dll assembly.<br />
To create this assembly, you must perform the steps described in “How To:<br />
Create an Encryption Library” in the Reference section of this guide.<br />
3. Add the following using statements to the top of Form1.cs beneath the existing<br />
using statements.<br />
using Encryption;<br />
using System.Text;<br />
using Microsoft.Win32;<br />
4. Add the controls in Table 1 to Form1 and arrange them as illustrated in Figure 1.<br />
Table 1: EncryptionTestApp controls<br />
Control Text ID<br />
Label<br />
Connection String:<br />
TextBox<br />
txtConnectionString<br />
Label<br />
Key:<br />
TextBox<br />
txtKey<br />
Label<br />
Initialization Vector:<br />
TextBox<br />
txtInitializationVector<br />
Label<br />
Encrypted String<br />
TextBox<br />
txtEncryptedString<br />
Label<br />
Decrypted String<br />
TextBox<br />
txtDecryptedString
How To: Store an Encrypted Connection String in the Registry 441<br />
Control Text ID<br />
Button Encrypt btnEncrypt<br />
Button Decrypt btnDecrypt<br />
Button Write Registry Data btnWriteRegistryData<br />
Figure 1<br />
Encryption Test Harness dialog box<br />
5. Set the Text property of txtConnectionString to<br />
"Server=local; database=pubs; uid=Bob; pwd=Password"<br />
6. Set the Text property of txtKey to<br />
"0123456789012345"<br />
The key length is 16 bytes to suite the Triple DES encryption algorithm.<br />
7. Set the Text property of Form1 to<br />
"Encryption Test Harness"<br />
8. Double-click the Encrypt button to create a button click event handler and add<br />
the following code to the event handler.<br />
try<br />
{<br />
// Create the encryptor object, specifying 3DES as the<br />
// encryption algorithm<br />
Encryptor enc = new Encryptor(EncryptionAlgorithm.TripleDes);<br />
// Get the connection string as a byte array<br />
byte[] plainText = Encoding.ASCII.GetBytes(txtConnectionString.Text);<br />
byte[] key = Encoding.ASCII.GetBytes(txtKey.Text);
442<br />
<strong>Building</strong> <strong>Secure</strong> <strong>ASP</strong>.<strong>NET</strong> <strong>Applications</strong><br />
// Perform the encryption<br />
byte[] cipherText = enc.Encrypt(plainText, key);<br />
// Store the intialization vector, as this will be required<br />
// for decryption<br />
txtInitializationVector.Text = Encoding.ASCII.GetString(enc.IV);<br />
// Display the encrypted string<br />
txtEncryptedString.Text = Convert.ToBase64String(cipherText);<br />
}<br />
catch(Exception ex)<br />
{<br />
MessageBox.Show("Exception encrypting: " + ex.Message,<br />
"Encryption Test Harness");<br />
}<br />
9. Return to Form1 in Designer mode and double-click the Decrypt button to create<br />
a button click event handler.<br />
10. Add the following code to the Decrypt button event handler.<br />
try<br />
{<br />
// Set up the Decryptor object<br />
Decryptor dec = new Decryptor(EncryptionAlgorithm.TripleDes);<br />
// Set the Initialization Vector<br />
dec.IV = Encoding.ASCII.GetBytes(txtInitializationVector.Text);<br />
byte[] key = Encoding.ASCII.GetBytes(txtKey.Text);<br />
// Perform the decryption<br />
byte[] plainText = dec.Decrypt(Convert.FromBase64String(<br />
txtEncryptedString.Text),<br />
key);<br />
// Display the decrypted string.<br />
txtDecryptedString.Text = Encoding.ASCII.GetString(plainText);<br />
}<br />
catch(Exception ex)<br />
{<br />
MessageBox.Show("Exception decrypting. " + ex.Message,<br />
"Encryption Test Harness");<br />
}<br />
11. Return to Form1 in Designer mode and double-click the Write Registry Data<br />
button to create a button click event handler.<br />
12. Add the following code to the event handler.<br />
// Create registry key and named values<br />
RegistryKey rk = Registry.LocalMachine.OpenSubKey("Software",true);<br />
rk = rk.CreateSubKey("TestApplication");
How To: Store an Encrypted Connection String in the Registry 443<br />
// Write encrypted string, initialization vector and key to the registry<br />
rk.SetValue("connectionString",txtEncryptedString.Text);<br />
rk.SetValue("initVector",Convert.ToBase64String(<br />
Encoding.ASCII.GetBytes(txtInitializationVector.Text)));<br />
rk.SetValue("key",Convert.ToBase64String(Encoding.ASCII.GetBytes(<br />
txtKey.Text)));<br />
MessageBox.Show("The data has been successfully written to the registry");<br />
13. Run the application, and then click Encrypt.<br />
The encrypted connection string is displayed in the Encrypted String field.<br />
14. Click Decrypt.<br />
The original string is displayed in the Decrypted String field.<br />
15. Click Write Registry Data.<br />
16. In the message box, click OK.<br />
17. Run regedit.exe and view the contents of the following key.<br />
HKLM\Software\TestApplication<br />
Confirm that encoded values are present for the connectionString, initVector<br />
and key named values.<br />
18. Close regedit and the test harness application.<br />
2. Create an <strong>ASP</strong>.<strong>NET</strong> Web Application<br />
This procedure develops a simple <strong>ASP</strong>.<strong>NET</strong> Web application that will retrieve the<br />
encrypted connection string from the registry and decrypt it.<br />
<br />
To create an <strong>ASP</strong>.<strong>NET</strong> application<br />
1. Create a new Visual C# <strong>ASP</strong>.<strong>NET</strong> Web Application called EncryptionWebApp.<br />
2. Add an assembly reference to the Encryption.dll assembly.<br />
To create this assembly, you must perform the steps described in “How To:<br />
Create an Encryption Library” in the Reference section of this guide.<br />
3. Open Webform1.aspx.cs and add the following using statements at the top of the<br />
file beneath the existing using statements.<br />
using Encryption;<br />
using System.Text;<br />
using Microsoft.Win32;
444<br />
<strong>Building</strong> <strong>Secure</strong> <strong>ASP</strong>.<strong>NET</strong> <strong>Applications</strong><br />
4. Add the controls listed in Table 2 to WebForm1.aspx.<br />
Table 2: WebForm1.aspx controls<br />
Control Text ID<br />
Label<br />
lblEncryptedString<br />
Label<br />
lblDecryptedString<br />
Button Get Connection String btnGetConnectionString<br />
5. Double-click the Get Connection String button to create a button click event<br />
handler.<br />
6. Add the following code to the event handler.<br />
RegistryKey rk = Registry.LocalMachine.OpenSubKey(<br />
@"Software\TestApplication",false);<br />
lblEncryptedString.Text = (string)rk.GetValue("connectionString");<br />
string initVector = (string)rk.GetValue("initVector");<br />
string strKey = (string)rk.GetValue("key");<br />
Decryptor dec = new Decryptor(EncryptionAlgorithm.TripleDes );<br />
dec.IV = Convert.FromBase64String(initVector);<br />
// Decrypt the string<br />
byte[] plainText = dec.Decrypt(Convert.FromBase64String(<br />
lblEncryptedString.Text),<br />
Convert.FromBase64String(strKey));<br />
lblDecryptedString.Text = Encoding.ASCII.GetString(plainText);<br />
7. On the Build menu, click Build Solution.<br />
8. Right-click Webform1.aspx in Solution Explorer, and then click View in Browser.<br />
9. Click Get Connection String.<br />
The encrypted and decrypted connection strings are displayed on the Web form.<br />
References<br />
For more information, see “How To: Create an Encryption Library” in the Reference<br />
section of this guide.
How To:<br />
Use Role-based Security<br />
with Enterprise Services<br />
This How To describes how to create a simple serviced component that uses<br />
Enterprise Services (ES) roles for authorization.<br />
Notes<br />
●<br />
●<br />
●<br />
●<br />
●<br />
●<br />
●<br />
●<br />
ES roles are not the same as .<strong>NET</strong> roles.<br />
ES roles can contain Windows group or Windows user accounts.<br />
ES roles are maintained in the COM+ catalog.<br />
ES roles can be applied at the (ES) application, interface, class or method levels.<br />
ES roles can be partially configured declaratively by using .<strong>NET</strong> attributes in the<br />
serviced component’s assembly.<br />
Windows group and user accounts must be added by an administrator at<br />
deployment time.<br />
Administrators can use the Component Services administration tool, or script.<br />
To effectively use Enterprise Services role-based security from an <strong>ASP</strong>.<strong>NET</strong> Web<br />
application, the Web application must use Windows authentication and impersonate<br />
callers prior to calling the serviced components.<br />
Requirements<br />
The following items describe the recommended hardware, software, network<br />
infrastructure, skills and knowledge, and service packs you will need.<br />
● Microsoft® Visual Studio® .<strong>NET</strong> development system<br />
The procedures in this article also require that you have knowledge of <strong>ASP</strong>.<strong>NET</strong><br />
Web development with the Microsoft Visual C# development tool.
446<br />
<strong>Building</strong> <strong>Secure</strong> <strong>ASP</strong>.<strong>NET</strong> <strong>Applications</strong><br />
Summary<br />
This How To includes the following procedures:<br />
1. Create a C# Class Library Application to Host the Serviced Component<br />
2. Create the Serviced Component<br />
3. Configure the Serviced Component<br />
4. Generate a Strong Name for the Assembly<br />
5. Build the Assembly and Add it to the Global Assembly Cache<br />
6. Manually Register the Serviced Component<br />
7. Examine the Configured Application<br />
8. Create a Test Client Application<br />
1. Create a C# Class Library Application to Host the Serviced<br />
Component<br />
This procedure creates a new C# class library application that contains the serviced<br />
component.<br />
<br />
To create a C# class library application to host the serviced component<br />
1. Start Visual Studio .<strong>NET</strong> and create a new C# class library application called<br />
ServicedCom.<br />
2. Rename the default class file Class1.cs to SimpleComponent.cs.<br />
3. Double-click SimpleComponent.cs to open it and rename the Class1 type as<br />
SimpleComponent. Also update the name of the class’ default constructor.<br />
2. Create the Serviced Component<br />
This procedure derives the SimpleComponent class from the<br />
EnterpriseServices.ServicedComponent class to turn this type into a serviced<br />
component. You will then create an interface and implement it within the<br />
SimpleComponent class. To use interface and method level security, you must<br />
define and implement interfaces.<br />
<br />
To create the serviced component<br />
1. Add a reference to the System.EnterpriseServices assembly.<br />
2. Add the following using statement to the top of the SimpleComponent.cs file<br />
beneath the existing using statements.<br />
using System.EnterpriseServices;
How To: Use Role-based Security with Enterprise Services 447<br />
3. Derive the SimpleComponent class from ServicedComponent.<br />
public class SimpleComponent : ServicedComponent<br />
4. Add the following interface definition within the ServicedCom namespace.<br />
public interface ISomeInterface<br />
{<br />
int Add( int operand1, int operand2 );<br />
}<br />
5. Derive SimpleComponent from this interface.<br />
public class SimpleComponent : ServicedComponent, ISomeInterface<br />
6. Implement the interface within the SimpleComponent class as follows.<br />
public int Add( int operand1, int operand2 )<br />
{<br />
return operand1 + operand2;<br />
}<br />
3. Configure the Serviced Component<br />
<br />
This procedure configures the serviced component for method-level role-based<br />
security.<br />
To configure the serviced component<br />
1. Add the following attributes directly above the SimpleComponent class. The<br />
ComponentAccessControl attribute enables component-level access checks and<br />
the <strong>Secure</strong>Method attribute enables method level access checks.<br />
[ComponentAccessControl]<br />
[<strong>Secure</strong>Method]<br />
public class SimpleComponent : ServicedComponent, ISomeInterface<br />
2. Add the following attribute above the Add method to create the Manager role<br />
and associate it with the method.<br />
[SecurityRole("Manager")]<br />
public int Add( int operand1, int operand2 )<br />
{<br />
return operand1 + operand2;<br />
}
448<br />
<strong>Building</strong> <strong>Secure</strong> <strong>ASP</strong>.<strong>NET</strong> <strong>Applications</strong><br />
3. Open assemblyinfo.cs and add the following using statement to the top of the<br />
file below the existing using statements.<br />
using System.EnterpriseServices;<br />
4. Move to the bottom of the file and add the following attributes. These are used<br />
to configure the Enterprise Services application used to host the serviced<br />
component.<br />
// Configure the application as a server (out-of-process) application<br />
[assembly: ApplicationActivation(ActivationOption.Server)]<br />
// For meaningful role-based security, enable access checking at the process<br />
// and component levels by using the following .<strong>NET</strong> attribute.<br />
[assembly: ApplicationAccessControl(AccessChecksLevel=<br />
AccessChecksLevelOption.ApplicationComponent)]<br />
// Set the name and description for the application<br />
[assembly: ApplicationName("SimpleRoles")]<br />
[assembly: Description("Simple application to show ES Roles")]<br />
// Add some additional roles<br />
[assembly:SecurityRole("Employee")]<br />
[assembly:SecurityRole("Senior Manager")]<br />
4. Generate a Strong Name for the Assembly<br />
Assemblies that host serviced components must be strong named. This procedure<br />
generates a public-private key pair used to strong name the assembly.<br />
<br />
To generate a strong name for the assembly<br />
1. Open a command window and go to the current project directory.<br />
2. Use the sn.exe utility to generate a key file that contains a public-private key<br />
pair.<br />
sn.exe -k SimpleComponent.snk<br />
3. In Visual Studio, open assemblyinfo.cs.<br />
4. Locate the [AssemblyKeyFile] attribute and modify it to reference the key file in<br />
the project directory as follows.<br />
[assembly: AssemblyKeyFile(@"..\..\SimpleComponent.snk")]
How To: Use Role-based Security with Enterprise Services 449<br />
5. Build the Assembly and Add it to the Global Assembly Cache<br />
This procedure builds the assembly that contains the serviced component and then<br />
adds it to the global assembly cache. Serviced components should generally be<br />
registered in the global assembly cache because they are system level resources.<br />
Serviced components hosted in COM+ server applications require installation in<br />
the global assembly cache, while library applications do not (although it is recommended).<br />
<br />
To build the assembly and add it to the global assembly cache<br />
1. On the Build menu, click Build Solution.<br />
2. Return to the command window and run the following command to add the<br />
assembly to the global assembly cache.<br />
gacutil –i bin\debug\ServicedCom.dll<br />
6. Manually Register the Serviced Component<br />
Serviced components can either be manually registered with the Regsvcs.exe tool,<br />
or they can be automatically registered using “lazy” registration. With “lazy”<br />
registration, the component is registered (and the hosting COM+ application created<br />
and configured using the assembly’s meta data) the first time an instance of the<br />
serviced component is instantiated.<br />
To avoid the one time performance hit associated with this approach, this procedure<br />
manually registers the serviced component.<br />
<br />
To manually register the serviced component<br />
1. Return to the command window.<br />
2. Run regsvcs.exe to register the component.<br />
regsvcs bin\debug\ServicedCom.dll<br />
7. Examine the Configured Application<br />
This procedure uses the Component Services tool and examines the catalog settings<br />
created as a result of the .<strong>NET</strong> attributes used earlier.<br />
<br />
To examine the configured application<br />
1. From the Administrative Tools program group, start Component Services.
450<br />
<strong>Building</strong> <strong>Secure</strong> <strong>ASP</strong>.<strong>NET</strong> <strong>Applications</strong><br />
2. Expand Component Services, Computers, My Computer, and COM+<br />
<strong>Applications</strong>.<br />
3. Right-click SimpleRoles, and then click Properties.<br />
4. Click the Security tab and make sure that Enforce access checks for this application<br />
is selected and that the security level is set to perform access checks at the<br />
process and component level. This configuration is a result of the .<strong>NET</strong> attributes<br />
used earlier.<br />
5. Click OK to close the Properties dialog box.<br />
6. Expand the SimpleRoles application, and then expand the Components folder<br />
and the ServicedCom.SimpleComponent class.<br />
7. Navigate to the Add method beneath the ISomeInterface method in the Interfaces<br />
folder.<br />
8. Right-click Add, and then click Properties.<br />
9. Click the Security tab and notice that the Manager role is associated with the<br />
method.<br />
10. Click OK to close the Properties dialog box.<br />
11. Expand the Roles folder beneath the SimpleRoles application. Notice the roles<br />
that you created earlier with .<strong>NET</strong> attributes. Also notice the Marshaler role.<br />
This is created as a direct result of the [<strong>Secure</strong>Method] attribute added earlier,<br />
and is required for method level security.<br />
8. Create a Test Client Application<br />
This procedure creates a Windows Forms-based test client application to instantiate<br />
and call the serviced component.<br />
<br />
To create a test client application<br />
1. Add a new C# Windows-based application called TestClient to the current<br />
solution.<br />
2. Add a new project reference to the ServicedCom project.<br />
a. In Solution Explorer, right-click References, and then click Add Reference.<br />
b. Click the Projects tab.<br />
c. Select ServicedCom, click Select, and then click OK.<br />
3. Add a reference to System.EnterpriseServices.<br />
4. Add a button to the application’s main form.<br />
5. Double-click the button to create a button click event handler.<br />
6. Add the following using statement to the top of the form1.cs beneath the existing<br />
using statements.<br />
using ServicedCom;
How To: Use Role-based Security with Enterprise Services 451<br />
7. Return to the button click event handler and add the following code to<br />
instantiate and call the serviced component.<br />
SimpleComponent comp = new SimpleComponent();<br />
MessageBox.Show( "Result is: " + comp.Add(1, 2));<br />
8. On the Build menu, click Build Solution.<br />
9. In Solution Explorer, right-click the TestClient project, and then click Set as<br />
StartUp Project.<br />
10. Press Ctrl+F5 to run the TestClient application.<br />
You should see that an unhandled exception is generated.<br />
11. Click the Details button on the message box to view the exception details.<br />
You will see that a System.UnauthorizedAccessException has been generated.<br />
This is because your interactive logon account used to run the TestClient application<br />
is not a member of the Manager role, which is required to call the Add on<br />
the serviced component.<br />
12. Click Quit to stop the application.<br />
13. Return to Component Services and add your current (interactive) account to the<br />
Manager role and the Marshaler role.<br />
Note: The Enterprise Services infrastructure uses a number of system-level interfaces that<br />
are exposed by all serviced components. These include IManagedObject, IDisposable, and<br />
IServiceComponentInfo. If access checks are enabled at the interface or method levels,<br />
the Enterprise Services infrastructure is denied access to these interfaces.<br />
As a result, Enterprise Services creates a special role called Marshaler and associates the<br />
role with these interfaces. At deployment time, application administrators need to add all<br />
users to the Marshaler role who needs to access any methods or interface of the class.<br />
You could automate this in two different ways:<br />
1. Write a script that uses the Component Services object model to copy all users from<br />
other roles to the Marshaler role.<br />
2. Write a script which assigns all other roles to these three special interfaces and delete<br />
the Marshaler role.<br />
14. Close the SimpleRoles application to enable the changes to take effect. To do<br />
this, right-click the application name, and then click Shut down.<br />
15. Return to Visual Studio .<strong>NET</strong> and press Ctrl+F5 to run the TestClient application<br />
again.<br />
16. Click the form’s button and confirm that the method is successfully called.
How To:<br />
Call a Web Service Using<br />
Client Certificates from <strong>ASP</strong>.<strong>NET</strong><br />
Web services often need to be able to authenticate their callers (other applications)<br />
in order to perform authorization. Client certificates provide an excellent authentication<br />
mechanism for Web services. When you use client certificates, your application<br />
also benefits from the creation of a secure channel (using <strong>Secure</strong> Sockets Layer<br />
[SSL]) between the client application and Web service. This allows you to securely<br />
send confidential information to and from the Web service. SSL ensures message<br />
integrity and confidentiality.<br />
This How To describes how to call a Web service that is configured to require client<br />
certificates.<br />
Note: The information in this How To also applies to remote components hosted by <strong>ASP</strong>.<strong>NET</strong><br />
and IIS.<br />
Why Use a Serviced Component?<br />
The solution presented in this How To uses a serviced component configured to run<br />
in an Enterprise Services server application, using a custom service account. The<br />
<strong>ASP</strong>.<strong>NET</strong> Web application calls the serviced component, which makes the call to the<br />
Web service (passing a client certificate). This solution configuration is illustrated in<br />
Figure 1 on the next page.
454<br />
<strong>Building</strong> <strong>Secure</strong> <strong>ASP</strong>.<strong>NET</strong> <strong>Applications</strong><br />
Web Server 1<br />
(Web Service Client)<br />
<strong>ASP</strong>.<strong>NET</strong><br />
Require <strong>Secure</strong><br />
Channel (SSL)<br />
(Privacy/Integrity)<br />
Web Server 2<br />
(Web Service Host)<br />
.cer file<br />
Enterprise<br />
Services<br />
(COM+<br />
Server)<br />
IIS<br />
<strong>ASP</strong>.<strong>NET</strong><br />
(Web Service<br />
or Remote<br />
Component)<br />
Custom Run As<br />
Identity (Account<br />
has User Profile)<br />
SSL<br />
(Privacy/Integrity)<br />
Require Client<br />
Certificates<br />
(Authentication)<br />
Figure 1<br />
<strong>ASP</strong>.<strong>NET</strong> calls a serviced component to invoke the Web service<br />
This arrangement is to ensure that the system has access to a user profile when<br />
communicating with the Web service. This is required for the initial SSL handshake.<br />
Note: The <strong>ASP</strong><strong>NET</strong> account used to run Web applications has the “Deny interactive logon”<br />
privilege, which prevents you from logging on interactively with this account. As a result, this<br />
account does not have a user profile.<br />
Do not grant the <strong>ASP</strong><strong>NET</strong> account (or any account used to run Web applications) the interactive<br />
logon capability. Always follow the principle of least privilege when configuring accounts to run<br />
Web applications and grant them as few privileges as possible. For more information, see<br />
“How To: Create a Custom Account to Run <strong>ASP</strong>.<strong>NET</strong>” in the Reference section of this guide.<br />
Why is a User Profile Required?<br />
When you make a request to a Web service that requires client certificates, there<br />
is an SSL handshake that takes place between the client and server. A few of the<br />
components exchanged are the server certificate, client certificate, and a “pre-master<br />
secret” which is generated by the client. This secret is used later in the protocol to<br />
generate a “master secret.”<br />
In order for the server to verify that the presenter of the certificate is indeed the<br />
holder of the private key, the client must encrypt the pre-master secret with the<br />
private key and send the encrypted pre-master secret to the server. In order for the<br />
system to access the client’s private key to sign the pre-master secret it must access<br />
the private key from the key store of the client. The key store is located in the<br />
client’s profile which must be loaded.
How To: Call a Web Service Using Client Certificates from <strong>ASP</strong>.<strong>NET</strong> 455<br />
Requirements<br />
The following items describe the recommended hardware, software, network<br />
infrastructure, skills and knowledge, and service packs you will need.<br />
● Microsoft® Windows® 2000 operating system<br />
●<br />
●<br />
Microsoft Visual Studio® .<strong>NET</strong> development system<br />
Access to a Certificate Authority (CA) to generate new certificates<br />
● A Web server with an installed server certificate<br />
For more information about installing Web server certificates, see “How To:<br />
Setup SSL on a Web Server”.<br />
The procedures in this How To also require that you have knowledge of the<br />
Microsoft Visual C# development tool.<br />
Summary<br />
This How To includes the following procedures:<br />
1. Create a Simple Web Service<br />
2. Configure the Web Service Virtual <strong>Directory</strong> to Require Client Certificates<br />
3. Create a Custom Account for Running a Serviced Component<br />
4. Request a Client Certificate for the Custom Account<br />
5. Test the Client Certificate using a Browser<br />
6. Export the Client Certificate to a File<br />
7. Develop the Serviced Component Used to Call the Web Service<br />
8. Configure and Install the Serviced Component<br />
9. Develop a Web Application to Call the Serviced Component<br />
Note: In this How To, the Web service computer (this hosts the Web service) is named<br />
“WSServer” and the Web service client computer (this hosts the client <strong>ASP</strong>.<strong>NET</strong> Web application<br />
and serviced component) is named “WSClient.”<br />
1. Create a Simple Web Service<br />
<br />
To create a simple Web service on the Web service host computer<br />
1. Start Visual Studio .<strong>NET</strong> and create a new C# <strong>ASP</strong>.<strong>NET</strong> Web Service application<br />
called <strong>Secure</strong>Math.
456<br />
<strong>Building</strong> <strong>Secure</strong> <strong>ASP</strong>.<strong>NET</strong> <strong>Applications</strong><br />
2. Rename service1.asmx as math.asmx.<br />
3. Open math.asmx.cs and rename the Service1 class as math.<br />
4. Add the following Web method to the math class.<br />
[WebMethod]<br />
public long Add(long operand1, long operand2)<br />
{<br />
return (operand1 + operand2);<br />
}<br />
5. On the Build menu, click Build Solution to create the Web service.<br />
2. Configure the Web Service Virtual <strong>Directory</strong> to Require Client<br />
Certificates<br />
This procedure uses Internet Information Services to configure your Web service’s<br />
virtual directory for SSL and to require certificates.<br />
This procedure assumes that you have a valid certificate installed on your Web<br />
server. For more information about installing Web server certificates, see "How To<br />
Setup SSL on a Web Server" in the Reference section of this guide.<br />
<br />
To configure the Web service virtual directory to require client certificates<br />
1. Start Internet Information Services on the Web service host computer.<br />
2. Navigate to the <strong>Secure</strong>Math virtual directory.<br />
3. Right-click <strong>Secure</strong>Math, and then click Properties.<br />
4. Click the <strong>Directory</strong> Security tab.<br />
5. Under <strong>Secure</strong> communications, click Edit.<br />
If Edit is unavailable, it is most likely that you haven’t installed a Web server<br />
certificate.<br />
6. Select the Require secure channel (SSL) check box.<br />
7. Select the Require client certificates option.<br />
8. Click OK, and then click OK again.<br />
9. In the Inheritance Overrides dialog box, click Select All, and then click OK to<br />
close the <strong>Secure</strong>Math properties dialog box.<br />
This applies the new security settings to all subdirectories beneath the virtual<br />
directory root.
How To: Call a Web Service Using Client Certificates from <strong>ASP</strong>.<strong>NET</strong> 457<br />
3. Create a Custom Account for Running the Serviced<br />
Component<br />
This procedure creates a new user account on the Web service client computer that<br />
you will use to run the serviced component that calls the Web service.<br />
<br />
To create a custom account for running the serviced component<br />
1. Create a new user account with a strong password on the client computer. Clear<br />
the User must change password at next logon check box, and then select the<br />
Password never expires option.<br />
2. Add the account to the Administrators group.<br />
The account used to load a user profile must be an administrator on the local<br />
computer.<br />
4. Request a Client Certificate for the Custom Account<br />
In this procedure, you will log on to the client computer using the new custom<br />
account. You will then issue a request for a certificate. This procedure assumes that<br />
you are using Microsoft Certificate Services. If you are not using Microsoft Certificate<br />
Services to create new certificates, issue a request to your preferred CA for<br />
a client certificate and install the certificate, while logged on using the custom<br />
account.<br />
This procedure also assumes that Microsoft Certificate Services is configured to<br />
automatically issue certificates in response to certificate requests. It can also be<br />
configured for pending requests, which require an administrator to explicitly issue<br />
the certificate.<br />
<br />
To check the Microsoft Certificate Services setting<br />
1. On the Microsoft Certificate Services computer, click Certification Authority in<br />
the Administrative Tools programs group.<br />
2. Expand Certification Authority (Local), right-click the certification authority,<br />
and click Properties.<br />
3. Click the Policy Module tab, and then click Configure.<br />
4. Check the default action.<br />
The following procedure assumes that Always issue the certificate is selected.
458<br />
<strong>Building</strong> <strong>Secure</strong> <strong>ASP</strong>.<strong>NET</strong> <strong>Applications</strong><br />
<br />
To request a client certificate for the custom account<br />
1. Log off the client computer and log back on using the custom account.<br />
This forces the creation of a user profile for the custom account.<br />
2. Browse to the CA in order to request a client certificate. For example, if your CA<br />
is located on the CAServer computer, browse to the following location.<br />
http://caserver/certsrv<br />
3. Click Request a certificate, and then click Next.<br />
4. Ensure User Certificate is selected, and then click Next.<br />
5. Click Submit.<br />
A request is generated and sent to the CA for processing.<br />
6. After the certificate is issued and you receive a response from the CA server, click<br />
Install this certificate.<br />
7. Ensure that the issuing CA’s certificate is installed as a trusted root certificate<br />
authority on the local computer.<br />
To confirm this, perform the following steps:<br />
a. On the taskbar, click the Start button, and then click Run.<br />
b. Type mmc, and then click OK.<br />
c. On the File menu, click Add/Remove Snap-in.<br />
d. Click Add.<br />
e. Click Certificates, and then click Add.<br />
f. Click Computer account, and then click Next.<br />
g. Click Local Computer: (the computer this console is running on), and then<br />
click Finish.<br />
h. Click Close, and then click OK.<br />
i. In the left pane of the MMC snap-in, expand Certificates (Local Computer).<br />
j. Expand Trusted Root Certification Authorities, and then click Certificates.<br />
k. Confirm that your CA’s certificate is listed.<br />
If the CA’s certificate isn’t listed, perform the following steps:<br />
a. Browse to http://caserver/certsrv.<br />
b. Click Retrieve the CA certificate or certificate revocation list, and then click<br />
Next.<br />
c. Click Install this CA certification path.
How To: Call a Web Service Using Client Certificates from <strong>ASP</strong>.<strong>NET</strong> 459<br />
5. Test the Client Certificate Using a Browser<br />
In this procedure, you will browse to the Web service in order to confirm that there<br />
are no problems with either the server or client certificates.<br />
<br />
To test the client certificate using a browser<br />
1. Use Internet Explorer and navigate to https://server/<strong>Secure</strong>Math/Math.asmx.<br />
Make sure that you specify “https” because the site is configured to require SSL.<br />
2. A Client Authentication dialog box should appear. Select your client certificate,<br />
and then click OK.<br />
3. Confirm that the Web service test page is displayed successfully within your<br />
browser.<br />
If you see the dialog box illustrated in Figure 2, you need to install the certificate<br />
authority’s certificate into the Trusted Root Certification Authorities store, as<br />
described in the previous procedure.<br />
Figure 2<br />
Security Alert dialog box<br />
6. Export the Client Certificate to a File<br />
This procedure exports the client certificate to a file. This is subsequently retrieved<br />
by the serviced component, when it needs to pass the certificate to the Web service.<br />
<br />
To export the client certificate to a file<br />
1. Within Internet Explorer, click Internet Options on the Tools menu.<br />
2. Click the Content tab.
460<br />
<strong>Building</strong> <strong>Secure</strong> <strong>ASP</strong>.<strong>NET</strong> <strong>Applications</strong><br />
3. Click Certificates.<br />
4. Click the client certificate, and then click Export.<br />
5. Click Next to move past the welcome dialog box of the Certificate Export<br />
Wizard.<br />
6. Confirm that No, do not export the private key is selected, and then click Next.<br />
7. Make sure that DER encoded binary X.509 (.CER) is selected, and then click<br />
Next.<br />
You must use this format, because the .<strong>NET</strong> Framework does not support<br />
Base-64 or PKCS #7 formats.<br />
8. Enter an export file name. Note the location of the .cer export file, because you<br />
will require this again in a subsequent procedure.<br />
9. Click Next, and then click Finish to export the certificate.<br />
10. Close Internet Explorer.<br />
11. Log off the computer and log back on using your regular development account.<br />
7. Develop the Serviced Component Used to Call the Web<br />
Service<br />
This procedure creates a new C# Class Library application and creates the serviced<br />
component used to call the Web service. This procedure assumes that you are<br />
working on the client computer.<br />
<br />
To develop the serviced component used to call the Web service<br />
1. Start Visual Studio.<strong>NET</strong> and create a new C# Class Library project called<br />
WebServiceRequestor.<br />
2. Add a Web reference to the <strong>Secure</strong>Math Web service.<br />
Important: You must temporarily reconfigure your Web service’s virtual directory to not<br />
require client certificates (although still require SSL), prior to adding the Web reference.<br />
After you successfully add the Web reference, change the virtual directory configuration<br />
back to require client certificates.<br />
In practice, if a site requires client certificates, the publisher of the service makes the<br />
WSDL available as a separate offline file, which the consumers (of the service) can use to<br />
create the proxy.<br />
In the Add Web Reference dialog box, be sure to specify https when specifying<br />
the Web service location. Failure to do so results in an error because the Web<br />
service virtual directory is configured to require SSL.
How To: Call a Web Service Using Client Certificates from <strong>ASP</strong>.<strong>NET</strong> 461<br />
3. Add a reference to the System.EnterpriseServices assembly.<br />
4. Rename class1.cs as ProfileManager.cs.<br />
5. Add the following class definition to ProfileManager.cs (replacing the skeleton<br />
class1 class). The ProfileManager class uses P/Invoke to call the<br />
LoadUserProfile and UnloadUserProfile Win32 APIs.<br />
internal class ProfileManager<br />
{<br />
[DllImport("Userenv.dll", SetLastError=true,<br />
CharSet=System.Runtime.InteropServices.CharSet.Auto)]<br />
internal static extern bool LoadUserProfile(IntPtr hToken,<br />
ref PROFILEINFO lpProfileInfo);<br />
}<br />
[DllImport("Userenv.dll", SetLastError=true,<br />
CharSet=System.Runtime.InteropServices.CharSet.Auto)]<br />
internal static extern bool UnloadUserProfile(IntPtr hToken,<br />
IntPtr hProfile);<br />
[StructLayout(LayoutKind.Sequential, CharSet=CharSet.Ansi)]<br />
public struct PROFILEINFO<br />
{<br />
public int dwSize;<br />
public int dwFlags;<br />
public String lpUserName;<br />
public String lpProfilePath;<br />
public String lpDefaultPath;<br />
public String lpServerName;<br />
public String lpPolicyPath;<br />
public IntPtr hProfile;<br />
}<br />
6. Add a second class file called MathServiceComponent.cs to the project.<br />
7. Add the following using statements to MathServiceComponent.cs below the<br />
existing using statement.<br />
using System.Net;<br />
using System.Web.Services;<br />
using System.Security.Principal;<br />
using System.EnterpriseServices;<br />
using System.Runtime.InteropServices;<br />
using System.Security.Cryptography.X509Certificates;<br />
using WebServiceRequestor.WebReference1;
462<br />
<strong>Building</strong> <strong>Secure</strong> <strong>ASP</strong>.<strong>NET</strong> <strong>Applications</strong><br />
8. Add the following class definition, which provides a public<br />
CallMathWebService method. You will call this method in a later procedure<br />
from a client <strong>ASP</strong>.<strong>NET</strong> Web application.<br />
// This class calls the web service that requires a certificate.<br />
public class MathServiceComponent : ServicedComponent<br />
{<br />
[DllImport("advapi32.dll", CharSet=CharSet.Auto, SetLastError=true)]<br />
private extern static bool DuplicateToken(IntPtr ExistingTokenHandle,<br />
int SECURITY_IMPERSONATION_LEVEL,<br />
ref IntPtr DuplicateTokenHandle);<br />
[DllImport("kernel32.dll", CharSet=CharSet.Auto)]<br />
private extern static bool CloseHandle(IntPtr handle);<br />
// Calls the Web service that requires client certificates<br />
// certFilepath points to the .cer file to use<br />
// url is the Web service url<br />
// operand1 and operand2 are the parameters to pass to the Web service<br />
public long CallMathWebService(String certFilepath,<br />
String url, int operand1, int operand2)<br />
{<br />
bool retVal = false;<br />
// Need to duplicate the token. LoadUserProfile needs a token with<br />
// TOKEN_IMPERSONATE and TOKEN_DUPLICATE.<br />
const int SecurityImpersonation = 2;<br />
IntPtr dupeTokenHandle = DupeToken(WindowsIdentity.GetCurrent().Token,<br />
SecurityImpersonation);<br />
if(IntPtr.Zero == dupeTokenHandle)<br />
{<br />
throw new Exception("Unable to duplicate token.");<br />
}<br />
// Load the profile.<br />
ProfileManager.PROFILEINFO profile = new ProfileManager.PROFILEINFO();<br />
profile.dwSize = 32;<br />
profile.lpUserName = @"alexmlaptop\Custom<strong>ASP</strong><strong>NET</strong>";<br />
retVal = ProfileManager.LoadUserProfile(dupeTokenHandle, ref profile);<br />
if(false == retVal)<br />
{<br />
throw new Exception("Error loading user profile. " +<br />
Marshal.GetLastWin32Error());<br />
}<br />
// Instantiate the Web service proxy<br />
math mathservice = new math();<br />
mathservice.Url = url;<br />
String certPath = certFilepath;<br />
mathservice.ClientCertificates.Add(<br />
X509Certificate.CreateFromCertFile(certPath));<br />
long lngResult = 0;<br />
try<br />
{<br />
lngResult = mathservice.Add(operand1, operand2);<br />
}
How To: Call a Web Service Using Client Certificates from <strong>ASP</strong>.<strong>NET</strong> 463<br />
}<br />
catch(Exception ex)<br />
{<br />
if(ex is WebException)<br />
{<br />
WebException we = ex as WebException;<br />
WebResponse webResponse = we.Response;<br />
throw new Exception("Exception calling method. " + ex.Message);<br />
}<br />
}<br />
ProfileManager.UnloadUserProfile(WindowsIdentity.GetCurrent().Token,<br />
profile.hProfile);<br />
CloseHandle(dupeTokenHandle);<br />
return lngResult;<br />
private IntPtr DupeToken(IntPtr token, int Level)<br />
{<br />
IntPtr dupeTokenHandle = new IntPtr(0);<br />
bool retVal = DuplicateToken(token, Level, ref dupeTokenHandle);<br />
if (false == retVal)<br />
{<br />
return IntPtr.Zero;<br />
}<br />
return dupeTokenHandle;<br />
}<br />
} // end class<br />
9. On the Build menu, click Build Solution.<br />
8. Configure and Install the Serviced Component<br />
This procedure configures the service component, generates a strong name, installs<br />
it in the global assembly cache and registers it with COM+.<br />
1. Open assemblyinfo.cs and add the following using statement beneath the existing<br />
using statements.<br />
using System.EnterpriseServices;<br />
2. Add the following assembly level attribute to assemblyinfo.cs to configure the<br />
serviced component to run within a COM+ server application.<br />
[assembly: ApplicationActivation(ActivationOption.Server)]<br />
3. Open a command prompt window and change to the current project directory.<br />
4. Use the sn.exe utility to generate a key file that contains a public-private key<br />
pair.<br />
sn.exe -k WebServiceRequestor.snk
464<br />
<strong>Building</strong> <strong>Secure</strong> <strong>ASP</strong>.<strong>NET</strong> <strong>Applications</strong><br />
5. Return to Visual Studio .<strong>NET</strong>.<br />
6. Locate the [AssemblyKeyFile] attribute within assemblyinfo.cs and modify it to<br />
reference the key file in the project directory as follows.<br />
[assembly: AssemblyKeyFile(@"..\..\WebServiceRequestor.snk")]<br />
7. On the Build menu, click Build Solution.<br />
8. Return to the command prompt and run the following command to add the<br />
assembly to the global assembly cache.<br />
gacutil.exe /i bin\debug\webservicerequestor.dll<br />
9. Run the following command to register the assembly with COM+.<br />
regsvcs bin\debug\webservicerequestor.dll<br />
10. Start Component Services (located beneath the Administrative Tools program<br />
group).<br />
11. Expand the Component Services, Computers, and My Computer nodes.<br />
12. Expand the COM+ <strong>Applications</strong> folder.<br />
13. Right-click WebServiceRequestor, and then click Properties.<br />
14. Click the Identity tab.<br />
15. Select the This user: option and enter the account details corresponding to the<br />
custom account that you created earlier.<br />
This configures the COM+ application to run using your custom account.<br />
16. Click OK to close the Properties dialog box.<br />
17. Close Component Services.<br />
9. Develop a Web Application to Call the Serviced Component<br />
This procedure creates a simple <strong>ASP</strong>.<strong>NET</strong> Web application that you will use as the<br />
client application to call the Web service (via the serviced component).<br />
<br />
To develop a Web application to call the serviced component<br />
1. On the Web service client computer, create a new C# <strong>ASP</strong>.<strong>NET</strong> Web application<br />
called <strong>Secure</strong>MathClient.<br />
2. Add a reference to System.EnterpriseServices.
How To: Call a Web Service Using Client Certificates from <strong>ASP</strong>.<strong>NET</strong> 465<br />
3. Add a reference to the WebServiceRequestor serviced component.<br />
Browse to WebServiceRequestor.dll located within the bin\debug folder beneath<br />
the WebServiceRequestor project directory.<br />
4. Open WebForm1.aspx.cs and add the following using statement beneath the<br />
existing using statements.<br />
using WebServiceRequestor;<br />
5. View WebForm1.aspx in Designer mode and create the form shown in Figure 3<br />
using the following IDs:<br />
● operand1<br />
● operand2<br />
● result<br />
● add<br />
Figure 3<br />
Web Form control arrangement<br />
6. Double-click Add to create a button-click event hander.<br />
7. Add the following code to the event handler.<br />
Note: Set the certPath string to the location of the certificate file that you exported during<br />
Procedure 6, “Export the Client Certificate to a File.”<br />
Set the url string with the HTTPS URL to your Web service.<br />
private void add_Click(object sender, System.EventArgs e)<br />
{<br />
// TODO: Replace with a valid path to your certificate<br />
string certPath = @"C:\CustomAccountCert.cer";<br />
// TODO: Replace with a valid URL to your Web service<br />
string url = "https://wsserver/securemath/math.asmx";<br />
MathServiceComponent mathComp = new MathServiceComponent();<br />
}<br />
long addResult = mathComp.CallMathWebService( certPath,<br />
url,<br />
Int32.Parse(operand1.Text),<br />
Int32.Parse(operand2.Text));<br />
result.Text = addResult.ToString();
466<br />
<strong>Building</strong> <strong>Secure</strong> <strong>ASP</strong>.<strong>NET</strong> <strong>Applications</strong><br />
8. On the Build menu, click Build Solution.<br />
9. Run the application. Enter two numbers to add, and then click Add.<br />
The Web application will call the serviced component which will call the Web<br />
service using SSL and passing the client certificate.<br />
Additional Resources<br />
For more information, see “How To: Set Up SSL on a Web Server” in the Reference<br />
section of this guide.
How To:<br />
Call a Web Service Using SSL<br />
You can configure a Web service to require <strong>Secure</strong> Sockets Layer (SSL) to protect<br />
sensitive data sent between the client and the service. SSL provides:<br />
● Message integrity. This ensures that messages are not modified while in transit.<br />
● Message confidentiality. This ensures that messages remain private while in<br />
transit.<br />
This How To describes how to configure a Web service to require SSL and how<br />
to call the Web service from an <strong>ASP</strong>.<strong>NET</strong> client application by using the HTTPS<br />
protocol.<br />
Note: The information in this How To also applies to remote objects hosted by <strong>ASP</strong>.<strong>NET</strong> and IIS<br />
(using .<strong>NET</strong> Remoting technology). For information about how to create a remote component<br />
hosted by IIS, see article Q312107, “HOW TO: Host a remote object in Internet Information<br />
Services” in the Microsoft Knowledge Base.<br />
Requirements<br />
The following items describe the recommended hardware, software, network<br />
infrastructure, skills and knowledge, and service packs you will need:<br />
● Microsoft® Windows® 2000 Server operating system<br />
●<br />
Microsoft Visual Studio® .<strong>NET</strong> development system<br />
● A Web server with an installed server certificate<br />
For more information about installing Web server certificates, see “How To: Set<br />
Up SSL on a Web Server.”<br />
The procedures in this article also require that you have knowledge of <strong>ASP</strong>.<strong>NET</strong><br />
Web development with Microsoft Visual C# development tool.<br />
Summary<br />
This article includes the following procedures:<br />
1. Create a Simple Web Service<br />
2. Configure the Web Service Virtual <strong>Directory</strong> to Require SSL<br />
3. Test the Web Service Using a Browser
468<br />
<strong>Building</strong> <strong>Secure</strong> <strong>ASP</strong>.<strong>NET</strong> <strong>Applications</strong><br />
4. Install the Certificate Authority’s Certificate on the Client Computer<br />
5. Develop a Web Application to Call the Serviced Component<br />
1. Create a Simple Web Service<br />
<br />
To create a simple Web service on the Web service host computer<br />
1. Start Visual Studio .<strong>NET</strong> and create a new C# <strong>ASP</strong>.<strong>NET</strong> Web Service application<br />
called <strong>Secure</strong>Math.<br />
2. Rename service1.asmx as math.asmx.<br />
3. Open math.asmx.cs and rename the Service1 class as math.<br />
4. Add the following Web method to the math class.<br />
[WebMethod]<br />
public long Add(long operand1, long operand2)<br />
{<br />
return (operand1 + operand2);<br />
}<br />
5. To create the Web service, click Build Solution on the Build menu.<br />
2. Configure the Web Service Virtual <strong>Directory</strong> to Require SSL<br />
Your Web service runs on Internet Information Services (IIS) and relies on IIS to<br />
provide SSL support.<br />
This procedure assumes that you have a valid server certificate installed on your<br />
Web server. For more information about installing Web server certificates, see<br />
“How To: Set Up SSL on a Web Server.”<br />
<br />
To use IIS to configure your Web service’s virtual directory for SSL<br />
1. On the Web service host computer, start IIS.<br />
2. Navigate to the <strong>Secure</strong>Math virtual directory.<br />
3. Right-click <strong>Secure</strong>Math, and then click Properties.<br />
4. Click the <strong>Directory</strong> Security tab.<br />
5. Under <strong>Secure</strong> communications, click Edit.<br />
If Edit is unavailable, it is likely that a Web server certificate is not installed.<br />
6. Select the Require secure channel (SSL) check box.<br />
7. Click OK, and then OK again.
How To: Call a Web Service Using SSL 469<br />
8. In the Inheritance Overrides dialog box, click Select All, and then click OK to<br />
close the <strong>Secure</strong>Math properties dialog box.<br />
This applies the new security settings to all subdirectories in the virtual directory<br />
root.<br />
3. Test the Web Service Using a Browser<br />
This procedure ensures that the Web server certificate is valid and has been issued<br />
by a Certification Authority (CA) that is trusted by the client computer.<br />
<br />
To call the Web service using SSL from Internet Explorer<br />
1. Start Internet Explorer on the client computer and browse (using HTTPS) to the<br />
Web service. For example:<br />
https://WebServer/securemath/math.asmx<br />
The Web service test page should be displayed by the browser.<br />
2. If the Web service test page is displayed successfully, close Internet Explorer and<br />
go to Procedure 5, “Develop a Web Application to Call the Serviced Component.”<br />
3. If the Security Alert dialog box, as illustrated in Figure 1, is displayed, click<br />
View Certificate to see the identity of the issuing CA for the Web server certificate.<br />
You must install the CA’s certificate on the client computer. This is described<br />
in Procedure 4, “Install the Certificate Authority’s Certificate on the<br />
Client Computer.”<br />
4. Close Internet Explorer.<br />
Figure 1<br />
Security Alert dialog box
470<br />
<strong>Building</strong> <strong>Secure</strong> <strong>ASP</strong>.<strong>NET</strong> <strong>Applications</strong><br />
4. Install the Certificate Authority’s Certificate on the Client<br />
Computer<br />
This procedure installs the issuing CA’s certificate on the client computer as a<br />
trusted root certificate authority. The client computer must trust the issuing CA<br />
in order to accept the server certificate without displaying the Security Alert<br />
dialog box.<br />
<br />
If you use Microsoft Certificate Services as a CA within your Windows domain<br />
Perform this procedure only if your Web server certificate was issued by a Microsoft<br />
Certificate Services CA. Otherwise, if you have the CA’s .cer file, go to Step 8.<br />
1. Start Internet Explorer and browse to http://hostname/certsrv, where hostname is<br />
the name of the computer where Microsoft Certificate Services that issued the<br />
server certificate is located.<br />
2. Click Retrieve the CA certificate or certificate revocation list, and then click<br />
Next.<br />
3. Click Install this CA certification path.<br />
4. In the Root Certificate Store dialog box, click Yes.<br />
5. Browse to Web service using HTTPS. For example:<br />
https://WebServer/securemath/math.asmx<br />
The Web service test page should now be correctly displayed by the browser,<br />
without a Security Alert dialog box.<br />
You have now installed the CA’s certificate in your personal trusted root certificate<br />
store. To be able to call the Web service successfully from an <strong>ASP</strong>.<strong>NET</strong> page,<br />
you must add the CA’s certificate to the computer’s trusted root store.<br />
6. Repeat Steps 1 and 2, click Download CA certificate, and then save it to a file on<br />
your local computer.<br />
7. Now perform the remaining steps, if you have the CA’s .cer certificate file.<br />
8. On the taskbar, click Start, and then click Run.<br />
9. Type mmc, and then click OK.<br />
10. On the Console menu, click Add/Remove Snap-in.<br />
11. Click Add.<br />
12. Select Certificates, and then click Add.<br />
13. Select Computer account, and then click Next.<br />
14. Select Local Computer: (the computer this console is running on), and then<br />
click Finish.
How To: Call a Web Service Using SSL 471<br />
15. Click Close, and then OK.<br />
16. Expand Certificates (Local Computer) in the left pane of the MMC snap-in.<br />
17. Expand Trusted Root Certification Authorities.<br />
18. Right-click Certificates, point to All Tasks, and then click Import.<br />
19. Click Next to move past the Welcome dialog box of the Certificate Import<br />
Wizard.<br />
20. Enter the path and filename of the CA’s .cer file.<br />
21. Click Next.<br />
22. Select Place all certificates in the following store, and then click Browse.<br />
23. Select Show physical stores.<br />
24. Expand Trusted Root Certification Authorities within the list, and then select<br />
Local Computer.<br />
25. Click OK, click Next, and then click Finish.<br />
26. Click OK to close the confirmation message box.<br />
27. Refresh the view of the Certificates folder within the MMC snap-in and confirm<br />
that the CA’s certificate is listed.<br />
28. Close the MMC snap-in.<br />
5. Develop a Web Application to Call the Web Service<br />
This procedure creates a simple <strong>ASP</strong>.<strong>NET</strong> Web application. You will use this<br />
<strong>ASP</strong>.<strong>NET</strong> Web application as the client application to call the Web service.<br />
<br />
To create a simple <strong>ASP</strong>.<strong>NET</strong> Web application<br />
1. On the Web service client computer, create a new C# <strong>ASP</strong>.<strong>NET</strong> Web application<br />
called <strong>Secure</strong>MathClient.<br />
2. Add a Web reference (by using HTTPS) to the Web service.<br />
a. Right-click the References node within Solution Explorer, and then click Add<br />
Web Reference.<br />
b. In the Add Web Reference dialog box, enter the URL of your Web service.<br />
Make sure you use an HTTPS URL.<br />
Note: If you have already set a Web reference to a Web service without using HTTPS,<br />
you can manually edit the generated proxy class file and change the line of code that<br />
sets the Url property from an HTTP URL to an HTTPS URL.<br />
c. Click Add Reference.
472<br />
<strong>Building</strong> <strong>Secure</strong> <strong>ASP</strong>.<strong>NET</strong> <strong>Applications</strong><br />
3. Open WebForm1.aspx.cs and add the following using statement beneath the<br />
existing using statements.<br />
using <strong>Secure</strong>MathClient.WebReference1;<br />
4. View WebForm1.aspx in Designer mode and create a form like the one illustrated<br />
in Figure 2 using the following IDs:<br />
● operand1<br />
● operand2<br />
● result<br />
● add<br />
Figure 2<br />
WebForm1.aspx form<br />
5. Double-click the Add button to create a button-click event hander.<br />
6. Add the following code to the event handler.<br />
private void add_Click(object sender, System.EventArgs e)<br />
{<br />
math mathService = new math();<br />
int addResult = (int) mathService.Add( Int32.Parse(operand1.Text),<br />
Int32.Parse(operand2.Text));<br />
result.Text = addResult.ToString();<br />
}<br />
7. On the Build menu, click Build Solution.<br />
8. Run the application. Enter two numbers to add, and then click the Add button.<br />
The Web application will call the Web service using SSL.<br />
Additional Resources<br />
●<br />
●<br />
“How To: Set Up SSL on a Web Server”<br />
“How To: Call a Web Service Using Client Certificates from <strong>ASP</strong>.<strong>NET</strong>”
How To:<br />
Host a Remote Object<br />
in a Windows Service<br />
This How To describes how to host a remote object in a Windows service and call it<br />
from an <strong>ASP</strong>.<strong>NET</strong> Web application.<br />
Notes<br />
●<br />
●<br />
●<br />
●<br />
●<br />
Remote objects (that is, .<strong>NET</strong> objects accessed remotely using .<strong>NET</strong> Remoting<br />
technology) can be hosted in Windows services, custom executables, or <strong>ASP</strong>.<strong>NET</strong>.<br />
Clients communicate with remote objects hosted in custom executables or<br />
Windows services by using the TCP channel.<br />
Clients communicate with remote objects hosted in <strong>ASP</strong>.<strong>NET</strong> by using the HTTP<br />
channel.<br />
If security is the prime concern, host objects in <strong>ASP</strong>.<strong>NET</strong> and use the HTTP<br />
channel. This allows you to benefit from the underlying security features of<br />
<strong>ASP</strong>.<strong>NET</strong> and IIS.<br />
For information about how to host a remote object in <strong>ASP</strong>.<strong>NET</strong> (with IIS), see<br />
article Q312107, “HOW TO: Host a Remote Object in IIS,” in the Microsoft<br />
Knowledge Base.<br />
If performance is the prime concern, host objects in a Windows service and use<br />
the TCP channel. This option provides no built-in security.<br />
Requirements<br />
The following items describe the recommended hardware, software, network<br />
infrastructure, skills and knowledge, and service packs you will need.<br />
● Microsoft® Windows® 2000 operating system<br />
●<br />
Microsoft Visual Studio® .<strong>NET</strong> development system<br />
The procedures in this article also require that you have knowledge of the Microsoft<br />
Visual C# development tool.
474<br />
<strong>Building</strong> <strong>Secure</strong> <strong>ASP</strong>.<strong>NET</strong> <strong>Applications</strong><br />
Summary<br />
This How To includes the following procedures.<br />
1. Create the Remote Object Class<br />
2. Create a Windows Service Host Application<br />
3. Create a Windows Account to Run the Service<br />
4. Install the Windows Service<br />
5. Create a Test Client Application<br />
1. Create the Remote Object Class<br />
This procedure creates a simple remote object class. It provides a single method<br />
called Add that will add two numbers together and return the result.<br />
<br />
To create the remote object class<br />
1. Start Visual Studio .<strong>NET</strong> and create a new Visual C# Class Library project called<br />
RemoteObject.<br />
2. Use Solution Explorer to rename class1.cs as Calculator.cs.<br />
3. In Calculator.cs, rename Class1 as Calculator and rename the default constructor<br />
accordingly.<br />
4. Derive the Calculator class from MarshalByRefObject to make the class<br />
remotable.<br />
public class Calculator : MarshalByRefObject<br />
5. Add the following public method to the Calculator class.<br />
public int Add( int operand1, int operand2 )<br />
{<br />
return operand1 + operand2;<br />
}<br />
6. On the Build menu, click Build Solution.<br />
2. Create a Windows Service Host Application<br />
This procedure creates a Windows service application, which will be used to host<br />
the remote object. When the service is started it will configure the TCP remoting<br />
channel to listen for client requests.
How To: Host a Remote Object in a Windows Service 475<br />
Note: This procedure uses an Installer class and the Installutil.exe command line utility to<br />
install the Windows service. To uninstall the service, run Installutil.exe with the /u switch. As<br />
an alternative, you could use a Setup and Deployment Project to help install and uninstall the<br />
Windows service.<br />
<br />
To create a Windows Service host application<br />
1. Add a new Visual C# Windows Service project called RemotingHost to the<br />
current solution.<br />
2. Use Solution Explorer to rename Service1.cs as RemotingHost.cs.<br />
3. In RemotingHost.cs, rename the Service1 class as HostService and rename the<br />
default constructor accordingly.<br />
4. At the top of the file, add the following using statement beneath the existing<br />
using statements.<br />
using System.Runtime.Remoting;<br />
5. Locate the Main method and replace the existing line of code that initializes the<br />
ServicesToRun variable with the following.<br />
ServicesToRun = new System.ServiceProcess.ServiceBase[] {<br />
new HostService() };<br />
6. Locate the InitializeComponent method and set the ServiceName property to<br />
RemotingHost.<br />
this.ServiceName = "RemotingHost";<br />
7. Locate the OnStart method and add the following line of code to configure<br />
remoting. The fully qualified path to the configuration file will be passed as a<br />
start parameter to the service.<br />
RemotingConfiguration.Configure(args[0]);<br />
8. Add a new C# class file to the project and name it HostServiceInstaller.<br />
9. Add an assembly reference to the System.Configuration.Install.dll assembly.<br />
10. Add the following using statements to the top of HostServiceInstaller beneath<br />
the existing using statement.<br />
using System.ComponentModel;<br />
using System.ServiceProcess;<br />
using System.Configuration.Install;<br />
11. Derive the HostServiceInstaller class from the Installer class.<br />
public class HostServiceInstaller : Installer
476<br />
<strong>Building</strong> <strong>Secure</strong> <strong>ASP</strong>.<strong>NET</strong> <strong>Applications</strong><br />
12. Add the RunInstaller attribute at the class level as follows.<br />
[RunInstaller(true)]<br />
public class HostServiceInstaller : Installer<br />
13. Add the following two private member variables to the HostServiceInstaller<br />
class. The objects will be used when installing the service.<br />
private ServiceInstaller HostInstaller;<br />
private ServiceProcessInstaller HostProcessInstaller;<br />
14. Add the following code to the constructor of the HostServiceInstaller class.<br />
HostInstaller = new ServiceInstaller();<br />
HostInstaller.StartType = System.ServiceProcess.ServiceStartMode.Manual;<br />
HostInstaller.ServiceName = "RemotingHost";<br />
HostInstaller.DisplayName = "Calculator Host Service";<br />
Installers.Add (HostInstaller);<br />
HostProcessInstaller = new ServiceProcessInstaller();<br />
HostProcessInstaller.Account = ServiceAccount.User;<br />
Installers.Add (HostProcessInstaller);<br />
15. Within Solution Explorer, right-click RemotingHost, point to Add, and then click<br />
Add New Item.<br />
16. In the Templates list, click Text File and name the file app.config.<br />
Configuration files with the name app.config are automatically copied by Visual<br />
Studio .<strong>NET</strong> as part of the build process to the output folder (for example,<br />
\bin\debug) and renamed as .config.<br />
17. Click OK to add the new configuration file.<br />
18. Add the following configuration elements to the new configuration file.<br />
<br />
<br />
<br />
<br />
<br />
<br />
<br />
<br />
<br />
<br />
<br />
<br />
<br />
<br />
<br />
<br />
19. On the Build menu, click Build Solution.
How To: Host a Remote Object in a Windows Service 477<br />
3. Create a Windows Account to Run the Service<br />
This procedure creates a Windows account used to run the Windows service.<br />
<br />
To create a Windows account to run the service<br />
1. Create a new local user account called RemotingAccount. Enter a password and<br />
select the Password never expires check box.<br />
2. In the Administrative Tools programs group, click Local Security Policy.<br />
3. Use the Local Security Policy tool to give the new account the Log on as a<br />
service privilege.<br />
4. Install the Windows Service<br />
This procedure installs the Windows service using the installutil.exe utility and then<br />
start the service.<br />
<br />
To install the Windows service<br />
1. Open a command window and change directory to the Bin\Debug directory<br />
beneath the RemotingHost project folder.<br />
2. Run the installutil.exe utility to install the service.<br />
installutil.exe remotinghost.exe<br />
3. In the Set Service Login dialog box, enter the user name and password of the<br />
account created earlier in procedure 3 and click OK.<br />
View the output from the installutil.exe utility and confirm that the service is<br />
installed correctly.<br />
4. Copy the RemoteObject.dll assembly into the RemotingHost project output<br />
directory (that is, RemotingHost\Bin\Debug).<br />
5. From the Administrative Tools program group, start the Services MMC snap-in.<br />
6. In the Services list, right-click Calculator Host Service, and then click<br />
Properties.<br />
7. Enter the full path to the service’s configuration file (remotinghost.exe.config)<br />
into the Start parameters field.<br />
Note: A quick way to do this is to select and copy the Path to executable field and paste it<br />
into the Start parameters field. Then append the “.config” string.<br />
8. Click Start to start the service.<br />
9. Confirm that the service status changes to Started.<br />
10. Click OK to close the Properties dialog box.
478<br />
<strong>Building</strong> <strong>Secure</strong> <strong>ASP</strong>.<strong>NET</strong> <strong>Applications</strong><br />
5. Create a Test Client Application<br />
This procedure creates a test console application that is used to call the remote<br />
object within the Windows service.<br />
<br />
To create a test client application<br />
1. Add a new Visual C# Console application called RemotingClient to the current<br />
solution.<br />
2. Within Solution Explorer, right-click RemotingClient, and then click Set as<br />
StartUp Project.<br />
3. Add an assembly reference to the System.Runtime.Remoting.dll assembly.<br />
4. Add a project reference to the RemoteObject project.<br />
5. Add the following using statements to the top of class1.cs beneath the existing<br />
using statements.<br />
using System.Runtime.Remoting.Channels;<br />
using System.Runtime.Remoting.Channels.Tcp;<br />
using RemoteObject;<br />
6. Add the following test code to the Main method to call and invoke the<br />
Calculator object hosted by the Windows service.<br />
TcpChannel chan = new TcpChannel();<br />
ChannelServices.RegisterChannel(chan);<br />
Calculator calc = (Calculator)Activator.GetObject(<br />
typeof(RemoteObject.Calculator),<br />
"tcp://localhost:8085/RemoteObject.Calculator");<br />
if (calc == null)<br />
System.Console.WriteLine("Could not locate server");<br />
else<br />
Console.WriteLine("21 + 21 is : " + calc.Add(21,21) );<br />
7. On the Build menu, click Build Solution.<br />
8. Run the client application and confirm that the correct result is displayed in the<br />
console output window.<br />
References<br />
For information about how to host a remote object in <strong>ASP</strong>.<strong>NET</strong> (with IIS), see article<br />
Q312107, “HOW TO: Host a Remote Object in IIS,” in the Microsoft Knowledge Base.
How To:<br />
Set Up SSL on a Web Server<br />
<strong>Secure</strong> Sockets Layer (SSL) is a set of cryptographic technologies that provides<br />
authentication, confidentiality, and data integrity. SSL is most commonly used<br />
between Web browsers and Web servers to create a secure communication channel.<br />
It can also be used between client applications and Web services.<br />
Requirements<br />
The following items describe the recommended hardware, software, network<br />
infrastructure, skills and knowledge, and service packs you will need.<br />
● Microsoft® Windows® 2000 Server operating system (Service Pack 2)<br />
● Microsoft Certificate Services (required if you need to generate your own<br />
certificates).<br />
The procedures in this How To also require that you have some knowledge of IIS<br />
configuration.<br />
Summary<br />
This How To includes the following procedures:<br />
1. Generate a Certificate Request<br />
2. Submit a Certificate Request<br />
3. Issue the Certificate<br />
4. Install the Certificate on the Web server<br />
5. Configure Resources to Require SSL Access<br />
1. Generate a Certificate Request<br />
This procedure creates a new certificate request, which can be sent to a Certificate<br />
Authority (CA) for processing. If successful, the CA will send you back a file containing<br />
a validated certificate.<br />
<br />
To generate a certificate request<br />
1. Start the IIS Microsoft Management Console (MMC) snap-in.
480<br />
<strong>Building</strong> <strong>Secure</strong> <strong>ASP</strong>.<strong>NET</strong> <strong>Applications</strong><br />
2. Expand your Web server name and select the Web site for which you want to<br />
install a certificate.<br />
3. Right-click the Web site, and then click Properties.<br />
4. Click the <strong>Directory</strong> Security tab.<br />
5. Click the Server Certificate button within <strong>Secure</strong> communications to launch the<br />
Web Server Certificate Wizard.<br />
Note: If Server Certificate is unavailable, you probably selected a virtual directory,<br />
directory, or file. Go back to Step 2 and select a Web site.<br />
6. Click Next to move past the welcome dialog box.<br />
7. Click Create a New Certificate, and then click Next.<br />
8. The dialog box has the following two options:<br />
● Prepare the request now, but send it later<br />
This option is always available.<br />
● Send the request immediately to an online certification authority<br />
This option is available only if the Web server can access one or more<br />
Microsoft Certificate servers in a Windows 2000 domain configured to issue<br />
Web server certificates. Later on in the request process, you are given the<br />
opportunity to select an authority from a list to send the request to.<br />
Click Prepare the request now, but send it later, and then click Next.<br />
9. Type a descriptive name for the certificate in the Name field, type a bit length for<br />
the key in the Bit length field, and then click Next.<br />
The wizard uses the name of the current Web site as a default name. It is not<br />
used in the certificate but acts as a friendly name to help administrators.<br />
10. Type an organization name (such as Contoso) in the Organization field and type<br />
an organizational unit (such as Sales Department) in the Organizational unit<br />
field, and then click Next.<br />
Note: This information will be placed in the certificate request, so make sure it is accurate.<br />
The CA will verify this information and will place it in the certificate. A user browsing your<br />
Web site will want to see this information in order to decide if they should accept the<br />
certificate.<br />
11. In the Common name field, type a common name for your site, and then click<br />
Next.
How To: Set Up SSL on a Web Server 481<br />
Important: The common name is one of the most significant pieces of information that<br />
ends up in the certificate. It is the DNS name of the Web site (that is, the name that users<br />
type in when browsing your site). If the certificate name doesn’t match the site name, a<br />
certificate problem will be reported when users browse to the site.<br />
If your site is on the Web and is named www.contoso.com, this is what you should specify<br />
for the common name.<br />
If your site is internal and users browse by computer name, enter the NetBIOS or DNS<br />
name of the computer.<br />
12. Enter the appropriate information in the Country/Region, State/province, and<br />
City/locality fields, and then click Next.<br />
13. Enter a file name for the certificate request.<br />
The file contains information similar to the following.<br />
-----BEGIN NEW CERTIFICATE REQUEST-----<br />
MIIDZjCCAs8CAQAwgYoxNjA0BgNVBAMTLW1penJvY2tsYXB0b3Aubm9ydGhhbWVy…<br />
-----END NEW CERTIFICATE REQUEST-----<br />
This is a Base 64 encoded representation of your certificate request. The request<br />
contains the information entered into the wizard and also your public key and<br />
information signed with your private key.<br />
This request file is sent to the CA. The CA then uses your public key information<br />
from the certificate request to verify information signed with your private key.<br />
The CA also verifies the information supplied in the request.<br />
After you submit the request to a CA, the CA sends back a certificate contained<br />
in a file. You would then restart the Web Server Certificate Wizard.<br />
14. Click Next. The wizard displays a summary of the information contained in the<br />
certificate request.<br />
15. Click Next, and then click Finish to complete the request process.<br />
The certificate request can now be sent to a CA for verification and processing.<br />
After you receive a certificate response from the CA, you can continue and install<br />
the certificate on the Web server, once again by using the IIS Certificate Wizard.<br />
2. Submit a Certificate Request<br />
This procedure uses Microsoft Certificate Services to submit the certificate request<br />
generated in the previous procedure.<br />
<br />
To submit a certificate request<br />
1. Use Notepad to open the certificate file generated in the previous procedure and<br />
copy its entire contents to the clipboard.
482<br />
<strong>Building</strong> <strong>Secure</strong> <strong>ASP</strong>.<strong>NET</strong> <strong>Applications</strong><br />
2. Start Internet Explorer and navigate to http://hostname/CertSrv, where hostname<br />
is the name of the computer running Microsoft Certificate Services.<br />
3. Click Request a Certificate, and then click Next.<br />
4. On the Choose Request Type page, click Advanced request, and then click<br />
Next.<br />
5. On the Advanced Certificate Requests page, click Submit a certificate request<br />
using a base64 encoded PKCS#10 file, and then click Next.<br />
6. On the Submit a Saved Request page, click in the Base64 Encoded Certificate<br />
Request (PKCS #10 or #7) text box and press CTRL+V to paste the certificate<br />
request you copied to the clipboard earlier.<br />
7. In the Certificate Template combo box, click Web Server.<br />
8. Click Submit.<br />
9. Close Internet Explorer.<br />
3. Issue the Certificate<br />
<br />
To issue the certificate<br />
1. Start the Certification Authority tool from the Administrative Tools program<br />
group.<br />
2. Expand your certificate authority, and then select the Pending Requests folder.<br />
3. Select the certificate request you just submitted.<br />
4. On the Action menu, point to All Tasks, and then click Issue.<br />
5. Confirm that the certificate is displayed in the Issued Certificates folder, and<br />
then double-click it to view it.<br />
6. On the Details tab, click Copy to File, and save the certificate as a Base-64<br />
encoded X.509 certificate.<br />
7. Close the properties window for the certificate.<br />
8. Close the Certificate Authority tool.<br />
4. Install the Certificate on the Web Server<br />
This procedure installs the certificate issued in the previous procedure on the Web<br />
server.<br />
<br />
To install the certificate on the Web server<br />
1. Start Internet Information Services, if it’s not already running.<br />
2. Expand your server name and select the Web site for which you want to install<br />
a certificate.
How To: Set Up SSL on a Web Server 483<br />
3. Right-click the Web site, and then click Properties.<br />
4. Click the <strong>Directory</strong> Security tab.<br />
5. Click Server Certificate to launch the Web Server Certificate Wizard.<br />
6. Click Process the pending request and install the certificate, and then click<br />
Next.<br />
7. Enter the path and file name of the file that contains the response from the CA,<br />
and then click Next.<br />
8. Examine the certificate overview, click Next, and then click Finish.<br />
A certificate is now installed on the Web server.<br />
5. Configure Resources to Require SSL Access<br />
This procedure uses Internet Services Manager to configure a virtual directory to<br />
require SSL for access. You can require the use of SSL for specific files, directories,<br />
or virtual directories. Clients must use the HTTPS protocol to access any such<br />
resource.<br />
<br />
To configure resources to require SSL access<br />
1. Start Internet Information Services, if it’s not already running.<br />
2. Expand your server name and Web site. (This must be a Web site that has an<br />
installed certificate.)<br />
3. Right-click a virtual directory, and then click Properties.<br />
4. Click the <strong>Directory</strong> Security tab.<br />
5. Under <strong>Secure</strong> communications, click Edit.<br />
6. Click Require secure channel (SSL).<br />
Client’s browsing to this virtual directory must now use HTTPS.<br />
7. Click OK, and then click OK again to close the Properties dialog box.<br />
8. Close Internet Information Services.
How To:<br />
Set Up Client Certificates<br />
Web services often need to be able to authenticate their callers (other applications)<br />
in order to perform authorization. Client certificates provide an excellent authentication<br />
mechanism for Web services. When you use client certificates, your application<br />
also benefits from the creation of a secure channel (using <strong>Secure</strong> Sockets Layer<br />
[SSL]) between the client application and Web service. This allows you to securely<br />
send confidential information to and from the Web service. SSL ensures message<br />
integrity and confidentiality.<br />
This How To includes step-by-step instructions to call a Web service that is configured<br />
to require client certificates.<br />
Note: The information in this How To also applies to remote components hosted by IIS.<br />
Requirements<br />
The following items describe the recommended hardware, software, network<br />
infrastructure, skills and knowledge, and service packs you will need.<br />
● Microsoft® Windows® 2000 Server operating system with Service Pack 2<br />
●<br />
●<br />
Microsoft Visual Studio® .<strong>NET</strong> development system<br />
Access to a Certificate Authority (CA) to generate new certificates<br />
● A Web server with an installed server certificate<br />
For more information about installing Web server certificates, see “How To: Set<br />
Up SSL on a Web Server” in the Reference section of this guide.<br />
The procedures in this How To also require that you have knowledge of <strong>ASP</strong>.<strong>NET</strong><br />
Web development with the Microsoft Visual C# development tool.<br />
Summary<br />
This How To includes the following procedures:<br />
1. Create a Simple Web Application<br />
2. Configure the Web Application to Require Client Certificates<br />
3. Request and Install a Client Certificate<br />
4. Verify Client Certificate Operation
486<br />
<strong>Building</strong> <strong>Secure</strong> <strong>ASP</strong>.<strong>NET</strong> <strong>Applications</strong><br />
1. Create a Simple Web Application<br />
<br />
To create a simple Web application<br />
1. Start Visual Studio .<strong>NET</strong> and create a new C# <strong>ASP</strong>.<strong>NET</strong> Web application called<br />
<strong>Secure</strong>App.<br />
2. Drag a label control from the toolbox onto the WebForm1.aspx Web form, and<br />
then set its ID property to message.<br />
3. Drag a second label onto WebForm1.aspx and set its ID property to certData.<br />
4. Add the following code to the Page_Load event procedure.<br />
string username;<br />
username = User.Identity.Name;<br />
message.Text = "Welcome " + username;<br />
HttpClientCertificate cert = Request.ClientCertificate;<br />
if (cert.IsPresent)<br />
{<br />
certData.Text = "Client certificate retrieved";<br />
}<br />
else<br />
{<br />
certData.Text = "No client certificate";<br />
}<br />
5. On the Build menu, click Build Solution.<br />
6. Start Internet Explorer and navigate to http://localhost/<strong>Secure</strong>App/WebForm1.aspx.<br />
The page should be displayed with the messages “Welcome” (no user name is<br />
displayed because the user has not been authenticated) and “No client certificate.”<br />
7. Close Internet Explorer.<br />
2. Configure the Web Application to Require Client Certificates<br />
This procedure uses Internet Information Services (IIS) to configure your Web<br />
application’s virtual directory to require certificates.<br />
This procedure assumes that you have a valid certificate installed on your Web<br />
server. For more information about installing Web server certificates, see “How To:<br />
Set Up SSL on a Web Server.”<br />
<br />
To configure your Web application’s virtual directory to require certificates<br />
1. On the Web service host computer, start IIS.<br />
2. Navigate to the <strong>Secure</strong>App virtual directory.<br />
3. Right-click <strong>Secure</strong>App, and then click Properties.<br />
4. Click the <strong>Directory</strong> Security tab.
How To: Set Up Client Certificates 487<br />
5. Under <strong>Secure</strong> communications, click Edit.<br />
If Edit is unavailable, it is likely that a Web server certificate is not installed.<br />
6. Select the Require secure channel (SSL) check box.<br />
7. Select the Require client certificates option.<br />
8. Click OK, and then click OK again.<br />
9. In the Inheritance Overrides dialog box, click Select All, and then click OK to<br />
close the <strong>Secure</strong>App properties dialog box.<br />
This applies the new security settings to all subdirectories in the virtual directory<br />
root.<br />
10. To confirm that the Web site is configured correctly, start Internet Explorer and<br />
browse (using HTTPS) to https://localhost/secureapp/webform1.aspx.<br />
11. A Client Authentication dialog box is displayed by Internet Explorer asking you<br />
to select a client certificate. Because you have not yet installed a client certificate,<br />
click OK, and confirm that an error page is displayed informing you that the<br />
page requires a client certificate.<br />
12. Close Internet Explorer.<br />
3. Request and Install a Client Certificate<br />
This procedure installs a client-side certificate. You can use a certificate from any<br />
certificate authority, or you can generate your own certificate using Microsoft<br />
Certificate Services as described in the following sections.<br />
This procedure assumes that Microsoft Certificate Services is configured for pending<br />
requests, which require an administrator to explicitly issue the certificate. It can<br />
also be configured to automatically issue certificates in response to certificate<br />
requests.<br />
<br />
<br />
To check the certificate request status setting<br />
1. On the Microsoft Certificate Services computer, select Certification Authority<br />
from the Administrative Tools programs group.<br />
2. Expand Certification Authority (Local), right-click the certification authority<br />
and click Properties.<br />
3. Click the Policy Module tab, and then click Configure.<br />
4. Check the default action.<br />
The following procedure assumes that Set the certificate request status to<br />
pending. Administrator must explicitly issue the certificate is selected.<br />
To request a client-side certificate<br />
1. Start Internet Explorer and navigate to http://hostname/certsrv, where hostname is<br />
the name of the computer on which Microsoft Certificate Services is installed.
488<br />
<strong>Building</strong> <strong>Secure</strong> <strong>ASP</strong>.<strong>NET</strong> <strong>Applications</strong><br />
2. Click Request a certificate, and then click Next.<br />
3. On the Choose Request Type page, click User Certificate, and then click Next.<br />
4. Click Submit to complete the request.<br />
5. Close Internet Explorer.<br />
<br />
<br />
To issue the client-side certificate<br />
1. From the Administrative Tools program group, start the Certification Authority<br />
tool.<br />
2. Expand your certificate authority, and then select the Pending Requests folder.<br />
3. Select the certificate request you just submitted, point to All Tasks on the Action<br />
menu, and then click Issue.<br />
4. Confirm that the certificate is displayed in the Issued Certificates folder, and<br />
then double-click it to view it.<br />
5. On the Details tab, click Copy to File to save the certificate as a Base-64 encoded<br />
X.509 certificate.<br />
6. Close the properties window for the certificate.<br />
7. Close the Certification Authority tool.<br />
To install the client-side certificate<br />
1. To view the certificate, start Windows Explorer, navigate to the .cer file saved in<br />
the previous procedure, and then double-click it.<br />
2. Click Install Certificate, and then click Next on the first page of the Certificate<br />
Import Wizard.<br />
3. Select Automatically select the certificate store based on the type of certificate,<br />
and then click Next.<br />
4. Click Finish to complete the wizard. Dismiss the confirmation message box, and<br />
then click OK to close the certificate.<br />
4. Verify Client Certificate Operation<br />
This procedure verifies that you can access the <strong>Secure</strong>App application using a client<br />
certificate.<br />
<br />
To verify client certificate operation<br />
1. Start Internet Explorer and navigate to https://localhost/secureapp/webform1.aspx.<br />
2. Confirm that the Web page displays successfully.<br />
Additional Resources<br />
For more information, see “How to Set Up SSL on a Web Server” in the Reference<br />
section of this guide.
How To:<br />
Use IPSec to Provide <strong>Secure</strong><br />
Communication Between Two<br />
Servers<br />
Internet Protocol Security (IPSec) can be used to secure the data sent between two<br />
computers, such as an application server and a database server. IPSec is completely<br />
transparent to applications because encryption, integrity, and authentication<br />
services are implemented at the transport level. <strong>Applications</strong> continue to communicate<br />
with one another in the normal manner using TCP and UDP ports.<br />
Using IPSec you can:<br />
● Provide message confidentiality by encrypting all of the data sent between two<br />
computers.<br />
● Provide message integrity between two computers (without encrypting data).<br />
● Provide mutual authentication between two computers. For example, you can<br />
help secure a database server by establishing a policy that permits requests only<br />
from a specific client computer (for example, an application or Web server).<br />
● Restrict which computers can communicate with one another. You can also<br />
restrict communication to specific IP protocols and TCP/UDP ports.<br />
This How To shows you how to secure the communication channel between an<br />
application server and a database server running SQL Server 2000. The application<br />
server uses the recommended TCP/IP client network library to connect to SQL<br />
Server and uses the default SQL Server TCP port 1433. The configuration is shown<br />
in Figure 1 on the next page.
490<br />
<strong>Building</strong> <strong>Secure</strong> <strong>ASP</strong>.<strong>NET</strong> <strong>Applications</strong><br />
Application<br />
Server<br />
Database Server<br />
Port<br />
1433<br />
SQL<br />
Server<br />
192.168.13.32 IPSec 192.168.12.11<br />
(Privacy/Integrity)<br />
Figure 1<br />
How To solution configuration<br />
This How To describes how to use a simple IPSec policy to enforce the following:<br />
● Allow communications with SQL Server only from the application server using<br />
TCP through port 1433.<br />
● Drop all other IP packets, including ICMP (ping).<br />
● Encrypt all data sent between the two computers to guarantee confidentiality.<br />
The advantages of this approach are:<br />
● Data confidentiality is provided for all data sent between the two computers.<br />
● The attach surface on SQL Server is significantly reduced. The only remaining<br />
points of attack are to interactively log on to the database server or to gain<br />
control of the application server and try to attack SQL Server via TCP port 1433.<br />
● The IPSec policy is extremely simple to define and implement.<br />
This particular policy suffers from the following drawbacks:<br />
● SQL Server cannot communicate with domain controllers and as a result:<br />
● Group policy cannot be applied (the database server should be a standalone<br />
server).<br />
● Windows authentication between the application server and database server<br />
requires synchronized local accounts (with the same user name and password)<br />
on both computers.<br />
● You cannot use more robust methods of applying IPSec (Windows 2000<br />
default / Kerberos).<br />
● SQL Server will not be able to communicate with other computers, including<br />
DNS servers.<br />
● The approach presented in this How To uses pre-shared key authentication,<br />
which is not recommended for production scenarios. Production systems should<br />
use certificates or Windows 2000 domain authentication. IPSec policies that use<br />
pre-shared secrets are suitable for use in development or test environments only.<br />
● Both computers must have static IP addresses.
How To: Use IPSec to Provide <strong>Secure</strong> Communication Between Two Servers 491<br />
Notes<br />
●<br />
●<br />
●<br />
●<br />
●<br />
●<br />
An IPSec policy consists of a set of filters, filter actions, and rules.<br />
A filter consists of:<br />
●<br />
●<br />
●<br />
●<br />
A source IP address or range of addresses.<br />
A destination IP address or range of addresses.<br />
An IP protocol, such as TCP, UDP, or “any.”<br />
Source and destination ports (for TCP or UDP only).<br />
Filters can also be mirrored on two computers. A mirrored filter applies the same<br />
rule on client and server computer (with the source and destination addresses<br />
reversed).<br />
A filter action specifies actions to take when a given filter is invoked. It can be<br />
one of the following:<br />
● Permit. The traffic is not secured; it is allowed to be sent and received without<br />
intervention.<br />
● Block. The traffic is not permitted.<br />
● Negotiate security. The endpoints must agree on and then use a secure<br />
method to communicate. If they cannot agree on a method, the communication<br />
does not take place. If negotiation fails, you can specify whether to allow<br />
unsecured communication or to whether all communication should be<br />
blocked.<br />
A rule associates a filter with a filter action.<br />
A mirrored policy is one that applies rules to all packets with the exact reverse of<br />
the specified source and destination IP addresses. A mirrored policy is created in<br />
this How To.<br />
Requirements<br />
The following items describe the recommended hardware, software, network<br />
infrastructure, skills and knowledge, and service packs you will need.<br />
● Two computers running Microsoft® Windows® 2000 Server operating system<br />
You must know their IP addresses<br />
● Microsoft® SQL Server 2000 on the database server computer
492<br />
<strong>Building</strong> <strong>Secure</strong> <strong>ASP</strong>.<strong>NET</strong> <strong>Applications</strong><br />
Summary<br />
This How To includes the following procedures:<br />
1. Create an IP Filter<br />
2. Create Filter Actions<br />
3. Create Rules<br />
4. Export the IPSec Policy to the Remote Computer<br />
5. Assign Policies<br />
6. Verify that it Works<br />
1. Create an IP Filter<br />
<br />
To create a new IP filter on the database server computer<br />
1. Log on to the database server as an administrator.<br />
2. Start the Local Security Policy Microsoft Management Console (MMC) snap-in<br />
from the Administrative Tools program group.<br />
3. In the left pane, right-click IP Security Policies on Local Machine, and then click<br />
Manage IP filter lists and filter actions.<br />
You will see that two filter lists are already defined for all ICMP traffic and all IP<br />
traffic.<br />
4. Click Add.<br />
5. In the IP Filter List dialog box, type SQL Port in the Name field.<br />
6. Click Add, and then click Next to move past the welcome dialog of the IP Filter<br />
Wizard.<br />
7. In the IP Traffic Source dialog box, select A specific IP Address from the Source<br />
address drop-down list, and then enter the IP address of your application server<br />
computer.<br />
8. Click Next.<br />
9. In the IP Traffic Destination dialog box, select A specific IP Address from the<br />
Destination address drop-down list, and then enter the IP address of your<br />
database server computer.<br />
10. Click Next.<br />
11. In the IP Protocol Type dialog box, select TCP as the protocol type, and then<br />
click Next.<br />
12. In the IP Protocol Port dialog box, select From any port, and then select To this<br />
port. Enter 1433 as the port number.<br />
13. Click Next, and then click Finish to close the wizard.<br />
14. Click Close to close the IP Filter List dialog box.
How To: Use IPSec to Provide <strong>Secure</strong> Communication Between Two Servers 493<br />
2. Create Filter Actions<br />
<br />
This procedure creates two filter actions. The first will be used to block all communications<br />
from specified computers and the second will be used to enforce the use of<br />
encryption between application server and database server computers.<br />
To create filter actions<br />
1. Click the Manage Filter Actions tab.<br />
Note that several predefined actions are already defined.<br />
2. Click Add to create a new filter action.<br />
In the next few steps, you will create a block action that can be used to block all<br />
communications from selected computers.<br />
3. Click Next to move past the initial dialog box of the Filter Action Wizard.<br />
4. In the Name field, type Block, and then click Next.<br />
5. In the Filter Action General Options dialog box, select Block, and then click<br />
Next.<br />
6. Click Finish to close the wizard.<br />
7. Click Add to start the Filter Action Wizard again.<br />
In the next few steps, you will create a filter action to force the use of encryption<br />
between application server and database server computers.<br />
8. Click Next to move past the initial dialog box of the Filter Action Wizard.<br />
9. In the Name field, type Require High Security, and then click Next.<br />
10. Select Negotiate security, and then click Next.<br />
11. Select Do not communicate with computers that do not support IPSec, and then<br />
click Next.<br />
12. Select Custom, and then click Settings.<br />
13. Make sure that the Data integrity and encryption (ESP) check box is selected.<br />
14. Select SHA1 from the Integrity algorithm drop-down list.<br />
15. Select 3DES from the Encryption algorithm drop-down list.<br />
16. Select the two check boxes within the Session Key Settings group to generate a<br />
new key every 100000 Kb and 3600 seconds respectively.<br />
17. Click OK to close the Custom Security Method Settings dialog box, and then<br />
click Next.<br />
18. Select the Edit Properties check box, and then click Finish.<br />
19. Clear the Accept unsecured communication, but always respond using IPSec<br />
check box.<br />
20. Select the Session key Perfect Forward Secrecy check box, and then click OK.<br />
21. Click Close to close the Manage IP filter lists and filter actions dialog box.
494<br />
<strong>Building</strong> <strong>Secure</strong> <strong>ASP</strong>.<strong>NET</strong> <strong>Applications</strong><br />
3. Create Rules<br />
This procedure creates two new rules that will be used to associate the filter that<br />
you created in Procedure 1, with the two filter actions you created in Procedure 2.<br />
<br />
To create rules<br />
1. In the left pane, right-click IP Security Policies on Local Machine, and then click<br />
Create IP Security Policy.<br />
2. Click Next to move past the initial dialog box of the IP Security Policy Wizard.<br />
3. In the Name field, type <strong>Secure</strong> SQL, and then click Next.<br />
4. Clear the Activate the default response rule check box, and then click Next.<br />
5. Leave the Edit properties check box selected, and then click Finish.<br />
6. Click Add to start the Security Rule Wizard.<br />
7. Click Next to move past the initial dialog box of the Security Rule Wizard.<br />
8. Click This rule does not specify a tunnel, and then click Next.<br />
9. Click All network connections, and then click Next.<br />
10. Click Use this string to protect the key exchange (preshared key).<br />
11. Enter MySecret as a “secret” key in the text box.<br />
Note: This key must be the same for both computers in order for them to successfully<br />
communicate. You should use a long random number, but for the purposes of this How To,<br />
“MySecret” will suffice.<br />
12. Click Next.<br />
13. Select the SQL Port option.<br />
Note: You must click the circle (radio button) and not the text for the option to be selected.<br />
14. Click Next.<br />
15. Select the Require High Security option, and then click Next.<br />
16. Click Finish to return to the <strong>Secure</strong> SQL Properties dialog box.<br />
17. Click Add to start the Security Rule Wizard again, and then click Next to move<br />
past the initial dialog box.<br />
18. Click This rule does not specify a tunnel, and then click Next.<br />
19. Click All network connections, and then click Next.<br />
20. In the Authentication Method dialog box, leave Windows 2000 default<br />
(Kerberos V5 Protocol) selected, and then click Next.<br />
Note: This rule will specify the Block filter action, so no authentication will be needed.<br />
22. In the IP Filter List dialog box, click All IP Traffic, and then click Next.
How To: Use IPSec to Provide <strong>Secure</strong> Communication Between Two Servers 495<br />
23. In the Filter Action dialog box, select the Block option, and then click Next.<br />
24. Click Finish.<br />
25. Click Close to close the <strong>Secure</strong> SQL Properties dialog box.<br />
4. Export the IPSec Policy to the Remote Computer<br />
The IPSec policy that you have created on the database server must now be<br />
exported and copied to the application server computer.<br />
<br />
To export the IPSec policy to the application server computer<br />
1. In the left pane, right-click the IP Security Policies on Local Machine node,<br />
point to All Tasks, and then click Export Policies.<br />
2. In the Name field, type <strong>Secure</strong> SQL, and then click Save to export the file to the<br />
local hard disk.<br />
3. Either copy the .ipsec file across to the application server or make it available by<br />
using a file share.<br />
Important: Because the exported policy file contains a pre-shared key in clear text, the file<br />
must be properly secured. It should not be stored on the hard disk of either computer.<br />
4. Log on to the Application Server as an administrator and start the Local Security<br />
Policy MMC snap-in.<br />
5. Select and right-click IP Security Policies on Local Machine, point to All Tasks,<br />
and then click Import Policies.<br />
6. Browse for the previously exported .ipsec file and click Open to import the<br />
policy.<br />
5. Assign Policies<br />
An IPSec policy must be assigned before it becomes active. Note that only one<br />
policy may be active at any one time on a particular computer.<br />
<br />
To assign the <strong>Secure</strong> SQL policy on the application server and database server computers<br />
1. On the application server computer, right-click the newly imported <strong>Secure</strong> SQL<br />
policy, and then click Assign.<br />
2. Repeat the previous step on the database server computer.<br />
The mirrored policy is now assigned on both computers.<br />
The policies ensure that only the application server can communicate with the<br />
database server. Furthermore, only TCP connections using port 1433 are permitted<br />
and all traffic sent between the two computers is encrypted.
496<br />
<strong>Building</strong> <strong>Secure</strong> <strong>ASP</strong>.<strong>NET</strong> <strong>Applications</strong><br />
6. Verify that it Works<br />
This procedure uses Network Monitor to verify that data sent between the application<br />
server and database server is encrypted.<br />
<br />
To verify that it works<br />
1. On the application server computer, use Visual Studio .<strong>NET</strong> to create a new C#<br />
Console Application called SQLIPSecClient.<br />
2. Copy the following code to class1.cs replacing all of the existing code.<br />
Note: Replace the IP address in the connection string with the IP address of your database<br />
server.<br />
using System;<br />
using System.Data;<br />
using System.Data.SqlClient;<br />
namespace SQLIPSecClient<br />
{<br />
class Class1<br />
{<br />
[STAThread]<br />
static void Main(string[] args)<br />
{<br />
// Replace the IP address in the following connection string with the IP<br />
// address of your database server<br />
SqlConnection conn = new SqlConnection(<br />
"server=192.168.12.11;database=NorthWind;Integrated Security='SSPI'");<br />
SqlCommand cmd = new SqlCommand(<br />
"SELECT ProductID, ProductName FROM Products");<br />
try<br />
{<br />
conn.Open();<br />
cmd.Connection = conn;<br />
SqlDataReader reader = cmd.ExecuteReader();<br />
while (reader.Read())<br />
{<br />
Console.WriteLine("{0} {1}",<br />
reader.GetInt32(0).ToString(),<br />
reader.GetString(1) );<br />
}<br />
reader.Close();<br />
}<br />
catch( Exception ex)<br />
{<br />
}<br />
finally
How To: Use IPSec to Provide <strong>Secure</strong> Communication Between Two Servers 497<br />
}<br />
}<br />
}<br />
{<br />
}<br />
conn.Close();<br />
3. On the Build menu, click Build Solution.<br />
4. In order for Windows authentication to succeed between the two computers, you<br />
must duplicate the account that you are currently interactively logged on to the<br />
application computer with, on the database server computer. Ensure that the<br />
user name and password matches.<br />
You must also use SQL Server Enterprise Manager to create a database login for<br />
the newly created account and add a new database user for this logon to the<br />
Northwind database.<br />
5. Temporarily un-assign the <strong>Secure</strong> SQL IPSec policy on both computers:<br />
a. Start Local Security Settings on the application server computer.<br />
b. Click IP Security Policies on Local Machine.<br />
c. In the right pane, right-click <strong>Secure</strong> SQL, and then click Un-assign.<br />
d. Repeat Steps a – c on the database server computer.<br />
6. On the database server computer, click Network Monitor in the Administrative<br />
Tools program group.<br />
Note: A limited version of Network Monitor is available with Windows 2000 Server. A full<br />
version is available with Microsoft SMS.<br />
If you do not have Network Monitor installed, go to Add/Remove Programs in Control<br />
Panel, click Add/Remove Windows Components, select Management and Monitoring<br />
Tools from the Windows Components list, click Details, and then click Network Monitor<br />
Tools. Click OK, and then click Next to install the limited version of Network Monitor. You<br />
may be prompted for a Windows 2000 Server CD.<br />
7. On the Capture menu, click Filter to create a new filter configured to view<br />
TCP/IP network traffic sent between the application server and database server.<br />
8. Click the Start Capture button.<br />
9. Return to the application server computer and run the test console application.<br />
A list of products from the Northwind database should be displayed in the<br />
console window.<br />
10. Return to the database server and click the Stop and View Capture button<br />
within Network Monitor.<br />
11. Double-click the first captured frame to view the captured data.
498<br />
<strong>Building</strong> <strong>Secure</strong> <strong>ASP</strong>.<strong>NET</strong> <strong>Applications</strong><br />
12. Scroll down through the captured frames. You should see the SELECT statement<br />
in clear text followed by the list of products retrieved from the database.<br />
13. Assign the <strong>Secure</strong> SQL IPSec policy on both computers:<br />
a. Start Local Security Settings on the application server computer.<br />
b. Click IP Security Policies on Local Machine.<br />
c. In the right pane, right-click <strong>Secure</strong> SQL, and then click Assign.<br />
d. Repeat Steps a – c on the database server computer.<br />
14. In Network Monitor, close the capture window.<br />
15. Click the Start Capture button, and then click No in the Save File message box.<br />
16. Return to the application server computer and run the test console application<br />
once again.<br />
17. Return to the database server computer and click Stop and View Capture within<br />
Network Monitor.<br />
18. Confirm that the data is now unintelligible (because it is encrypted).<br />
19. Close Network Monitor.<br />
Additional Resources<br />
For more information about IPSec, see “IP Security and Filtering” on TechNet<br />
(http://www.microsoft.com/technet/treeview/default.asp?url=/technet/prodtechnol<br />
/winxppro/reskit/prcc_tcp_erqb.asp?frame=true>).<br />
For more information about Network Monitor, see the “Network Monitor” section<br />
of the Microsoft Platform SDK on MSDN (http://msdn.microsoft.com/library<br />
/default.asp?url=/library/en-us/netmon/netmon/network_monitor.asp).
How To:<br />
Use SSL to <strong>Secure</strong> Communication<br />
with SQL Server 2000<br />
You can use the <strong>Secure</strong> Sockets Layer (SSL) protocol to secure the communication<br />
link between clients (direct callers) and Microsoft® SQL Server 2000. When you<br />
configure SQL Server for SSL, all of the data transmitted between client and server<br />
(and vice versa) may be encrypted to ensure that the data remains confidential<br />
while in transit between the client and SQL Server.<br />
Notes<br />
●<br />
●<br />
●<br />
●<br />
●<br />
●<br />
●<br />
SSL is an alternative to using IPSec to secure database traffic.<br />
For more information about how to use IPSec to secure database traffic, see<br />
“How To: Use IPSec to Provide <strong>Secure</strong> Communication Between Two Servers” in<br />
the Reference section of this guide.<br />
Unlike IPSec, configuration changes are not required if the client or server IP<br />
addresses change.<br />
For SSL to work, you must install a server certificate on the database server<br />
computer. The client computer must also have a root certificate authority (CA)<br />
certificate from the same authority.<br />
Clients must have the SQL Server 2000 connectivity libraries installed. Earlier<br />
versions or generic libraries will not work.<br />
SSL only works for TCP/IP (the recommended communication protocol for SQL<br />
Server) and named pipes.<br />
You can configure the server to force the use of encryption for all connections.<br />
On the client, you can:<br />
● Force the use of encryption for all outgoing connections.<br />
● Allow client applications to choose whether or not to use encryption on a<br />
per-connection basis, by using the connection string.
500<br />
<strong>Building</strong> <strong>Secure</strong> <strong>ASP</strong>.<strong>NET</strong> <strong>Applications</strong><br />
Requirements<br />
The following items describe the recommended hardware, software, network<br />
infrastructure, skills and knowledge, and service packs you will need.<br />
● Two computers running the Microsoft Windows® 2000 Server operating system.<br />
● SQL Server 2000 on the database server computer. For this example, the SQL<br />
Server service is assumed to be running as Local System. If the certificate is in<br />
the Local Machine store, SSL should work no matter which account SQL runs<br />
under.<br />
● Microsoft Data Access Components (MDAC) 2.6 or later, or SQL Server 2000<br />
client connectivity libraries on the client computer.<br />
● This example requires access to Microsoft Certificate Services running on<br />
Windows 2000 to allow the creation of server authentication certificates;<br />
however, this is not a requirement.<br />
Summary<br />
This How To includes the following procedures:<br />
1. Install a Server Authentication Certificate<br />
2. Verify that the Certificate Has Been Installed<br />
3. Install the Issuing CA’s Certificate on the Client<br />
4. Force All Clients to Use SSL<br />
5. Allow Clients to Determine Whether to Use SSL<br />
6. Verify that Communication Is Encrypted<br />
1. Install a Server Authentication Certificate<br />
SSL requires that the server possess a server authentication certificate issued by a<br />
certificate authority (CA) that is trusted by connecting clients.<br />
<br />
To install a server certificate<br />
1. Logon to the database server computer using an administrator account.<br />
2. Start Internet Explorer and browse to Microsoft Certificate Services, for example:<br />
http://MyCA/certsrv<br />
3. Click Request a certificate, and then click Next.<br />
4. Click Advanced request, and then click Next<br />
5. Click Submit a certificate request to this CA using a form, and then click Next.
How To: Use SSL to <strong>Secure</strong> Communication with SQL Server 2000 501<br />
6. Fill out the certificate request form noting the following:<br />
a. Enter the fully-qualified domain name of the computer running SQL Server<br />
into the Name field. For example:<br />
sql01.nwtraders.com<br />
b. In the Intended Purpose (or Type of Certificate Needed) field, click Server<br />
Authentication Certificate.<br />
c. For the Cryptographic Service Provider (CSP), click Microsoft RSA SChannel<br />
Cryptographic Provider.<br />
Note: Microsoft Base Cryptographic Provider version 1.0 and Microsoft Enhanced<br />
Cryptographic providers also work. Microsoft Strong Cryptographic Provider does not.<br />
d. Select the Use local machine store check box.<br />
Note: Do NOT select Enable strong private key protection.<br />
7. Click Submit to submit the request.<br />
If the certificate server automatically issues certificates, you can install the<br />
certificate now. Otherwise, you can install the certificate after it has been issued<br />
by the CA administrator by browsing to Microsoft Certificate Services and<br />
selecting Check on a pending certificate.<br />
2. Verify that the Certificate Has Been Installed<br />
This procedure verifies that the server certificate has been installed successfully.<br />
<br />
To verify that the certificate has been installed<br />
1. On the taskbar, click the Start button, and then click Run.<br />
2. Enter mmc, and then click OK.<br />
3. On the Console menu, click Add/Remove Snap-in.<br />
4. Click Add.<br />
5. Click Certificates, and then click Add.<br />
6. Click Computer account, and then click Next.<br />
7. Ensure that Local computer: (the computer this console is running on) is<br />
selected, and then click Finish<br />
8. Click Close, and then click OK.<br />
9. In the left-pane tree view, expand Certificates (Local Computer), expand<br />
Personal, and then select Certificates.
502<br />
<strong>Building</strong> <strong>Secure</strong> <strong>ASP</strong>.<strong>NET</strong> <strong>Applications</strong><br />
10. Verify that there is exactly one certificate with the fully qualified domain name<br />
that you specified in the previous procedure.<br />
You can double-click the certificate to view its details.<br />
3. Install the Issuing CA’s Certificate on the Client<br />
After the certificate has been installed and the SQL Server service has been restarted,<br />
SQL Server can negotiate SSL with clients. Clients that use SSL to connect<br />
to SQL Server must:<br />
● Have MDAC 2.6 or SQL Server 2000 connectivity libraries installed.<br />
● Trust the issuer of the SQL Server’s certificate.<br />
<br />
To install the certificate of the issuing CA on the client computer<br />
1. Log on to the client computer as an administrator.<br />
2. Start Internet Explorer and browse to Microsoft Certificate Services, for example:<br />
http://MyCA/certsrv<br />
3. Click Retrieve the CA certificate or certificate revocation list, and then click<br />
Next.<br />
4. Click Install this CA certification path, and then click Yes in response to the<br />
confirmation dialog to install the root certificate.<br />
4. Force All Clients to Use SSL<br />
You can configure the server to force all clients to use SSL (as described in this<br />
procedure), or you can let clients choose whether or not to use SSL on a perconnection<br />
basis (as described in the next procedure). The advantages of configuring<br />
the server to force clients to use SSL are:<br />
● All communications are guaranteed to be secure.<br />
● Any unsecured connections are rejected.<br />
The disadvantages are:<br />
● All clients must have MDAC 2.6 or SQL Server 2000 connectivity libraries<br />
installed; earlier or generic libraries will fail to connect.<br />
● Connections that you do not need to secure suffer a slight performance overhead<br />
due to the added encryption.
How To: Use SSL to <strong>Secure</strong> Communication with SQL Server 2000 503<br />
<br />
To force all clients to use SSL<br />
1. On the computer running SQL Server, click Server Network Utility in the<br />
Microsoft SQL Server program group.<br />
2. Click to select Force protocol encryption.<br />
3. Verify that TCP/IP and/or named pipes are enabled.<br />
SSL is not supported with other protocols.<br />
4. Click OK to close the SQL Server Network Utility, and then click OK in response<br />
to the SQL Server Network Utility message box.<br />
5. Restart the SQL Server service.<br />
All subsequent client connections will be required to use SSL, whether they<br />
specify secure connections or not.<br />
5. Allow Clients to Determine Whether to Use SSL<br />
This procedure shows you how to configure SSL to allow clients to choose whether<br />
or not to use SSL. You can either configure the client libraries to enforce the use<br />
of SSL on all connections, or you can let individual applications choose on a perconnection<br />
basis. The advantages of configuring the client are:<br />
● The overhead of SSL is incurred only for connections that truly require it.<br />
● Clients that do not support SSL with SQL Server can still connect.<br />
If you adopt this approach, make sure that you are willing to allow unsecured<br />
connections.<br />
<br />
<br />
To reconfigure the server<br />
1. On the computer running SQL Server, run the Server Network Utility.<br />
2. Clear the Force protocol encryption check box.<br />
3. Restart the SQL Server service.<br />
4. Return to the client computer.<br />
To use SSL for all client connections<br />
With this approach, you configure the client libraries to use SSL for all connections.<br />
This means that SQL Servers that do not support encryption and SQL Servers<br />
earlier than SQL Server 2000 will not be accessible.<br />
1. In the Microsoft SQL Server program group, click Client Network Utility.<br />
2. Ensure that TCP/IP and/or named pipes are enabled.<br />
3. Select Force protocol encryption.
504<br />
<strong>Building</strong> <strong>Secure</strong> <strong>ASP</strong>.<strong>NET</strong> <strong>Applications</strong><br />
<br />
To allow applications to choose whether or not to use encryption<br />
With this approach applications use the connection string to determine whether or<br />
not to use encryption. This allows each application to only use encryption when it is<br />
needed.<br />
1. If you are using the OLE-DB data provider to connect to SQL Server, set<br />
Use Encryption for Data to true as shown in the following sample OLE-DB<br />
connection string.<br />
"Provider=SQLOLEDB.1;Integrated Security=SSPI;Persist Security<br />
Info=False;Initial Catalog=Northwind;Data Source=sql01;Use Encryption for<br />
Data=True"<br />
2. If you are using the SQL Server .<strong>NET</strong> data provider to connect to SQL Server, set<br />
Encrypt to true as shown in the following example.<br />
"Server=sql01;Integrated Security=SSPI;Persist Security<br />
Info=False;Database=Northwind;Encrypt=True"<br />
6. Verify that Communication is Encrypted<br />
In this procedure you will use Network Monitor to verify that data sent between the<br />
application server and database server is encrypted. You will start by sending data<br />
in clear text form and then enable encryption first by configuring the server and<br />
then by configuring the client.<br />
<br />
To verify that communication is encrypted<br />
1. On the client computer, use Visual Studio.<strong>NET</strong> to create a new C# Console<br />
Application called SQL<strong>Secure</strong>Client.<br />
2. Copy the following code to class1.cs replacing all of the existing code.<br />
Note: Replace server name in the connection string with the name of your database server.<br />
using System;<br />
using System.Data;<br />
using System.Data.SqlClient;<br />
namespace SQL<strong>Secure</strong>Client<br />
{<br />
class Class1<br />
{<br />
[STAThread]<br />
static void Main(string[] args)<br />
{
How To: Use SSL to <strong>Secure</strong> Communication with SQL Server 2000 505<br />
// Replace the server name in the following connection string with the<br />
// name of your database server<br />
SqlConnection conn = new SqlConnection(<br />
"server='sql01';database=NorthWind;Integrated Security='SSPI'");<br />
}<br />
}<br />
}<br />
SqlCommand cmd = new SqlCommand("SELECT * FROM Products");<br />
try<br />
{<br />
conn.Open();<br />
cmd.Connection = conn;<br />
SqlDataReader reader = cmd.ExecuteReader();<br />
while (reader.Read())<br />
{<br />
Console.WriteLine("{0} {1}",<br />
reader.GetInt32(0).ToString(),<br />
reader.GetString(1) );<br />
}<br />
reader.Close();<br />
}<br />
catch( Exception ex)<br />
{<br />
}<br />
finally<br />
{<br />
conn.Close();<br />
}<br />
3. On the Build menu, click Build Solution.<br />
4. In order for Windows authentication to succeed between the two computers, you<br />
must duplicate the account that you are currently interactively logged on to the<br />
client computer with, on the database server computer. Ensure that the user<br />
name and password matches. An alternative is to use a domain account that is<br />
recognized by both computers.<br />
You must also use SQL Server Enterprise Manager to create a database logon for<br />
the newly created account and add a new database user for this logon to the<br />
Northwind database.<br />
5. On the database server computer, use the SQL Server Network Utility to disable<br />
the use of encryption by ensuring that the Force protocol encryption option is<br />
not selected.<br />
6. On the database server computer, click Network Monitor in the Administrative<br />
Tools program group.
506<br />
<strong>Building</strong> <strong>Secure</strong> <strong>ASP</strong>.<strong>NET</strong> <strong>Applications</strong><br />
Note: A limited version of Network Monitor is available with Windows 2000 Server. A full<br />
version is available with Microsoft SMS.<br />
If you do not have Network Monitor installed, go to Add/Remove Programs in Control<br />
Panel, click Add/Remove Windows Components, select Management and Monitoring<br />
Tools from the Windows Components list, click Details and select Network Monitor Tools.<br />
Click OK, and then click Next, to install the limited version of Network Monitor. You may be<br />
prompted for a Windows 2000 Server CD.<br />
7. On the Capture menu, click Filter to create a new filter configured to view<br />
TCP/IP network traffic sent between the database server and database server.<br />
8. Click the Start Capture button.<br />
9. Return to the client computer and run the test console application. A list of<br />
products from the Northwind database should be displayed in the console<br />
window.<br />
10. Return to the database server and click the Stop and View Capture button<br />
within Network Monitor.<br />
11. Double-click the first captured frame to view the captured data.<br />
12. Scroll down through the captured frames. You should see the SELECT statement<br />
in clear text followed by the list of products retrieved from the database.<br />
13. Now force the use of encryption for all connections by configuring the server<br />
with the SQL Server Network Utility:<br />
a. Use the SQL Server Network Utility to select Force protocol encryption.<br />
b. Stop and restart the SQL Server service.<br />
14. Return to Network Monitor and click the Start Capture button. In the Save File<br />
dialog box, click No.<br />
15. Return to the client computer and run the test console application once again.<br />
16. Return to the database server computer and click Stop and View Capture within<br />
Network Monitor.<br />
17. Confirm that the data is now unintelligible (because it is encrypted).<br />
18. Reconfigure the server to no longer force encryption:<br />
a. Use the SQL Server Network Utility and clear the Force protocol encryption<br />
check box.<br />
b. Stop and restart the SQL Server service.<br />
19. Start a new capture within Network Monitor and rerun the client application.<br />
Confirm that the data is once again in clear text.<br />
20. Return to the client computer and select Client Network Utility from the<br />
Microsoft SQL Server program group.
How To: Use SSL to <strong>Secure</strong> Communication with SQL Server 2000 507<br />
21. Select Force protocol encryption, and then click OK to close the Client Network<br />
Utility.<br />
22. Return to Network Monitor and click the Start Capture button. In the Save File<br />
dialog box, click No.<br />
23. Return to the client computer and run the test console application once again.<br />
24. Return to the database server computer and click Stop and View Capture within<br />
Network Monitor.<br />
25. Confirm that the data is now unintelligible (because it is encrypted).<br />
26. Note that, in all cases, SQL Server sends its server authentication certificate in<br />
the clear to the client at the beginning of the communication sequence. This is<br />
part of the SSL protocol. Note that this occurs even when neither the server nor<br />
the client requires encryption.<br />
Additional Resources<br />
For information about how to install Network Monitor in Windows 2000, go to the<br />
Microsoft Knowledge Base and search for the following articles:<br />
● “HOW TO: Install Network Monitor in Windows 2000 (Q243270)”<br />
●<br />
“HOW TO: Enable SSL Encryption for SQL Server 2000 with Certificate<br />
Server”(Q276553)”<br />
For more information about Network Monitor, see the “Network Manager” section<br />
of the Microsoft Platform SDK on MSDN (http://msdn.microsoft.com/library<br />
/default.asp?url=/library/en-us/netmon/netmon/network_monitor.asp).
Base Configuration<br />
The following table illustrates the base software configuration used during the<br />
development and testing of the <strong>Building</strong> <strong>Secure</strong> <strong>ASP</strong>.<strong>NET</strong> <strong>Applications</strong> Guide.<br />
Base Configuration<br />
Windows 2000 SP3<br />
.<strong>NET</strong> Framework SP2<br />
<strong>ASP</strong>.<strong>NET</strong><br />
Running <strong>ASP</strong>.<strong>NET</strong> on<br />
a domain controller<br />
<strong>ASP</strong>.<strong>NET</strong> Session State<br />
Security Update<br />
Notes<br />
For more information, see the following Knowledge Base article:<br />
“INFO: Determining Whether Service Packs Are Installed on .<strong>NET</strong><br />
Framework” (http://support.microsoft.com<br />
/default.aspx?scid=kb;en-us;Q318785)<br />
The .<strong>NET</strong> Framework Service Pack 2 can be downloaded from:<br />
http://msdn.microsoft.com/netframework/downloads/sp<br />
/default.asp<br />
Notes<br />
In general, it’s not advisable to run your Web server on a domain<br />
controller, because a compromise of the machine is a compromise<br />
of the domain. If you need to run <strong>ASP</strong>.<strong>NET</strong> on a domain controller,<br />
you need to give the <strong>ASP</strong>.<strong>NET</strong> process account appropriate privileges<br />
as outlined in the following Knowledge Base article:<br />
“BUG: <strong>ASP</strong>.<strong>NET</strong> Does Not Work with the Default <strong>ASP</strong><strong>NET</strong> Account on<br />
a Domain Controller” (http://support.microsoft.com<br />
/default.aspx?scid=kb;en-us;q315158)<br />
http://www.microsoft.com/Downloads/Release.asp?ReleaseID=39298<br />
MDAC<br />
Notes<br />
MDAC 2.6 is required Visual Studio .<strong>NET</strong> installs MDAC 2.7<br />
by the .<strong>NET</strong> Framework<br />
SQL Server 2000<br />
SQL Server 2000 SP2<br />
Notes
Configuration Stores and Tools<br />
The combined authentication, authorization, and secure communication services<br />
available to .<strong>NET</strong> Web applications are summarized in the following tables. The<br />
tables show the various security services available to each of the core .<strong>NET</strong> Web<br />
application technologies and for each one indicates where the related security<br />
configuration settings are maintained and what tools are available to edit the<br />
settings.<br />
Note: Settings within the Internet Information Services (IIS) metabase are configured using the<br />
IIS MMC snap-in, or programmatically via script. Settings maintained within machine.config or<br />
web.config can be edited with any text editor (such as Notepad) or XML editor (such as the<br />
Microsoft Visual Studio® .<strong>NET</strong> XML editor).<br />
Table 1: IIS security configuration<br />
Authentication Configuration Tools<br />
Anonymous IIS metabase IIS MMC snap-in<br />
Basic<br />
Digest<br />
Script<br />
Windows Integrated<br />
Client Certificates<br />
Makecert.exe can be used<br />
to create test certificates<br />
Authorization Configuration Tools<br />
NTFS permissions Windows (NTFS) file Windows Explorer<br />
(Windows ACLs) system Cacls.exe<br />
Security templates<br />
Secedit.exe<br />
IP and DNS restrictions IIS metabase Group Policy<br />
<strong>Secure</strong> Communication Configuration Tools<br />
SSL Windows (NTFS) file IIS MMC snap-in<br />
system<br />
Script<br />
IPSec Machine’s local policy Local Security Policy MMC<br />
(registry) or Microsoft<br />
snap-in<br />
Active <strong>Directory</strong>®directory Domain security Policy MMC<br />
service<br />
snap-in<br />
Ipsecpol.exe
512<br />
<strong>Building</strong> <strong>Secure</strong> <strong>ASP</strong>.<strong>NET</strong> <strong>Applications</strong><br />
Table 1: IIS security configuration (continued)<br />
Additional Gatekeepers Configuration Tools<br />
IP address and domain IIS metabase IIS MMC snap-in<br />
name restrictions<br />
Script<br />
Table 2: <strong>ASP</strong>.<strong>NET</strong> security configuration<br />
Authentication Configuration Tools<br />
Windows element Notepad.exe<br />
Forms of machine.config or Visual Studio .<strong>NET</strong><br />
Passport web.config Any XML editor<br />
None (Custom)<br />
Authorization Configuration Tools<br />
URL authorization element of Notepad.exe<br />
Machine.config or<br />
Visual Studio .<strong>NET</strong><br />
Web.config<br />
Any XML editor<br />
File authorization Windows (NTFS) file Windows Explorer<br />
system<br />
Calcs.exe<br />
Active <strong>Directory</strong><br />
Security templates<br />
– or – Secedit.exe<br />
SAM database<br />
Group Policy<br />
– or – For Windows groups, use<br />
Custom data store (for<br />
the Active <strong>Directory</strong> Users<br />
example, SQL Server)<br />
and Computers MMC snapin<br />
or (for local settings) use<br />
the Computer Management<br />
tool<br />
.<strong>NET</strong> roles<br />
ADSI script<br />
Net.exe<br />
For custom groups –<br />
depends on custom data<br />
store<br />
Table 3: Enterprise Services security configuration*<br />
Authentication Configuration Tools<br />
DCOM/RPC authentication COM+ Catalog Component Services MMC<br />
Note: Computer-wide<br />
snap-in<br />
settings for serviced<br />
Script (Catalog automation<br />
component (and regular<br />
objects)<br />
DCOM) proxies is<br />
maintained in<br />
Machine.config.
Configuration Stores and Tools 513<br />
Authorization Configuration Tools<br />
Enterprise Services COM+ Catalog Component Services MMC<br />
(COM+) roles<br />
snap-in<br />
Script (Catalog automation<br />
objects)<br />
Windows ACLs (when Windows (NTFS) file Windows Explorer<br />
using impersonation in system Cacls.exe<br />
serviced component)<br />
Security templates<br />
Secedit.exe<br />
Group Policy<br />
<strong>Secure</strong> Communication Configuration Tools<br />
RPC encryption COM+ Catalog Component Services<br />
(packet privacy) Note: Computer-wide Script (Catalog automation<br />
settings for serviced<br />
objects)<br />
component (and regular<br />
DCOM) proxies is<br />
maintained in<br />
Machine.config.<br />
IPSec Machine’s local policy Local Security Policy MMC<br />
(registry) or Active <strong>Directory</strong> snap-in<br />
Ipsecpol.exe<br />
* The security services for Enterprise Service components apply both to components hosted by server and<br />
library applications. However, certain restrictions apply for library applications because many of the security<br />
defaults are inherited from the host process and as a result are not directly configurable. Process-wide<br />
authentication may also be explicitly switched off by library applications. For more details, see Chapter 9,<br />
“Enterprise Services Security.”<br />
Table 4: Web Services (Implemented using <strong>ASP</strong>.<strong>NET</strong>) security configuration<br />
Authentication Configuration Tools<br />
Windows element Notepad<br />
of Machine.config or<br />
Visual Studio .<strong>NET</strong><br />
Web.config<br />
Any XML editor<br />
Custom Custom data store (for Depends on custom store.<br />
example. SQL Server or<br />
Active <strong>Directory</strong>)
514<br />
<strong>Building</strong> <strong>Secure</strong> <strong>ASP</strong>.<strong>NET</strong> <strong>Applications</strong><br />
Table 4: Web Services (Implemented using <strong>ASP</strong>.<strong>NET</strong>) security configuration (continued)<br />
Authorization Configuration Tools<br />
URL Authorization Web.config Notepad<br />
Visual Studio .<strong>NET</strong><br />
Any XML editor<br />
File Authorization Windows (NTFS) file Windows Explorer<br />
system<br />
Cacls.exe<br />
Security templates<br />
Secedit.exe<br />
Group Policy<br />
.<strong>NET</strong> roles Active <strong>Directory</strong> For Windows groups, use<br />
– or – the Active <strong>Directory</strong> Users<br />
SAM database<br />
and Computers MMC snap-<br />
– or – in or (for local settings) use<br />
Custom data store (for<br />
the Computer Management<br />
example, SQL Server)<br />
tool<br />
<strong>Secure</strong> Communication Configuration Tools<br />
ADSI script<br />
Net.exe<br />
For custom groups<br />
– depends on custom store<br />
SSL IIS metabase IIS MMC snap-in<br />
Script<br />
IPSec Machine’s local policy Local Security Policy MMC<br />
(registry) or Active <strong>Directory</strong> snap-in<br />
Ipsecpol.exe<br />
Table 5: .<strong>NET</strong> Remoting security configuration** (When hosted by <strong>ASP</strong>.<strong>NET</strong> using HTTP Channel)<br />
Authentication Configuration Tools<br />
Windows IIS metabase IIS MMC snap-in Script<br />
Custom Custom data store (for Depends on custom store<br />
example SQL Server)
Configuration Stores and Tools 515<br />
Authorization Configuration Tools<br />
URL authorization Web.config Notepad<br />
Visual Studio .<strong>NET</strong><br />
Any XML editor<br />
File authorization Windows (NTFS) file Windows Explorer<br />
system<br />
Cacls.exe<br />
Security templates<br />
Secedit.exe<br />
Group Policy<br />
.<strong>NET</strong> roles Active <strong>Directory</strong> For Windows groups, use<br />
– or – the Active <strong>Directory</strong> Users<br />
SAM database<br />
and Computers MMC snap-<br />
– or – in or (for local settings) use<br />
Custom data store (for<br />
the Computer Management<br />
example, SQL Server<br />
tool<br />
<strong>Secure</strong> Communication Configuration Tools<br />
ADSI script,<br />
Net.exe<br />
For custom groups –<br />
depends on custom store<br />
SSL IIS metabase IIS MMC snap-in Script<br />
IPSec Machine’s local policy Local Security Policy MMC<br />
(registry) or Active <strong>Directory</strong> snap-in<br />
Ipsecpol.exe<br />
** The security services shown for .<strong>NET</strong> Remoting assumes that the .<strong>NET</strong> remote component is hosted within<br />
<strong>ASP</strong>.<strong>NET</strong> and is using the HTTP channel. No default security services are available to .<strong>NET</strong> remote components<br />
hosted outside of IIS (for example, in a custom Win32 process or Win32 service) using the TCP channel. For<br />
more details, see Chapter 11, “.<strong>NET</strong> Remoting Security.”
516<br />
<strong>Building</strong> <strong>Secure</strong> <strong>ASP</strong>.<strong>NET</strong> <strong>Applications</strong><br />
Table 6: .SQL Server security configuration<br />
Authentication Configuration Tools<br />
Integrated Windows SQL Server SQL Server Enterprise Manager<br />
SQL Server Enterprise Manager<br />
SQL Server standard<br />
SQL Server<br />
authentication<br />
Authorization Configuration Tools<br />
Object permissions SQL Server SQL Server Enterprise Manager<br />
Database roles<br />
Osql.exe (Database script)<br />
Server roles<br />
User defined database<br />
roles<br />
Application roles<br />
<strong>Secure</strong> Communication Configuration Tools<br />
SSL Server’s machine certificate Certificates MMC snap-in<br />
store<br />
Server Network Utility<br />
Client and server registry Client Network Utility<br />
settings<br />
Connection string<br />
IPSec Machine’s local policy Local Security Policy snap-in<br />
(registry) or Active <strong>Directory</strong> Ipsecpol.exe
Reference Hub<br />
This section provides a series of reference links to articles, support roadmaps, and<br />
technology hubs that relate to the core areas covered by the <strong>Building</strong> <strong>Secure</strong> <strong>ASP</strong>.<strong>NET</strong><br />
<strong>Applications</strong> guide. Use this section to help locate additional background reading<br />
and useful articles. This section has a consolidated set of pointers for the following:<br />
● MSDN articles and hubs from MSDN (http://msdn.microsoft.com/)<br />
●<br />
●<br />
●<br />
●<br />
●<br />
●<br />
Knowledge Base articles and roadmaps for support (http://support.microsoft.com/)<br />
Articles and hubs from Microsoft.com (http://www.microsoft.com/)<br />
Seminars from Microsoft Online Seminars (http://www.microsoft.com/seminar/)<br />
Support WebCasts (http://support.microsoft.com/default.aspx?scid=/webcasts)<br />
How To articles on MSDN (http://msdn.microsoft.com/howto/)<br />
For security specific How Tos, see http://msdn.microsoft.com/howto/security.asp.<br />
Articles and resources on GotDotNet (http://www.gotdotnet.com/)<br />
<strong>Search</strong>ing the Knowledge Base<br />
You can search the Microsoft Knowledge Base from two locations:<br />
●<br />
Directly from Microsoft’s Support site (http://support.microsoft.com/)<br />
● Indirectly from MSDN’s search facility (http://msdn.microsoft.com/)<br />
When you search the Knowledge Base, you can supplement your search with<br />
keywords to help refine the articles that appear as a result of your search.<br />
The following example uses the support search site, but similar concepts apply<br />
when searching from MSDN.<br />
<br />
To search the Knowledge Base, from http://support.microsoft.com<br />
1. In the <strong>Search</strong> the Knowledge Base box, select All Microsoft <strong>Search</strong> Topics (the<br />
default selection).<br />
2. In the For solutions containing (optional) box, type your search criteria. You can<br />
use a combination of Knowledge Base keywords and search criteria.<br />
The following list shows some example Knowledge Base keywords:<br />
● kbAspNet – Returns <strong>ASP</strong>.<strong>NET</strong> articles.<br />
●<br />
●<br />
kbAspNet kbSecurity – Returns <strong>ASP</strong>.<strong>NET</strong> articles that discuss security issues.<br />
kbAspNet impersonation – Returns <strong>ASP</strong>.<strong>NET</strong> articles that discuss impersonation.<br />
Note that impersonation is not a keyword; it is simply an additional search criterion,<br />
which helps to refine the search.
518<br />
<strong>Building</strong> <strong>Secure</strong> <strong>ASP</strong>.<strong>NET</strong> <strong>Applications</strong><br />
Tips<br />
●<br />
●<br />
●<br />
To access additional search options, click Show options.<br />
To make sure the search includes all of the words you enter, click All of the<br />
words entered in the Using field.<br />
To limit the age of articles returned from the search, select a value from the<br />
Maximum Age field.<br />
● To show more search results than the default 25, enter a value into the Results<br />
Limit field.<br />
You may find the following Knowledge Base keywords helpful:<br />
● Security: kbSecurity<br />
● Roadmaps: kbArtTypeRoadmap<br />
● How Tos: kbHowToMaster<br />
You can use the preceding keywords in conjunction with the following technology<br />
and product keywords:<br />
● ADO.<strong>NET</strong>: kbAdoNet<br />
● <strong>ASP</strong>.<strong>NET</strong>: kbAspNet<br />
● Enterprise Services: kbEntServ<strong>NET</strong>FRAME<br />
● Web Services: kbWebServices<br />
● Remoting: kbRemoting<br />
.<strong>NET</strong> Security<br />
Hubs<br />
●<br />
●<br />
MSDN: .<strong>NET</strong> Security Hub: http://msdn.microsoft.com/library/default.asp?url=/nhp<br />
/Default.asp?contentid=28001369<br />
GotDotNet: .<strong>NET</strong> Security: http://www.gotdotnet.com/team/clr/about_security.aspx<br />
Active <strong>Directory</strong><br />
Hubs<br />
●<br />
●<br />
Microsoft.com: Active <strong>Directory</strong> information: http://www.microsoft.com/ad/<br />
MSDN Active <strong>Directory</strong> information: http://msdn.microsoft.com/library<br />
/default.asp?url=/nhp/Default.asp?contentid=28000413
Reference Hub 519<br />
Key Notes<br />
●<br />
●<br />
●<br />
Transitive trust is always available between domains in the same forest. Only<br />
“external trusts,” which are not transitive, are available in separate forests in<br />
Windows 2000.<br />
Active <strong>Directory</strong> installations in perimeter networks (also known as DMZ,<br />
demilitarized zones, and screened subnets) should always be in a separate forest,<br />
not just a separate domain. The forest is the security boundary. This concept is<br />
illustrated in Chapter 6, “Extranet Security.”<br />
If you need more than 5,000 members in a group then you need either .<strong>NET</strong><br />
Server (which supports direct group membership of arbitrary sizes) or nested<br />
groups. The Commerce Server 2000 Software Development Kit (SDK) uses nested<br />
groups. However, the SDK is not required.<br />
Articles<br />
●<br />
●<br />
ADO.<strong>NET</strong><br />
Active <strong>Directory</strong> Extranet Adoption Fueled by Internet Scalability and Rapid<br />
Return on Investment: http://www.microsoft.com/PressPass/press/2002/May02<br />
/05-08ADMomentumPR.asp<br />
Netegrity SiteMinder 4.61 with Microsoft Active <strong>Directory</strong> AuthMark Performance:<br />
http://www.mindcraft.com/whitepapers/sm461ad/sm461ad.html<br />
Roadmaps and Overviews<br />
●<br />
●<br />
INFO: Roadmap for Using ADO in .<strong>NET</strong>: http://support.microsoft.com<br />
/default.aspx?scid=kb;EN-US;Q308044<br />
INFO: Roadmap for ADO.<strong>NET</strong> DataSet Objects and XML Web Services<br />
(Q313648): http://support.microsoft.com/default.aspx?scid=kb;en-us;Q313648<br />
Seminars and WebCasts<br />
●<br />
<strong>ASP</strong>.<strong>NET</strong><br />
Advanced ADO.<strong>NET</strong> Online Seminars: http://www.microsoft.com/seminar/<br />
Hubs<br />
●<br />
●<br />
MSDN : <strong>ASP</strong>.<strong>NET</strong> Developer Center: http://msdn.microsoft.com/library<br />
/default.asp?url=/nhp/default.asp?contentid=28000440<br />
Support: <strong>ASP</strong>.<strong>NET</strong> Support Center: http://support.microsoft.com<br />
/default.aspx?scid=fh;EN-US;aspnet
520<br />
<strong>Building</strong> <strong>Secure</strong> <strong>ASP</strong>.<strong>NET</strong> <strong>Applications</strong><br />
Roadmaps and Overviews<br />
●<br />
●<br />
●<br />
●<br />
INFO: <strong>ASP</strong>.<strong>NET</strong> Roadmap:<br />
http://support.microsoft.com/default.aspx?scid=kb;en-us;Q305140<br />
INFO: <strong>ASP</strong>.<strong>NET</strong> Security Overview:<br />
http://support.microsoft.com/default.aspx?scid=kb;EN-US;Q306590<br />
INFO: <strong>ASP</strong>.<strong>NET</strong> HTTP Modules and HTTP Handlers Overview:<br />
http://support.microsoft.com/default.aspx?scid=kb;EN-US;Q307985<br />
INFO: <strong>ASP</strong>.<strong>NET</strong> Configuration Overview:<br />
http://support.microsoft.com/default.aspx?scid=kb;EN-US;Q307626<br />
Knowledge Base<br />
The following keywords help retrieve <strong>ASP</strong>.<strong>NET</strong> articles:<br />
● Show <strong>ASP</strong>.<strong>NET</strong> articles: kbAspNet<br />
● Show <strong>ASP</strong>.<strong>NET</strong> articles related to security: kbAspNet kbSecurity<br />
Articles<br />
●<br />
Managed Security Context in <strong>ASP</strong>.<strong>NET</strong>: http://msdn.microsoft.com/library<br />
/default.asp?url=/nhp/Default.asp?contentid=28000440<br />
How Tos<br />
●<br />
●<br />
●<br />
●<br />
●<br />
●<br />
●<br />
HOW TO: Implement Forms-Based Authentication in Your <strong>ASP</strong>.<strong>NET</strong> Application<br />
by Using C# .<strong>NET</strong>:<br />
http://support.microsoft.com/default.aspx?scid=kb;en-us;Q301240<br />
HOW TO: <strong>Secure</strong> <strong>ASP</strong>.<strong>NET</strong> Application Using Client-Side Certificate:<br />
http://support.microsoft.com/default.aspx?scid=kb;EN-US;Q315588<br />
HOW TO: <strong>Secure</strong> an <strong>ASP</strong>.<strong>NET</strong> Application by Using Windows Security:<br />
http://support.microsoft.com/default.aspx?scid=kb;EN-US;Q315736<br />
HOW TO: Implement Role-Based Security in <strong>ASP</strong>.<strong>NET</strong> App by Using C#:<br />
http://support.microsoft.com/default.aspx?scid=kb;EN-US;Q311495<br />
HOW TO: Create Keys with VB .<strong>NET</strong> for Use in Forms Authentication:<br />
http://support.microsoft.com/default.aspx?scid=kb;EN-US;Q313091<br />
HOW TO: Create Keys w/ C# .<strong>NET</strong> for Use in Forms Authentication:<br />
http://support.microsoft.com/default.aspx?scid=kb;EN-US;Q312906<br />
HOW TO: Control Authorization Permissions in <strong>ASP</strong>.<strong>NET</strong> Application:<br />
http://support.microsoft.com/default.aspx?scid=kb;EN-US;Q316871
Reference Hub 521<br />
●<br />
●<br />
HOW TO: Authenticate Against the Active <strong>Directory</strong> by Using Forms:<br />
http://support.microsoft.com/default.aspx?scid=kb;EN-US;Q316748<br />
HOW TO: Implement Role-Based Security with Forms-Based Authentication in<br />
Your <strong>ASP</strong>.<strong>NET</strong> Application by Using Visual Basic .<strong>NET</strong>:<br />
http://support.microsoft.com/default.aspx?scid=kb;en-us;Q306238<br />
For more <strong>ASP</strong>.<strong>NET</strong> related How Tos, you can search using the following KB<br />
keywords:<br />
● kbAspNet<br />
● kbHowToMaster<br />
Seminars and WebCasts<br />
●<br />
Support WebCast: Microsoft <strong>ASP</strong>.<strong>NET</strong> Security:<br />
http://support.microsoft.com/default.aspx?scid=http://support.microsoft.com<br />
/servicedesks/webcasts/wc112001/wcblurb112001.asp<br />
Enterprise Services<br />
Knowledge Base<br />
●<br />
●<br />
HOW TO: <strong>Search</strong> for Enterprise Services in the Knowledge Base and MSDN:<br />
http://support.microsoft.com/default.aspx?scid=kb;en-us;Q316816<br />
HOWTO: <strong>Search</strong> for COM+ Knowledge Base Articles:<br />
http://support.microsoft.com/default.aspx?scid=kb;EN-US;Q252318<br />
Roadmaps and Overviews<br />
●<br />
●<br />
●<br />
●<br />
INFO: Roadmap for .<strong>NET</strong> Enterprise Services: http://support.microsoft.com<br />
/default.aspx?scid=kb;en-us;Q308672<br />
Serviced Component Overview:<br />
http://msdn.microsoft.com/library/default.asp?url=/library/en-us/cpguide/html<br />
/cpconservicedcomponentoverview.asp<br />
COM+ Integration: How .<strong>NET</strong> Enterprise Services Can Help You Build<br />
Distributed <strong>Applications</strong>:<br />
http://msdn.microsoft.com/library/default.asp?url=/library/en-us/dnmag01/html<br />
/complus0110.asp<br />
Understanding Enterprise Services (COM+) in .<strong>NET</strong>:<br />
http://msdn.microsoft.com/library/default.asp?url=/library/en-us/dndotnet/html<br />
/entserv.asp
522<br />
<strong>Building</strong> <strong>Secure</strong> <strong>ASP</strong>.<strong>NET</strong> <strong>Applications</strong><br />
How Tos<br />
●<br />
●<br />
Q305683 – BETA-HOWTO: Create a Simple Serviced Component that Uses<br />
Transactions in C#: http://kbtools/PreviewWEB/PreviewQ.asp?Q=305683<br />
Q305679 – HOWTO: Sign Your Assembly with a Strong Name Using SN.EXE:<br />
http://kbtools/PreviewWEB/PreviewQ.asp?Q=305679<br />
FAQs<br />
●<br />
Enterprise Services FAQ:<br />
http://www.gotdotnet.com/team/xmlentsvcs/<br />
Seminars and WebCasts<br />
●<br />
●<br />
Support WebCast: Microsoft COM+ and the Microsoft .<strong>NET</strong> Framework:<br />
http://support.microsoft.com/default.aspx?scid=http://support.microsoft.com<br />
/servicedesks/webcasts/wc032202/wcblurb032202.asp<br />
Support WebCast: COM Threading and Application Architecture in COM+<br />
<strong>Applications</strong>:<br />
http://support.microsoft.com/default.aspx?scid=http://support.microsoft.com<br />
/servicedesks/webcasts/wc051801/wcblurb051801.asp<br />
IIS (Internet Information Server)<br />
Hubs<br />
●<br />
●<br />
Remoting<br />
Microsoft.com: IIS : http://www.microsoft.com/iis/<br />
Support: IIS 5 Support Center: IIS http://support.microsoft.com<br />
/default.aspx?scid=fh;EN-US;iis50<br />
Roadmaps and Overviews<br />
●<br />
●<br />
An Introduction to Microsoft .<strong>NET</strong> Remoting Framework:<br />
http://msdn.microsoft.com/library/default.asp?url=/library/en-us/dndotnet/html<br />
/introremoting.asp?frame=true<br />
Microsoft .<strong>NET</strong> Remoting: A Technical Overview:<br />
http://msdn.microsoft.com/library/default.asp?url=/library/en-us/dndotnet/html<br />
/hawkremoting.asp
Reference Hub 523<br />
How Tos<br />
●<br />
●<br />
Remoting Basic and Advanced samples:<br />
http://msdn.microsoft.com/library/default.asp?url=/library/en-us/cpsamples/html<br />
/remoting.asp<br />
IPrincipal remoting sample:<br />
http://staff.develop.com/woodring/dotnet/#remprincipal<br />
Seminars and WebCasts<br />
●<br />
●<br />
SQL Server<br />
Develop Distributed <strong>Applications</strong> using Microsoft .<strong>NET</strong> Remoting: http://<br />
www.microsoft.com/Seminar/Includes/Seminar.asp?Url=/Seminar/en/Developers<br />
/20020531devt1-54/Portal.xml<br />
Support WebCast: Microsoft .<strong>NET</strong> Framework: .<strong>NET</strong> Remoting Essentials<br />
http://support.microsoft.com/default.aspx?scid=http://support.microsoft.com<br />
/servicedesks/webcasts/wc040402/wcblurb040402.asp<br />
Hubs<br />
●<br />
●<br />
MSDN: SQL Server: http://msdn.microsoft.com/library/default.asp?url=/nhp<br />
/Default.asp?contentid=28000409<br />
Support: SQL Server Support Center:<br />
http://support.microsoft.com/default.aspx?scid=fh;EN-US;sql<br />
Seminars and WebCasts<br />
●<br />
Microsoft SQL Server 2000: How to Configure SSL Encryption<br />
http://support.microsoft.com/default.aspx?scid=http://support.microsoft.com<br />
/servicedesks/webcasts/wc042302/wcblurb042302.asp<br />
Visual Studio .<strong>NET</strong><br />
Hubs<br />
●<br />
Support: Visual Studio .<strong>NET</strong> Support Center: http://support.microsoft.com<br />
/default.aspx?scid=fh;EN-US;vsnet<br />
Roadmaps and Overviews:<br />
●<br />
HOW TO: Use the Key Productivity Features in Visual Studio .<strong>NET</strong>:<br />
http://support.microsoft.com/default.aspx?scid=kb;en-us;Q318205
524<br />
<strong>Building</strong> <strong>Secure</strong> <strong>ASP</strong>.<strong>NET</strong> <strong>Applications</strong><br />
Web Services<br />
Hubs<br />
●<br />
MSDN.Microsoft.Com: Web Services:<br />
http://msdn.microsoft.com/library/default.asp?url=/nhp<br />
/Default.asp?contentid=28000442<br />
Roadmaps and Overviews<br />
●<br />
●<br />
●<br />
●<br />
●<br />
INFO: Roadmap for ADO.<strong>NET</strong> DataSet Objects and XML Web Services<br />
(Q313648):<br />
http://support.microsoft.com/default.aspx?scid=kb;en-us;Q313648<br />
INFO: Roadmap for XML Serialization in the .<strong>NET</strong> Framework:<br />
http://support.microsoft.com/default.aspx?scid=kb;EN-US;Q314150<br />
INFO: Roadmap for XML in the .<strong>NET</strong> Framework:<br />
http://support.microsoft.com/default.aspx?scid=kb;EN-US;Q313651<br />
XML Web Services Technology Map:<br />
http://msdn.microsoft.com/library/default.asp?url=/library/en-us/dndotnet/html<br />
/Techmap_websvcs.asp?frame=true<br />
House of Web Services:<br />
http://msdn.microsoft.com/msdnmag/issues/01/11/webserv/webserv0111.asp ;<br />
http://msdn.microsoft.com/msdnmag/issues/02/02/WebServ/WebServ0202.asp<br />
How Tos<br />
● HOW TO: <strong>Secure</strong> XML Web Services with SSL in Windows 2000:<br />
http://support.microsoft.com/default.aspx?scid=kb;EN-US;Q307267<br />
Seminars and WebCasts<br />
● Support WebCast: Microsoft <strong>ASP</strong>.<strong>NET</strong>: Advanced XML Web Services Using<br />
<strong>ASP</strong>.<strong>NET</strong>:<br />
http://support.microsoft.com/default.aspx?scid=http://support.microsoft.com<br />
/servicedesks/webcasts/wc032802/wcblurb032802.asp<br />
● Support WebCast: Microsoft .<strong>NET</strong>: Introduction to Web Services:<br />
http://support.microsoft.com/default.aspx?scid=http://support.microsoft.com<br />
/servicedesks/webcasts/wc012902/wcblurb012902.asp<br />
<strong>Search</strong> Online Seminars at http://www.microsoft.com/seminar/ for:<br />
●<br />
●<br />
How to Migrate Windows DNA <strong>Applications</strong> to .<strong>NET</strong> and XML Web Services<br />
XML Web Services – Authoring, Consuming, Testing and Deploying
Reference Hub 525<br />
●<br />
●<br />
Best Practices for <strong>Building</strong> Web Services with Microsoft Visual Studio .<strong>NET</strong><br />
Advanced Web Services<br />
Windows 2000<br />
Hubs<br />
● Microsoft.com: Windows 2000 :<br />
http://www.microsoft.com/windows2000/default.asp<br />
● Support.Microsoft.Com: Windows 2000 Support Center:<br />
http://support.microsoft.com/default.aspx?scid=fh;EN-US;win2000<br />
● MSDN.Microsoft.Com:<br />
http://msdn.microsoft.com/library/default.asp?url=/nhp<br />
/Default.asp?contentid=28000458<br />
● TechNet.Microsoft.Com:<br />
http://www.microsoft.com/technet/treeview/default.asp?url=/technet/prodtechnol<br />
/windows2000serv/Default.asp
How Does It Work?<br />
This appendix provides additional material to explain in more detail how certain<br />
key concepts and processes discussed within the main body of the guide actually<br />
work.<br />
IIS and <strong>ASP</strong>.<strong>NET</strong> Processing<br />
Note: The information in this section applies to Internet Information Services (IIS) 5, running<br />
on Windows 2000.<br />
<strong>ASP</strong>.<strong>NET</strong> Web applications and Web services are processed by code that executes in<br />
a single instance of the <strong>ASP</strong>.<strong>NET</strong> worker process (aspnet_wp.exe), although on<br />
multi-processor computers, you can configure multiple instances, one per processor.<br />
IIS authenticates callers and creates a Windows access token for the caller. If anonymous<br />
access is enabled within IIS, then a Windows access token for the anonymous<br />
Internet user account (typically, IUSR_MACHINE) is created by IIS.<br />
Requests for <strong>ASP</strong>.<strong>NET</strong> file types are handled by an <strong>ASP</strong>.<strong>NET</strong> ISAPI extension<br />
(aspnet_isapi.dll), which runs in the IIS (inetinfo.exe) process address space. This<br />
uses a named pipe to communicate with the <strong>ASP</strong>.<strong>NET</strong> worker process as shown in<br />
Figure 1. IIS passes the Windows access token that represents the caller to the<br />
<strong>ASP</strong>.<strong>NET</strong> worker process. The <strong>ASP</strong>.<strong>NET</strong> Windows authentication module uses this<br />
to construct a WindowsPrincipal object and the <strong>ASP</strong>.<strong>NET</strong> File authorization module<br />
uses it to perform Windows access checks to ensure the caller is authorized to access<br />
the requested file.<br />
HTTP<br />
Request<br />
IIS<br />
(inetinfo.exe)<br />
Metabase<br />
Application<br />
Mapping<br />
aspnet_isapi.dll<br />
HTTP Request<br />
Named Pipe<br />
<strong>ASP</strong>.<strong>NET</strong> worker<br />
process<br />
(aspnet_wp.exe)<br />
Application<br />
Domain<br />
Authenticated caller’s Windows access token<br />
Figure 1<br />
IIS and <strong>ASP</strong>.<strong>NET</strong> communication
528<br />
<strong>Building</strong> <strong>Secure</strong> <strong>ASP</strong>.<strong>NET</strong> <strong>Applications</strong><br />
Note: Access tokens are process relative. As a result, the <strong>ASP</strong>.<strong>NET</strong> ISAPI DLL running in<br />
inetinfo.exe calls DuplicateHandle to duplicate the token handle into the aspnet_wp.exe<br />
process address space and then passes the handle value through the named pipe.<br />
Application Isolation<br />
Separate application domains within the worker process (one per IIS virtual directory,<br />
or in other words, one per <strong>ASP</strong>.<strong>NET</strong> Web application or Web service) are used<br />
to provide isolation.<br />
This is in contrast to classic <strong>ASP</strong>, where the application protection level, configured<br />
within the IIS metabase determined whether the <strong>ASP</strong> application should execute in<br />
process with IIS (inetinfo.exe), out of process in a dedicated instance of Dllhost.exe,<br />
or in a shared (pooled) instance of Dllhost.exe.<br />
Important: The process isolation level setting within IIS has no affect on the way <strong>ASP</strong>.<strong>NET</strong> Web<br />
applications are processed.<br />
The <strong>ASP</strong>.<strong>NET</strong> ISAPI Extension<br />
The <strong>ASP</strong>.<strong>NET</strong> ISAPI extension (aspnet_isapi.dll) runs in the IIS process address<br />
space (inetinfo.exe) and forwards requests for <strong>ASP</strong>.<strong>NET</strong> file types to the <strong>ASP</strong>.<strong>NET</strong><br />
worker process through a named pipe.<br />
Specific <strong>ASP</strong>.<strong>NET</strong> file types are mapped to the <strong>ASP</strong>.<strong>NET</strong> ISAPI extension by mappings<br />
defined within the IIS metabase. Mappings for standard <strong>ASP</strong>.<strong>NET</strong> file types<br />
(including .aspx, .asmx, .rem, .soap) are established when the .<strong>NET</strong> Framework is<br />
installed.<br />
<br />
To view application mappings<br />
1. From the Administrative Tools programs group, start Internet Information<br />
Services.<br />
2. Right-click the default Web site on your Web server computer, and then click<br />
Properties.<br />
3. Click the Home <strong>Directory</strong> tab, and then click Configuration.<br />
A list of mappings is displayed. You can see which file types are mapped to<br />
Aspnet_isapi.dll<br />
IIS 6.0 and Windows .<strong>NET</strong> Server<br />
IIS 6.0 on Windows .<strong>NET</strong> Server will introduce some significant changes to the<br />
current process arrangement.
How Does It Work? 529<br />
●<br />
●<br />
You will be able to configure multiple application pools, each served by one or<br />
more process instances (w3wp.exe). This will provide additional fault tolerance<br />
and manageability benefits and will allow you to isolate separate applications in<br />
separate processes.<br />
<strong>ASP</strong>.<strong>NET</strong> is integrated with the IIS 6.0 Kernel mode HTTP listener, which will<br />
allow requests to be passed directly from the operating system to the <strong>ASP</strong>.<strong>NET</strong><br />
worker process.<br />
More Information<br />
For more information about IIS6, see the “IIS 6 Overview” article on TechNet<br />
(http://www.microsoft.com/technet/treeview/default.asp?url=/TechNet/prodtechnol/iis<br />
/evaluate/iis6ovw.asp).<br />
<strong>ASP</strong>.<strong>NET</strong> Pipeline Processing<br />
<strong>ASP</strong>.<strong>NET</strong> authentication and authorization mechanisms are implemented using<br />
HTTP module objects, which are invoked as part of the standard <strong>ASP</strong>.<strong>NET</strong> pipeline<br />
processing. Individual Web requests and responses pass through a pipeline of<br />
objects as shown in Figure 2.<br />
From IIS<br />
To IIS<br />
HttpRuntime<br />
HTTP Modules<br />
HTTP Handler<br />
(Request Endpoint)<br />
HttpApplication<br />
WindowsAuthentication<br />
Module<br />
FormsAuthentication<br />
Module<br />
PassportAuthentication<br />
Module<br />
UrlAuthorization<br />
Module<br />
FileAuthorization<br />
Module<br />
PageHandler<br />
HttpContext<br />
AppDomain (one per v-dir)<br />
aspnet_wp.exe<br />
Figure 2<br />
<strong>ASP</strong>.<strong>NET</strong> pipeline processing
530<br />
<strong>Building</strong> <strong>Secure</strong> <strong>ASP</strong>.<strong>NET</strong> <strong>Applications</strong><br />
The <strong>ASP</strong>.<strong>NET</strong> pipeline model consists of an HttpApplication object, various HTTP<br />
module objects, and an HTTP handler object, together with their associated factory<br />
objects, which have been omitted from Figure 2 for clarity. An HttpRuntime object<br />
is used at the start of the processing sequence and an HttpContext object is used<br />
throughout the lifecycle of a request to convey details about the request and response.<br />
The following list explains the responsibilities and operations performed by the<br />
objects associated with the HTTP processing pipeline:<br />
● The HttpRuntime object examines the request received from IIS and dispatches<br />
it to an appropriate instance of the HttpApplication object to process the request.<br />
There is a pool of HttpApplication objects in each application domain in<br />
Aspnet_wp.exe. There is a one-to-one mapping between application domains,<br />
HttpApplication objects and IIS virtual directories. In other words, <strong>ASP</strong>.<strong>NET</strong><br />
treats separate IIS virtual directories as separate applications.<br />
Note: There is one instance of HttpRuntime in every Web application domain.<br />
●<br />
●<br />
●<br />
●<br />
The HttpApplication objects control the pipeline processing. An individual<br />
HttpApplication object is created to handle each simultaneous HTTP request.<br />
HttpApplication objects are pooled for performance reasons.<br />
HTTP module objects are filters that process HTTP request and response messages<br />
as they flow through the pipeline. They can view or alter the content of the<br />
request and response messages. HTTP modules are classes that implement<br />
IHttpModule.<br />
HTTP handler objects are the endpoints for HTTP requests and provide the<br />
request processing for specific file types. For example, one handler processes<br />
requests for *.aspx files while another processes requests for *.asmx files. The<br />
HTTP response message is generated and returned from the HTTP handler.<br />
HTTP handlers are classes that implement IHttpHandler.<br />
An HttpContext object is used throughout the pipeline to represent the current<br />
Web request and response. It is available to all modules in the pipeline and the<br />
handler object at the end of the pipeline. The HttpContext object exposes various<br />
properties including the User property which contains an IPrincipal object that<br />
represents the caller.<br />
The Anatomy of a Web Request<br />
The <strong>ASP</strong>.<strong>NET</strong> ISAPI library (Aspnet_isapi.dll) runs inside the IIS process address<br />
space (Inetinfo.exe). It dispatches requests to the HttpRuntime object within the<br />
<strong>ASP</strong>.<strong>NET</strong> worker process (Aspnet_wp.exe). The following set of actions occurs in<br />
response to each Web request received by <strong>ASP</strong>.<strong>NET</strong>:
How Does It Work? 531<br />
●<br />
●<br />
The HttpRuntime object examines the request and forwards it to an instance of<br />
an HttpApplication object.<br />
There is at least one HttpApplication object instance per application domain (the<br />
objects are pooled) and one application domain per IIS virtual directory. The<br />
initial request for a file in a particular virtual directory results in a new application<br />
domain and a new HttpApplication object being created.<br />
A list of HTTP modules is read from Machine.config (they are contained within<br />
the element). Additional custom HTTP modules can be added to<br />
Web.config for a specific application. The default element within<br />
Machine.config is shown in the following code snippet.<br />
<br />
<br />
<br />
<br />
<br />
<br />
<br />
<br />
<br />
The authentication modules hook the AuthenticateRequest event, while the<br />
authorization modules hook the AuthorizeRequest event.<br />
The request passes through every module in the pipeline, although only a single<br />
authentication module is loaded. This depends on the configuration of the<br />
element in Web.config. For example, the <br />
element that follows results in the WindowsAuthenticationModule being<br />
loaded.<br />
<br />
●<br />
The activated authentication module is responsible for creating an IPrincipal<br />
object and storing it in the HttpContext.User property. This is vital, because the<br />
downstream authorization modules use this IPrincipal object in order to make<br />
authorization decisions.
532<br />
<strong>Building</strong> <strong>Secure</strong> <strong>ASP</strong>.<strong>NET</strong> <strong>Applications</strong><br />
In the absence of authentication (for example, where anonymous access is enabled<br />
within IIS and <strong>ASP</strong>.<strong>NET</strong> is configured with ),<br />
there’s a special non configured module that puts a default anonymous principal<br />
into the HttpContext.User property. As a result, HttpContext.User is always<br />
non-null after authentication.<br />
If you implement a custom authentication module, code within the custom<br />
module must create an IPrincipal object and store it in HttpContext.User,<br />
Note: <strong>ASP</strong>.<strong>NET</strong> also wires up Thread.CurrentPrincipal based on HttpContext.User after the<br />
AuthenticateRequest event.<br />
●<br />
●<br />
●<br />
●<br />
The HttpApplication fires the AuthenticateRequest event, which can be hooked<br />
in global.asax. This allows you to inject custom processing code; for example, to<br />
load the set of roles associated with the current user. However, note that the<br />
WindowsAuthenticationModule does this automatically. The role list is obtained<br />
from the set of Windows groups in which the authenticated Windows user<br />
is a member.<br />
After the appropriate authentication module has finished its processing, the<br />
authorization modules are called if the request hasn’t been aborted.<br />
When the UrlAuthorizationModule is called, it checks for an <br />
tag in Machine.config and Web.config. If present, it retrieves the IPrincipal<br />
object from HttpContext.User and checks to see whether the user is authorized<br />
to access the requested resource using the specified verb (GET, POST, and so on).<br />
If the user is not authorized, the UrlAuthorizationModule calls<br />
HttpApplication.CompleteRequest, which aborts normal message processing.<br />
The UrlAuthorizationModule returns an HTTP 401 status code.<br />
Next, the FileAuthorizationModule is called. It checks whether the IIdentity<br />
object in HttpContext.User.Identity is an instance of the WindowsIdentity class.<br />
If the IIdentity object is not a WindowsIdentity, the FileAuthorizationModule<br />
performs no further processing.<br />
If a WindowsIdentity is present, the FileAuthorizationModule calls the<br />
AccessCheck API (through P/Invoke) to see if the authenticated caller (whose<br />
access token has been passed to <strong>ASP</strong>.<strong>NET</strong> by IIS and is exposed by the<br />
WindowsIdentity object) is authorized to access the requested file. If the file’s<br />
security descriptor contains at least a Read ACE in its DACL, the request is<br />
allowed to proceed. Otherwise the FileAuthorizationModule calls<br />
HttpApplication.CompleteRequest and returns a 401 status code.
How Does It Work? 533<br />
Forms Authentication Processing<br />
The FormsAuthenticationModule is activated when the following element is in<br />
Web.config.<br />
<br />
Remember that for Forms authentication, you implement the<br />
Application_Authenticate event in Global.asax. For Forms authentication, the<br />
following sequence occurs:<br />
● Within this code, you can construct an IPrincipal object and store it in<br />
HttpContext.User. This typically contains the role list retrieved from a custom<br />
data store (normally a SQL Server database or Active <strong>Directory</strong>). The IPrincipal<br />
object is typically an instance of the GenericPrincipal class but could also be a<br />
custom IPrincipal class.<br />
The FormsAuthenticationModule checks to see if you have created an<br />
IPrincipal object. If you have, it is used by the downstream authorization<br />
modules. If you haven’t, the FormsAuthenticationModule constructs a<br />
GenericPrincipal (with no roles) and stores it in the context.<br />
If there is no role information, any authorization checks (such as<br />
PrincipalPermssion demands) that demand role membership, will fail.<br />
●<br />
The UrlAuthorizationModule handles the AuthorizeRequest event. Its<br />
authorization decisions are based on the IPrincipal object contained within<br />
HttpContext.User.<br />
Windows Authentication Processing<br />
The WindowsAuthenticationModule is activated when the following element is in<br />
Web.config.<br />
<br />
For Windows authentication, the following sequence occurs:<br />
1. The WindowsAuthenticationModule creates a WindowsPrincipal object using<br />
the Windows access token passed to <strong>ASP</strong>.<strong>NET</strong> by IIS.<br />
2. It uses P/Invoke to call Win32 functions to obtain the list of Windows group that<br />
the user belongs to. These are used to populate the WindowsPrincipal role list.<br />
3. It stores the WindowsPrincipal object in HttpContext.User, ready to be used by<br />
the downstream authorization modules.
534<br />
<strong>Building</strong> <strong>Secure</strong> <strong>ASP</strong>.<strong>NET</strong> <strong>Applications</strong><br />
Event Handling<br />
The HttpApplication object fires the set of events shown in Table 1. Individual<br />
HTTP modules can hook these events (by providing their own event handlers).<br />
Table 1: Events fired by HttpApplication objects<br />
Event<br />
BeginRequest<br />
AuthenticateRequest<br />
AuthorizeRequest<br />
ResolveRequestCache<br />
AcquireRequestState<br />
PreRequestHandlerExecute<br />
PostRequestHandlerExecute<br />
ReleaseRequestState<br />
UpdateRequestCache<br />
EndRequest<br />
PreSendRequestHeaders<br />
PreSendRequestContent<br />
Notes<br />
Fired before request processing starts<br />
To authenticate the caller<br />
To perform access checks<br />
To get a response from the cache<br />
To load session state<br />
Fired immediately before the request is sent to the handler<br />
object<br />
Fired immediately after the request is sent to the handler<br />
object<br />
To store session state<br />
To update the response cache<br />
Fired after processing ends<br />
Fired before buffered response headers are sent<br />
Fired before buffered response body sent<br />
Note: The HTTP handler executes in between the PreRequestHandlerExecute and<br />
PostRequestHandlerExecute events.<br />
The last two events are non-deterministic and could occur at any time (for example, as a result<br />
of a Response.Flush). All other events are sequential.<br />
You do not need to implement an HTTP module simply in order to hook one of<br />
these events. You can also add event handlers to Global.asax. In addition to the<br />
events listed in Table 1 (which can all be hooked by individual HTTP module<br />
objects), the HttpApplication object fires Application_OnStart and<br />
Application_OnEnd handlers, which will be familiar to <strong>ASP</strong> developers. These can<br />
be handled only within Global.asax. Finally, you can also implement custom event<br />
handlers within Global.asax for events fired by individual HTTP module objects.<br />
For example, the session state module fires Session_OnStart and Session_OnEnd<br />
events.
How Does It Work? 535<br />
Implementing a Custom HTTP Module<br />
<br />
To create your own HTTP module and insert it into the <strong>ASP</strong>.<strong>NET</strong> processing pipeline<br />
1. Create a class that implements IHttpModule.<br />
2. Place the assembly that contains the module in your application’s \bin<br />
subdirectory or you can install it into the Global Assembly Cache.<br />
3. Add an element to your application’s web.config, as shown<br />
below.<br />
<br />
<br />
<br />
<br />
<br />
Implementing a Custom HTTP Handler<br />
You may need to implement a custom HTTP handler, for example to handle the<br />
processing of files with the .data file extension.<br />
<br />
To implement a custom HTTP handler<br />
1. Add a mapping to the IIS metabase to map the .data file extension to the<br />
<strong>ASP</strong>.<strong>NET</strong> ISAPI extension (Aspnet_isapi.dll).<br />
Right-click your application’s virtual directory in the IIS MMC snap-in, click the<br />
Configuration button, and then click Add to create a new mapping for .data files<br />
to C:\Winnt\Microsoft.<strong>NET</strong>\Framework\v1.0.3705\aspnet_isapi.dll.<br />
Note: If you select the Check that file exists check box when adding the mapping, then<br />
the file must be physically present. This is usually what is wanted unless you have<br />
virtualized paths that don’t map to a physical file. Virtualized paths ending with .rem or<br />
.soap are used by .<strong>NET</strong> Remoting.<br />
2. Create a class that implements IHttpHandler (and optionally<br />
IHttpAsyncHandler if you want to handle requests asynchronously).<br />
3. Place the assembly that contains the handler in your application’s \bin<br />
subdirectory or you can install it into the Global Assembly Cache.<br />
4. Add the handler to the processing pipeline by adding an <br />
section to your application’s Web.config file.<br />
<br />
<br />
<br />
<br />
<strong>ASP</strong>.<strong>NET</strong> Identity Matrix<br />
Principal objects implement the IPrincipal interface and represent the security<br />
context of the user on whose behalf the code is running. The principal object<br />
includes the user’s identity (as a contained IIdentity object) and any roles to which<br />
the user belongs.<br />
<strong>ASP</strong>.<strong>NET</strong> provides the following principal and identity object implementations:<br />
● WindowsPrincipal and WindowsIdentity objects represent users who have been<br />
authenticated with Windows authentication. With these objects, the role list is<br />
automatically obtained from the set of Windows groups to which the Windows<br />
user belongs.<br />
● GenericPrincipal and GenericIdentity objects represent users who have been<br />
authenticated using Forms authentication or other custom authentication<br />
mechanisms. With these objects, the role list is obtained in a custom manner,<br />
typically from a database.<br />
● FormsIdentity and PassportIdentity objects represent users who have been<br />
authenticated with Forms and Passport authentication respectively.<br />
The following tables illustrate, for a range of IIS authentication settings, the<br />
resultant identity that is obtained from each of the variables that maintain an<br />
IPrincipal and/or IIdentity object. The following abbreviations are used in<br />
the table:<br />
● HttpContext = HttpContext.Current.User, which returns an IPrincipal object<br />
that contains security information for the current Web request. This is the<br />
authenticated Web client.<br />
● WindowsIdentity = WindowsIdentity.GetCurrent(), which returns the identity<br />
of the security context of the currently executing Win32 thread.<br />
● Thread = Thread.CurrentPrincipal which returns the principal of the currently<br />
executing .<strong>NET</strong> thread which rides on top of the Win32 thread.
538<br />
<strong>Building</strong> <strong>Secure</strong> <strong>ASP</strong>.<strong>NET</strong> <strong>Applications</strong><br />
Table 1: IIS Anonymous Authentication<br />
Web.config Settings Variable Location Resultant Identity<br />
HttpContext -<br />
WindowsIdentity MACHINE\IUSR_MACHINE<br />
Thread -<br />
HttpContext -<br />
WindowsIdentity MACHINE\<strong>ASP</strong><strong>NET</strong><br />
Thread -<br />
HttpContext Name provided by user<br />
WindowsIdentity MACHINE\IUSR_MACHINE<br />
Thread<br />
Name provided by user<br />
HttpContext Name provided by user<br />
WindowsIdentity MACHINE\<strong>ASP</strong><strong>NET</strong><br />
Thread<br />
Name provided by user<br />
Table 2: IIS Basic Authentication<br />
Web.config Settings Variable Location Resultant Identity<br />
HttpContext Domain\UserName<br />
WindowsIdentity Domain\UserName<br />
Thread<br />
Domain\UserName<br />
HttpContext Domain\UserName<br />
WindowsIdentity MACHINE\<strong>ASP</strong><strong>NET</strong><br />
Thread<br />
Domain\UserName<br />
HttpContext Name provided by user<br />
WindowsIdentity Domain\UserName<br />
Thread<br />
Name provided by user<br />
HttpContext Name provided by user<br />
WindowsIdentity MACHINE\<strong>ASP</strong><strong>NET</strong><br />
Thread<br />
Name provided by user
<strong>ASP</strong>.<strong>NET</strong> Identity Matrix 539<br />
Table 3: IIS Digest Authentication<br />
Web.config Settings Variable Location Resultant Identity<br />
HttpContext Domain\UserName<br />
WindowsIdentity Domain\UserName<br />
Thread<br />
Domain\UserName<br />
HttpContext Domain\UserName<br />
WindowsIdentity MACHINE\<strong>ASP</strong><strong>NET</strong><br />
Thread<br />
Domain\UserName<br />
HttpContext Name provided by user<br />
WindowsIdentity Domain\UserName<br />
Thread<br />
Name provided by user<br />
HttpContext Name provided by user<br />
WindowsIdentity MACHINE\<strong>ASP</strong><strong>NET</strong><br />
Thread<br />
Name provided by user<br />
Table 4: IIS Integrated Windows<br />
Web.config Settings Variable Location Resultant Identity<br />
HttpContext Domain\UserName<br />
WindowsIdentity Domain\UserName<br />
Thread<br />
Domain\UserName<br />
HttpContext Domain\UserName<br />
WindowsIdentity MACHINE\<strong>ASP</strong><strong>NET</strong><br />
Thread<br />
Domain\UserName<br />
HttpContext Name provided by user<br />
WindowsIdentity Domain\UserName<br />
Thread<br />
Name provided by user<br />
HttpContext Name provided by user<br />
WindowsIdentity MACHINE\<strong>ASP</strong><strong>NET</strong><br />
Thread<br />
Name provided by user
Cryptography and Certificates<br />
Keys and Certificates<br />
Asymmetric encryption uses a public/private key pair. Data encrypted with the<br />
private key can be decrypted only with the corresponding public key and vice<br />
versa.<br />
Public keys (as their name suggests) are made generally available. Conversely, a<br />
private key remains private to a specific individual. The distribution mechanism by<br />
which public keys are transported to users is a certificate. Certificates are normally<br />
signed by a certification authority (CA) in order to confirm that the public key is<br />
from the subject who claims to have sent the public key. The CA is a mutually<br />
trusted entity.<br />
The typical implementation of digital certification involves a process for signing the<br />
certificate. The process is shown in Figure 1.<br />
(1) Certificate Request<br />
(inc name + public key)<br />
Certification<br />
Authority<br />
(CA)<br />
Alice<br />
(3) Alice sends<br />
certificate to Bob<br />
(providing access to<br />
Alice’s public key)<br />
Figure 1<br />
Digital certification process<br />
(2) Message<br />
(signed with<br />
CA’s private key)<br />
Bob<br />
(4) Verify<br />
CA<br />
signature<br />
The sequence of events shown in Figure 1 is as follows:<br />
1. Alice sends a signed certificate request containing her name, her public key, and<br />
perhaps some additional information to a CA.<br />
2. The CA creates a message from Alice’s request. The CA signs the message with<br />
its private key, creating a separate signature. The CA returns the message and the<br />
signature, to Alice. Together, the message and signature form Alice’s certificate.
542<br />
<strong>Building</strong> <strong>Secure</strong> <strong>ASP</strong>.<strong>NET</strong> <strong>Applications</strong><br />
3. Alice sends her certificate to Bob to give him access to her public key.<br />
4. Bob verifies the certificate’s signature, using the CA’s public key. If the signature<br />
proves valid, he accepts the public key in the certificate as Alice’s public key.<br />
As with any digital signature, any receiver with access to the CA’s public key can<br />
determine whether a specific CA signed the certificate. This process requires no<br />
access to any secret information. The preceding scenario assumes that Bob has<br />
access to the CA’s public key. Bob would have access to that key if he has a copy<br />
of the CA’s certificate that contains that public key.<br />
X.509 Digital Certificates<br />
X.509 digital certificates include not only a user’s name and public key, but also<br />
other information about the user. These certificates are more than stepping stones<br />
in a digital hierarchy of trust. They enable the CA to give a certificate’s receiver a<br />
means of trusting not only the public key of the certificate’s subject, but also that<br />
other information about the certificate’s subject. That other information can include,<br />
among other things, an e-mail address, an authorization to sign documents of a<br />
given value, or the authorization to become a CA and sign other certificates.<br />
X.509 certificates and many other certificates have a valid time duration. A certificate<br />
can expire and no longer be valid. A CA can revoke a certificate for a number<br />
of reasons. To handle revocations, a CA maintains and distributes a list of revoked<br />
certificates called a Certificate Revocation List (CRL). Network users access the CRL<br />
to determine the validity of a certificate.<br />
Certificate Stores<br />
Certificates are stored in safe locations called a certificate stores. A certificate store<br />
can contain certificates, CRLs, and Certificate Trust Lists (CTLs). Each user has a<br />
personal store (called the “MY store”) where that user’s certificates are stored. The<br />
MY store can be physically implemented in a number of locations including the<br />
registry, on a local or remote computer, a disk file, a data base, a directory service,<br />
a smart device, or another location.<br />
While any certificate can be stored in the MY store, this store should be reserved for<br />
a user’s personal certificates, that is the certificates used for signing and decrypting<br />
that particular user’s messages.<br />
In addition to the MY store, Windows also maintains the following certificate stores:<br />
● CA and ROOT. This store contains the certificates of certificate authorities that<br />
the user trusts to issue certificates to others. A set of trusted CA certificates are<br />
supplied with the operating system and others can be added by administrators.<br />
● Other. This store contains the certificates of other people to whom the user<br />
exchanges signed messages.
Cryptography and Certificates 543<br />
The CryptoAPI provides functions to manage certificates. These APIs can be<br />
accessed only through unmanaged code. Also, CAPICOM is a COM-based API for<br />
the CryptoAPI, which can be accessed via COM Interop.<br />
More Information<br />
For more information, see “Cryptography, CryptoAPI, and CAPICOM” on MSDN<br />
(http://msdn.microsoft.com/library/default.asp?url=/library/en-us/security/Security<br />
/cryptography_cryptoapi_and_capicom.asp).<br />
Cryptography<br />
Cryptography is used to provide the following:<br />
●<br />
●<br />
●<br />
Confidentiality. To ensure data remains private. Confidentiality is usually<br />
achieved using encryption. Encryption algorithms (that use encryption keys)<br />
are used to convert plain text into cipher text and the equivalent decryption<br />
algorithm is used to convert the cipher text back to plain text. Symmetric<br />
encryption algorithms use the same key for encryption and decryption, while<br />
asymmetric algorithms use a public/private key pair.<br />
Data integrity. To ensure data is protected from accidental or deliberate<br />
(malicious) modification. Integrity is usually provided by message<br />
authentication codes or hashes. A hash value is a fixed length numeric value<br />
derived from a sequence of data. Hash values are used to verify the integrity<br />
of data sent through insecure channels. The hash value of received data is<br />
compared to the hash value of the data as it was sent to determine if the data<br />
was altered.<br />
Authentication. To assure that data originates from a particular party. Digital<br />
certificates are used to provide authentication. Digital signatures are usually<br />
applied to hash values as these are significantly smaller than the source data that<br />
they represent.<br />
Technical Choices<br />
●<br />
●<br />
●<br />
●<br />
Use a hash when you want a way of verifying that data has not been tampered<br />
with in transit.<br />
Use a keyed hash when you want to prove that an entity knows a secret without<br />
sending the secret back and forth, or you want to defend against interception<br />
during transit by using a simple hash.<br />
Use encryption when you want to hide data when being sent across an insecure<br />
medium or when making the data persistent.<br />
Use a certificate when you want to verify the person claiming to be the owner of<br />
the public key.
544<br />
<strong>Building</strong> <strong>Secure</strong> <strong>ASP</strong>.<strong>NET</strong> <strong>Applications</strong><br />
●<br />
●<br />
●<br />
●<br />
Use symmetric encryption for speed and when both parties share the key in<br />
advance.<br />
Use asymmetric encryption when you want to safely exchange data across an<br />
insecure medium.<br />
Use a digital signature when you want authentication and non-repudiation.<br />
Use a salt value (a cryptographically generated random number) to defend<br />
against dictionary attacks.<br />
Cryptography in .<strong>NET</strong><br />
The System.Security.Cryptography namespace provides cryptographic services,<br />
including secure encoding and decoding of data, hashing, random number generation,<br />
and message authentication.<br />
The .<strong>NET</strong> Framework provides implementations of many standard cryptographic<br />
algorithms and these can be easily extended because of the well defined inheritance<br />
hierarchy consisting of abstract classes that define the basic algorithm types —<br />
symmetric, asymmetric and hash algorithms, together with algorithm classes.<br />
Table 1: Shows the algorithms for which the .<strong>NET</strong> Framework provides implementation classes<br />
“out of the box.”<br />
Symmetric Algorithms Asymmetric Algorithms Hash Algorithms<br />
DES (Data Encryption Standard) DSA (Digital Signature HMAC SHA1 (Hash-based<br />
Algorithm)<br />
Message Authentication<br />
Code using the SHA1 hash<br />
algorithm)<br />
TripleDES (Triple Data RSA MAC Triple DES (Message<br />
Encryption Standard)<br />
Authentication Code using<br />
Triple DES)<br />
Rijndael<br />
RC2<br />
MD5<br />
SHA1, SHA256, SHA384,<br />
SHA512 (<strong>Secure</strong> Hash<br />
Algorithm using various<br />
hash sizes)
Cryptography and Certificates 545<br />
Symmetric Algorithm Support<br />
.<strong>NET</strong> provides the following implementation classes that provide symmetric, secret<br />
key encryption algorithms:<br />
● DESCryptoServiceProvider<br />
● RC2CryptoServiceProvider<br />
● RijndaelManaged<br />
● TripleDESCryptoServiceProvider<br />
Note: The classes that end with “CryptoServiceProvider” are wrappers that use the underlying<br />
services of the cryptographic service provider (CSP) and the classes that end with “Managed”<br />
are implemented in managed code.<br />
Figure 2 shows the inheritance hierarchy adopted by the .<strong>NET</strong> Framework. The<br />
algorithm type base class (for example, SymmetricAlgorithm) is abstract. A set of<br />
abstract algorithm classes derive from the abstract type base class. Algorithm<br />
implementation classes provide concrete implementations of the selected algorithm;<br />
for example DES, Triple-DES, Rijndael and RC2.<br />
Abstract Base<br />
Class<br />
Abstract<br />
Algorithm<br />
Classes<br />
SymmetricAlgorithm<br />
DES TripleDes Rijndael RC2<br />
Abstract<br />
Implementation<br />
Classes<br />
DESCrypto<br />
ServiceProvider<br />
TripleDESCrypto<br />
ServiceProvider<br />
Rijndael<br />
Managed<br />
RC2Crypto<br />
ServiceProvider<br />
Figure 2<br />
The symmetric crypto class inheritance hierarchy<br />
Asymmetric Algorithm Support<br />
.<strong>NET</strong> provides following asymmetric (public/private key) encryption algorithms<br />
through the abstract base class<br />
(System.Security.Crytography.AsymmetricAlgorithm):<br />
●<br />
●<br />
DSACryptoServiceProvider<br />
RSACryptoServiceProvider
546<br />
<strong>Building</strong> <strong>Secure</strong> <strong>ASP</strong>.<strong>NET</strong> <strong>Applications</strong><br />
These are used to digitally sign and encrypt data. Figure 3 shows the inheritance<br />
hierarchy.<br />
Abstract Base<br />
Class<br />
AsymmetricAlgorithm<br />
Abstract<br />
Algorithm<br />
Classes<br />
DSA<br />
RSA<br />
Abstract<br />
Implementation<br />
Classes<br />
DESCrypto<br />
ServiceProvider<br />
RSACrypto<br />
ServiceProvider<br />
Figure 3<br />
The asymmetric crypto class inheritance hierarchy<br />
Hashing Algorithm Support<br />
.<strong>NET</strong> provides following hash algorithms:<br />
● SHA1, SHA256, SHA384, SHA512<br />
● MD5<br />
● HMACSHA (Keyed Hashed algorithm)<br />
● MACTripleDES (Keyed Hashed algorithm)<br />
Figure 4 shows the inheritance hierarchy for the hash algorithm classes.<br />
Abstract Base<br />
Class<br />
Abstract<br />
Algorithm<br />
Classes<br />
HashAlgorithm<br />
KeyedHashAlgorithm MD5 SHA1 SHA256 SHA384 SHA512<br />
Abstract<br />
Implementation<br />
Classes<br />
HMACSHA1<br />
MacTripleDES<br />
MD5Crypto<br />
ServiceProvider<br />
SHA256Managed SHA512Managed<br />
SHA1Managed SHA384Managed<br />
SHA1Crypto<br />
ServiceProvider<br />
Figure 4<br />
The hash crypto class inheritance hierarchy
Cryptography and Certificates 547<br />
Summary<br />
Cryptography is an important technology for building secure Web applications.<br />
This appendix has covered some of the fundamentals of certificates and<br />
cryptography and has introduced some of the classes exposed by the<br />
System.Security.Cryptography namespace, which enable you to more easily<br />
incorporate cryptographic security solutions into your .<strong>NET</strong> applications.<br />
For more information about cryptography in .<strong>NET</strong>, search MSDN for the page<br />
entitled “.<strong>NET</strong> Framework Cryptography Model.”
.<strong>NET</strong> Web Application Security<br />
The technologies that fall under the umbrella of the .<strong>NET</strong> security framework<br />
include:<br />
● IIS<br />
● <strong>ASP</strong>.<strong>NET</strong><br />
● Enterprise Services<br />
● Web Services<br />
● .<strong>NET</strong> Remoting<br />
● SQL Server<br />
These are illustrated in Figure 1.<br />
Clients<br />
IIS<br />
Web Server<br />
IIS<br />
Authentication<br />
Anonymous<br />
Basic<br />
Digest<br />
Integrated<br />
Certificates<br />
Authorization<br />
NTFS Perms<br />
IP Restrictions<br />
<strong>Secure</strong> Communication (SSL / IPSec)<br />
IIS<br />
<strong>ASP</strong>.<strong>NET</strong><br />
Web<br />
Services<br />
<strong>ASP</strong>.<strong>NET</strong><br />
Enterprise<br />
Services<br />
(COM+)<br />
IIS<br />
<strong>ASP</strong>.<strong>NET</strong><br />
.<strong>NET</strong><br />
Remoting<br />
Authentication<br />
Windows<br />
Forms<br />
Passport<br />
None (Custom)<br />
Authentication<br />
RPC<br />
<strong>ASP</strong>.<strong>NET</strong><br />
Authorization<br />
URL Auth<br />
File Auth<br />
.<strong>NET</strong> Roles<br />
Enterprise Services<br />
Authorization<br />
COM+ Roles<br />
NTFS Perms<br />
SQL Server<br />
Database Server<br />
SQL Server<br />
Authentication<br />
Windows<br />
SQL Auth<br />
Authorization<br />
Logins<br />
Object Perms<br />
Dbase Roles<br />
User Roles<br />
App Roles<br />
Figure 1<br />
The .<strong>NET</strong> Web application security framework
Glossary<br />
A<br />
access control entry (ACE)<br />
An access control entry (ACE) identifies a specific user or user group within an<br />
access control list and specifies the access rights for the user or user group. An<br />
individual ACE may explicitly deny or permit rights.<br />
access control list (ACL)<br />
An access control list (ACL) is an ordered list of access control entries (ACEs)<br />
attached to a securable object. The Windows operating system uses two types of<br />
ACL; a discretionary access control list (DACL) used to specify the access rights<br />
of a user or user group and a system access control list (SACL) used to determine<br />
when specific types of access should generate audit messages.<br />
access right<br />
An access right is an attribute of an access token that determines the type of<br />
operation that a particular Windows group or user can perform on a secured<br />
object. Example access rights include read, write, delete, execute, and so on.<br />
access token<br />
An access token is a data structure attached to every Windows process. It maintains<br />
security context information for the process, which includes a user SID identifying<br />
the principal whom the logon session represents, and authorization attributes<br />
including the user’s group SIDs and privileges.<br />
Every access token is associated with exactly one logon session, while a logon<br />
session may contain multiple access tokens; one for each process started within the<br />
logon session and optionally, additional thread tokens attached to individual<br />
threads.<br />
account<br />
An account is an entry in the security database that maintains the security attributes<br />
of an individual principal. The security database may either be the SAM database or<br />
Active <strong>Directory</strong>.<br />
Accounts may either be domain accounts or local accounts.<br />
Active <strong>Directory</strong><br />
Active <strong>Directory</strong> is the LDAP directory service used by the Windows 2000 operating<br />
system.
552<br />
<strong>Building</strong> <strong>Secure</strong> <strong>ASP</strong>.<strong>NET</strong> <strong>Applications</strong><br />
anonymous authentication<br />
Anonymous authentication is a form of IIS authentication in which IIS makes no<br />
attempt to prove the identity of its clients. Anonymous authentication is akin to no<br />
authentication. It is often used in conjunction with <strong>ASP</strong>.<strong>NET</strong> Forms authentication<br />
which uses an HTML form to capture the client’s credentials.<br />
application server<br />
An application server is a dedicated server computer, separate from a front-end<br />
Web server. The application server typically hosts Web services, remote components,<br />
and/or Enterprise Services applications that contain the majority of an<br />
application’s business logic.<br />
authentication<br />
Authentication is the process of proving identity. For example, when you log on to<br />
Windows, the operating system authenticates you by requesting your credentials;<br />
a user name and password. When a process (a type of principal), acting on your<br />
behalf connects to a remote computer, it uses a cached set of credentials to answer<br />
network authentication requests.<br />
authority<br />
An authority is a trusted entity (organization or computer) that is used to provide<br />
authentication services.<br />
authorization<br />
Authorization is the process of determining whether or not an authenticated identity<br />
is allowed to access a requested resource or perform a requested operation.<br />
B<br />
Base 64 encoding<br />
Base 64 encoding is a well-defined method for rendering binary data as printable<br />
ASCII text, suitable for use with text-based protocols such as HTTP. It is not<br />
encryption.<br />
Basic authentication<br />
Basic authentication is part of the HTTP 1.0 protocol. It is widely used because it is<br />
implemented by virtually all Web servers and Web browsers. Basic authentication<br />
is a simple authentication mechanism that does not involve cryptography or challenge/response<br />
handshaking. Instead, a principal’s credentials (user name and<br />
password) are passed directly from client to server. Basic authentication is insecure<br />
unless combined with SSL, because the password is not encrypted before it is<br />
passed across the network. It is transmitted using Base 64 encoding, so the clear text<br />
password is easily obtainable.
Glossary 553<br />
C<br />
certificate<br />
A certificate is a digitally signed data structure that contains information about a<br />
subject (person or application) and the subject’s public key. Certificates are issued<br />
by trusted organizations called certification authorities (CAs) after the CA has<br />
verified the identity of the subject.<br />
certificate authentication<br />
Certificate authentication is a form of IIS authentication in which IIS accepts clientcertificates<br />
used to prove the client’s identity. Using this form of authentication, IIS<br />
can optionally map a client certificate to a Windows user account by using an<br />
internal mapping table or Active <strong>Directory</strong>.<br />
certificate revocation list (CRL)<br />
A CRL is a document that is maintained and published by a certification authority<br />
(CA) that lists certificates issued by the CA that are no longer valid.<br />
certificate store<br />
A certificate store is a storage location for certificates, certificate revocation lists<br />
(CRLs) and certificate trust lists (CTL).<br />
certification authority (CA)<br />
A CA is a trusted organization or entity that issues certificates.<br />
code access security<br />
Code access security is a form of .<strong>NET</strong> security that is used to control the access that<br />
code has to protected resources.<br />
clear text<br />
Clear text is data that has not been encrypted.<br />
cipher<br />
Cipher is a cryptographic algorithm used to encrypt data.<br />
cipher text<br />
Cipher text is data that has been encrypted.<br />
client certificate<br />
A client certificate is a certificate used by clients to provide positive identification of<br />
their identity to server applications.<br />
confidentiality<br />
See privacy.
554<br />
<strong>Building</strong> <strong>Secure</strong> <strong>ASP</strong>.<strong>NET</strong> <strong>Applications</strong><br />
credentials<br />
Credentials are the set of items that a principal uses to prove its identity. A user<br />
name and password are a common example of a set of credentials.<br />
cryptography<br />
Cryptography is the art and science of information security. It encompasses<br />
confidentiality, integrity, and authentication.<br />
D<br />
declarative authorization<br />
Declarative authorization is a form of authorization applied through the use of<br />
attributes. For example, .<strong>NET</strong> provides the PrincipalPermissionAttribute class<br />
which can be used to annotate methods to provide declarative authorization.<br />
For example, the following declarative authorization ensures that the method<br />
DoPrivMethod can only be executed by members of the Manager or Teller role.<br />
[PrincipalPermissionAttribute(SecurityAction.Demand, Role="Teller"),<br />
PrincipalPermissionAttribute(SecurityAction.Demand, Role="Manager")]<br />
public void DoPrivMethod()<br />
{<br />
}<br />
delegation<br />
Delegation is an extended form of impersonation that allows a server process that<br />
is performing work on behalf of a client, to access resources on a remote computer.<br />
This capability is natively provided by Kerberos on Windows 2000 and later operating<br />
systems. Conventional impersonation (for example, that provided by NTLM)<br />
allows only a single network hop. When NTLM impersonation is used, the one hop<br />
is used between the client and server computers, restricting the server to local<br />
resource access while impersonating.<br />
DES (data encryption standard)<br />
DES is a block cipher that encrypts data in 64-bit blocks. DES is a symmetric algorithm<br />
that uses the same algorithm and key for encryption and decryption. DES has<br />
been superceded by triple DES.<br />
dictionary attack<br />
A dictionary attack is a brute-force attack in which the attacker tries every possible<br />
secret key to decrypt encrypted data. You can mitigate against this form of attack by<br />
using a salt value in conjunction with encrypted (or hashed) data.
Glossary 555<br />
Digest authentication<br />
Digest authentication is defined by the HTTP 1.1 protocol although it is not widely<br />
used. With this form of authentication a clear text password is not passed across the<br />
network. A password hash or digest is passed instead. While more secure than Basic<br />
authentication, it requires Internet Explorer 5.0 or later on the client, and a Windows<br />
2000 computer running IIS 5.0 with Active <strong>Directory</strong> on the server.<br />
digital signature<br />
A digital signature is used for message authentication; to ensure the validity of the<br />
sender of the message and also for message integrity; to ensure that data is not<br />
modified while in transit. Signing data does not alter it; it simply generates a digital<br />
signature string which is transmitted with the data.<br />
Digital signatures are created using public-key signature algorithms such as the<br />
RSA public-key cipher.<br />
digest<br />
See hash.<br />
discretionary access control list (DACL)<br />
A DACL is associated with a securable object (using a security descriptor) and<br />
specifies the set of access rights granted to users and groups of users. The DACL is<br />
controlled by the owner of an object and it consists of an ordered list of access<br />
control entries (ACEs) that determine the types of operation a user or user group<br />
can perform against the object.<br />
domain accounts<br />
Domain accounts are a Windows or group account centrally maintained and administered<br />
in a domain controller’s SAM database or in Active <strong>Directory</strong>.<br />
DPAPI (data protection API)<br />
DPAPI is a Win32 API available on Windows 2000 and later operating systems used<br />
to encrypt and decrypt data. DPAPI passes the key management issue associated<br />
with encryption techniques to the operating system, as it uses Windows account<br />
passwords to generate encryption keys.<br />
E<br />
EFS (encrypting file system)<br />
The encrypting file system (EFS) is provided by Windows 2000 and later operating<br />
systems, to provide file-encryption capabilities on an NTFS volume.
556<br />
<strong>Building</strong> <strong>Secure</strong> <strong>ASP</strong>.<strong>NET</strong> <strong>Applications</strong><br />
encryption<br />
Encryption is the process of converting data (plain text) into something that appears<br />
to be random and meaningless (cipher text), which is difficult to decode without a<br />
secret key. Encryption is used to provide message confidentiality.<br />
entropy<br />
Entropy is a measure of uncertainty. It is used in association some encryption<br />
technologies to introduce a degree of randomness into the encryption process.<br />
An entropy value used in addition to a key to encrypt data must also be used<br />
to decrypt data.<br />
F<br />
fixed principal impersonation<br />
Fixed principal impersonation is a form of impersonation used by <strong>ASP</strong>.<strong>NET</strong> in<br />
which the impersonated identity remains constant regardless of the authenticated<br />
caller’s identity. Usually, the impersonated identity is determined by the identity of<br />
the caller. The identity used for fixed principal impersonation is specified by using<br />
the userName and password attributes of the element in web.config.<br />
An example follows.<br />
<br />
Forms authentication<br />
Forms authentication is a type of authentication supported by <strong>ASP</strong>.<strong>NET</strong> that<br />
requires users to log on by supplying logon credentials through an HTML form.<br />
G<br />
gatekeeper<br />
A gatekeeper is a technology or subsystem used to provide access control. Example<br />
gatekeepers include IIS, the <strong>ASP</strong>.<strong>NET</strong> UrlAuthorizationModule, and the <strong>ASP</strong>.<strong>NET</strong><br />
FileAuthorizationModule.<br />
GenericIdentity<br />
GenericIdentity is an implementation of the IIdentity interface, used by <strong>ASP</strong>.<strong>NET</strong><br />
in conjunction with Forms, Passport (and sometimes custom) authentication mechanisms.<br />
The GenericPrincipal object contains a GenericIdentity object.
Glossary 557<br />
GenericPrincipal<br />
GenericPrincipal is an implementation of the IPrincipal interface, used by<br />
<strong>ASP</strong>.<strong>NET</strong> in conjunction with Forms and Passport (and possibly custom) authentication<br />
mechanisms. It contains the list of roles (retrieved by the application from a<br />
custom data store) that the user belongs to.<br />
The GenericPrincipal object is attached to the context of Web requests and is used<br />
for authorization. It contains a GenericIdentity object.<br />
H<br />
hash<br />
A hash is a fixed length numeric value that uniquely identifies data. Hash values<br />
are useful to verify the integrity of data sent through insecure channels. The hash<br />
value of received data can be compared to the hash value of data as it was sent to<br />
determine if the data was altered.<br />
Hash values are also used with digital signatures. Because small hash values can be<br />
used to represent much large amounts of data, only the hash of a message needs to<br />
be signed; rather than the entire message data.<br />
HTTP context<br />
HTTP context is the context or property collection associated with (and describing)<br />
the current Web request.<br />
HTTP module<br />
An HTTP module is a module used by <strong>ASP</strong>.<strong>NET</strong> to process Web requests. An HTTP<br />
module is an assembly that implements the IhttpModule interface and handles<br />
events. <strong>ASP</strong>.<strong>NET</strong> uses a series of built-in modules such as authentication modules,<br />
the session state module and the global cache module. Custom HTTP modules can<br />
be developed and plugged into the <strong>ASP</strong>.<strong>NET</strong> HTTP processing pipeline.<br />
HTTP handler<br />
<strong>ASP</strong>.<strong>NET</strong> maps HTTP requests to HTTP handlers. <strong>ASP</strong>.<strong>NET</strong> maps individual URLs<br />
or groups of URL extensions to specific HTTP handlers. HTTP handlers are functionality<br />
equivalent to ISAPI extensions but with a much simpler programming<br />
model. An HTTP handler is an assembly that implements the IHttpHandler and<br />
IHttpAsyncHandler interfaces.
558<br />
<strong>Building</strong> <strong>Secure</strong> <strong>ASP</strong>.<strong>NET</strong> <strong>Applications</strong><br />
I<br />
identity<br />
Identity refers to a characteristic of a user or service that can uniquely identify it.<br />
For example, this is often a display name, which often takes the form “authority/<br />
username”.<br />
imperative authorization<br />
Imperative authorization is a form of authorization applied within method code.<br />
For example, .<strong>NET</strong> provides the PrincipalPermissionAttribute class which can be<br />
used to provide imperative authorization as shown in the code that follows. The<br />
code demands that the caller belong to the Teller role. If the caller doesn’t belong to<br />
this role, a security exception is generated and the privileged code (the code that<br />
follows the Demand method call) is not executed.<br />
public UsePrivilege()<br />
{<br />
PrincipalPermission permCheck = new PrincipalPermission(null,"Teller");<br />
permCheck.Demand();<br />
// privileged code<br />
}<br />
impersonation<br />
Impersonation is the technique used by a server application to access resources on<br />
behalf of a client by using a copy of the client’s access token. To facilitate the generation<br />
of a client’s access token on a server computer, the client must pass its identity<br />
across the network to the server application.<br />
Also see fixed principal impersonation.<br />
impersonation/delegation model<br />
An impersonation/delegation model is a resource access model that flows the<br />
security context of the original caller through successive application tiers and onto<br />
back-end resource managers. This allows resource managers to implement authorization<br />
decisions based on the identity of the original caller.<br />
This is in contrast to the trusted subsystem model that uses fixed “trusted” identities<br />
for resource access.<br />
impersonation token<br />
See thread token.
Glossary 559<br />
integrity<br />
<strong>Secure</strong> communication channels must also ensure that data is protected from<br />
accidental or deliberate (malicious) modification while in transit. Integrity is<br />
usually provided by using message authentication codes (MACs).<br />
IPSec (Internet Protocol Security)<br />
IPSec is a form of transport level security. IPSec is designed to encrypt data as<br />
it travels between two computers, protecting the data from modification and<br />
interpretation.<br />
K<br />
Kerberos<br />
Kerberos is an authentication protocol supported by Windows 2000 and later<br />
operating systems. Kerberos supports the extended form of impersonation called<br />
delegation, which allows a caller’s security context to access network resources in<br />
addition to resources local to the server’s operating system.<br />
key<br />
A key is a value supplied to an encryption or decryption algorithm used to encrypt<br />
and decrypt data. Symmetric encryption algorithms use the same key to encrypt<br />
and decrypt data, while asymmetric algorithms use a public/private key pair.<br />
key pair<br />
A key pair is a public and private pair of keys that belong to an entity and are used<br />
to encrypt and decrypt data.<br />
key store<br />
A key store is where the Microsoft Cryptography API (CryptoAPI) stores key pairs<br />
(usually in a file or registry key). Key stores are specific to either a user or the<br />
computer the keys were generated on.<br />
L<br />
LDAP (Lightweight <strong>Directory</strong> Access Protocol)<br />
LDAP is a protocol used to access directory services including Active <strong>Directory</strong>.<br />
local account<br />
A local account is a Windows account maintained and stored within the SAM<br />
database local to a specific computer. Local accounts (unlike domain accounts)<br />
cannot be used to access network resources, unless a duplicate local account (with<br />
the same name and password) is created on the remote computer.
560<br />
<strong>Building</strong> <strong>Secure</strong> <strong>ASP</strong>.<strong>NET</strong> <strong>Applications</strong><br />
logon session<br />
A logon session defines the security context in which every process runs. When you<br />
interactively log on to a computer, an interactive logon session is created to host the<br />
Windows shell and any process that you may start interactively. When a process<br />
connects on your behalf to a remote computer, your credentials (which are cached in<br />
your local logon session) are used to handle authentication requests from the<br />
remote computer. Assuming the authentication process is successful, a network<br />
logon session is established on the remote computer to represent the work performed<br />
on your behalf on the remote computer.<br />
LogonUser<br />
LogonUser is a Win32 API used to create a logon session (and access token) for<br />
a specified Windows account. Code that calls LogonUser must be part of the<br />
computer’s TCB, which means that it must be running within a process whose<br />
Windows account has been granted the “Act as part of the operating system”<br />
privilege.<br />
LSA (Local Security Authority)<br />
The Local Security Authority (LSA) is a local Windows subsystem responsible for<br />
providing authentication services.<br />
M<br />
MAC (message authentication code)<br />
Message authentication code is a hash value appended to a message to provide<br />
integrity. When using a MAC algorithm to generate a hash, the receiving application<br />
must also posses the session key to re-compute the hash value so it can verify<br />
that the message data has not changed.<br />
mutual authentication<br />
Mutual authentication is a form of authentication where the client authenticates the<br />
server in addition to the server authenticating the client. Mutual authentication is<br />
not supported by NTLM but is supported by Kerberos. Mutual authentication is<br />
also possible with SSL when the server accepts or requires client certificates.<br />
N<br />
non-repudiation<br />
Non-repudiation is the ability to identify users who performed certain actions, thus<br />
irrefutably countering any attempts by a user to deny responsibility. For example, a<br />
system may log the ID of a user whenever a file is deleted.
Glossary 561<br />
NTLM<br />
NTLM (which stands for Windows NT LAN Manager) is a challenge/response<br />
authentication protocol used on networks that include systems running versions of<br />
the Microsoft Windows NT operating system earlier than Windows 2000 and on<br />
stand-alone systems.<br />
P<br />
PKCS (public-key cryptography standards)<br />
PKCS is a set of syntax standards for public-key cryptography covering security<br />
functions, including methods for signing data, exchanging keys, requesting certificates,<br />
public-key encryption and decryption, and other security functions.<br />
plain text<br />
See clear text.<br />
principal<br />
A principal is an entity (typically a human, computer, application or service) that<br />
attempts to access a secured resource or application. A principal has a unique name<br />
and some way of proving its Identity to other principals in a system.<br />
principle of least privilege<br />
Principle of least privilege is the notion of running executable code using the<br />
weakest possible process identity. This is to limit the potential damage that can be<br />
done should the process be compromised.<br />
If a malicious user manages to inject code into a server process, the privileges<br />
granted to that process determine to a large degree the types of operations the user<br />
is able to perform.<br />
privacy<br />
Privacy is concerned with ensuring that data remains private and confidential, and<br />
cannot be viewed by eavesdroppers who may be armed with network monitoring<br />
software. Privacy is usually provided by means of encryption.<br />
private key<br />
A private key is the secret half of a key pair used in a public key algorithm. Private<br />
keys are typically used to encrypt a symmetric session key, digitally sign a message,<br />
or decrypt a message that has been encrypted with the corresponding public key.<br />
privilege<br />
Privilege is the right of a user to perform various system-related operations, such as<br />
shutting down the system, loading device drivers, or changing the system time.<br />
A user’s access token contains a list of the privileges held by either the user or the<br />
user’s groups.
562<br />
<strong>Building</strong> <strong>Secure</strong> <strong>ASP</strong>.<strong>NET</strong> <strong>Applications</strong><br />
process identity<br />
Process identity is determined by the Windows account used to run an executable<br />
process. For example, the default process identity of the <strong>ASP</strong>.<strong>NET</strong> worker process<br />
(aspnet_wp.exe) is <strong>ASP</strong><strong>NET</strong> (a local, least privileged Windows account).<br />
The process identity determines the security context used when code within the<br />
process accesses local or remote resources. If the code is impersonating, the thread<br />
identity (determined by the thread token) provides the security context for resource<br />
access.<br />
proxy account<br />
See service account.<br />
public key<br />
A public key is the public half of a public/private key pair. It is typically used when<br />
decrypting a session key or a digital signature. The public key can also be used to<br />
encrypt a message, guaranteeing that only the person with the corresponding<br />
private key can decrypt the message.<br />
public-private key encryption<br />
Public-private key encryption is an asymmetric form of encryption that relies on a<br />
cryptographically generated public/private key pair. Data encrypted with a private<br />
key can only be decrypted with the corresponding public key (and vice-versa).<br />
R<br />
RC2<br />
RC2 is the CryptoAPI algorithm name for the RC2 algorithm.<br />
RC4<br />
RC4 is the CryptoAPI algorithm name for the RC4 algorithm.<br />
roles<br />
Roles are logical identifiers (such as “Manager” or “Employee”) used by an application<br />
to group together users who share the same security privileges within the<br />
application. Example role types include .<strong>NET</strong> roles, Enterprise Services (COM+)<br />
roles, and database roles used by SQL Server.<br />
RSA<br />
RSA Data Security, Inc., is a major developer and publisher of public-key cryptography<br />
standards. RSA stands for the names of the company’s three developers and the<br />
owners: Rivest, Shamir, and Adleman.
Glossary 563<br />
S<br />
SACL (system access control list )<br />
An SACL is associated with a securable object (using a security descriptor) and<br />
specifies the types of operations performed by particular users that should generate<br />
audit messages.<br />
salt value<br />
Salt value is random data that can be used in conjunction with encrypted or hashed<br />
data in order to increase the work required to mount a brute-force dictionary attack<br />
against the protected data. It is usually placed in front of the encrypted or hashed<br />
data.<br />
SAM database<br />
The SAM database is the database used by Windows NT and Windows 2000 (without<br />
Active <strong>Directory</strong>) to maintain user and group accounts.<br />
secure communication<br />
<strong>Secure</strong> communication is concerned with providing message integrity and privacy,<br />
while data flows across a network. Technologies that provide secure communication<br />
include SSL and IPSec.<br />
security context<br />
Security context is a generic term used to refer to the collection of security settings<br />
that affect the security-related behavior of a process or thread. The attributes from<br />
a process’ logon session and access token combine to form the security context of<br />
the process.<br />
security descriptor (SD)<br />
A security descriptor (SD) contains security information that is associated with a<br />
securable object such as a file or process. A security descriptor contains attributes<br />
that includes an identification of the object’s owner, the security groups the owner<br />
belongs to, and two access control lists (ACLs); the discretionary access control list<br />
(DACL) which defines the access rights for individual users and groups of users,<br />
and the system access control list (SACL) which defines the types of operation<br />
performed on the object that should result in the generation of audit messages.<br />
service account<br />
A service account is a specifically configured account (also known as a proxy<br />
account) used solely for the purposes of accessing a downstream resource (often a<br />
database) in a multi-tier distributed application. Middle tier components often use a<br />
limited number of service accounts to connect to a database to support connection<br />
pooling. Service accounts may be Windows accounts maintained in Active <strong>Directory</strong><br />
or the SAM database, or SQL accounts maintained within SQL Server.
564<br />
<strong>Building</strong> <strong>Secure</strong> <strong>ASP</strong>.<strong>NET</strong> <strong>Applications</strong><br />
session key<br />
Session key is a randomly-generated symmetric key used to encrypt data transmitted<br />
between two parties. Session keys are used once (for a single session) and then<br />
discarded.<br />
SHA (secure hash algorithm)<br />
SHA is an algorithm used to generate a message digest or hash. The original SHA<br />
algorithm has been replaced with the improved SHA1 algorithm.<br />
SID (security identifier)<br />
A security identifier (SID) uniquely identifies a user or user group within a domain.<br />
A SID is a variable length value and consists of a revision level, an authenticating<br />
authority value (the SID issuer, typically Windows), a set of sub-authority values<br />
(typically representing the network domain) and a relative ID (RID) which is<br />
unique within the authenticating authority / sub-authority combination.<br />
SIDs are never reused even when a user account is deleted and then recreated with<br />
the same name and password combination.<br />
SOAP<br />
SOAP is a lightweight, XML-based protocol for the exchange of information in a<br />
distributed environment. Used by Web services<br />
SOAP extension<br />
A SOAP extension is an extensibility mechanism supported by <strong>ASP</strong>.<strong>NET</strong> that allows<br />
you to extend SOAP message processing. With a SOAP extension, you can inspect<br />
or modify a message at specific stages during the processing lifecycle on either the<br />
client or server.<br />
SSL (secure sockets layer)<br />
SSL is a protocol for secure network communications using a combination of public<br />
and secret key technology.<br />
SSPI (security support provider interface)<br />
SSPI is a common interface between transport-level applications, such as Microsoft<br />
Remote Procedure Call (RPC), and security providers, such as the Windows Integrated<br />
authentication provider. SSPI allows a transport application to call one of<br />
several security providers to obtain an authenticated connection in a uniform<br />
fashion.<br />
symmetric encryption<br />
Symmetric encryption is a form of encryption that uses the same (single) key to<br />
encrypt and decrypt data. Both the sender and the recipient of the encrypted data<br />
must have the same key.
Glossary 565<br />
T<br />
TCB (trusted computing base)<br />
A TCB is a boundary that defines the portion of a system that is trusted to enforce<br />
security policy. Executable code that runs within the TCB is able to perform operations<br />
without being subjected to normal security checks. Device drivers run within<br />
the TCB. User code runs within the TCB if the associated process account is granted<br />
the “Act as part of the operating system” privilege. User code that runs under the<br />
local SYSTEM account also runs within the boundaries of the TCB.<br />
temporary token<br />
See thread token.<br />
thread token<br />
A thread token is a temporary access token associated with a specific thread. When<br />
a thread is created, it has no access token and any secure operations performed by<br />
the thread, use information obtained from the process token. A classic situation in<br />
which a thread acquires an access token is when a thread in a server process wants<br />
to perform work on behalf of a client. In this situation the thread impersonates the<br />
client by acquiring an access token to represent the client.<br />
Thread tokens are also referred to as temporary tokens and impersonation tokens.<br />
token<br />
See access token.<br />
transitive trust<br />
Transitive trust is a bidirectional form of trust relationship between computers or<br />
domains. Transitive means that if authority A trusts authority B and authority B<br />
trusts authority C then authority A implicitly trusts authority C (without an explicit<br />
trust relationship having to exist between A and C). Transitive trust relationships<br />
are supported by Active <strong>Directory</strong> on Windows 2000.<br />
triple DES<br />
This is the triple DES (3DES) encryption cipher. It is a variation of the DES block<br />
cipher algorithm that encrypts plain text with one key, encrypts the resulting cipher<br />
text with a second key, and finally, encrypts the result of the second encryption with<br />
a third key. Triple DES is a symmetric algorithm that uses the same algorithm and<br />
keys for encryption and decryption.
566<br />
<strong>Building</strong> <strong>Secure</strong> <strong>ASP</strong>.<strong>NET</strong> <strong>Applications</strong><br />
trust<br />
<strong>Secure</strong> systems rely on the notion of trust to one degree or another. For example,<br />
users who have administrative privileges (that is, administrators) must be trusted<br />
to correctly administer a system and not to deliberately perform malicious acts.<br />
Similarly, code that runs with extended privileges, such as device drivers and code<br />
that runs as LocalSystem must be trusted. Code that implicitly requires trust such as<br />
this, runs within the computer’s Trusted Computing Base (TCB). Code that cannot<br />
be fully trusted must not be allowed to run within the TCB.<br />
The notion of trust is also important for the trusted subsystem model, which places<br />
trust in an application or service.<br />
trusted subsystem model<br />
A trusted subsystem model is a resource access model adopted by Web applications<br />
in which the application uses a fixed “trusted” identity to access downstream<br />
resource managers such as databases.<br />
A database administrator defines security roles and permissions for the specific<br />
“trusted” identity within the database. This model supports database connection<br />
pooling which greatly helps an application’s ability to scale. This is in contrast to<br />
the impersonation/delegation model.<br />
U<br />
user profile<br />
User profiles maintain a user’s configuration information. This includes desktop<br />
arrangement, personal program groups, program items, screen colors, screen<br />
savers, network connections and so on. When a user logs on interactively, the<br />
system loads the user’s profile and configures the environment according to the<br />
information in the profile.<br />
The LoadUserProfile API can be used to programmatically load a user profile. Noninteractive<br />
accounts such as the local <strong>ASP</strong><strong>NET</strong> account used to run <strong>ASP</strong>.<strong>NET</strong> Web<br />
applications do not have a user profile.<br />
W<br />
WindowsIdentity<br />
WindowsIdentity is an implementation of the IIdentity interface, used by <strong>ASP</strong>.<strong>NET</strong><br />
in conjunction with Windows authentication. A WindowsIdentity object exposes<br />
the Windows access token of the user together with user name information. The<br />
WindowsPrincipal object contains a WindowsIdentity object.
Glossary 567<br />
WindowsPrincipal<br />
WindowsPrincipal is an implementation of the IPrincipal interface, used by<br />
<strong>ASP</strong>.<strong>NET</strong> in conjunction with Windows authentication. <strong>ASP</strong>.<strong>NET</strong> attaches a<br />
WindowsPrincipal object to the context of the current Web request to represent the<br />
authenticated caller. It is used for authorization.<br />
The WindowsPrincipal object contains the set of roles (Windows groups) that the<br />
user belongs to. It also contains a WindowsIdentity object that provides identity<br />
information about the caller.<br />
X<br />
XML digital signature<br />
An XML digital signature is a digital signature applied to an XML document.