

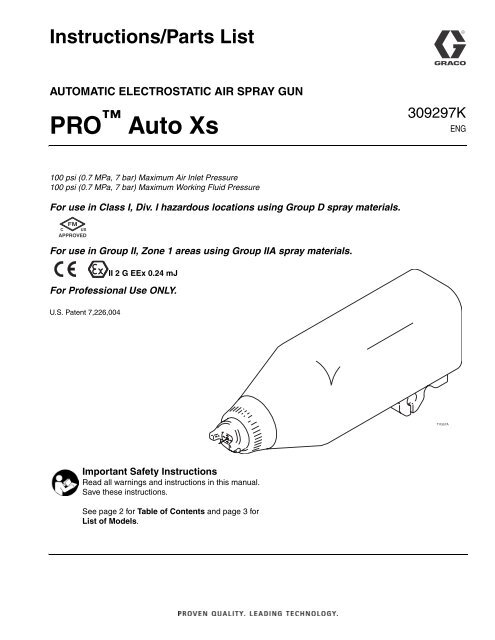
PRO Auto Xs, Automatic Electrostatic Air Spray Gun ... - Graco Inc.
PRO Auto Xs, Automatic Electrostatic Air Spray Gun ... - Graco Inc.
PRO Auto Xs, Automatic Electrostatic Air Spray Gun ... - Graco Inc.

Create successful ePaper yourself
Turn your PDF publications into a flip-book with our unique Google optimized e-Paper software.
Instructions/Parts List<br />
AUTOMATIC ELECTROSTATIC AIR SPRAY GUN<br />
<strong>PRO</strong> <strong>Auto</strong> <strong>Xs</strong><br />
309297K<br />
ENG<br />
100 psi (0.7 MPa, 7 bar) Maximum <strong>Air</strong> Inlet Pressure<br />
100 psi (0.7 MPa, 7 bar) Maximum Working Fluid Pressure<br />
For use in Class I, Div. I hazardous locations using Group D spray materials.<br />
<br />
<br />
For use in Group II, Zone 1 areas using Group IIA spray materials.<br />
II 2 G EEx 0.24 mJ<br />
For Professional Use ONLY.<br />
U.S. Patent 7,226,004<br />
TI1557A<br />
Important Safety Instructions<br />
Read all warnings and instructions in this manual.<br />
Save these instructions.<br />
See page 2 for Table of Contents and page 3 for<br />
List of Models.
List of Models . . . . . . . . . . . . . . . . . . . . . . . . . . . . . 3<br />
Symbols . . . . . . . . . . . . . . . . . . . . . . . . . . . . . . . . . . 3<br />
Warning Symbol . . . . . . . . . . . . . . . . . . . . . . . . . 3<br />
Caution Symbol . . . . . . . . . . . . . . . . . . . . . . . . . . 3<br />
Warning . . . . . . . . . . . . . . . . . . . . . . . . . . . . . . . . . . 4<br />
Introduction . . . . . . . . . . . . . . . . . . . . . . . . . . . . . . . 6<br />
How the <strong>Electrostatic</strong> <strong>Air</strong> <strong>Spray</strong> <strong>Gun</strong> Works . . . . 6<br />
Operating the <strong>Spray</strong> Function . . . . . . . . . . . . . . . 6<br />
Operating the <strong>Electrostatic</strong>s . . . . . . . . . . . . . . . . 6<br />
<strong>Gun</strong> Features and Options . . . . . . . . . . . . . . . . . 6<br />
Changing the kV Setting . . . . . . . . . . . . . . . . . . . 6<br />
Installation . . . . . . . . . . . . . . . . . . . . . . . . . . . . . . . . 8<br />
Install the System . . . . . . . . . . . . . . . . . . . . . . . . 8<br />
Warning Signs . . . . . . . . . . . . . . . . . . . . . . . . . . . 8<br />
Ventilate the <strong>Spray</strong> Booth . . . . . . . . . . . . . . . . . . 8<br />
Install the <strong>Air</strong> Line Accessories . . . . . . . . . . . . . 10<br />
Install the Fluid Line Accessories . . . . . . . . . . . 10<br />
Install the <strong>Gun</strong> and Mounting Bracket . . . . . . . . 10<br />
Connect the <strong>Air</strong> and Fluid Lines . . . . . . . . . . . . 11<br />
Manifold Connections . . . . . . . . . . . . . . . . . . . . 11<br />
Optional Fiber Optic Cable Connection . . . . . . . 12<br />
Grounding . . . . . . . . . . . . . . . . . . . . . . . . . . . . . 13<br />
Check Electrical Grounding . . . . . . . . . . . . . . . . 14<br />
Check Fluid Resistivity . . . . . . . . . . . . . . . . . . . 15<br />
Check Fluid Viscosity . . . . . . . . . . . . . . . . . . . . 15<br />
Install the Fabric Cover . . . . . . . . . . . . . . . . . . . 15<br />
245324 HC Conversion Kit . . . . . . . . . . . . . . . . 16<br />
Operation . . . . . . . . . . . . . . . . . . . . . . . . . . . . . . . . 17<br />
Pressure Relief Procedure . . . . . . . . . . . . . . . . 17<br />
Operating Checklist . . . . . . . . . . . . . . . . . . . . . . 18<br />
Select a Fluid Nozzle and <strong>Air</strong> Cap . . . . . . . . . . 18<br />
Adjust the <strong>Spray</strong> Pattern . . . . . . . . . . . . . . . . . . 19<br />
Adjust the <strong>Electrostatic</strong>s . . . . . . . . . . . . . . . . . . 20<br />
<strong>Spray</strong>ing . . . . . . . . . . . . . . . . . . . . . . . . . . . . . . 21<br />
Triggering the Fluid Alone . . . . . . . . . . . . . . . . . 21<br />
Shutdown . . . . . . . . . . . . . . . . . . . . . . . . . . . . . 21<br />
Maintenance . . . . . . . . . . . . . . . . . . . . . . . . . . . . . . 22<br />
Daily Care and Cleaning . . . . . . . . . . . . . . . . . . 22<br />
Clean the <strong>Air</strong> Cap and Fluid Nozzle . . . . . . . . . 24<br />
Check for Fluid Leakage . . . . . . . . . . . . . . . . . . 25<br />
Electrical Tests . . . . . . . . . . . . . . . . . . . . . . . . . . . 26<br />
Test <strong>Gun</strong> Resistance . . . . . . . . . . . . . . . . . . . . . 26<br />
Test Power Supply Resistance . . . . . . . . . . . . . 27<br />
Test Electrode Resistance . . . . . . . . . . . . . . . . . 28<br />
Table of Contents<br />
Troubleshooting . . . . . . . . . . . . . . . . . . . . . . . . . . . 29<br />
<strong>Spray</strong> Pattern Troubleshooting . . . . . . . . . . . . . 29<br />
<strong>Gun</strong> Operation Troubleshooting . . . . . . . . . . . . . 30<br />
Electrical Troubleshooting . . . . . . . . . . . . . . . . . 31<br />
Repair . . . . . . . . . . . . . . . . . . . . . . . . . . . . . . . . . . . 32<br />
Prepare the <strong>Gun</strong> for Service . . . . . . . . . . . . . . . 32<br />
Remove the <strong>Gun</strong> from the Manifold . . . . . . . . . . 33<br />
Install the <strong>Gun</strong> on the Manifold . . . . . . . . . . . . . 33<br />
<strong>Air</strong> Cap/Nozzle Replacement . . . . . . . . . . . . . . 34<br />
Electrode Replacement . . . . . . . . . . . . . . . . . . . 35<br />
Fluid Packing Removal . . . . . . . . . . . . . . . . . . . 36<br />
Packing Rod Repair . . . . . . . . . . . . . . . . . . . . . . 37<br />
Piston Repair . . . . . . . . . . . . . . . . . . . . . . . . . . . 38<br />
Adjust the Actuator Arm . . . . . . . . . . . . . . . . . . 39<br />
Barrel Removal . . . . . . . . . . . . . . . . . . . . . . . . . 40<br />
Barrel Installation . . . . . . . . . . . . . . . . . . . . . . . . 41<br />
Power Supply Removal and Replacement . . . . 42<br />
Turbine Alternator Removal and Replacement . 43<br />
Parts . . . . . . . . . . . . . . . . . . . . . . . . . . . . . . . . . . . . 45<br />
Accessories . . . . . . . . . . . . . . . . . . . . . . . . . . . . . . 52<br />
<strong>Air</strong> Line Accessories . . . . . . . . . . . . . . . . . . . . . 52<br />
Fluid Line Accessories . . . . . . . . . . . . . . . . . . . 52<br />
Miscellaneous Accessories . . . . . . . . . . . . . . . . 53<br />
<strong>Gun</strong> Accessories . . . . . . . . . . . . . . . . . . . . . . . . 54<br />
Technical Data . . . . . . . . . . . . . . . . . . . . . . . . . . . . 55<br />
<strong>Graco</strong> Standard Warranty . . . . . . . . . . . . . . . . . . . 56<br />
<strong>Graco</strong> Information . . . . . . . . . . . . . . . . . . . . . . . . . 56<br />
2 309297K
List of Models<br />
List of Models<br />
Part No. Model Voltage<br />
Standard<br />
Type of Coatings<br />
High Conductivity<br />
244589 <strong>PRO</strong> <strong>Auto</strong> <strong>Xs</strong> 40-85 kV X<br />
244590 <strong>PRO</strong> <strong>Auto</strong> <strong>Xs</strong> 40-85 kV X<br />
Symbols<br />
Warning Symbol<br />
WARNING<br />
This symbol alerts you to the possibility of serious injury<br />
or death if you do not follow the instructions.<br />
Caution Symbol<br />
CAUTION<br />
This symbol alerts you to the possibility of damage to or<br />
destruction of equipment if you do not follow the instructions.<br />
309297K 3
Warning<br />
WARNING<br />
Fire, Explosion, and Electric Shock Hazard<br />
Flammable fumes, such as solvent and paint fumes, in work area can ignite or explode. To help<br />
prevent fire and explosion:<br />
• <strong>Electrostatic</strong> equipment must be used only by trained, qualified personnel who understand the<br />
requirements of this manual.<br />
• Ground equipment, personnel, object being sprayed, and conductive objects in work area. See<br />
Grounding instructions.<br />
• Only use grounded <strong>Graco</strong> conductive air supply hoses.<br />
• Check gun and hose resistance and electrical grounding daily.<br />
• Use and clean equipment only in well ventilated area.<br />
• Interlock the gun air supply to prevent operation unless ventilating fans are on.<br />
• Use cleaning solvents with highest possible flash point when flushing or cleaning equipment.<br />
To comply with EN50050 requirements, cleaning solvents must have a flash point at least 5°C<br />
above ambient temperature.<br />
• Always turn the electrostatics off when flushing, cleaning or servicing equipment.<br />
• If there is static sparking or you feel a shock, stop operation immediately. Do not use equipment<br />
until you identify and correct the problem.<br />
• Eliminate all ignition sources; such as pilot lights, cigarettes, portable electric lamps, and plastic<br />
drop cloths (potential static arc).<br />
• Do not plug or unplug power cords or turn lights on or off when flammable fumes are present.<br />
• Keep work area free of debris, including solvent, rags and gasoline.<br />
• Keep a working fire extinguisher in the work area.<br />
Toxic Fluid Hazard<br />
Hazardous fluids or toxic fumes can cause a serious injury or death if splashed in the eyes or on<br />
the skin, swallowed, or inhaled.<br />
• Know the specific hazards of the fluid you are using. Read the fluid manufacturer’s warnings.<br />
• Store hazardous fluid in an approved container. Dispose of the hazardous fluid according to all<br />
local, state, and national guidelines.<br />
• Wear appropriate protective clothing, gloves, eyewear, and respirator.<br />
4 309297K
Warning<br />
WARNING<br />
Equipment Misuse Hazard<br />
Equipment misuse can cause the equipment to rupture, malfunction, or start unexpectedly and<br />
result in a serious injury.<br />
• This equipment is for professional use only.<br />
• Read all manuals, tags, and labels before operating the equipment.<br />
• Use the equipment only for its intended purpose. If you are uncertain, call your <strong>Graco</strong> distributor.<br />
• Do not alter or modify equipment. Use only genuine <strong>Graco</strong> parts and accessories.<br />
• Check the equipment daily. Repair or replace worn or damaged parts immediately.<br />
• Do not exceed the maximum working pressure of the lowest rated system component. Maximum<br />
working air and fluid pressure of this equipment is 100 psi (0.7 MPa, 7.0 bar).<br />
• Use fluids and solvents that are compatible with the equipment wetted parts. See the Technical<br />
Data section of all equipment manuals. Read the fluid and solvent manufacturer’s warnings.<br />
• Route the hoses away from traffic areas, sharp edges, moving parts, and hot surfaces. Do not<br />
expose <strong>Graco</strong> hoses to temperatures above 180°F (82°C) or below -40°F (-40°C).<br />
• Wear hearing protection when operating this equipment.<br />
• Comply with all applicable local, state, and national fire, electrical, and other safety regulations.<br />
Pressurized Equipment Hazard<br />
<strong>Spray</strong> from the gun, hose leaks, or ruptured components can splash fluid in the eyes or on the skin<br />
and cause serious injury.<br />
• Do not point the spray gun at anyone or at any part of the body.<br />
• Do not stop or deflect fluid leaks with your hand, body, glove, or rag.<br />
• Follow the steps under Prepare the <strong>Gun</strong> for Service, page 32, when you stop spraying and<br />
before cleaning, checking, or repairing equipment.<br />
• Check hoses and couplings daily. Replace worn, damaged, or loose parts immediately.<br />
• Tighten all fluid connections before each use.<br />
309297K 5
Introduction<br />
Introduction<br />
How the <strong>Electrostatic</strong> <strong>Air</strong><br />
<strong>Spray</strong> <strong>Gun</strong> Works<br />
The automatic electrostatic air spray gun operates very<br />
similar to a traditional air spray gun. The atomization<br />
and fan air are emitted from the air cap. The atomization<br />
air breaks up the fluid stream and controls the droplet<br />
size. The fan air controls the shape and width of the<br />
spray pattern. The fan and atomization air can be<br />
adjusted independently.<br />
Operating the <strong>Spray</strong><br />
Function<br />
Applying a minimum of 50 psi (0.35 MPa, 3.5 bar) air<br />
pressure to the gun manifold’s cylinder air fitting (CYL)<br />
will retract the gun piston, which opens the air valves<br />
and a short time later opens the fluid needle. This provides<br />
the proper air lead and lag when triggering the<br />
gun. A spring returns the piston when the cylinder air is<br />
shut off.<br />
Operating the <strong>Electrostatic</strong>s<br />
To operate the electrostatics, apply air pressure to the<br />
gun manifold’s turbine air fitting (TA) through a <strong>Graco</strong><br />
grounded air hose. The air enters the manifold and is<br />
directed to the inlet of the power supply turbine. The air<br />
spins the turbine, which then provides electrical power<br />
to the internal high voltage power supply. The fluid is<br />
charged by the spray gun electrode. The charged fluid is<br />
attracted to the nearest grounded object, wrapping<br />
around and evenly coating all surfaces.<br />
The turbine air is exhausted into the shroud and out the<br />
back of the manifold through the exhaust fitting (EXH).<br />
The exhaust air helps keep contaminants out and helps<br />
keep the gun clean.<br />
<strong>Gun</strong> Features and Options<br />
• The gun is designed for use with a reciprocator, and<br />
can be mounted directly on a 1/2 in. (13 mm) rod.<br />
With additional brackets, the gun can be mounted<br />
for robotic applications.<br />
• The gun’s quick-disconnect design enables its<br />
removal without disconnecting the fluid and air lines<br />
to the gun.<br />
• <strong>Gun</strong> functions are activated from a separate controller<br />
that sends the appropriate signal to the actuating<br />
solenoids.<br />
• The optional fiber optic readout system can be<br />
installed to monitor the gun’s spraying voltage. A<br />
fiber optic cable connected to the gun manifold carries<br />
the signal from the gun to a remote display<br />
module. Part No. 224117 Display Module displays<br />
the gun’s spraying voltage and current. Battery-operated<br />
Display Module 189762 displays the<br />
gun’s spraying voltage only.<br />
Changing the kV Setting<br />
The gun’s full voltage setting is 85 kV. Three lower voltage<br />
settings are possible by actuating the KV1 and KV2<br />
switches. Supply 50 psi (0.35 MPa, 3.5 bar) air pressure<br />
to the KV1 and KV2 ports. Turn the air on or off as<br />
shown in Table 1 to set the desired voltage.<br />
The solenoid valves used to activate the KV1 and KV2<br />
switches must bleed the air out of the lines for the<br />
switches to draw back to the higher voltage setting.<br />
Table 1: KV1 and KV2 Switch Settings<br />
KV1 <strong>Air</strong> KV2 <strong>Air</strong> Output Voltage (kV)<br />
OFF OFF 85<br />
OFF ON 70<br />
ON OFF 60<br />
ON ON 45<br />
6 309297K
Introduction<br />
F<br />
TA<br />
CYL<br />
A1<br />
KV1<br />
FO<br />
KV2<br />
A2<br />
TI1557A<br />
P1<br />
P2<br />
E<br />
A<br />
C<br />
D<br />
H<br />
EXH<br />
TI1577A<br />
Manifold Back View<br />
TI1561A<br />
J<br />
B<br />
G<br />
Fig. 1: <strong>Gun</strong> Overview<br />
Key<br />
A<br />
B<br />
C<br />
D<br />
E<br />
F<br />
G<br />
H<br />
J<br />
<strong>Air</strong> Cap<br />
Fluid Nozzle<br />
Retaining Ring<br />
Shroud<br />
Mounting Bracket<br />
Manifold<br />
Turbine<br />
Power Supply<br />
Electrode<br />
A1<br />
A2<br />
CYL<br />
EXH<br />
FO<br />
KV1<br />
KV2<br />
P1<br />
P2<br />
Manifold Markings<br />
Atomization <strong>Air</strong> Inlet Fitting<br />
Fan <strong>Air</strong> Inlet Fitting<br />
Cylinder <strong>Air</strong> Inlet Fitting<br />
Shroud Exhaust Outlet Fitting<br />
Fiber Optic Fitting (shipped unassembled)<br />
kV Switch 1 <strong>Air</strong> Inlet<br />
kV Switch 2 <strong>Air</strong> Inlet<br />
Fluid Supply Inlet Fitting<br />
Fluid Return Inlet Fitting (optional)<br />
TA<br />
Turbine <strong>Air</strong> Inlet Fitting<br />
309297K 7
Installation<br />
Installation<br />
Install the System<br />
FIGURE 2 shows a typical electrostatic air spray system,<br />
and FIGURE 3 shows possible system options. It is not<br />
an actual system design. For assistance in designing a<br />
system to suit your particular needs, contact your <strong>Graco</strong><br />
distributor.<br />
Warning Signs<br />
WARNING<br />
Fire, Explosion, and Electric Shock Hazard<br />
Installing and servicing this equipment<br />
requires access to parts which may cause<br />
electric shock or other serious injury if work<br />
is not performed properly.<br />
•Do not install or service this equipment<br />
unless you are trained and qualified.<br />
•Be sure your installation complies with<br />
National, State and Local codes for the<br />
installation of electrical apparatus in a Class<br />
I, Div. I, Group D or a Group II,<br />
Category 2G Hazardous Location.<br />
• Comply with all applicable local, state, and<br />
national fire, electrical, and other safety regulations.<br />
Mount warning signs in the spray area where they can<br />
easily be seen and read by all operators. An English<br />
Warning Sign is provided with the gun.<br />
Ventilate the <strong>Spray</strong> Booth<br />
Electrically interlock the gun turbine air supply (B) with<br />
the ventilators to prevent gun operation without ventilating<br />
fans operating. Check and follow all National, State,<br />
and Local codes regarding air exhaust velocity requirements.<br />
High velocity air exhaust will decrease the operating efficiency<br />
of the electrostatic system. The minimum allowable<br />
air exhaust velocity is 60 ft/minute (19 linear<br />
meters/minute).<br />
Key to FIGURE 2 and FIGURE 3<br />
A<br />
B<br />
C<br />
D<br />
E<br />
F<br />
G<br />
H<br />
J<br />
K<br />
L<br />
M<br />
N<br />
P<br />
Q<br />
R<br />
S<br />
T<br />
U<br />
V<br />
W<br />
X<br />
Y<br />
<strong>Air</strong> Hose Ground Wire<br />
<strong>Graco</strong> Grounded Turbine <strong>Air</strong> Hose (TA)<br />
Atomizing <strong>Air</strong> Hose, 3/8 in. (10 mm) OD (A1)<br />
Fan <strong>Air</strong> Hose, 3/8 in. (10 mm) OD (A2)<br />
Cylinder <strong>Air</strong> Hose, 5/32 in. (4 mm) OD (CYL)<br />
Fluid Hose, 1/4-18 npsm gun fluid inlet (P1)<br />
To Fluid Supply<br />
<strong>Auto</strong> <strong>PRO</strong> <strong>Xs</strong> <strong>Air</strong> <strong>Spray</strong> <strong>Gun</strong><br />
Mounting Bracket for 1/2 in. (13 mm) rod<br />
Solenoid Valve, requires quick exhaust port<br />
Bleed-Type Master <strong>Air</strong> Valve<br />
<strong>Air</strong> Pressure Regulator<br />
True Earth Ground<br />
24 Volt Power Supply<br />
4-20 microampere Outputs<br />
Full Feature ES Display Module<br />
kV Only ES Display Module (battery operated)<br />
Fiber Optic Y Cable<br />
Bulkhead<br />
Fiber Optic Cable<br />
Main <strong>Air</strong> Line<br />
kV Switch <strong>Air</strong> Hose, 5/32 in. (4 mm) OD (optional; plug KV1<br />
fitting if not used)<br />
kV Switch <strong>Air</strong> Hose, 5/32 in. (4 mm) OD (optional; plug KV2<br />
fitting if not used)<br />
WARNING<br />
Flammable or Toxic Vapor Hazard<br />
Provide fresh air ventilation to avoid the buildup of<br />
flammable or toxic vapors when spraying, flushing, or<br />
cleaning the gun. Do not operate the gun unless ventilation<br />
fans are operating.<br />
8 309297K
Installation<br />
L<br />
W<br />
See *<br />
above<br />
NOTE:<br />
* The turbine air supply (TA) must be electrically interlocked with the spray booth ventilation fans to prevent<br />
the power supply from operating without ventilating fans on.<br />
A<br />
L<br />
K<br />
K<br />
K<br />
X<br />
Y<br />
B C D<br />
TA<br />
KV1<br />
KV2<br />
L<br />
A1<br />
CYL<br />
A2<br />
K<br />
P1<br />
M<br />
Non-Hazardous Area<br />
N<br />
G<br />
E<br />
Hazardous Area<br />
F<br />
J<br />
Manifold Back View<br />
TI1712A<br />
Fig. 2: Typical Installation<br />
NOTE:<br />
** A maximum of two splices with a total of 108 ft (33 m) of cable can be used. For the strongest<br />
light signals, use a minimum number of bulkhead splices. See Accessories on page 53.<br />
Non-Hazardous Area<br />
Hazardous Area<br />
P<br />
R<br />
T<br />
U**<br />
H<br />
KV<br />
µA<br />
Q<br />
85.0 KV<br />
V**<br />
S<br />
Fig. 3: Optional Fiber Optic Connection to Voltage<br />
Display Module<br />
TI1583A<br />
309297K 9
03460<br />
Installation<br />
Install the <strong>Air</strong> Line<br />
Accessories<br />
1. Install a bleed-type air valve (L) on the main air line<br />
(W) to shut off all air to the gun (H).<br />
2. Install an air line filter/water separator on the gun air<br />
line to ensure a dry, clean air supply to the gun. Dirt<br />
and moisture can ruin the appearance of your finished<br />
workpiece and can cause the gun to malfunction.<br />
3. Install a bleed-type air regulator (M) on each of the<br />
air supply lines (B, C, D, E, X, Y) to control air pressure<br />
to the gun.<br />
4. Install a solenoid valve (K) on the cylinder air line (E)<br />
to actuate the gun. The solenoid valve must have a<br />
quick exhaust port.<br />
WARNING<br />
Pressurized Equipment Hazard<br />
Trapped air can cause the gun to spray<br />
unexpectedly, which can result in serious<br />
injury, including splashing fluid in the eyes<br />
or on the skin. The solenoid valves (K) must<br />
have a quick exhaust port so trapped air will<br />
be relieved between the valve and gun<br />
when the solenoids are shut off.<br />
WARNING<br />
Pressurized Equipment Hazard<br />
The fluid drain valve is required in your system<br />
to assist in relieving fluid pressure in<br />
the displacement pump, hose, and gun.<br />
Triggering the gun to relieve pressure may<br />
not be sufficient. Install a drain valve close<br />
to the pump's fluid outlet. The drain valve<br />
reduces the risk of serious injury, including<br />
splashing in the eyes or on the skin.<br />
2. Install a fluid regulator on the fluid line to control<br />
fluid pressure to the gun.<br />
Install the <strong>Gun</strong> and Mounting<br />
Bracket<br />
1. Loosen the mounting bracket’s two set screws (103)<br />
and slide the bracket (102) onto a 1/2 in. (13 mm)<br />
mounting rod. See FIGURE 4.<br />
2. Position the gun and tighten the two set screws.<br />
For added positioning reliability, insert a 1/8 in. (3 mm)<br />
locating pin into the slot (NN) in the bracket and through<br />
a hole in the rod. See the detail in FIGURE 4.<br />
Install the Fluid Line<br />
Accessories<br />
1. Install a fluid filter and drain valve at the pump outlet.<br />
102<br />
103<br />
TI1570A<br />
2.88 in<br />
(73.2 mm)<br />
NN<br />
9.22 in<br />
(234.2 mm)<br />
To nozzle tip<br />
Fig. 4: Mounting Bracket<br />
10 309297K
Installation<br />
Connect the <strong>Air</strong> and Fluid<br />
Lines<br />
FIGURE 3 shows a schematic of air and fluid line connections,<br />
and FIGURE 5 shows the manifold connections.<br />
Connect the air and fluid lines as instructed.<br />
Electric Shock Hazard<br />
WARNING<br />
To reduce the risk of electric shock or other<br />
serious injury, the turbine air supply hose<br />
must be electrically connected to a true<br />
earth ground. Use only <strong>Graco</strong> Grounded<br />
<strong>Air</strong> Supply Hose.<br />
EXH<br />
FO<br />
KV1<br />
KV2<br />
P1<br />
P2<br />
TA<br />
Shroud Exhaust Outlet Fitting<br />
Connect a 1/4 in. (6 mm) OD x 4 ft (1.22 m) long tube to<br />
this fitting.<br />
Fiber Optic Fitting (Optional)<br />
Connect the <strong>Graco</strong> Fiber Optic cable (see page 11).<br />
kV Switch 1 <strong>Air</strong> Inlet Fitting<br />
Connect a 5/32 in. (4 mm) OD tube between this fitting and<br />
the solenoid.<br />
kV Switch 2 <strong>Air</strong> Inlet Fitting<br />
Connect a 5/32 in. (4 mm) OD tube between this fitting and<br />
the solenoid.<br />
Fluid Supply Inlet Fitting<br />
Connect a 1/4 npsm swivel fitting between this fitting and<br />
the fluid supply.<br />
Fluid Return Inlet Fitting (optional)<br />
Order Part No. 233676 Fluid Recirculation Kit.<br />
Turbine <strong>Air</strong> Inlet Fitting<br />
Connect the <strong>Graco</strong> Electrically Conductive <strong>Air</strong> Hose<br />
between this fitting (left-hand thread) and the solenoid.<br />
Connect the air hose ground wire to a true earth ground.<br />
1. Connect the <strong>Graco</strong> Grounded <strong>Air</strong> Supply Hose (B)<br />
to the gun's turbine air inlet (TA) and connect the<br />
hose ground wire (A) to a true earth ground (N). The<br />
gun turbine air inlet fitting has left-hand threads to<br />
prevent connecting another type of air hose to the<br />
turbine air inlet. See Accessories on page 52 for<br />
further information about the hose.<br />
2. Check the electrical grounding of the gun as<br />
instructed on page 14.<br />
KV2<br />
TA<br />
CYL<br />
A1<br />
KV1<br />
FO<br />
A2<br />
3. Before connecting the fluid line (P1), blow it out with<br />
air and flush it with solvent. Use solvent which is<br />
compatible with the fluid to be sprayed.<br />
P1<br />
P2<br />
Manifold Connections<br />
EXH<br />
A1<br />
A2<br />
Atomization <strong>Air</strong> Inlet Fitting<br />
Connect a 3/8 in. (10 mm) OD tube between this fitting and<br />
the air supply.<br />
Fan <strong>Air</strong> Inlet Fitting<br />
Connect a 3/8 in. (10 mm) OD tube between this fitting and<br />
the air supply.<br />
Fig. 5: Manifold Connections<br />
TI1577A<br />
CYL<br />
Cylinder <strong>Air</strong> Inlet Fitting<br />
Connect a 5/32 in. (4 mm) OD tube between this fitting and<br />
the solenoid. For quicker response, use the shortest hose<br />
length possible.<br />
309297K 11
Installation<br />
Optional Fiber Optic Cable<br />
Connection<br />
An optional fiber optic fitting is shipped unassembled<br />
with the gun. If an ES (kV) display module is used,<br />
install the fitting in the FO port of the manifold. See FIG-<br />
URE 3, page 9, for a schematic of the fiber optic connections.<br />
1. Remove the plug (120) from the fiber optic port, and<br />
install the fiber optic fitting (5, shipped loose with the<br />
gun). See FIGURE 6.<br />
2. Remove the nut (AA) from the fiber optic fitting (5)<br />
and slide the nut over the end of the fiber optic cable<br />
(BB). See FIGURE 7.<br />
3. Push the cable (BB) into the fitting (5) until it bottoms<br />
out. Tighten the nut (AA) to secure the cable.<br />
BB<br />
AA<br />
5<br />
5<br />
Fig. 7: Fiber Optic Cable<br />
TI1581A<br />
120<br />
Most of the fiber optic light transmission loss occurs at<br />
the bulkhead splices. For the strongest light signals, use<br />
a minimum number of bulkhead splices. A maximum of<br />
two splices, with a total of 108 ft (33 m) of cable, is recommended.<br />
Fig. 6: Fiber Optic Fitting<br />
TI1580A<br />
4. See manual 308265 to install a <strong>Graco</strong> ES Display<br />
Module.<br />
12 309297K
Installation<br />
Grounding<br />
WARNING<br />
Fire, Explosion, and Electric Shock Hazard<br />
When operating the electrostatic gun, any<br />
ungrounded objects in the spray area (people,<br />
containers, tools, etc.) can become<br />
electrically charged. Improper grounding<br />
can result in static sparking, which can<br />
cause a fire, explosion, or electric shock.<br />
Follow the grounding instructions below.<br />
The following are minimum grounding requirements for<br />
a basic electrostatic system. Your system may include<br />
other equipment or objects which must be grounded.<br />
Check your local electrical code for detailed grounding<br />
instructions. Your system must be connected to a true<br />
earth ground.<br />
• Pump: ground the pump by connecting a ground<br />
wire and clamp as described in your separate pump<br />
instruction manual.<br />
• <strong>Electrostatic</strong> <strong>Air</strong> <strong>Spray</strong> <strong>Gun</strong>: ground the gun by connecting<br />
the <strong>Graco</strong> Grounded <strong>Air</strong> Hose to the turbine<br />
air inlet and connecting the air hose ground wire to a<br />
true earth ground. See Check Electrical Grounding,<br />
page 14.<br />
• <strong>Air</strong> compressors and hydraulic power supplies:<br />
ground the equipment according to the manufacturer's<br />
recommendations.<br />
• All air and fluid lines must be properly grounded.<br />
• All electrical cables must be properly grounded.<br />
• All persons entering the spray area: shoes must<br />
have conductive soles, such as leather, or personal<br />
grounding straps must be worn. Do not wear shoes<br />
with non-conductive soles such as rubber or plastic.<br />
• Object being sprayed: keep the workpiece hangers<br />
clean and grounded at all times. Resistance must<br />
not exceed 1 megohm.<br />
• The floor of the spray area: must be electrically conductive<br />
and grounded. Do not cover the floor with<br />
cardboard or any non-conductive material which<br />
would interrupt grounding continuity.<br />
• Flammable liquids in the spray area: must be kept in<br />
approved, grounded containers. Do not use plastic<br />
containers. Do not store more than the quantity<br />
needed for one shift.<br />
• All electrically conductive objects or devices in the<br />
spray area: including fluid containers and wash<br />
cans, must be properly grounded.<br />
309297K 13
Installation<br />
Check Electrical Grounding<br />
WARNING<br />
Fire, Explosion, and Electric Shock Hazard<br />
Megohmmeter Part No. 241079 (AA-see<br />
FIGURE 8) is not approved for use in a hazardous<br />
area. To reduce the risk of sparking,<br />
do not use the megohmmeter to check<br />
electrical grounding unless:<br />
• The gun has been removed from the<br />
hazardous area;<br />
• Or all spraying devices in the hazardous<br />
area are turned off, ventilation fans in the<br />
hazardous area are operating, and there<br />
are no flammable vapors in the area<br />
(such as open solvent containers or<br />
fumes from spraying).<br />
Failure to follow this warning could cause<br />
fire, explosion, and electric shock and result<br />
in serious injury and property damage.<br />
4. Measure the resistance between the turbine air inlet<br />
fitting (TA) and a true earth ground (N).<br />
a. If using a black or grey turbine air hose, use a<br />
megohmmeter to measure the resistance. Use<br />
an applied voltage of 500 minimum to 1000<br />
volts maximum. The resistance should not<br />
exceed 1 megohm.<br />
b. If using a red turbine air hose, use an ohmmeter<br />
to measure the resistance. The resistance<br />
should not exceed 100 ohms.<br />
3. If the resistance is greater than the maximum reading<br />
specified above for your hose, check the tightness<br />
of the ground connections and be sure the<br />
turbine air hose ground wire is connected to a true<br />
earth ground. If the resistance is still too high,<br />
replace the turbine air hose.<br />
N<br />
AA<br />
TA<br />
1. Have a qualified electrician check the electrical<br />
grounding continuity of the spray gun and turbine air<br />
hose.<br />
2. Make sure the turbine air hose (B) is connected and<br />
the hose ground wire is connected to a true earth<br />
ground.<br />
3. Turn off the air and fluid supply to the gun. The fluid<br />
hose must not have any fluid in it.<br />
B<br />
Fig. 8. Check <strong>Gun</strong> Grounding<br />
TI1584A<br />
14 309297K
Installation<br />
Check Fluid Resistivity<br />
WARNING<br />
Fire, Explosion, and Electric Shock Hazard<br />
Check the fluid resistivity in a non-hazardous<br />
area only. Resistance Meter 722886<br />
and Probe 722860 are not approved for use<br />
in a hazardous area.<br />
Failure to follow this warning could cause<br />
fire, explosion, or electric shock and result<br />
in serious injury and property damage.<br />
<strong>Graco</strong> Part No. 722886 Resistance Meter and 722860<br />
Probe are available as accessories to check that the<br />
resistivity of the fluid being sprayed meets the requirements<br />
of an electrostatic air spray system.<br />
Follow the instructions included with the meter and<br />
probe. Readings of 25 megohms-cm and above provide<br />
the best electrostatic results.<br />
Check Fluid Viscosity<br />
To check fluid viscosity you will need:<br />
• a viscosity cup<br />
• a stopwatch.<br />
1. Completely submerge the viscosity cup in the fluid.<br />
Lift the cup out quickly, starting the stopwatch as<br />
soon as the cup is completely removed.<br />
2. Watch the stream of fluid coming from the bottom of<br />
the cup. As soon as there is a break in the stream,<br />
shut off the stopwatch.<br />
3. Record the fluid type, elapsed time, and size of the<br />
viscosity cup.<br />
4. If the viscosity is too high or too low, contact the<br />
material supplier. Adjust as necessary.<br />
Install the Fabric Cover<br />
1. Install a fabric cover (XX) over the front of the gun<br />
and slide it back to cover the exposed tubing and<br />
hoses at the back of the manifold. See FIGURE 9.<br />
2. Route the exhaust tube (YY) outside the cover. This<br />
enables you to monitor the exhaust tube for the<br />
presence of any paint or solvent. See Check for<br />
Fluid Leakage on page 25. Strap down the exhaust<br />
tube to prevent it from moving around.<br />
YY<br />
YY<br />
Fig. 9. Fabric Cover<br />
XX<br />
ti1571a<br />
TI1579A<br />
309297K 15
Installation<br />
245324 HC Conversion Kit<br />
Part No. 245324 Conversion Kit is available to convert<br />
<strong>PRO</strong> <strong>Auto</strong> <strong>Xs</strong> standard coating guns (Part No. 244589)<br />
to high conductivity guns (244590).<br />
The kit is for use with fluids with low resistivity values.<br />
WARNING<br />
6. Slide the loops of the hc tube (19) onto the gun barrel<br />
(9).<br />
7. Make sure the barrel threads are clean and dry.<br />
Apply <strong>Graco</strong> Part No. 116553 dielectric grease to<br />
the fluid fitting (19d) threads and o-rings. Thread<br />
the fitting into the barrel inlet. See FIGURE 10.<br />
8. Slide the nut (20) and ferrules (21, 22) onto the<br />
coiled tube (19). Insert the end of the tube into the<br />
fitting (23). Make sure the ferrules seat in the fitting.<br />
Tighten the nut (20).<br />
Pressurized Equipment Hazard<br />
To reduce the risk of an injury, follow the<br />
Pressure Relief Procedure on page 17<br />
before installing this kit.<br />
9<br />
1. Turn the turbine air (TA) off.<br />
2. Flush the gun.<br />
3. Relieve the pressure.<br />
4. Remove the retaining ring (1), air cap (3), and<br />
shroud (2).<br />
19d<br />
19<br />
21<br />
22<br />
23<br />
TI1731A<br />
5. Refer to the parts drawing for Model 244589 on<br />
page 45. Loosen the two nuts (20) and remove the<br />
fluid tube (19) and ferrules (21, 22). Remove the<br />
other parts (14, 15, 16, 17, 18) at the gun barrel<br />
inlet.<br />
Fig. 10. HC Conversion Kit<br />
20<br />
16 309297K
Operation<br />
Operation<br />
Pressure Relief Procedure<br />
WARNING<br />
Pressurized Equipment Hazard<br />
The system pressure must be manually<br />
relieved to prevent the system from starting<br />
or spraying accidentally. To reduce the risk<br />
of an injury from electric shock, accidental spray from<br />
the gun, splashing fluid, or moving parts, follow the<br />
Pressure Relief Procedure whenever you:<br />
• are instructed to relieve the pressure<br />
2. Turn off the fluid supply to the gun.<br />
3. Trigger the gun into a grounded metal waste container<br />
to relieve the fluid pressure.<br />
4. If an air pilot fluid regulator is used, turn off the air<br />
pressure at the regulator air inlet.<br />
5. Relieve fluid pressure in the fluid supply equipment<br />
as instructed in its instruction manual.<br />
6. Turn off the main air supply by closing the<br />
bleed-type master air valve on the main air supply<br />
line. Leave the valve closed until you are ready to<br />
spray again.<br />
• stop spraying<br />
• check or service any of the system equipment<br />
• or install or clean the fluid nozzle.<br />
1. Turn off all the air to the spray gun except the cylinder<br />
air, which triggers the gun. If an air pilot fluid<br />
regulator is used in the system, the air pressure is<br />
needed at the regulator air inlet.<br />
309297K 17
Operation<br />
Operating Checklist<br />
Check the following list daily, before starting to operate<br />
the system, to help ensure you of safe, efficient operation.<br />
All operators are properly trained to safely<br />
operate an automatic electrostatic air spray<br />
system as instructed in this manual.<br />
All operators are trained in the Pressure<br />
Relief Procedure on page 17.<br />
The warning sign provided with the gun is<br />
mounted in the spray area where it can be<br />
easily seen and read by all operators.<br />
The system is thoroughly grounded and the<br />
operator and all persons entering the spray<br />
area are properly grounded. See Grounding<br />
on page 13.<br />
The condition of the gun’s electrical components<br />
has been checked as instructed in Electrical<br />
Tests on page 26.<br />
Ventilation fans are operating properly.<br />
Workpiece hangers are clean and grounded.<br />
All debris, including flammable fluids and rags,<br />
is removed from the spray area.<br />
All flammable fluids in the spray booth are in<br />
approved, grounded containers.<br />
All conductive objects in the spray area are<br />
electrically grounded and the floor of the spray<br />
area is electrically conductive and grounded.<br />
The manifold exhaust tubes have been<br />
checked for the presence of any fluid as<br />
instructed in Check for Fluid Leakage on<br />
page 25.<br />
Select a Fluid Nozzle and <strong>Air</strong><br />
Cap<br />
WARNING<br />
Pressurized Equipment Hazard<br />
To reduce the risk of an injury, follow the<br />
Pressure Relief Procedure on page 17<br />
before removing or installing a fluid nozzle<br />
and/or air cap.<br />
The gun is supplied with Part No. 197266 Nozzle and<br />
24A438 <strong>Air</strong> Cap. If you require a different size, refer to<br />
Table 2 and Table 3 , and instruction manual 309419, or<br />
consult with your <strong>Graco</strong> distributor. See <strong>Air</strong> Cap/Nozzle<br />
Replacement on page 34.<br />
Part No.<br />
Table 2: Fluid Nozzles<br />
Size,<br />
mm (in.)<br />
Part No.<br />
Size,<br />
mm (in.)<br />
197263 0.75 (.030) 197266 1.5 (.055)<br />
197264 1.0 (.042) 197267 1.8 (.070)<br />
197265 1.2 (.047) 197268 2.0 (.080)<br />
Part No.<br />
24A438<br />
24A279<br />
24A376*<br />
24A274<br />
24A439<br />
Table 3: <strong>Air</strong> Caps<br />
Pattern Shape<br />
and Length in.<br />
(mm)<br />
Round end;<br />
15-17 (381-432)<br />
Round end;<br />
14-16 (356-406)<br />
Tapered end;<br />
17-19 (432-483)<br />
Tapered end;<br />
12-14 (305-356)<br />
Round end;<br />
11-13 (279-330)<br />
Recommended Fluids and<br />
Production Rates<br />
Light to medium viscosity.<br />
Up to 15 oz/min (450<br />
cc/min)<br />
Medium to high viscosity<br />
and high solids.<br />
Up to 15 oz/min (450<br />
cc/min)<br />
Light to medium viscosity.<br />
Up to 15 oz/min (450<br />
cc/min)<br />
Light to medium viscosity.<br />
Up to 15 oz/min (450<br />
cc/min)<br />
Medium to high viscosity<br />
and high solids.<br />
Up to 15 oz/min (450<br />
cc/min)<br />
For use with 2.0 mm nozzle.<br />
*Also available in the following colors: 24A276 - blue,<br />
24A277 - red, 24A278 - green<br />
18 309297K
Operation<br />
Adjust the <strong>Spray</strong> Pattern<br />
Follow the steps below to establish the correct fluid flow<br />
and air flow. Do not turn on the turbine air (TA) yet.<br />
1. Relieve the pressure.<br />
WARNING<br />
Pressurized Equipment Hazard<br />
To reduce the risk of an injury, follow the<br />
Pressure Relief Procedure on page 17<br />
whenever you are instructed to relieve the<br />
pressure.<br />
2. Loosen the air cap retaining ring, and rotate the air<br />
cap for a vertical or horizontal spray pattern. See<br />
FIGURE 11. Tighten the retaining ring until the air<br />
cap is held firmly in place; you should not be able to<br />
rotate the air cap horns by hand.<br />
4. Use the air pressure regulator on the atomization air<br />
supply line (A1) to adjust the degree of atomization.<br />
See FIGURE 12. For example, for a fluid flow rate of<br />
10 ounces per minute (0.3 liters per minute), a typical<br />
atomization pressure would be 20-30 psi<br />
(1.4-2.1 bar, 0.14-0.21 MPa) at the gun manifold.<br />
5. Use the air pressure regulator on the fan air supply<br />
line (A2) to adjust the pattern size.<br />
• For the most efficiency, always use the lowest air<br />
pressure possible.<br />
• When increasing to a wide, flat pattern, it may be<br />
necessary to increase the supply of fluid to the gun<br />
to maintain the same amount of coverage over a<br />
large area.<br />
• See <strong>Spray</strong> Pattern Troubleshooting on page 29 to<br />
correct spray pattern problems.<br />
KV2<br />
TA<br />
KV1<br />
CYL<br />
Vertical Pattern<br />
A1<br />
A2<br />
Horizontal Pattern<br />
Fig. 11. <strong>Air</strong> Cap Positions<br />
3. Adjust the fluid flow with the fluid pressure regulator.<br />
Refer to instruction manual 309419 to set the fluid<br />
pressure for various fluid flows, according to the size<br />
of the fluid nozzle being used.<br />
Fig. 12. Manifold <strong>Air</strong> Connections<br />
TI1577A<br />
309297K 19
Operation<br />
Adjust the <strong>Electrostatic</strong>s<br />
1. Shut off the fluid supply.<br />
2. Trigger the gun, then turn on the turbine air (TA).<br />
See FIGURE 12.<br />
3. Refer to Table 4 to set the proper pressure at the<br />
turbine air hose inlet when air is flowing. Do not<br />
exceed these pressures as there is no added benefit<br />
and turbine life could be reduced.<br />
Table 4: Dynamic Turbine <strong>Air</strong> Pressures<br />
Turbine <strong>Air</strong><br />
Hose Length<br />
ft (m)<br />
<strong>Air</strong> pressure at turbine air hose<br />
inlet for full voltage<br />
psi (bar, MPa)<br />
15 (4.6) 54 (3.8, 0.38)<br />
25 (7.6) 55 (3.85, 0.38)<br />
36 (11) 56 (3.9, 0.39)<br />
50 (15.3) 57 (4.0, 0.40)<br />
75 (22.9) 59 (4.1, 0.41)<br />
100 (30.5) 61 (4.3, 0.43)<br />
4. Check the voltage output of the gun using a high<br />
voltage probe and meter or by reading the ES (kV)<br />
Display Module.<br />
The gun’s normal high voltage reading is 60-70 kV. If a<br />
ball end high voltage measurement probe is used, the<br />
gun voltage will rise to about 85 kV. This will happen<br />
with all resistive electrostatic guns.<br />
See Electrical Troubleshooting on page 31 to correct<br />
voltage problems.<br />
20 309297K
Operation<br />
<strong>Spray</strong>ing<br />
Triggering the Fluid Alone<br />
Electric Shock Hazard<br />
WARNING<br />
To reduce the risk of electric shock, do not<br />
touch the gun electrode or come within 4 in.<br />
(10 cm) of the nozzle during gun operation.<br />
1. Apply a minimum of 50 psi (3.5 bar, 0.35 MPa) air<br />
pressure to the cylinder air fitting (CYL) to activate<br />
the on/off sequence of atomization air (A1), fan air<br />
(A2), and fluid (P1). See FIGURE 12.<br />
2. Turn the gun functions on and off by using the air<br />
solenoid valves on the cylinder (CYL) and turbine<br />
(TA) air supply lines.<br />
3. To change to a lower voltage setting, activate the<br />
solenoids controlling the KV1 and KV2 ports. See<br />
Changing the kV Setting on page 6.<br />
WARNING<br />
1. Shut off and relieve the air pressure to the atomization<br />
(A1) and fan (A2) air lines, using the bleed-type<br />
air shutoff valves.<br />
2. Apply 50 psi (3.5 bar, 0.35 MPa) air pressure to the<br />
cylinder air fitting (CYL) to trigger the fluid.<br />
Shutdown<br />
1. Relieve the pressure.<br />
WARNING<br />
Pressurized Equipment Hazard<br />
To reduce the risk of an injury, follow the<br />
Pressure Relief Procedure on page 17<br />
when you stop spraying and whenever you<br />
are instructed to relieve the pressure.<br />
2. Flush and clean the equipment. See Maintenance<br />
on page 22.<br />
Fire and Explosion Hazard<br />
If any fluid leakage from the gun is<br />
detected, stop spraying immediately. Fluid<br />
leakage into the gun shroud could cause<br />
fire or explosion and result in serious injury<br />
and property damage. See Check for Fluid<br />
Leakage on page 25.<br />
309297K 21
Maintenance<br />
Maintenance<br />
Daily Care and Cleaning<br />
CAUTION<br />
• Clean all parts with a non-conductive, compatible<br />
solvent. Conductive solvents can cause the gun to<br />
malfunction.<br />
Do not immerse the gun in fluid.<br />
• Do not use methylene chloride as a flushing or<br />
cleaning solvent with this gun as it will damage<br />
nylon components.<br />
• Fluid in the air passages could cause the gun to<br />
malfunction and could draw current and reduce the<br />
electrostatic effect. Fluid in the power supply cavity<br />
can reduce the alternator life. Whenever possible,<br />
point the gun down when cleaning it. Do not use<br />
any cleaning method which could allow fluid into<br />
the gun air passages.<br />
TI1573A<br />
Do not point the gun up while cleaning it.<br />
Do not wipe the gun with a cloth that is heavily<br />
saturated; wring out the excess fluid.<br />
02027A<br />
TI1574A<br />
22 309297K
Maintenance<br />
Daily Care and Cleaning,<br />
continued<br />
WARNING<br />
Pressurized Equipment Hazard<br />
To reduce the risk of an injury, follow the<br />
Pressure Relief Procedure on page 17<br />
before doing any maintenance on the gun<br />
or system.<br />
• Clean the fluid and air line filters daily.<br />
• Clean the outside of the gun daily with a soft cloth<br />
dampened in a compatible solvent.<br />
• Clean the air cap and fluid nozzle daily, minimum.<br />
Some applications require more frequent cleaning.<br />
Replace the fluid nozzle and air cap if they are damaged.<br />
See Clean the <strong>Air</strong> Cap and Fluid Nozzle,<br />
page 24.<br />
• Check the electrode and replace if broken or damaged.<br />
See Electrode Replacement on page 35.<br />
• Check for fluid leakage from the gun and fluid<br />
hoses. See Check for Fluid Leakage on page 25.<br />
Tighten fittings or replace equipment as needed.<br />
• Flush the gun before changing colors and whenever<br />
you are done operating the gun.<br />
WARNING<br />
Fire, Explosion, and Electric Shock Hazard<br />
To reduce the risk of fire, explosion, or electric<br />
shock, turn off the turbine air (TA)<br />
before flushing the gun or any part of the<br />
system.<br />
309297K 23
Maintenance<br />
Clean the <strong>Air</strong> Cap and Fluid<br />
Nozzle<br />
Equipment Needed<br />
• soft bristle brush<br />
• compatible solvent<br />
Procedure<br />
1. Relieve the pressure.<br />
WARNING<br />
Pressurized Equipment Hazard<br />
To reduce the risk of an injury, follow the<br />
Pressure Relief Procedure on page 17<br />
when you stop spraying and whenever you<br />
are instructed to relieve the pressure.<br />
2. Remove the air cap assembly (1, 3) and shroud (2).<br />
See FIGURE 13.<br />
3. Wipe the fluid nozzle (4), shroud (2), and exterior of<br />
the gun clean with a cloth dampened in solvent.<br />
Avoid getting any solvent into the air passages.<br />
Whenever possible, point the gun down when cleaning<br />
it.<br />
6. Slide the shroud (2) onto the gun.<br />
7. Carefully install the air cap (3). Be sure to insert the<br />
electrode (7) through the center hole of the air cap.<br />
Rotate the air cap to the desired position.<br />
8. Make sure the u-cup (1a) is in place on the retaining<br />
ring (1). The lips must face forward. Tighten the<br />
retaining ring until the air cap is held firmly in place;<br />
you should not be able to rotate the air cap horns by<br />
hand.<br />
9. Test gun resistance, page 26.<br />
2<br />
CAUTION<br />
Do not use metal tools to clean the<br />
air cap or fluid nozzle holes as this<br />
could scratch them, and make sure<br />
the electrode is not damaged.<br />
Scratches in the air cap or nozzle or<br />
a damaged electrode can distort the<br />
spray pattern.<br />
4. If it appears that there is paint inside the fluid nozzle<br />
(4) air passages, remove the gun from the line for<br />
servicing.<br />
5. Clean the air cap (3) with the soft bristle brush and<br />
solvent or submerge the air cap in suitable solvent<br />
and wipe it clean.<br />
1a<br />
7<br />
4<br />
TI1560A<br />
3<br />
1<br />
Fig. 13. Clean <strong>Air</strong> Cap and Fluid Nozzle<br />
24 309297K
Maintenance<br />
Check for Fluid Leakage<br />
Fire and Explosion Hazard<br />
WARNING<br />
If any fluid leakage from the gun is<br />
detected, stop spraying immediately. Fluid<br />
leakage into the gun shroud could cause<br />
fire or explosion and result in serious injury<br />
and property damage.<br />
WARNING<br />
Pressurized Equipment Hazard<br />
To reduce the risk of an injury, follow the<br />
Pressure Relief Procedure on page 17<br />
when you stop spraying and whenever you<br />
are instructed to relieve the pressure.<br />
During operation, periodically check the manifold<br />
exhaust tube (YY) and both ends of the gun shroud (ZZ)<br />
for the presence of fluid. See FIGURE 14. Fluid in these<br />
areas indicates leakage into the shroud, which could be<br />
caused by leaks at the fluid tube connections or fluid<br />
packing leakage.<br />
If fluid is seen in these areas, stop spraying immediately.<br />
Relieve the pressure, then remove the gun for<br />
repair.<br />
YY<br />
YY<br />
ZZ<br />
ZZ<br />
ti1571a<br />
TI1579A<br />
Fig. 14. Check for Fluid Leakage<br />
309297K 25
Electrical Tests<br />
Test Power Supply<br />
Resistance<br />
6. Be sure the spring (12b) is in place before reinstalling<br />
the power supply.<br />
1. Remove the power supply (12), page 42.<br />
2. Remove the turbine alternator (13) from the power<br />
supply, page 43.<br />
3. Measure resistance from the power supply's ground<br />
strips (EE) to the spring (12b). See FIGURE 16.<br />
4. The resistance should be 135-150 megohms. If outside<br />
this range, replace the power supply. If in<br />
range, proceed to the next test.<br />
12b<br />
EE<br />
5. If you still have problems, refer to Electrical Troubleshooting<br />
on page 31 for other possible causes<br />
of poor performance, or contact your <strong>Graco</strong> distributor.<br />
Fig. 16. Test Power Supply Resistance<br />
ti1599a<br />
309297K 27
Electrical Tests<br />
Test Electrode Resistance<br />
1. Insert a conductive rod (B) into the gun barrel<br />
(removed for the power supply test) and against the<br />
metal contact (C) in the front of the barrel.<br />
2. Measure the resistance between the conductive rod<br />
(B) and the electrode (7). The resistance should be<br />
20-30 megohms. See FIGURE 17.<br />
3. If in range, refer to Electrical Troubleshooting on<br />
page 31 for other possible causes of poor performance,<br />
or contact your <strong>Graco</strong> distributor.<br />
4. Remove the electrode (7), page 35. Measure the<br />
resistance between the contact (E) and the electrode<br />
wire (F). The resistance should be 20-30 megohms.<br />
If out of range, replace the electrode. See<br />
FIGURE 18.<br />
Fig. 18. Electrode<br />
F 7 E<br />
ti1548a<br />
5. Make sure the metal contact (C) in the barrel, the<br />
nozzle contact ring (4a, FIGURE 19), and the electrode<br />
contacts (E) are clean and undamaged.<br />
ti1513a<br />
4a<br />
Fig. 19. Nozzle Conductive O-Ring<br />
7<br />
C<br />
B<br />
ti1499a<br />
Fig. 17. Test Electrode Resistance<br />
28 309297K
Troubleshooting<br />
Troubleshooting<br />
Electric Shock Hazard<br />
WARNING<br />
Installing and servicing this equipment<br />
requires access to parts which may cause<br />
an electric shock or other serious injury if<br />
the work is not performed properly. Do not install or<br />
repair this equipment unless you are trained and<br />
qualified.<br />
WARNING<br />
Pressurized Equipment Hazard<br />
To reduce the risk of an injury, follow the<br />
Pressure Relief Procedure on page 17<br />
whenever you are instructed to relieve the<br />
pressure.<br />
Check all possible remedies in the Troubleshooting<br />
Chart before disassembling the gun.<br />
<strong>Spray</strong> Pattern Troubleshooting<br />
Some spray pattern problems are caused by the improper balance between air and fluid.<br />
Problem Cause Solution<br />
Fluttering or spitting spray. No fluid. Refill supply.<br />
Loose, dirty, damaged nozzle/seat. Clean or replace nozzle, page 34.<br />
<strong>Air</strong> in fluid supply.<br />
Check fluid source. Refill.<br />
Improper spray pattern. Damaged nozzle or air cap. Replace, page 34.<br />
Fluid buildup on air cap or nozzle. Clean. See page 24.<br />
Fan air pressure too high.<br />
Fluid too thin.<br />
Fluid pressure too low.<br />
Fan air pressure too low.<br />
Decrease.<br />
<strong>Inc</strong>rease viscosity.<br />
<strong>Inc</strong>rease.<br />
<strong>Inc</strong>rease.<br />
Fluid too thick.<br />
Reduce viscosity.<br />
Too much fluid.<br />
Decrease flow.<br />
Streaks. Did not apply 50% overlap. Overlap strokes 50%.<br />
Dirty or damaged air cap. Clean or replace, page 34.<br />
309297K 29
Troubleshooting<br />
<strong>Gun</strong> Operation Troubleshooting<br />
Problem Cause Solution<br />
Excessive spray fog. Atomizing air pressure too high. Decrease air pressure as low as possible.<br />
Fluid too thin.<br />
<strong>Inc</strong>rease viscosity.<br />
“Orange Peel” finish. Atomizing air pressure too low. <strong>Inc</strong>rease air pressure; use lowest air<br />
pressure necessary.<br />
Poorly mixed or filtered fluid. Remix or refilter fluid.<br />
Fluid too thick.<br />
Reduce viscosity.<br />
Fluid leaks from the fluid packing<br />
area<br />
Worn packings or rod.<br />
Replace packings or rod; see pages<br />
36 or 37.<br />
<strong>Air</strong> leaks from the air cap Worn piston stem o-rings (34e, 34f). Replace; see page 38.<br />
Fluid leakage from the front of the Worn or damaged packing rod (8). Replace; see page 36<br />
gun<br />
Worn fluid seat.<br />
Replace fluid nozzle (4) and/or electrode<br />
needle (7); see pages 34 to 35.<br />
Loose fluid nozzle (4). Tighten; see page 34.<br />
Damaged nozzle o-ring (4b). Replace; see page 34.<br />
<strong>Gun</strong> does not spray Low fluid supply. Add fluid if necessary.<br />
Damaged air cap (3). Replace; see page 34.<br />
Dirty or clogged fluid nozzle (4). Clean; see page 34.<br />
Damaged fluid nozzle (4). Replace; see page 34.<br />
Piston (34) not actuating.<br />
Check cylinder air. Check piston<br />
u-cup (34d); see page 38.<br />
Actuator arm (29) is out of position. Check actuator arm and nuts. See<br />
page 39.<br />
Dirty air cap<br />
Misaligned air cap (3) and fluid nozzle<br />
(4).<br />
Clean fluid buildup off air cap and<br />
fluid nozzle seat; see page 24.<br />
Damaged nozzle orifice. Replace nozzle (4); see page 34.<br />
Fluid is coming on before the air. Check actuator arm and nuts. See<br />
page 39.<br />
<strong>Air</strong> leaks from manifold Manifold is not tight. Tighten manifold screws (106).<br />
Fluid leaks at the quick-disconnect. Manifold is not tight. Tighten manifold screws (106).<br />
Fluid hose o-rings are worn or missing.<br />
Inspect or replace o-rings.<br />
30 309297K
Troubleshooting<br />
Electrical Troubleshooting<br />
Problem Cause Solution<br />
Poor wrap. Turbine air is not turned on. Turn on.<br />
Booth exhaust velocity is too high. Reduce velocity to within code limits.<br />
Atomizing air pressure too high. Decrease.<br />
Fluid pressure too high.<br />
Decrease.<br />
<strong>Inc</strong>orrect distance from gun to part. Should be 8-12 in. (200-300 mm).<br />
Poorly grounded parts.<br />
Resistance must be 1 megohm or<br />
less. Clean workpiece hangers.<br />
Faulty gun resistance.<br />
See Test <strong>Gun</strong> Resistance on page<br />
26.<br />
Low fluid resistivity. Check fluid resistivity, page 15.<br />
No voltage or low voltage reading on<br />
the gun ES display module<br />
Operator gets mild shock.<br />
Fluid leaks from the packing (8d) and<br />
causes a short.<br />
Faulty turbine alternator.<br />
The KV switch is stuck on low.<br />
Clean the packing rod cavity.<br />
Replace the packing rod. See page<br />
37.<br />
Be sure the plug is in place on the<br />
back of the turbine alternator housing.<br />
Remove and test the turbine<br />
alternator. See page 43.<br />
Check the switch actuation; replace if<br />
needed.<br />
No power. Replace power supply. See page 42.<br />
Damaged fiber optic cable or connection.<br />
Turbine air is not turned on.<br />
Poor wrap.<br />
Operator not grounded or is near<br />
ungrounded object.<br />
<strong>Gun</strong> not grounded.<br />
Check; replace damaged parts.<br />
Turn on.<br />
See causes and solutions under Poor<br />
Wrap, above.<br />
See Grounding on page 13.<br />
See Check Electrical Grounding on<br />
page 14 and Test <strong>Gun</strong> Resistance<br />
on page 26.<br />
Operator gets shock from workpiece. Workpiece not grounded. Resistance must be 1 megohm or<br />
less. Clean workpiece hangers.<br />
309297K 31
Repair<br />
Repair<br />
Prepare the <strong>Gun</strong> for Service<br />
• Check all possible remedies in Troubleshooting<br />
before disassembling the gun.<br />
Electric Shock Hazard<br />
WARNING<br />
Installing and repairing this equipment<br />
requires access to parts that may cause<br />
electric shock or other serious injury if the<br />
work is not performed properly. Do not install or service<br />
this equipment unless you are trained and qualified.<br />
WARNING<br />
Pressurized Equipment Hazard<br />
To reduce the risk of injury, follow the Pressure<br />
Relief Procedure on page 17 before<br />
checking or servicing any part of the system<br />
and whenever you are instructed to relieve the pressure.<br />
• Use a vise with padded jaws to prevent damage to<br />
plastic parts.<br />
• Lubricate the power supply o-ring (12a), some packing<br />
rod parts (8), and certain fluid fittings with Part<br />
No. 116553 Dielectric Grease, as specified in the<br />
text.<br />
• Lightly lubricate o-rings and seals with non-silicone<br />
grease. Order Part No. 111265 Lubricant. Do not<br />
over-lubricate.<br />
• Only use genuine <strong>Graco</strong> parts. Do not mix or use<br />
parts from other <strong>PRO</strong> <strong>Gun</strong> models.<br />
1. Flush and clean the gun, page 22.<br />
2. Relieve the pressure, page 17.<br />
3. Remove the gun from the manifold, page 33.<br />
4. Remove the gun from the worksite. Repair area<br />
must be clean.<br />
32 309297K
Repair<br />
Remove the <strong>Gun</strong> from the<br />
Manifold<br />
1. Loosen the bottom gun screw (31) until the gun sits<br />
loosely in the mounting bracket slot (A). See FIGURE<br />
20.<br />
CAUTION<br />
The piston return spring (105) is compressed<br />
between the manifold and the gun body when they<br />
are assembled. To avoid sudden movement of the<br />
gun, loosen the bottom gun screw (31) before loosening<br />
the three manifold screws (106). This allows<br />
the gun to move forward gradually as the manifold<br />
screws are loosened. Hold the gun firmly in hand<br />
while loosening the manifold screws.<br />
Install the <strong>Gun</strong> on the<br />
Manifold<br />
1. Make sure the gasket (112) and spring (105) are in<br />
place on the manifold. See FIGURE 20. Inspect the<br />
parts for damage and replace them as needed.<br />
2. Secure the gun to the manifold by tightening the<br />
three screws (106).<br />
3. Secure the gun to the mounting bracket (102) by<br />
tightening the bottom screw (31).<br />
2. Holding the gun firmly in hand, loosen the three<br />
screws (106) from the back of the manifold.<br />
3. Remove the gun from the manifold and take it to the<br />
service area.<br />
112<br />
106<br />
105<br />
A<br />
TI1559A<br />
102<br />
Fig. 20. Remove <strong>Gun</strong> from Manifold<br />
309297K 33
Repair<br />
<strong>Air</strong> Cap/Nozzle Replacement<br />
CAUTION<br />
Hold the front end of the gun up and trigger the gun<br />
while removing the nozzle to help drain the gun and<br />
prevent any paint or solvent left in the gun from entering<br />
the air passages.<br />
1. Prepare gun for service, page 32.<br />
2. Remove the retaining ring (1) and air cap (3). See<br />
FIGURE 21.<br />
3. Point gun up while removing the fluid nozzle (4)<br />
assembly with the multi-tool (40).<br />
1, 3<br />
40<br />
1<br />
WARNING<br />
Fire, Explosion, and Electric Shock Hazard<br />
The nozzle contact ring (4a) is a conductive<br />
contact ring, not a sealing o-ring. To reduce<br />
the risk of sparking or electric shock, do not<br />
remove the nozzle contact ring (4a) except<br />
to replace it and never operate the gun<br />
without the contact ring in place. Do not<br />
replace the contact ring with anything but a<br />
genuine <strong>Graco</strong> part.<br />
Use non-silicone grease, Part No. 111265, on the small<br />
o-ring (4b). Do not over-lubricate. Do not lubricate the<br />
contact ring (4a).<br />
4. Lightly lubricate the o-ring (4b). Install it and the<br />
contact ring (4a) on the nozzle (4).<br />
Make sure the electrode needle (7) is finger- tight (page<br />
35).<br />
5. Install the fluid nozzle (4) with the multi-tool (40).<br />
Tighten until the fluid nozzle seats in the gun barrel<br />
(1/8 to 1/4 turn past hand-tight).<br />
4<br />
7<br />
1a<br />
6. Carefully install the air cap (3). Be sure to insert the<br />
electrode (7) through the center hole of the air cap.<br />
Rotate the air cap to the desired position.<br />
4<br />
4a<br />
4b<br />
3<br />
7. Make sure the u-cup (1a) is in place on the retaining<br />
ring (1). The lips must face forward. Tighten the<br />
retaining ring until the air cap is held firmly in place;<br />
you should not be able to rotate the air cap horns by<br />
hand.<br />
8. Test gun resistance, page 26.<br />
TI1572A<br />
Fig. 21. <strong>Air</strong> Cap/Nozzle Replacement<br />
9. Install the gun onto the manifold and bracket. See<br />
page 33.<br />
34 309297K
Repair<br />
Electrode Replacement<br />
1. Prepare the gun for service, page 32.<br />
2. Remove the air cap and nozzle, page 34. Remove<br />
the gun shroud (2).<br />
3. Unscrew the electrode (7) with the multi-tool (40).<br />
Hold the packing rod end (8h) to prevent it from turning,<br />
FIGURE 22.<br />
40<br />
CAUTION<br />
To avoid damaging the plastic threads, be very careful<br />
when installing the electrode.<br />
8h<br />
4. Apply low-strength (purple) Loctite® or equivalent<br />
thread sealant to the electrode and packing rod<br />
threads. Install the electrode finger-tight. Do not<br />
overtighten.<br />
5. Install the fluid nozzle, page 34.<br />
6. Test gun resistance, page 26.<br />
7. Install the gun shroud (2) and air cap, page 34.<br />
8. Install the gun onto the manifold and bracket. See<br />
page 33.<br />
Fig. 22. Electrode Replacement<br />
TI1565A<br />
309297K 35
Repair<br />
Fluid Packing Removal<br />
You may replace the packing rod as an assembly, as<br />
described below, or as individual parts (see page 37).<br />
The assembly is pre-adjusted at the factory.<br />
Before installing the packing rod, clean the internal surface<br />
of the barrel (9) with a soft cloth or brush. Check for<br />
marks from high voltage arcing. If marks are present,<br />
replace the barrel.<br />
1. Prepare the gun for service, page 32.<br />
2. Remove the air cap, page 34. Remove the gun<br />
shroud (2).<br />
3. Remove the jam nut (28) and actuator arm (29). See<br />
page 38.<br />
The fluid nozzle (4) must be in place when removing or<br />
installing the jam nut and actuator arm.<br />
40<br />
4. Remove the fluid nozzle (4) and electrode (7). See<br />
pages 34 and 35.<br />
9<br />
5. Remove the packing rod (8), using the multi-tool<br />
(40).<br />
CAUTION<br />
28<br />
Clean all parts in non-conductive solvent compatible<br />
with the fluid being used, such as xylol or mineral<br />
spirits. Use of conductive solvents can cause the gun<br />
to malfunction.<br />
TI1566A<br />
6. Check all parts for wear or damage and replace if<br />
necessary.<br />
Fig. 23. Fluid Packing Removal<br />
36 309297K
Repair<br />
Packing Rod Repair<br />
You may replace the packing rod as individual parts, as<br />
described below, or as an assembly (see page 36). The<br />
assembly is pre-adjusted at the factory.<br />
Before installing the fluid packing rod into the gun barrel,<br />
make sure the internal surfaces of the barrel are clean.<br />
Remove any residue with a soft brush or cloth. Check<br />
the inside of the barrel for marks from high voltage arcing.<br />
If marks are present, replace the barrel.<br />
To assemble the individual parts:<br />
1. Place the packing nut (8e) and seal (8b) on the fluid<br />
rod (8h). Flats on the packing nut must face the<br />
back of the fluid rod. The seal o-ring must face away<br />
from the packing nut. See FIGURE 24.<br />
2. Fill the inner cavity of the spacer (8g) with dielectric<br />
grease. Place the spacer on the fluid rod (8h) in the<br />
direction shown. Generously apply dielectric grease<br />
to the outside of the spacer.<br />
3. Place the rod packing (8d), packing spreader (8c),<br />
and housing (8f) on the packing rod (8h).<br />
4. Lightly tighten the packing nut (8e). The packing nut<br />
is properly tightened when there is 3 lb (13.3 N) of<br />
drag force when sliding the packing housing (8f)<br />
assembly along the rod. Tighten or loosen the packing<br />
nut as needed.<br />
5. Install the o-ring (8a) on the outside of housing (8f).<br />
Lubricate the o-ring with non-silicone grease, Part<br />
No. 111265. Do not over-lubricate.<br />
6. Install the spring (25) against the nut (E) as shown.<br />
7. Install the packing rod assembly (8) into the gun<br />
barrel. Using the multi-tool (40), tighten the assembly<br />
until just snug.<br />
8. Install the electrode, page 35 and nozzle, page 34.<br />
9. Install and adjust the actuator arm (29) and jam nut<br />
(28). See page 39.<br />
10. Test gun resistance, page 26.<br />
11. Install the gun shroud (2) and air cap, page 34.<br />
12. Install the gun onto the manifold and bracket. See<br />
page 33.<br />
E<br />
8h<br />
TI1489A<br />
25<br />
8c<br />
8d<br />
8g<br />
8b<br />
8e<br />
8f<br />
8a<br />
Fig. 24. Packing Rod<br />
309297K 37
Repair<br />
Piston Repair<br />
1. Prepare the gun for service, page 32.<br />
2. Remove the air cap, page 34. Remove the gun<br />
shroud (2).<br />
Description<br />
Shaft O-Ring<br />
(34g)<br />
Table 5: Piston O-Rings<br />
Function<br />
Seals cylinder air along the piston rod<br />
(34b). Replace if air leaks along rod.<br />
3. Remove the jam nut (28), actuator arm (29), and<br />
adjustment nut (30). See FIGURE 25.<br />
The fluid nozzle (4) must be in place when removing or<br />
installing the jam nut and actuator arm.<br />
Front O-Ring<br />
(34e)<br />
Back O-Ring<br />
(34f)<br />
U-Cup (34d)<br />
<strong>Air</strong> shutoff seal. Replace if air leaks from<br />
air cap when gun is de-triggered.<br />
Separates cylinder air from fan and<br />
atomizing air.<br />
Replace if air leaks from small vent hole<br />
at back of manifold when gun is triggered.<br />
34d<br />
34a<br />
Fig. 25. Actuator Arm<br />
28 29 30 34b<br />
TI1709A<br />
34e<br />
34f<br />
34c<br />
4. Push on the piston rod (34b) to push the piston out<br />
the back of the gun.<br />
34b<br />
TI1575A<br />
5. Inspect the o-rings (34e, 34f, 34g) and u-cup packing<br />
(34d) for damage. See Table 5 and FIGURE 26.<br />
6. Lubricate the o-rings (34e, 34f, 34g) and u-cup<br />
packing (34d) with non-silicone grease, Part No.<br />
111265. Do not over-lubricate.<br />
34g<br />
34e<br />
34f<br />
34d<br />
7. Align the two stems (34c) with the holes in the gun<br />
body and press the piston assembly into the back of<br />
the gun until it bottoms.<br />
8. Install and adjust the actuator arm, page 39.<br />
Fan <strong>Air</strong> Side<br />
Atomizing <strong>Air</strong> Side<br />
34g<br />
TI1576A<br />
Fig. 26. Piston O-Rings<br />
38 309297K
Repair<br />
Adjust the Actuator Arm<br />
The fluid nozzle (4) must be in place when removing or<br />
installing the jam nut and actuator arm.<br />
1. Install the adjustment nut (30), actuator arm (29),<br />
and jam nut (28) onto the piston rod (34b). Note that<br />
the jam nut (28) has a slightly larger hex and a thinner<br />
profile than the adjustment nut (30). See FIGURE<br />
25 on page 38.<br />
5. Install the gun shroud (2) and air cap (3), page 34.<br />
6. Install the gun onto the manifold and bracket. See<br />
page 33.<br />
0.125 in. (3 mm) gap<br />
2. Position the parts so there is a 0.125 in. (3 mm) gap<br />
between the actuator arm (29) and the fluid packing<br />
rod nut (E), which allows the atomizing air to actuate<br />
before the fluid. See FIGURE 27.<br />
3. Tighten the adjustment nut (30) against the actuator<br />
arm (29). Check that the 0.125 in. (3 mm) gap has<br />
been maintained. In addition, there should be 3-4<br />
mm of electrode needle travel when the gun is triggered.<br />
Adjust the jam nut position to obtain these<br />
dimensions.<br />
4. Test gun resistance, page 26.<br />
29<br />
28 30 34b E<br />
Fig. 27. Actuator Arm Adjustment<br />
TI1567A<br />
309297K 39
Repair<br />
Barrel Removal<br />
6. Hold the gun body (32) with one hand and pull the<br />
barrel (9) straight off the body. See FIGURE 28.<br />
1. Prepare the gun for service, page 32.<br />
2. Remove the air cap, page 34. Remove the gun<br />
shroud (2).<br />
3. Carefully loosen the fluid fitting nut (20). Pull the<br />
tube (19) out of the fitting (23). Make sure both ferrules<br />
(21, 22) and the nut stay with the tube.<br />
4. Remove the jam nut (28) and actuator arm (29). See<br />
page 38.<br />
9<br />
10<br />
32<br />
5. Loosen the three screws (10, 33). See FIGURE 28.<br />
CAUTION<br />
To avoid damaging the power supply (12), pull the<br />
gun barrel (9) straight away from the gun body (32). If<br />
necessary, gently move the gun barrel from side to<br />
side to free it from the gun body.<br />
33<br />
Fig. 28. Barrel Removal<br />
TI1563A<br />
9<br />
32<br />
29<br />
TI1709A<br />
28<br />
30<br />
19<br />
20 23<br />
Fig. 29. Disconnect Fluid Tube<br />
40 309297K
Repair<br />
Barrel Installation<br />
1. Be sure the gasket (11) and grounding spring (51)<br />
are in place. Make sure the air holes are aligned<br />
properly. Replace if damaged. See FIGURE 30.<br />
2. Place the barrel (9) over the power supply (12) and<br />
onto the gun body (32).<br />
3. Tighten the three screws (10, 33) oppositely and<br />
evenly (about a half turn past snug).<br />
4. Assemble the fluid tube (19) into the fluid fitting (23).<br />
Ensure that the ferrules (21, 22) are in place.<br />
Tighten the nut (20).<br />
5. Install and adjust the actuator arm (29) and jam nut<br />
(28). See page 39.<br />
6. Test gun resistance, page 26.<br />
7. Install the gun shroud (2) and air cap, page 34.<br />
8. Install the gun onto the manifold and bracket. See<br />
page 33.<br />
CAUTION<br />
Do not over-tighten the screws (10, 33).<br />
32<br />
11<br />
12<br />
10<br />
TI1569A<br />
33<br />
9<br />
51 28<br />
29<br />
19<br />
20<br />
23<br />
Fig. 30. Barrel Installation<br />
309297K 41
Repair<br />
Power Supply Removal and<br />
Replacement<br />
• Inspect the gun body power supply cavity for dirt or<br />
moisture. Clean with a clean, dry rag.<br />
• Do not expose gasket (11) to solvents.<br />
1. Prepare gun for service, page 32.<br />
2. Remove the barrel (9), page 40.<br />
CAUTION<br />
Be careful when handling the power supply (12) to<br />
avoid damaging it.<br />
3. Grasp the power supply (12) with your hand. With a<br />
gentle side to side motion, free the power supply/alternator<br />
assembly from the gun body (32),<br />
then carefully pull it straight out. Disconnect the flexible<br />
circuit (39) from the socket at the top of the body<br />
(32). See FIGURE 31.<br />
4. Disconnect the 3-wire connector (GG) from the<br />
power supply. Slide the alternator up and off the<br />
power supply. Inspect the power supply and alternator<br />
for damage. Disconnect the 6-pin flexible circuit<br />
(39) from the power supply.<br />
5. Check the power supply resistance, page 27.<br />
Replace if necessary.<br />
Before installing the power supply, make sure the<br />
o-rings (12a, 13a), spring (12b), and pads (13e) are in<br />
place.<br />
6. Connect the 6-pin flexible circuit (39) to the power<br />
supply.<br />
7. Connect the 3-wire connector (GG). Slide the alternator<br />
(13) down onto the power supply (12).<br />
8. Lubricate the alternator o-ring (13a) with non-silicone<br />
grease, Part No. 111265. Do not over-lubricate.<br />
9. Lubricate the power supply o-ring (12a) with dielectric<br />
grease.<br />
10. Insert the power supply/alternator assembly in the<br />
gun body (32). Make sure the ground strips make<br />
contact with the body. Connect the flexible circuit<br />
(39) to the socket at the top of the body. Push the<br />
6-pin connector into the socket to ensure it is properly<br />
connected.<br />
11. Install the barrel (9), page 41.<br />
12. Test gun resistance, page 26.<br />
42 309297K
Repair<br />
39<br />
12<br />
11<br />
12a<br />
12b<br />
32<br />
13a<br />
13e<br />
13<br />
GG<br />
TI1568A<br />
Fig. 31. Power Supply<br />
Turbine Alternator Removal<br />
and Replacement<br />
Replace turbine alternator bearings after 2000 hours of<br />
operation. Order Part No. 223688 Bearing Kit.<br />
1. Prepare gun for service, page 32.<br />
2. Remove the power supply/alternator assembly,<br />
page 42.<br />
3. Disconnect the alternator from the power supply,<br />
page 42.<br />
4. Measure resistance between the two outer terminals<br />
of the 3-wire connector (GG); it should be<br />
2.5-3.5 ohms. If outside this range, replace the alternator<br />
coil.<br />
5. Follow the bearing replacement procedure in the<br />
bearing kit manual 308034.<br />
6. Install the alternator on the power supply, page 42.<br />
7. Install the power supply/alternator assembly, page<br />
42.<br />
309297K 43
Repair<br />
Notes<br />
44 309297K
Parts<br />
Parts<br />
Part No. 244589 <strong>PRO</strong> <strong>Auto</strong> <strong>Xs</strong> <strong>Electrostatic</strong> <strong>Gun</strong>, Series B, for standard coatings<br />
4<br />
4a<br />
4b<br />
7<br />
1a<br />
3<br />
2<br />
8<br />
1<br />
39<br />
13<br />
13a<br />
9<br />
10<br />
11<br />
51<br />
12<br />
20<br />
21<br />
22<br />
19<br />
35<br />
13e<br />
41<br />
Ref. No. 13: Alternator Detail<br />
13b<br />
13b<br />
13a<br />
TI1481a<br />
14<br />
15<br />
16<br />
25<br />
27<br />
17 18 34f<br />
34e<br />
34d<br />
34c<br />
34a<br />
40<br />
13d<br />
13c<br />
13e<br />
26<br />
29<br />
28<br />
30<br />
12a 12b 32<br />
24<br />
23<br />
34b<br />
33<br />
34g<br />
TI1558A<br />
8f<br />
8c<br />
8d<br />
8g<br />
8b<br />
8e<br />
8h<br />
ti1601a<br />
19 (Ref) 20 21 22<br />
31<br />
8a<br />
Ref. No. 8: Packing Rod Detail<br />
309297K 45
Parts<br />
Part No. 244589 <strong>PRO</strong> <strong>Auto</strong> <strong>Xs</strong> <strong>Electrostatic</strong> <strong>Gun</strong>, Series B, for standard coatings<br />
Ref.<br />
No.<br />
Part No. Description Qty<br />
1 244950 RING, retaining, air cap; includes<br />
1a<br />
1a*† 198307 . U-CUP 1<br />
2 245312 SHROUD 1<br />
3 24A438 AIR CAP 1<br />
4 197266 NOZZLE; 1.5 mm orifice; includes<br />
4a and 4b<br />
4a 111261 . O-RING, conductive 1<br />
4b 111507 . O-RING; fluoroelastomer 1<br />
5 198486 CONNECTOR, tube, fiber optic;<br />
pictured on page 51 (unassembled)<br />
7 276697 NEEDLE, electrode 1<br />
8 244521 ROD, packing; includes 8a-8h 1<br />
8a* 111316 . O-RING; fluoroelastomer 1<br />
8b* 116905 . SEAL 1<br />
8c* 178409 . SPREADER, packing; uhmwpe 1<br />
8d* 178763 . PACKING, rod; acetal 1<br />
8e 197641 . NUT, packing 1<br />
8f 185495 . HOUSING, packing 1<br />
8g* 186069 . SPACER, packing; acetal 1<br />
8h 244696 . ROD, packing 1<br />
9 244394 BARREL, gun 1<br />
10 197518 SCREW; socket-hd; 10-24 x 3/4<br />
in. (19 mm)<br />
11*† 197517 GASKET, barrel 1<br />
12 244541 POWER SUPPLY, 85 kV; includes<br />
12a-12b<br />
12a*† 103337 . O-RING; fluoroelastomer 1<br />
1<br />
1<br />
1<br />
1<br />
1<br />
Ref.<br />
No.<br />
Part No. Description Qty<br />
13 244555 TURBINE, alternator; includes<br />
13a-13e<br />
13a*† 110073 . O-RING; fluoroelastomer 1<br />
13b 223688 . BEARING KIT; includes front<br />
and rear bearings and fan<br />
13c 244577 . COIL 1<br />
13d 111745 . RING, retaining 1<br />
13e 198821 . PAD, pressure 2<br />
14* 111316 O-RING 1<br />
15* 102982 O-RING 1<br />
16 189757 FITTING, fluid 1<br />
17 112642 SPACER 1<br />
18 111370 CONNECTOR, elbow; includes<br />
items 20, 21, 22<br />
19 198043 TUBE, fluid 1<br />
20 112644 NUT 1<br />
21* 111285 FERRULE, back 1<br />
22* 111286 FERRULE, front 1<br />
23 189549 FITTING, fluid, quick-disconnect 1<br />
24* 111450 O-RING 1<br />
25 185111 SPRING, compression 1<br />
26 189367 CAP, exhaust 1<br />
27 185122 MUFFLER 1<br />
28 101324 NUT, jam, hex 1<br />
29 197919 ARM, actuator 1<br />
30 102025 NUT, hex 1<br />
31 112689 SCREW, button-hd; 1/4-20 x 3/4<br />
in. (19 mm)<br />
32 245662 BODY, gun 1<br />
1<br />
1<br />
1<br />
1<br />
12b 197624 . SPRING, compression 1<br />
46 309297K
Parts<br />
Ref.<br />
No.<br />
Part No. Description Qty<br />
Ref.<br />
No.<br />
Part No. Description Qty<br />
33 116575 SCREW, cap, socket-hd; 10-24; 3<br />
in. (76 mm)<br />
34 244702 PISTON; includes 34a-34g 1<br />
34a 197920 . PISTON 1<br />
34b 189754 . ROD, piston 1<br />
34c 189355 . STEM, piston 2<br />
34d*† 189752 . PACKING, u-cup 1<br />
34e*† 111504 . O-RING 2<br />
34f*† 112319 . O-RING 2<br />
34g*† 111508 . O-RING 1<br />
35 244586 MANIFOLD; see separate parts<br />
list on page 51<br />
39 245265 CIRCUIT, flexible 1<br />
2<br />
1<br />
41 107460 WRENCH, ball end; 4 mm 1<br />
42 179791 TAG, warning (not shown);<br />
replacement available at no cost<br />
43 180060 SIGN, warning (not shown);<br />
replacement available at no cost<br />
44 239945 COVER, gun; box of 10 (not<br />
shown)<br />
51 197624 SPRING, grounding 1<br />
* Recommended spare parts. Keep on hand to reduce<br />
downtime.<br />
† <strong>Inc</strong>luded in repair kit 15D592.<br />
Replacement Warning labels, signs, tags, and cards are<br />
available at no cost.<br />
1<br />
1<br />
1<br />
40 276741 MULTI-TOOL 1<br />
309297K 47
Parts<br />
Part No. 244590 <strong>PRO</strong> <strong>Auto</strong> <strong>Xs</strong> <strong>Electrostatic</strong> <strong>Gun</strong>, Series B, for high conductivity coatings<br />
7<br />
8<br />
4<br />
4a<br />
4b<br />
2<br />
1a<br />
3<br />
1<br />
39<br />
13<br />
13a<br />
10<br />
11<br />
12<br />
41<br />
Ref. No. 13: Alternator Detail<br />
13a<br />
9<br />
51<br />
19<br />
13e<br />
35<br />
13b<br />
13b<br />
TI1481a<br />
19b<br />
19a<br />
19 (Ref)<br />
25<br />
27<br />
19d<br />
19c<br />
34f<br />
34e<br />
34d<br />
34c<br />
34a<br />
40<br />
13d<br />
13c<br />
13e<br />
26<br />
29<br />
28<br />
30<br />
12a 12b 32<br />
24<br />
23<br />
34b<br />
33<br />
34g<br />
TI1586A<br />
8f<br />
8c<br />
8d<br />
8g<br />
8b<br />
8e<br />
8h<br />
ti1601a<br />
19 (Ref) 20 21 22 31<br />
8a<br />
Ref. No. 8: Packing Rod Detail<br />
48 309297K
Parts<br />
Part No. 244590 <strong>PRO</strong> <strong>Auto</strong> <strong>Xs</strong> <strong>Electrostatic</strong> <strong>Gun</strong>, Series B, for high conductivity coatings<br />
Ref.<br />
No.<br />
Part No. Description Qty<br />
1 244950 RING, retaining, air cap; includes<br />
1a<br />
1a*† 198307 . U-CUP 1<br />
2 245312 SHROUD 1<br />
3 24A438 AIR CAP 1<br />
4 197266 NOZZLE; 1.5 mm orifice; includes<br />
4a and 4b<br />
4a 111261 . O-RING, conductive 1<br />
4b 111507 . O-RING; fluoroelastomer 1<br />
5 198486 CONNECTOR, tube, fiber optic;<br />
pictured on page 51 (unassembled)<br />
7 276697 NEEDLE, electrode 1<br />
8 244521 ROD, packing; includes 8a-8h 1<br />
8a* 111316 . O-RING; fluoroelastomer 1<br />
8b* 116905 . SEAL 1<br />
8c* 178409 . SPREADER, packing; uhmwpe 1<br />
8d* 178763 . PACKING, rod; acetal 1<br />
8e 197641 . NUT, packing 1<br />
8f 185495 . HOUSING, packing 1<br />
8g* 186069 . SPACER, packing; acetal 1<br />
8h 244696 . ROD, packing 1<br />
9 244394 BARREL, gun 1<br />
10 197518 SCREW; socket-hd; 10-24 x 3/4<br />
in. (19 mm)<br />
11*† 197517 GASKET, barrel 1<br />
12 244541 POWER SUPPLY, 85 kV; includes<br />
12a-12b<br />
12a*† 103337 . O-RING; fluoroelastomer 1<br />
12b 197624 . SPRING, compression 1<br />
1<br />
1<br />
1<br />
1<br />
1<br />
Ref.<br />
No.<br />
Part No. Description Qty<br />
13 244555 TURBINE, alternator; includes<br />
13a-13e<br />
13a*† 110073 . O-RING; fluoroelastomer 1<br />
13b 223688 . BEARING KIT; includes front<br />
and rear bearings and fan<br />
13c 244577 . COIL 1<br />
13d 111745 . RING, retaining 1<br />
13e 198821 . PAD, pressure 2<br />
19 237297 TUBE, fluid; coiled; includes<br />
19a-19d<br />
19a* 102982 . O-RING 1<br />
19b* 111450 . O-RING 1<br />
19c* 103337 . O-RING 2<br />
19d 186818 . FITTING 1<br />
20 112644 NUT 1<br />
21* 111285 FERRULE, back 1<br />
22* 111286 FERRULE, front 1<br />
23 189549 FITTING, fluid, quick-disconnect 1<br />
24* 111450 O-RING 1<br />
25 185111 SPRING, compression 1<br />
26 189367 CAP, exhaust 1<br />
27 185122 MUFFLER 1<br />
28 101324 NUT, jam, hex 1<br />
29 197919 ARM, actuator 1<br />
30 102025 NUT, hex 1<br />
31 112689 SCREW, button-hd; 1/4-20 x 3/4<br />
in. (19 mm)<br />
32 245662 BODY, gun 1<br />
33 116575 SCREW, cap, socket-hd; 10-24; 3<br />
in. (76 mm)<br />
Continued on page 50.<br />
1<br />
1<br />
1<br />
1<br />
2<br />
309297K 49
Parts<br />
Ref.<br />
No.<br />
Part No. Description Qty<br />
Ref.<br />
No.<br />
Part No. Description Qty<br />
34 244702 PISTON; includes 34a-34g 1<br />
34a 197920 . PISTON 1<br />
34b 189754 . ROD, piston 1<br />
34c 189355 . STEM, piston 2<br />
34d*† 189752 . PACKING, u-cup 1<br />
34e*† 111504 . O-RING 2<br />
34f*† 112319 . O-RING 2<br />
34g*† 111508 . O-RING 1<br />
35 244586 MANIFOLD; see separate parts<br />
list on page 51<br />
39 245265 CIRCUIT, flexible 1<br />
40 276741 MULTI-TOOL 1<br />
1<br />
41 107460 WRENCH, ball end; 4 mm 1<br />
42 179791 TAG, warning (not shown);<br />
replacement available at no cost<br />
43 180060 SIGN, warning (not shown);<br />
replacement available at no cost<br />
44 239945 COVER, gun; box of 10 (not<br />
shown)<br />
51 197624 SPRING, grounding 1<br />
* Recommended spare parts. Keep on hand to reduce<br />
downtime.<br />
† <strong>Inc</strong>luded in repair kit 15D592.<br />
Replacement Warning labels, signs, tags, and cards are<br />
available at no cost.<br />
1<br />
1<br />
1<br />
50 309297K
Parts<br />
Part No. 244586 Manifold, Series A<br />
101 (Ref)<br />
106 (Ref)<br />
5 (see pages 46 or 49)<br />
112<br />
116<br />
117<br />
120<br />
101<br />
116a<br />
109<br />
119 114<br />
115<br />
102<br />
113<br />
105<br />
TI1582A<br />
104<br />
103<br />
108<br />
111<br />
106<br />
118<br />
TI1578A<br />
107<br />
110<br />
Ref.<br />
No.<br />
Part No. Description Qty<br />
101 198216 MANIFOLD 1<br />
102 189581 BRACKET, reciprocator 1<br />
103 110465 SCREW, set 2<br />
104 112689 SCREW, button-hd 2<br />
105 112640 SPRING, compression 1<br />
106 197518 SCREW; socket-hd; 10-24 x 3/4<br />
in. (19 mm)<br />
107 111157 FITTING, tube, exhaust 1<br />
108 186845 FITTING, turbine, air 1<br />
109 110078 FITTING, tube, air 2<br />
3<br />
Ref.<br />
No.<br />
Part No. Description Qty<br />
114 189365 CAP, kV, HI/LO 2<br />
115 198764 RESTRICTOR 1<br />
116 244772 PISTON; includes 116a 2<br />
116a† 112085 . O-RING (1 per piston) 2<br />
117 114263 FITTING, tube, air 3<br />
118 111450 O-RING 1<br />
119 116621 SPRING, compression 2<br />
120 112645 PLUG 1<br />
† <strong>Inc</strong>luded in repair kit 15D592.<br />
110 112646 PLUG 1<br />
111 189551 FITTING, quick-disconnect, fluid 1<br />
112† 197925 GASKET, manifold 1<br />
113 108290 SCREW, machine 2<br />
309297K 51
Accessories<br />
Accessories<br />
<strong>Air</strong> Line Accessories<br />
<strong>Air</strong>Flex Flexible Grounded <strong>Air</strong> Hose<br />
100 psi (7 bar, 0.7 MPa) Maximum Working Pressure<br />
0.315 in. (8 mm) ID; 1/4 npsm(f) x 1/4 npsm(f) left-hand<br />
thread<br />
244963 6 ft (1.8 m)<br />
244964 15 ft (4.6 m)<br />
244965 25 ft (7.6 m)<br />
244966 36 ft (11 m)<br />
244967 50 ft (15 m)<br />
244968 75 ft (23 m)<br />
244969 100 ft (30.5 m)<br />
Standard Grounded <strong>Air</strong> Hose (Grey)<br />
100 psi (7 bar, 0.7 MPa) Maximum Working Pressure<br />
0.315 in. (8 mm) ID; 1/4 npsm(f) x 1/4 npsm(f) left-hand<br />
thread<br />
223068 6 ft (1.8 m)<br />
223069 15 ft (4.6 m)<br />
223070 25 ft (7.6 m)<br />
223071 36 ft (11 m)<br />
223072 50 ft (15 m)<br />
223073 75 ft (23 m)<br />
223074 100 ft (30.5 m)<br />
Bleed-Type Master <strong>Air</strong> Valve<br />
300 psi (21 bar, 2.1 MPa) Maximum Working Pressure<br />
Relieves air trapped in the air line between this valve<br />
and the pump air motor when closed.<br />
107141 3/4 npt<br />
<strong>Air</strong> Line Shutoff Valve<br />
150 psi (10 bar, 1.0 MPa) Maximum Working Pressure<br />
For turning air to gun on or off.<br />
224754 1/4 npsm(m) x 1/4 npsm(f) left-hand thread.<br />
Fluid Line Accessories<br />
Fluid Hose<br />
225 psi (14 bar, 1.4 MPa) Maximum Working Pressure<br />
FM Approved; nylon; 3/8 npsm(fbe)<br />
215637 1/4 in. (6 mm) ID x 25 ft (7.6 m)<br />
215638 1/4 in. (6 mm) ID x 50 ft (15.2 m)<br />
Fluid Shutoff/Drain Valve<br />
500 psi (35 bar, 3.5 MPa) Maximum Working Pressure<br />
For turning fluid on or off to the gun and for relieving<br />
fluid line pressure at the pump.<br />
208630 1/2 npt(m) x 3/8 npt(f); carbon steel and<br />
PTFE; for non-corrosive fluids<br />
Drain Valve<br />
300 psi (21 bar, 2.1 MPa) Maximum Working Pressure<br />
236853 Mounts directly to gun manifold for faster<br />
flushing and color changes. Must be used<br />
with 233676 Fluid Recirculation Kit.<br />
Fluid Recirculation Kit<br />
233676 Converts standard gun to a recirculating<br />
gun. Requires 236853 Drain Valve.<br />
<strong>Gun</strong> Mounted Fluid Regulator<br />
100 psi (7 bar, 0.7 MPa) Maximum Working Pressure<br />
236854 <strong>Air</strong>-piloted fluid regulator mounts directly to<br />
gun manifold for precise fluid control.<br />
52 309297K
Accessories<br />
Miscellaneous Accessories<br />
Ground Wire and Clamp<br />
222011 For grounding pump and other components<br />
and equipment in the spray area.<br />
12 gauge, 25 ft (7.6 m).<br />
Megohmmeter<br />
241079 500 Volt output; 0.01-2000 megohms.<br />
Not for use in hazardous areas.<br />
Paint Resistance Meter<br />
722886 Use with 722860 Paint Probe to measure<br />
resistance of paint.<br />
Not for use in hazardous areas.<br />
Paint Probe<br />
722860 Use with 722886 Paint Resistance Meter to<br />
measure resistance of paint.<br />
Not for use in hazardous areas.<br />
Safety Warning Signs<br />
180060 English Warning Sign. FM Approved. Available<br />
at no charge from <strong>Graco</strong>.<br />
ES Display Module<br />
224117 Receives fiber optic transmission from the<br />
<strong>PRO</strong> <strong>Auto</strong> <strong>Xs</strong> gun and displays the gun’s<br />
output voltage and current. Mounts in a<br />
standard 19 in. DIN rack. See 308265.<br />
Fiber Optic Y Cables<br />
Fiber Optic Cables<br />
See item V in FIGURE 3 on page 9. Connect gun manifold<br />
and remote voltage display, bulkhead connector<br />
and remote display, or bulkhead connector and gun<br />
manifold. See 308265.<br />
224672 25 ft (7.6 m)<br />
224674 50 ft (15 m)<br />
224676 100 ft (30.5 m)<br />
Power Supply<br />
235301 Supplies low voltage DC power to 224117<br />
Display Module. See 308265.<br />
Remote Voltage Display<br />
189762 Battery-operated meter displays actual<br />
spraying voltage. remote mount outside<br />
hazardous area. Connects to gun via fiber<br />
optic cable. See 308265.<br />
Remote Voltage Display Kits<br />
<strong>Inc</strong>lude 189762 Remote Voltage Display and fiber optic<br />
cable.<br />
236917 25 ft (7.6 m)<br />
236919 50 ft (15 m)<br />
236921 100 ft (30.5 m)<br />
Bulkhead Connector<br />
189870 For connecting two fiber optic cables.<br />
See item T in FIGURE 3 on page 9. For use with 224117<br />
Display Module only. Connect gun manifold and display<br />
module, or bulkhead connector and display module. See<br />
308265.<br />
224682 25 ft (7.6 m)<br />
224684 50 ft (15 m)<br />
224686 100 ft (30.5 m)<br />
309297K 53
Accessories<br />
<strong>Gun</strong> Accessories<br />
Round Pattern Kits<br />
Consists of fluid tip, diffuser and air cap.<br />
245217 4-6 in. (102-152 mm) diameter<br />
245219 8-10 in. (203-254 mm) diameter<br />
Dielectric Grease<br />
116553 1 oz (28 g) tube of dielectric grease for the<br />
power supply o-ring (12a), some packing<br />
rod parts (8), and certain fluid fittings.<br />
<strong>Gun</strong> Valve Lubricant<br />
111265 4 oz (113 g) tube of sanitary (non-silicone)<br />
lubricant for fluid seals and wear areas.<br />
Alternator Bearing Kit<br />
223688 To repair the turbine alternator.<br />
Cleaning Brush<br />
105749 For cleaning air cap and fluid nozzle.<br />
HC Conversion Kit<br />
245324 Converts <strong>PRO</strong> <strong>Auto</strong> <strong>Xs</strong> standard coating<br />
gun (Part No. 244589) to high conductivity<br />
gun (244590). The kit is for use with fluids<br />
with low resistivity values. See page 16.<br />
54 309297K
Technical Data<br />
Technical Data<br />
Category<br />
Maximum Working Fluid Pressure<br />
Maximum Working <strong>Air</strong> Pressure<br />
Minimum <strong>Air</strong> Pressure at <strong>Gun</strong> Inlet<br />
Maximum Fluid Operating Temperature<br />
Paint Resistivity Range<br />
Short Circuit Current Output<br />
Voltage Output<br />
Sound Power (measured per ISO Standard 9216)<br />
Sound Pressure (measured 1 m from gun)<br />
Turbine air inlet fitting, left-hand thread<br />
Atomizing air inlet fitting<br />
Fan air inlet fitting<br />
Cylinder air inlet fitting<br />
Hi/Lo voltage selector air inlet fittings<br />
Fluid inlet fitting<br />
<strong>Gun</strong> Weight<br />
<strong>Gun</strong> Length<br />
Wetted Parts<br />
Data<br />
100 psi (0.7 MPa, 7 bar)<br />
100 psi (0.7 MPa, 7 bar)<br />
40 psi (0.28 MPa, 2.8 bar)<br />
120°F (48°C)<br />
3 megohm/cm to infinity<br />
125 microamperes<br />
40-85 kV<br />
at 40 psi (0.28 MPa, 2.8 bar): 90.4 dB(A)<br />
at 100 psi (0.7 MPa, 7 bar): 105.4 dB(A)<br />
at 40 psi (0.28 MPa, 2.8 bar): 87 dB(A)<br />
at 100 psi (0.7 MPa, 7 bar): 99 dB(A)<br />
1/4 npsm(m)<br />
3/8 in. OD nylon tube<br />
3/8 in. OD nylon tube<br />
5/32 in. OD nylon tube<br />
5/32 in. OD nylon tube<br />
1/4-18 npsm(m)<br />
3.52 lb (1.6 kg)<br />
12.25 in. (31.1 cm)<br />
Stainless Steel; Nylon, Acetal, Ultra-High Molecular<br />
Weight Polyethylene, Fluoroelastomer, PEEK, Tungsten<br />
Wire, Polyethylene<br />
Loctite® is a registered trademark of the Loctite Corporation.<br />
309297K 55
<strong>Graco</strong> Standard Warranty<br />
<strong>Graco</strong> warrants all equipment manufactured by <strong>Graco</strong> and bearing its name to be free from defects in material and workmanship on the date of<br />
sale to the original purchaser for use. With the exception of any special, extended, or limited warranty published by <strong>Graco</strong>, <strong>Graco</strong> will, for a period<br />
of twelve months or two thousand hours of operation from the date of sale, repair or replace any part of the equipment determined by <strong>Graco</strong> to be<br />
defective. However, any deficiency in the gun barrel, gun body, manifold, mounting bracket, internal power supply, and alternator (excluding turbine<br />
bearings) will be repaired or replaced for thirty-six months or six thousand hours of operation from the date of sale. This warranty applies only<br />
when the equipment is installed, operated and maintained in accordance with <strong>Graco</strong>'s written recommendations.<br />
This warranty does not cover, and <strong>Graco</strong> shall not be liable for general wear and tear, or any malfunction, damage or wear caused by faulty<br />
installation, misapplication, abrasion, corrosion, inadequate or improper maintenance, negligence, accident, tampering, or substitution of<br />
non-<strong>Graco</strong> component parts. Nor shall <strong>Graco</strong> be liable for malfunction, damage or wear caused by the incompatibility of <strong>Graco</strong> equipment with<br />
structures, accessories, equipment or materials not supplied by <strong>Graco</strong>, or the improper design, manufacture, installation, operation or<br />
maintenance of structures, accessories, equipment or materials not supplied by <strong>Graco</strong>.<br />
This warranty is conditioned upon the prepaid return of the equipment claimed to be defective to an authorized <strong>Graco</strong> distributor for verification of<br />
the claimed defect. If the claimed defect is verified, <strong>Graco</strong> will repair or replace free of charge any defective parts. The equipment will be returned<br />
to the original purchaser transportation prepaid. If inspection of the equipment does not disclose any defect in material or workmanship, repairs will<br />
be made at a reasonable charge, which charges may include the costs of parts, labor, and transportation.<br />
THIS WARRANTY IS EXCLUSIVE, AND IS IN LIEU OF ANY OTHER WARRANTIES, EXPRESS OR IMPLIED, INCLUDING BUT NOT LIMITED<br />
TO WARRANTY OF MERCHANTABILITY OR WARRANTY OF FITNESS FOR A PARTICULAR PURPOSE.<br />
<strong>Graco</strong>'s sole obligation and buyer's sole remedy for any breach of warranty shall be as set forth above. The buyer agrees that no other remedy<br />
(including, but not limited to, incidental or consequential damages for lost profits, lost sales, injury to person or property, or any other incidental or<br />
consequential loss) shall be available. Any action for breach of warranty must be brought within two (2) years of the date of sale.<br />
<strong>Graco</strong> makes no warranty, and disclaims all implied warranties of merchantability and fitness for a particular purpose in connection with<br />
accessories, equipment, materials or components sold but not manufactured by <strong>Graco</strong>. These items sold, but not manufactured by <strong>Graco</strong> (such as<br />
electric motors, switches, hose, etc.), are subject to the warranty, if any, of their manufacturer. <strong>Graco</strong> will provide purchaser with reasonable<br />
assistance in making any claim for breach of these warranties.<br />
In no event will <strong>Graco</strong> be liable for indirect, incidental, special or consequential damages resulting from <strong>Graco</strong> supplying equipment hereunder, or<br />
the furnishing, performance, or use of any products or other goods sold hereto, whether due to a breach of contract, breach of warranty, the<br />
negligence of <strong>Graco</strong>, or otherwise.<br />
FOR GRACO CANADA CUSTOMERS<br />
The parties acknowledge that they have required that the present document, as well as all documents, notices and legal proceedings entered into,<br />
given or instituted pursuant hereto or relating directly or indirectly hereto, be drawn up in English. Les parties reconnaissent avoir convenu que la<br />
rédaction du présente document sera en Anglais, ainsi que tous documents, avis et procédures judiciaires exécutés, donnés ou intentés à la suite<br />
de ou en rapport, directement ou indirectement, avec les procedures concernées.<br />
<strong>Graco</strong> Information<br />
For the latest information about <strong>Graco</strong> products, visit www.graco.com.<br />
TO PLACE AN ORDER, contact your <strong>Graco</strong> distributor, or call this number to identify the distributor closest to you:<br />
1-800-328-0211 Toll Free<br />
612-623-6921<br />
612-378-3505 Fax<br />
All written and visual data contained in this document reflects the latest product information available at the time of publication.<br />
<strong>Graco</strong> reserves the right to make changes at any time without notice.<br />
Original instructions. This manual contains English. MM 309297<br />
<strong>Graco</strong> Headquarters: Minneapolis<br />
International Offices: Belgium, China, Japan, Korea<br />
GRACO INC. P.O. BOX 1441 MINNEAPOLIS, MN 55440-1441<br />
Copyright 2002, <strong>Graco</strong> <strong>Inc</strong>. is registered to ISO 9001<br />
www.graco.com<br />
Revised 08/2010


