President's Challenge Qualifying standards
President's Challenge Qualifying standards
President's Challenge Qualifying standards

Create successful ePaper yourself
Turn your PDF publications into a flip-book with our unique Google optimized e-Paper software.
President’s <strong>Challenge</strong><br />
<strong>Qualifying</strong> <strong>standards</strong><br />
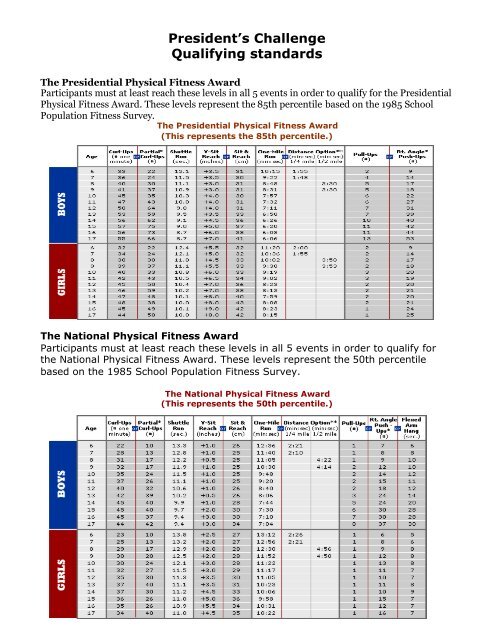
The Presidential Physical Fitness Award<br />
Participants must at least reach these levels in all 5 events in order to qualify for the Presidential<br />
Physical Fitness Award. These levels represent the 85th percentile based on the 1985 School<br />
Population Fitness Survey.<br />
The Presidential Physical Fitness Award<br />
(This represents the 85th percentile.)<br />
The National Physical Fitness Award<br />
Participants must at least reach these levels in all 5 events in order to qualify for<br />
the National Physical Fitness Award. These levels represent the 50th percentile<br />
based on the 1985 School Population Fitness Survey.<br />
The National Physical Fitness Award<br />
(This represents the 50th percentile.)<br />
1
The Participant Physical Fitness Award<br />
Boys and Girls who attempt all five items, but whose scores fall below the 50th percentile on one<br />
or more of them are eligible to receive the Participant Award.<br />
The National Physical Fitness Award<br />
(This represents the 50th percentile.)<br />
Testing guidelines and events<br />
The PCPFS recommends fitness testing at least twice each year, in the fall and spring. It works<br />
best as part of a complete physical education program that supports testing with educational and<br />
motivational information.<br />
Before conducting The <strong>President's</strong> <strong>Challenge</strong>, or any youth fitness test, you should review each<br />
student's medical status to identify medical, orthopedic or other health problems that should be<br />
considered.<br />
Before you begin, make sure all students know the correct techniques for all tests, including<br />
proper pacing and running style. There is no limit to the number of tries students may have on<br />
each event.<br />
*When determining award levels, use the age of the student at the start of testing.<br />
2
Physical Fitness Test Events<br />
Curl-ups (or partial curl-ups)<br />
This event measures abdominal strength and endurance.<br />
Curl-ups test<br />
Have student lie on cushioned, clean surface with knees flexed and<br />
feet about 12 inches from buttocks. Partner holds feet. Arms are<br />
crossed with hands placed on opposite shoulders and elbows held close to chest. Keeping this<br />
arm position, student raises the trunk curling up to touch elbows to thighs and then lowers the<br />
back to the floor so that the scapulas (shoulder blades) touch the floor, for one curl-up. To start,<br />
a timer calls out the signal "Ready? Go!" and begins timing student for one minute. The student<br />
stops on the word "stop."<br />
Curl-ups tip<br />
Instruct helpers to count aloud the number of repetitions.<br />
Curl-ups scoring<br />
"Bouncing" off the floor is not permitted. The curl-up should be<br />
counted only if performed correctly.<br />
Partial curl-ups test<br />
Have student lie on cushioned, clean surface with knees flexed and feet about 12 inches from<br />
buttocks. Do not hold or anchor the feet. Arms are extended forward with fingers resting on the<br />
legs and pointing toward the knees. The student's partner is behind the head with hands cupped<br />
under the student's head. The student being tested curls up slowly sliding the fingers up the legs<br />
until the fingertips touch the knees, then back down until the head touches the partner's hands.<br />
The curl-ups are done to a metronome (or audio tape, clapping, drums) with one complete curlup<br />
every three seconds, and are continued until the student can do no more in rhythm (has not<br />
done the last three in rhythm) or has reached the target number for the test.<br />
Partial curl-ups tip<br />
Make sure that the participant's arm is fully extended from the starting position.<br />
Partial curl-ups scoring<br />
Record only those curl-ups done with proper form and in rhythm.<br />
Partial curl-ups rationale<br />
Done slowly with knees bent and feet not held, the partial curl-up is a better indicator of<br />
abdominal strength and endurance than the timed curl-ups.<br />
3
Shuttle Run<br />
This event measures speed, quickness and agility.<br />
Shuttle run testing<br />
Mark two parallel lines 30 feet apart and place two blocks of wood or similar<br />
object behind one of the lines. Students start behind opposite line. On the signal<br />
"Ready? Go!" the student runs to the blocks, picks one up, runs back to the<br />
starting line, places block behind the line, runs back and picks up the second<br />
block and runs back across starting line.<br />
Shuttle run tip<br />
Be sure the participants understand the importance of<br />
running through the finish line.<br />
Shuttle run scoring<br />
Blocks should not be thrown across the lines. Scores are<br />
recorded to the nearest tenth of a second.<br />
Endurance run/walk<br />
This event measures heart/lung endurance.<br />
Endurance run/walk testing<br />
On a safe, one-mile distance, students begin running on the count<br />
"Ready? Go!" Walking may be interspersed with running. However, the<br />
students should be encouraged to cover the distance in as short a time<br />
as possible.<br />
Endurance run/walk tip<br />
Use a large enough running area so that no more than eight laps are necessary to complete a<br />
mile. Help participants learn proper pacing for the mile by having them run at the mile pace for<br />
short distances during warm-up time.<br />
If you are not using a track that is measured in miles, then you will need to convert from that<br />
measurement into miles. Refer to the conversion chart below for converting to miles when using<br />
a 400 meter track or 440 yards.<br />
Endurance run/walk scoring<br />
Always review students' health status before<br />
administering this test. Give students ample<br />
instruction on how to pace themselves. Allow<br />
them to practice running this distance against<br />
time, as well as sufficient time for warming up and cooling down before and after the test. Times<br />
are recorded in minutes and seconds.<br />
Alternative distances for younger children are 1/4 mile for 6-7 years old, and 1/2 mile for 8-9<br />
years old. The same objective and testing procedure are used as with the mile run.<br />
4<br />
Conversion for Miles<br />
On a 400 meter track<br />
1 mile = 4 laps + 9 meters<br />
3/4 mile = 3 laps + 6.75 meters<br />
1/2 mile = 2 laps + 4.5 meters<br />
1/4 mile = 1 lap + 2.25 meters<br />
On a 440 yard track<br />
1 mile = 4 laps<br />
3/4 mile = 3 laps<br />
1/2 mile = 2 laps<br />
1/4 mile = 1 lap
Pull-ups (or right angle push-ups or<br />
flexed-arm hang)<br />
This event measures upper body strength and endurance.<br />
Pull-ups testing<br />
Student hangs from a horizontal bar at a height the student can<br />
hang from with arms fully extended and feet free from floor, using<br />
either an overhand grasp (palms facing away from body) or underhand grip (palms facing<br />
toward body). Small students may be lifted to starting position. Student raises body until chin<br />
clears the bar and then lowers body to full-hang starting position. Student performs as many<br />
correct pull-ups as possible.<br />
Pull-ups tip<br />
Spend as little time hanging from the bar beforehand as possible, the extra time on the bar may<br />
reduce the number of pull-ups performed. Discourage any kicking of the legs or swinging of the<br />
body as this may also decrease the number of repetitions.<br />
Pull-ups scoring<br />
Pull-ups should be done in a smooth rather than jerky motion. Kicking or bending the legs is not<br />
permitted and the body must not swing during the movement.<br />
Right angle push-ups testing<br />
The student lies face down on the mat in push-up position with hands under shoulders, fingers<br />
straight, and legs straight, parallel, and slightly apart, with the toes supporting the feet. The<br />
student straightens the arms, keeping the back and knees straight, then lowers the body until<br />
there is a 90-degree angle at the elbows, with the upper arms parallel to the floor. A partner<br />
holds her / his hand at the point of the 90-degree angle so that the student being tested goes<br />
down only until her / his shoulder touches the partner's hand, then back up. The push-ups are<br />
done to a metronome (or audio tape, clapping, drums) with one complete push-up every three<br />
seconds, and are continued until the student can do no more in rhythm (has not done the last<br />
three in rhythm) or has reached the target number for the PPFA.<br />
Right angle push-ups tip<br />
As with the pull-up, spend as little time in the starting position beforehand in order to increase<br />
the number of repetitions. Any extra movement may also decrease the number of repetitions.<br />
Right angle push-ups scoring<br />
Record only those push-ups done with proper form and in rhythm.<br />
Right angle push-ups rationale<br />
The student's body weight has less effect on right angle push-ups than it does on pull-ups. This<br />
makes right angle push-ups a better indicator of the range of strength and endurance found in<br />
students, whereas many are unable to do any pull-ups. Pull-ups remain an option for students at<br />
higher levels of strength and endurance.<br />
5
Flexed-arm hang testing<br />
Using either an overhand grasp (palms facing away from body) or underhand grip (palms facing<br />
toward body), student assumes flexed-arm hang position with chin clearing the bar. Students<br />
may be lifted to this position. Student holds this position as long as possible.<br />
Flexed-arm hang tip<br />
Rather than doing a pull-up to start, lift the participant to the starting position. This decreases<br />
any extra exertion and may possibly increase the length of time.<br />
Flexed-arm hang scoring<br />
Chest should be held close to bar with legs hanging straight.<br />
chin touches or falls below the bar.<br />
V-sit reach (or sit and reach)<br />
This event measures flexibility of the lower back and hamstrings.<br />
Timing is stopped when student's<br />
V-sit testing<br />
Mark a straight line two feet long on the floor as the baseline. Draw a<br />
measuring line perpendicular to the midpoint of the baseline extending<br />
two feet on each side and marked off in half-inches. The point where<br />
the baseline and measuring line intersect is the "0" point. Student<br />
removes shoes and sits on floor with measuring line between legs and<br />
soles of feet placed immediately behind baseline, heels 8-12" apart. Student clasps thumbs so<br />
that hands are together, palms down and places them on measuring line. With the legs held flat<br />
by a partner, student slowly reaches forward as far as possible, keeping fingers on baseline and<br />
feet flexed. After three practice tries, the student holds the fourth reach for three seconds while<br />
that distance is recorded.<br />
V-sit tip<br />
Participants are most flexible after a warm-up run. Best results may<br />
occur immediately after performing the endurance run.<br />
V-sit rules<br />
Legs must remain straight with soles of feet held perpendicular to the<br />
floor (feet flexed). Students should be encouraged to reach slowly<br />
rather than "bounce" while stretching. Scores, recorded to the nearest<br />
half inch, are read as plus scores for reaches beyond baseline, minus scores for reaches behind<br />
baseline.<br />
Sit and reach testing<br />
A specially constructed box (see below) with a measuring scale marked in centimeters, with 23<br />
centimeters at the level of the feet. Student removes shoes and sits on floor with knees fully<br />
extended, feet shoulder-width apart and soles of the feet held flat against the end of the box.<br />
With hands on top of each other, palms down, and legs held flat, student reaches along the<br />
measuring line as far as possible. After three practice reaches, the fourth reach is held while the<br />
distance is recorded.<br />
Sit and reach tip<br />
Participants are most flexible after a warm-up run. Best results may occur immediately after<br />
performing the endurance run.<br />
6
Sit and reach rules<br />
Legs must remain straight, soles of feet against box and fingertips of both hands should reach<br />
evenly along measuring line. Scores are recorded to the nearest centimeter.<br />
See next page for information on how to make a sit and reach box at home.<br />
Constructing the Sit and Reach Box<br />
1. Using any sturdy wood or comparable material (3/4" plywood is recommended), cut the following pieces:<br />
• 2 pieces - 12" x 12"<br />
• 2 pieces - 12" x 10"<br />
• 1 piece - 12" x 21"<br />
2. Assemble the pieces using nails or screws and wood glue.<br />
3. Inscribe the top panel with 1 centimeter gradations. It is crucial that the 23 centimeter line be exactly in line with the<br />
vertical plane against which the subject's feet will be placed.<br />
4. Cover the apparatus with two coats of polyurethane sealer or shellac.<br />
5. For convenience, you can make a handle by cutting a 1" x 3" hole in the top panel.<br />
6. The measuring scale should extend from 9 cm to 50 cm.<br />
7