INSTRUCTION MANUAL FOR SPOT WELDING MACHINES ... - GYS
INSTRUCTION MANUAL FOR SPOT WELDING MACHINES ... - GYS
INSTRUCTION MANUAL FOR SPOT WELDING MACHINES ... - GYS

You also want an ePaper? Increase the reach of your titles
YUMPU automatically turns print PDFs into web optimized ePapers that Google loves.
<strong>GYS</strong> S5<br />
Mise à jour : 10/03/03<br />
<strong>INSTRUCTION</strong> <strong>MANUAL</strong><br />
<strong>FOR</strong> <strong>SPOT</strong> <strong>WELDING</strong><br />
<strong>MACHINES</strong><br />
GY<strong>SPOT</strong> P230<br />
GY<strong>SPOT</strong> P400<br />
GY<strong>SPOT</strong> 25D<br />
GY<strong>SPOT</strong> 32D<br />
1
Congratulations for the selection of this product which has been designed with great care ; Before<br />
installing and using the product, please read carefully the following recommendations of safety in<br />
order to avoid accidents to the users and damages of the welding process.<br />
<strong>GYS</strong> can’t be responsible for the damages occurred to persons or things, which derive from the use of<br />
the machine in following circumstances:<br />
- Modification or neutralization of safety elements<br />
- Non respect of the recommendations written in the manual instruction.<br />
- Modification of the characteristics on the product<br />
- Use of the accessories, which are different from the ones delivered by <strong>GYS</strong>.<br />
I / PRESENTATION<br />
This product has been designed to carry out the following operations in car body workshop:<br />
- Spot welding machine on sheet metals with pneumatic pliers (except GY<strong>SPOT</strong> P230, P400),<br />
- Welding of sheet metals with gun<br />
- Welding of nails, rivets, discs and pins.<br />
- Suppression of bumps and impacts ( impact of hail with the option “quick repair”).<br />
II / SAFETY STANDARDS AND GENERAL PRECAUTIONS<br />
GENERALITIES<br />
1. Before disassembling the product’s body, plug out the lead cable.<br />
2. The operators must have the appropriate qualification.<br />
3. The operations of servicing can only be controlled by qualified technicians.<br />
4. The operator is responsible for respect of the car manufacturers ‘ recommendations, concerning the<br />
protection of electrical and electronic procedures ( car computer, car radio, alarm, air bag, etc…)<br />
5. Before an operation of servicing, the power supply with compressed air must be cut off and off<br />
loaded.<br />
6. The electrodes, arms, and the other secondary conductors can reach a very high temperature and<br />
remain hot very long after having stopped the machine. Be careful: high risk of burns.<br />
7. It is necessary to make a regular preventive maintenance.<br />
ELECTRICITY<br />
1. Check that the unity must be connected to the earth coupler and that the connection to the earth is<br />
in good condition.<br />
2. Check that the work bench is connected to the earth coupler.<br />
3. Make sure that the operator has no contact with the metal parts to be welded without any protection<br />
or with wet clothes.<br />
4. Avoid to be in contact with the welding part.<br />
5. Don’t make spot welding operations in very wet areas or on a wet floor.<br />
6. Don’t weld with worn out cables. Check that there is no default with the isolation with stripped<br />
cables or with loose connections.<br />
7. Switch off the unit before replacing the electrodes..<br />
8. Before controlling or repairing, please disconnect the unit directly to the level of the plug.<br />
PROTECTION OF EYES AND BODY<br />
1. During the welding process, the process must be protected from the eventual flashes of the electrical<br />
arc with protection clothes like leather gloves, welding aprons, safety shoes, welding helmets or<br />
glasses for filtering radiations and projections. As well during operations of rubbing and hammering,<br />
the operator must protect his eyes.<br />
2. The force of tightening of the clamp can reach 310 DaN. Keep away all body parts from the mobile<br />
elements to avoid risks of tightening.<br />
3. Don’t keep rings, watches, or jewellery, which are current lead and can create burns.<br />
4. All the protection board must be in good condition and maintained in place.<br />
Never look at an arc of welding without any protection of your eyes.<br />
Protect the environment near the product against projections and reflections.<br />
2
SMOKES AND GAZ<br />
Welding operations can cause the emission of toxic smokes and harmful metallic dusts. Use the device<br />
in a sheltered place equipped with smoke aspirators.<br />
The operator must wear an anti smoke mask.<br />
The welding material must be degreased and cleaned in order to limit the toxic gas during the welding<br />
process.<br />
FIRE<br />
1. Check that the sparks don’t cause fire especially near inflammable material.<br />
2. Check that fire extinguishers are not too far from the operator.<br />
3. Leave the product in a place with air movers.<br />
4. Don’t weld neither on containers of combustibles and lubricants, even empty, nor on containers<br />
with inflammable material..<br />
5. Don’t weld in an atmosphere full with inflammable gas or fuel steam..<br />
ELECTRO-MAGNETIC COMPATIBILITY<br />
Near the spot welding, check :<br />
- there is neither no other power supply cable nor control lines, nor phone cables, nor radio or<br />
TV reception appliances, nor watches, nor mobile phones, nor magnetic cards, nor computers<br />
or any other electronic appliance.<br />
- there is in the surroundings (minimum 3 meters of each point of the product) no persons using<br />
active medical appliances (pacemakers, acoustic prosthetics).<br />
Make supplementary protections if other products are used in the same environment.<br />
3
III / NORM CE<br />
This product has been designed with respect of the European standards.<br />
- Directive Low Voltage 73/23 CEE of 19th February 1973 (decree n°95-1081 of 3rd October 1995)<br />
- Directive electromagnetic compatibility 89/336 CEE of 3rd May 1989<br />
- Directive machines Under pressure 97/23 CEE of 29th November 1999 ( except GY<strong>SPOT</strong> P230 et<br />
P400)<br />
IV / CONNECTIONS OF POWER SUPPLY CABLES<br />
Electricity :<br />
GY<strong>SPOT</strong> P400, 25D, 32D Two phases 400V 50Hz . Use of the PHASE 1, PHASE 2 and EARTH<br />
CONNECTION on a 3 phase plug.<br />
GY<strong>SPOT</strong> P230 single phase 230V 50Hz . Use of the PHASE 1, NEUTRAL and EARTH<br />
CONNECTION..<br />
Protection of the line<br />
GY<strong>SPOT</strong> P230 : Circuit breaker25A curve D or fuse 25A type aM<br />
GY<strong>SPOT</strong> P400 : Circuit breaker 16A curve D or fuse 16A type aM<br />
GY<strong>SPOT</strong> 25D : Circuit breaker 25A curve D or fuse 25A type aM<br />
GY<strong>SPOT</strong> 32D : Circuit breaker 32A curve D or fuse 32A type aM<br />
Case of malfunction :<br />
If the product releases the circuit breaker of the protection of installation, please check that you have<br />
the right calibre and the adequate type of circuit breaker( curve D absolutely).<br />
4
Compressed air : GY<strong>SPOT</strong> P230 et P400)<br />
Connect a compressed air pipe to the purifier behind the product. The service pressure can’t be over 10<br />
bars. The product can’t be used on an air network with a pressure under 3 bars.<br />
V/ DESCRIPTION OF THE MACHINE<br />
GY<strong>SPOT</strong> P230 et P400 : Foreside<br />
Indicator of power<br />
Indicator of time.<br />
Buttons of power<br />
adjustment.<br />
Yellow indicator of<br />
thermal switch-off.<br />
Mode A :<br />
Welding process of<br />
pins, screws, rivets,<br />
nails and discs.<br />
Buttons of time<br />
adjustment<br />
Button of mode selection.<br />
Mode C :<br />
Withdrawal of the impact<br />
of hail (option for quick<br />
repair)<br />
Mode B :<br />
- Smoothing of bumps<br />
- Heat to swag with a<br />
graphite pen<br />
GY<strong>SPOT</strong> P230 et P400 : Back side<br />
Commutator<br />
on/ off<br />
Power supply<br />
cable<br />
3 x 4 mm2<br />
5
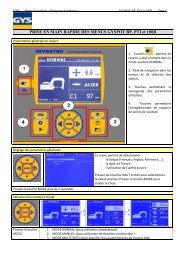
GY<strong>SPOT</strong> 25D et 32D : Foreside<br />
Indicator of<br />
pneumatic loading.<br />
Button of power<br />
adjustment.<br />
Indicator of<br />
power.<br />
Button of time<br />
adjustment.<br />
Button of time adjustment.<br />
Button of mode<br />
selection .<br />
Mode D :<br />
Welding process on<br />
mild steel plates (1<br />
pulsation).<br />
Mode C :<br />
Clamp welding<br />
process with treated<br />
steel (4 pulsations).<br />
Button of<br />
pneumatic<br />
pressure.<br />
Yellow indicator<br />
of thermal<br />
protection<br />
Mode A :<br />
- Welding of pins, screws, rivets, nails and discs<br />
- Withdrawal of impact of hail (avec l’option pince tire-creux).<br />
- Butt welding.<br />
Mode B :<br />
- Smoothing of<br />
bumps.<br />
- Procedure to swag<br />
with a graphite pen.<br />
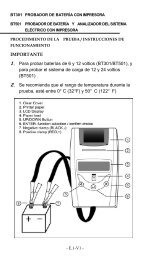
GY<strong>SPOT</strong> 25D et 32D : Back side<br />
Button of<br />
selection :<br />
Ventilation of the<br />
automatic cables<br />
or forced<br />
ventilation of the<br />
cables.<br />
Air purifier<br />
with<br />
incoming<br />
joint of<br />
compressed<br />
air.<br />
Circuit breaker on/<br />
off.<br />
Power supply<br />
cable<br />
3 x 6 mm2<br />
H07RNF.<br />
6
VI / <strong>WELDING</strong> WITH A GUN<br />
- Connect the earth clamp to the spade terminal of the generator.<br />
- Fix firmly the earth clamp as near the place to be welded as possible.<br />
In the case of a single point welding process with a gun, leave always the earth clamp on the metal<br />
sheet that is not in contact with the welding electrode ( in order to make the current circulate).<br />
- select the mode to be used and adjust with the values written on the charts page 7.<br />
Blinking of the displays : the displays can blink because of 2 reasons:<br />
- the product is in position of thermal protection,<br />
- the selected mode is incompatible with the tool already used..<br />
VII / USE OF THE PNEUMATIC CLAMP (EXCEPT GY<strong>SPOT</strong> P 230 AND P 400)<br />
Select the mode of function<br />
- mode D : Welding process of mild steel sheets(1 pulsation)<br />
- mode C : Welding process of treated steel sheets(4 pulsations).<br />
Blinking of the displays: as for the welding with gun, the display blinks if the product is in a position<br />
of thermal protection or if the selected mode is not right.<br />
Cautions: :<br />
The electrodes must be regularly sharpened..<br />
Blow off regularly the filter of un humidity on the back side of the product. Please adjust with a<br />
middle pressure of 6 bars.<br />
VIII/ COOLING AND THERMAL PROTECTION (except GY<strong>SPOT</strong> P230 et P400)<br />
The cables are cooled with compressed air. The cooling process can be permanent or controlled with<br />
an intern thermostat of the product ( selection with a button on the back side)<br />
A second thermal protection can forbid the use of the product in case of superheat. (yellow indicator<br />
on the fore side)<br />
Recommendation : When you use it intensively, you should cool the cables continuously.<br />
7
IX/ RECOMMENDED ADJUSTMENTS <strong>FOR</strong> BODY CAR WORKSHOP<br />
(only indicative and to modulate depending on the type and the thickness of the sheets)<br />
GY<strong>SPOT</strong> P230 et P400 :<br />
TOOL OPERATION MODE POWER TIMER<br />
Gun Welding of pins A HI 4 to 10<br />
Gun Welding of nails and rivets A HI 2 to 3<br />
Gun Withdrawal of the impacts (star) A HI 2 to 3<br />
Gun Welding of nails A HI 2 to 4<br />
Gun Smoothing of bumps B 50 à 60<br />
Gun Swaging with a graphite pen B 20 à 40<br />
Quick repair gun<br />
(option)<br />
Withdrawal of the impact of hail C 50 1 to 4<br />
RECOMMENDED ADJUSTMENTS <strong>FOR</strong> BODY CAR WORKSHOP<br />
(only indicative and to modulate depending on the type and the thickness of the sheets)<br />
GY<strong>SPOT</strong> 25D et 32D :<br />
OUTIL OPERATION MODE POWER TIMER<br />
Gun Welding monopoint 1 face A HI 10<br />
Gun Welding of pins A 40 5<br />
Gun Welding of nails and rivets A 40 2<br />
Gun Withdrawal of the impacts (star) A 30 1 to 5<br />
Gun Welding of discs A 40 2<br />
Gun Smoothing of bumps B 30 to 35<br />
Gun Swaging with a graphite pen B 10<br />
Quick repair gun<br />
(option)<br />
Withdrawal of the impacts of hail A 30 1<br />
Gun Kit for small repairs A 30 1<br />
Pneumatic clamp<br />
Welding 2 faces of mild steel sheets<br />
D<br />
1 pulsation<br />
HI 10<br />
Pneumatic clamp<br />
Welding 2 faces of treated steel sheets<br />
C<br />
4 pulsations<br />
HI 3<br />
8