Dune HD Center - Hantz + Partner Mailing Aktionen, Links und ...
Dune HD Center - Hantz + Partner Mailing Aktionen, Links und ...
Dune HD Center - Hantz + Partner Mailing Aktionen, Links und ...

Create successful ePaper yourself
Turn your PDF publications into a flip-book with our unique Google optimized e-Paper software.
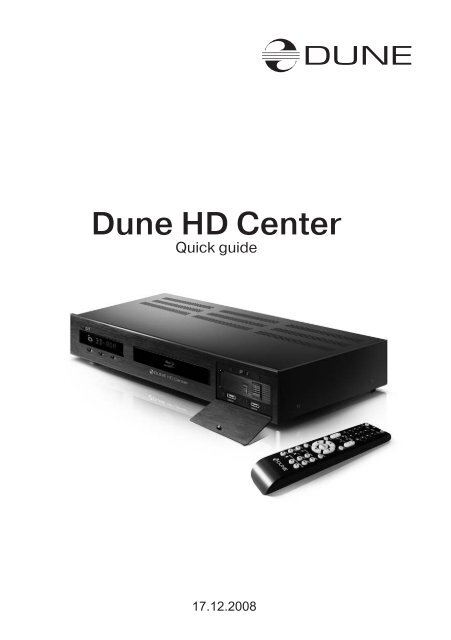
<strong>Dune</strong> <strong>HD</strong> <strong>Center</strong><br />
Quick guide<br />
17.12.2008
AC~100-240V<br />
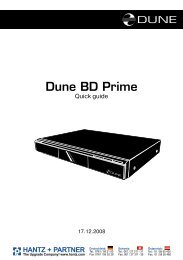
Exterior<br />
Front view<br />
1 2 3 4 5 6 7 8<br />
1. Standby Indicator<br />
2. Display<br />
3. STOP Button<br />
Rear view<br />
4. PLAY Button<br />
5. OPEN/CLOSE<br />
6. Blu-Ray tray<br />
7. Mobile rack<br />
8. USB 2.0<br />
DTS is a registered trademark & the DTS<br />
logos and Symbol are trademarks of DTS,<br />
lnc. 1996-2008 DTS, lnc. All Rights Reserved.<br />
BLU-RAY DISC PLAYER<br />
MODEL: <strong>HD</strong> <strong>Center</strong><br />
Manufactured <strong>und</strong>er license from Dolby Laboratories. Dolby<br />
and the double-D symbol are trademarks of Dolby Laboratories.<br />
USB<br />
50/60Hz, 27W min.<br />
Do not remove covers hazard - life parts<br />
5 C<br />
Made in Israel<br />
ETHERNET<br />
<strong>HD</strong>MI<br />
1 2 3 4 5 6 7 8 9 10 11 12<br />
1. AC Power Jack<br />
2. On/Off Button<br />
3. 7.1 Channel Audio Output Jacks<br />
4. LAN<br />
5. <strong>HD</strong>MI 1.3 Jack<br />
6. Video Output (CVBS) Jack<br />
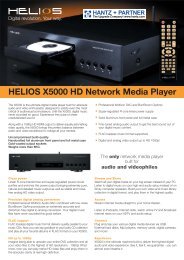
Player features:<br />
7. S-Video Output Jack<br />
8. Component Video (Y, PB, PR) Output Jacks<br />
9. COAXIAL Output Jack<br />
10. OPTICAL Output Jack<br />
11. Stereo Audio Left/Right Output Jacks<br />
12. USB 2.0<br />
Blu-Ray discs playback<br />
● BD-ROM (Profile 1.1/2.0), as well as DVD and CD.<br />
Media content playback<br />
● Video, Music and Pictures.<br />
Network drive operation<br />
● NFS, SMB and some other HTTP clients.<br />
Mobile rack with SATA Direct Link for fast and easy <strong>HD</strong>D exchange<br />
● Supports any audio and video collection on any number of hard discs w/o need to<br />
create expensive multi-disc NAS solutions. Any 3.5" SATA <strong>HD</strong>Ds can be used.<br />
<strong>HD</strong>MI v1.3<br />
● Up-to-date <strong>HD</strong>MI v1.3 interface ensures peerless quality of digital video and audio<br />
signal.<br />
Three USB 2.0 ports<br />
● Three high-speed USB 2.0 ports ensure an easy-to-use playback of media content<br />
from such external data storage devices, as USB-<strong>HD</strong>D, flash drives, cardreaders, etc.<br />
Upgradeability<br />
● availability of connection of optional modules: Wi-Fi 802.11n, Ethernet 1000 Mb/s<br />
and 2 x eSATA
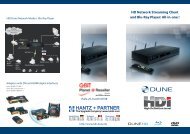
Package contents:<br />
1 2<br />
3<br />
4<br />
Safety measures<br />
5<br />
1. <strong>Dune</strong> <strong>HD</strong> <strong>Center</strong> media player<br />
2. Remote control (batteries not included)<br />
3. Power supply cord<br />
4. AV cable<br />
5. Quick start guide<br />
To avoid troubles, before to start using this device, please read this manual carefully and<br />
keep it for future reference.<br />
Warning: This Blu-ray player uses a laser beam sightless with human eye.<br />
If directed to human eye retina, it may cause hazardous radiation exposure<br />
and loss of sight. Please make sure that you use the player in conformity with<br />
the user’s manual. Please make sure that the device is out of reach of small<br />
children as far as possible.<br />
Caution: This product employs a laser system. Performing adjustments,<br />
or carrying out procedures other than those specified herein may result in<br />
hazardous radiation exposure. Do not open the safety enclosure: this product<br />
does not contain any parts that can be repaired by the user.<br />
1) Do not try to repair the device. Only authorized after-sales centers are entitled to carry out<br />
repair and preventive maintenance.<br />
2) To avoid electric shock, do not touch the plugged in device with wet hands and do not allow<br />
moisture within the case. If it happened, immediately unplug the device and contact an<br />
authorized <strong>Dune</strong> service center.<br />
3) Clean the device only with a dry soft cotton, or alike, cloth preventing accumulation of static<br />
discharges. Do not use any liquid detergent or scouring powder. In case of hard dirt, use<br />
special wipes suitable for PC care. Make sure that the wipe is dry enough (otherwise fluid<br />
drops may get inside).<br />
4) The device is for indoor use only. Do not expose it to direct sunlight, do not leave it near a<br />
heater or radiator.<br />
5) DO NOT use the device in rooms with high humidity.<br />
6) DO NOT plug in the player immediately after moving it from a cold into a warm place. If you<br />
move the device from an extremely cold place, unpack it and leave for 1.5 to 2 hours in order<br />
to allow evaporation of condensate on internal parts, afterwards you may start using it.<br />
7) Please make sure to switch off all relevant AV equipment before connection to the Blu-ray<br />
media player.<br />
8) Use EU-standard screened cables and sockets.
Operations with <strong>HD</strong>D<br />
How to tаke out the <strong>HD</strong>D.<br />
How to insert the <strong>HD</strong>D<br />
1. Shift the clamp upwards.<br />
1. Having convinced that the container<br />
handle is slightly opened, insert the<br />
internal container and push it inside<br />
all the way.<br />
2. Keeping the<br />
clamp, turn the handle<br />
outside<br />
3. Pull out the internal container from<br />
a player<br />
2. Turn the handle inside till the<br />
clamp clicks.<br />
How to change the <strong>HD</strong>D in the internal container<br />
1. Shift the top cover of the internal<br />
container in an arrows direction.<br />
3. Be convinced that the <strong>HD</strong>D is densely<br />
pressed to a rear side of the container<br />
and fixed to an emphasis.<br />
Only such placing provides correct<br />
functioning of the device.<br />
2. Insert the <strong>HD</strong>D into the internal<br />
container.<br />
4. Close the top cover<br />
of the internal container.
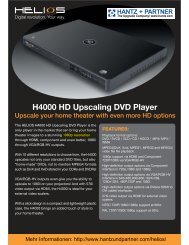
Remote Control (RC)<br />
1) Command indicator (i.e. indicator of remote control response<br />
to button pressing)<br />
2) EJECT, MUTE, POWER – opening/closing of disk tray, so<strong>und</strong><br />
on/off and standby mode on/off, respectively<br />
3) A(Red) - INFO, B(Green) - ZOOM, C(Yelow) - MODE, D(Blue)<br />
- SETUP – control menu buttons for setting of internal<br />
functions, as well as some playback modes.<br />
4) 0 - 9 – numeric buttons. Allow controlling of player in playback<br />
mode, as well as text entry.<br />
5) INFO, ZOOM, MODE, SETUP – control menu buttons,<br />
allow setting of internal functions, as well as some playback<br />
modes.<br />
6) Vol+ / Vol- – volume adjusting<br />
7) Page Up / Page Down – for scrolling up and down to see and<br />
change settings.<br />
8) SUBTITLE, AUDIO, RETURN, POP UP/MENU, ENTER<br />
and control menu buttons UP, DOWN, RIGHT, LEFT – to<br />
control main player modes and cursor motions through file<br />
browser.<br />
9) PLAY, PAUSE, STOP, REW, FWD, PREV, NEXT, SLOW<br />
REW, SLOW FWD – media file playback control buttons.<br />
10) TOP MENU/URL, ANGLE/ROTATE, SEARCH – control<br />
menu buttons, allow setting of internal functions, as well as<br />
some playback modes.<br />
*Some buttons may have several functions, depending on<br />
mode. For more details, please refer to Text entry with Remote<br />
control, System adjustments and Playback sections.<br />
Note:<br />
● Use alkaline AA batteries.<br />
● Observe polarity when inserting batteries.<br />
● Direct the remote control to the player. There must be no<br />
obstacles between the RC and the player. If the player is<br />
installed inside a desk with tinted glass, the manufacturer may<br />
not guarantee an <strong>und</strong>isturbed functioning of RC.<br />
● If RC functions only at short distances or stopped functioning,<br />
make sure to replace batteries to new ones.<br />
Effective distance of the remote control transmitter<br />
NOTES:<br />
• When there is an obstacle between the<br />
player and the transmitter, the transmitter<br />
may not operate.<br />
• When direct sunlight, an incandescent<br />
lamp, fluorescent lamp or any other<br />
strong light shines on the REMOTE SEN-<br />
SOR of the Player, the remote operation<br />
may be unstable.<br />
3<br />
1<br />
2<br />
3<br />
4<br />
5<br />
6<br />
7<br />
8<br />
10<br />
9
Connection to a TV set with <strong>HD</strong>MI/DVI output:<br />
Since <strong>Dune</strong> <strong>HD</strong> <strong>Center</strong> is designed first of all for playback of high definition (<strong>HD</strong>) video (up to<br />
1080p), the best way of signal transmission from player to a TV set or projector is the <strong>HD</strong>MI<br />
interface. In this case, video and audio streams are transmitted in digital form, without<br />
losses, allowing enjoying excellent picture and so<strong>und</strong>. It is recommended to connect the<br />
player to any compatible equipment using original DUNE <strong>HD</strong>MI cable (option).<br />
If your TV set has no <strong>HD</strong>MI socket, but it is equipped with DVI one, you can use an original DUNE<br />
<strong>HD</strong>MI-DVI adapter (to be connected to <strong>HD</strong>MI-<strong>HD</strong>MI cable) or <strong>Dune</strong> <strong>HD</strong>MI-DVI cable (no adapter<br />
needed). In this case, transmission of audio stream is only available separately, from an analog<br />
audio or digital optical output.<br />
1) Make sure that the player and the TV set are<br />
switched off. Do not switch on until the end of<br />
connection procedure.<br />
2) Connect the <strong>HD</strong>MI output of the player with<br />
appropriate <strong>HD</strong>MI/DVI input of the TV set using<br />
a <strong>HD</strong>MI-<strong>HD</strong>MI cable for <strong>HD</strong>MI input of your TV<br />
set, or <strong>HD</strong>MI-DVI cable or <strong>HD</strong>MI-<strong>HD</strong>MI cable<br />
with <strong>HD</strong>MI-DVI adapter, for DVI input of your<br />
<strong>HD</strong>MI IN<br />
TV set.<br />
3) Using RC of TV or projector (depending on<br />
what you use), select required input and display<br />
mode. For more instructions please refer to the<br />
manual of your displaying equipment.<br />
4) Wait until you see a picture on screen of your TV (or projection) set received from the player.<br />
Connection to a TV set with component video signal<br />
input (Component Video, Y, Cb, Cr)<br />
For this connection you should use a 3RCA-3RCA video cable and (optionally) a 2RCA-<br />
2RCA audio cable for so<strong>und</strong> transmission to your TV set. Please note that video cable<br />
shall have an impedance of 75 Ohm, i.e. specially fitted for transmission of analog video<br />
signal.<br />
1) Make sure that the player and TV set are<br />
switched off. Do not switch on until the end<br />
of connection procedure.<br />
2) Connect the component video output of<br />
media player with relevant TV input using a<br />
3RCA-3RCA cable.<br />
3) Optionally connect audio output AUDIO L<br />
R of the player with relevant input of TV set<br />
using a 2RCA-2 RCA cable (note: you can<br />
use optical cable to transmit digital audio<br />
to your A/V receiver; this way better audio<br />
quality result may be expected).<br />
4) Using RC of TV or projector (depending<br />
on what you use), select required input<br />
and display mode. For more instructions<br />
please refer to the manual of your displaying<br />
equipment.<br />
COMPONENT<br />
VIDEO IN<br />
AUDIO IN<br />
R L
DUNE <strong>HD</strong> <strong>Center</strong> specifications<br />
Optical discs<br />
Video file formats<br />
Video compression<br />
algorithms<br />
Audio formats<br />
Digital images<br />
Subtitle formats<br />
Processor<br />
System memory<br />
Available picture<br />
modes through <strong>HD</strong>MI<br />
v1.3<br />
Analog video output<br />
Audio output<br />
USB 2.0 ports<br />
LAN connection<br />
Size, mm<br />
BD-ROM, BD-R (RE), DVD-ROM, DVD-R (RW), CD, CD-R (RW)<br />
MKV, MPEG-TS, MPEG-PS, M2TS, VOB, AVI, MOV, MP4, QT, ASF, WMV,<br />
DVD-ISO, VIDEO_TS<br />
MPEG2, MPEG4, DivX, XVID, WMV9, VC1, H.264<br />
DD: AC3 (DD), EAC3 (DD+), Dolby True <strong>HD</strong> [lossless]; DTS: DTS <strong>HD</strong><br />
High Resolution Audio (HRA), DTS <strong>HD</strong> Master Audio (MA) [lossless],<br />
decoding in PCM/analog, Bitstream on <strong>HD</strong>MI1.3.<br />
JPG, PNG, BMP<br />
Plain text, SSA/AAS (MKV containers), SRT (with any supported video<br />
file format), VOB<br />
Sigma Designs 8634 SoC<br />
RAM: 384 Mb<br />
ROM: 64 Mb (for control microprogramm)<br />
1GB NAND flash<br />
● 480i, 480p (60 Гц) ● 576i, 576p (50 Гц) ● 720p (50 Гц, 60 Гц)<br />
●1080i (50 Гц, 60 Гц) ●1080p (24 Гц, 25 Гц, 30 Гц, 50 Гц, 60 Гц)<br />
●1024х768, 1280х1024, 1280х768, 1280х960, 1360х768, 1366х768,<br />
1400х1050, 1440х900, 1600х1200, 1680х1050, 1920х1200 (60 Гц)<br />
Component (Y, Pb, Pr), S-Video, composite (CVBS)<br />
D igital: optical Toslink and Сoaxial, analog: 7.1 output and stereo 2RCA<br />
3 x USB Host<br />
LAN Ethernet 100 Mbit/sec Wi-Fi<br />
430mm (width) x 270mm (depth) x 50mm (height)<br />
DUNE <strong>HD</strong> <strong>Center</strong> dimensions<br />
301,5mm<br />
81,1mm<br />
435,5mm<br />
* Note: Files with specific coding features or specific combinations of containers/codecs may not be<br />
played, or played with limitations or improperly. Follow release of firmware updates (control microprograms).<br />
Firmware update may resolve problems of playback of some files. This procedure may<br />
be made by the user or by a technician of post-sales service center.<br />
** Note: basic modes of music files playback are currently supported (single file playback, M3U<br />
and PLS play lists are supported). More advanced mechanisms will be available in future firmware<br />
releases.<br />
*** Note: only very basic mode of picture viewing is currently supported (single picture view only).<br />
More advanced mechanisms, including slide shows, will be available in future firmware releases.
http://www.hdi-dune.de<br />
HANTZ + PARTNER<br />
The Upgrade Company! www.hantz.com<br />
Deutschland:<br />
Tel.: 0761 / 59 21 00<br />
Fax: 0761 / 58 52 28<br />
Schweiz:<br />
Tel.: 061 / 27 311 - 31<br />
Fax: 061 / 27 311 - 39<br />
Österreich:<br />
Tel.: 01 / 58 55 430<br />
Fax: 01 / 58 55 460