Dermo-Marker Tattoo Machine - Harvard Apparatus
Dermo-Marker Tattoo Machine - Harvard Apparatus
Dermo-Marker Tattoo Machine - Harvard Apparatus
Create successful ePaper yourself
Turn your PDF publications into a flip-book with our unique Google optimized e-Paper software.
O P E R A T I N G<br />
I N S T R U C T I O N S<br />
<strong>Dermo</strong>-<strong>Marker</strong> <strong>Tattoo</strong> <strong>Machine</strong><br />
Catalog No. 52-4744<br />
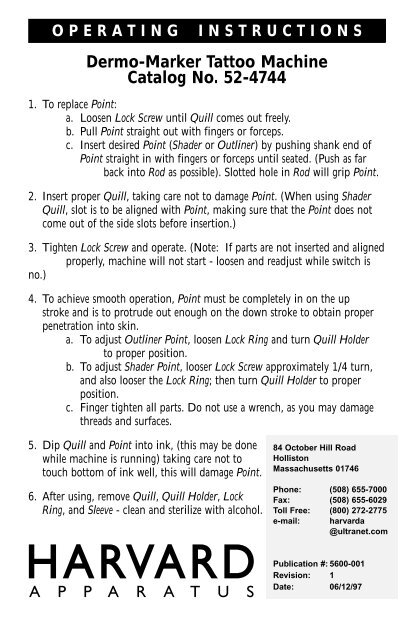
1. To replace Point:<br />
a. Loosen Lock Screw until Quill comes out freely.<br />
b. Pull Point straight out with fingers or forceps.<br />
c. Insert desired Point (Shader or Outliner) by pushing shank end of<br />
Point straight in with fingers or forceps until seated. (Push as far<br />
back into Rod as possible). Slotted hole in Rod will grip Point.<br />
2. Insert proper Quill, taking care not to damage Point. (When using Shader<br />
Quill, slot is to be aligned with Point, making sure that the Point does not<br />
come out of the side slots before insertion.)<br />
3. Tighten Lock Screw and operate. (Note: If parts are not inserted and aligned<br />
properly, machine will not start - loosen and readjust while switch is<br />
no.)<br />
4. To achieve smooth operation, Point must be completely in on the up<br />
stroke and is to protrude out enough on the down stroke to obtain proper<br />
penetration into skin.<br />
a. To adjust Outliner Point, loosen Lock Ring and turn Quill Holder<br />
to proper position.<br />
b. To adjust Shader Point, looser Lock Screw approximately 1/4 turn,<br />
and also looser the Lock Ring; then turn Quill Holder to proper<br />
position.<br />
c. Finger tighten all parts. Do not use a wrench, as you may damage<br />
threads and surfaces.<br />
5. Dip Quill and Point into ink, (this may be done<br />
while machine is running) taking care not to<br />
touch bottom of ink well, this will damage Point.<br />
6. After using, remove Quill, Quill Holder, Lock<br />
Ring, and Sleeve - clean and sterilize with alcohol.<br />
84 October Hill Road<br />
Holliston<br />
Massachusetts 01746<br />
Phone: (508) 655-7000<br />
Fax: (508) 655-6029<br />
Toll Free: (800) 272-2775<br />
e-mail: harvarda<br />
@ultranet.com<br />
Publication #: 5600-001<br />
Revision: 1<br />
Date: 06/12/97
P A R T S<br />
D I A G R A M<br />
TATTOO MACHINE<br />
Catalog No. 52-4744<br />
Cover<br />
401-1<br />
Cam<br />
401-15<br />
Screw<br />
401-8<br />
Base Plate<br />
401-2<br />
Washer<br />
400-22<br />
Sleeve<br />
401-4A<br />
Lock Ring<br />
400-5A<br />
Quill Holder<br />
400-6A<br />
Quill Outliner<br />
400-9A<br />
or<br />
Quill Shader<br />
400-10A<br />
(To remove cover - lift up)<br />
;<br />
;<br />
;<br />
;<br />
;<br />
I M P O R T A N T<br />
Battery<br />
2 REQ Type A - A<br />
(Face one each way)<br />
Battery Holder<br />
401-13<br />
Bracket<br />
401-3<br />
Motor<br />
401-14<br />
Switch<br />
401-18<br />
Nut<br />
400-21<br />
Rod Assembly<br />
401-12<br />
Lock Screw<br />
400-11<br />
Outer Point<br />
400-16<br />
or<br />
Shader Point<br />
400-17<br />
Work Slowly, Dip Point in Ink Often, and Stretch Skin Tight


