RMX111 User Manual - Henley Designs Ltd.
RMX111 User Manual - Henley Designs Ltd.
RMX111 User Manual - Henley Designs Ltd.

Create successful ePaper yourself
Turn your PDF publications into a flip-book with our unique Google optimized e-Paper software.
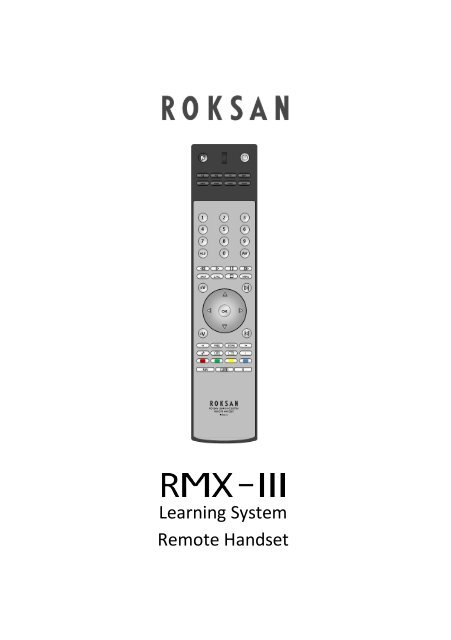
Learning System<br />
Remote Handset
TABLE OF CONTENT<br />
Quick Launch Page 1<br />
Before you start Page 2<br />
Connecting to a PC for the first time Page 3 - 5<br />
Registering the <strong>RMX111</strong> for the first time Page 3 - 5<br />
Setting codes via online database Page 3 -5<br />
Storing IR codes manually Page 6<br />
Operating the <strong>RMX111</strong> Page7<br />
Restoring the <strong>RMX111</strong> to default Page 7<br />
Maintenance / Trouble Shooting Page 8<br />
Lock up & Reset Page 9<br />
ROKSAN - <strong>RMX111</strong> USER MANUAL
K2 M2 TV SAT<br />
DVD VID1 VID2 AUD<br />
1 2 3<br />
4 5 6<br />
7 8 9<br />
+10 0 AV<br />
QUICK LAUNCH<br />
4<br />
1<br />
2<br />
3<br />
5<br />
6<br />
1. Infrared Transmitter<br />
2. LED Indicator<br />
3. Power Button<br />
4. Mute Button<br />
5. Devices selector keys<br />
6. Function Keys<br />
7. Battery Compartment<br />
8. USB Connector<br />
9. CD Transport keys<br />
10. Tuner Section Keys<br />
11. Input Selector<br />
12. Master Volume<br />
SHUF 1/ALL MENU<br />
9<br />
+V<br />
12<br />
Input<br />
Input<br />
OK<br />
- +<br />
11<br />
-V<br />
><br />
i<br />
10<br />
Please Note:<br />
The "Tape" function on both<br />
K2 & M2 Integrated Amplifier<br />
is actuated <strong>Manual</strong>ly.<br />
FAV LIVE X<br />
7<br />
8<br />
ROKSAN LEARNING SYSTEM<br />
REMOTE HANDSET<br />
RMX-III<br />
1
2<br />
BEFORE YOU START<br />
Congratulations! Your Roksan <strong>RMX111</strong> Universal Remote Control is a state of the art device<br />
which integrates many different Infra-red remote controls to deliver instant A/V control<br />
action to your fingertips. Before operating the remote, please read thoroughly.<br />
Please keep this manual for future use.<br />
1. Roksan <strong>RMX111</strong><br />
2. USB Cables type A to USB Type B mini<br />
3. <strong>Manual</strong><br />
PACKAGE CONTENTS<br />
PC SYSTEM REQUIREMENTS (MINIMUM)<br />
Microsoft Windows XP/Vista/7<br />
512MB RAM & 300MB Free Disk Space<br />
Available USB2.0 Port x 1<br />
Installed Microsoft Internet Explorer 8.0 (or newer)<br />
Established Reliable Internet Connection<br />
Please note: Due to security reason of Microsoft Windows Vista / 7, the set-up program<br />
and drivers of your <strong>RMX111</strong> will not be executed automatically<br />
(Program auto-run is prohibited). Please double click pop-up window - CD ROM Drive -<br />
KRMAP and KRMAP.exe to install the program and drivers manually.<br />
HOW TO INSTALL BATTERIES<br />
Alkaline batteries are always recommended. The Roksan <strong>RMX111</strong> requires two batteries.<br />
1. Remove the battery cover on the back side of your <strong>RMX111</strong>.<br />
2. Observe the polarity of the batteries and the "+/-" marks inside the battery compartment.<br />
3. Insert the batteries accordingly.<br />
4. Push the battery cover back in place.<br />
Please Note: Whenever you see the LED indicator of your remote flashes 3 times after you<br />
have pressed any key, it tells your batteries are running out.<br />
Please replace with the new and fresh alkaline batteries to ensure proper operation and<br />
performance.<br />
HOW TO SET UP YOUR REMOTE<br />
Your <strong>RMX111</strong> can replace up to 8 original A/V remote controls. Before your remote can operate<br />
your A/V devices, you firstly have to register it. Once this step is complete, you can go through<br />
the following easy online setup procedure (Page 4) procedures to set your remote control handset.
EASY ONLINE SETUP<br />
A reliable internet connection and PC system loaded with Windows XP / Vista / 7 is<br />
required.<br />
Please make sure you have a PC system loaded with Windows XP / Vista / 7, installed<br />
with Microsoft Internet Explorer 8 and it is connected to a reliable internet<br />
connection throughout the whole setup process.<br />
Please also have your various other devices and model number ready.<br />
BY SMART LEARNING<br />
Please follow the simple setup procedures on the Online Remote Code Database web page<br />
throughout the whole setup:<br />
1. Remove the battery cover on the back side of your remote.<br />
2. Make sure your remote is loaded with fresh batteries.<br />
3. Locate the mini USB connector inside the battery compartment.<br />
4. Connect your remote with the supplied USB cable to your PC (via one of the available<br />
USB Ports).<br />
5. Once, your remote is connected to your PC, the installation program will be started<br />
automatically ( all necessary device drivers will be installed to your PC automatically,<br />
only for the 1 st time connection/setup). When the installation is completed your PC<br />
will launch a browser ( Internet Explorer ) to reach out online database server.<br />
Remark: If your browser is not running after the connection of your remote to the PC, you<br />
have to double-click the<br />
Windows Vista / 7 users).<br />
icon ( KRMAP.exe) manually on your desktop to start ( for<br />
Register your <strong>RMX111</strong> - Required only once!<br />
New user-Please register your <strong>RMX111</strong> by filling in your name and email address. Simply follow the<br />
below procedure and you can activate your new Roksan RMX 111 in a very short time. Once all the<br />
necessary drivers and the auto-run program have been installed, you will be prompted at the<br />
following page. Simply fill in your information under the space provided with marks * and then click<br />
Confirm to send your file. Your <strong>RMX111</strong> will be activated and ready for a further setup.<br />
3
Set up your Roksan <strong>RMX111</strong> via one of the methods below:<br />
1. Easy Online Setup<br />
2. Smart Learning<br />
1. Select Remote Setup page<br />
EASY ONLINE SETUP<br />
2. On the Remote Setup page, simply select your Device type (e.g. TV), type in your<br />
Device name (e.g. SONY KV-J29MH9), select Brand - SONY from the drop down list<br />
and select model from the drop down list.<br />
3. Repeat step 2 for the rest of your other devices, such as VCR, DVD, SAT, CBL, STB, etc.<br />
4. Press to re-confirm your selected setting.<br />
5. Press to activate the data file<br />
4
6. Press to download the data file automatically to your remote.<br />
!<br />
WARNING:<br />
Do Not try to press<br />
for data file download. For security reasons, each remote<br />
has been limited to 5 attempts for SAVING the data file to the user's local computer. After<br />
that, your remote will be LOCKED. Please make sure that this is really necessary for such<br />
action.<br />
(For more information please see Page 9)<br />
7. Disconnect the USB cable from the remote. Turn on your device (e.g. TV), try the<br />
function keys on the remote. If your device (e.g. TV) responds to your invoked<br />
function correctly, your remote has been loaded with the right Device Code.<br />
Otherwise, repeat the above set-up instructions with the rest available Device Codes<br />
until your device (e.g. TV) responds to your invoked function, and most keys work<br />
correctly.<br />
Remarks:<br />
Always keep secure connection of the remote and the PC system throughout the whole "Easy<br />
Online Setup" process.<br />
After the remote code is downloaded to the remote, simply disconnect it from the USB cable<br />
and try the functions.<br />
If you cannot find a correct Device Code for you equipment, you should try to select a code<br />
with a similar description of your device. (e.g if your TV is 29XUMH, where you can see a<br />
32XUMH on the available code, you can try to use this code 32XUMH), as the manufacturers<br />
tend to use the same remote code for a series of products, simply reconnect your remote with<br />
your computer and try another available codes. (refer to the above steps.)<br />
Should only some of the commands work for your device, you can either select another code or<br />
try to copy the rest of the commands to your remote from your original remote, see the "By<br />
Smart Learning" section.<br />
Do Not try to press for data file download. For security reason each <strong>RMX111</strong> has<br />
been limited to 5 attempts for SAVING the data file to the users local computer. After that, your<br />
remote will be LOCKED. Please make sure that this is really necessary for such action (See more<br />
information on page 9).<br />
5
6<br />
SMART LEARNING - STORING IR CODES MANUALLY<br />
If you cannot find a correct device code for your equipment from the Online Database,<br />
you can copy your device's original remote control commands to your <strong>RMX111</strong>. Your<br />
<strong>RMX111</strong> allows you to store up to 360 additional remote control commands and all 8<br />
device modes can facilitate learning in seconds. Please follow the instructions below to<br />
start the process:<br />
(Please have your original remote controls ready for the code copying process)<br />
1. Select a desired Device Mode (e.g. TV, if you want to set up your <strong>RMX111</strong> to operate<br />
your TV).<br />
2. Press and Hold the Device Mode key e.g TV for 3 seconds, the LED indicator will<br />
light up.<br />
3. Release the Device Mode key e.g. TV<br />
4. Press and Release a desired key on the <strong>RMX111</strong> you want to hold the function key,<br />
the LED will flash slowly.<br />
(Now aim your device remote control to the <strong>RMX111</strong> Infra Red Lens on a flat surface<br />
with 1-3 cm apart. Make sure your A/V remote control is loaded with fresh batteries).<br />
5. Press and hold the corresponding key on<br />
your original A/V remote control to transfer<br />
the command. The LED indicator of the 1-3 cm<br />
<strong>RMX111</strong> will flash. When the command has<br />
been copied successfully, the LED indicator<br />
will stay on. You can release the key on the<br />
A/V remote control. If the LED indicator<br />
keeps flashing quickly, it shows an error in<br />
learning process. Please adjust the position<br />
of both remote controls and repeat steps 4<br />
& 5 again.<br />
6. Repeat step 4 & 5 to transfer other commands into the rest of the function keys.<br />
7. When you have finished the whole device mode. Press and hold the corresponding<br />
device Mode Key e.g. TV for 3 seconds to save all the copied commands and exit<br />
the learning mode.<br />
Remarks:<br />
Your <strong>RMX111</strong> will quit the learning mode automatically after 30 seconds of idle period.<br />
If you want to quit the learning mode at any time, simply Press and Hold the corresponding<br />
Device Mode key for 3 seconds.<br />
Downloading a new Device Code from the Online Setup will automatically erase and replace all<br />
learned commands in the chosen device mode.<br />
When you have finished copying and teaching the original device's commands to your <strong>RMX111</strong><br />
you can upload your <strong>RMX111</strong> to our online database for future retrieval. Please connect your<br />
<strong>RMX111</strong> to your PC, the system will prompt a set of automatic actions.<br />
A MASTER RESET OF YOUR <strong>RMX111</strong> WILL ERASE ALL NEWLY LEARNED COMMANDS
OPERATING THE <strong>RMX111</strong><br />
Normal Operation<br />
Once you have set up the <strong>RMX111</strong> for your system's equipment, it works like your original<br />
remote controls. To operate, just aim it at your equipment, press an appropriate device<br />
mode key and invoke the desired function by pressing a corresponding key on the<br />
<strong>RMX111</strong>. The indicator flashes during signal transmission and as confirmation of key being<br />
pressed.<br />
Master Reset/Reset/Default<br />
Master reset allows you to reset your <strong>RMX111</strong> to its factory default state.<br />
After Master Reset, you have to setup the remote all over again. Before you press master<br />
reset, please make sure it is really necessary.<br />
1. Remove the battery cover on the back side of your remote.<br />
2. Make sure your <strong>RMX111</strong> is loaded with fresh batteries.<br />
3. Locate the mini USB connector inside the battery compartment.<br />
4. Connect your <strong>RMX111</strong> with the provided USB cable to your PC (via one of the<br />
available USB Port).<br />
5. Once, your <strong>RMX111</strong> is connected to your PC, it will launch an Window Internet<br />
Explorer browser to reach our online database setup server. if your browser is not<br />
running after the connection of the <strong>RMX111</strong> to your PC, you have to double-click the<br />
icon (KRMAP.exe) on your desktop.<br />
6. On the remote set up page simple click the ResetDefault button once.<br />
7. Click Create button once and wait for 1 minute, your <strong>RMX111</strong> will be reset to<br />
factory default.<br />
7
Remarks: Master Reset of <strong>RMX111</strong>will erase all previously copied commands as well.<br />
8<br />
MAINTENANCE<br />
1. Do not expose your URC to dust, strong sunlight, humidity, high temperature or<br />
mechanical shock.<br />
2. Do not use old and new batteries together as old batteries tend to leak.<br />
3. Do not use corrosive or abrasive cleaner on your URC.<br />
4. Keep the unit always dust free by wiping it only with a soft and dry cloth.<br />
5. Do not disassemble your URC, it contains no user- serviceable parts<br />
TROUBLE - SHOOTING<br />
Q. My URC does not work at all!<br />
A. Check if you have set up your URC by Easy Online Setup or Smart Learning.<br />
A. IMPORTANT 2. Do not REMARKS use old and for new Windows batteries Vista together / 7 users, as old batteries after you tend connect to leak. your URC to<br />
your computer, please double click to pop up window - CD ROM Drive - KRMAP and<br />
the KRMAP.exe to install the program and drivers.<br />
A. Check your A/V device, if the device's mains switch is turned off, your URC could not<br />
operate your device.<br />
A. Check whether your batteries are inserted properly and are in correct +/- marks.<br />
A. Check whether you have pressed the corresponding device mode key for your device.<br />
A. If the batteries are low, replace the batteries.<br />
A. Try to connect your URC to your PC and reload the user data by selecting<br />
on the Remote Setup Page.<br />
<strong>User</strong>Config<br />
Q. If several Device Codes are listed under the brand of my A/V device, how can I<br />
select the correct Device code?<br />
A. To locate the correct Device Code that is similar to your device model number, as<br />
manufacturers 2. Do not use tend old to and use new the batteries same remote together for as a series old batteries of products. tend to leak.<br />
A. To locate the correct Device Code for your A/V device, test the code one by one until<br />
most keys work properly.
Q. My A/V equipment responds only to some of the commands.<br />
A. You have set a code for which only some commands work properly but some do not.<br />
Try 2. other Do codes not use until old most and new keys batteries work properly. together as old batteries tend to leak.<br />
A. You can learn the rest of the missing commands from your original remote, see<br />
Smart Learning section.<br />
Q. Some learned commands in my URC do not work.<br />
A. Those commands are not learned properly. Try to teach your URC again for those<br />
functions. 2. Do not use old and new batteries together as old batteries tend to leak.<br />
A. Check the batteries inside both A/V remote and your URC. If the batteries are weak,<br />
the URC cannot learn command properly. You have to replace all batteries for proper<br />
functioning.<br />
<strong>RMX111</strong> LOCK UP AND RESET<br />
If the <strong>RMX111</strong> becomes locked, you will have to reset the remote to factory default set up<br />
which will erase all your devices codes and unlock the <strong>RMX111</strong>. However, all codes can be<br />
backed up in advance on an online facility.<br />
(When you finished copying and teaching the original remote to your <strong>RMX111</strong>, you can upload<br />
your <strong>RMX111</strong> to your online database for future retrieval. Please connect your <strong>RMX111</strong> with your<br />
PC, the system will prompt an action automatically.)<br />
Master Reset/Reset/Default<br />
Master reset allows you to reset your <strong>RMX111</strong> to its factory default state.<br />
(After Master Reset, you have to setup the remote all over again. Before you do this,<br />
please make sure it is really necessary.)<br />
1. Remove the battery cover on the back side of your remote.<br />
2. Make sure your <strong>RMX111</strong> is loaded with fresh batteries.<br />
3. Locate the mini USB connector inside the battery compartment.<br />
4. Connect your <strong>RMX111</strong> with the provided USB cable to your PC (via one of the<br />
available USB Ports).<br />
5. Once, your <strong>RMX111</strong> is connected to your PC, it will launch Internet Explorer browser<br />
to reach our online database setup server. If your browser is not running after the<br />
connection of the <strong>RMX111</strong> to your PC, you have to double-click the<br />
icon(KRMAP.exe) on your desktop.<br />
9
FOR MORE INFORMATION PLEASE CONTACT<br />
ROKSAN AUDIO LIMITED<br />
Jubilee Close, Townsend Lane<br />
London, NW9 8TR<br />
Tel: +44 (0)20 8900 6801 FAX: +44 (0)20 8205 2644<br />
Website: www.roksan.co.uk Email: info@roksan.co.uk<br />
Follow us on:<br />
facebook.com/roksan.audioltd<br />
twitter.com/roksan<br />
goo.gl/NRtKc<br />
roksan.co.uk/forum/<br />
Roksan Audio <strong>Ltd</strong><br />
<strong>User</strong> <strong>Manual</strong><br />
CLASSIFICATION: General Use Version: 1.06.2012<br />
All specifications are liable to change without notice. E&OE