CLEARING SKIP IDs - HHb
CLEARING SKIP IDs - HHb
CLEARING SKIP IDs - HHb

You also want an ePaper? Increase the reach of your titles
YUMPU automatically turns print PDFs into web optimized ePapers that Google loves.
OVERVIEW<br />
CONTROLLING TRACK START INFORMATION<br />
The CDR800 has five modes of operation for recording a CD. The mode you choose will depend on the format<br />
of the input signal, and the way you wish to control the CD’s track starts. Modes 1 to 3 are Digital Synchro<br />
modes, which trigger recording from the incoming audio signal or start/track ID information, thus ensuring a<br />
neat start. However, with the AES/EBU protocol, start/track <strong>IDs</strong> are not transferable.<br />
MODE 1: 1-Track Digital Synchro<br />
The CDR800 records one single track, and returns to record ready. Ideal for making compilation CDs.<br />
MODE 2: All-Track Digital Synchro<br />
Records incoming tracks in sequence, stopping automatically after the last track.<br />
MODE 3: ID-Sync Digital Synchro<br />
Creates new tracks according to start/track ID information in the incoming datastream. Ideal for making an<br />
identical digital clone. Remember that this only applies via the SPDIF co-axial and optical protocol.<br />
MODE 4: Manual Digital<br />
Recording is controlled by the ‘cassette deck’ style transport keys.<br />
MODE 5: Manual Analogue<br />
Analogue source recording, controlled by the transport keys, as well as the recording balance and level<br />
controls.<br />
NOTE: Exactly how these modes write track starts in your recording will depend on the setting of the<br />
AUTO TRACK function. See the following page of this quick start guide for details.<br />
HOW TO RECORD A CD<br />
NOTE: Insert a blank disc onto the CD tray with the label side down and the shiny recording surface facing<br />
upwards. This is contrary to normal audio CD players.<br />
MODES 1, 2 and 3 – Digital Synchro<br />
1 Use INPUT SELECTOR to set the digital input format: AES/EBU (display shows DIGITAL 1, <strong>IDs</strong> not transferable<br />
with this protocol), SPDIF (display shows DIGITAL 2), or optical (display shows DIGITAL 1 & 2).<br />
2 Ensure that your source player (the unit you are recording from) is not playing (ideally place it in<br />
play/pause). The CDR800 cannot enter DIGITAL SYNCHRO mode if the source machine is playing.<br />
3 Press DIGITAL SYNCHRO: once to engage Mode 1 (1-Track), twice to engage Mode 2 (All-Track) and three<br />
times to engage Mode 3 (ID-Sync).<br />
4 The word SYNC will appear in the display in red, after SETUP is displayed, and will flash to indicate that<br />
the CDR800 is waiting for audio.<br />
5 On receipt of audio, or a start/track ID, the CDR800 will start recording automatically. As this is SYNCHRO<br />
mode, recording will stop automatically. However, recording can of course be stopped at any time by<br />
pressing STOP. Note that if the digital input has a sampling rate of 48kHz, the CDR800 automatically<br />
converts this to 44.1kHz using the built-in sample rate converter.<br />
MODES 4 & 5 – Manual Digital / Manual Analogue<br />
1 Use INPUT SELECTOR to set the format of signal to be recorded: AES/EBU digital (display shows<br />
DIGITAL 1, <strong>IDs</strong> are not transferable with this protocol), SPDIF co-axial digital (display shows DIGITAL 2),<br />
optical digital (display shows DIGITAL 1 and DIGITAL 2), or analogue (display shows ANALOGUE).<br />
2 Press RECORD. The CDR800 will enter rec/pause mode, allowing you to monitor signal throughput, both<br />
audibly and visibly on the display meters.<br />
3 If you are recording an analogue signal (Mode 5) set the REC LEVEL so that the 0 indicator at the right of<br />
the display occasionally lights. The red OVER indicator must never light; this will result in distortion.<br />
4 At the appropriate moment, press PLAY to start the CDR800 recording. As this is manual mode, recording<br />
will continue until manually stopped.<br />
5 To stop recording, press REC MUTE. A four second silence will be recorded, after which the CDR800 will<br />
enter rec/pause. If you do not want to record this silence between tracks, simply press STOP or PAUSE.<br />
One of the most difficult aspects of CD Recording is controlling the placement of track starts, because once<br />
a recording is made it cannot be altered. Each of the five CDR800 modes work slightly differently in this<br />
regard, and are further influenced by the setting of the AUTO TRACK function. Again, only the SPDIF digital<br />
interface carries information about start/track <strong>IDs</strong>. Here is a breakdown of exactly how each mode behaves<br />
in either setting:<br />
MODE 1 - DIGITAL SYNCHRO 1-TRACK<br />
Recording starts on audio or start/track ID only • AUTO TRACK ON: Subsequent <strong>IDs</strong> cause the machine to<br />
go into rec/pause • AUTO TRACK OFF: Subsequent <strong>IDs</strong> are ignored • Silence of 10 seconds causes the<br />
machine to go into rec/pause • When audio starts again, machine does not start recording again<br />
MODE 2 - DIGITAL SYNCHRO ALL-TRACK<br />
Recording starts on audio or start/track ID only • AUTO TRACK ON: Subsequent <strong>IDs</strong> cause a new track start<br />
to be written • AUTO TRACK OFF: Subsequent <strong>IDs</strong> are ignored • Silence of 10 seconds causes the machine<br />
to go back into AL-SYNC and wait for next audio • When audio starts again, machine goes back into record<br />
with a new track<br />
MODE 3 - DIGITAL SYNCHRO ID-SYNC<br />
Recording starts on ID only, audio does not cause the machine to start recording • AUTO TRACK ON:<br />
Subsequent <strong>IDs</strong> cause a new track start to be written • AUTO TRACK OFF: Subsequent <strong>IDs</strong> are ignored •<br />
Silence of 10 seconds causes the machine to go back into ID-SYNC and wait for next audio • When audio<br />
starts again, machine does not go back into record • The next ID causes the machine to start recording again<br />
MODE 4 - MANUAL DIGITAL<br />
When in record pause mode, pressing PLAY activates record • Mode 4 does not enable track starts to be<br />
triggered by incoming audio • AUTO TRACK ON: Subsequent <strong>IDs</strong> will cause a new track start • AUTO TRACK<br />
OFF: <strong>IDs</strong> are ignored • Silence of 30 seconds causes machine to go into rec/pause<br />
MODE 5 - MANUAL ANALOGUE<br />
Recording starts with new track on pressing of play button to activate record • AUTO TRACK ON: Audio<br />
levels do not cause a new track start to be written first time, thereafter they do • AUTO TRACK OFF: Audio<br />
levels do not cause a new track ever<br />
FINALIZING CDs FOR PLAYBACK ON STANDARD CD PLAYERS<br />
In order for a CD-R disc to be playable on audio CD players, it has to be closed to the standard CD audio<br />
format. This process is known as finalization. Note that once a disc has been finalized, it cannot be recorded<br />
on again.<br />
1 Insert the disc that you want to finalize.<br />
2 Press FINALIZE.<br />
3 After a few seconds, you will see the time that the finalization process will take (approximately four<br />
minutes) appear on the display.<br />
4 If you're sure about finalizing the disc, press PAUSE.<br />
5 The display counts down to indicate the progress of finalization. During this time, all the CDR800's<br />
functions are suspended.<br />
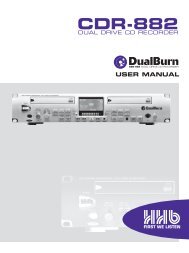
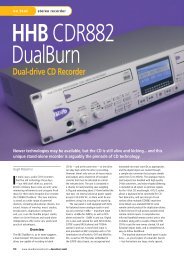
HHB CDR800 Compact Disc Recorder