
Create successful ePaper yourself
Turn your PDF publications into a flip-book with our unique Google optimized e-Paper software.
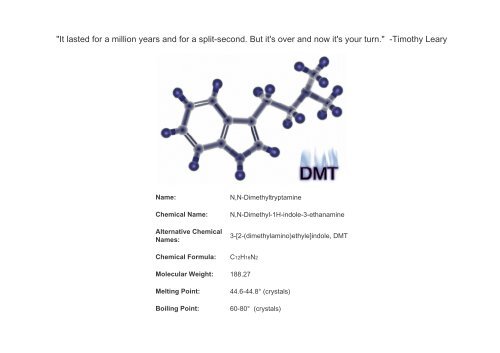
"It lasted for a million years and for a split-second. But it's over and now it's your turn." -Timothy Leary<br />
Name:<br />
Chemical Name:<br />
Alternative Chemical<br />
Names:<br />
Chemical Formula:<br />
N,N-Dimethyltryptamine<br />
N,N-Dimethyl-1H-indole-3-ethanamine<br />
3-[2-(dimethylamino)ethyle]indole, <strong>DMT</strong><br />
C12H16N2<br />
Molecular Weight: 188.27<br />
Melting Point:<br />
Boiling Point:<br />
44.6-44.8° (crystals)<br />
60-80° (crystals)
Dosages:<br />
4-30mg (intravenously)<br />
60-100mg (smoking)<br />
60-100mg (subcutaneously)<br />
60-100mg (intramuscularly)<br />
>350mg (orally)<br />
QT's <strong>DMT</strong> <strong>Extraction</strong> for Students<br />
Version 1.1<br />
INTRODUCTION:<br />
By Quantum Tantra<br />
Controlled substance (hallucinogen) U.S. Code of Federal Regulations, Title 21 Part 1308.11 (1985).<br />
In modern times there has been a reduction of ritual. The ceremonies, that previously served to cast out an individual from modern associations and throw<br />
him into a field of epiphanies, have become merely form, betraying the inner forces that must somehow manifest. Shamen know of these inner forces.<br />
They understand the inevitable overwhelming psychological experience that everyone will face if they are to complete their inward path to open the<br />
unconscious and fall in. The psychological crisis is the fulcrum of any metaphysical realization the individual may have about himself or his world. Without<br />
these intense experiences, without the rituals that convey the message of the journey, and without shamen to show the way, many are lost in the world<br />
searching constantly farther for what is contained only within. To chemically force such spiritual breakthrough may be interpreted by some as a way to<br />
circumvent the trials that are necessary to test each soul willing to see the truth of their life. But in contemporary society where is the individual to seek<br />
these tests of the self or to be struck silent in awe of their own natural beauty or that of the universe? The shamen offered these opportunities to the<br />
individuals of their society for generations, helping people maintain a healthy psychology between the known world and the mystical. I now offer this ability<br />
to you in one of many forms, <strong>DMT</strong>.<br />
<strong>DMT</strong> is perhaps the most powerful hallucinogen known to man. It is related to LSD and psilocybin. There are no drug tests that would show <strong>DMT</strong> usage.<br />
None of the basic NIDA-5 drug tests or any extended drug test will show a result for <strong>DMT</strong>. <strong>DMT</strong> is naturally formed in the body and has been found in<br />
abnormal levels in the body fluids of persons suffering from schizophrenia. <strong>DMT</strong> is almost never sold through dealers, rarely synthesized, and seldom<br />
used. It is, however, easily extracted from common plant materials and has been used in various forms for hundreds of years (timeline.) <strong>DMT</strong> is not a
"social drug" however. Respect the drug and it's incredible potential. This drug is not for the inexperienced, nor is it recommended to those who are just<br />
looking for another "high." Few seek the visions enabled through <strong>DMT</strong>, and even fewer return to them. Even avid psychedelic users have had frightening<br />
experiences with <strong>DMT</strong> on their first encounter with the drug. Take care to research and find out if <strong>DMT</strong> is for you. I stress that educating yourself about this<br />
drug (and about all drugs you intend to use) will make you a more competent and prepared chemist, tripper, and guide.<br />
This manual is presented as a quick bench guide for the complete novice on how to extract <strong>DMT</strong>. Although the text and illustrations for the process were<br />
all created by myself, there are a few pictures which are not my own. The origins of these pictures are credited in the bibliography. I would like to<br />
encourage others to add to this manual their own written observations. When attempting to produce any of these products the reader is encouraged to<br />
read through the steps several times to closely familiarize himself with the entire process. Please take note that <strong>DMT</strong> is an illegal substance in the United<br />
States of America and is controlled under federal regulations. The following is for educational purposes only.<br />
How to Extract <strong>DMT</strong> from Natural Sources<br />
(in Ten Easy Steps)<br />
First a plant must be selected that contains the chemicals we wish to extract. None of these plants are illegal and they can be found growing wild and free<br />
all over the world (much less can be said for some of our other favorite plants.) Most of these plant materials can be ordered through the internet. A little<br />
research may reveal a large quantity of some useful plant material growing near you. Alkaloid contents of each plant mary vary according to the growing<br />
conditions. Specifics about these plants and how to grow them are beyond the scope of this manual but the information can easily be found. Below is a<br />
chart of several plants that contain NN-<strong>DMT</strong>, 5-OH-<strong>DMT</strong>, and 5-MeO-<strong>DMT</strong> (<strong>DMT</strong>'s close cousin.)<br />
Alkaloids reported as (mg) per (100g) raw dried plant, and as percent of total plant source weight:<br />
Acacia bark<br />
0.71% NN-<strong>DMT</strong><br />
Acacia maidenii bark<br />
0.36% NN-<strong>DMT</strong>
Acacia simplicifolia bark<br />
0.86% NN-<strong>DMT</strong><br />
Mimosa hostilis root (bark)<br />
0.57% NN-<strong>DMT</strong><br />
Virola shoots & flowers<br />
0.44% NN-<strong>DMT</strong><br />
Desmanthus illinoensis root<br />
(bark)<br />
0.34% NN-<strong>DMT</strong><br />
Pilocarpus organensis<br />
1.06% 5-MeO-<strong>DMT</strong><br />
Phalaris tuberosa<br />
0.10% NN-<strong>DMT</strong><br />
0.022% 5-MeO-<strong>DMT</strong>
0.005% 5-OH-<strong>DMT</strong><br />
Phalaris arundinacea ('net gossip)<br />
0.060% NN-<strong>DMT</strong><br />
?? 5-MeO-<strong>DMT</strong><br />
Psychotria species (averaged, from<br />
Jonathan Ott)<br />
0.200% NN-<strong>DMT</strong><br />
N,N-<strong>DMT</strong><br />
<strong>DMT</strong> (N,N-dimethyltryptamine) is one of the most hallucinogenic compounds known. <strong>DMT</strong> is not active orally (unless in the<br />
form of an ayahuasca brew), but must be smoked in it's freebase form to experience its effects. (<strong>DMT</strong> can be taken orally when<br />
mixed with a MAOIs, but this is not recommended for the first time user.) The body quickly builds a tolerance for the drug. Your<br />
<strong>DMT</strong> dose must be taken within 60 seconds. Any more of the drug after this first minute will not enhance the experience. It is<br />
recommended to give at least one hour before attempting another <strong>DMT</strong> trip.<br />
5-MeO-<strong>DMT</strong><br />
Effects of 5-MeO-<strong>DMT</strong> are psychedelic without the visual distortions found in NN-<strong>DMT</strong>. 5-MeO-<strong>DMT</strong> is taken at 1/4 the dose of<br />
NN-<strong>DMT</strong> and will overpower the NN-<strong>DMT</strong>.<br />
5-OH-<strong>DMT</strong><br />
(Bufotenine) can cause severe physical discomfort including circulatory distress, nausea, psychological distress (panic and<br />
fear), severe skin flushing, and has the possibility of being fatal.<br />
MAOI<br />
(Monoamine Oxidase Inhibitors) will intensify and prolong the effects of NN-<strong>DMT</strong>, however this is never recommended. Foolish<br />
combinations of MAOIs and other drugs can lead to serious health problems and even death. The tryptamines are normally<br />
metabolized by an MAO in the body. MAO metabolizes serotonin, norepinephrine, and dopamine. By inhibiting this, MAOIs<br />
increase levels of those neurotransmitters. Tyramine will not be metabolized and will cause an increase in tyramine levels in<br />
blood.
<strong>Extraction</strong> Procedure<br />
For our experiment we will be using Mimosa hostilis root-bark to provide a very pure product of NN-<strong>DMT</strong><br />
without the over powering influence of 5-MeO-<strong>DMT</strong> or the negative side effects of 5-OH-<strong>DMT</strong>. For a solvent we<br />
will be using common naphtha. Notes on adaptations for chemicals and other variations of this process are<br />
described as well. The following is a list of materials:<br />
It helps to test all non glass materials with solvents to make sure there aren't any adverse reactions.<br />
1. Mimosa hostilis root-bark (30g suggested starting amount - $45/100g)<br />
2. Muratic acid (pool acid - $4/gallon)<br />
3. pH papers (litmus papers - $3/100 tests)<br />
4. Lye (Red Devil Brand - $5)<br />
5. Naphtha (Zippo lighter fluid - $5)<br />
6. Coffee filters and cotton swabs/cloth ( - $2)<br />
7. Funnel ( - $2)<br />
8. 3 labeled glass jars with lids (thick canning jars work best, but pickle jars will do) (labeled Jar A, Jar B, and Jar C - $3)<br />
9. Evaporating dish (glass baking pan - $10)
10. Glass pipette (turkey baster - $4)<br />
11. Goggles and gloves ( - $10)<br />
Total = ~$100.00<br />
STATEMENT OF HAZARDS: Methylene Chloride<br />
Suspect cancer hazard. Risk of cancer depends on duration and level of contact. Harmful if swallowed. Causes skin and eye irritation. Causes<br />
respiratory tract irritation. May affect blood cells. May affect the central nervous system. May cause blindness. Avoid breathing vapor or mist. Handle<br />
with caution. Keep in mind these risks whenever substituting DCM for any other solvent.<br />
STEP 1<br />
Preparing Plant Material<br />
Grind the plant material to a fine powder. The finer ground the material the better your yields will be. The<br />
best technique to pulverize and rupture the cell structure of any plant material is to repeatedly freeze and<br />
thaw it over and over again. An example of a plant requiring this treatment is Phalaris arundinacea, a<br />
strong and limber grass. Mimosa hostilis root-bark is easily pulverized to a fine powder in a blender,<br />
releasing a pink haze.<br />
Above photo credit to Jim DeKorne
A.<br />
First place the grass clippings in the freezer over night.<br />
B.<br />
Remove them and place the frozen clippings into a blender. Try and liquefy the<br />
clippings as much as possible while they are frozen.<br />
C.<br />
Repeat this process of freezing, thawing, and blending with the plant material several<br />
times for best results.<br />
Mimosa hostilis root-bark<br />
© 2000 Erowid<br />
STEP 2<br />
Acidify Water to pH 2<br />
Take two pickle jars (about 20 ounces each) and wash them in the dishwasher to help sterilize and clean<br />
them. Label the jars A and B. Fill Jar A 2/3 way full with water (~15 ounces, or ~500ml filtered<br />
preferable.) Pour 1/2 teaspoon (~2ml) of acid into Jar A. Test the pH of the water in Jar A. The pH of the<br />
water should read 2 If not, add more water to dilute (5% acidity). There are many sources of acid: (Always<br />
add acid into water, not water into acid.)
A.<br />
Distilled white vinegar (5% acidity, ~2 cups, or 500ml for every 50g root- bark) or lemon<br />
juice.<br />
B. Muratic acid from pool shop (10ml 30% HCl to 1 liter water is recommended.)<br />
C. Reagent grade hydrochloric and sulfuric acid (over-poweringly potent without dilution.)<br />
Add powdered root-bark to Jar B.<br />
Lab Notes:<br />
Proper method of testing pH with pH papers; Use a glass stirring rod (or something that won't<br />
corrode with acid) to stir the acidic solution. Dab the pH paper with the stirring rod lightly. To<br />
save pH paper, you can cut only a small section of strip for a single test. If a pH meter or pH<br />
papers are unavailable there are certain organic sources that produce antocyanines which<br />
change color with different pH ranges. Red beats or red cabbage may be used to produce a<br />
rough estimate of pH range. This is not always recommended, but it works. To create the<br />
indicator solution, blend or grind either red beats or red cabbage. Strain off the juice from the<br />
pulp and filter out any remaining plant material. If not enough pigment is found, try extracting<br />
more with water from the mushy pulp. If there is too much pigment, simply dilute solution with<br />
water. Indicator solution produced has a short shelf life but can be stored in a refrigerator for<br />
several weeks. Below is a rough pH chart for reference: (litmus paper comes with its own pH chart)<br />
Figure 1
STEP 3<br />
Convert Alkaloids to Salts<br />
Using a pipette (or turkey baster) transfer enough acidified water from Jar A into Jar B to cover the root-bark<br />
in the bottom of Jar B (~8 ounces, or 250ml acidified water into Jar B.) When the acid reacts with the rootbark,<br />
it converts the alkaloids (elf-spice) into salts. To help facilitate this process we can:<br />
A.<br />
Periodically shake the contents of the jar. This helps more root-bark come in contact with the acid.<br />
B.<br />
The weaker the acid, the longer it should be heated for. Do not allow evaporation of the liquid<br />
inside. Do not boil. Maintain temperature below 50° C or 122° F. Since we are using pickle jars,<br />
and not pyrex, they can shatter easily if heated or cooled too quickly. It is recommended using a<br />
double boiler with hot (not boiling) water to warm the solution. To cool, simply turn off the heat<br />
source and allow the solution to slowly return to room temperature.<br />
1. When using muratic acid, heat the jar for 15-30 minutes.<br />
2. When using weaker acids, simmer the contents overnight.<br />
Allow the contents of the jar 24 hours to react the first time. The alkaloids (tryptamines) are converted into<br />
salts and become water soluble. Our elf-spice is now contained in the aqueous solution.<br />
Figure 2<br />
STEP 4<br />
Filtration
Plug the bottom of the funnel with cotton balls or cotton cloth to create a cotton-filter. Pour the contents of Jar<br />
B through the funnel and into Jar C. Squeeze the root-bark contents inside the filter to press out the remaining<br />
juices. Save the root-bark that has been caught by the filter and place it back into Jar B.<br />
Lab Notes:<br />
Whether filtering material through a cotton-filter or a coffee filter it helps if the thinner parts of the<br />
solution are filtered first, followed by the mushy and more bulky components (which may clog the<br />
pores of your filters as you strain.) The better your filtration, the more rapid and efficient your<br />
emulsions, also resulting in a cleaner product. Cotton must be specifically used. Other fibers have<br />
the potential to react with our solvents. A tea strainer (wire strain) can be a simple way to separate<br />
bulk ruffage. Another way to improve this method is to use a vacuum filter. There are several<br />
varieties, the most affordable being a water vacuum filter that attaches to a household faucet. These<br />
cost about $30.00 and are very quick, useful and effective.<br />
Figure 3<br />
STEP 5<br />
Collect 3 <strong>Extraction</strong>s
Repeat the process outlined in STEPS 2, 3, and 4, two more times. The initial<br />
extraction is most important. For best results, allow the contents of the jar more time to react during the<br />
remaining two extractions. Shake Jar B, 4 times a day, for 1 week before filtering each time through a cottonfilter.<br />
Collect the acidic contents in Jar C each time. After these initial 3 cotton-filtration cycles, clean Jar A<br />
and Jar B, and dispose of remaining root-bark.<br />
After all 3 extraction phases, filter the contents of Jar C again, this time using a paper coffee-filter instead of a<br />
cotton filter.<br />
A.<br />
Place several paper-filters (coffee filters) in the bottom of the funnel.<br />
B.<br />
Strain contents of Jar C through the paper-filters and into Jar B.<br />
C.<br />
When finished, clean Jar C.<br />
Repeat this process as necessary to remove as many of the particulates from<br />
our solution as possible.<br />
Lab Notes:
The majority of the alkaloids we are searching for will convert to salts in the first extraction phase.<br />
The second and third extraction phases take place over a longer period of time. This will ensure<br />
that we will be able to extract as many alkaloids as possible from our material. The third phase<br />
can be reduced to 1-2 days but will not produce the best yields. Remember, these measurements<br />
are all crude estimates.<br />
Figure 4<br />
STEP 6<br />
Defatting<br />
Next we defat the solution. This is part of standard lab procedure whenever extracting alkaloids of this sort.<br />
This process removes the oils, fats, and other unwanted substances from our aqueous solution and also helps<br />
with yields. All <strong>DMT</strong> salts are insoluble in non-polar solvents -- with the exception of <strong>DMT</strong> acetate -- which is<br />
soluble in chlorinated non-polar solvents such as chloroform and DCM. Thus if you are using white vinegar<br />
(acetic acid) as your acid, you will need to use naptha or ether to defat as chloroform or DCM would extract the<br />
<strong>DMT</strong> acetate along with the oils and fats, defeating the purpose of this step.When using mimosa hostilis rootbark<br />
you may find this step unnecessary, however, any plant material foliage containing chlorophyl it is<br />
strongly recommended. To do this we add an organic (non-polar) solvent to the acidic solution. Before using<br />
any solvents test a significant amount (~500ml) of the solvent by evaporating it in a dish. This will verify that<br />
there are no residues or orders left when evaporation is complete (commonly found in many over-the-counter<br />
solvents.) Later in the procedure (STEP 10) you will be evaporating this solvent to leave a smokable form of<br />
<strong>DMT</strong>. Anything your solvent contributes, you may be smoking in the final product. Below are listed several<br />
more common organic non-polar solvents.<br />
A.<br />
Naphtha:
Coleman fuel, VM&P naphtha, Zippo, or lighter fluid. Evaporate a small amount in a dish and<br />
inspect the residue if you are unsure of it's contaminants. If used for the extraction phase instead of<br />
the defatting phase, warm naphtha will extract alkaloids much better than cool naphtha. Naphtha is<br />
considered more selective for catching these alkaloids than DCM. Naphtha rises to the top of the<br />
jar.<br />
B.<br />
Methylene Chloride:<br />
Also known as DCM or dichloromethane. Often used as an adhesive solvent for acrylics. Pure<br />
DCM can be found in craft stores. DCM must be distilled first from all non-flammable paint strippers<br />
beforehand (they contain a paste that holds several unwanted substances.) The paint stripper may<br />
also contain methanol (most marine grade paint strippers are 80-90% DCM. Methanol is also an<br />
organic solvent. DCM distills at 47° C or 116° F. Pure DCM is best. May cause cancer and<br />
blindness. Take necessary precautions. Methylene chloride sinks to the bottom of the jar.<br />
C.<br />
Ether:<br />
Contained in engine-starting fluid purchased at automotive stores. To remove liquid ether from an<br />
engine-starting aerosol can, spray the contents of the can down a 12 inch (~30cm) length of 3/4 inch<br />
PVC pipe. The ether will condense on the sides of the pipe and fall into the jar, while the inert<br />
propellant will be released into the air. Ether is extremely volatile. Ether floats to the top of the jar.<br />
D.<br />
Chloroform:<br />
Chloroform (CH2C12) can be purchased over the internet from arts and crafts warehouses. It has a<br />
tendency to be harsh on organics and has a boiling range of 35-65°C (95-149° F). Chloroform sinks<br />
to the bottom of the jar.
It is important to remember what type of organic solvent you use. For our defatting process we will use<br />
naphtha.<br />
Figure 5<br />
Add to Jar B ~50-100ml (~2-3.5 ounces) naphtha. (Only 10-15% the volume of our acidic solution is enough<br />
naphtha for this step. Visualize what 10% of the total of the solution is and add that amount of naphtha into the<br />
jar.) Cap the lid on Jar B and shake the contents vigorously for 20 minutes. Set Jar B aside and allow for<br />
emulsion (foam, bubbles, solutions, particles, etc.) to separate into two distinct layers (much like oil and water<br />
will separate.) This may take ~24 hours (48 in some cases.) The oils and fats will migrate into the non-polar<br />
solvent layer leaving our alkaloids in the aqueous solution. Since we are using naphtha, the solvent layer will<br />
rise to the top of Jar B. Using a pipette (or turkey baster) remove the solvent layer and discard.<br />
Repeat defatting process 2 times.<br />
Lab Notes:<br />
A separatory funnel is very handy for dividing and eliminating layers of solutions. This device<br />
consists of a single chamber with a tapered bottom. On the bottom is a closed faucet. The container<br />
is filled with the two solutions and they are mixed. After mixing, the apparatus is set aside until both<br />
fluids separate into two distinct layers. The lower fraction of the fluids can be drained via the bottom<br />
faucet and into a container for preservation or to discard. A quick separatory funnel can be made by<br />
filling a Ziplock plastic baggie with your mixtures, and hanging it from one corner. When the layers<br />
have separated, the bottom corner of the bag is pinched and then cut for drainage. It is suggested to<br />
test the baggie to make sure your solvents will not melt it.<br />
Naphtha
STEP 7<br />
Prepare to Basify<br />
Separatory funnel with <strong>DMT</strong><br />
© 2000 Erowid
In this step we will be preparing the solution for the alkaloids migration using a common organic non-polar solvent. For our solvent we will use warm<br />
naphtha (other solvents are identified in STEP 6.)<br />
Add to Jar B 100ml (~3 ounces) warm naphtha. Shake the jar for 5 minutes.<br />
STEP 8<br />
Basify to pH 11<br />
Now we must basify our solution. By doing this we will "unhook" the salt and transform the alkaloid into its<br />
"free base" form. The alkaloids will no longer be a salt, nor will they be soluble in water. This allows us to<br />
extract them with the organic solvent added in STEP 7. Ammonium hydroxide is normally used, but for our<br />
experiment we will be using NaOH found in household lye crystals (Red Devil drain cleaner) and purchased at<br />
hardware stores. Lye is very caustic and can react violently. Take the proper precautions when using lye.<br />
A good mixture for basifying is 5g (~0.2 ounces) lye mixed with 95g (~3 ounces) water. The reason we dilute<br />
the base is to prevent localized pH spikes which will destroy the alkaloids in the area that we are adding the<br />
concentrated base. Create a basic mixture as follows:<br />
A. Fill Jar A 95ml (~3 ounces) full with water.<br />
B. Slowly add 5g (~1 teaspoon) of lye to water. Shake and mix contents thoroughly.<br />
C. Test to make sure pH is ~12.
Now using a pipette transfer small amounts of solution in Jar A into Jar B.<br />
A.<br />
Stir and check the pH of contents in Jar B after each transfer of lye solution until the solution in Jar<br />
B reaches a pH of ~11-12.<br />
B.<br />
Shake the jar but be careful of pressure that will build up inside the jar. Release the lid and vent<br />
often! The solution will change a gray color as the alkaloids are turned from acid salts to free<br />
base. It may resemble a thick gel. Then the solution will turn black and slippery as you add more<br />
base. The jar will heat up during this process.<br />
You have now formed the free base alkaloids that are soluble in non-polar solvents.
Figure 6<br />
STEP 9<br />
Emulsions<br />
As these alkaloids dissolve in non-polar solvent added in STEP 7, an emulsion will form. The strength of<br />
emulsion formed is directly proportional to the strength of stirring. Heavy, rapid stirring produces a thick<br />
emulsion that takes up to 4 days to settle out. Light, slow stirring over a longer period of time produces and<br />
emulsion that separates quickly without affecting the yield. Let the jar sit overnight until the emulsion has<br />
separated into two distinct layers. If emulsion has not cleared in 48 hours, try the following:<br />
A.<br />
Sometimes adding a lot of salt and gentle stirring will make the polar layer more polar and help with<br />
emulsions.<br />
B. Add more organic solvent.<br />
C. Filter solutions again through a cotton filter several times. A paper filter will not work.<br />
B. Test and increase the pH.<br />
Figure 7
The naphtha will create a thick orange emulsion with small bubbles that sometimes takes over 48 hours to<br />
separate. Always wait a few days before trying other methods to break down the emulsion. Keeping the<br />
naphtha warm will increase the amount of alkaloids it carries with it during each extraction. To help keep the<br />
jar warm, place it in a pot surrounded by warm water. Naphtha floats. If DCM is used for our extraction<br />
solvent in STEP 7, we will have a faster resolving emulsion than naphtha (less than an hour in some cases.)<br />
The solvent will turn a darker color, usually reddish-brown or yellow. DCM sinks. Allow a minimum of 24 hours<br />
for the contents of the jar to react completely. If using methanol allow a minimum of 4 days warmed to roomtemperature<br />
for reactions to complete.<br />
Using a pipette remove the corresponding solvent layer from Jar B and save it in Jar A.<br />
STEP 10<br />
Final Alkaloid <strong>Extraction</strong> and Evaporation<br />
Repeat STEP 7 and STEP 9 (in that order) 2 times. Our elf-spice falls from the basified<br />
aqueous solution and into our solvent.<br />
The combined solvent fractions from our solvent extractions should now be in Jar A. Pour contents of Jar A<br />
into a glass baking dish. Allow for the solvent to evaporate. Evaporation may take up to one week (depending<br />
on your solvent.) During this time keep dish with solvent away from heat or open flame.<br />
The remaining substance may resemble anything from a sticky orangish goo to white or pale-orange crystals,<br />
depending on how well you followed the procedure. Scrape up this substance from the baking pan with a<br />
razor. About 25mg is a good starting amount (try about the size of a pea.) Assuming best yields you could get<br />
5-6 doses (275mg) from 30g mimosa hostilis root-bark. You will know when <strong>DMT</strong> is in the final product by the<br />
smell. <strong>DMT</strong> has a distinct synthetic smell, almost like some manufactured plastics.<br />
© 2000 Erowid
"Don't worry about weighing it. Smoke it 'til your high, then save the rest for next time.<br />
Remember the flame should never touch the dmt, just the glass that's holding the<br />
dmt. Just heat up the "bulb" and gets to toking. Slow & steady, deep inhalation, hold<br />
the smoke 'til you burst. If nothing after 1st hit, huge toke again, etc. The 3rd toke will<br />
usually be the one."<br />
Lab Notes:<br />
© 2000 Erowid<br />
After DCM has evaporated your product may<br />
contain trace amounts of hydroxide. Some find<br />
hydroxide to be unpleasant in the final product.<br />
To help reduce this try washing the <strong>DMT</strong> crystals<br />
in water, and letting the water evaporate. Water<br />
can be added to the solvent evaporating dish to<br />
help carry off hydroxide.<br />
© 2000 Erowid<br />
Photos of <strong>DMT</strong> crystals taken from The Vaults of Erowid<br />
Lab Notes from Previous <strong>DMT</strong> <strong>Extraction</strong>s
LAB #1<br />
Materials: 1. 25g mimosa hostilis root-bark<br />
2. Pool acid<br />
3. Litmus papers<br />
4. Red Devil Lye<br />
5. Lighter fluid<br />
6. Coffee filter and cotton T-shirt<br />
7. Plastic funnel<br />
8. Pickle jars<br />
9. Baking dish and turkey baster<br />
10. Cooking pot<br />
Day 1:<br />
The root-bark is brittle. To powderize it one had to simply place the sticks of dried bark into the blender. They were immediately<br />
ground to a fine powder without any trouble, giving off a pink haze when the cover of the blender was released. The powder was<br />
stored in a tupperware container and placed in the back of a freezer.
Day 2: Muratic acid is powerful. Thick gloves were worn along with eye protection. Using a stainless steel teaspoon, about 1-5ml (1<br />
teaspoon) of muratic acid was poured into a pickle jar that contained roughly 3/4 filtered water (15 ounces or about 500ml.) The pickle<br />
jar was previously washed twice in a dishwasher in an attempt to ensure sterility. Under the lid of the pickle jar the manufacturer had<br />
painted on a thin ring of some type of latex or rubber to help seal the jar. The mixture of water and acid do not seem to affect the ring<br />
(it doesn't dissolve or melt the latex in any way) so the jar and its lid were used.<br />
The jar was shook to mix the acid and water. Immediately afterwards the pH of the water was tested. The pH was 1 using pH papers<br />
to measure. (Compare pH within 30 seconds with litmus.)<br />
Added the 25g root-bark to the bottom of jar B. Then the baster was used to pour enough acidified water to just cover the root-bark.<br />
Then jar B was capped and shook vigorously for 10 minutes. While shaking the jar it began to foam up with pink foam. Then the jar<br />
rest for a couple hours. The contents of the jar broke into 3 layers. The top was pink foam. The middle was a very very dark red<br />
(burgundy) color. Light didn't seem to pass through it very well at all. The bottom layer was a lighter red sediment.<br />
Day 3:<br />
The dark red color of the top layer of liquid has now turned almost black it seems. No light passes through it.<br />
Day 4:<br />
It was decided to heat the solution for several hours in an attempt to speed up the process. The jar and it's contents were propped up<br />
on a porcelain stand inside a cooking pot. To this pot was added enough water to surround the pickle jar. The lid to the pickle jar was<br />
made finger tight so that the contents could not evaporate but still allow pressure to escape. For roughly 3 hours the mixture sat in<br />
very warm water (not boiling.) Occasionally one would lift the jar, and shake the contents before placing it back on the stand.<br />
Afterwards the heat source was turned off and the water and the pickle jar contents cooled to room temperature.<br />
Day 5:<br />
A funnel was placed in the empty jar A. Inside the funnel was placed a cotton T-shirt filter. In jar B the root-bark and the solution had<br />
formed two layers. This made it easier to sift the smaller particles through the filter before the larger particles clogged the pores of the<br />
filter. After the filter was full of sediment I took the edges of the filter and twisted to squeeze any remaining liquid into the second jar.<br />
The process was repeated until the jar B was empty. Then jar C was filled with roughly 2/3 filtered water, and was added roughly 5ml<br />
of muratic acid. The cotton filters were opened again, and the sediments they held were poured back into the jar B.<br />
Both jars were capped tightly and checked for leaks again. Needless to say anytime one is working with these chemicals one should<br />
wear thick gloves and the proper eye and body protection.<br />
Acidified water from jar C was siphoned with a turkey baster into jar B until the water covered the sediments. The contents of the jar<br />
were again left to sit in warm water, this time about 30 minutes.
Day 6:<br />
Strained aqueous solution and collected. Added acidic water to remaining plant material. Simmered for 30 minutes.<br />
Day 9:<br />
Final collection of aqueous solution. Plant material was thrown away. Solution was strained 3 times through coffee filters.<br />
Naphtha (Lighter Fuel) was added. About 100ml. The jar was shaken vigorously for ~10 minutes, resulting in a thick bubbly solution.<br />
This was allowed to rest for 24 hours. After 24 hours the top layer resembles water with a few drops of milk added. There is also a<br />
layer of translucent pink scum. This this is the nasty stuff we want to get rid of.<br />
To remove the naphtha layer (top layer) it was agreed that it would be best to siphon the bottom layer out of the jar and save it,<br />
instead, then clean out the jar containing the remaining nasty naphtha stuff. Using a plastic turkey baster we slowly squeezed the bulb<br />
as it passed through the layers into the jar. This forced small bubbles to pour from the nozzle, and prevented any naphtha from<br />
entering the baster before we could suck up the bottom layer.<br />
After removing the naphtha, the remaining contents were again filtered once through a paper coffee filter.<br />
Added 100ml of naphtha again, and shook the jar for 5 minutes.<br />
Day 10:<br />
A 5% base solution was made with lye crystals and water in an empty jar.. About 100ml water for 1 teaspoon (5ml?) lye crystals. The<br />
jar was shaken, and stirred and made sure all the lye crystals had dissolved. This was added slowly to the jar containing our main<br />
solution.<br />
After 4 teaspoons of base solution, the mixture changed from a burgundy red to a very grayish blue color. The pH was tested and<br />
found to be 7.<br />
After 8 teaspoons of base solution the mixture has turned a darker gray color. The pH tested was ~10.<br />
After 10 teaspoons of base solution the mixture changed from gray to very inky black. There is a lot of foam. The pH tested was found<br />
to be ~11-12.<br />
A total of 10 teaspoons were added to this mixture before the pH was ~11. The jar was shaken for several minutes with the cap tightly<br />
sealed. Then the jar was placed in a pot of warm water for 15 minutes while slowly stirred. Then the jar was allowed to rest for 3<br />
hours inside the warm water.
Day 11:<br />
Solution has not separated into two layers. The naphtha layer on top still resembles a thick oily foam.<br />
Day 12:<br />
Solution has not separated into two layers. Markings were made on the side of the jar to see if any progress had been made. Nothing<br />
changed in the jar within the last 48 hours. More solvent was added.<br />
Day 13:<br />
No change in solutions. About 1 teaspoon of salt was added to the mixture and stirred gently for 30 minutes.<br />
Day 14:<br />
No change in solutions. The pH was taken of the aqueous solution. Because of the dark color of the material being tested it's hard to<br />
get an accurate measurement. A small sample was taken and lightly diluted with water. The pH was about 9 or 10. Another mixture<br />
of lye and water was made in a separate jar. About 2 teaspoons (10ml) of base solution was added to the mixture in jar B. The pH<br />
was tested again and read about 11 or 12. There seemed to be an immediate change in the emulsion. A clear layer appeared on top<br />
of the jar, followed by the familiar thick orange bubbles, and then finally the aqueous solution on the bottom. The container was<br />
steeped in warm water for 1 hour.<br />
After 1 hour the contents were strained 3 times through a cotton-filter and the emulsions were allowed to separate. There was a<br />
dramatic improvement after filtration. The top layer of naphtha was removed and saved. Another 100ml naphtha was added and the<br />
jar was heated again for perhaps another hour. The best technique to mixing the two solutions does not seem to be shaking or<br />
stirring. Instead, very slowly tip the jar end over end repeatedly for several minutes. This produces an emulsion that settles in about 2-<br />
3 hours time.<br />
Day 15:<br />
The contents of the jar were heated and mixed slowly for a period of 2 hours. Afterwards the top layer was saved and another 100ml<br />
naphtha was added. Again the jar was heated and stirred for a few hours. The solvent layer was removed and placed with the rest of<br />
the previous solvent fractions.<br />
Day 16:<br />
The combined solvent fractions were poured into a glass baking dish and set aside for evaporation.<br />
Day 17-20: 3 day evaporation process. Bottom of dish there appears small yellow/orange crystal formations, circular in pattern, about 2-3mm<br />
across.<br />
Day 21:<br />
Some of the outer edges of the crystals have dried a bit. The larger crystals still seem wet.
Day 22:<br />
The entire dish was scraped with a razor. The crystals bunched together and dissolved into a caramel gum like substance. This<br />
substance was smeared across a 3X5 note card.<br />
Day 23:<br />
The brownish goo has dried up and reveals a more crystalline structure. This was scrapped off using an exacto knife.<br />
Day 24:<br />
Elf-spice hyperspace. The experiment was a success.<br />
LAB #2<br />
Materials:<br />
1. 25g Phalaris arundinacea (rather dry, note this grass contains 5-MeO alkaloids as well)<br />
2. Pool acid<br />
3. Litmus papers<br />
4. Red Devil Lye<br />
5. Lighter fluid<br />
6. Cotton balls<br />
7. Plastic funnel<br />
8. Pickle jars<br />
9. Baking dish, turkey baster, and cooking pot.
Day 1:<br />
Phalaris grass is very hard to pulverize. The grass was placed in a freezer and then into a blender. To help mash the grass down<br />
towards the blades of the blender, a small amount of water was added. Repeatedly the lid to the blender was lifted and the grass had<br />
to be pushed back down. It took over an hour to pulverize the grass sufficiently. The mixture of water and clippings was placed into a<br />
baggie. The baggie was frozen and thawed several times over a period of 24 hours.<br />
Day 3:<br />
5ml muratic acid added to a pickle jar that contained roughly 500ml water. Water and acid were mixed well. 25g of grass was placed<br />
in the bottom of jar B and the acidified water covered this amount of grass. Shook the jar and contents.<br />
Day 4-11:<br />
Jar contents are shaken daily.<br />
Day 12:<br />
A funnel was placed in jar A. Inside the funnel was placed a cotton ball. The material from jar B was filtered through the funnel into jar<br />
A. The remaining material in the filter was placed back into jar B and covered again with acidified water. Jar B contents are shaken<br />
daily for 7 days.<br />
Day 19: Collection of aqueous solution same as Day 12.<br />
Day 26:<br />
Final collection of aqueous solution. Plant material was thrown away. Solution was strained 3 times through coffee filters.<br />
100ml Naphtha added. The jar was shaken 10 minutes. This was allowed to rest for 24 hours. After 24 hours the nasty stuff was<br />
skimmed off the top along with the naphtha solvent. This was done twice.<br />
Added 100ml of naphtha again, and shook the jar for 5 minutes.<br />
Day 28:<br />
A 5% base solution was made with lye crystals and water in an empty jar. This was added slowly to the jar containing our main<br />
solution. The pH was now ~11. The jar was slowly stirred for several hours while heated.<br />
Day 29-31:<br />
After the emulsion had cleared the top layer of naphtha was collected and more naphtha added to the original mixture. This was done<br />
3 times.
Day 39:<br />
The combined solvent fractions were poured into a glass baking dish and set aside for evaporation. After 4 days the dish was scraped<br />
clean and the crystals put to use. Success!<br />
BIBLIOGRAPHY<br />
The Vaults of Erowid: http://www.freespeech.org/quantumtantra/www.erowid.org<br />
Perhaps the best collection of information on the internet about chemicals and plants for anyone new to drugs. Within this document I have reprinted<br />
several smaller pictures found from their website. Although I asked permission, I was never sent a response, but here I credit their wonderful database and<br />
used the pictures anyway.<br />
Color photo of a large ultrapure <strong>DMT</strong> crystal, grown in 1996. The crystal is approximately 1 inch across.<br />
Anonymous Photographer. Used by Erowid.<br />
http://www.erowid.org/chemicals/show_image.php3?image=dmt/dmt_crystal1.jpg<br />
Color photo of a pile of <strong>DMT</strong> crystals extracted with Naptha.<br />
Photo by Bucwheat. © 2000 Erowid.<br />
http://www.erowid.org/chemicals/show_image.php3?image=dmt/dmt_crystal2.jpg<br />
Color photo of a small vial full of N,N-<strong>DMT</strong> crystals.<br />
Anonymous Photographer. © 2000 Erowid.<br />
http://www.erowid.org/chemicals/show_image.php3?image=dmt/dmt2.jpg<br />
Color photo of a keugelröhr distillation receiving flask full of <strong>DMT</strong> crystals.<br />
Anonymous Photographer. Used by Erowid.<br />
http://www.erowid.org/chemicals/show_image.php3?image=dmt/dmt1.jpg<br />
Color photo of a collection of rootbark pieces layed out on a plate.<br />
Photo by Murple. © 2000 Erowid.<br />
http://www.erowid.org/plants/show_image.php3?image=mimosa/mimosa_hostilis6.jpg<br />
Psychedelic Shamanism The Cultivation, Preparation and Shamanic Use of Psychotropic Plants.
DeKorne, Jim. (1994)<br />
Publisher : Loompanics Unlimited<br />
ISBN : 1-55950-110-3<br />
Color photo of grass growing outdoors. (Pictured as found on Erowid.)<br />
http://www.erowid.org/plants/show_image.php3?image=phalaris/images/archive/phalaris_arundinacea1.jpg<br />
Rhodium - an informative element: rodium.lycaeum.org<br />
A collection of highly technical information. I humble myself before the knowlege they posess.<br />
http://rhodium.lycaeum.org/chemistry/ph-indicator.html<br />
Ayahuasca Analogues: Pangaen Entheogens.<br />
Ott, Jonathan. (1994).<br />
Kennewick, WA: Natural Products.<br />
ISBN: 0-9614234-5-5<br />
Tryptamines I Have Known And Loved: The Chemistry Continues. (Part 2)<br />
By Alexander and Ann Shulgin.<br />
Journal of Pharmaceutical Sciences.<br />
Vol. 56, page 1526.<br />
Thanks to:<br />
Dr. Foss<br />
Gumby<br />
baalchemist<br />
willytell<br />
Gumby<br />
Placenta_Juan<br />
neuron<br />
MagikVenom<br />
GravNet<br />
Saguaro<br />
NoRezz<br />
D-4138
And all those who have helped expand and add to this piece of literature. Feel free to add to this your own written observations, dreams, or thoughts on<br />
these topics.