User's Guide - Draytek
User's Guide - Draytek
User's Guide - Draytek

Create successful ePaper yourself
Turn your PDF publications into a flip-book with our unique Google optimized e-Paper software.
Vigor2130 Series<br />
High Speed Gigabit Router<br />
User’s <strong>Guide</strong><br />
Version: 1.1<br />
Date: 25/11/2009<br />
ii<br />
Vigor2130 Series User’s <strong>Guide</strong>
Copyright Information<br />
Copyright<br />
Declarations<br />
Trademarks<br />
Safety Instructions and Approval<br />
Safety<br />
Instructions<br />
Warranty<br />
Be a Registered<br />
Owner<br />
Firmware & Tools<br />
Updates<br />
Copyright 2009 All rights reserved. This publication contains information that is<br />
protected by copyright. No part may be reproduced, transmitted, transcribed, stored in a<br />
retrieval system, or translated into any language without written permission from the<br />
copyright holders.<br />
The following trademarks are used in this document:<br />
• Microsoft is a registered trademark of Microsoft Corp.<br />
• Windows, Windows 95, 98, Me, NT, 2000, XP, Vista and Explorer are<br />
trademarks of Microsoft Corp.<br />
• Apple and Mac OS are registered trademarks of Apple Inc.<br />
• Other products may be trademarks or registered trademarks of their respective<br />
manufacturers.<br />
• Read the installation guide thoroughly before you set up the router.<br />
• The router is a complicated electronic unit that may be repaired only be<br />
authorized and qualified personnel. Do not try to open or repair the router<br />
yourself.<br />
• Do not place the router in a damp or humid place, e.g. a bathroom.<br />
• The router should be used in a sheltered area, within a temperature range of +5 to<br />
+40 Celsius.<br />
• Do not expose the router to direct sunlight or other heat sources. The housing and<br />
electronic components may be damaged by direct sunlight or heat sources.<br />
• Do not deploy the cable for LAN connection outdoor to prevent electronic shock<br />
hazards.<br />
• Keep the package out of reach of children.<br />
• When you want to dispose of the router, please follow local regulations on<br />
conservation of the environment.<br />
We warrant to the original end user (purchaser) that the router will be free from any<br />
defects in workmanship or materials for a period of two (2) years from the date of<br />
purchase from the dealer. Please keep your purchase receipt in a safe place as it serves<br />
as proof of date of purchase. During the warranty period, and upon proof of purchase,<br />
should the product have indications of failure due to faulty workmanship and/or<br />
materials, we will, at our discretion, repair or replace the defective products or<br />
components, without charge for either parts or labor, to whatever extent we deem<br />
necessary tore-store the product to proper operating condition. Any replacement will<br />
consist of a new or re-manufactured functionally equivalent product of equal value, and<br />
will be offered solely at our discretion. This warranty will not apply if the product is<br />
modified, misused, tampered with, damaged by an act of God, or subjected to abnormal<br />
working conditions. The warranty does not cover the bundled or licensed software of<br />
other vendors. Defects which do not significantly affect the usability of the product will<br />
not be covered by the warranty. We reserve the right to revise the manual and online<br />
documentation and to make changes from time to time in the contents hereof without<br />
obligation to notify any person of such revision or changes.<br />
Web registration is preferred. You can register your Vigor router via<br />
http://www.draytek.com.<br />
Due to the continuous evolution of DrayTek technology, all routers will be regularly<br />
upgraded. Please consult the DrayTek web site for more information on newest<br />
firmware, tools and documents.<br />
http://www.draytek.com<br />
Vigor2130 Series User’s <strong>Guide</strong><br />
iii
European Community Declarations<br />
Manufacturer: DrayTek Corp.<br />
Address: No. 26, Fu Shing Road, HuKou County, HsinChu Industrial Park, Hsin-Chu, Taiwan 303<br />
Product: Vigor2130 Series Router<br />
DrayTek Corp. declares that Vigor2130 Series of routers are in compliance with the following essential<br />
requirements and other relevant provisions of R&TTE Directive 1999/5/EEC.<br />
The product conforms to the requirements of Electro-Magnetic Compatibility (EMC) Directive 2004/108/EC by<br />
complying with the requirements set forth in EN55022/Class B and EN55024/Class B.<br />
The product conforms to the requirements of Low Voltage (LVD) Directive 2006/95/EC by complying with the<br />
requirements set forth in EN60950-1.<br />
Regulatory Information<br />
Federal Communication Commission Interference Statement<br />
This equipment has been tested and found to comply with the limits for a Class B digital device, pursuant to Part<br />
15 of the FCC Rules. These limits are designed to provide reasonable protection against harmful interference in a<br />
residential installation. This equipment generates, uses and can radiate radio frequency energy and, if not installed<br />
and used in accordance with the instructions, may cause harmful interference to radio communications. However,<br />
there is no guarantee that interference will not occur in a particular installation. If this equipment does cause<br />
harmful interference to radio or television reception, which can be determined by turning the equipment off and<br />
on, the use is encouraged to try to correct the interference by one of the following measures:<br />
• Reorient or relocate the receiving antenna.<br />
• Increase the separation between the equipment and receiver.<br />
• Connect the equipment into an outlet on a circuit different form that to which the receiver is connected.<br />
• Consult the dealer or an experienced radio/TV technician for help.<br />
This device complies with Part 15 of the FCC Rules. Operation is subject to the following two conditions:<br />
(1) This device may not cause harmful interference, and<br />
(2) This device may accept any interference received, including interference that may cause undesired operation.<br />
Please visit http://www.draytek.com/user/AboutRegulatory.php<br />
This product is designed for 2.4GHz WLAN network throughout the EC region and Switzerland with restrictions<br />
in France. Please see the user manual for the applicable networks on your product.<br />
iv<br />
Vigor2130 Series User’s <strong>Guide</strong>
Table of Contents<br />
1<br />
Preface ...............................................................................................................1<br />
1.1 Web Configuration Buttons Explanation ................................................................................. 1<br />
1.2 LED Indicators and Connectors .............................................................................................. 2<br />
1.2.1 For Vigor2130 ................................................................................................................... 2<br />
1.2.2 For Vigor2130n ................................................................................................................. 4<br />
1.2.3 For Vigor2130Vn............................................................................................................... 6<br />
1.3 Hardware Installation .............................................................................................................. 8<br />
Stand Installation ....................................................................................................................... 9<br />
1.4 Printer Installation ................................................................................................................. 10<br />
2<br />
Configuring Basic Settings ............................................................................15<br />
2.1 Two-Level Management........................................................................................................ 15<br />
2.2 Accessing Web Page ............................................................................................................ 15<br />
2.3 Changing Password.............................................................................................................. 16<br />
2.4 Quick Start Wizard ................................................................................................................ 18<br />
2.4.1 Setting up the Password................................................................................................. 18<br />
2.4.2 Setting up the Time Zone ............................................................................................... 19<br />
2.4.3 Setting up the Internet Connection ................................................................................. 19<br />
2.4.4 Setting up the Wireless Connection ............................................................................... 24<br />
2.4.5 Saving the Wizard Configuration .................................................................................... 29<br />
2.5 Online Status......................................................................................................................... 29<br />
2.6 Saving Configuration............................................................................................................. 30<br />
3<br />
User Mode Operation............................................................................................31<br />
3.1 WAN ...................................................................................................................................... 31<br />
3.1.1 Internet Access ............................................................................................................... 33<br />
3.1.2 Ports................................................................................................................................ 39<br />
3.1.3 3G Backup ...................................................................................................................... 40<br />
3.2 LAN ....................................................................................................................................... 41<br />
3.2.1 General Setup................................................................................................................. 43<br />
3.2.2 Ports................................................................................................................................ 44<br />
3.2.3 MAC Address Table........................................................................................................ 45<br />
3.2.4 VLAN............................................................................................................................... 47<br />
3.2.5 Monitor Port .................................................................................................................... 48<br />
3.2.6 Static Route .................................................................................................................... 48<br />
3.2.7 Bind IP to MAC ............................................................................................................... 50<br />
3.3 NAT ....................................................................................................................................... 52<br />
3.3.1 Hardware NAT ................................................................................................................ 52<br />
Vigor2130 Series User’s <strong>Guide</strong><br />
v
3.3.2 Open Ports...................................................................................................................... 53<br />
3.3.3 DMZ Host........................................................................................................................ 54<br />
3.4 Bandwidth Management ....................................................................................................... 55<br />
3.4.1 Session Limit .................................................................................................................. 55<br />
3.4.2 Bandwidth Limit .............................................................................................................. 56<br />
3.4.3 Port Rate Control ............................................................................................................ 57<br />
3.4.4 QoS Control List ............................................................................................................. 58<br />
3.4.5 Ports Priority ................................................................................................................... 62<br />
3.4.6 QoS Statistics ................................................................................................................. 63<br />
3.5 Applications ........................................................................................................................... 66<br />
3.5.1 Dynamic DNS ................................................................................................................. 66<br />
3.5.2 Schedule......................................................................................................................... 67<br />
3.5.3 IGMP Snooping .............................................................................................................. 68<br />
3.5.4 IGMP Status ................................................................................................................... 69<br />
3.5.5 UPnP Configuration........................................................................................................ 69<br />
3.6 Wireless LAN ........................................................................................................................ 71<br />
3.6.1 Basic Concepts............................................................................................................... 71<br />
3.6.2 General Setup................................................................................................................. 72<br />
3.6.3 Access Control................................................................................................................ 77<br />
3.6.4 Station List ...................................................................................................................... 78<br />
3.6.5 Access Point Discovery .................................................................................................. 79<br />
3.7 USB Application .................................................................................................................... 79<br />
3.7.1 USB General Settings..................................................................................................... 79<br />
3.7.2 FTP User Management .................................................................................................. 80<br />
3.7.3 Disk Status...................................................................................................................... 81<br />
3.7.4 Disk Shares .................................................................................................................... 81<br />
3.8 IPv6 ....................................................................................................................................... 83<br />
3.8.1 IPv6 WAN Setup............................................................................................................. 83<br />
3.8.2 IPv6 LAN Setup .............................................................................................................. 87<br />
3.8.3 IPv6 Firewall Setup......................................................................................................... 88<br />
3.8.4 IPv6 Routing ................................................................................................................... 90<br />
3.8.5 IPv6 Neighbour ............................................................................................................... 91<br />
3.8.6 IPv6 TSPC Status........................................................................................................... 91<br />
3.9 User....................................................................................................................................... 94<br />
3.9.1 User Configuration.......................................................................................................... 94<br />
3.10 System Maintenance........................................................................................................... 95<br />
3.10.1 System Status............................................................................................................... 95<br />
3.10.2 User Password ............................................................................................................. 97<br />
3.9.3 Configuration Backup ..................................................................................................... 97<br />
3.9.4 Syslog / Mail Alert ........................................................................................................... 99<br />
3.9.5 Time and Date .............................................................................................................. 101<br />
3.9.6 Management................................................................................................................. 102<br />
3.9.7 Reboot System ............................................................................................................. 102<br />
3.9.8 Firmware Upgrade ........................................................................................................ 103<br />
4<br />
Admin Mode Operation.......................................................................................105<br />
4.1 WAN .................................................................................................................................... 105<br />
4.1.1 Internet Access ............................................................................................................. 107<br />
4.1.2 Ports.............................................................................................................................. 113<br />
vi<br />
Vigor2130 Series User’s <strong>Guide</strong>
4.1.3 3G Backup .................................................................................................................... 114<br />
4.2 LAN ......................................................................................................................................115<br />
4.2.1 General Setup............................................................................................................... 117<br />
4.2.2 Ports.............................................................................................................................. 118<br />
4.2.3 MAC Address Table...................................................................................................... 120<br />
4.2.4 VLAN............................................................................................................................. 121<br />
4.2.5 Monitor Port .................................................................................................................. 122<br />
4.2.6 Static Route .................................................................................................................. 122<br />
4.2.7 Bind IP to MAC ............................................................................................................. 124<br />
4.3 NAT ..................................................................................................................................... 125<br />
4.3.1 Hardware NAT .............................................................................................................. 126<br />
4.3.2 Open Ports.................................................................................................................... 126<br />
4.3.3 DMZ Host...................................................................................................................... 128<br />
4.4 Firewall................................................................................................................................ 129<br />
4.4.1 DoS Defense ................................................................................................................ 129<br />
4.4.2 Ports Configuration....................................................................................................... 130<br />
4.4.3 Access Control List....................................................................................................... 132<br />
4.5 Bandwidth Management ..................................................................................................... 144<br />
4.5.1 Session Limit ................................................................................................................ 144<br />
4.5.2 Bandwidth Limit ............................................................................................................ 145<br />
4.5.3 Port Rate Control .......................................................................................................... 146<br />
4.5.4 QoS Control List ........................................................................................................... 147<br />
4.5.5 Ports Priority ................................................................................................................. 151<br />
4.5.6 QoS Statistics ............................................................................................................... 152<br />
4.6 Applications ......................................................................................................................... 155<br />
4.6.1 Dynamic DNS ............................................................................................................... 155<br />
4.6.2 Schedule....................................................................................................................... 156<br />
4.6.3 IGMP Snooping ............................................................................................................ 157<br />
4.6.4 IGMP Status ................................................................................................................. 158<br />
4.6.5 UPnP Configuration...................................................................................................... 158<br />
4.7 VPN and Remote Access.................................................................................................... 160<br />
4.7.1 Remote Access Control................................................................................................ 160<br />
4.7.2 PPTP Remote Dial-in.................................................................................................... 161<br />
4.7.3 IPSec Remote Dial-in ................................................................................................... 163<br />
4.7.4 Remote Dial-in Status................................................................................................... 164<br />
4.7.5 LAN to LAN................................................................................................................... 165<br />
4.8 Wireless LAN ...................................................................................................................... 169<br />
4.8.1 Basic Concepts............................................................................................................. 169<br />
4.8.2 General Setup............................................................................................................... 170<br />
4.8.3 Access Control.............................................................................................................. 175<br />
4.8.4 Station List .................................................................................................................... 176<br />
4.8.5 Access Point Discovery ................................................................................................ 176<br />
4.9 USB Application .................................................................................................................. 177<br />
4.9.1 USB General Settings................................................................................................... 177<br />
4.9.2 FTP User Management ................................................................................................ 178<br />
4.9.3 Disk Status.................................................................................................................... 179<br />
4.9.4 Disk Shares .................................................................................................................. 179<br />
4.10 IPv6 ................................................................................................................................... 181<br />
4.10.1 IPv6 WAN Setup......................................................................................................... 181<br />
4.10.2 IPv6 LAN Setup .......................................................................................................... 185<br />
4.10.3 IPv6 Firewall Setup..................................................................................................... 186<br />
Vigor2130 Series User’s <strong>Guide</strong><br />
vii
4.10.4 IPv6 Routing ............................................................................................................... 189<br />
4.10.5 IPv6 Neighbour ........................................................................................................... 190<br />
4.10.6 IPv6 TSPC Status....................................................................................................... 190<br />
4.11 User ................................................................................................................................... 193<br />
4.11.1 User Configuration...................................................................................................... 193<br />
4.12 System Maintenance......................................................................................................... 195<br />
4.12.1 System Status............................................................................................................. 195<br />
4.12.2 System Password ....................................................................................................... 196<br />
4.12.3 User Password ........................................................................................................... 197<br />
4.12.4 Configuration Backup ................................................................................................. 197<br />
4.12.5 Syslog/Mail Alert ......................................................................................................... 199<br />
4.12.6 Time and Date ............................................................................................................ 201<br />
4.12.7 Management............................................................................................................... 202<br />
4.12.8 Reboot System ........................................................................................................... 202<br />
4.12.9 Firmware Upgrade ...................................................................................................... 203<br />
4.13 Diagnostics........................................................................................................................ 204<br />
4.13.1 Ping............................................................................................................................. 204<br />
4.13.2 Routing Table ............................................................................................................. 205<br />
4.13.3 System Log................................................................................................................. 206<br />
4.13.4 Traffic Overview.......................................................................................................... 206<br />
4.13.5 Detailed Statistics ....................................................................................................... 207<br />
4.13.6 MAC Address Table.................................................................................................... 209<br />
4.13.7 DHCP Table................................................................................................................ 211<br />
4.13.8 Data Flow Monitor....................................................................................................... 212<br />
4.13.9 Ports State .................................................................................................................. 213<br />
5<br />
Trouble Shooting ...........................................................................................215<br />
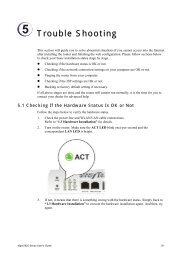
5.1 Checking If the Hardware Status Is OK or Not.................................................................... 215<br />
5.2 Checking If the Network Connection Settings on Your Computer Is OK or Not ................. 216<br />
5.3 Pinging the Router from Your Computer............................................................................. 218<br />
5.4 Checking If the ISP Settings are OK or Not........................................................................ 219<br />
5.5 Forcing Vigor Router into TFTP Mode for Performing the Firmware Upgrade ................... 221<br />
5.6 Backing to Factory Default Setting If Necessary ................................................................ 224<br />
5.7 Contacting Your Dealer ....................................................................................................... 225<br />
viii<br />
Vigor2130 Series User’s <strong>Guide</strong>
1 Preface<br />
The Vigor2130 series are the routers with high speed in data transmission through WAN port<br />
and LAN ports. With hardware NAT acceleration, the rate of Vigor2130 series can be greater<br />
than 900Mbps almost.<br />
With the development of NGN (Next Generation Network), you may recently hear the news<br />
about FTTx deployment in your local area or even have already subscribed the unbundling last<br />
mile service (e.g. VDSL2) from local ITSP for FTTx. As adopting FTTx, the main question<br />
for end users is whether your legacy router could fully utilize its bandwidth or not.<br />
For example, you purchase a 120 Mbps Internet connection from your ISP but your existing<br />
router cannot support 90 Mbps throughput. That’s why DrayTek launches Vigor 2130 series –<br />
High speed Gigabit router, perfectly complied with VDSL2 environment including Vigor2130,<br />
Vigor2130n and Vigor2130Vn for speed-wanted customers. With high throughput<br />
performance and secured broadband connectivity provided by Vigor 2130 series, you can<br />
simultaneously engage these bandwidth-intensive applications, such as high-definition video<br />
streaming, online gaming, and Internet telephony / access.<br />
1.1 Web Configuration Buttons Explanation<br />
Several main buttons appeared on the web pages are defined as the following:<br />
Save and apply current settings.<br />
Cancel current settings and recover to the previous saved settings.<br />
Clear all the selections and parameters settings, including selection from<br />
drop-down list. All the values must be reset with factory default settings.<br />
Add new settings for specified item.<br />
Edit the settings for the selected item.<br />
Delete the selected item with the corresponding settings.<br />
Note: For the other buttons shown on the web pages, please refer to Chapter 4 for detailed<br />
explanation.<br />
Vigor2130 Series User’s <strong>Guide</strong> 1
1.2 LED Indicators and Connectors<br />
Before you use the Vigor router, please get acquainted with the LED indicators and connectors<br />
first.<br />
1.2.1 For Vigor2130<br />
LED Status Explanation<br />
ACT<br />
(Activity)<br />
Blinking<br />
Off<br />
The router is powered on and running<br />
normally.<br />
The router is powered off.<br />
HPA On Hardware NAT is enabled.<br />
Off Hardware NAT is disabled.<br />
WAN On The WAN port is connected.<br />
Blinking It will blink while transmitting data.<br />
On The port is connected.<br />
LAN1/2/3/4 Off The port is disconnected.<br />
Blinking The data is transmitting.<br />
USB1/2 On A USB device is connected and active.<br />
Blinking The data is transmitting.<br />
VPN On The VPN tunnel is active.<br />
QoS On The QoS function is active.<br />
DoS On The DoS/DDoS function is active.<br />
Blinking It will blink while detecting an attack.<br />
Interface<br />
WAN<br />
LAN (1-4)<br />
USB<br />
Description<br />
Connector for accessing the Internet.<br />
Connectors for local networked devices.<br />
Connector for USB storage device (Pen<br />
Driver/Mobile HD) or printer or 3G backup.<br />
2<br />
Vigor2130 Series User’s <strong>Guide</strong>
Interface<br />
Factory Reset<br />
PWR<br />
ON/OFF<br />
Description<br />
Restore the default settings. Usage: Turn on the router (ACT LED is blinking). Press<br />
the hole and keep for more than 5 seconds. When you see the ACT LED begins to<br />
blink rapidly than usual, release the button. Then the router will restart with the<br />
factory default configuration.<br />
Connector for a power adapter.<br />
Power Switch.<br />
Vigor2130 Series User’s <strong>Guide</strong> 3
1.2.2 For Vigor2130n<br />
LED Status Explanation<br />
ACT<br />
(Activity)<br />
Blinking<br />
Off<br />
The router is powered on and running<br />
normally.<br />
The router is powered off.<br />
HPA On Hardware NAT is enabled.<br />
Off Hardware NAT is disabled.<br />
WAN On The WAN port is connected.<br />
Blinking It will blink while transmitting data.<br />
On The port is connected.<br />
LAN1/2/3/4 Off The port is disconnected.<br />
Blinking The data is transmitting.<br />
USB1/2 On A USB device is connected and active.<br />
Blinking The data is transmitting.<br />
VPN On The VPN tunnel is active.<br />
QoS On The QoS function is active.<br />
WLAN On Wireless access point is ready.<br />
Blinking It will blink while wireless traffic goes<br />
through.<br />
WPS Button On Press this button for 2 seconds to wait<br />
for client device making network<br />
connection through WPS. When the<br />
LED lights up, the WPS connection<br />
will be on.<br />
Off The WPS is off.<br />
Blinking Waiting for wireless client sending<br />
requests for connection about two<br />
minutes.<br />
Interface Description<br />
WLAN Press the button once to enable (WLAN LED on) or<br />
disable (WLAN LED off) wireless connection.<br />
WAN Connector for accessing the Internet.<br />
LAN (1-4) Connectors for local networked devices.<br />
USB Connector for USB storage (Pen Driver /Mobile<br />
HD) or printer.<br />
4<br />
Vigor2130 Series User’s <strong>Guide</strong>
Interface<br />
Factory Reset<br />
PWR<br />
ON/OFF<br />
Description<br />
Restore the default settings. Usage: Turn on the router (ACT LED is blinking). Press<br />
the hole and keep for more than 5 seconds. When you see the ACT LED begins to<br />
blink rapidly than usual, release the button. Then the router will restart with the<br />
factory default configuration.<br />
Connector for a power adapter.<br />
Power Switch.<br />
Vigor2130 Series User’s <strong>Guide</strong> 5
1.2.3 For Vigor2130Vn<br />
LED Status Explanation<br />
ACT<br />
(Activity)<br />
Blinking<br />
Off<br />
The router is powered on and running<br />
normally.<br />
The router is powered off.<br />
HPA On Hardware NAT is enabled.<br />
Off Hardware NAT is disabled.<br />
WAN On The WAN port is connected.<br />
Blinking It will blink while transmitting data.<br />
On The port is connected.<br />
LAN1/2/3/4 Off The port is disconnected.<br />
Blinking The data is transmitting.<br />
USB1/2 On A USB device is connected and active.<br />
Blinking The data is transmitting.<br />
Phone1/<br />
Phone2<br />
On The phone connected to this port is<br />
off-hook.<br />
Off The phone connected to this port is<br />
on-hook.<br />
Blinking A phone call comes.<br />
WLAN On Wireless access point is ready.<br />
Blinking It will blink while wireless traffic goes<br />
through.<br />
WPS Button On Press this button for 2 seconds to wait<br />
for client device making network<br />
connection through WPS. When the<br />
LED lights up, the WPS connection<br />
will be on.<br />
Off The WPS is off.<br />
Blinking Waiting for wireless client sending<br />
requests for connection about two<br />
minutes.<br />
Interface Description<br />
WLAN Press the button once to enable (WLAN LED on) or<br />
disable (WLAN LED off) wireless connection.<br />
WAN Connector for accessing the Internet.<br />
LAN (1-4) Connectors for local networked devices.<br />
USB Connector for USB storage (Pen Driver/Mobile<br />
HD) or printer.<br />
6<br />
Vigor2130 Series User’s <strong>Guide</strong>
Interface<br />
Phone2/Phone1<br />
Factory Reset<br />
PWR<br />
ON/OFF<br />
Description<br />
Connector of analog phone for VoIP communication.<br />
Restore the default settings. Usage: Turn on the router (ACT LED is blinking). Press<br />
the hole and keep for more than 5 seconds. When you see the ACT LED begins to<br />
blink rapidly than usual, release the button. Then the router will restart with the<br />
factory default configuration.<br />
Connector for a power adapter.<br />
Power Switch.<br />
Vigor2130 Series User’s <strong>Guide</strong> 7
1.3 Hardware Installation<br />
Before starting to configure the router, you have to connect your devices correctly.<br />
1. Connect Line port to land line jack with a RJ-11 cable (Vn model).<br />
2. Connect this device to a modem with an Ethernet cable.<br />
3. Connect one port of 4-port switch to your computer with a RJ-45 cable. This device<br />
allows you to connect 4 PCs directly.<br />
4. Connect Phone port to a conventional analog telephone.<br />
5. Connect detachable antennas to the router for Vigor2130 series (n model).<br />
6. Connect one end of the power cord to the power port of this device. Connect the other<br />
end to the wall outlet of electricity.<br />
7. Power on the router.<br />
8. Check the ACT and WAN, LAN LEDs to assure network connections.<br />
(For the detailed information of LED status, please refer to section 1.1.)<br />
Caution:<br />
1. Each of the Phone ports can be connected to an analog phone only. Do not connect the<br />
phone ports to the land line jack. Such connection might damage your router.<br />
2. When the power is shutdown, VoIP phone will be disconnected. However, a phone set<br />
connected to Phone 2 port can be used as the traditional telephone for the line will be<br />
guided to land line jack via the router (loop through).<br />
8<br />
Vigor2130 Series User’s <strong>Guide</strong>
Stand Installation<br />
The Vigor2130 must be placed erectly. Therefore you have to install a stand onto the router to<br />
make it standing firmly. Please follow the figures listed below to finish the installation.<br />
<br />
<br />
<br />
<br />
Vigor2130 Series User’s <strong>Guide</strong> 9
1.4 Printer Installation<br />
You can install a printer onto the router for sharing printing. All the PCs connected this router<br />
can print documents via the router. The example provided here is made based on Windows<br />
XP/2000. For Windows 98/SE/Vista, please visit www.draytek.com.<br />
Before using it, please follow the steps below to configure settings for connected computers<br />
(or wireless clients).<br />
1. Connect the printer with the router through USB/parallel port.<br />
2. Open Start->Settings-> Printer and Faxes.<br />
3. Open File->Add a New Computer. A welcome dialog will appear. Please click Next.<br />
10<br />
Vigor2130 Series User’s <strong>Guide</strong>
4. Click Local printer attached to this computer and click Next.<br />
5. In this dialog, choose Create a new port Type of port and use the drop down list to<br />
select Standard TCP/IP Port. Click Next.<br />
Vigor2130 Series User’s <strong>Guide</strong> 11
6. In the following dialog, type 192.168.1.1 (router’s LAN IP) in the field of Printer Name<br />
or IP Address and type IP_192.168.1.1 as the port name. Then, click Next.<br />
7. Click Standard and choose Generic Network Card.<br />
8. Then, in the following dialog, click Finish.<br />
12<br />
Vigor2130 Series User’s <strong>Guide</strong>
9. Now, your system will ask you to choose right name of the printer that you installed onto<br />
the router. Such step can make correct driver loaded onto your PC. When you finish the<br />
selection, click Next.<br />
10. For the final stage, you need to go back to Control Panel-> Printers and edit the<br />
property of the new printer you have added.<br />
11. Select "LPR" on Protocol, type p1 (number 1) as Queue Name. Then click OK. Next<br />
please refer to the red rectangle for choosing the correct protocol and UPR name.<br />
Vigor2130 Series User’s <strong>Guide</strong> 13
The printer can be used for printing now. Most of the printers with different manufacturers are<br />
compatible with vigor router.<br />
Note 1: Some printers with the fax/scanning or other additional functions are not<br />
supported. If you do not know whether your printer is supported or not, please visit<br />
www.draytek.com to find out the printer list. Open Support >FAQ; find out the link of<br />
Printer Server and click it; then click the What types of printers are compatible with<br />
Vigor router? link.<br />
Note 2: Vigor router supports printing request from computers via LAN ports but not<br />
WAN port.<br />
14<br />
Vigor2130 Series User’s <strong>Guide</strong>
2 Configuring Basic Settings<br />
For using the router properly, it is necessary for you to change the password of web<br />
configuration for security and adjust primary basic settings.<br />
2.1 Two-Level Management<br />
This chapter explains how to setup a password for an administrator/user and how to adjust<br />
basic/advanced settings for accessing Internet successfully.<br />
For user mode operation, do not type any word on the window and click Login for the simple<br />
web pages for configuration. Yet, for admin mode operation, please type “admin/admin” on<br />
Username/Password and click Login for full configuration.<br />
2.2 Accessing Web Page<br />
1. Make sure your PC connects to the router correctly.<br />
Notice: You may either simply set up your computer to get IP dynamically<br />
from the router or set up the IP address of the computer to be the same subnet as<br />
the default IP address of Vigor router 192.168.1.1. For the detailed<br />
information, please refer to the later section - Trouble Shooting of the guide.<br />
2. Open a web browser on your PC and type http://192.168.1.1. The following window<br />
will be open to ask for username and password.<br />
3. For user mode operation, do not type any word on the window and click Login for the<br />
simple web pages for configuration. Yet, for admin mode operation, please type<br />
“admin/admin” on Username/Password and click Login for full configuration.<br />
Notice: If you fail to access to the web configuration, please go to “Trouble<br />
Shooting” for detecting and solving your problem.<br />
4. The web page can be logged out according to the chosen condition. The default setting is<br />
Auto Logout, which means the web configuration system will logout after 5 minutes<br />
without any operation. Change the setting for your necessity.<br />
Vigor2130 Series User’s <strong>Guide</strong> 15
2.3 Changing Password<br />
No matter user mode operation or admin mode operation, please change the password for the<br />
original security of the router.<br />
1. Open a web browser on your PC and type http://192.168.1.1. A pop-up window will<br />
open to ask for username and password.<br />
2. Please type “admin/admin” on Username/Password for admin mode. Otherwise, do not<br />
type any word (both username and password are Null for user mode) on the window and<br />
click Login on the window.<br />
3. Now, the Main Screen will appear.<br />
Main screen for admin mode operation (full configuration)<br />
Main screen for user mode operation (simple configuration)<br />
Note: The home page will change slightly in accordance with the type of the router<br />
you have.<br />
16<br />
Vigor2130 Series User’s <strong>Guide</strong>
4. Go to System Maintenance page and choose System Password/User Password.<br />
Or<br />
5. Type New Password in New Password and Confirm New Password fields. Then click<br />
OK to continue.<br />
6. Now, the password has been changed. Next time, use the new password to access the<br />
Web Configurator for this router.<br />
Vigor2130 Series User’s <strong>Guide</strong> 17
2.4 Quick Start Wizard<br />
Notice: Quick Start Wizard for user mode operation is the same as for admin<br />
mode operation.<br />
If your router can be under an environment with high speed NAT, the configuration provide<br />
here can help you to deploy and use the router quickly. The first screen of Quick Start<br />
Wizard is welcome page, please click Next.<br />
2.4.1 Setting up the Password<br />
The first screen of Quick Start Wizard is entering login password. After typing the password,<br />
please click Next.<br />
18<br />
Vigor2130 Series User’s <strong>Guide</strong>
2.4.2 Setting up the Time Zone<br />
On the next page as shown below, please select the Time Zone for the router installed and<br />
specify the NTP server(s). Then click Next for next step.<br />
2.4.3 Setting up the Internet Connection<br />
On the next page as shown below, please select the appropriate connection type according to<br />
the information from your ISP. There are five types offered in this page. Each connection type<br />
will bring out different web page.<br />
Vigor2130 Series User’s <strong>Guide</strong> 19
Static IP<br />
You will receive a fixed public IP address or a public subnet, namely multiple public IP<br />
addresses from your DSL or Cable ISP service providers. In most cases, a Cable service<br />
provider will offer a fixed public IP, while a DSL service provider will offer a public subnet.<br />
If you have a public subnet, you could assign an IP address or many IP address to the WAN<br />
interface.<br />
IP Address<br />
Subnet Mask<br />
Gateway<br />
Primary DNS Server<br />
Secondary DNS Server<br />
Enable<br />
Clone MAC Address<br />
Type the IP address.<br />
Type the subnet mask.<br />
Type the gateway IP address.<br />
Type in the primary IP address for the router<br />
Type in secondary IP address for necessity in the future.<br />
The router will detect the MAC address automatically. Or,<br />
check the box to enable MAC address cloning.<br />
It is available when the box of Enable is checked. Click Clone<br />
PC Address. The result will be displayed in the field of MAC<br />
Address.<br />
After finishing the settings here, please click Next.<br />
20<br />
Vigor2130 Series User’s <strong>Guide</strong>
DHCP<br />
It is not necessary for you to type any IP address manually. Simply choose this type and the<br />
system will obtain the IP address automatically from DHCP server.<br />
Enable<br />
Clone MAC Address<br />
The router will detect the MAC address automatically. Or,<br />
check the box to enable MAC address cloning.<br />
It is available when the box of Enable is checked. Click Clone<br />
PC Address. The result will be displayed in the field of MAC<br />
Address.<br />
After finishing the settings here, please click Next.<br />
PPPoE<br />
PPPoE stands for Point-to-Point Protocol over Ethernet. It relies on two widely accepted<br />
standards: PPP and Ethernet. It connects users through an Ethernet to the Internet with a<br />
common broadband medium, such as a single DSL line, wireless device or cable modem. All<br />
the users over the Ethernet can share a common connection.<br />
PPPoE is used for most of DSL modem users. All local users can share one PPPoE connection<br />
for accessing the Internet. Your service provider will provide you information about user name,<br />
password, and authentication mode.<br />
Vigor2130 Series User’s <strong>Guide</strong> 21
If your ISP provides you the PPPoE connection, please select PPPoE for this router. The<br />
following page will be shown:<br />
User Name<br />
Password<br />
Redial Policy<br />
Assign a specific valid user name provided by the ISP.<br />
Assign a valid password provided by the ISP.<br />
If you want to connect to Internet all the time, you can choose<br />
Always On. Otherwise, choose Connect on Demand.<br />
Idle Time Out<br />
MTU Size<br />
Enable<br />
Clone MAC Address<br />
Set the timeout for breaking down the Internet after passing<br />
through the time without any action. The unit is seconds. The<br />
range is XX ~ XX.<br />
It means Max Transmit Unit for packet. The default<br />
setting is 1442.<br />
The router will detect the MAC address automatically. Or,<br />
check the box to enable MAC address cloning.<br />
It is available when the box of Enable is checked. Click Clone<br />
PC Address. The result will be displayed in the field of MAC<br />
Address.<br />
After finishing the settings here, please click Next.<br />
22<br />
Vigor2130 Series User’s <strong>Guide</strong>
PPTP/L2TP<br />
if you click PPTP/L2TP as the protocol, please manually enter the Username/Password<br />
provided by your ISP and all the required information.<br />
User Name<br />
Password<br />
Server Address<br />
Assign a specific valid user name provided by the ISP.<br />
Assign a valid password provided by the ISP.<br />
Specify the IP address of the PPTP server.<br />
WAN IP Network Settings You can choose Static IP or DHCP as WAN IP network setting.<br />
IP Address<br />
Subnet Mask<br />
Redial Policy<br />
Type the IP address if you choose Static IP as the WAN IP<br />
network setting.<br />
Type the subnet mask if you chose Static IP as the WAN IP.<br />
If you want to connect to Internet all the time, you can choose<br />
Always On. Otherwise, choose Connect on Demand.<br />
Idle Time Out<br />
MTU Size<br />
Enable<br />
Set the timeout for breaking down the Internet after passing<br />
through the time without any action. The unit is seconds. The<br />
range is XX ~ XX.<br />
It means Max Transmit Unit for packet. The default<br />
setting is 1442.<br />
The router will detect the MAC address automatically. Or,<br />
check the box to enable MAC address cloning.<br />
Vigor2130 Series User’s <strong>Guide</strong> 23
Clone MAC Address<br />
It is available when the box of Enable is checked. Click Clone<br />
PC Address. The result will be displayed in the field of MAC<br />
Address.<br />
After finishing the settings here, please click Next.<br />
2.4.4 Setting up the Wireless Connection<br />
Now, you have to set up the wireless connection. For the user of Vigor2130, please skip this<br />
step.<br />
Enable Wireless LAN<br />
SSID Broadcast<br />
SSID<br />
Wireless Mode<br />
Country Region Code<br />
Channel<br />
Encryption<br />
Check the box to enable the wireless function.<br />
Choose Show to make the SSID being seen by wireless clients.<br />
Choose Hide to prevent from wireless sniffing and make it<br />
harder for unauthorized clients or STAs to join your wireless<br />
LAN.<br />
It means the identification of the wireless LAN. SSID can be<br />
any text numbers or various special characters. The default<br />
SSID is "DrayTek". We suggest you to change it.<br />
Choose the wireless mode for this router. At present, only<br />
802.11B/B/N mix is available.<br />
Use the drop down list to choose the one that this router<br />
supports.<br />
It means the channel of frequency of the wireless LAN. The<br />
default channel is 11. You may switch channel if the selected<br />
channel is under serious interference. If you have no idea of<br />
choosing the frequency, please select Auto to let system<br />
determine for you.<br />
Select an appropriate encryption mode to improve the security<br />
and privacy of your wireless data packets.<br />
24<br />
Vigor2130 Series User’s <strong>Guide</strong>
WEP<br />
Each encryption mode will bring out different web page and ask<br />
you to offer additional configuration.<br />
If you choose WEP as the security configuration, you have to specify encryption key (Key 1 ~<br />
Key 4) and authentication mode (open or shared). All wireless devices must support the same<br />
WEP encryption bit size and have the same key.<br />
Four keys can be entered here, but only one key can be selected at a time. The keys can be<br />
entered in ASCII or Hexadecimal. Choose the key you wish to use by using the Default Key<br />
drop down list.<br />
Vigor2130 Series User’s <strong>Guide</strong> 25
WPA-PSK<br />
If you choose WPA-PSK as the security configuration, you have to specify WPA mode,<br />
algorithm and pre-shared key.<br />
Type<br />
The WPA encrypts each frame transmitted from the radio using<br />
the key, which either PSK (Pre-Shared Key) entered manually<br />
in this field below or automatically negotiated via 802.1x<br />
authentication. Select WPA, WPA2 or Auto as WPA mode.<br />
WPA Algorithm<br />
Choose the WPA algorithm, TKIP, AES or Auto.<br />
WPA Pre-shared Key<br />
The keys can be entered in ASCII or Hexadecimal. Check the<br />
key you wish to use.<br />
26<br />
Vigor2130 Series User’s <strong>Guide</strong>
WPA- RADIUS<br />
Remote Authentication Dial-In User Service (RADIUS) is a security authentication<br />
client/server protocol that supports authentication, authorization and accounting, which is<br />
widely used by Internet service providers. It is the most common method of authenticating and<br />
authorizing dial-up and tunneled network users.<br />
The built-in RADIUS client feature enables the router to assist the remote dial-in user or a<br />
wireless station and the RADIUS server in performing mutual authentication. It enables<br />
centralized remote access authentication for network management.<br />
If you choose WPA-Radius as the security configuration, you have to specify WPA mode,<br />
algorithm, Radius server, Radius server port and Radius server secret respectively.<br />
Type<br />
The WPA encrypts each frame transmitted from the radio using<br />
the key, which either PSK (Pre-Shared Key) entered manually<br />
in this field below or automatically negotiated via 802.1x<br />
authentication. Select WPA, WPA2 or Auto as WPA mode.<br />
WPA Algorithm<br />
Choose the WPA algorithm, TKIP, AES or Auto.<br />
Server IP Address<br />
Destination Port<br />
Enter the IP address of RADIUS server.<br />
The UDP port number that the RADIUS server is using. The<br />
default value is 1812, based on RFC 2138.<br />
Vigor2130 Series User’s <strong>Guide</strong> 27
Shared Secret<br />
The RADIUS server and client share a secret that is used to<br />
authenticate the messages sent between them. Both sides must<br />
be configured to use the same shared secret.<br />
WPS<br />
WPS (Wi-Fi Protected Setup) provides easy procedure to make network connection<br />
between wireless station and wireless access point (vigor router) with the encryption of<br />
WPA and WPA2.<br />
If you choose WPS as the security configuration, you can press Start WPS PIN and Start WPS<br />
PBC to complete the wireless connection.<br />
Configure via Push Button Click Start PBC to invoke Push-Button style WPS setup<br />
procedure. The router will wait for WPS requests from wireless<br />
clients about two minutes. The WPS LED on the router will<br />
blink fast when WPS is in progress. It will return to normal<br />
condition after two minutes. (You need to setup WPS within<br />
two minutes)<br />
Configure via Client PinCode Type the PIN code specified in wireless client you wish to<br />
connect, and click Start PIN button. The WLAN LED on the<br />
router will blink fast when WPS is in progress. It will return to<br />
normal condition after two minutes. (You need to setup WPS<br />
within two minutes)<br />
After finishing the settings here, please click Next.<br />
28<br />
Vigor2130 Series User’s <strong>Guide</strong>
2.4.5 Saving the Wizard Configuration<br />
Now you can see the following screen. It indicates that the setup is complete. Different types<br />
of connection modes will have different summary. Click Finish and then restart the router.<br />
2.5 Online Status<br />
The online status shows the system status, WAN status, and other status related to this router<br />
within one page. If you select PPPoE as the protocol, you will find out a link of Dial PPPoE<br />
or Drop PPPoE in the Online Status web page.<br />
Online status for DHCP<br />
Detailed explanation is shown below:<br />
LAN Status<br />
IP Address<br />
Displays the IP address of the LAN interface.<br />
TX Packets<br />
Displays the total transmitted packets at the LAN interface.<br />
RX Packets<br />
Displays the total number of received packets at the LAN interface.<br />
WAN Status<br />
Line<br />
Displays the physical connection (Ethernet) of this interface.<br />
Vigor2130 Series User’s <strong>Guide</strong> 29
Name<br />
Mode<br />
Up Time<br />
IP<br />
GW IP<br />
TX Packets<br />
TX Rate<br />
RX Packets<br />
RX Rate<br />
Displays the name set in WAN1/WAN web page.<br />
Displays the type of WAN connection (e.g., PPPoE).<br />
Displays the total uptime of the interface.<br />
Displays the IP address of the WAN interface.<br />
Displays the IP address of the default gateway.<br />
Displays the total transmitted packets at the WAN interface.<br />
Displays the speed of transmitted octets at the WAN interface.<br />
Displays the total number of received packets at the WAN interface.<br />
Displays the speed of received octets at the WAN interface.<br />
Note: The words in green mean that the WAN connection of that interface is ready for<br />
accessing Internet; the words in red mean that the WAN connection of that interface is not<br />
ready for accessing Internet.<br />
2.6 Saving Configuration<br />
Each time you click OK on the web page for saving the configuration, you can find messages<br />
showing the system interaction with you.<br />
Ready indicates the system is ready for you to input settings.<br />
Settings Saved means your settings are saved once you click Finish or OK button.<br />
30<br />
Vigor2130 Series User’s <strong>Guide</strong>
3 User Mode Operation<br />
This chapter will guide users to execute simple configuration through user mode operation.<br />
1. Open a web browser on your PC and type http://192.168.1.1. The window will ask for<br />
typing username and password.<br />
2. Do not type any word (both username and password are Null for user operation) on the<br />
window and click Login on the window.<br />
Now, the Main Screen will appear. Be aware that “User mode” will be displayed on the<br />
bottom left side.<br />
3.1 WAN<br />
Quick Start Wizard offers user an easy method to quick setup the connection mode for the<br />
router. Moreover, if you want to adjust more settings for different WAN modes, please go to<br />
WAN group.<br />
Basics of Internet Protocol (IP) Network<br />
IP means Internet Protocol. Every device in an IP-based Network including routers, print<br />
server, and host PCs, needs an IP address to identify its location on the network. To avoid<br />
address conflicts, IP addresses are publicly registered with the Network Information Centre<br />
(NIC). Having a unique IP address is mandatory for those devices participated in the public<br />
network but not in the private TCP/IP local area networks (LANs), such as host PCs under the<br />
management of a router since they do not need to be accessed by the public. Hence, the NIC<br />
has reserved certain addresses that will never be registered publicly. These are known as<br />
private IP addresses, and are listed in the following ranges:<br />
From 10.0.0.0 to 10.255.255.255<br />
From 172.16.0.0 to 172.31.255.255<br />
From 192.168.0.0 to 192.168.255.255<br />
Vigor2130 Series User’s <strong>Guide</strong> 31
What are Public IP Address and Private IP Address<br />
As the router plays a role to manage and further protect its LAN, it interconnects groups of<br />
host PCs. Each of them has a private IP address assigned by the built-in DHCP server of the<br />
Vigor router. The router itself will also use the default private IP address: 192.168.1.1 to<br />
communicate with the local hosts. Meanwhile, Vigor router will communicate with other<br />
network devices through a public IP address. When the data flow passing through, the<br />
Network Address Translation (NAT) function of the router will dedicate to translate<br />
public/private addresses, and the packets will be delivered to the correct host PC in the local<br />
area network. Thus, all the host PCs can share a common Internet connection.<br />
Get Your Public IP Address from ISP<br />
In ADSL deployment, the PPP (Point to Point)-style authentication and authorization is<br />
required for bridging customer premises equipment (CPE). Point to Point Protocol over<br />
Ethernet (PPPoE) connects a network of hosts via an access device to a remote access<br />
concentrator or aggregation concentrator. This implementation provides users with significant<br />
ease of use. Meanwhile it provides access control, billing, and type of service according to<br />
user requirement.<br />
When a router begins to connect to your ISP, a serial of discovery process will occur to ask for<br />
a connection. Then a session will be created. Your user ID and password is authenticated via<br />
PAP or CHAP with RADIUS authentication system. And your IP address, DNS server, and<br />
other related information will usually be assigned by your ISP.<br />
Network Connection by 3G USB Modem<br />
For 3G mobile communication through Access Point is popular more and more, Vigor router<br />
adds the function of 3G network connection for such purpose. By connecting 3G USB Modem<br />
to the USB port of Vigor router, it can support HSDPA/UMTS/EDGE/GPRS/GSM and the<br />
future 3G standard (HSUPA, etc). Vigor router with 3G USB Modem allows you to receive<br />
3G signals at any place such as your car or certain location holding outdoor activity and share<br />
the bandwidth for using by more people. Users can use four LAN ports on the router to access<br />
Internet. Also, they can access Internet via SuperG wireless function of Vigor router, and<br />
enjoy the powerful firewall, bandwidth management, VPN, VoIP features of Vigor router.<br />
After connecting into the router, 3G USB Modem will be regarded as the second WAN port.<br />
However, the original Ethernet WAN still can be used and Load-Balance can be done in the<br />
router. Besides, 3G USB Modem also can be used as backup device. Therefore, when WAN is<br />
not available, the router will use 3.5G for supporting automatically. The supported 3G USB<br />
Modem will be listed on DrayTek web site. Please visit www.draytek.com for more detailed<br />
information.<br />
Below shows the menu items for WAN.<br />
32<br />
Vigor2130 Series User’s <strong>Guide</strong>
3.1.1 Internet Access<br />
This page allows you to set WAN configuration with different modes. Use the Connection<br />
Type drop down list to choose one of the WAN modes. The corresponding page will be<br />
displayed.<br />
Static<br />
For static IP mode, you usually receive a fixed public IP address or a public subnet, namely<br />
multiple public IP addresses from your DSL or Cable ISP service providers. In most cases, a<br />
Cable service provider will offer a fixed public IP, while a DSL service provider will offer a<br />
public subnet. If you have a public subnet, you could assign an IP address or many IP address<br />
to the WAN interface.<br />
To use Static as the accessing protocol of the internet, please choose Static mode from<br />
Connection Type drop down menu. The following web page will be shown.<br />
IP Address<br />
Subnet Mask<br />
Type the IP address.<br />
Type the subnet mask.<br />
Vigor2130 Series User’s <strong>Guide</strong> 33
Gateway IP Address<br />
Primary DNS Server<br />
Secondary DNS Server<br />
Clone MAC Address<br />
Type the gateway IP address.<br />
Type in the primary IP address for the router if you want to use<br />
Static IP mode.<br />
Type in secondary IP address for using in the future if<br />
necessary.<br />
It is available when the box of Enable is checked. Click Clone<br />
MAC Address. The result will be displayed in the field of<br />
MAC Address.<br />
After finishing all the settings here, please click OK to activate them.<br />
34<br />
Vigor2130 Series User’s <strong>Guide</strong>
DHCP<br />
DHCP allows a user to obtain an IP address automatically from a DHCP server on the Internet.<br />
If you choose DHCP mode, the DHCP server of your ISP will assign a dynamic IP address for<br />
your router automatically. It is not necessary for you to assign any setting,<br />
Router Name<br />
Clone MAC Address<br />
Type in a name for the router. It must be the same as the name<br />
used in Syslog.<br />
It is available when the box of Enable is checked. Click Clone<br />
MAC Address. The result will be displayed in the field of<br />
MAC Address.<br />
After finishing all the settings here, please click OK to activate them.<br />
PPPoE<br />
To choose PPPoE as the accessing protocol of the internet, please select PPPoE from the<br />
Internet Access menu. The following web page will be shown.<br />
Username<br />
Type in the username provided by ISP in this field.<br />
Vigor2130 Series User’s <strong>Guide</strong> 35
Password<br />
Redial Policy<br />
Type in the password provided by ISP in this field.<br />
If you want to connect to Internet all the time, you can choose<br />
Always On. Otherwise, choose Connect on Demand.<br />
Idle Time Out<br />
MTU Size<br />
Enable/Disable<br />
Clone MAC Address<br />
Set the timeout for breaking down the Internet after passing<br />
through the time without any action. When you choose Connect<br />
on Demand, you have to type value here.<br />
It means Max Transmit Unit for packet. The default<br />
setting is 1442. Leave blank for default value.<br />
Click Enable for activating this function. If you click Disable,<br />
this function will be closed and all the settings that you adjusted<br />
in this page will be invalid.<br />
It is available when the box of Enable is checked. Click Clone<br />
MAC Address. The result will be displayed in the field of<br />
MAC Address.<br />
After finishing all the settings here, please click OK to activate them.<br />
36<br />
Vigor2130 Series User’s <strong>Guide</strong>
PPTP/L2TP<br />
To use PPTP/L2TP as the accessing protocol of the internet, please choose PPTP/L2TP from<br />
Connection Type drop down menu. The following web page will be shown.<br />
Username<br />
Password<br />
Server Address<br />
Type in the username provided by ISP in this field.<br />
Type in the password provided by ISP in this field.<br />
Type in the IP address for PPTP /L2TP server.<br />
WAN IP Network Settings You can choose Static IP or DHCP as WAN IP network setting.<br />
IP Address<br />
Subnet Mask<br />
Primary DNS Server<br />
Secondary DNS Server<br />
Type the IP address if you choose Static IP as the WAN IP<br />
network setting.<br />
Type the subnet mask if you chose Static IP as the WAN IP.<br />
If you choose Static IP for WAN IP Network Settings, you<br />
must specify a DNS server IP address here because your ISP<br />
should provide you with usually more than one DNS Server. If<br />
your ISP does not provide it, the router will apply a default<br />
DNS Server automatically.<br />
If you choose Static IP for WAN IP Network Settings, you can<br />
specify secondary DNS server IP address here because your ISP<br />
often provides you more than one DNS Server. If your ISP does<br />
not provide it, the router will apply a default secondary DNS<br />
Server automatically.<br />
Vigor2130 Series User’s <strong>Guide</strong> 37
Redial Policy<br />
If you want to connect to Internet all the time, you can choose<br />
Always On. Otherwise, choose Connect on Demand and<br />
Idle Time Out<br />
MTU Size<br />
Clone MAC Address<br />
Set the timeout for breaking down the Internet after passing<br />
through the time without any action. When you choose Connect<br />
on Demand, you have to type value here.<br />
It means Max Transmit Unit for packet. The default<br />
setting is 1442.<br />
It is available when the box of Enable is checked. Click Clone<br />
MAC Address. The result will be displayed in the field of<br />
MAC Address.<br />
After finishing all the settings here, please click OK to activate them.<br />
3G USB Modem<br />
If your router connects to a 3G modem and you want to access Internet via 3G modem, choose<br />
3G as connection type and type the required information in this web page.<br />
SIM PIN code<br />
Modem Initial String1/2<br />
APN Name<br />
Type PIN code of the SIM card that will be used to access<br />
Internet.<br />
Such value is used to initialize USB modem. Please use the<br />
default value. If you have any question, please contact to your<br />
ISP.<br />
APN means Access Point Name which is provided and<br />
required by some ISPs.<br />
38<br />
Vigor2130 Series User’s <strong>Guide</strong>
Modem Dial String<br />
PPP Username<br />
PPP Password<br />
Clone MAC Address<br />
Such value is used to dial through USB mode. Please use the<br />
default value. If you have any question, please contact to your<br />
ISP.<br />
Type the PPP username (optional).<br />
Type the PPP password (optional).<br />
It is available when the box of Enable is checked. Click Clone<br />
MAC Address. The result will be displayed in the field of<br />
MAC Address.<br />
3.1.2 Ports<br />
After finishing all the settings here, please click OK to activate them.<br />
Ports page is used to change the setting for WAN port. You can set or reset the following<br />
items. All of them are described in detail below.<br />
Port<br />
Link<br />
Current<br />
Speed Configured<br />
It displays current network interface.<br />
It displays current connection status. Green light means the<br />
WAN connection is successful.<br />
It displays current speed that the router uses.<br />
It can set the speed and duplex of the port. You can use the drop<br />
down list to choose the required speed for the router. If you<br />
have no idea in configuring speed, simple use the default setting,<br />
Auto.<br />
Vigor2130 Series User’s <strong>Guide</strong> 39
Flow Control<br />
Maximum Frame<br />
Excessive Collision Mode<br />
If flow control is enabled by checking Configured box, both<br />
parties can send PAUSE frame to the transmitting device(s) if<br />
the receiving port is too busy to handle. If not, there will be no<br />
flow control in the port. It drops the packet if too much to<br />
handle.<br />
Current Rx: indicates whether pause frames on the port are<br />
obeyed.<br />
Current Tx: indicates whether pause frames on the port are<br />
transmitted.<br />
This module offers 1518~9600 (Bytes) length to make the long<br />
packet for data transmission.<br />
There are two modes for you to choose when excessive<br />
collision happened in half-duplex condition.<br />
Discard - It determines whether the MAC drops frames after an<br />
excessive collision has occurred. If yes, a frame is dropped after<br />
excessive collision. This is IEEE Standard 802.3 half-duplex<br />
flow control operation.<br />
Power Control<br />
Restart - It determines whether the MAC retransmits frames<br />
after an excessive collision has occurred. If set, a frame is not<br />
dropped after excessive collisions, but the backoff sequence is<br />
restarted. This is a violation of IEEE Standard 802.3, but is<br />
useful in non-dropping half-duplex flow control operation.<br />
The Configured column allows for changing the power savings<br />
mode parameters per port.<br />
Refresh<br />
Disabled: All power savings mechanisms disabled.<br />
ActiPHY: Link down power savings enabled.<br />
PerfectReach: Link up power savings enabled.<br />
Enabled: Both link up and link down power savings enabled.<br />
Click this button to refresh the information for WAN port.<br />
After finishing all the settings here, please click OK to activate them.<br />
3.1.3 3G Backup<br />
This page is used to setup 3G backup function. If you enable 3G backup, make sure your<br />
WAN connection type is not in 3G mode. When the WAN connection is broken, router will<br />
try to keep the connection with 3G mode. After WAN connection is recovered, router will<br />
disconnect the 3G connection automatically.<br />
40<br />
Vigor2130 Series User’s <strong>Guide</strong>
SIM PIN code<br />
Modem Initial String1/2<br />
APN Name<br />
Modem Dial String<br />
PPP Username<br />
PPP Password<br />
Clone MAC Address<br />
Type PIN code of the SIM card that will be used to access<br />
Internet.<br />
Such value is used to initialize USB modem. Please use the<br />
default value. If you have any question, please contact to your<br />
ISP.<br />
APN means Access Point Name which is provided and<br />
required by some ISPs.<br />
Such value is used to dial through USB mode. Please use the<br />
default value. If you have any question, please contact to your<br />
ISP.<br />
Type the PPP username (optional).<br />
Type the PPP password (optional).<br />
It is available when the box of Enable is checked. Click Clone<br />
MAC Address. The result will be displayed in the field of<br />
MAC Address.<br />
3.2 LAN<br />
Local Area Network (LAN) is a group of subnets regulated and ruled by router. The design of<br />
network structure is related to what type of public IP addresses coming from your ISP.<br />
Basics of LAN<br />
The most generic function of Vigor router is NAT. It creates a private subnet of your own. As<br />
mentioned previously, the router will talk to other public hosts on the Internet by using public<br />
IP address and talking to local hosts by using its private IP address. What NAT does is to<br />
translate the packets from public IP address to private IP address to forward the right packets<br />
to the right host and vice versa. Besides, Vigor router has a built-in DHCP server that assigns<br />
private IP address to each local host. See the following diagram for a briefly understanding.<br />
Vigor2130 Series User’s <strong>Guide</strong> 41
In some special case, you may have a public IP subnet from your ISP such as<br />
220.135.240.0/24. This means that you can set up a public subnet or call second subnet that<br />
each host is equipped with a public IP address. As a part of the public subnet, the Vigor router<br />
will serve for IP routing to help hosts in the public subnet to communicate with other public<br />
hosts or servers outside. Therefore, the router should be set as the gateway for public hosts.<br />
What is Routing Information Protocol (RIP)<br />
Vigor router will exchange routing information with neighboring routers using the RIP to<br />
accomplish IP routing. This allows users to change the information of the router such as IP<br />
address and the routers will automatically inform for each other.<br />
What are Virtual LANs and Rate Control<br />
42<br />
Vigor2130 Series User’s <strong>Guide</strong>
You can group local hosts by physical ports and create up to 4 virtual LANs. To manage the<br />
communication between different groups, please set up rules in Virtual LAN (VLAN) function<br />
and the rate of each.<br />
Below shows the LAN menu:<br />
3.2.1 General Setup<br />
This page provides you the general settings for LAN.<br />
Click LAN to open the LAN settings page and choose General Setup.<br />
IP Address<br />
Type in private IP address for connecting to a local private<br />
network (Default: 192.168.1.1).<br />
Vigor2130 Series User’s <strong>Guide</strong> 43
Subnet Mask<br />
Enable DHCP<br />
Start IP Address<br />
IP Pool Counts<br />
Lease Time<br />
Type in an address code that determines the size of the network.<br />
(Default: 255.255.255.0/ 24)<br />
DHCP stands for Dynamic Host Configuration Protocol. The<br />
router by factory default acts a DHCP server for your network<br />
so it automatically dispatch related IP settings to any local user<br />
configured as a DHCP client. It is highly recommended that you<br />
leave the router enabled as a DHCP server if you do not have a<br />
DHCP server for your network.<br />
You can configure the router to serve as a DHCP server for the<br />
2nd subnet. Check the box to enable DHCP server setting.<br />
Enter a value of the IP address pool for the DHCP server to start<br />
with when issuing IP addresses. If the 2nd IP address of your<br />
router is 220.135.240.1, the starting IP address must be<br />
220.135.240.2 or greater, but smaller than 220.135.240.254.<br />
Enter the number of IP addresses in the pool. The maximum is<br />
10. For example, if you type 3 and the 2nd IP address of your<br />
router is 220.135.240.1, the range of IP address by the DHCP<br />
server will be from 220.135.240.2 to 220.135.240.11.<br />
It allows you to set the leased time for the specified PC.<br />
After finishing all the settings here, please click OK to activate them.<br />
3.2.2 Ports<br />
Ports page is used to change the setting for LAN ports. You can set or reset the following<br />
items. All of them are described in detail below.<br />
Port<br />
Link<br />
Current<br />
Speed Configured<br />
It displays current network interface.<br />
It displays current connection status. Green light means the<br />
LAN connection is successful.<br />
It displays current speed that the router uses.<br />
It can set the speed and duplex of the port. You can use the drop<br />
down list to choose the required speed for the router. If you<br />
have no idea in configuring speed, simple use the default setting,<br />
44<br />
Vigor2130 Series User’s <strong>Guide</strong>
Auto.<br />
Flow Control<br />
Maximum Frame<br />
Excessive Collision Mode<br />
If flow control is enabled by checking Configured box, both<br />
parties can send PAUSE frame to the transmitting device(s) if<br />
the receiving port is too busy to handle. If not, there will be no<br />
flow control in the port. It drops the packet if too much to<br />
handle.<br />
Current Rx: indicates whether pause frames on the port are<br />
obeyed.<br />
Current Tx: indicates whether pause frames on the port are<br />
transmitted.<br />
This module offers 1518~9600 (Bytes) length to make the long<br />
packet for data transmission.<br />
There are two modes for you to choose when excessive<br />
collision happened in half-duplex condition.<br />
Discard - It determines whether the MAC drops frames after an<br />
excessive collision has occurred. If yes, a frame is dropped after<br />
excessive collision. This is IEEE Standard 802.3 half-duplex<br />
flow control operation.<br />
Power Control<br />
Restart - It determines whether the MAC retransmits frames<br />
after an excessive collision has occurred. If set, a frame is not<br />
dropped after excessive collisions, but the backoff sequence is<br />
restarted. This is a violation of IEEE Standard 802.3, but is<br />
useful in non-dropping half-duplex flow control operation.<br />
The Configured column allows for changing the power savings<br />
mode parameters per port.<br />
Refresh<br />
Disabled: All power savings mechanisms disabled.<br />
ActiPHY: Link down power savings enabled.<br />
PerfectReach: Link up power savings enabled.<br />
Enabled: Both link up and link down power savings enabled.<br />
Click this button to refresh the information for LAN ports.<br />
After finishing all the settings here, please click OK to activate them.<br />
3.2.3 MAC Address Table<br />
Vigor2130 Series User’s <strong>Guide</strong> 45
This page allows you to set timeouts for entries in dynamic MAC Table and configure the<br />
static MAC table here.<br />
Disable Automatic Aging<br />
Age Time<br />
MAC Table Learning<br />
Stop the MAC table aging timer, the learned MAC address will<br />
not age out automatically. The default setting is enabled. Check<br />
the box to disable this function if required.<br />
Delete a MAC address idling for a period of time from the<br />
following MAC Table, which will not affect static MAC<br />
address. Range of MAC Address Aging Time is 10-1000000<br />
seconds. The default Aging Time is 300 seconds.<br />
List the port members which apply dynamic learning<br />
mechanism or not.<br />
Auto - Enable this port MAC address dynamic learning<br />
mechanism.<br />
Disable - Disable this port MAC address dynamic learning<br />
mechanism, only support static MAC address setting.<br />
Secure - Disable this port MAC address dynamic learning<br />
mechanism and copy the dynamic learning packets to CPU.<br />
Static MAC Table Config.. Specify static MAC address with VLAN ID to apply aging<br />
configuration.<br />
Delete - Click the button to remove the VLAN setting.<br />
VLAN ID - Specify the interface for the port members.<br />
MAC Address - It is a six-byte long Ethernet hardware address<br />
and usually expressed by hex and separated by hyphens. For<br />
example, 00 – 40 - C7 - D6 – 00 – 02.<br />
WAN/LAN1~4 - Check the port to apply this VLAN setting.<br />
To add a new static MAC entry, click Add new static entry. A new entry will be shown as<br />
follows. Choose VLAN ID and type a new MAC address. Next, specify port member for this<br />
table. Finally, click OK to save the changes.<br />
46<br />
Vigor2130 Series User’s <strong>Guide</strong>
3.2.4 VLAN<br />
Virtual LAN function provides you a very convenient way to manage hosts by grouping them<br />
based on the physical port. You can also manage the in/out rate of each port. Go to LAN page<br />
and select VLAN. The following page will appear. VLAN function is enabled in default.<br />
Add New Private VLAN<br />
Click this button to add a new private VLAN. The router allows<br />
you to add up to 4 VLAN.<br />
To add or remove a VLAN, please refer to the following example.<br />
1. VLAN 1 is consisted of hosts linked to P1 ~ P4.<br />
2. After checking the box to enable VLAN function, you will check the table according to<br />
the needs as shown below.<br />
Vigor2130 Series User’s <strong>Guide</strong> 47
3. To remove VLAN, click the Delete button for the one you want to remove and click OK<br />
to save the results.<br />
3.2.5 Monitor Port<br />
It is used to monitor the traffic of the network. For example, we assume that LAN1 and LAN2<br />
are Monitor Port and Monitor ingress Port respectively, thus, the traffic received by LAN2<br />
will be copied to LAN1 for monitoring.<br />
Enable Monitor Port<br />
Monitor Port<br />
Monitor ingress port<br />
Monitor egress port<br />
Check to enable this function.<br />
Click the one of the LAN ports to specify it for monitoring.<br />
Check to set up the port(s) for being monitored. It only<br />
monitors the packets received by the port you set up.<br />
Check to set up the port(s) for being monitored. It only<br />
monitors the packets transmitted by the port you set up.<br />
3.2.6 Static Route<br />
Go to LAN to open setting page and choose Static Route.<br />
48<br />
Vigor2130 Series User’s <strong>Guide</strong>
Index<br />
Destination Address<br />
Status<br />
Add<br />
The number (1 to 10) under Index displays current static router.<br />
Display the destination address of the static route.<br />
Display the status of the static route.<br />
Add a new static route.<br />
Add Static Routes to Private and Public Networks<br />
Here is an example of setting Static Route in Main Router so that user A and B locating in<br />
different subnet can talk to each other via the router. Assuming the Internet access has been<br />
configured and the router works properly:<br />
• use the Main Router to surf the Internet.<br />
• create a private subnet 192.168.10.0 using an internal Router A (192.168.1.2)<br />
• create a public subnet 211.100.88.0 via an internal Router B (192.168.1.3).<br />
• have set Main Router 192.168.1.1 as the default gateway for the Router A 192.168.1.2.<br />
Before setting Static Route, user A cannot talk to user B for Router A can only forward<br />
recognized packets to its default gateway Main Router.<br />
1. Click the LAN - Static Route and click Add. Check the Enable box. Please add a static<br />
route as shown below, which regulates all packets destined to 192.168.10.0 will be<br />
forwarded to 192.168.1.2. Click OK.<br />
Vigor2130 Series User’s <strong>Guide</strong> 49
2. Return to Static Route page. Click Add again to add another static route as show below,<br />
which regulates all packets destined to 211.100.88.0 will be forwarded to 192.168.1.3.<br />
3. Verify current routing table.<br />
3.2.7 Bind IP to MAC<br />
This function is used to bind the IP and MAC address in LAN to have a strengthening control<br />
in network. When this function is enabled, all the assigned IP and MAC address binding<br />
together cannot be changed. If you modified the binding IP or MAC address, it might cause<br />
you not access into the Internet.<br />
Click LAN and click Bind IP to MAC to open the setup page.<br />
50<br />
Vigor2130 Series User’s <strong>Guide</strong>
Enable<br />
Disable<br />
Strict Bind<br />
ARP Table<br />
Add and Edit<br />
Refresh<br />
IP Bind List<br />
Add<br />
Edit<br />
Click this radio button to invoke this function. However,<br />
IP/MAC which is not listed in IP Bind List also can connect to<br />
Internet.<br />
Click this radio button to disable this function. All the settings<br />
on this page will be invalid.<br />
Click this radio button to block the connection of the IP/MAC<br />
which is not listed in IP Bind List.<br />
This table is the LAN ARP table of this router. The information<br />
for IP and MAC will be displayed in this field. Each pair of IP<br />
and MAC address listed in ARP table can be selected and added<br />
to IP Bind List by clicking Add below.<br />
IP Address – Type the IP address that will be used for the<br />
specified MAC address.<br />
Mac Address – Type the MAC address that is used to bind<br />
with the assigned IP address.<br />
It is used to refresh the ARP table. When there is one new PC<br />
added to the LAN, you can click this link to obtain the newly<br />
ARP table information.<br />
It displays a list for the IP bind to MAC information.<br />
It allows you to add the one you choose from the ARP table or<br />
the IP/MAC address typed in Add and Edit to the table of IP<br />
Bind List.<br />
It allows you to edit and modify the selected IP address and<br />
MAC address that you create before.<br />
Vigor2130 Series User’s <strong>Guide</strong> 51
3.3 NAT<br />
Remove<br />
You can remove any item listed in IP Bind List. Simply click<br />
and select the one, and click Remove. The selected item will be<br />
removed from the IP Bind List.<br />
Note: Before you select Strict Bind, you have to bind one set of IP/MAC address for one<br />
PC. If not, no one of the PCs can access into Internet. And the web configurator of the router<br />
might not be accessed.<br />
Usually, the router serves as an NAT (Network Address Translation) router. NAT is a<br />
mechanism that one or more private IP addresses can be mapped into a single public one.<br />
Public IP address is usually assigned by your ISP, for which you may get charged. Private IP<br />
addresses are recognized only among internal hosts.<br />
When the outgoing packets destined to some public server on the Internet reach the NAT<br />
router, the router will change its source address into the public IP address of the router, select<br />
the available public port, and then forward it. At the same time, the router shall list an entry in<br />
a table to memorize this address/port-mapping relationship. When the public server response,<br />
the incoming traffic, of course, is destined to the router’s public IP address and the router will<br />
do the inversion based on its table. Therefore, the internal host can communicate with external<br />
host smoothly.<br />
The benefit of the NAT includes:<br />
• Save cost on applying public IP address and apply efficient usage of IP address.<br />
NAT allows the internal IP addresses of local hosts to be translated into one public IP<br />
address, thus you can have only one IP address on behalf of the entire internal hosts.<br />
• Enhance security of the internal network by obscuring the IP address. There are<br />
many attacks aiming victims based on the IP address. Since the attacker cannot be aware<br />
of any private IP addresses, the NAT function can protect the internal network.<br />
On NAT page, you will see the private IP address defined in RFC-1918. Usually we use the<br />
192.168.1.0/24 subnet for the router. As stated before, the NAT facility can map one or<br />
more IP addresses and/or service ports into different specified services. In other words, the<br />
NAT function can be achieved by using port mapping methods.<br />
Below shows the menu items for NAT.<br />
3.3.1 Hardware NAT<br />
Hardware-base Acceleration Engine, also named Protocol Processing Engine API is the<br />
function that <strong>Draytek</strong> provides to extremely speed up the NAT performance.<br />
While the hardware acceleration mechanism is activated, most of the bandwidth usage will<br />
be concentrated on the specific sessions which increase transmission speed to get ultimately<br />
accelerated.<br />
With Hardware NAT, LAN to WAN NAT throughput can be over 900M bps. But be sure that<br />
your PC has Giga Ethernet and connect with CAT6 Ethernet cable.<br />
52<br />
Vigor2130 Series User’s <strong>Guide</strong>
3.3.2 Open Ports<br />
Open Ports allows you to open a range of ports for the traffic of special applications.<br />
Common application of Open Ports includes P2P application (e.g., BT, KaZaA, Gnutella,<br />
WinMX, eMule and others), Internet Camera etc. Ensure that you keep the application<br />
involved up-to-date to avoid falling victim to any security exploits.<br />
To add a new open port, click Add new entry.<br />
Name<br />
Protocol<br />
Specify the name for the defined network service.<br />
Specify the transport layer protocol. It could be TCP, UDP and<br />
TCP+UDP.<br />
Start Port<br />
End Port (optional)<br />
Local Host<br />
Specify the starting port number of the service offered by the<br />
local host.<br />
Specify the ending port number of the service offered by the<br />
local host.<br />
Enter the private IP address of the local host.<br />
Vigor2130 Series User’s <strong>Guide</strong> 53
Local Port (optional)<br />
3.3.3 DMZ Host<br />
If it is configured, the forwarded traffic is mapped to this port<br />
on the local host.<br />
Vigor router provides a facility DMZ Host that maps ALL unsolicited data on any protocol to<br />
a single host in the LAN. Regular web surfing and other such Internet activities from other<br />
clients will continue to work without inappropriate interruption. DMZ Host allows a defined<br />
internal user to be totally exposed to the Internet, which usually helps some special<br />
applications such as Netmeeting or Internet Games etc.<br />
Note: The security properties of NAT are somewhat bypassed if you set up DMZ host. We<br />
suggest you to add additional filter rules or a secondary firewall.<br />
Click DMZ Host to open the following page:<br />
Enable<br />
DMZ IP<br />
Check to enable the DMZ Host function.<br />
Enter the private IP address of the DMZ host, or click Choose<br />
PC to select one.<br />
54<br />
Vigor2130 Series User’s <strong>Guide</strong>
3.4 Bandwidth Management<br />
Below shows the menu items for Bandwidth Management.<br />
3.4.1 Session Limit<br />
A PC with private IP address can access to the Internet via NAT router. The router will<br />
generate the records of NAT sessions for such connection. The P2P (Peer to Peer) applications<br />
(e.g., BitTorrent) always need many sessions for procession and also they will occupy over<br />
resources which might result in important accesses impacted. To solve the problem, you can<br />
use limit session to limit the session procession for specified Hosts.<br />
In the Bandwidth Management menu, click Sessions Limit to open the web page.<br />
To activate the function of limit session, simply click Enable and set the default session limit.<br />
Enable<br />
Disable<br />
Default Max Sessions<br />
Limitation List<br />
Start IP<br />
Click this button to activate the function of limit session.<br />
Click this button to close the function of limit session.<br />
Defines the default session number used for each computer in<br />
LAN.<br />
Displays a list of specific limitations that you set on this web<br />
page.<br />
Defines the start LAN IP address for limit session.<br />
Vigor2130 Series User’s <strong>Guide</strong> 55
End IP<br />
Maximum Sessions<br />
Add<br />
Edit<br />
Delete<br />
Defines the end LAN IP address for limit session.<br />
Defines the available session number for each host in the<br />
specific range of IP addresses. If you do not set the session<br />
number in this field, the system will use the default session limit<br />
for the specific limitation you set for each index.<br />
Adds the specific session limitation onto the list above.<br />
Allows you to edit the settings for the selected limitation.<br />
Remove the selected settings existing on the limitation list.<br />
When you finish adding a new session limit, simply click OK.<br />
3.4.2 Bandwidth Limit<br />
The downstream or upstream from FTP, HTTP or some P2P applications will occupy large of<br />
bandwidth and affect the applications for other programs. Please use Limit Bandwidth to make<br />
the bandwidth usage more efficient.<br />
In the Bandwidth Management menu, click Bandwidth Limit to open the web page.<br />
To activate the function of limit bandwidth, simply click Enable and set the default upstream<br />
and downstream limit.<br />
Enable<br />
Click this button to activate the function of limit bandwidth.<br />
Disable<br />
Click this button to close the function of limit bandwidth.<br />
Default TX limit<br />
Define the default speed of the upstream for each computer in<br />
LAN.<br />
Default RX limit<br />
Define the default speed of the downstream for each computer<br />
in LAN.<br />
56<br />
Vigor2130 Series User’s <strong>Guide</strong>
Limitation List<br />
Start IP<br />
End IP<br />
TX Limit<br />
RX Limit<br />
Add<br />
Edit<br />
Delete<br />
Display a list of specific limitations that you set on this web<br />
page.<br />
Bandwidth limit can be applied on certain IP range. That’s, only<br />
the PCs within the range will be influenced by the bandwidth<br />
limitation set here. Please define the start IP address for the<br />
specific limitation.<br />
Define the end IP address for the specific limitation.<br />
Define the limitation for the speed of the upstream to be applied<br />
as specific limitation. If you do not set the limit in this field, the<br />
system will use the default speed for the specific limitation you<br />
set for each index.<br />
Define the limitation for the speed of the downstream to be<br />
applied as specific limitation. If you do not set the limit in this<br />
field, the system will use the default speed for the specific<br />
limitation you set for each index.<br />
Add the specific speed limitation onto the list above.<br />
Allows you to edit the settings for the selected limitation.<br />
Remove the selected settings existing on the limitation list.<br />
When you finish adding a new bandwidth limit, simply click OK.<br />
3.4.3 Port Rate Control<br />
A policer can limit the bandwidth of received frames. It is located in front of the ingress queue.<br />
And a shaper can limit the bandwidth of transmitted frames. It is located after the ingress<br />
queues. This page allows you to configure the switch port rate limit for Policers and Shapers.<br />
Port<br />
Policer Enabled<br />
Represent LAN or WAN interface.<br />
Check this box to enable policer function.<br />
Policer Rate(Rx) Type the number for policer function. The default value is 500.<br />
It is restricted to 500-1000000 when the Policer Unit is set in<br />
kbps, and it is restricted to 1-1000 when the Policer Unit is set<br />
in Mbps.<br />
Policer Unit<br />
Shaper Enabled<br />
Determine the unit (kbps/Mbps) for policer.<br />
Check this box to enable shaper function.<br />
Shaper Rate (Tx) Type the number for shaper function. The default value is 500.<br />
It is restricted to 500-1000000 when the Shaper Unit is set in<br />
Vigor2130 Series User’s <strong>Guide</strong> 57
Shaper Unit<br />
kbps, and it is restricted to 1-1000 when the Shaper Unit is set<br />
in Mbps.<br />
Determine the unit (kbps/Mbps) for shaper function.<br />
3.4.4 QoS Control List<br />
Deploying QoS (Quality of Service) management to guarantee that all applications receive the<br />
service levels required and sufficient bandwidth to meet performance expectations is indeed<br />
one important aspect of modern enterprise network.<br />
One reason for QoS is that numerous TCP-based applications tend to continually increase their<br />
transmission rate and consume all available bandwidth, which is called TCP slow start. If<br />
other applications are not protected by QoS, it will detract much from their performance in the<br />
overcrowded network. This is especially essential to those are low tolerant of loss, delay or<br />
jitter (delay variation).<br />
Another reason is due to congestions at network intersections where speeds of interconnected<br />
circuits mismatch or traffic aggregates, packets will queue up and traffic can be throttled back<br />
to a lower speed. If there’s no defined priority to specify which packets should be discarded<br />
(or in another term “dropped”) from an overflowing queue, packets of sensitive applications<br />
mentioned above might be the ones to drop off. How this will affect application performance?<br />
There are two components within Primary configuration of QoS deployment:<br />
• Classification: Identifying low-latency or crucial applications and marking them for<br />
high-priority service level enforcement throughout the network.<br />
• Scheduling: Based on classification of service level to assign packets to queues and<br />
associated service types<br />
The basic QoS implementation in Vigor routers is to classify and schedule packets based on<br />
the service type information in the IP header. For instance, to ensure the connection with the<br />
headquarter, a teleworker may enforce an index of QoS Control to reserve bandwidth for<br />
HTTPS connection while using lots of application at the same time.<br />
One more larger-scale implementation of QoS network is to apply DSCP (Differentiated<br />
Service Code Point) and IP Precedence disciplines at Layer 3. Compared with legacy IP<br />
Precedence that uses Type of Service (ToS) field in the IP header to define 8 service classes,<br />
DSCP is a successor creating 64 classes possible with backward IP Precedence compatibility.<br />
In a QoS-enabled network, or Differentiated Service (DiffServ or DS) framework, a DS<br />
domain owner should sign a Service License Agreement (SLA) with other DS domain owners<br />
to define the service level provided toward traffic from different domains. Then each DS node<br />
in these domains will perform the priority treatment. This is called per-hop-behavior (PHB).<br />
The definition of PHB includes Expedited Forwarding (EF), Assured Forwarding (AF), and<br />
Best Effort (BE). AF defines the four classes of delivery (or forwarding) classes and three<br />
levels of drop precedence in each class.<br />
Vigor routers as edge routers of DS domain shall check the marked DSCP value in the IP<br />
header of bypassing traffic, thus to allocate certain amount of resource execute appropriate<br />
policing, classification or scheduling. The core routers in the backbone will do the same<br />
checking before executing treatments in order to ensure service-level consistency throughout<br />
the whole QoS-enabled network.<br />
58<br />
Vigor2130 Series User’s <strong>Guide</strong>
However, each node may take different attitude toward packets with high priority marking<br />
since it may bind with the business deal of SLA among different DS domain owners. It’s not<br />
easy to achieve deterministic and consistent high-priority QoS traffic throughout the whole<br />
network with merely Vigor router’s effort.<br />
In the Bandwidth Management menu, click QoS Control List (QCL) to open the web page.<br />
QCE Type<br />
Display the type of that QCE (QoS Control Entries).<br />
Type Value<br />
Display the value specified for the QCE.<br />
Traffic Class<br />
Display the class of the data transmission for the QCE.<br />
QoS Control List allows users to set up to five groups of QCL. Each QCL group can contain<br />
12 QCE settings.<br />
Vigor2130 Series User’s <strong>Guide</strong> 59
Adding a New QCE<br />
Click<br />
settings.<br />
to add a new QCE onto this page. Different QCE type will bring out different web<br />
• If you choose Ethernet Type as QCE Type, you have to type value for it and specify<br />
traffic class from Low, Normal, Medium and High.<br />
Ethernet Type Value Either 8~63 ASCII characters, such as 012345678(or 64<br />
Hexadecimal digits leading by 0x, such as "0x321253abcde...").<br />
• If you choose VLAN ID as QCE Type, you have to type the ID number for it and specify<br />
traffic class from Low, Normal, Medium and High.<br />
• If you choose TCP/UDP Port as QCE Type, you have to type the port number for it and<br />
specify traffic class from Low, Normal, Medium and High.<br />
60<br />
Vigor2130 Series User’s <strong>Guide</strong>
TCP/UDP Port<br />
TCP/UDP Port Range<br />
Click Single or Range. If you select Range, you have to type<br />
in the starting port number and the end porting number on<br />
the boxes below.<br />
Type in the starting port number and the end porting number<br />
here if you choose Range as the type.<br />
• If you choose DSCP as QCE Type, you have to type value for it and specify traffic class<br />
from Low, Normal, Medium and High.<br />
• If you choose ToS as QCE Type, you have to specify priority class from Low, Normal,<br />
Medium and High.<br />
• If you choose Tag Priority as QCE Type, you have to specify priority class from Low,<br />
Normal, Medium and High.<br />
Vigor2130 Series User’s <strong>Guide</strong> 61
Editing a QCE<br />
Click<br />
to modify the settings of an existing QCE on this page.<br />
Moving Up/Down a QCE<br />
Click and to move a QCE up and down.<br />
Deleting a QCE<br />
To delete a QCE in the list, simply click<br />
of that one. It will be removed immediately.<br />
3.4.5 Ports Priority<br />
This page allows you to configure QoS settings for each port. The classification is controlled<br />
by a QCL (Quality Control List) that is assigned to each port. A QCL consists of an ordered<br />
list of up to 12 QCEs (Quality Control Entry). Each QCE can be used to classify certain<br />
frames to a specific QoS class. This classification can be based on parameters such as VLAN<br />
ID, UDP/TCP port, IPv4/IPv6 DSCP or Tag Priority. Frames not matching any of the QCEs<br />
are classified to the default QoS class for the port.<br />
Port<br />
Indicate the interface for the physical port, WAN port, LAN<br />
port and Wireless Port.<br />
62<br />
Vigor2130 Series User’s <strong>Guide</strong>
Default Class<br />
Use the drop down list to choose the priority for each port.<br />
QCL<br />
Use the drop down list to choose the QCL number defined in<br />
QoS Control List for the port.<br />
Queuing Mode<br />
Use the drop down list to choose suitable mode.<br />
Queue Weighted<br />
3.4.6 QoS Statistics<br />
Use the drop down list to choose 1, 2, 4, or 8 as the queue<br />
weighted number.<br />
This page displays statistics for QoS setting. Click WAN/LAN link to check detailed<br />
information for each interface.<br />
Click WAN/LAN link to check detailed information for each interface.<br />
Vigor2130 Series User’s <strong>Guide</strong> 63
Rx Packets<br />
Rx Octets<br />
Rx Unicast<br />
Rx Broadcast<br />
Rx Pause<br />
RX 64 Bytes<br />
RX 65-127 Bytes<br />
RX 128-255 Bytes<br />
RX 256-511 Bytes<br />
RX 512-1023 Bytes<br />
RX 1024- 1526 Bytes<br />
RX 1527 Bytes<br />
Display the counting number of the packet received.<br />
Display the total received bytes.<br />
Display the counting number of the received unicast packet.<br />
Display the counting number of the received broadcast packet.<br />
Display the counting number of the received pause packet.<br />
Display the number of 64-byte frames in good and bad packets<br />
received.<br />
Display the number of 65 ~ 127-byte frames in good and bad<br />
packets received.<br />
Display the number of 128 ~ 255-byte frames in good and bad<br />
packets received.<br />
Display the number of 256 ~ 511-byte frames in good and bad<br />
packets received.<br />
Display the number of 512 ~ 1023-byte frames in good and bad<br />
packets received.<br />
Display the number of 1024-1522-byte frames in good and bad<br />
packets received.<br />
Display the number of 1527-byte frames in good and bad<br />
packets received.<br />
64<br />
Vigor2130 Series User’s <strong>Guide</strong>
Rx Low<br />
Rx Normal<br />
Rx Medium<br />
Rx High<br />
Rx Drops<br />
Rx CRC/Alignment<br />
Rx Undersize<br />
Rx Oversize<br />
Rx Fragments<br />
Rx Jabber<br />
Rx Filtered<br />
Tx Packets<br />
Tx Octets<br />
Tx Unicast<br />
Tx Multicast<br />
Tx Broadcast<br />
Tx Pause<br />
Tx 64 Bytes<br />
Tx 65-127 Bytes<br />
Tx 128-255 Bytes<br />
Tx 256-511 Bytes<br />
Tx 512-1023 Bytes<br />
Tx 1024- 1526 Bytes<br />
Tx 1527 Bytes:<br />
Tx Low<br />
Tx Normal<br />
Tx Medium<br />
Display the low queue counter of the packet received.<br />
Display the normal queue counter of the packet received.<br />
Display the medium queue counter of the packet received.<br />
Display the high queue counter of the packet received.<br />
Display the number of frames dropped due to the lack of<br />
receiving buffer.<br />
Display the number of Alignment errors packets received.<br />
Display the number of short frames (
Tx High<br />
Tx Drops<br />
Tx lat/Exc.Coll.<br />
Display the high queue counter of the packet received.<br />
Display the number of frames dropped due to excessive<br />
collision, late collision, or frame aging.<br />
Display the number of Frames late collision or excessive<br />
collision Error, which switch transmitted<br />
3.5 Applications<br />
Below shows the menu items for Applications.<br />
3.5.1 Dynamic DNS<br />
The ISP often provides you with a dynamic IP address when you connect to the Internet via<br />
your ISP. It means that the public IP address assigned to your router changes each time you<br />
access the Internet. The Dynamic DNS feature lets you assign a domain name to a dynamic<br />
WAN IP address. It allows the router to update its online WAN IP address mappings on the<br />
specified Dynamic DNS server. Once the router is online, you will be able to use the<br />
registered domain name to access the router or internal virtual servers from the Internet. It is<br />
particularly helpful if you host a web server, FTP server, or other server behind the router.<br />
Before you use the Dynamic DNS feature, you have to apply for free DDNS service to the<br />
DDNS service providers. The router provides up to three accounts from three different DDNS<br />
service providers. Basically, Vigor routers are compatible with the DDNS services supplied by<br />
most popular DDNS service providers such as www.dyndns.org, www.no-ip.com,<br />
www.dtdns.com, www.changeip.com, www.dynamic- nameserver.com. You should visit<br />
their websites to register your own domain name for the router.<br />
Enable Dynamic DNS<br />
DynDNS Service<br />
Hostname<br />
Check this box to enable the current account.<br />
Select the service provider for the DDNS account.<br />
Type in one domain name that you applied previously. Use the<br />
drop down list to choose the desired domain.<br />
66<br />
Vigor2130 Series User’s <strong>Guide</strong>
Username<br />
Password<br />
Check IP change every<br />
Force IP update every<br />
Type in the login name that you set for applying domain.<br />
Type in the password that you set for applying domain.<br />
Set the interval for checking the information.<br />
Force the router updates its information to DDNS server with<br />
the interval set here.<br />
Click OK button to activate the settings. You will see your setting has been saved.<br />
3.5.2 Schedule<br />
The Vigor router has a built-in real time clock which can update itself manually or<br />
automatically by means of Network Time Protocols (NTP). As a result, you can not only<br />
schedule the router to dialup to the Internet at a specified time, but also restrict Internet access<br />
to certain hours so that users can connect to the Internet only during certain hours, say,<br />
business hours. The schedule is also applicable to other functions.<br />
You have to set your time before set schedule. In System Maintenance>> Time and Date<br />
menu, press Inquire Time button to set the Vigor router’s clock to current time of your PC.<br />
The clock will reset once if you power down or reset the router. There is another way to set up<br />
time. You can inquiry an NTP server (a time server) on the Internet to synchronize the router’s<br />
clock. This method can only be applied when the WAN connection has been built up.<br />
You can set up to 15 schedules. To add a schedule profile, please click Add.<br />
Enable<br />
Start Date<br />
Start Time<br />
Action<br />
Check to enable the schedule.<br />
Specify the starting date of the schedule.<br />
Specify the starting time of the schedule.<br />
Specify which action should be applied during the period of the<br />
schedule.<br />
Vigor2130 Series User’s <strong>Guide</strong> 67
Acts<br />
3.5.3 IGMP Snooping<br />
WAN UP/DOWN – WAN connection will be activated /<br />
inactivated based on the time schedule configured here.<br />
WiFi UP/DOWN – Wireless Wi-Fi connection will be<br />
activated / inactivated based on the time schedule configured<br />
here.<br />
VPN UP/DOWN - VPN connection will be activated /<br />
inactivated based on the time schedule configured here.<br />
Specify how often the schedule will be applied<br />
Once -The schedule will be applied just once<br />
Routine or Weekdays -Specify which days in one week should<br />
perform the schedule.<br />
IGMP snooping means multicast traffic will be forwarded to ports that have members of that<br />
group. If you disable IGMP snooping, the system will make multicast traffic treated in the<br />
same manner as broadcast traffic.<br />
Snooping Enabled<br />
Unregistered IPMC…<br />
Fast Leave<br />
Check the box to enable this function.<br />
Check the box to enable unregistered IPMC traffic flooding.<br />
Check the box to Fast Leave on the LAN port.<br />
68<br />
Vigor2130 Series User’s <strong>Guide</strong>
3.5.4 IGMP Status<br />
This page display current IGMP snooping status.<br />
V1~3 Reports Receive Display the number of Received V1 – V3 Reports.<br />
V2 Leave Receive<br />
Groups<br />
Port Members<br />
Refresh<br />
Clear<br />
3.5.5 UPnP Configuration<br />
Display the number of Received V2 Leave.<br />
Display current IGMP groups. Maximum number of group<br />
for each VLAN can be set is 128.<br />
Display the LAN ports in this group.<br />
Click this button to refresh the page immediately.<br />
Click this button to clear the settings on this page.<br />
The UPnP (Universal Plug and Play) protocol is supported to bring to network connected<br />
devices the ease of installation and configuration which is already available for directly<br />
connected PC peripherals with the existing Windows 'Plug and Play' system. For NAT routers,<br />
the major feature of UPnP on the router is “NAT Traversal”. This enables applications inside<br />
the firewall to automatically open the ports that they need to pass through a router. It is more<br />
reliable than requiring a router to work out by itself which ports need to be opened. Further,<br />
the user does not have to manually set up port mappings or a DMZ. UPnP is available on<br />
Windows XP and the router provide the associated support for MSN Messenger to allow full<br />
use of the voice, video and messaging features.<br />
Enable UPNP<br />
Enable UPnP function. You have to type the download and<br />
upload speed.<br />
Vigor2130 Series User’s <strong>Guide</strong> 69
After setting Enable UPNP Service setting, an icon of IP Broadband Connection on Router<br />
on Windows XP/Network Connections will appear. The connection status and control status<br />
will be able to be activated. The NAT Traversal of UPnP enables the multimedia features of<br />
your applications to operate. This has to manually set up port mappings or use other similar<br />
methods. The screenshots below show examples of this facility.<br />
The UPnP facility on the router enables UPnP aware applications such as MSN Messenger to<br />
discover what are behind a NAT router. The application will also learn the external IP address<br />
and configure port mappings on the router. Subsequently, such a facility forwards packets from<br />
the external ports of the router to the internal ports used by the application.<br />
The reminder as regards concern about Firewall and UPnP<br />
Can't work with Firewall Software<br />
Enabling firewall applications on your PC may cause the UPnP function not working<br />
properly. This is because these applications will block the accessing ability of some network<br />
ports.<br />
Security Considerations<br />
Activating the UPnP function on your network may incur some security threats. You should<br />
consider carefully these risks before activating the UPnP function.<br />
70<br />
Vigor2130 Series User’s <strong>Guide</strong>
‣ Some Microsoft operating systems have found out the UPnP weaknesses and hence<br />
you need to ensure that you have applied the latest service packs and patches.<br />
‣ Non-privileged users can control some router functions, including removing and<br />
adding port mappings.<br />
The UPnP function dynamically adds port mappings on behalf of some UPnP-aware<br />
applications. When the applications terminate abnormally, these mappings may not be<br />
removed.<br />
3.6 Wireless LAN<br />
This function is used for “n” models.<br />
3.6.1 Basic Concepts<br />
Over recent years, the market for wireless communications has enjoyed tremendous growth.<br />
Wireless technology now reaches or is capable of reaching virtually every location on the<br />
surface of the earth. Hundreds of millions of people exchange information every day via<br />
wireless communication products. The Vigor “n” model, a.k.a. Vigor wireless router, is<br />
designed for maximum flexibility and efficiency of a small office/home. Any authorized staff<br />
can bring a built-in WLAN client PDA or notebook into a meeting room for conference<br />
without laying a clot of LAN cable or drilling holes everywhere. Wireless LAN enables high<br />
mobility so WLAN users can simultaneously access all LAN facilities just like on a wired<br />
LAN as well as Internet access<br />
The Vigor wireless routers are equipped with a wireless LAN interface compliant with the<br />
standard IEEE 802.11n draft 2 protocol. To boost its performance further, the Vigor Router is<br />
also loaded with advanced wireless technology to lift up data rate up to 300 Mbps*. Hence,<br />
you can finally smoothly enjoy stream music and video.<br />
Note: * The actual data throughput will vary according to the network conditions and<br />
environmental factors, including volume of network traffic, network overhead and<br />
building materials.<br />
In an Infrastructure Mode of wireless network, Vigor wireless router plays a role as an Access<br />
Point (AP) connecting to lots of wireless clients or Stations (STA). All the STAs will share the<br />
same Internet connection via Vigor wireless router. The General Settings will set up the<br />
information of this wireless network, including its SSID as identification, located channel etc.<br />
Vigor2130 Series User’s <strong>Guide</strong> 71
Security Overview<br />
Real-time Hardware Encryption: Vigor Router is equipped with a hardware AES encryption<br />
engine so it can apply the highest protection to your data without influencing user experience.<br />
Complete Security Standard Selection: To ensure the security and privacy of your wireless<br />
communication, we provide several prevailing standards on market.<br />
WEP (Wired Equivalent Privacy) is a legacy method to encrypt each frame transmitted via<br />
radio using either a 64-bit or 128-bit key. Usually access point will preset a set of four keys<br />
and it will communicate with each station using only one out of the four keys.<br />
WPA (Wi-Fi Protected Access), the most dominating security mechanism in industry, is<br />
separated into two categories: WPA-personal or called WPA Pre-Share Key (WPA/PSK), and<br />
WPA-Enterprise or called WPA/802.1x.<br />
In WPA-Personal, a pre-defined key is used for encryption during data transmission. WPA<br />
applies Temporal Key Integrity Protocol (TKIP) for data encryption while WPA2 applies AES.<br />
The WPA-Enterprise combines not only encryption but also authentication.<br />
Since WEP has been proved vulnerable, you may consider using WPA for the most secure<br />
connection. You should select the appropriate security mechanism according to your needs.<br />
No matter which security suite you select, they all will enhance the over-the-air data<br />
protection and /or privacy on your wireless network. The Vigor wireless router is very flexible<br />
and can support multiple secure connections with both WEP and WPA at the same time.<br />
Below shows the menu items for Wireless LAN.<br />
3.6.2 General Setup<br />
By clicking the General Setup, a new web page will appear so that you could configure the<br />
SSID and the wireless channel.<br />
Please refer to the following figure for more information.<br />
72<br />
Vigor2130 Series User’s <strong>Guide</strong>
Enable Wireless LAN<br />
SSID Broadcast<br />
SSID<br />
Wireless Mode<br />
Channel<br />
Tx Power<br />
Check the box to enable the wireless function.<br />
Choose Show to make the SSID being seen by wireless clients.<br />
Choose Hide to prevent from wireless sniffing and make it<br />
harder for unauthorized clients or STAs to join your wireless<br />
LAN.<br />
It means the identification of the wireless LAN. SSID can be<br />
any text numbers or various special characters. The default<br />
SSID is "DrayTek". We suggest you to change it.<br />
Choose the wireless mode for this router. At present, only<br />
802.11B/B/N mix is available.<br />
It means the channel of frequency of the wireless LAN. The<br />
default channel is 11. You may switch channel if the selected<br />
channel is under serious interference. If you have no idea of<br />
choosing the frequency, please select Auto to let system<br />
determine for you.<br />
Set the power percentage for transmission signal of access point.<br />
The greater the value is, the higher intensity of the signal will<br />
be.<br />
Enable Green AP<br />
Encryption<br />
Such function is used to reduce the power consumption (Green<br />
AP) for the access point. When there is no station connected,<br />
the power consumption of access point will be reduced.<br />
Select an appropriate encryption mode to improve the security<br />
and privacy of your wireless data packets.<br />
Wireless Security Configuration<br />
Each encryption mode will bring out different web page and ask<br />
you to offer additional configuration.<br />
For the security of your system, choose the proper encryption for data transmission. Different<br />
encryption mode will bring out different setting encryption ways.<br />
• None<br />
The encryption mechanism is turned off.<br />
• WEP<br />
Accepts only WEP clients and the encryption key should be entered in WEP Key.<br />
Vigor2130 Series User’s <strong>Guide</strong> 73
Default Key<br />
Key1-Key4<br />
Authentication Mode<br />
• WPA-PSK<br />
All wireless devices must support the same WEP<br />
encryption bit size and have the same key.<br />
Four keys can be entered here, but only one key can be<br />
selected at a time. The format of WEP Key is restricted to<br />
5 ASCII characters or 10 hexadecimal values in 64-bit<br />
encryption level, or restricted to 13 ASCII characters or 26<br />
hexadecimal values in 128-bit encryption level. The<br />
allowed content is the ASCII characters from 33(!) to<br />
126(~) except '#' and ',' .<br />
Choose OPEN or SHARED as the authentication mode.<br />
OPEN: Set wireless to authentication open mode.<br />
SHARED: Set wireless to authentication shared mode.<br />
Accepts only WPA clients and the encryption key should be entered in PSK. The WPA<br />
encrypts each frame transmitted from the radio using the key, which either PSK<br />
(Pre-Shared Key) entered manually in this field below or automatically negotiated via<br />
802.1x authentication.<br />
WPA Mode<br />
Select WPA, WPA2 or Auto as the type.<br />
74<br />
Vigor2130 Series User’s <strong>Guide</strong>
WPA Algorithm<br />
Select TKIP, AES or auto as the algorithm for WPA.<br />
WPA Pre-Shared Key Either 8~63 ASCII characters, such as 012345678..(or 64<br />
Hexadecimal digits leading by 0x, such as<br />
"0x321253abcde...").<br />
• WPA-RADIUS<br />
The built-in RADIUS client feature enables the router to assist the remote dial-in user or<br />
a wireless station and the RADIUS server in performing mutual authentication. It enables<br />
centralized remote access authentication for network management.<br />
Type<br />
The WPA encrypts each frame transmitted from the radio<br />
using the key, which either PSK (Pre-Shared Key) entered<br />
manually in this field below or automatically negotiated<br />
via 802.1x authentication. Select WPA, WPA2 or Auto as<br />
WPA mode.<br />
WPA Algorithm<br />
Choose the WPA algorithm, TKIP, AES or Auto.<br />
• WPS<br />
Server IP Address<br />
Destination Port<br />
Shared Secret<br />
Enter the IP address of RADIUS server.<br />
The UDP port number that the RADIUS server is using.<br />
The default value is 1812, based on RFC 2138.<br />
The RADIUS server and client share a secret that is used<br />
to authenticate the messages sent between them. Both<br />
sides must be configured to use the same shared secret.<br />
WPS (Wi-Fi Protected Setup) provides easy procedure to make network connection<br />
between wireless station and wireless access point (vigor router) with the encryption<br />
of WPA and WPA2.<br />
Vigor2130 Series User’s <strong>Guide</strong> 75
Configure via Push Button Click Start PBC to invoke Push-Button style WPS setup<br />
procedure. The router will wait for WPS requests from<br />
wireless clients about two minutes. The WPS LED on the<br />
router will blink fast when WPS is in progress. It will<br />
return to normal condition after two minutes. (You need to<br />
setup WPS within two minutes)<br />
Configure via Client PinCode Type the PIN code specified in wireless client you<br />
wish to connect, and click Start PIN button. The WLAN<br />
LED on the router will blink fast when WPS is in progress.<br />
It will return to normal condition after two minutes. (You<br />
need to setup WPS within two minutes<br />
It is the simplest way to build connection between wireless network clients and vigor<br />
router. Users do not need to select any encryption mode and type any long encryption<br />
passphrase to setup a wireless client every time. He/she only needs to press a button on<br />
wireless client, and WPS will connect for client and router automatically.<br />
Note: Such function is available for the wireless station with WPS supported.<br />
There are two methods to do network connection through WPS between AP and Stations:<br />
pressing the Start PBC button or using PIN Code.<br />
On the side of Vigor 2130 series which served as an AP, press WPS button once on the<br />
front panel of the router or click Start PBC on web configuration interface. On the side<br />
76<br />
Vigor2130 Series User’s <strong>Guide</strong>
of a station with network card installed, press Start PBC button of network card.<br />
If you want to use PIN code, you have to know the PIN code specified in wireless client.<br />
Then provide the PIN code of the wireless client you wish to connect to the vigor router.<br />
3.6.3 Access Control<br />
For additional security of wireless access, the Access Control facility allows you to restrict<br />
the network access right by controlling the wireless LAN MAC address of client. Only the<br />
valid MAC address that has been configured can access the wireless LAN interface. By<br />
clicking the Access Control, a new web page will appear, as depicted below, so that you<br />
could edit the clients' MAC addresses to control their access rights (deny or allow).<br />
Filter Type<br />
Choose the rule for the MAC addresses displayed in this<br />
page.<br />
Allow List – all the MAC address of wireless clients listed<br />
here are allowed to do wireless connection.<br />
Vigor2130 Series User’s <strong>Guide</strong> 77
Add a New Entry<br />
Delete<br />
Deny List – all the MAC address of wireless clients listed<br />
here will be blocked.<br />
Add a new MAC address into the list.<br />
Delete the selected MAC address in the list. This button<br />
will appear only an entry of MAC Address has been typed.<br />
Cancel<br />
OK<br />
3.6.4 Station List<br />
Give up the configuration.<br />
Click it to save the configuration.<br />
Station List provides the knowledge of connecting wireless clients now along with its status<br />
code.<br />
Index<br />
IP Address<br />
MAC Address<br />
Connected Time<br />
Auto-refresh<br />
Refresh<br />
Display the number of the connecting client.<br />
Display the WAN IP address for the connecting client.<br />
Display the MAC Address for the connecting client.<br />
Display the connection time for the connecting client.<br />
Check this box to force the system refreshing the table<br />
automatically.<br />
Click this button to refresh current page.<br />
78<br />
Vigor2130 Series User’s <strong>Guide</strong>
3.6.5 Access Point Discovery<br />
Vigor router can scan all regulatory channels and find working APs in the neighborhood.<br />
Based on the scanning result, users will know which channel is clean for usage.<br />
Note: During the scanning process (about 5 seconds), no client is allowed to connect to<br />
Vigor.<br />
The table will list channel, SSID, BSSID, Security and the Signal strength of working APs in<br />
the neighborhood.<br />
CH<br />
SSID<br />
BSSID<br />
Security<br />
Signal<br />
Scan<br />
Display the channel for the scanned AP.<br />
Display the SSID of the scanned AP.<br />
Display the MAC address of the scanned AP.<br />
Display the encryption type of the scanned AP.<br />
Display the strength (in percentage) of the signal of the<br />
scanned AP.<br />
It is used to discover all the connected AP. The results will<br />
be shown on the box above this button.<br />
3.7 USB Application<br />
USB diskette can be regarded as an FTP server. By way of Vigor router, uses on LAN/WAN<br />
can access, write and read data stored in USB diskette. After setting the configuration in USB<br />
Application, you can type the IP address of the Vigor router and username/password created<br />
in USB Application>>FTP User Management on the FTP client software. Thus, the client<br />
can use the FTP site (USB diskette) through Vigor router.<br />
3.7.1 USB General Settings<br />
At present, the Vigor router can support USB diskette with versions of FAT16 and FAT32<br />
only. Therefore, before connecting the USB diskette into the Vigor router, please make sure<br />
the memory format for the USB diskette is FAT16 or FAT32. It is recommended for you to<br />
use FAT32 for viewing the filename completely (FAT16 cannot support long filename).<br />
Vigor2130 Series User’s <strong>Guide</strong> 79
Enable FTP<br />
Enable Disk Sharing<br />
Workgroup Name<br />
3.7.2 FTP User Management<br />
Check this box to enable FTP connection.<br />
Check this box to enable Samba file sharing.<br />
Type the name for FTP users for accessing into FTP server<br />
(USB diskette). Be aware that users cannot access into USB<br />
diskette in anonymity. Later, you can open FTP client software<br />
and type the username specified here for accessing into USB<br />
storage diskette.<br />
This page allows you to change user setting for USB storage disk. Before modifying settings<br />
in this page, please insert a USB diskette and configure settings in User>>User<br />
Configuration first. Otherwise, an error message will appear to warn you.<br />
Click the name link under User Name to open the setting web page.<br />
User Name<br />
Volume<br />
Home Folder<br />
It displays the username that user uses to login to the FTP<br />
server.<br />
Select the proper volume for the connected USB diskette.<br />
It determines the range for the client to access into.<br />
The user can enter a directory name in this field. Then,<br />
after clicking OK, the router will create the specific/new<br />
folder in the USB diskette. In addition, if the user types “/”<br />
here, he/she can access into all of the disk folders and files<br />
in USB diskette.<br />
80<br />
Vigor2130 Series User’s <strong>Guide</strong>
Access Rule<br />
Note: When write protect status for the USB diskette is<br />
ON, you cannot type any new folder name in this field.<br />
Only “/” can be used in such case.<br />
Select the access right for the USB diskette.<br />
When you finish the settings, simply click OK to save the configuration.<br />
3.7.3 Disk Status<br />
This page can display current using status of the USB diskette. If you want to remove the<br />
diskette from USB port in router, please check the box of Safely Remove Disk first. And then,<br />
remove the USB diskette later.<br />
Safely Remove Disk<br />
Manufacturer<br />
Model<br />
Size<br />
Free Capacity<br />
Status<br />
Update<br />
Check this box and then you can remove the USB diskette<br />
safely.<br />
Display the manufacturer of the disk.<br />
Display the type of the disk.<br />
Display the storage space of the diskette(s).<br />
Display the free disk space of the diskette(s).<br />
Display current usage status of the diskette(s)<br />
Click this button to refresh the disk status.<br />
3.7.4 Disk Shares<br />
This page can define the folder which will be shared while Samba File Sharing is enabled.<br />
To add a new entry for disk sharing, please click Add a New Entry to open the following<br />
page.<br />
Vigor2130 Series User’s <strong>Guide</strong> 81
Share Name<br />
Comment<br />
Volume<br />
Path<br />
Visible<br />
Access Rights<br />
Type a name to be used as shared folder name in Samba service.<br />
The name must not contain spaces or special characters.<br />
Type the brief description for the disk sharing. The words here<br />
will be seen in Network Neighborhood on Windows client<br />
computers<br />
Select the proper volume for the connected USB diskette.<br />
It determines the range for the client to access into.<br />
The user can enter a directory name in this field. Then,<br />
after clicking OK, the router will create the specific/new<br />
folder in the USB diskette. In addition, if the user types “/”<br />
here, he/she can access into all of the disk folders and files<br />
in USB diskette.<br />
Note: When write protect status for the USB diskette is<br />
ON, you cannot type any new folder name in this field.<br />
Only “/” can be used in such case.<br />
Check this box to make the shared folder to be seen in Network<br />
Neighborhood on Windows of clients in local network.<br />
Specify the access right and apply to all the wireless clients that<br />
want to connect to the attached USB diskette.<br />
All Users Read-only - everyone has read-only access to the<br />
share disk.<br />
All Users Read-write - everyone has read-write access to the<br />
share disk.<br />
Specific Users – Only specific user(s) can access into the share<br />
disk.<br />
82<br />
Vigor2130 Series User’s <strong>Guide</strong>
3.8 IPv6<br />
3.8.1 IPv6 WAN Setup<br />
This page defines the IPv6 connection types for WAN interface. Possible types contain<br />
Link-Local only, Static IPv6, DHCPv6 and TSPC. Each type requires different parameter<br />
settings.<br />
Link-Local Only<br />
Link-Local address is used for communicating with neighbouring nodes on the same link. It is<br />
defined by the address prefix fe80::/10. You don't need to setup Link-Local address manually<br />
for it is generated automatically according to your MAC Address.<br />
Vigor2130 Series User’s <strong>Guide</strong> 83
IPv6 Address<br />
Prefix Length<br />
The least significant 64 bits are usually chosen as the interface<br />
hardware address constructed in modified EUI-64 format.<br />
Display the fixed value (64) for prefix length.<br />
Static IPv6<br />
This type allows you to setup static IPv6 address for WAN.<br />
IPv6 Address<br />
Prefix Length<br />
Gateway IPv6 Server<br />
Primary DNS Server<br />
Secondary DNS Server<br />
Type your IPv6 static IP here.<br />
Type your IPv6 address prefix length here.<br />
Type your IPv6 gateway address here.<br />
Type your IPv6 primary DNS Server address here.<br />
Type your IPv6 secondary DNS Server address here.<br />
DHCPv6 Client<br />
DHCPv6 client type would use DHCPv6 Client protocol to obtain IPv6 address from server.<br />
84<br />
Vigor2130 Series User’s <strong>Guide</strong>
Primary DNS Server<br />
Secondary DNS Server<br />
Type primary DNS Server address here.<br />
Type secondary DNS Server address here<br />
TSPC<br />
Tunnel setup protocol client (TSPC) is an application which could help you to connect to IPv6<br />
network easily.<br />
Please make sure your IPv4 WAN connection is OK and apply one free account from hexage<br />
(http://go6.net/4105/register.asp) before you try to use TSPC for network connection. TSPC<br />
would connect to tunnel broker and requests a tunnel according to the specifications inside the<br />
configuration file. It gets a public IPv6 IP address and an IPv6 prefix from the tunnel broker<br />
and then monitors the state of the tunnel in background.<br />
After getting the IPv6 prefix and starting router advertisement daemon (RADVD), the PC<br />
behind this router can directly connect to IPv6 the Internet.<br />
Username<br />
Type the name obtained from the broker. “vigor2130” is a<br />
default username applied from<br />
Vigor2130 Series User’s <strong>Guide</strong> 85
Password<br />
Confirm Password<br />
Tunnel Broker<br />
Tunnel Mode<br />
http://go6.net/4105/register.asp. It is suggested for you to<br />
apply another username and password.<br />
Type the password assigned with the user name.<br />
Type the password again to make the confirmation.<br />
Type the address for the tunnel broker IP, FQDN or an<br />
optional port number.<br />
IPv6-in-IPv4 Tunnel- Let the broker choose the tunnel<br />
mode appropriate for the client.<br />
IPv6-in-IPv4 (Native) - Request an IPv6 in IPv4 tunnel.<br />
IPv6-in-IPv4 (NAT Traversal - Request an IPv6 in UDP<br />
of IPv4 tunnel (for clients behind a NAT).<br />
Auto-reconnect Delay<br />
Keepalive<br />
Keepalive_interval<br />
Prefixlen<br />
If_prefix<br />
After passing the time set here, the client will retry to<br />
connect in case of failure or keepalive timeout.<br />
0 means not retry.<br />
Yes – Keep the connection between TSPC and tunnel<br />
broker always on. TSPC will send ping packet to make<br />
sure the connection between both ends is normal.<br />
No - The client will not send keepalives.<br />
Type the time for the interval between two keepalive<br />
messages transferring from the client to the broker.<br />
Type the required prefix length for the client network.<br />
Display LAN interface name. The name of the OS<br />
interface that will be configured with the first 64 of<br />
the received prefix from the broker and the router<br />
advertisement daemon is started to advertise that<br />
prefix on the if_prefix interface.<br />
86<br />
Vigor2130 Series User’s <strong>Guide</strong>
3.8.2 IPv6 LAN Setup<br />
This page defines the IPv6 connection types for LAN interface. Possible types contain<br />
DHCPv6 and RADVD. Each type requires different parameter settings.<br />
IPv6 Address<br />
IPv6 Link_local Address<br />
Enable Autoconfiguration<br />
Configuration Type<br />
Type static IPv6 address for LAN.<br />
It is used for communicating with neighbouring nodes on<br />
the same link. It is defined by the address prefix fe80::/10.<br />
You don't need to setup Link-Local address manually for it<br />
is generated automatically according to your MAC<br />
Address.<br />
Check this box to enable the auto-configuration function<br />
for IPv6 connection.<br />
Vigor2130 provides 2 daemons for LAN side IPv6 address<br />
configuration. One is RADVD(stateless) and the other is<br />
DHCPv6 Server (Stateful).<br />
DHCPv6 Server - DHCPv6 Server could assign IPv6<br />
address to PC according to the Start/End IPv6 address<br />
configuration.<br />
IPv6 Start Address/IPv6 End Address- Type the start and<br />
end address for IPv6 server.<br />
Vigor2130 Series User’s <strong>Guide</strong> 87
RADVD - The router advertisement daemon (radvd) sends<br />
Router Advertisement messages, specified by RFC 2461,<br />
to a local Ethernet LAN periodically and when requested<br />
by a node sending a Router Solicitation message. These<br />
messages are required for IPv6 stateless autoconfiguration.<br />
3.8.3 IPv6 Firewall Setup<br />
This page allows users to set firewall for the protocol of IPv6.<br />
Note: Section 4.4 Firewall is configured for IPv4 packets only.<br />
Advertisement Lifetime - The lifetime associated with<br />
the default router in units of seconds. It's used to control<br />
the lifetime of the prefix. The maximum value corresponds<br />
to 18.2 hours. A lifetime of 0 indicates that the router is not<br />
a default router and should not appear on the default router<br />
list.<br />
Name<br />
Protocol<br />
Source IP<br />
Destination IP<br />
Source Port<br />
Destination Port<br />
Action<br />
Display the name of the rule.<br />
Display the protocol (TCP/UDP/ICMPv6) the rule uses.<br />
Display the source IP address of such rule.<br />
Display the destination IP address of such rule.<br />
Display the source port number of such rule.<br />
Display the destination port number of such rule.<br />
Display the status (accept or drop) of such rule.<br />
88<br />
Vigor2130 Series User’s <strong>Guide</strong>
Adding a New Rule<br />
Click Add New Rule to configure a new rule for IPv6 Firewall.<br />
Note: You can set up to 20 sets of IPv6 rules.<br />
Name<br />
Protocol<br />
Type a name for the rule.<br />
Specify a protocol for this rule.<br />
Source IP Type<br />
Determine the IP type as the source.<br />
Source IP<br />
Source Subnet<br />
Destination IP Type<br />
Type the IP address here if you choose Single as Source<br />
IP Type.<br />
Type the subnet mask here if you choose Subnet as<br />
Source IP Type.<br />
Determine the IP type as the destination.<br />
Destination IP<br />
Type the IP address here if you choose Single as<br />
Destination IP Type.<br />
Vigor2130 Series User’s <strong>Guide</strong> 89
Destination Subnet<br />
Source Start Port<br />
Source End Port (optional)<br />
Destination Start Port<br />
Type the subnet mask here if you choose Subnet as<br />
Destination IP Type.<br />
Type a value as the source start port. Such value will be<br />
available only TCP/UDP is selected as the protocol.<br />
Type a value as the source end port. Such value will be<br />
available only TCP/UDP is selected as the protocol.<br />
Type a value as the destination start port. Such value will<br />
be available only TCP/UDP is selected as the protocol.<br />
Destination End Port (optional) Type a value as the destination end port. Such value will be<br />
available only TCP/UDP is selected as the protocol.<br />
Action<br />
Set the action that the router will perform for the packets<br />
through the protocol of IPv6.<br />
Accept – If the IPv6 packets fit the condition listed in this<br />
page, the router will let it pass through.<br />
Drop - If the IPv6 packets fit the condition listed in this<br />
page, the router will block it.<br />
3.8.4 IPv6 Routing<br />
This page displays the routing table for the protocol of IPv6.<br />
Device<br />
Prefix<br />
Metric<br />
Expires<br />
MTU<br />
Advmss<br />
Display the interface name (eth0, eth1, fp, etc..)that<br />
used to transfer packets with addresses matching the<br />
prefix.<br />
The IPv6 address prefix.<br />
Display the distance to the target (usually counted in<br />
hops). It is not used by recent kernels, but may be<br />
needed by routing daemons.<br />
Display the lifetime of the route.<br />
Display the largest size (in bytes) of a packet.<br />
Display the largest size (in bytes) of an unfragmented<br />
piece of a routing advertisement.<br />
90<br />
Vigor2130 Series User’s <strong>Guide</strong>
Hoplimit<br />
Auto-refresh<br />
Display the number of network segments on which the<br />
packet is allowed to travel before discarded.<br />
Check this box to enable an automatic refresh of the page<br />
at regular intervals.<br />
3.8.5 IPv6 Neighbour<br />
IPv6 uses neighbor discovery protocol to find out neighbors on the same link.<br />
Device<br />
IP Address<br />
MAC Address<br />
State<br />
Auto-refresh<br />
3.8.6 IPv6 TSPC Status<br />
The interface name of the link where the neighbor is on.<br />
The IPv6 address of the neighbor.<br />
The link-layer address of the neighbor.<br />
Possible states include:<br />
incomplete - address resolution is in progress.<br />
reachable - neighbor is reachable.<br />
stale – neighbor(s) may be unreachable but not verified<br />
until a packet is sent).<br />
delay - neighbor may be unreachable and a packet was sent.<br />
probe - neighbor may be unreachable and probes are sent<br />
to verify the reachability.<br />
Check this box to enable an automatic refresh of the page<br />
at regular intervals.<br />
IPv6 TSPC status web page could help you to diagnose the connection status of TSPC. TSPC<br />
log contains some debug information from program.<br />
If TSPC has not configured properly, the router will display the following page when the user<br />
tries to connect through TSPC connection.<br />
Vigor2130 Series User’s <strong>Guide</strong> 91
When TSPC configuration has been done, the router will start to connect. The connecting page<br />
will be shown as below:<br />
When the router detects all the information, the screen will be shown as follows. One set of<br />
TSPC prefix and prefix length will be obtained after the connection between TSPC and<br />
Tunnel broker built.<br />
Connection Status<br />
Tunnel Information<br />
Tunnel Status<br />
Activity<br />
It will bring out different pages to represent IPv6<br />
disconnection, connecting and connected.<br />
Display interface name (used to send TSPC prefix), tunnel<br />
mode, local endpoint addresses, remote endpoint address,<br />
TSPC Prfix, TSPC Prefixlen (prefix length), tunnel broker<br />
and so on.<br />
Disconnected - The remote client doesn't connect to the<br />
tunnel server.<br />
Connecting - The remote client is connecting to the tunnel<br />
server.<br />
Connected – The remote client has been connected to the<br />
tunnel server.<br />
Sent - sent to the tunnel (RX bytes).<br />
Received - received from the tunnel (RX bytes).<br />
92<br />
Vigor2130 Series User’s <strong>Guide</strong>
When the router connects to the tunnel broker, the router will use RADVD to transmit the<br />
prefix to the PC on LAN. Next, the PC will generate one set of IPv6 public IP (see the figure<br />
below). Users can use such IP for connecting to IPv6 network.<br />
When your PC obtains the IPv6 address, please connect to http://www.ipv6.org. If your PC<br />
access Internet via IPv6 connection, your IPv6 address will be shown on the web page<br />
immediately. Refer to the following figure.<br />
Vigor2130 Series User’s <strong>Guide</strong> 93
3.9 User<br />
3.9.1 User Configuration<br />
This page allows you to set user’s setting that allowed to use PPTP, FTP, IPSEC/L2TP<br />
connection.<br />
Adding a New User<br />
Click Add a New User to open the following page.<br />
Username<br />
Full Name<br />
Password<br />
Password (again)<br />
Allow Disk Sharing<br />
Allow IPSEC/L2TP<br />
Allow PPTP<br />
Allow FTP<br />
Type a name for this user.<br />
Type full name for this user.<br />
Type the password for this user.<br />
Type the password again for confirmation.<br />
Check this box to enable Samba file sharing.<br />
Check this box to let the user connect via IPSEC/L2TP.<br />
Check this box to let the user connect via PPTP.<br />
Check this box to let the user connect to FTP server.<br />
When you finish the settings, simply click OK to save the configuration. The new user will be<br />
created and displayed on the page.<br />
94<br />
Vigor2130 Series User’s <strong>Guide</strong>
Editing/Deleting User Settings<br />
To edit a user, click the name link under Username to open the following page. Modify the<br />
settings except Username and then click OK to save and exit it. If you want to remove such<br />
user settings, simply click Delete User.<br />
3.10 System Maintenance<br />
For the system setup, there are several items that you have to know the way of configuration:<br />
Status, User Password, Configuration Backup, Syslog/Mail Alert, Time and Date,<br />
Management, Reboot System and Firmware Upgrade.<br />
Below shows the menu items for System Maintenance.<br />
3.10.1 System Status<br />
The System Status provides basic network settings of Vigor router. It includes LAN and<br />
WAN interface information. Also, you could get the current running firmware version or<br />
firmware related information from this presentation.<br />
Vigor2130 Series User’s <strong>Guide</strong> 95
Model Name<br />
Platform<br />
Bootloader Version<br />
Firmware Version<br />
Build Date/Time<br />
Hardware NAT Version<br />
System Date<br />
System Uptime<br />
LAN-------<br />
MAC Address<br />
IP Address<br />
IP Mask<br />
WAN-------<br />
MAC Address<br />
IP Address<br />
IP Mask<br />
IPv6 Address<br />
Default Gateway<br />
Primary DNS<br />
Secondary DNS<br />
Wireless LAN-------<br />
MAC Address<br />
Device Type<br />
SSID<br />
Channel<br />
Display the model name of the router.<br />
Display the hardware type that this device is built upon.<br />
Display the bootloader version of the router.<br />
Display the firmware version of the router.<br />
Display the date and time of the current firmware build.<br />
Display the hardware acceleration NAT version.<br />
Display current time and date for the system server.<br />
Display the connection time for the system server.<br />
Display the MAC address of the LAN Interface.<br />
Display the IP address of the LAN interface.<br />
Display the subnet mask address of the LAN interface.<br />
Display the MAC address of the WAN Interface.<br />
Display the IP address of the WAN interface.<br />
Display the subnet mask address of the WAN interface.<br />
Display the IPv6 address of the WAN interface.<br />
Display the gateway address of the WAN interface.<br />
Display the specified primary DNS setting.<br />
Display the specified secondary DNS setting.<br />
Display the MAC address of the wireless LAN.<br />
Display the device type used for wireless LAN.<br />
Display the SSID of the router.<br />
Display the channel that wireless LAN used.<br />
96<br />
Vigor2130 Series User’s <strong>Guide</strong>
Manufacturer<br />
Display the manufacturer of the disk.<br />
Model<br />
Display the model of the disk.<br />
Size<br />
Display the storage size of the USB diskette.<br />
Status<br />
Display current status of the USB diskette.<br />
3.10.2 User Password<br />
This page allows you to set new password for user operation.<br />
Old Password<br />
New Password<br />
Confirm Password<br />
Type in the old password. The factory default setting for<br />
password is blank.<br />
Type in new password in this filed.<br />
Type in the new password again.<br />
When you click OK, the login window will appear. Please use the new password to access into<br />
the web configurator again.<br />
3.10.3 Configuration Backup<br />
Backup the Configuration<br />
Follow the steps below to backup your configuration.<br />
1. Go to System Maintenance >> Configuration Backup. The following windows will be<br />
popped-up, as shown below.<br />
2. Type a key arbitrarily for encrypting the file. Keep the key in mind. You will need it<br />
whenever you want to restore such file. Click Backup button to get into the following<br />
dialog. Click Save button to open another dialog for saving configuration as a file.<br />
Vigor2130 Series User’s <strong>Guide</strong> 97
3. In Save As dialog, the default filename is config.cfg. You could give it another name by<br />
yourself.<br />
4. Click Save button, the configuration will download automatically to your computer as a<br />
file named config.cfg.<br />
The above example is using Windows platform for demonstrating examples. The Mac or<br />
Linux platform will appear different windows, but the backup function is still available.<br />
Note: Backup for Certification must be done independently. The Configuration Backup<br />
does not include information of Certificate.<br />
Restore Configuration<br />
1. Go to System Maintenance >> Configuration Backup. The following windows will be<br />
popped-up, as shown below.<br />
98<br />
Vigor2130 Series User’s <strong>Guide</strong>
2. Click Browse button to choose the correct configuration file for uploading to the router.<br />
Click Restore button and wait for few seconds, the following picture will tell you that the<br />
restoration procedure is successful.<br />
Note: If the file you want to restore has been encrypted, you will be asked to type the<br />
encrypted key before clicking Restore.<br />
3.10.4 Syslog / Mail Alert<br />
SysLog function is provided for users to monitor router. There is no bother to directly get into<br />
the Web Configurator of the router or borrow debug equipments.<br />
Enable (Syslog Access…)<br />
Router Name<br />
Server IP Address<br />
Check the box to activate function of syslog.<br />
Type a name of this device.<br />
The IP address of the Syslog server.<br />
Vigor2130 Series User’s <strong>Guide</strong> 99
Destination Port<br />
Log Level<br />
Type a port for the Syslog protocol.<br />
Choose the severity level for the system log entry.<br />
Enable (Mail Alert…)<br />
Send a test e-mail<br />
SMTP Server<br />
Mail To<br />
Mail From<br />
User Name<br />
Password<br />
Enable E-mail Alert<br />
Click OK to save these settings.<br />
Check the box to activate function of mail alert.<br />
Make a simple test for the e-mail address specified in this<br />
page. Please assign the mail address first and click this<br />
button to execute a test for verify the mail address is<br />
available or not.<br />
The IP address of the SMTP server.<br />
Assign a mail address for sending mails out.<br />
Assign a path for receiving the mail from outside.<br />
Type the user name for authentication.<br />
Type the password for authentication.<br />
Check the box of User Login to send alert message to the<br />
e-mail box while the router detecting the item(s) you<br />
specify here.<br />
For viewing the Syslog, please do the following:<br />
1. Just set your monitor PC’s IP address in the field of Server IP Address<br />
2. Install the Router Tools in the Utility within provided CD. After installation, click on the<br />
Router Tools>>Syslog from program menu.<br />
3. From the Syslog screen, select the router you want to monitor. Be reminded that in<br />
Network Information, select the network adapter used to connect to the router.<br />
Otherwise, you won’t succeed in retrieving information from the router.<br />
100<br />
Vigor2130 Series User’s <strong>Guide</strong>
3.10.5 Time and Date<br />
It allows you to specify where the time of the router should be inquired from.<br />
Current System Time<br />
Time Zone<br />
Add NTP server<br />
Delete<br />
Click OK to save these settings.<br />
Click Inquire Time to get the current time.<br />
Select the time zone where the router is located.<br />
Click the button to add a new NTP server.<br />
Click this button to remove an NTP server.<br />
Vigor2130 Series User’s <strong>Guide</strong> 101
3.10.6 Management<br />
This page allows you to manage the settings for access control, access list, port setup, and<br />
SMP setup. For example, as to management access control, the port number is used to<br />
send/receive SIP message for building a session. The default value is 5060 and this must<br />
match with the peer Registrar when making VoIP calls.<br />
Enable HTTP/HTTPS/SSH/ICMP Ping/FTP/SNMP Enable the checkbox to allow system<br />
administrators to login from the Internet. There are several<br />
servers provided by the system to allow you managing the<br />
router from Internet. Check the box(es) to specify.<br />
Manager Host IP – Type the IP address for the host to<br />
perform the remote management.<br />
Access List<br />
3.10.7 Reboot System<br />
You could specify that the system administrator can only<br />
login from a specific host or network defined in the list. A<br />
maximum of three IPs/subnet masks is allowed.<br />
List IP - Indicate an IP address allowed to login to the<br />
router.<br />
Subnet Mask - Represent a subnet mask allowed to login to<br />
the router.<br />
The Web Configurator may be used to restart your router for using current configuration.<br />
Click Reboot System from System Maintenance to open the following page.<br />
102<br />
Vigor2130 Series User’s <strong>Guide</strong>
Click OK. The router will take 5 seconds to reboot the system.<br />
Note: When the system pops up Reboot System web page after you configure web settings,<br />
please click OK to reboot your router for ensuring normal operation and preventing<br />
unexpected errors of the router in the future.<br />
3.10.8 Firmware Upgrade<br />
Before upgrading your router firmware, you need to install the Router Tools. The Firmware<br />
Upgrade Utility is included in the tools. The following web page will guide you to upgrade<br />
firmware by using an example. Note that this example is running over Windows OS<br />
(Operating System).<br />
Download the newest firmware from DrayTek's web site or FTP site. The DrayTek web site is<br />
www.draytek.com (or local DrayTek's web site) and FTP site is ftp.draytek.com.<br />
Click Maintenance>> Firmware Upgrade to launch the Firmware Upgrade Utility.<br />
Click Browse.. to locate the newest firmware and click Upgrade. During the process of<br />
upgrade, do not turn off your router.<br />
Vigor2130 Series User’s <strong>Guide</strong> 103
104<br />
Vigor2130 Series User’s <strong>Guide</strong>
4 Admin Mode Operation<br />
This chapter will guide users to execute advanced (full) configuration through admin mode<br />
operation.<br />
1. Open a web browser on your PC and type http://192.168.1.1. The window will ask for<br />
typing username and password.<br />
2. Please type “admin/admin” on Username/Password for administration operation.<br />
Now, the Main Screen will appear. Be aware that “Admin mode” will be displayed on the<br />
bottom left side.<br />
4.1 WAN<br />
Quick Start Wizard offers user an easy method to quick setup the connection mode for the<br />
router. Moreover, if you want to adjust more settings for different WAN modes, please go to<br />
Internet Access group.<br />
Basics of Internet Protocol (IP) Network<br />
IP means Internet Protocol. Every device in an IP-based Network including routers, print<br />
server, and host PCs, needs an IP address to identify its location on the network. To avoid<br />
address conflicts, IP addresses are publicly registered with the Network Information Centre<br />
(NIC). Having a unique IP address is mandatory for those devices participated in the public<br />
network but not in the private TCP/IP local area networks (LANs), such as host PCs under the<br />
management of a router since they do not need to be accessed by the public. Hence, the NIC<br />
has reserved certain addresses that will never be registered publicly. These are known as<br />
private IP addresses, and are listed in the following ranges:<br />
Vigor2130 Series User’s <strong>Guide</strong> 105
From 10.0.0.0 to 10.255.255.255<br />
From 172.16.0.0 to 172.31.255.255<br />
From 192.168.0.0 to 192.168.255.255<br />
What are Public IP Address and Private IP Address<br />
As the router plays a role to manage and further protect its LAN, it interconnects groups of<br />
host PCs. Each of them has a private IP address assigned by the built-in DHCP server of the<br />
Vigor router. The router itself will also use the default private IP address: 192.168.1.1 to<br />
communicate with the local hosts. Meanwhile, Vigor router will communicate with other<br />
network devices through a public IP address. When the data flow passing through, the<br />
Network Address Translation (NAT) function of the router will dedicate to translate<br />
public/private addresses, and the packets will be delivered to the correct host PC in the local<br />
area network. Thus, all the host PCs can share a common Internet connection.<br />
Get Your Public IP Address from ISP<br />
In ADSL deployment, the PPP (Point to Point)-style authentication and authorization is<br />
required for bridging customer premises equipment (CPE). Point to Point Protocol over<br />
Ethernet (PPPoE) connects a network of hosts via an access device to a remote access<br />
concentrator or aggregation concentrator. This implementation provides users with significant<br />
ease of use. Meanwhile it provides access control, billing, and type of service according to<br />
user requirement.<br />
When a router begins to connect to your ISP, a serial of discovery process will occur to ask for<br />
a connection. Then a session will be created. Your user ID and password is authenticated via<br />
PAP or CHAP with RADIUS authentication system. And your IP address, DNS server, and<br />
other related information will usually be assigned by your ISP.<br />
Network Connection by 3G USB Modem<br />
For 3G mobile communication through Access Point is popular more and more, Vigor router<br />
adds the function of 3G network connection for such purpose. By connecting 3G USB Modem<br />
to the USB port of Vigor router, it can support HSDPA/UMTS/EDGE/GPRS/GSM and the<br />
future 3G standard (HSUPA, etc). Vigor router with 3G USB Modem allows you to receive<br />
3G signals at any place such as your car or certain location holding outdoor activity and share<br />
the bandwidth for using by more people. Users can use four LAN ports on the router to access<br />
Internet. Also, they can access Internet via SuperG wireless function of Vigor router, and<br />
enjoy the powerful firewall, bandwidth management, VPN, VoIP features of Vigor router.<br />
After connecting into the router, 3G USB Modem will be regarded as the second WAN port.<br />
However, the original Ethernet WAN still can be used and Load-Balance can be done in the<br />
router. Besides, 3G USB Modem also can be used as backup device. Therefore, when WAN is<br />
not available, the router will use 3.5G for supporting automatically. The supported 3G USB<br />
106<br />
Vigor2130 Series User’s <strong>Guide</strong>
Modem will be listed on DrayTek web site. Please visit www.draytek.com for more detailed<br />
information.<br />
Below shows the menu items for WAN.<br />
4.1.1 Internet Access<br />
This page allows you to set WAN configuration with different modes. Use the Connection<br />
Type drop down list to choose one of the WAN modes. The corresponding page will be<br />
displayed.<br />
Static<br />
For static IP mode, you usually receive a fixed public IP address or a public subnet, namely<br />
multiple public IP addresses from your DSL or Cable ISP service providers. In most cases, a<br />
Cable service provider will offer a fixed public IP, while a DSL service provider will offer a<br />
public subnet. If you have a public subnet, you could assign an IP address or many IP address<br />
to the WAN interface.<br />
To use Static as the accessing protocol of the internet, please choose Static mode from<br />
Connection Type drop down menu. The following web page will be shown.<br />
Vigor2130 Series User’s <strong>Guide</strong> 107
IP Address<br />
Subnet Mask<br />
Gateway IP Address<br />
Primary DNS Server<br />
Secondary DNS Server<br />
Clone MAC Address<br />
Type the IP address.<br />
Type the subnet mask.<br />
Type the gateway IP address.<br />
You must specify a DNS server IP address here because your<br />
ISP should provide you with usually more than one DNS Server.<br />
If your ISP does not provide it, the router will automatically<br />
apply default DNS Server IP address: 198.95.1.1 to this field.<br />
You can specify secondary DNS server IP address here because<br />
your ISP often provides you more than one DNS Server. If your<br />
ISP does not provide it, the router will automatically apply<br />
default secondary DNS Server IP address: 4.2.2.1 to this field.<br />
It is available when the box of Enable is checked. Click Clone<br />
MAC Address. The result will be displayed in the field of<br />
MAC Address.<br />
After finishing all the settings here, please click OK to activate them.<br />
DHCP<br />
DHCP allows a user to obtain an IP address automatically from a DHCP server on the Internet.<br />
If you choose DHCP mode, the DHCP server of your ISP will assign a dynamic IP address for<br />
your router automatically. It is not necessary for you to assign any setting,<br />
108<br />
Vigor2130 Series User’s <strong>Guide</strong>
Router Name<br />
Clone MAC Address<br />
Type in a name for the router. It must be the same as the name<br />
used in Syslog.<br />
It is available when the box of Enable is checked. Click Clone<br />
MAC Address. The result will be displayed in the field of<br />
MAC Address.<br />
After finishing all the settings here, please click OK to activate them.<br />
PPPoE<br />
To choose PPPoE as the accessing protocol of the internet, please select PPPoE from the<br />
Internet Access menu. The following web page will be shown.<br />
Username<br />
Password<br />
Type in the username provided by ISP in this field.<br />
Type in the password provided by ISP in this field.<br />
Vigor2130 Series User’s <strong>Guide</strong> 109
Redial Policy<br />
If you want to connect to Internet all the time, you can choose<br />
Always On. Otherwise, choose Connect on Demand.<br />
Idle Time Out<br />
MTU Size<br />
Enable/Disable<br />
Clone MAC Address<br />
Set the timeout for breaking down the Internet after passing<br />
through the time without any action. When you choose Connect<br />
on Demand, you have to type value here.<br />
It means Max Transmit Unit for packet. The default<br />
setting is 1442.<br />
Click Enable for activating this function. If you click Disable,<br />
this function will be closed and all the settings that you adjusted<br />
in this page will be invalid.<br />
It is available when the box of Enable is checked. Click Clone<br />
MAC Address. The result will be displayed in the field of<br />
MAC Address.<br />
After finishing all the settings here, please click OK to activate them.<br />
110<br />
Vigor2130 Series User’s <strong>Guide</strong>
PPTP/L2TP<br />
To use PPTP/L2TP as the accessing protocol of the internet, please choose PPTP/L2TP from<br />
Connection Type drop down menu. The following web page will be shown.<br />
Username<br />
Password<br />
Server Address<br />
Type in the username provided by ISP in this field.<br />
Type in the password provided by ISP in this field.<br />
Type in the IP address for PPTP /L2TP server.<br />
WAN IP Network Settings You can choose Static IP or DHCP as WAN IP network setting.<br />
IP Address<br />
Subnet Mask<br />
Primary DNS Server<br />
Secondary DNS Server<br />
Redial Policy<br />
Type the IP address if you choose Static IP as the WAN IP<br />
network setting.<br />
Type the subnet mask if you chose Static IP as the WAN IP.<br />
You must specify a DNS server IP address here because your<br />
ISP should provide you with usually more than one DNS Server.<br />
If your ISP does not provide it, the router will automatically<br />
apply default DNS Server IP address: 194.109.6.66 to this field.<br />
You can specify secondary DNS server IP address here because<br />
your ISP often provides you more than one DNS Server. If your<br />
ISP does not provide it, the router will automatically apply<br />
default secondary DNS Server IP address: 194.98.0.1 to this<br />
field.<br />
If you want to connect to Internet all the time, you can choose<br />
Always On. Otherwise, choose Connect on Demand and<br />
Vigor2130 Series User’s <strong>Guide</strong> 111
Idle Time Out<br />
MTU Size<br />
Clone MAC Address<br />
Set the timeout for breaking down the Internet after passing<br />
through the time without any action. When you choose Connect<br />
on Demand, you have to type value here.<br />
It means Max Transmit Unit for packet. The default<br />
setting is 1442.<br />
It is available when the box of Enable is checked. Click Clone<br />
MAC Address. The result will be displayed in the field of<br />
MAC Address.<br />
After finishing all the settings here, please click OK to activate them.<br />
3G USB Modem<br />
If your router connects to a 3G modem and you want to access Internet via 3G modem, choose<br />
3G as connection type and type the required information in this web page.<br />
SIM PIN code<br />
Modem Initial String1/2<br />
APN Name<br />
Modem Dial String<br />
PPP Username<br />
Type PIN code of the SIM card that will be used to access<br />
Internet.<br />
Such value is used to initialize USB modem. Please use the<br />
default value. If you have any question, please contact to your<br />
ISP.<br />
APN means Access Point Name which is provided and<br />
required by some ISPs.<br />
Such value is used to dial through USB mode. Please use the<br />
default value. If you have any question, please contact to your<br />
ISP.<br />
Type the PPP username (optional).<br />
112<br />
Vigor2130 Series User’s <strong>Guide</strong>
PPP Password<br />
Clone MAC Address<br />
Type the PPP password (optional).<br />
It is available when the box of Enable is checked. Click Clone<br />
MAC Address. The result will be displayed in the field of<br />
MAC Address.<br />
4.1.2 Ports<br />
After finishing all the settings here, please click OK to activate them.<br />
Ports page is used to change the setting for WAN port. You can set or reset the following<br />
items. All of them are described in detail below.<br />
Port<br />
Link<br />
Current<br />
Speed Configured<br />
It displays current network interface.<br />
It displays current connection status. Green light means the<br />
WAN connection is successful.<br />
It displays current speed that the router uses.<br />
You can use the drop down list to choose the required speed for<br />
the router. If you have no idea in configuring speed, simple use<br />
the default setting, Auto.<br />
Flow Control<br />
If flow control is enabled by checking Configured box, both<br />
parties can send PAUSE frame to the transmitting device(s) if<br />
the receiving port is too busy to handle. If not, there will be no<br />
flow control in the port. It drops the packet if too much to<br />
handle.<br />
Current Rx: indicates whether pause frames on the port are<br />
obeyed.<br />
Vigor2130 Series User’s <strong>Guide</strong> 113
Maximum Frame<br />
Excessive Collision Mode<br />
Current Tx: indicates whether pause frames on the port are<br />
transmitted.<br />
This module offers 1518~9600 (Bytes) length to make the long<br />
packet for data transmission.<br />
There are two modes for you to choose when excessive<br />
collision happened in half-duplex condition.<br />
Discard - It determines whether the MAC drops frames after an<br />
excessive collision has occurred. If yes, a frame is dropped after<br />
excessive collision. This is IEEE Standard 802.3 half-duplex<br />
flow control operation.<br />
Power Control<br />
Restart - It determines whether the MAC retransmits frames<br />
after an excessive collision has occurred. If set, a frame is not<br />
dropped after excessive collisions, but the backoff sequence is<br />
restarted. This is a violation of IEEE Standard 802.3, but is<br />
useful in non-dropping half-duplex flow control operation.<br />
The Configured column allows for changing the power savings<br />
mode parameters per port.<br />
Refresh<br />
Disabled: All power savings mechanisms disabled.<br />
ActiPHY: Link down power savings enabled.<br />
PerfectReach: Link up power savings enabled.<br />
Enabled: Both link up and link down power savings enabled.<br />
Click this button to refresh the information for WAN port.<br />
After finishing all the settings here, please click OK to activate them.<br />
4.1.3 3G Backup<br />
This page is used to setup 3G backup function. If you enable 3G backup, make sure your<br />
WAN connection type is not in 3G mode. When the WAN connection is broken, router will<br />
try to keep the connection with 3G mode. After WAN connection is recovered, router will<br />
disconnect the 3G connection automatically.<br />
114<br />
Vigor2130 Series User’s <strong>Guide</strong>
SIM PIN code<br />
Modem Initial String1/2<br />
APN Name<br />
Modem Dial String<br />
PPP Username<br />
PPP Password<br />
Clone MAC Address<br />
Type PIN code of the SIM card that will be used to access<br />
Internet.<br />
Such value is used to initialize USB modem. Please use the<br />
default value. If you have any question, please contact to your<br />
ISP.<br />
APN means Access Point Name which is provided and<br />
required by some ISPs.<br />
Such value is used to dial through USB mode. Please use the<br />
default value. If you have any question, please contact to your<br />
ISP.<br />
Type the PPP username (optional).<br />
Type the PPP password (optional).<br />
It is available when the box of Enable is checked. Click Clone<br />
MAC Address. The result will be displayed in the field of<br />
MAC Address.<br />
4.2 LAN<br />
Local Area Network (LAN) is a group of subnets regulated and ruled by router. The design of<br />
network structure is related to what type of public IP addresses coming from your ISP.<br />
Basics of LAN<br />
Vigor2130 Series User’s <strong>Guide</strong> 115
The most generic function of Vigor router is NAT. It creates a private subnet of your own. As<br />
mentioned previously, the router will talk to other public hosts on the Internet by using public<br />
IP address and talking to local hosts by using its private IP address. What NAT does is to<br />
translate the packets from public IP address to private IP address to forward the right packets<br />
to the right host and vice versa. Besides, Vigor router has a built-in DHCP server that assigns<br />
private IP address to each local host. See the following diagram for a briefly understanding.<br />
In some special case, you may have a public IP subnet from your ISP such as<br />
220.135.240.0/24. This means that you can set up a public subnet or call second subnet that<br />
each host is equipped with a public IP address. As a part of the public subnet, the Vigor router<br />
will serve for IP routing to help hosts in the public subnet to communicate with other public<br />
hosts or servers outside. Therefore, the router should be set as the gateway for public hosts.<br />
What is Routing Information Protocol (RIP)<br />
116<br />
Vigor2130 Series User’s <strong>Guide</strong>
Vigor router will exchange routing information with neighboring routers using the RIP to<br />
accomplish IP routing. This allows users to change the information of the router such as IP<br />
address and the routers will automatically inform for each other.<br />
What is Static Route<br />
When you have several subnets in your LAN, sometimes a more effective and quicker way for<br />
connection is the Static routes function rather than other method. You may simply set rules to<br />
forward data from one specified subnet to another specified subnet without the presence of<br />
RIP.<br />
What are Virtual LANs and Rate Control<br />
You can group local hosts by physical ports and create up to 4 virtual LANs. To manage the<br />
communication between different groups, please set up rules in Virtual LAN (VLAN) function<br />
and the rate of each.<br />
4.2.1 General Setup<br />
This page provides you the general settings for LAN.<br />
Click LAN to open the LAN settings page and choose General Setup.<br />
Vigor2130 Series User’s <strong>Guide</strong> 117
IP Address<br />
Subnet Mask<br />
Enable DHCP<br />
Start IP Address<br />
IP Pool Counts<br />
Lease Time<br />
Type in private IP address for connecting to a local private<br />
network (Default: 192.168.1.1).<br />
Type in an address code that determines the size of the network.<br />
(Default: 255.255.255.0/ 24)<br />
DHCP stands for Dynamic Host Configuration Protocol. The<br />
router by factory default acts a DHCP server for your network<br />
so it automatically dispatch related IP settings to any local user<br />
configured as a DHCP client. It is highly recommended that you<br />
leave the router enabled as a DHCP server if you do not have a<br />
DHCP server for your network.<br />
You can configure the router to serve as a DHCP server for the<br />
2nd subnet. Check the box to enable DHCP server setting.<br />
Enter a value of the IP address pool for the DHCP server to start<br />
with when issuing IP addresses. If the 2nd IP address of your<br />
router is 220.135.240.1, the starting IP address must be<br />
220.135.240.2 or greater, but smaller than 220.135.240.254.<br />
Enter the number of IP addresses in the pool. The maximum is<br />
10. For example, if you type 3 and the 2nd IP address of your<br />
router is 220.135.240.1, the range of IP address by the DHCP<br />
server will be from 220.135.240.2 to 220.135.240.11.<br />
It allows you to set the leased time for the specified PC.<br />
After finishing all the settings here, please click OK to activate them.<br />
4.2.2 Ports<br />
Ports page is used to change the setting for LAN ports. You can set or reset the following<br />
items. All of them are described in detail below.<br />
Port<br />
Link<br />
Current<br />
Speed Configured<br />
It displays current network interface.<br />
It displays current connection status. Green light means the<br />
LAN connection is successful.<br />
It displays current speed that the router uses.<br />
It can set the speed and duplex of the port. You can use the drop<br />
down list to choose the required speed for the router. If you<br />
have no idea in configuring speed, simple use the default setting,<br />
118<br />
Vigor2130 Series User’s <strong>Guide</strong>
Auto.<br />
Flow Control<br />
Maximum Frame<br />
Excessive Collision Mode<br />
If flow control is enabled by checking Configured box, both<br />
parties can send PAUSE frame to the transmitting device(s) if<br />
the receiving port is too busy to handle. If not, there will be no<br />
flow control in the port. It drops the packet if too much to<br />
handle.<br />
Current Rx: indicates whether pause frames on the port are<br />
obeyed.<br />
Current Tx: indicates whether pause frames on the port are<br />
transmitted.<br />
This module offers 1518~9600 (Bytes) length to make the long<br />
packet for data transmission.<br />
There are two modes for you to choose when excessive<br />
collision happened in half-duplex condition.<br />
Discard - It determines whether the MAC drops frames after an<br />
excessive collision has occurred. If yes, a frame is dropped after<br />
excessive collision. This is IEEE Standard 802.3 half-duplex<br />
flow control operation.<br />
Power Control<br />
Restart - It determines whether the MAC retransmits frames<br />
after an excessive collision has occurred. If set, a frame is not<br />
dropped after excessive collisions, but the backoff sequence is<br />
restarted. This is a violation of IEEE Standard 802.3, but is<br />
useful in non-dropping half-duplex flow control operation.<br />
The Configured column allows for changing the power savings<br />
mode parameters per port.<br />
Refresh<br />
Disabled: All power savings mechanisms disabled.<br />
ActiPHY: Link down power savings enabled.<br />
PerfectReach: Link up power savings enabled.<br />
Enabled: Both link up and link down power savings enabled.<br />
Click this button to refresh the information for LAN ports.<br />
After finishing all the settings here, please click OK to activate them.<br />
Vigor2130 Series User’s <strong>Guide</strong> 119
4.2.3 MAC Address Table<br />
This page allows you to set timeouts for entries in dynamic MAC Table and configure the<br />
static MAC table here.<br />
Disable Automatic Aging<br />
Age Time<br />
MAC Table Learning<br />
Stop the MAC table aging timer, the learned MAC address will<br />
not age out automatically. The default setting is enabled. Check<br />
the box to disable this function if required.<br />
Delete a MAC address idling for a period of time from the<br />
following MAC Table, which will not affect static MAC<br />
address. Range of MAC Address Aging Time is 10-1000000<br />
seconds. The default Aging Time is 300 seconds.<br />
List the port members which apply dynamic learning<br />
mechanism or not.<br />
Auto - Enable this port MAC address dynamic learning<br />
mechanism.<br />
Disable - Disable this port MAC address dynamic learning<br />
mechanism, only support static MAC address setting.<br />
Secure - Disable this port MAC address dynamic learning<br />
mechanism and copy the dynamic learning packets to CPU.<br />
Static MAC Table Config.. Specify static MAC address with VLAN ID to apply aging<br />
configuration.<br />
Delete - Click the button to remove the VLAN setting.<br />
VLAN ID - Specify the interface for the port members.<br />
MAC Address - It is a six-byte long Ethernet hardware address<br />
and usually expressed by hex and separated by hyphens. For<br />
example, 00 – 40 - C7 - D6 – 00 – 02.<br />
WAN/LAN1~4 - Check the port to apply this VLAN setting.<br />
To add a new static MAC entry, click Add new static entry. A new entry will be shown as<br />
follows. Choose VLAN ID and type a new MAC address. Next, specify port member for this<br />
table. Finally, click OK to save the changes.<br />
120<br />
Vigor2130 Series User’s <strong>Guide</strong>
4.2.4 VLAN<br />
Virtual LAN function provides you a very convenient way to manage hosts by grouping them<br />
based on the physical port. You can also manage the in/out rate of each port. Go to LAN page<br />
and select VLAN. The following page will appear. VLAN function is enabled in default.<br />
Add New Private VLAN<br />
Click this button to add a new private VLAN. The router allows<br />
you to add up to 4 VLAN.<br />
To add or remove a VLAN, please refer to the following example.<br />
1. VLAN 1 is consisted of hosts linked to P1 ~ P4.<br />
2. After checking the box to enable VLAN function, you will check the table according to<br />
the needs as shown below.<br />
Vigor2130 Series User’s <strong>Guide</strong> 121
3. To remove VLAN, click the Delete button for the one you want to remove and click OK<br />
to save the results.<br />
4.2.5 Monitor Port<br />
It is used to monitor the traffic of the network. For example, we assume that LAN1 and LAN2<br />
are Monitor Port and Monitor ingress Port respectively, thus, the traffic received by LAN2<br />
will be copied to LAN1 for monitoring.<br />
Enable Monitor Port<br />
Monitor Port<br />
Monitor ingress port<br />
Monitor egress port<br />
4.2.6 Static Route<br />
Check to enable this function.<br />
Click the one of the LAN ports to specify it for monitoring.<br />
Check to set up the port(s) for being monitored. It only<br />
monitors the packets received by the port you set up.<br />
Go to LAN to open setting page and choose Static Route.<br />
Check to set up the port(s) for being monitored. It only<br />
monitors the packets transmitted by the port you set up.<br />
Index<br />
The number (1 to 10) under Index displays current static router.<br />
122<br />
Vigor2130 Series User’s <strong>Guide</strong>
Destination Address<br />
Status<br />
Add<br />
Display the destination address of the static route.<br />
Display the status of the static route.<br />
To add a new static route.<br />
Add Static Routes to Private and Public Networks<br />
Here is an example of setting Static Route in Main Router so that user A and B locating in<br />
different subnet can talk to each other via the router. Assuming the Internet access has been<br />
configured and the router works properly:<br />
• use the Main Router to surf the Internet.<br />
• create a private subnet 192.168.10.0 using an internal Router A (192.168.1.2)<br />
• create a public subnet 211.100.88.0 via an internal Router B (192.168.1.3).<br />
• have set Main Router 192.168.1.1 as the default gateway for the Router A 192.168.1.2.<br />
Before setting Static Route, user A cannot talk to user B for Router A can only forward<br />
recognized packets to its default gateway Main Router.<br />
1. Click the LAN - Static Route and click Add. Check the Enable box. Please add a static<br />
route as shown below, which regulates all packets destined to 192.168.10.0 will be<br />
forwarded to 192.168.1.2. Click OK.<br />
Vigor2130 Series User’s <strong>Guide</strong> 123
2. Return to Static Route page. Click Add again to add another static route as show below,<br />
which regulates all packets destined to 211.100.88.0 will be forwarded to 192.168.1.3.<br />
3. Verify current routing table.<br />
4.2.7 Bind IP to MAC<br />
This function is used to bind the IP and MAC address in LAN to have a strengthening control<br />
in network. When this function is enabled, all the assigned IP and MAC address binding<br />
together cannot be changed. If you modified the binding IP or MAC address, it might cause<br />
you not access into the Internet.<br />
Click LAN and click Bind IP to MAC to open the setup page.<br />
124<br />
Vigor2130 Series User’s <strong>Guide</strong>
Enable<br />
Disable<br />
Strict Bind<br />
ARP Table<br />
Add and Edit<br />
Refresh<br />
IP Bind List<br />
Add<br />
Edit<br />
Remove<br />
Click this radio button to invoke this function. However, IP/MAC<br />
which is not listed in IP Bind List also can connect to Internet.<br />
Click this radio button to disable this function. All the settings on<br />
this page will be invalid.<br />
Click this radio button to block the connection of the IP/MAC<br />
which is not listed in IP Bind List.<br />
This table is the LAN ARP table of this router. The information for<br />
IP and MAC will be displayed in this field. Each pair of IP and<br />
MAC address listed in ARP table can be selected and added to IP<br />
Bind List by clicking Add below.<br />
IP Address – Type the IP address that will be used for the<br />
specified MAC address.<br />
Mac Address – Type the MAC address that is used to bind with<br />
the assigned IP address.<br />
It is used to refresh the ARP table. When there is one new PC<br />
added to the LAN, you can click this link to obtain the newly ARP<br />
table information.<br />
It displays a list for the IP bind to MAC information.<br />
It allows you to add the one you choose from the ARP table or the<br />
IP/MAC address typed in Add and Edit to the table of IP Bind<br />
List.<br />
It allows you to edit and modify the selected IP address and MAC<br />
address that you create before.<br />
You can remove any item listed in IP Bind List. Simply click and<br />
select the one, and click Remove. The selected item will be<br />
removed from the IP Bind List.<br />
Note: Before you select Strict Bind, you have to bind one set of IP/MAC address for one<br />
PC. If not, no one of the PCs can access into Internet. And the web configurator of the router<br />
might not be accessed.<br />
4.3 NAT<br />
Usually, the router serves as an NAT (Network Address Translation) router. NAT is a<br />
mechanism that one or more private IP addresses can be mapped into a single public one.<br />
Public IP address is usually assigned by your ISP, for which you may get charged. Private IP<br />
addresses are recognized only among internal hosts.<br />
When the outgoing packets destined to some public server on the Internet reach the NAT<br />
router, the router will change its source address into the public IP address of the router, select<br />
the available public port, and then forward it. At the same time, the router shall list an entry in<br />
a table to memorize this address/port-mapping relationship. When the public server response,<br />
the incoming traffic, of course, is destined to the router’s public IP address and the router will<br />
do the inversion based on its table. Therefore, the internal host can communicate with external<br />
host smoothly.<br />
The benefit of the NAT includes:<br />
• Save cost on applying public IP address and apply efficient usage of IP address.<br />
NAT allows the internal IP addresses of local hosts to be translated into one public IP<br />
address, thus you can have only one IP address on behalf of the entire internal hosts.<br />
Vigor2130 Series User’s <strong>Guide</strong> 125
• Enhance security of the internal network by obscuring the IP address. There are<br />
many attacks aiming victims based on the IP address. Since the attacker cannot be aware<br />
of any private IP addresses, the NAT function can protect the internal network.<br />
On NAT page, you will see the private IP address defined in RFC-1918. Usually we use the<br />
192.168.1.0/24 subnet for the router. As stated before, the NAT facility can map one or<br />
more IP addresses and/or service ports into different specified services. In other words, the<br />
NAT function can be achieved by using port mapping methods.<br />
Below shows the menu items for NAT.<br />
4.3.1 Hardware NAT<br />
Hardware-base Acceleration Engine, also named Protocol Processing Engine API is the<br />
function that <strong>Draytek</strong> provides to extremely speed up the NAT performance.<br />
While the hardware acceleration mechanism is activated, most of the bandwidth usage will<br />
be concentrated on the specific sessions which increase transmission speed to get ultimately<br />
accelerated.<br />
With Hardware NAT, LAN to WAN NAT throughput can be over 900M bps. But be sure that<br />
your PC has Giga Ethernet and connect with CAT6 Ethernet cable.<br />
4.3.2 Open Ports<br />
Open Ports allows you to open a range of ports for the traffic of special applications.<br />
Common application of Open Ports includes P2P application (e.g., BT, KaZaA, Gnutella,<br />
WinMX, eMule and others), Internet Camera etc. Ensure that you keep the application<br />
involved up-to-date to avoid falling victim to any security exploits.<br />
To add a new open port, click Add new entry.<br />
126<br />
Vigor2130 Series User’s <strong>Guide</strong>
Name<br />
Protocol<br />
Specify the name for the defined network service.<br />
Specify the transport layer protocol. It could be TCP, UDP and<br />
TCP+UDP.<br />
Start Port<br />
End Port (optional)<br />
Local Host<br />
Local Port (optional)<br />
Specify the starting port number of the service offered by the<br />
local host.<br />
Specify the ending port number of the service offered by the<br />
local host.<br />
Enter the private IP address of the local host.<br />
If it is configured, the forwarded traffic is mapped to this port<br />
on the local host.<br />
Vigor2130 Series User’s <strong>Guide</strong> 127
4.3.3 DMZ Host<br />
As mentioned above, Port Redirection can redirect incoming TCP/UDP or other traffic on<br />
particular ports to the specific private IP address/port of host in the LAN. However, other IP<br />
protocols, for example Protocols 50 (ESP) and 51 (AH), do not travel on a fixed port. Vigor<br />
router provides a facility DMZ Host that maps ALL unsolicited data on any protocol to a<br />
single host in the LAN. Regular web surfing and other such Internet activities from other<br />
clients will continue to work without inappropriate interruption. DMZ Host allows a defined<br />
internal user to be totally exposed to the Internet, which usually helps some special<br />
applications such as Netmeeting or Internet Games etc.<br />
The security properties of NAT are somewhat bypassed if you set up DMZ host. We suggest<br />
you to add additional filter rules or a secondary firewall.<br />
Click DMZ Host to open the following page:<br />
Enable<br />
DMZ IP<br />
Check to enable the DMZ Host function.<br />
Enter the private IP address of the DMZ host, or click Choose<br />
PC to specify a suitable one.<br />
128<br />
Vigor2130 Series User’s <strong>Guide</strong>
4.4 Firewall<br />
Basics for Firewall<br />
While the broadband users demand more bandwidth for multimedia, interactive applications,<br />
or distance learning, security has been always the most concerned. The firewall of the Vigor<br />
router helps to protect your local network against attack from unauthorized outsiders. It also<br />
restricts users in the local network from accessing the Internet. Furthermore, it can filter out<br />
specific packets that trigger the router to build an unwanted outgoing connection.<br />
Denial of Service (DoS) Defense<br />
The DoS Defense functionality helps you to detect and mitigate the DoS attack. The attacks<br />
are usually categorized into two types, the flooding-type attacks and the vulnerability attacks.<br />
The flooding-type attacks will attempt to exhaust all your system's resource while the<br />
vulnerability attacks will try to paralyze the system by offending the vulnerabilities of the<br />
protocol or operation system.<br />
The DoS Defense function enables the Vigor router to inspect every incoming packet based on<br />
the attack signature database. Any malicious packet that might duplicate itself to paralyze the<br />
host in the secure LAN will be strictly blocked and a Syslog message will be sent as warning, if<br />
you set up Syslog server.<br />
Also the Vigor router monitors the traffic. Any abnormal traffic flow violating the pre-defined<br />
parameter, such as the number of thresholds, is identified as an attack and the Vigor router will<br />
activate its defense mechanism to mitigate in a real-time manner.<br />
Below shows the menu items for Firewall.<br />
4.4.1 DoS Defense<br />
Click Firewall and click DoS Defense to open the setup page. Storm control for the switch is<br />
configured on this page.<br />
Frame Type<br />
Status<br />
Rate<br />
Set the Unicast storm rate control, multicast storm rate control,<br />
and a broadcast storm rate control for your router.<br />
Check this box to enable storm control status for the frame type.<br />
The unit is packet per second (pps). Use the drop down list to<br />
set the rate for data transmission. The rate is 2^n, where n is<br />
equal to or less than 15, or "No Limit". The unit of the rate can<br />
be either pps (packets per second) or kpps (kilopackets per<br />
Vigor2130 Series User’s <strong>Guide</strong> 129
4.4.2 Ports Configuration<br />
second). The configuration indicates the permitted packet rate<br />
for unicast, multicast, or broadcast traffic across the switch.<br />
This page is used to configure the ACL (Access Control List) parameters for each port. These<br />
parameters will affect data packets received on a port unless the data packets match a specific<br />
ACE (Access Control Entry).<br />
Port<br />
Action<br />
There is one WAN port and 4 LAN ports in Vigor2130. Here<br />
each port will be configured with different ID, action, rate<br />
limiter ID, port copy and etc.<br />
Select whether forwarding is permitted ("Allow") or denied<br />
("Deny"). The default value is "Allow".<br />
Rate Limiter ID<br />
Select a rate limiter to apply to this port. Available settings<br />
include Disabled, and 1 to 10. The default value is Disabled.<br />
Counter<br />
Refresh<br />
Counts the number of frames that match this Access Control<br />
Entry (ACE).<br />
Click this button to refresh the number of the counter<br />
immediately.<br />
130<br />
Vigor2130 Series User’s <strong>Guide</strong>
Clear<br />
Click this button to clear the number of the counter on this<br />
page.<br />
Rate Limiter ID<br />
Configure the rate limiter for the ACL (Access Control List) of the router. Please click Rate<br />
Limiter ID link to access into the following page.<br />
Rate Limiter ID<br />
Rate<br />
Rate limiter ID will be applied to WAN port and LAN port.<br />
Please specify a rate number for each ID. The default setting is<br />
“1”(packet per second).<br />
Define the rate by choosing from the following drop down list.<br />
Vigor2130 Series User’s <strong>Guide</strong> 131
4.4.3 Access Control List<br />
This page can define which kind of packet can access the router. The packet can be defined<br />
with input port, Frame type, Rate, MAC type, VLAN ID, tag and etc.. For IPv4, we can also<br />
define the protocol type, source IP and destination IP.<br />
Adding a New Access Control Profile<br />
Click<br />
to add a new specific session limitation onto the list.<br />
Define which port the packet from.<br />
ACE Configuration Ingress Port – define which port the packet coming from. The<br />
policy IDs are defined in Firewall>>Port Configuration. Each<br />
Policy ID might have more than one port grouped.<br />
Frame Type - Such option differs according to the selection<br />
132<br />
Vigor2130 Series User’s <strong>Guide</strong>
you choose, we will explain it in detailed later.<br />
Action – it means the session limitation for this access control<br />
list will be applied to if matching with the rule defined in this<br />
page.<br />
Rate Limiter - Select a rate limiter to apply to this port.<br />
Available settings include Disabled, and 1 to 10. The default<br />
value is Disabled. Click the Rate Limiter link to configure<br />
different rates for each ID.<br />
Detailed Explanation for Frame Type<br />
Frame Type selection will lead different options for configuration.<br />
• Choose Ethernet Type as the Frame Type, you will get Ethernet Type Parameters<br />
option as the following:<br />
Ethernet Type Filter<br />
Choose Any to set the parameter with any value set by the<br />
router automatically or choose Specific to specify certain<br />
value (the range is 0x0000 to 0xFFFF).<br />
Vigor2130 Series User’s <strong>Guide</strong> 133
• Choose ARP as the Frame Type, you will get ARP Parameters option as the following:<br />
ARP/RARP<br />
Choose the ARP/RARP that you want to filter.<br />
Request/Reply<br />
Choose the request or replay that you want to filter.<br />
Sender IP Filter<br />
Specify the sender IP filter for this ACE.<br />
Sender IP Address<br />
Sender IP Mask<br />
Choose Any to filter all of the packets.<br />
Choose Host to filter the packets from the host with the<br />
address typed in Sender IP Address filed.<br />
Choose Network to filter the packets within the network<br />
defined in Sender IP Address and Sender IP Mask<br />
fields.<br />
Type the Sender IP Address here. This option is available<br />
when you choose Host or Network as Sender IP Filter.<br />
Type the Sender IP Mask here. This option is available<br />
only when you choose Network as Sender IP Filter.<br />
134<br />
Vigor2130 Series User’s <strong>Guide</strong>
Target IP Filter<br />
Specify the target IP filter for this specific ACE.<br />
Target IP Address<br />
Target IP Mask<br />
ARP SMAC Match<br />
Choose Any to filter all of the packets.<br />
Choose Host to filter the packets from the host with the<br />
address typed in Target IP Address filed.<br />
Choose Network to filter the packets within the network<br />
defined in Target IP Address and Target IP Mask fields.<br />
Type the Target IP Address here. This option is available<br />
when you choose Host or Network as Target IP Filter.<br />
Type the Target IP Mask here. This option is available<br />
only when you choose Network as Target IP Filter.<br />
Specify whether frames/packets can meet the action<br />
according to the sender hardware address field (SHA)<br />
settings.<br />
RARP DMAC Match<br />
0: means sender hardware address is not equal to the<br />
SMAC address.<br />
1: means sender hardware address is equal to the SMAC<br />
address.<br />
Any: means any value is allowed.<br />
Specify whether frames can hit the action according to<br />
their target hardware address field (THA) settings.<br />
IP/Ethernet Length<br />
0: means target hardware address is not equal to the<br />
SMAC address.<br />
1: means s target hardware address is equal to the SMAC<br />
address.<br />
Any: means any value is allowed.<br />
Specify whether frames/packets can meet the action<br />
according to the ARP/RARP hardware address length<br />
(HLN) and protocol address length (PLN) settings.<br />
0: means ARP/RARP frames/packets where the hardware<br />
address length is equal to Ethernet (0x06) and the protocol<br />
address length is equal to IPv4 (0x04) must not match this<br />
entry.<br />
Vigor2130 Series User’s <strong>Guide</strong> 135
IP<br />
1: means ARP/RARP frames/packets where the hardware<br />
address length is equal to Ethernet (0x06) and the protocol<br />
address length is equal to IPv4 (0x04) must match this<br />
entry.<br />
Any: Any value is allowed<br />
Specify whether frames/packets can meet the action<br />
according to their ARP/RARP hardware address space<br />
(HRD) settings.<br />
Ethernet<br />
0: ARP/RARP frames where the hardware address space is<br />
equal to Ethernet (1) must not match this entry.<br />
1: ARP/RARP frames where the hardware address space is<br />
equal to Ethernet (1) must match this entry.<br />
Any: Any value is allowed.<br />
Specify whether frames can hit the action according to<br />
their ARP/RARP protocol address space (PRO) settings.<br />
0: ARP/RARP frames where the protocol address space is<br />
equal to IP (0x800) must not match this entry.<br />
1: ARP/RARP frames where the protocol address space is<br />
equal to IP (0x800) must match this entry.<br />
Any: Any value is allowed.<br />
• Choose IPv4 as the Frame Type. You will see IP Parameters on the bottom of the page.<br />
If you choose ICMP as IP Protocol Filter, you will get the page as the following:<br />
Source IP<br />
Specify the Source IP filter for this ACE.<br />
Any: No source IP filter is specified.<br />
Host: Source IP filter is set to Host. Specify the source IP<br />
address in the Source IP Address field that appears.<br />
Network: Source IP filter is set to Network. Specify the<br />
136<br />
Vigor2130 Series User’s <strong>Guide</strong>
Source IP Address<br />
Source IP Mask<br />
Dest IP Filter<br />
source IP address and source IP mask in the Source IP<br />
Address and Source IP Mask fields that appear.<br />
Type the Source IP Address here. This option is available<br />
when you choose Host or Network as Source IP.<br />
Type the Source IP Mask here. This option is available<br />
only when you choose Network as source Source IP.<br />
Specify the destination IP filter for this ACE.<br />
Dest IP Address<br />
Dest IP Mask<br />
ICMP Type Filter<br />
Any: No destination IP filter is specified.<br />
Host: Destination IP filter is set to Host. Specify the<br />
destination IP address in the Dest IP Address field that<br />
appears.<br />
Network: Destination IP filter is set to Network. Specify<br />
the destination IP address and destination IP mask in the<br />
DIP Address and Dest IP Mask fields that appear.<br />
Type the Dest IP Address here. This option is available<br />
when you choose Host or Network as destination Dest IP.<br />
Type the Dest IP Mask here. This option is available only<br />
when you choose Network as destination Dest IP.<br />
Specify the ICMP filter for this ACE.<br />
ICMP Type Value<br />
ICMP Code Filter<br />
Any: No ICMP filter is specified.<br />
Specific: If you want to filter a specific ICMP filter with<br />
this ACE, you can enter a specific ICMP value. A field for<br />
entering an ICMP value appears.<br />
If you choose Specific as ICMP Type Filter, you have to<br />
type the ICMP Type Value manually. The allowed range is<br />
0 to 255. A frame meeting this ACE matches this ICMP<br />
value.<br />
Specify the ICMP code filter for this ACE.<br />
ICMP Code Value<br />
Any: No ICMP code filter is specified (ICMP code filter<br />
status is "don't-care").<br />
Specific: If you want to filter a specific ICMP code filter<br />
with this ACE, you can enter a specific ICMP code value.<br />
A field for entering an ICMP code value appears.<br />
If you choose Specific as ICMP Code Filter, you have to<br />
type the ICMP Type Value manually. The allowed range is<br />
0 to 255. A frame meeting this ACE matches this ICMP<br />
value.<br />
Vigor2130 Series User’s <strong>Guide</strong> 137
• Choose IPv4 as the Frame Type. You will see IP Parameters on the bottom of the page.<br />
If you choose UDP as IP Protocol Filter, you will get the page as the following:<br />
Source IP<br />
Specify the source IP filter for this ACE.<br />
Source IP Address<br />
Source IP Mask<br />
Dest IP<br />
Any: No source IP filter is specified.<br />
Host: Source IP filter is set to Host. Specify the source IP<br />
address in the Source IP Address field that appears.<br />
Network: Source IP filter is set to Network. Specify the<br />
source IP address and source IP mask in the Source IP<br />
Address and Source IP Mask fields that appear.<br />
Type the Source IP Address here. This option is available<br />
when you choose Host or Network as source Source IP.<br />
Type the Source IP Mask here. This option is available<br />
only when you choose Network as source Source IP.<br />
Specify the destination IP filter for this ACE.<br />
Dest IP Address<br />
Dest IP Mask<br />
Any: No destination IP filter is specified.<br />
Host: Destination IP filter is set to Host. Specify the<br />
destination IP address in the destination IP Address field<br />
that appears.<br />
Network: Destination IP filter is set to Network. Specify<br />
the destination IP address and destination IP mask in the<br />
destination IP Address and destination IP Mask fields that<br />
appear.<br />
Type the destination IP Address here. This option is<br />
available when you choose Host or Network as<br />
destination IP.<br />
Type the DIP Mask here. This option is available only<br />
when you choose Network as destination DIP.<br />
138<br />
Vigor2130 Series User’s <strong>Guide</strong>
Source Port Filter<br />
Specify the UDP port source filter for this ACE.<br />
Source Port No.<br />
Source Port Range<br />
Dest. Port Filter<br />
Any: No UDP source filter is specified.<br />
Specific: If you want to filter a specific UDP source filter<br />
with this ACE, you can enter a specific UDP source value.<br />
A field for entering a UDP source value appears.<br />
Range: If you want to filter a specific UDP source range<br />
filter with this ACE, you can enter a specific UDP source<br />
range value. A field for entering a UDP source port range<br />
appears.<br />
Type the value if you choose Specific as the Source Port<br />
Filter. The allowed range is 0 to 65535. A frame meeting<br />
this ACE matches this UDP source value.<br />
Type the value if you choose Range as the Source Port<br />
Filter. The allowed range is 0 to 65535. A frame meeting<br />
this ACE matches this UDP source value.<br />
Specify the UDP port destination filter for this ACE.<br />
Dest. Port No.<br />
Dest. Port Range<br />
Any: No UDP destination filter is specified.<br />
Specific: If you want to filter a specific UDP destination<br />
filter with this ACE, you can enter a specific UDP<br />
destination value. A field for entering a UDP destination<br />
value appears.<br />
Range: If you want to filter a specific UDP destination<br />
range filter with this ACE, you can enter a specific UDP<br />
destination range value. A field for entering a UDP<br />
destination port range appears.<br />
Type the value if you choose Specific as the Dest. Port<br />
Filter. The allowed range is 0 to 65535. A frame meeting<br />
this ACE matches this UDP source value.<br />
Type the value if you choose Range as the Dest. Port Filter.<br />
The allowed range is 0 to 65535. A frame meeting this<br />
ACE matches this UDP source value.<br />
Vigor2130 Series User’s <strong>Guide</strong> 139
• Choose IPv4 as the Frame Type. You will see IP Parameters on the bottom of the page.<br />
If you choose TCP as IP Protocol Filter, you will get the page as the following:<br />
Source IP<br />
Specify the source IP filter for this ACE.<br />
Source IP Address<br />
Source IP Mask<br />
Dest IP Filter<br />
Any: No source IP filter is specified.<br />
Host: Source IP filter is set to Host. Specify the source IP<br />
address in the source IP Address field that appears.<br />
Network: Source IP filter is set to Network. Specify the<br />
source IP address and source IP mask in the source IP<br />
Address and source IP Mask fields that appear.<br />
Type the source IP Address here. This option is available<br />
when you choose Host or Network as source source IP<br />
filter.<br />
Type the SIP Mask here. This option is available only<br />
when you choose Network as source IP filter.<br />
Specify the destination IP filter for this ACE.<br />
Dest IP Address<br />
Dest IP Mask<br />
Any: No destination IP filter is specified.<br />
Host: Destination IP filter is set to Host. Specify the<br />
destination IP address in the destination IP Address field<br />
that appears.<br />
Network: Destination IP filter is set to Network. Specify<br />
the destination IP address and destination IP mask in the<br />
destination IP Address and destination IP Mask fields that<br />
appear.<br />
Type the destination IP Address here. This option is<br />
available when you choose Host or Network as<br />
destination IP filter.<br />
Type the destination IP Mask here. This option is available<br />
only when you choose Network as destination IP filter.<br />
140<br />
Vigor2130 Series User’s <strong>Guide</strong>
Source Port Filter<br />
Specify the TCP port source filter for this ACE.<br />
Source Port No.<br />
Source Port Range<br />
Dest. Port Filter<br />
Any: No TCP source filter is specified.<br />
Specific: If you want to filter a specific TCP source filter<br />
with this ACE, you can enter a specific TCP source value.<br />
A field for entering a TCP source value appears.<br />
Range: If you want to filter a specific TCP source range<br />
filter with this ACE, you can enter a specific TCP source<br />
range value. A field for entering a TCP source port range<br />
appears.<br />
Type the value if you choose Specific as the Source Port<br />
Filter. The allowed range is 0 to 65535. A frame meeting<br />
this ACE matches this TCP source value.<br />
Type the value if you choose Range as the Source Port<br />
Filter. The allowed range is 0 to 65535. A frame meeting<br />
this ACE matches this TCP source value.<br />
Specify the TCP port destination filter for this ACE.<br />
Dest. Port No.<br />
Dest. Port Range<br />
TCP FIN<br />
Any: No TCP destination filter is specified.<br />
Specific: If you want to filter a specific TCP destination<br />
filter with this ACE, you can enter a specific TCP<br />
destination value. A field for entering a TCP destination<br />
value appears.<br />
Range: If you want to filter a specific TCP destination<br />
range filter with this ACE, you can enter a specific TCP<br />
destination range value. A field for entering a TCP<br />
destination port range appears.<br />
Type the value if you choose Specific as the Dest. Port<br />
filter. The allowed range is 0 to 65535. A frame meeting<br />
this ACE matches this TCP source value.<br />
Type the value if you choose Range as the Dest. Port filter.<br />
The allowed range is 0 to 65535. A frame meeting this<br />
ACE matches this TCP source value.<br />
Specify the TCP "No more data from sender" (FIN) value<br />
for this ACE.<br />
0: TCP frames where the FIN field is set must not be able<br />
to match this entry.<br />
1: TCP frames where the FIN field is set must be able to<br />
match this entry.<br />
Any: Any value is allowed.<br />
Vigor2130 Series User’s <strong>Guide</strong> 141
TCP SYN<br />
Specify the TCP "Synchronize sequence numbers" (SYN)<br />
value for this ACE.<br />
TCP RST<br />
0: TCP frames where the SYN field is set must not be able<br />
to match this entry.<br />
1: TCP frames where the SYN field is set must be able to<br />
match this entry.<br />
Any: Any value is allowed.<br />
Specify the TCP RST value for this ACE.<br />
TCP PSH<br />
0: TCP frames where the RST field is set must not be able<br />
to match this entry.<br />
1: TCP frames where the RST field is set must be able to<br />
match this entry.<br />
Any: Any value is allowed.<br />
Specify the TCP "Push Function" (PSH) value for this<br />
ACE.<br />
TCP ACK<br />
0: TCP frames where the PSH field is set must not be able<br />
to match this entry.<br />
1: TCP frames where the PSH field is set must be able to<br />
match this entry.<br />
Any: Any value is allowed.<br />
Specify the TCP "Acknowledgment field significant"<br />
(ACK) value for this ACE.<br />
TCP URG<br />
0: TCP frames where the ACK field is set must not be able<br />
to match this entry.<br />
1: TCP frames where the ACK field is set must be able to<br />
match this entry.<br />
Any: Any value is allowed<br />
Specify the TCP "Urgent Pointer field significant" (URG)<br />
value for this ACE.<br />
0: TCP frames where the URG field is set must not be able<br />
to match this entry.<br />
142<br />
Vigor2130 Series User’s <strong>Guide</strong>
1: TCP frames where the URG field is set must be able to<br />
match this entry.<br />
Any: Any value is allowed.<br />
• Choose IPv4 as the Frame Type. You will see IP Parameters on the bottom of the page.<br />
If you choose Other as IP Protocol Filter, you will get the page as the following:<br />
IP Protocol Value<br />
Source IP<br />
When "Other" is selected for the IP protocol filter, you can<br />
enter a specific value here. The range is 0 to 255. The<br />
default value is “255”.A frame meeting this ACE matches<br />
this IP protocol value.<br />
Specify the source IP filter for this ACE.<br />
Source IP Address<br />
Source IP Mask<br />
Dest IP<br />
Any: No source IP filter is specified.<br />
Host: Source IP filter is set to Host. Specify the source IP<br />
address in the source IP Address field that appears.<br />
Network: Source IP filter is set to Network. Specify the<br />
source IP address and source IP mask in the source IP<br />
Address and source IP Mask fields that appear.<br />
Type the source IP Address here. This option is available<br />
when you choose Host or Network as source IP Filter.<br />
Type the source IP Mask here. This option is available<br />
only when you choose Network as source IP.<br />
Specify the destination IP filter for this ACE.<br />
Any: No destination IP filter is specified.<br />
Host: Destination IP filter is set to Host. Specify the<br />
destination IP address in the destination IP Address field<br />
that appears.<br />
Network: Destination IP is set to Network. Specify the<br />
destination IP address and destination IP mask in the<br />
Vigor2130 Series User’s <strong>Guide</strong> 143
Dest IP Address<br />
Dest IP Mask<br />
destination IP address and destination IP mask fields that<br />
appear.<br />
Type the Dest IP Address here. This option is available<br />
when you choose Host or Network as destination IP filter.<br />
Type the Dest IP Mask here. This option is available only<br />
when you choose Network as destination IP filter.<br />
4.5 Bandwidth Management<br />
Below shows the menu items for Bandwidth Management.<br />
4.5.1 Session Limit<br />
A PC with private IP address can access to the Internet via NAT router. The router will<br />
generate the records of NAT sessions for such connection. The P2P (Peer to Peer) applications<br />
(e.g., BitTorrent) always need many sessions for procession and also they will occupy over<br />
resources which might result in important accesses impacted. To solve the problem, you can<br />
use limit session to limit the session procession for specified Hosts.<br />
In the Bandwidth Management menu, click Sessions Limit to open the web page.<br />
To activate the function of limit session, simply click Enable and set the default session limit.<br />
Enable<br />
Click this button to activate the function of limit session.<br />
Disable<br />
Click this button to close the function of limit session.<br />
144<br />
Vigor2130 Series User’s <strong>Guide</strong>
Default Max Sessions<br />
Limitation List<br />
Start IP<br />
End IP<br />
Maximum Sessions<br />
Add<br />
Edit<br />
Delete<br />
Defines the default session number used for each computer in<br />
LAN.<br />
Displays a list of specific limitations that you set on this web<br />
page.<br />
Defines the start LAN IP address for limit session.<br />
Defines the end LAN IP address for limit session.<br />
Defines the available session number for each host in the<br />
specific range of IP addresses. If you do not set the session<br />
number in this field, the system will use the default session limit<br />
for the specific limitation you set for each index.<br />
Adds the specific session limitation onto the list above.<br />
Allows you to edit the settings for the selected limitation.<br />
Remove the selected settings existing on the limitation list.<br />
When you finish adding a new session limit, simply click OK. The following page will appear<br />
for you to check.<br />
4.5.2 Bandwidth Limit<br />
The downstream or upstream from FTP, HTTP or some P2P applications will occupy large of<br />
bandwidth and affect the applications for other programs. Please use Limit Bandwidth to make<br />
the bandwidth usage more efficient.<br />
In the Bandwidth Management menu, click Bandwidth Limit to open the web page.<br />
To activate the function of limit bandwidth, simply click Enable and set the default upstream<br />
and downstream limit.<br />
Vigor2130 Series User’s <strong>Guide</strong> 145
Enable<br />
Disable<br />
Default TX limit<br />
Default RX limit<br />
Limitation List<br />
Start IP<br />
End IP<br />
TX Limit<br />
RX Limit<br />
Add<br />
Edit<br />
Delete<br />
Click this button to activate the function of limit bandwidth.<br />
Click this button to close the function of limit bandwidth.<br />
Define the default speed of the upstream for each computer in<br />
LAN.<br />
Define the default speed of the downstream for each computer<br />
in LAN.<br />
Display a list of specific limitations that you set on this web<br />
page.<br />
Bandwidth limit can be applied on certain IP range. That’s, only<br />
the PCs within the range will be influenced by the bandwidth<br />
limitation set here. Please define the start IP address for the<br />
specific limitation.<br />
Define the end IP address for the specific limitation.<br />
Define the limitation for the speed of the upstream to be applied<br />
as specific limitation. If you do not set the limit in this field, the<br />
system will use the default speed for the specific limitation you<br />
set for each index.<br />
Define the limitation for the speed of the downstream to be<br />
applied as specific limitation. If you do not set the limit in this<br />
field, the system will use the default speed for the specific<br />
limitation you set for each index.<br />
Add the specific speed limitation onto the list above.<br />
Allows you to edit the settings for the selected limitation.<br />
Remove the selected settings existing on the limitation list.<br />
When you finish adding a new bandwidth limit, simply click OK. The following page will<br />
appear for you to check.<br />
4.5.3 Port Rate Control<br />
A policer can limit the bandwidth of received frames. It is located in front of the ingress queue.<br />
And a shaper can limit the bandwidth of transmitted frames. It is located after the ingress<br />
queues. This page allows you to configure the switch port rate limit for Policers and Shapers.<br />
Port<br />
Policer Enabled<br />
Represent LAN or WAN interface.<br />
Check this box to enable policer function.<br />
Policer Rate(Rx) Type the number for policer function. The default value is 500.<br />
It is restricted to 500-1000000 when the Policer Unit is set in<br />
146<br />
Vigor2130 Series User’s <strong>Guide</strong>
Policer Unit<br />
Shaper Enabled<br />
kbps, and it is restricted to 1-1000 when the Policer Unit is set<br />
in Mbps.<br />
Determine the unit (kbps/Mbps) for policer.<br />
Check this box to enable shaper function.<br />
Shaper Rate (Tx) Type the number for shaper function. The default value is 500.<br />
It is restricted to 500-1000000 when the Shaper Unit is set in<br />
kbps, and it is restricted to 1-1000 when the Shaper Unit is set<br />
in Mbps.<br />
Shaper Unit<br />
4.5.4 QoS Control List<br />
Determine the unit (kbps/Mbps) for shaper function.<br />
Deploying QoS (Quality of Service) management to guarantee that all applications receive the<br />
service levels required and sufficient bandwidth to meet performance expectations is indeed<br />
one important aspect of modern enterprise network.<br />
One reason for QoS is that numerous TCP-based applications tend to continually increase their<br />
transmission rate and consume all available bandwidth, which is called TCP slow start. If<br />
other applications are not protected by QoS, it will detract much from their performance in the<br />
overcrowded network. This is especially essential to those are low tolerant of loss, delay or<br />
jitter (delay variation).<br />
Another reason is due to congestions at network intersections where speeds of interconnected<br />
circuits mismatch or traffic aggregates, packets will queue up and traffic can be throttled back<br />
to a lower speed. If there’s no defined priority to specify which packets should be discarded<br />
(or in another term “dropped”) from an overflowing queue, packets of sensitive applications<br />
mentioned above might be the ones to drop off. How this will affect application performance?<br />
There are two components within Primary configuration of QoS deployment:<br />
• Classification: Identifying low-latency or crucial applications and marking them for<br />
high-priority service level enforcement throughout the network.<br />
• Scheduling: Based on classification of service level to assign packets to queues and<br />
associated service types<br />
The basic QoS implementation in Vigor routers is to classify and schedule packets based on<br />
the service type information in the IP header. For instance, to ensure the connection with the<br />
headquarter, a teleworker may enforce an index of QoS Control to reserve bandwidth for<br />
HTTPS connection while using lots of application at the same time.<br />
One more larger-scale implementation of QoS network is to apply DSCP (Differentiated<br />
Service Code Point) and IP Precedence disciplines at Layer 3. Compared with legacy IP<br />
Precedence that uses Type of Service (ToS) field in the IP header to define 8 service classes,<br />
DSCP is a successor creating 64 classes possible with backward IP Precedence compatibility.<br />
In a QoS-enabled network, or Differentiated Service (DiffServ or DS) framework, a DS<br />
domain owner should sign a Service License Agreement (SLA) with other DS domain owners<br />
to define the service level provided toward traffic from different domains. Then each DS node<br />
in these domains will perform the priority treatment. This is called per-hop-behavior (PHB).<br />
The definition of PHB includes Expedited Forwarding (EF), Assured Forwarding (AF), and<br />
Best Effort (BE). AF defines the four classes of delivery (or forwarding) classes and three<br />
levels of drop precedence in each class.<br />
Vigor routers as edge routers of DS domain shall check the marked DSCP value in the IP<br />
header of bypassing traffic, thus to allocate certain amount of resource execute appropriate<br />
policing, classification or scheduling. The core routers in the backbone will do the same<br />
Vigor2130 Series User’s <strong>Guide</strong> 147
checking before executing treatments in order to ensure service-level consistency throughout<br />
the whole QoS-enabled network.<br />
However, each node may take different attitude toward packets with high priority marking<br />
since it may bind with the business deal of SLA among different DS domain owners. It’s not<br />
easy to achieve deterministic and consistent high-priority QoS traffic throughout the whole<br />
network with merely Vigor router’s effort.<br />
In the Bandwidth Management menu, click QoS Control List to open the web page.<br />
QCE Type<br />
Display the type of that QCE (QoS Control Entries).<br />
Type Value<br />
Display the value specified for the QCE.<br />
Traffic Class<br />
Display the class of the data transmission for the QCE.<br />
QoS Control List allows users to set up to five groups of QCL. Each QCL group can contain<br />
12 QCE settings.<br />
148<br />
Vigor2130 Series User’s <strong>Guide</strong>
Adding a New QCE<br />
Click<br />
settings.<br />
to add a new QCE onto this page. Different QCE type will bring out different web<br />
• If you choose Ethernet Type as QCE Type, you have to type value for it and specify<br />
traffic class from Low, Normal, Medium and High.<br />
Ethernet Type Value Either 8~63 ASCII characters, such as 012345678(or 64<br />
Hexadecimal digits leading by 0x, such as "0x321253abcde...").<br />
• If you choose VLAN ID as QCE Type, you have to type the ID number for it and specify<br />
traffic class from Low, Normal, Medium and High.<br />
• If you choose TCP/UDP Port as QCE Type, you have to type the port number for it and<br />
specify traffic class from Low, Normal, Medium and High.<br />
Vigor2130 Series User’s <strong>Guide</strong> 149
TCP/UDP Port<br />
TCP/UDP Port Range<br />
Click Single or Range. If you select Range, you have to type<br />
in the starting port number and the end porting number on<br />
the boxes below.<br />
Type in the starting port number and the end porting number<br />
here if you choose Range as the type.<br />
• If you choose DSCP as QCE Type, you have to type value for it and specify traffic class<br />
from Low, Normal, Medium and High.<br />
• If you choose ToS as QCE Type, you have to specify priority class from Low, Normal,<br />
Medium and High.<br />
150<br />
Vigor2130 Series User’s <strong>Guide</strong>
• If you choose Tag Priority as QCE Type, you have to specify priority class from Low,<br />
Normal, Medium and High.<br />
Editing a QCE<br />
Click<br />
to modify the settings of an existing QCE on this page.<br />
Moving Up/Down a QCE<br />
Click and to move a QCE up and down.<br />
Deleting a QCE<br />
To delete a QCE in the list, simply click<br />
of that one. It will be removed immediately.<br />
4.5.5 Ports Priority<br />
This page allows you to configure QoS settings for each port. The classification is controlled<br />
by a QCL (Quality Control List) that is assigned to each port. A QCL consists of an ordered<br />
list of up to 12 QCEs (Quality Control Entry). Each QCE can be used to classify certain<br />
frames to a specific QoS class. This classification can be based on parameters such as VLAN<br />
ID, UDP/TCP port, IPv4/IPv6 DSCP or Tag Priority. Frames not matching any of the QCEs<br />
are classified to the default QoS class for the port.<br />
Port<br />
Indicate the interface for the physical port, WAN port, LAN<br />
port and Wireless Port.<br />
Vigor2130 Series User’s <strong>Guide</strong> 151
Default Class<br />
Use the drop down list to choose the priority for each port.<br />
QCL<br />
Use the drop down list to choose the QCL number defined in<br />
QoS Control List for the port.<br />
Queuing Mode<br />
Use the drop down list to choose suitable mode.<br />
Queue Weighted<br />
Use the drop down list to choose 1, 2, 4, or 8 as the queue<br />
weighted number.<br />
4.5.6 QoS Statistics<br />
This page displays statistics for QoS setting. Click WAN/LAN link to check detailed<br />
information for each interface.<br />
Click WAN/LAN link to check detailed information for each interface.<br />
152<br />
Vigor2130 Series User’s <strong>Guide</strong>
Rx Packets<br />
Rx Octets<br />
Rx Unicast<br />
Rx Broadcast<br />
Rx Pause<br />
RX 64 Bytes<br />
RX 65-127 Bytes<br />
RX 128-255 Bytes<br />
RX 256-511 Bytes<br />
RX 512-1023 Bytes<br />
RX 1024- 1526 Bytes<br />
RX 1527 Bytes<br />
Display the counting number of the packet received.<br />
Display the total received bytes.<br />
Display the counting number of the received unicast packet.<br />
Display the counting number of the received broadcast packet.<br />
Display the counting number of the received pause packet.<br />
Display the number of 64-byte frames in good and bad packets<br />
received.<br />
Display the number of 65 ~ 127-byte frames in good and bad<br />
packets received.<br />
Display the number of 128 ~ 255-byte frames in good and bad<br />
packets received.<br />
Display the number of 256 ~ 511-byte frames in good and bad<br />
packets received.<br />
Display the number of 512 ~ 1023-byte frames in good and bad<br />
packets received.<br />
Display the number of 1024-1522-byte frames in good and bad<br />
packets received.<br />
Display the number of 1527-byte frames in good and bad<br />
packets received.<br />
Vigor2130 Series User’s <strong>Guide</strong> 153
Rx Low<br />
Rx Normal<br />
Rx Medium<br />
Rx High<br />
Rx Drops<br />
Rx CRC/Alignment<br />
Rx Undersize<br />
Rx Oversize<br />
Rx Fragments<br />
Rx Jabber<br />
Rx Filtered<br />
Tx Packets<br />
Tx Octets<br />
Tx Unicast<br />
Tx Multicast<br />
Tx Broadcast<br />
Tx Pause<br />
Tx 64 Bytes<br />
Tx 65-127 Bytes<br />
Tx 128-255 Bytes<br />
Tx 256-511 Bytes<br />
Tx 512-1023 Bytes<br />
Tx 1024- 1526 Bytes<br />
Tx 1527 Bytes:<br />
Tx Low<br />
Tx Normal<br />
Tx Medium<br />
Display the low queue counter of the packet received.<br />
Display the normal queue counter of the packet received.<br />
Display the medium queue counter of the packet received.<br />
Display the high queue counter of the packet received.<br />
Display the number of frames dropped due to the lack of<br />
receiving buffer.<br />
Display the number of Alignment errors packets received.<br />
Display the number of short frames (
Tx High<br />
Tx Drops<br />
Tx lat/Exc.Coll.<br />
Display the high queue counter of the packet received.<br />
Display the number of frames dropped due to excessive<br />
collision, late collision, or frame aging.<br />
Display the number of Frames late collision or excessive<br />
collision Error, which switch transmitted.<br />
4.6 Applications<br />
Below shows the menu items for Applications.<br />
4.6.1 Dynamic DNS<br />
The ISP often provides you with a dynamic IP address when you connect to the Internet via<br />
your ISP. It means that the public IP address assigned to your router changes each time you<br />
access the Internet. The Dynamic DNS feature lets you assign a domain name to a dynamic<br />
WAN IP address. It allows the router to update its online WAN IP address mappings on the<br />
specified Dynamic DNS server. Once the router is online, you will be able to use the<br />
registered domain name to access the router or internal virtual servers from the Internet. It is<br />
particularly helpful if you host a web server, FTP server, or other server behind the router.<br />
Before you use the Dynamic DNS feature, you have to apply for free DDNS service to the<br />
DDNS service providers. The router provides up to three accounts from three different DDNS<br />
service providers. Basically, Vigor routers are compatible with the DDNS services supplied by<br />
most popular DDNS service providers such as www.dyndns.org, www.no-ip.com,<br />
www.dtdns.com, www.changeip.com, www.dynamic- nameserver.com. You should visit<br />
their websites to register your own domain name for the router.<br />
Enable Dynamic DNS<br />
DynDNS Service<br />
Hostname<br />
Username<br />
Check this box to enable the current account.<br />
Select the service provider for the DDNS account.<br />
Type in one domain name that you applied previously. Use the<br />
drop down list to choose the desired domain.<br />
Type in the login name that you set for applying domain.<br />
Vigor2130 Series User’s <strong>Guide</strong> 155
Password<br />
Check IP change every<br />
Force IP update every<br />
Type in the password that you set for applying domain.<br />
Set the interval for checking the information.<br />
Force the router updates its information to DDNS server with<br />
the interval set here.<br />
Click OK button to activate the settings. You will see your setting has been saved.<br />
4.6.2 Schedule<br />
The Vigor router has a built-in real time clock which can update itself manually or<br />
automatically by means of Network Time Protocols (NTP). As a result, you can not only<br />
schedule the router to dialup to the Internet at a specified time, but also restrict Internet access<br />
to certain hours so that users can connect to the Internet only during certain hours, say,<br />
business hours. The schedule is also applicable to other functions.<br />
You have to set your time before set schedule. In System Maintenance>> Time and Date<br />
menu, press Inquire Time button to set the Vigor router’s clock to current time of your PC.<br />
The clock will reset once if you power down or reset the router. There is another way to set up<br />
time. You can inquiry an NTP server (a time server) on the Internet to synchronize the router’s<br />
clock. This method can only be applied when the WAN connection has been built up.<br />
You can set up to 15 schedules. To add a schedule profile, please click Add.<br />
Enable<br />
Start Date<br />
Start Time<br />
Action<br />
Check to enable the schedule.<br />
Specify the starting date of the schedule.<br />
Specify the starting time of the schedule.<br />
Specify which action should be applied during the period of the<br />
schedule.<br />
156<br />
Vigor2130 Series User’s <strong>Guide</strong>
Acts<br />
4.6.3 IGMP Snooping<br />
WAN UP/DOWN – WAN connection will be activated /<br />
inactivated based on the time schedule configured here.<br />
WiFi UP/DOWN – Wireless Wi-Fi connection will be<br />
activated / inactivated based on the time schedule configured<br />
here.<br />
VPN UP/DOWN - VPN connection will be activated /<br />
inactivated based on the time schedule configured here.<br />
Specify how often the schedule will be applied<br />
Once -The schedule will be applied just once<br />
Routine /Weekday -Specify which days in one week should<br />
perform the schedule.<br />
IGMP snooping means multicast traffic will be forwarded to ports that have members of that<br />
group. If you disable IGMP snooping, the system will make multicast traffic treated in the<br />
same manner as broadcast traffic.<br />
Snooping Enabled<br />
Unregistered IPMC…<br />
Fast Leave<br />
Check the box to enable this function.<br />
Check the box to enable unregistered IPMC traffic flooding<br />
Check the box to Fast Leave on the LAN port.<br />
Vigor2130 Series User’s <strong>Guide</strong> 157
4.6.4 IGMP Status<br />
This page display current IGMP status.<br />
V1~3 Reports Receive Display the number of Received V1 – V3 Reports.<br />
V2 Leave Receive<br />
Groups<br />
Port Members<br />
Refresh<br />
Clear<br />
4.6.5 UPnP Configuration<br />
Display the number of Received V2 Leave.<br />
Display current IGMP groups. Maximum number of group<br />
for each VLAN can be set is 128.<br />
Display the LAN ports in this group.<br />
Click this button to refresh the page immediately.<br />
Click this button to clear the settings on this page.<br />
The UPnP (Universal Plug and Play) protocol is supported to bring to network connected<br />
devices the ease of installation and configuration which is already available for directly<br />
connected PC peripherals with the existing Windows 'Plug and Play' system. For NAT routers,<br />
the major feature of UPnP on the router is “NAT Traversal”. This enables applications inside<br />
the firewall to automatically open the ports that they need to pass through a router. It is more<br />
reliable than requiring a router to work out by itself which ports need to be opened. Further,<br />
the user does not have to manually set up port mappings or a DMZ. UPnP is available on<br />
Windows XP and the router provide the associated support for MSN Messenger to allow full<br />
use of the voice, video and messaging features.<br />
Enable UPnP<br />
Enable UPnP function. You have to type the download and<br />
upload speed.<br />
158<br />
Vigor2130 Series User’s <strong>Guide</strong>
Download Speed<br />
Upload Speed<br />
Enter the maximum sustained WAN download speed in<br />
kilobits/second. Such information can be requested by<br />
UPnP clients.<br />
Enter the maximum sustained WAN upload speed in<br />
kilobits/second. Such information can be requested by<br />
UPnP clients.<br />
After setting Enable UPnP setting, an icon of IP Broadband Connection on Router on<br />
Windows XP/Network Connections will appear. The connection status and control status will<br />
be able to be activated. The NAT Traversal of UPnP enables the multimedia features of your<br />
applications to operate. This has to manually set up port mappings or use other similar<br />
methods. The screenshots below show examples of this facility.<br />
The UPnP facility on the router enables UPnP aware applications such as MSN Messenger to<br />
discover what are behind a NAT router. The application will also learn the external IP address<br />
and configure port mappings on the router. Subsequently, such a facility forwards packets from<br />
the external ports of the router to the internal ports used by the application.<br />
The reminder as regards concern about Firewall and UPnP<br />
Can't work with Firewall Software<br />
Vigor2130 Series User’s <strong>Guide</strong> 159
Enabling firewall applications on your PC may cause the UPnP function not working<br />
properly. This is because these applications will block the accessing ability of some network<br />
ports.<br />
Security Considerations<br />
Activating the UPnP function on your network may incur some security threats. You should<br />
consider carefully these risks before activating the UPnP function.<br />
‣ Some Microsoft operating systems have found out the UPnP weaknesses and hence<br />
you need to ensure that you have applied the latest service packs and patches.<br />
‣ Non-privileged users can control some router functions, including removing and<br />
adding port mappings.<br />
The UPnP function dynamically adds port mappings on behalf of some UPnP-aware<br />
applications. When the applications terminate abnormally, these mappings may not be<br />
removed.<br />
4.7 VPN and Remote Access<br />
A Virtual Private Network (VPN) is the extension of a private network that encompasses links<br />
across shared or public networks like the Internet. In short, by VPN technology, you can send<br />
data between two computers across a shared or public network in a manner that emulates the<br />
properties of a point-to-point private link.<br />
Below shows the menu items for VPN and Remote Access.<br />
4.7.1 Remote Access Control<br />
Enable the necessary VPN service as you need. If you intend to run a VPN server inside your<br />
LAN, you should enable IPSec VPN Pass-through and specify an IP address to allow VPN<br />
tunnel pass through.<br />
Enable IPSec VPN Service<br />
If this checkbox is checked, the system firewall will allow<br />
VPN (IPSec) remote access from WAN side to the router.<br />
Enable IPSec VPN Pass-through If this checkbox is checked, the system f firewall will<br />
allow VPN (IPSec) remote access from WAN side to a<br />
VPN device on the LAN. Type the IP address of the VPN<br />
device in the field next to the checkbox.<br />
160<br />
Vigor2130 Series User’s <strong>Guide</strong>
Enable PPTP VPN Service<br />
4.7.2 PPTP Remote Dial-in<br />
If this checkbox is checked, the system firewall will allow<br />
VPN (PPTP) remote access from WAN side to the router.<br />
You can manage remote access by maintaining a table of remote user profile, so that users can<br />
be authenticated to dial-in via VPN connection.<br />
The router provides access accounts for dial-in users.<br />
Adding a New User<br />
Click Add new user to open the following page.<br />
Username<br />
Full Name<br />
Password<br />
Password (again)<br />
Allow Disk Sharing<br />
Allow IPSEC/L2TP<br />
Allow PPTP<br />
Allow FTP<br />
Type a name for this user.<br />
Type full name for this user.<br />
Type the password for this user.<br />
Type the password again for confirmation.<br />
Check this box to have the remote user share the disk<br />
information.<br />
Check this box to let the remote user connecting to this<br />
device through IPSEC/L2TP.<br />
Check this box to let the remote user connecting to this<br />
device through PPTP.<br />
Check this box to let the remote user connecting to FTP<br />
server via this router.<br />
Vigor2130 Series User’s <strong>Guide</strong> 161
Delete User<br />
Remove settings on current page and delete the user. This<br />
button is not available for new configuration by pressing<br />
Add a New User.<br />
When you finish the settings, simply click OK to save the configuration. The new user will be<br />
created and displayed on the page.<br />
Editing/Deleting User Settings<br />
To edit a user, click the name link under Username to open the following page. Modify the<br />
settings except Username and then click OK to save and exit it. If you want to remove such<br />
user settings, simply click Delete User.<br />
162<br />
Vigor2130 Series User’s <strong>Guide</strong>
4.7.3 IPSec Remote Dial-in<br />
This page allows you to configure IPSec Site-to-Client settings.<br />
Mobile VPN Type<br />
This usually applies to those are remote dial-in user or node<br />
(LAN-to-LAN) which uses dynamic IP address and<br />
IPSec-related VPN connections such as L2TP over IPSec and<br />
IPSec tunnel.<br />
Disabled – Ignore the configurations set in this page.<br />
Dynamic VPN (IPSec) – Traffic between this subnet and the<br />
client will travel through the VPN tunnel. If you choose this<br />
type, please specify the IP address and subnet mask for local<br />
network.<br />
L2TP/IPSec –The range must not overlap the DHCP address<br />
range (if enabled), and must allow for at least one IP address.<br />
Example: 10.10.137.240-10.10.137.245. If you choose this type,<br />
please specify the IP address range for L2TP/IPSec mode.<br />
Vigor2130 Series User’s <strong>Guide</strong> 163
Authentication<br />
Type - Determine the authentication method for remote dial-in<br />
user.<br />
Identities<br />
Advanced Settings<br />
Preshared secret – If you choose this one, you have to type the<br />
shared secret manually and specify local identity. When using<br />
Preshared secret, all clients share the same secret.<br />
Local Identity - Specify a local ID to be used for Dial-in<br />
setting in the LAN-to-LAN Profile setup. This item is optional<br />
and can be used only in IKE aggressive mode. It can also be a<br />
DNS name or an email address.<br />
Phase 1 (IKE) - Negotiation of IKE parameters including<br />
encryption, hash, Diffie-Hellman parameter values, and lifetime<br />
to protect the following IKE exchange, authentication of both<br />
peers using either a Pre-Shared Key or Digital Signature (x.509).<br />
The peer that starts the negotiation proposes all its policies to<br />
the remote peer and then remote peer tries to find a<br />
highest-priority match with its policies.<br />
Phase 2 (IPSec) - Negotiation IPSec security methods<br />
including Authentication Header (AH) or Encapsulating<br />
Security Payload (ESP) for the following IKE exchange and<br />
mutual examination of the secure tunnel establishment.<br />
4.7.4 Remote Dial-in Status<br />
You can find the summary table of all dial-in user status.<br />
164<br />
Vigor2130 Series User’s <strong>Guide</strong>
Client<br />
Identity<br />
Endpoint<br />
IKE Status<br />
IKE Alg<br />
ESP Status<br />
ESP Alg<br />
User Name<br />
Interface<br />
Remote IP<br />
Login Time<br />
Rx bytes<br />
Tx bytes<br />
Auto-refresh<br />
Refresh<br />
4.7.5 LAN to LAN<br />
Display the name of the VPN IPSec/Mobile client.<br />
Display the remote ID of the VPN client.<br />
Display the IP address of the VPN client.<br />
Display the status of the phase 1 ISAKMP key exchange.<br />
Display the encryption and authentication algorithm used<br />
during phase 1 of the VPN connection Establishment. The<br />
algorithm is used during exchange of key exchange.<br />
Display the status of the phase 2 IPSec ESP key exchange.<br />
Display the encryption and authentication algorithm used<br />
during phase 2 of the VPN connection Establishment. This<br />
algorithm is used for transporting data, and the choice will<br />
affect the performance of the VPN tunnel.<br />
Display the dial-in user account.<br />
Display the connection name assigned by the router.<br />
Display IP address of remote client.<br />
Display the system time that the user logs in.<br />
Display the data total received for such client.<br />
Display the data total transmitted for such client.<br />
Check this box to make the system refresh this page<br />
automatically.<br />
Click this button to refresh the page immediately.<br />
Here you can manage LAN-to-LAN connections by maintaining a table of connection profiles.<br />
You may set parameters including specified connection direction (dial-in or dial-out),<br />
connection peer ID, connection type (VPN connection - including PPTP, IPSec Tunnel) and<br />
corresponding security methods, etc.<br />
The router supports 2 VPN tunnels simultaneously and provides up to 2 profiles. The<br />
following figure shows the summary table.<br />
Vigor2130 Series User’s <strong>Guide</strong> 165
Name<br />
Endpoint<br />
IKE Status<br />
IKE Alg<br />
ESP Status<br />
ESP Alg<br />
Indicate the name of the LAN-to-LAN profile.<br />
Display the IP address of the VPN client.<br />
Display the status of the phase 1 ISAKMP key exchange.<br />
Display the encryption and authentication algorithm used<br />
during phase 1 of the VPN connection Establishment. The<br />
algorithm is used during exchange of key exchange.<br />
Display the status of the phase 2 IPSec ESP key exchange.<br />
Display the encryption and authentication algorithm used<br />
during phase 2 of the VPN connection Establishment. This<br />
algorithm is used for transporting data, and the choice will<br />
affect the performance of the VPN tunnel.<br />
166<br />
Vigor2130 Series User’s <strong>Guide</strong>
Adding a VPN Tunnel<br />
Click Add Tunnel to open the following page.<br />
Enabled<br />
Name<br />
Remote IP<br />
IKE phase 1 mode<br />
Check here to activate this tunnel.<br />
Specify a name for this tunnel.<br />
Enter the IP address of the remote host that located at the<br />
other-end of the VPN tunnel.<br />
Select from Main mode and Aggressive mode. The ultimate<br />
outcome is to exchange security proposals to create a protected<br />
secure channel. Main mode is more secure than Aggressive<br />
mode since more exchanges are done in a secure channel to set<br />
up the IPSec session. However, the Aggressive mode is faster.<br />
The default value in Vigor router is Main mode.<br />
Type<br />
This group of fields is applicable for IPSec Tunnels. Different<br />
type will bring out different requirement of information.<br />
Vigor2130 Series User’s <strong>Guide</strong> 167
Pre-Shared Key<br />
Confirm Pre-Shared key<br />
Local Identity<br />
Remote Identity<br />
Local Network / Mask<br />
Remote Network / Mask<br />
IKE Phase 1 proposal<br />
Such field will be applicable when Pre-shared key is selected as<br />
the Type for the authentication. Input 1-63 characters as<br />
pre-shared key.<br />
Such field will be applicable when Pre-shared key is selected as<br />
the Type for the authentication. Input 1-63 characters as<br />
pre-shared key again to confirm it.<br />
Local Identity is on behalf of the IP address while identity<br />
authenticating with remote VPN server. The length of the ID is<br />
limited to 47 characters.<br />
This field defines the identity of the remote end.<br />
Traffic between this subnet and the subnet specified in Remote<br />
Network / Mask will travel through the VPN tunnel.<br />
Add a static route to direct all traffic destined to this Remote<br />
Network IP Address/Remote Network Mask through the VPN<br />
connection. For IPSec, this is the destination clients IDs of<br />
phase 2 quick mode.<br />
Propose the local available authentication schemes and<br />
encryption algorithms to the VPN peers, and get its feedback to<br />
find a match.<br />
IKE Phase 2 proposal<br />
Propose the local available algorithms to the VPN peers, and<br />
get its feedback to find a match.<br />
Perfect Forward Secrecy<br />
The IKE Phase 1 key will be reused to avoid the computation<br />
complexity in phase 2. The default value is inactive this<br />
function.<br />
168<br />
Vigor2130 Series User’s <strong>Guide</strong>
4.8 Wireless LAN<br />
This function is used for “n” models.<br />
4.8.1 Basic Concepts<br />
Over recent years, the market for wireless communications has enjoyed tremendous growth.<br />
Wireless technology now reaches or is capable of reaching virtually every location on the<br />
surface of the earth. Hundreds of millions of people exchange information every day via<br />
wireless communication products. The Vigor “n” model, a.k.a. Vigor wireless router, is<br />
designed for maximum flexibility and efficiency of a small office/home. Any authorized staff<br />
can bring a built-in WLAN client PDA or notebook into a meeting room for conference<br />
without laying a clot of LAN cable or drilling holes everywhere. Wireless LAN enables high<br />
mobility so WLAN users can simultaneously access all LAN facilities just like on a wired<br />
LAN as well as Internet access<br />
The Vigor wireless routers are equipped with a wireless LAN interface compliant with the<br />
standard IEEE 802.11n draft 2 protocol. To boost its performance further, the Vigor Router is<br />
also loaded with advanced wireless technology to lift up data rate up to 300 Mbps*. Hence,<br />
you can finally smoothly enjoy stream music and video.<br />
Note: * The actual data throughput will vary according to the network conditions and<br />
environmental factors, including volume of network traffic, network overhead and<br />
building materials.<br />
In an Infrastructure Mode of wireless network, Vigor wireless router plays a role as an Access<br />
Point (AP) connecting to lots of wireless clients or Stations (STA). All the STAs will share the<br />
same Internet connection via Vigor wireless router. The General Settings will set up the<br />
information of this wireless network, including its SSID as identification, located channel etc.<br />
Security Overview<br />
Real-time Hardware Encryption: Vigor Router is equipped with a hardware AES encryption<br />
engine so it can apply the highest protection to your data without influencing user experience.<br />
Complete Security Standard Selection: To ensure the security and privacy of your wireless<br />
communication, we provide several prevailing standards on market.<br />
Vigor2130 Series User’s <strong>Guide</strong> 169
WEP (Wired Equivalent Privacy) is a legacy method to encrypt each frame transmitted via<br />
radio using either a 64-bit or 128-bit key. Usually access point will preset a set of four keys<br />
and it will communicate with each station using only one out of the four keys.<br />
WPA (Wi-Fi Protected Access), the most dominating security mechanism in industry, is<br />
separated into two categories: WPA-personal or called WPA Pre-Share Key (WPA/PSK), and<br />
WPA-Enterprise or called WPA/802.1x.<br />
In WPA-Personal, a pre-defined key is used for encryption during data transmission. WPA<br />
applies Temporal Key Integrity Protocol (TKIP) for data encryption while WPA2 applies AES.<br />
The WPA-Enterprise combines not only encryption but also authentication.<br />
Since WEP has been proved vulnerable, you may consider using WPA for the most secure<br />
connection. You should select the appropriate security mechanism according to your needs.<br />
No matter which security suite you select, they all will enhance the over-the-air data<br />
protection and /or privacy on your wireless network. The Vigor wireless router is very flexible<br />
and can support multiple secure connections with both WEP and WPA at the same time.<br />
Below shows the menu items for Wireless LAN.<br />
4.8.2 General Setup<br />
By clicking the General Setup, a new web page will appear so that you could configure the<br />
SSID and the wireless channel.<br />
Please refer to the following figure for more information.<br />
Enable Wireless LAN<br />
SSID Broadcast<br />
Check the box to enable the wireless function.<br />
Choose Show to make the SSID being seen by wireless clients.<br />
Choose Hide to prevent from wireless sniffing and make it<br />
harder for unauthorized clients or STAs to join your wireless<br />
LAN.<br />
170<br />
Vigor2130 Series User’s <strong>Guide</strong>
SSID<br />
Wireless Mode<br />
Country Region Code<br />
Channel<br />
Tx Power<br />
It means the identification of the wireless LAN. SSID can be<br />
any text numbers or various special characters. The default<br />
SSID is "DrayTek". We suggest you to change it.<br />
Choose the wireless mode for this router. At present, only<br />
802.11B/B/N mix is available.<br />
It represents different country region code.<br />
Use the drop down list to choose the one that fit the usage of<br />
regulations locally.<br />
It means the channel of frequency of the wireless LAN. The<br />
default channel is 11. You may switch channel if the selected<br />
channel is under serious interference. If you have no idea of<br />
choosing the frequency, please select Auto to let system<br />
determine for you.<br />
Set the power percentage for transmission signal of access point.<br />
The greater the value is, the higher intensity of the signal will<br />
be.<br />
Enable Green AP<br />
Encryption<br />
Such function is used to reduce the power consumption (Green<br />
AP) for the access point. When there is no station connected,<br />
the power consumption of access point will be reduced.<br />
Select an appropriate encryption mode to improve the security<br />
and privacy of your wireless data packets.<br />
Each encryption mode will bring out different web page and ask<br />
you to offer additional configuration.<br />
Wireless Security Configuration<br />
For the security of your system, choose the proper encryption for data transmission. Different<br />
encryption mode will bring out different setting encryption ways.<br />
Vigor2130 Series User’s <strong>Guide</strong> 171
• None<br />
The encryption mechanism is turned off.<br />
• WEP<br />
Accepts only WEP clients and the encryption key should be entered in WEP Key.<br />
Default Key<br />
Key1-Key4<br />
Authentication Mode<br />
• WPA-PSK<br />
All wireless devices must support the same WEP<br />
encryption bit size and have the same key.<br />
Four keys can be entered here, but only one key can be<br />
selected at a time. The format of WEP Key is restricted to<br />
5 ASCII characters or 10 hexadecimal values in 64-bit<br />
encryption level, or restricted to 13 ASCII characters or 26<br />
hexadecimal values in 128-bit encryption level. The<br />
allowed content is the ASCII characters from 33(!) to<br />
126(~) except '#' and ',' .<br />
Choose OPEN or SHARED as the authentication mode.<br />
OPEN: Set wireless to authentication open mode.<br />
SHARED: Set wireless to authentication shared mode.<br />
Accepts only WPA clients and the encryption key should be entered in PSK. The WPA<br />
encrypts each frame transmitted from the radio using the key, which either PSK<br />
(Pre-Shared Key) entered manually in this field below or automatically negotiated via<br />
802.1x authentication.<br />
172<br />
Vigor2130 Series User’s <strong>Guide</strong>
WPA Mode<br />
Select WPA, WPA2 or Auto as the type.<br />
WPA Algorithm<br />
Select TKIP, AES or auto as the algorithm for WPA.<br />
WPA Pre-Shared Key Either 8~63 ASCII characters, such as 012345678..(or 64<br />
Hexadecimal digits leading by 0x, such as<br />
"0x321253abcde...").<br />
• WPA-RADIUS<br />
The built-in RADIUS client feature enables the router to assist the remote dial-in user or<br />
a wireless station and the RADIUS server in performing mutual authentication. It enables<br />
centralized remote access authentication for network management.<br />
Type<br />
The WPA encrypts each frame transmitted from the radio<br />
using the key, which either PSK (Pre-Shared Key) entered<br />
manually in this field below or automatically negotiated<br />
via 802.1x authentication. Select WPA, WPA2 or Auto as<br />
WPA mode.<br />
WPA Algorithm<br />
Choose the WPA algorithm, TKIP, AES or Auto.<br />
Server IP Address<br />
Destination Port<br />
Enter the IP address of RADIUS server.<br />
The UDP port number that the RADIUS server is using.<br />
The default value is 1812, based on RFC 2138.<br />
Vigor2130 Series User’s <strong>Guide</strong> 173
• WPS<br />
Shared Secret<br />
The RADIUS server and client share a secret that is used<br />
to authenticate the messages sent between them. Both<br />
sides must be configured to use the same shared secret.<br />
WPS (Wi-Fi Protected Setup) provides easy procedure to make network connection<br />
between wireless station and wireless access point (vigor router) with the encryption<br />
of WPA and WPA2.<br />
Configure via Push Button Click Start PBC to invoke Push-Button style WPS setup<br />
procedure. The router will wait for WPS requests from<br />
wireless clients about two minutes. The WPS LED on the<br />
router will blink fast when WPS is in progress. It will<br />
return to normal condition after two minutes. (You need to<br />
setup WPS within two minutes)<br />
Configure via Client PinCode Type the PIN code specified in wireless client you<br />
wish to connect, and click Start PIN button. The WLAN<br />
LED on the router will blink fast when WPS is in progress.<br />
It will return to normal condition after two minutes. (You<br />
need to setup WPS within two minutes.<br />
It is the simplest way to build connection between wireless network clients and vigor<br />
router. Users do not need to select any encryption mode and type any long encryption<br />
passphrase to setup a wireless client every time. He/she only needs to press a button on<br />
wireless client, and WPS will connect for client and router automatically.<br />
Note: Such function is available for the wireless station with WPS supported.<br />
There are two methods to do network connection through WPS between AP and Stations:<br />
pressing the Start PBC button or using PIN Code.<br />
On the side of Vigor 2130 series which served as an AP, press WPS button once on the<br />
front panel of the router or click Start PBC on web configuration interface. On the side<br />
174<br />
Vigor2130 Series User’s <strong>Guide</strong>
of a station with network card installed, press Start PBC button of network card.<br />
If you want to use PIN code, you have to know the PIN code specified in wireless client.<br />
Then provide the PIN code of the wireless client you wish to connect to the vigor router.<br />
4.8.3 Access Control<br />
For additional security of wireless access, the Access Control facility allows you to restrict<br />
the network access right by controlling the wireless LAN MAC address of client. Only the<br />
valid MAC address that has been configured can access the wireless LAN interface. By<br />
clicking the Access Control, a new web page will appear, as depicted below, so that you<br />
could edit the clients' MAC addresses to control their access rights (deny or allow).<br />
Filter Type<br />
Choose the rule for the MAC addresses displayed in this<br />
page.<br />
Allow List – all the MAC address of wireless clients listed<br />
here are allowed to do wireless connection.<br />
Vigor2130 Series User’s <strong>Guide</strong> 175
Add a New Entry<br />
Delete<br />
Deny List – all the MAC address of wireless clients listed<br />
here will be blocked.<br />
Add a new MAC address into the list.<br />
Delete the selected MAC address in the list. This button<br />
will appear only an entry of MAC Address has been typed.<br />
Cancel<br />
OK<br />
4.8.4 Station List<br />
Give up the configuration.<br />
Click it to save the configuration.<br />
Station List provides the knowledge of connecting wireless clients now along with its status<br />
code.<br />
Index<br />
IP Address<br />
MAC Address<br />
Connected Time<br />
Auto-refresh<br />
Refresh<br />
4.8.5 Access Point Discovery<br />
Display the number of the connecting client.<br />
Display the WAN IP address for the connecting client.<br />
Display the MAC Address for the connecting client.<br />
Display the connection time for the connecting client.<br />
Check this box to force the system refreshing the table<br />
automatically.<br />
Click this button to refresh current page.<br />
Vigor router can scan all regulatory channels and find working APs in the neighborhood.<br />
Based on the scanning result, users will know which channel is clean for usage.<br />
Note: During the scanning process (about 5 seconds), no client is allowed to connect to<br />
Vigor.<br />
The table will list channel, SSID, BSSID, Security and the Signal strength of working APs in<br />
the neighborhood.<br />
176<br />
Vigor2130 Series User’s <strong>Guide</strong>
CH<br />
SSID<br />
BSSID<br />
Security<br />
Signal<br />
Scan<br />
Display the channel for the scanned AP.<br />
Display the SSID of the scanned AP.<br />
Display the MAC address of the scanned AP.<br />
Display the encryption type of the scanned AP.<br />
Display the strength (in percentage) of the signal of the<br />
scanned AP.<br />
It is used to discover all the connected AP. The results will<br />
be shown on the box above this button.<br />
4.9 USB Application<br />
USB diskette can be regarded as an FTP server. By way of Vigor router, clients on LAN can<br />
access, write and read data stored in USB diskette. After setting the configuration in USB<br />
Application, you can type the IP address of the Vigor router and username/password created<br />
in USB Application>>FTP User Setting on the FTP client software. Thus, the client can use<br />
the FTP site (USB diskette) through Vigor router.<br />
4.9.1 USB General Settings<br />
This page will determine the number of concurrent FTP connection and default charset for<br />
FTP server. At present, the Vigor router can support USB diskette with versions of FAT16 and<br />
FAT32 only. Therefore, before connecting the USB diskette into the Vigor router, please make<br />
sure the memory format for the USB diskette is FAT16 or FAT32. It is recommended for you<br />
to use FAT32 for viewing the filename completely (FAT16 cannot support long filename).<br />
Vigor2130 Series User’s <strong>Guide</strong> 177
Enable FTP<br />
Enable Disk Sharing<br />
Workgroup Name<br />
4.9.2 FTP User Management<br />
Check this box to enable FTP connection.<br />
Check this box to share the information on USB disk.<br />
Type the name for FTP users for accessing into FTP server<br />
(USB diskette). Be aware that users cannot access into USB<br />
diskette in anonymity. Later, you can open FTP client software<br />
and type the username specified here for accessing into USB<br />
storage diskette.<br />
This page allows you to change user setting for USB storage disk. Before modifying settings<br />
in this page, please insert a USB diskette and configure settings in User>>User<br />
Configuration first. Otherwise, an error message will appear to warn you.<br />
Click the name link under User Name to open the setting web page.<br />
User Name<br />
Volume<br />
Home Folder<br />
It displays the username that user uses to login to the FTP<br />
server.<br />
Select the proper volume for the connected USB diskette.<br />
It determines the range for the client to access into.<br />
The user can enter a directory name in this field. Then,<br />
after clicking OK, the router will create the specific/new<br />
folder in the USB diskette. In addition, if the user types “/”<br />
here, he/she can access into all of the disk folders and files<br />
in USB diskette.<br />
178<br />
Vigor2130 Series User’s <strong>Guide</strong>
Access Rule<br />
Note: When write protect status for the USB diskette is<br />
ON, you cannot type any new folder name in this field.<br />
Only “/” can be used in such case.<br />
Select the access right for the USB diskette.<br />
When you finish the settings, simply click OK to save the configuration.<br />
4.9.3 Disk Status<br />
This page can display current using status of the USB diskette. If you want to remove the<br />
diskette from USB port in router, please check the box of Safely Remove Disk first. And then,<br />
remove the USB diskette later.<br />
Safely Remove Disk<br />
Manufacturer<br />
Model<br />
Size<br />
Free Capacity<br />
Status<br />
Update<br />
Check this box and then you can remove the USB diskette<br />
safely.<br />
Display the manufacturer of the disk.<br />
Display the type of the disk.<br />
Display the storage space of the diskette(s).<br />
Display the free disk space of the diskette(s).<br />
Display current usage status of the diskette(s)<br />
Click this button to refresh the disk status.<br />
4.9.4 Disk Shares<br />
This page can define the folder which will be shared while Samba File Sharing is enabled.<br />
To add a new entry for disk sharing, please click Add a New Entry to open the following<br />
page.<br />
Vigor2130 Series User’s <strong>Guide</strong> 179
Share Name<br />
Comment<br />
Volume<br />
Path<br />
Visible<br />
Access Rights<br />
Type a name to be known by other computers in local network.<br />
The name must not contain spaces or special characters.<br />
Type the brief description for the disk sharing. The words here<br />
will be seen in Network Neighborhood on Windows client<br />
computers<br />
Select the proper volume for the connected USB diskette.<br />
It determines the range for the client to access into.<br />
The user can enter a directory name in this field. Then,<br />
after clicking OK, the router will create the specific/new<br />
folder in the USB diskette. In addition, if the user types “/”<br />
here, he/she can access into all of the disk folders and files<br />
in USB diskette.<br />
Note: When write protect status for the USB diskette is<br />
ON, you cannot type any new folder name in this field.<br />
Only “/” can be used in such case.<br />
Check this box to make this USB diskette to be seen in Network<br />
Neighborhood on Windows of clients in local network.<br />
Specify the access right and apply to all the wireless clients that<br />
want to connect to the attached USB diskette.<br />
All Users Read-only - everyone has read-only access to the<br />
share disk.<br />
All Users Read-write - everyone has read-write access to the<br />
share disk.<br />
Specific Users – Only specific user(s) can access into the share<br />
disk.<br />
180<br />
Vigor2130 Series User’s <strong>Guide</strong>
4.10 IPv6<br />
4.10.1 IPv6 WAN Setup<br />
This page defines the IPv6 connection types for WAN interface. Possible types contain<br />
Link-Local only, Static IPv6, DHCPv6 and TSPC. Each type requires different parameter<br />
settings.<br />
Link-Local Only<br />
Link-Local address is used for communicating with neighbouring nodes on the same link. It is<br />
defined by the address prefix fe80::/10. You don't need to setup Link-Local address manually<br />
for it is generated automatically according to your MAC Address.<br />
Vigor2130 Series User’s <strong>Guide</strong> 181
IPv6 Address<br />
Prefix Length<br />
The least significant 64 bits are usually chosen as the interface<br />
hardware address constructed in modified EUI-64 format.<br />
Display the fixed value (64) for prefix length.<br />
Static IPv6<br />
This type allows you to setup static IPv6 address for WAN.<br />
IPv6 Address<br />
Prefix Length<br />
Gateway IPv6 Server<br />
Primary DNS Server<br />
Secondary DNS Server<br />
Type your IPv6 static IP here.<br />
Type your IPv6 address prefix length here.<br />
Type your IPv6 gateway address here.<br />
Type your IPv6 primary DNS Server address here.<br />
Type your IPv6 secondary DNS Server address here.<br />
DHCPv6 Client<br />
DHCPv6 client type would use DHCPv6 protocol to obtain IPv6 address from server.<br />
Primary DNS Server<br />
Secondary DNS Server<br />
Type primary DNS Server address here.<br />
Type secondary DNS Server address here.<br />
182<br />
Vigor2130 Series User’s <strong>Guide</strong>
TSPC<br />
Tunnel setup protocol client (TSPC) is an application which could help you to connect to IPv6<br />
network easily.<br />
Please make sure your IPv4 WAN connection is OK and apply one free account from hexage<br />
(http://go6.net/4105/register.asp) before you try to use TSPC for network connection. TSPC<br />
would connect to tunnel broker and requests a tunnel according to the specifications inside the<br />
configuration file. It gets a public IPv6 IP address and an IPv6 prefix from the tunnel broker<br />
and then monitors the state of the tunnel in background.<br />
After getting the IPv6 prefix and starting router advertisement daemon (RADVD), the PC<br />
behind this router can directly connect to IPv6 the Internet.<br />
Username<br />
Password<br />
Confirm Password<br />
Tunnel Broker<br />
Tunnel Mode<br />
Type the name obtained from the broker. “vigor2130” is a<br />
default username applied from<br />
http://go6.net/4105/register.asp. It is suggested for you to<br />
apply another username and password.<br />
Type the password assigned with the user name.<br />
Type the password again to make the confirmation.<br />
Type the address for the tunnel broker IP, FQDN or an<br />
optional port number.<br />
IPv6-in-IPv4 Tunnel- Let the broker choose the tunnel<br />
mode appropriate for the client.<br />
IPv6-in-IPv4 (Native) - Request an IPv6 in IPv4 tunnel.<br />
IPv6-in-IPv4 (NAT Traversal - Request an IPv6 in UDP<br />
of IPv4 tunnel (for clients behind a NAT).<br />
Vigor2130 Series User’s <strong>Guide</strong> 183
Auto-reconnect Delay<br />
Keepalive<br />
Keepalive_interval<br />
Prefixlen<br />
If_prefix<br />
After passing the time set here, the client will retry to<br />
connect in case of failure or keepalive timeout.<br />
0 means not retry.<br />
Yes – Keep the connection between TSPC and tunnel<br />
broker always on. TSPC will send ping packet to make<br />
sure the connection between both ends is normal.<br />
No - The client will not send keepalives.<br />
Type the time for the interval between two keepalive<br />
messages transferring from the client to the broker.<br />
Type the required prefix length for the client network.<br />
Display LAN interface name. The name of the OS<br />
interface that will be configured with the first 64 of<br />
the received prefix from the broker and the router<br />
advertisement daemon is started to advertise that<br />
prefix on the if_prefix interface.<br />
184<br />
Vigor2130 Series User’s <strong>Guide</strong>
4.10.2 IPv6 LAN Setup<br />
This page defines the IPv6 connection types for LAN interface. Possible types contain<br />
DHCPv6 Server and RADVD. Each type requires different parameter settings.<br />
IPv6 Address<br />
IPv6 Link_local Address<br />
Enable Autoconfiguration<br />
Configuration Type<br />
Type static IPv6 address for LAN.<br />
It is used for communicating with neighbouring nodes on<br />
the same link. It is defined by the address prefix fe80::/10.<br />
You don't need to setup Link-Local address manually for it<br />
is generated automatically according to your MAC<br />
Address.<br />
Check this box to enable the auto-configuration function<br />
for IPv6 connection.<br />
Vigor2130 provides 2 daemons for LAN side IPv6 address<br />
configuration. One is RADVD(stateless) and the other is<br />
DHCPv6 Server (Stateful).<br />
DHCPv6 Server- DHCPv6 Server could assign IPv6<br />
address to PC according to the Start/End IPv6 address<br />
configuration.<br />
IPv6 Start Address/IPv6 End Address- Type the start and<br />
end address for IPv6 server.<br />
Vigor2130 Series User’s <strong>Guide</strong> 185
RADVD - The router advertisement daemon (radvd) sends<br />
Router Advertisement messages, specified by RFC 2461,<br />
to a local Ethernet LAN periodically and when requested<br />
by a node sending a Router Solicitation message. These<br />
messages are required for IPv6 stateless autoconfiguration.<br />
4.10.3 IPv6 Firewall Setup<br />
This page allows users to set firewall rules for IPv6 packets.<br />
Note: Section 4.4 Firewall is configured for IPv4 packets only.<br />
Advertisement Lifetime - The lifetime associated with<br />
the default router in units of seconds. It's used to control<br />
the lifetime of the prefix. The maximum value corresponds<br />
to 18.2 hours. A lifetime of 0 indicates that the router is not<br />
a default router and should not appear on the default router<br />
list.<br />
Name<br />
Protocol<br />
Source IP<br />
Destination IP<br />
Source Port<br />
Destination Port<br />
Action<br />
Display the name of the rule.<br />
Display the protocol (TCP/UDP/ICMPv6) the rule uses.<br />
Display the source IP address of such rule.<br />
Display the destination IP address of such rule.<br />
Display the source port number of such rule.<br />
Display the destination port number of such rule.<br />
Display the status (accept or drop) of such rule.<br />
186<br />
Vigor2130 Series User’s <strong>Guide</strong>
Adding a New Rule<br />
Click Add New Rule to configure a new rule for IPv6 Firewall.<br />
Note: You can set up to 20 sets of IPv6 rules.<br />
Name<br />
Protocol<br />
Type a name for the rule.<br />
Specify a protocol for this rule.<br />
Source IP Type<br />
Determine the IP type as the source.<br />
Source IP<br />
Source Subnet<br />
Destination IP Type<br />
Type the IP address here if you choose Single as Source<br />
IP Type.<br />
Type the subnet mask here if you choose Subnet as<br />
Source IP Type.<br />
Determine the IP type as the destination.<br />
Destination IP<br />
Type the IP address here if you choose Single as<br />
Destination IP Type.<br />
Vigor2130 Series User’s <strong>Guide</strong> 187
Destination Subnet<br />
Source Start Port<br />
Source End Port (optional)<br />
Destination Start Port<br />
Type the subnet mask here if you choose Subnet as<br />
Destination IP Type.<br />
Type a value as the source start port. Such value will be<br />
available only TCP/UDP is selected as the protocol.<br />
Type a value as the source end port. Such value will be<br />
available only TCP/UDP is selected as the protocol.<br />
Type a value as the destination start port. Such value will<br />
be available only TCP/UDP is selected as the protocol.<br />
Destination End Port (optional) Type a value as the destination end port. Such value will be<br />
available only TCP/UDP is selected as the protocol.<br />
Action<br />
Set the action that the router will perform for the packets<br />
through the protocol of IPv6.<br />
Example:<br />
Accept – If the IPv6 packets fit the condition listed in this<br />
page, the router will let it pass through.<br />
Drop - If the IPv6 packets fit the condition listed in this<br />
page, the router will block it.<br />
Refer to the following example.<br />
1. Use TSPC mode to connect to IPv6 network.<br />
PC get ipv6 IP: 2001:5c0:1503:7400:30e4:139d:53c8:3a1e<br />
2. Connect PC to http://www.ipv6.org/ with IPv6 IP address.<br />
A message will appear from the web page:<br />
Welcome to the IPv6 Information Page!<br />
You are using IPv6 from 2001:5c0:1503:7400:30e4:139d:53c8:3a1e<br />
3. Set firewall rule to block all TCP traffic from this IP address.<br />
4. Open IPv6 >> IPv6 Firewall Setup and press Add New Rule.<br />
In the following dialog, please configure the page with the following values.<br />
188<br />
Vigor2130 Series User’s <strong>Guide</strong>
5. Connect PC to http://www.ipv6.org/ with IPv6 IP address again.<br />
A message will appear from web page:<br />
Welcome to the IPv6 Information Page!<br />
You are using IPv4 from 114.37.132.219<br />
4.10.4 IPv6 Routing<br />
This page displays the routing table for the protocol of IPv6.<br />
Device<br />
Prefix<br />
Metric<br />
Expires<br />
MTU<br />
Display the interface name (eth0, eth1, fp, etc..)that<br />
used to transfer packets with addresses matching the<br />
prefix.<br />
The IPv6 address prefix.<br />
Display the distance to the target (usually counted in<br />
hops). It is not used by recent kernels, but may be<br />
needed by routing daemons.<br />
Display the lifetime of the route.<br />
Display the largest size (in bytes) of a packet.<br />
Vigor2130 Series User’s <strong>Guide</strong> 189
Advmss<br />
Hoplimit<br />
Auto-refresh<br />
Display the largest size (in bytes) of an unfragmented<br />
piece of a routing advertisement.<br />
Display the number of network segments on which the<br />
packet is allowed to travel before discarded.<br />
Check this box to enable an automatic refresh of the page<br />
at regular intervals.<br />
4.10.5 IPv6 Neighbour<br />
IPv6 uses neighbor discovery protocol to find out neighbors on the same link.<br />
Device<br />
IP Address<br />
MAC Address<br />
State<br />
Auto-refresh<br />
4.10.6 IPv6 TSPC Status<br />
The interface name of the link where the neighbor is on.<br />
The IPv6 address of the neighbor.<br />
The link-layer address of the neighbor.<br />
Possible states include:<br />
incomplete - address resolution is in progress.<br />
reachable - neighbor is reachable.<br />
stale – neighbor(s) may be unreachable but not verified<br />
until a packet is sent).<br />
delay - neighbor may be unreachable and a packet was sent.<br />
probe - neighbor may be unreachable and probes are sent<br />
to verify the reachability.<br />
Check this box to enable an automatic refresh of the page<br />
at regular intervals.<br />
IPv6 TSPC status web page could help you to diagnose the connection status of TSPC. TSPC<br />
log contains some debug information from program.<br />
If TSPC has not configured properly, the router will display the following page when the user<br />
tries to connect through TSPC connection.<br />
190<br />
Vigor2130 Series User’s <strong>Guide</strong>
When TSPC configuration has been done, the router will start to connect. The connecting page<br />
will be shown as below:<br />
When the router detects all the information, the screen will be shown as follows. One set of<br />
TSPC prefix and prefix length will be obtained after the connection between TSPC and<br />
Tunnel broker built.<br />
Connection Status<br />
It will bring out different pages to represent IPv6<br />
disconnection, connecting and connected.<br />
Vigor2130 Series User’s <strong>Guide</strong> 191
Tunnel Information<br />
Tunnel Status<br />
Activity<br />
Display interface name (used to send TSPC prefix), tunnel<br />
mode, local endpoint addresses, remote endpoint address,<br />
TSPC Prfix, TSPC Prefixlen (prefix length), tunnel broker<br />
and so on.<br />
Disconnected - The remote client doesn't connect to the<br />
tunnel server.<br />
Connecting - The remote client is connecting to the tunnel<br />
server.<br />
Connected – The remote client has been connected to the<br />
tunnel server.<br />
Sent - sent to the tunnel (RX bytes).<br />
Received - received from the tunnel (RX bytes).<br />
When the router connects to the tunnel broker, the router will use RADVD to transmit the<br />
prefix to the PC on LAN. Next, the PC will generate one set of IPv6 public IP (see the figure<br />
below). Users can use such IP for connecting to IPv6 network.<br />
When your PC obtains the IPv6 address, please connect to http://www.ipv6.org. If your PC<br />
access Internet via IPv6 connection, your IPv6 address will be shown on the web page<br />
immediately. Refer to the following figure.<br />
192<br />
Vigor2130 Series User’s <strong>Guide</strong>
4.11 User<br />
4.11.1 User Configuration<br />
This page allows you to set user’s setting that allowed to use PPTP, FTP, IPSEC/L2TP<br />
connection.<br />
Adding a New User<br />
Click Add a New User to open the following page.<br />
Username<br />
Full Name<br />
Password<br />
Confirm Password<br />
Allow Disk Sharing<br />
Allow IPSEC/L2TP<br />
Allow PPTP<br />
Allow FTP<br />
Delete User<br />
Type a name for this user.<br />
Type full name for this user.<br />
Type the password for this user.<br />
Type the password again for confirmation.<br />
Check this box to have the remote user share the disk<br />
information.<br />
Check this box to let the remote user connecting to this<br />
device through IPSEC/L2TP.<br />
Check this box to let the remote user connecting to this<br />
device through PPTP.<br />
Check this box to let the remote user connecting to FTP<br />
server via this router.<br />
Remove settings on current page and delete the user. This<br />
button is not available for new configuration by pressing<br />
Add a New User.<br />
Vigor2130 Series User’s <strong>Guide</strong> 193
When you finish the settings, simply click OK to save the configuration. The new user will be<br />
created and displayed on the page.<br />
Editing/Deleting User Settings<br />
To edit a user, click the name link under Username to open the following page. Modify the<br />
settings except Username and then click OK to save and exit it. If you want to remove such<br />
user settings, simply click Delete User.<br />
194<br />
Vigor2130 Series User’s <strong>Guide</strong>
4.12 System Maintenance<br />
For the system setup, there are several items that you have to know the way of configuration:<br />
Status, User Password, Configuration Backup, Syslog/Mail Alert, Time and Date,<br />
Management, Reboot System, and Firmware Upgrade.<br />
Below shows the menu items for System Maintenance.<br />
4.12.1 System Status<br />
The System Status provides basic network settings of Vigor router. It includes LAN and<br />
WAN interface information. Also, you could get the current running firmware version or<br />
firmware related information from this presentation.<br />
Model Name<br />
Platform<br />
Bootloader Version<br />
Firmware Version<br />
Build Date/Time<br />
Hardware NAT Version<br />
System Date<br />
System Uptime<br />
LAN-------<br />
Display the model name of the router.<br />
Display the hardware type that this device is built upon.<br />
Display the bootloader version of the router.<br />
Display the firmware version of the router.<br />
Display the date and time of the current firmware build.<br />
Display the hardware acceleration NAT version.<br />
Display current time and date for the system server.<br />
Display the connection time for the system server.<br />
Vigor2130 Series User’s <strong>Guide</strong> 195
MAC Address<br />
Display the MAC address of the LAN Interface.<br />
IP Address<br />
Display the IP address of the LAN interface.<br />
IP Mask<br />
Display the subnet mask address of the LAN interface.<br />
WAN-------<br />
MAC Address<br />
Display the MAC address of the WAN Interface.<br />
IP Address<br />
Display the IP address of the WAN interface.<br />
IP Mask<br />
Display the subnet mask address of the WAN interface.<br />
IPv6 Address<br />
Display the IPv6 address of the WAN interface.<br />
Default Gateway<br />
Display the gateway address of the WAN interface.<br />
Primary DNS<br />
Display the specified primary DNS setting.<br />
Secondary DNS<br />
Display the specified secondary DNS setting.<br />
Wireless LAN-------<br />
MAC Address<br />
Display the MAC address of the wireless LAN.<br />
Device Type<br />
Display the device type used for wireless LAN.<br />
SSID<br />
Display the SSID of the router.<br />
Channel<br />
Display the channel that wireless LAN used.<br />
Manufacturer<br />
Display the manufacturer of the disk.<br />
Model<br />
Display the type of the disk.<br />
Size<br />
Display the storage size of the USB diskette.<br />
Status<br />
Display current status of the USB diskette.<br />
4.12.2 System Password<br />
This page allows you to set new password for admin operation.<br />
Old Password<br />
Type in the old password. The factory default setting for<br />
password is blank.<br />
New Password<br />
Type in new password in this filed.<br />
Confirm Password<br />
Type in the new password again.<br />
When you click OK, the login window will appear. Please use the new password to access into<br />
the web configurator again.<br />
196<br />
Vigor2130 Series User’s <strong>Guide</strong>
4.12.3 User Password<br />
This page allows you to set new password for user operation.<br />
Old Password<br />
New Password<br />
Confirm Password<br />
Type in the old password. The factory default setting for<br />
password is blank.<br />
Type in new password in this filed.<br />
Type in the new password again.<br />
When you click OK, the login window will appear. Please use the new password to access<br />
into the web configurator again.<br />
4.12.4 Configuration Backup<br />
Backup the Configuration<br />
Follow the steps below to backup your configuration.<br />
1. Go to System Maintenance >> Configuration Backup. The following windows will be<br />
popped-up, as shown below.<br />
2. Type a key arbitrarily for encrypting the file. Keep the key in mind. You will need it<br />
whenever you want to restore such file. Click Backup button to get into the following<br />
dialog. Click Save button to open another dialog for saving configuration as a file.<br />
Vigor2130 Series User’s <strong>Guide</strong> 197
3. In Save As dialog, the default filename is config.cfg. You could give it another name by<br />
yourself.<br />
4. Click Save button, the configuration will download automatically to your computer as a<br />
file named config.cfg.<br />
The above example is using Windows platform for demonstrating examples. The Mac or<br />
Linux platform will appear different windows, but the backup function is still available.<br />
Note: Backup for Certification must be done independently. The Configuration Backup<br />
does not include information of Certificate.<br />
Restore Configuration<br />
1. Go to System Maintenance >> Configuration Backup. The following windows will be<br />
popped-up, as shown below.<br />
198<br />
Vigor2130 Series User’s <strong>Guide</strong>
2. Click Browse button to choose the correct configuration file for uploading to the router.<br />
3. Click Restore button and wait for few seconds, the following picture will tell you that<br />
the restoration procedure is successful.<br />
Note: If the file you want to restore has been encrypted, you will be asked to type the<br />
encrypted key before clicking Restore.<br />
4.12.5 Syslog/Mail Alert<br />
SysLog function is provided for users to monitor router. There is no bother to directly get into<br />
the Web Configurator of the router or borrow debug equipments.<br />
Enable (Syslog Access…)<br />
Router Name<br />
Server IP Address<br />
Destination Port<br />
Check “Enable” to activate function of syslog.<br />
Assign a name of this device.<br />
The IP address of the Syslog server.<br />
Assign a port for the Syslog protocol.<br />
Vigor2130 Series User’s <strong>Guide</strong> 199
Log Level<br />
Choose the severity level for the system log entry.<br />
Enable (Mail Alert…)<br />
SMTP Server<br />
Mail To<br />
Mail From<br />
User Name<br />
Password<br />
Enable E-mail Alert<br />
Click OK to save these settings.<br />
Check “Enable” to activate function of mail alert.<br />
The IP address of the SMTP server.<br />
Assign a mail address for sending mails out.<br />
Assign a path for receiving the mail from outside.<br />
Type the user name for authentication.<br />
Type the password for authentication.<br />
Check the box of User Login to send alert message to the<br />
e-mail box while the router detecting the item(s) you<br />
specify here.<br />
For viewing the Syslog, please do the following:<br />
4. Just set your monitor PC’s IP address in the field of Server IP Address<br />
5. Install the Router Tools in the Utility within provided CD. After installation, click on the<br />
Router Tools>>Syslog from program menu.<br />
6. From the Syslog screen, select the router you want to monitor. Be reminded that in<br />
Network Information, select the network adapter used to connect to the router.<br />
Otherwise, you won’t succeed in retrieving information from the router.<br />
200<br />
Vigor2130 Series User’s <strong>Guide</strong>
4.12.6 Time and Date<br />
It allows you to specify where the time of the router should be inquired from.<br />
Current System Time<br />
Time Zone<br />
Add NTP server<br />
Delete<br />
Click OK to save these settings.<br />
Click Inquire Time to get the current time.<br />
Select the time zone where the router is located.<br />
Click the button to add a new NTP server.<br />
Click this button to remove an NTP server.<br />
Vigor2130 Series User’s <strong>Guide</strong> 201
4.12.7 Management<br />
This page allows you to manage the settings for access control, access list, port setup, and<br />
SMP setup. For example, as to management access control, the port number is used to<br />
send/receive SIP message for building a session. The default value is 5060 and this must<br />
match with the peer Registrar when making VoIP calls.<br />
Enable HTTP/HTTPS/SSH/ICMP Ping/FTP/SNMP Enable the checkbox to allow system<br />
administrators to login from the Internet. There are several<br />
servers provided by the system to allow you managing the<br />
router from Internet. Check the box(es) to specify.<br />
Manager Host IP – Type the IP address for the host to<br />
perform the remote management.<br />
Access List<br />
4.12.8 Reboot System<br />
You could specify that the system administrator can only<br />
login from a specific host or network defined in the list. A<br />
maximum of three IPs/subnet masks is allowed.<br />
List IP - Indicate an IP address allowed to login to the<br />
router.<br />
Subnet Mask - Represent a subnet mask allowed to login to<br />
the router.<br />
The Web Configurator may be used to restart your router for using current configuration.<br />
Click Reboot System from System Maintenance to open the following page.<br />
202<br />
Vigor2130 Series User’s <strong>Guide</strong>
Click OK. The router will take 5 seconds to reboot the system.<br />
Note: When the system pops up Reboot System web page after you configure web settings,<br />
please click OK to reboot your router for ensuring normal operation and preventing<br />
unexpected errors of the router in the future.<br />
4.12.9 Firmware Upgrade<br />
Before upgrading your router firmware, you need to install the Router Tools. The Firmware<br />
Upgrade Utility is included in the tools. The following web page will guide you to upgrade<br />
firmware by using an example. Note that this example is running over Windows OS<br />
(Operating System).<br />
Download the newest firmware from DrayTek's web site or FTP site. The DrayTek web site is<br />
www.draytek.com (or local DrayTek's web site) and FTP site is ftp.draytek.com.<br />
Click Maintenance>> Firmware Upgrade to launch the Firmware Upgrade Utility.<br />
Click Browse.. to locate the newest firmware and click Upgrade. During the process of<br />
upgrade, do not turn off your router.<br />
Vigor2130 Series User’s <strong>Guide</strong> 203
4.13 Diagnostics<br />
Diagnostic Tools provide a useful way to view or diagnose the status of your Vigor router.<br />
Below shows the menu items for Diagnostics.<br />
4.13.1 Ping<br />
Click Diagnostics and click Ping to open the web page. It is used to troubleshoot IP<br />
connection for your router.<br />
IP Address<br />
Type in the IP address of the Host/IP that you want to ping.<br />
Ping Size Type in the payload size of the ICMP packet. Values range from 8<br />
bytes to 1400 bytes.<br />
Start<br />
Click this button to start the ping work. The result will be displayed<br />
on the screen.<br />
204<br />
Vigor2130 Series User’s <strong>Guide</strong>
4.13.2 Routing Table<br />
Click Diagnostics and click Routing Table to open the web page.<br />
Destination<br />
Gateway<br />
Genmask<br />
Flags<br />
Metric<br />
Ref<br />
Use<br />
Iface<br />
Refresh<br />
Display the IP address for destination network or<br />
destination host.<br />
Display the gateway address or “*” if none set.<br />
Display the netmask for the destination net;<br />
'255.255.255.255' is for a host destination and '0.0.0.0' is<br />
for the default route.<br />
Different codes represent different routing status.<br />
U - route is up.<br />
H - target is a host<br />
G - use gateway<br />
R - reinstate route for dynamic routing<br />
D - dynamically installed by daemon or redirect<br />
M - modified from routing daemon or redirect<br />
A - installed by addrconf<br />
C - cache entry<br />
! - reject route<br />
Display the distance to the target (usually counted in hops).<br />
Display number of references to this route. (Not used in the<br />
Linux kernel.)<br />
Display count of lookups for the route. Depending on the<br />
use of -F and –C, this will be either route cache misses (-F)<br />
or hits (-C).<br />
Display interface to which packets for this route will be<br />
sent.<br />
Click it to reload the page.<br />
Vigor2130 Series User’s <strong>Guide</strong> 205
4.13.3 System Log<br />
Click Diagnostics and click System Log to open the web page.<br />
Time<br />
Level<br />
Type<br />
Message<br />
Auto-refresh<br />
Reverse<br />
Refresh<br />
Display the time of the system log entry.<br />
Display the severity level of the system log entry.<br />
Display the type or subsystem of the system log entry.<br />
Display a short description of the system log entry.<br />
Check it to enable auto-refresh function.<br />
Check it to have newest log entries presented first.<br />
Click it to reload the page.<br />
4.13.4 Traffic Overview<br />
This page offers an overview of general traffic statistics for all connecting ports.<br />
206<br />
Vigor2130 Series User’s <strong>Guide</strong>
Port<br />
Packets<br />
Bytes<br />
Errors<br />
Drops<br />
Filtered<br />
Auto-refresh<br />
Refresh<br />
Clear<br />
Display the interface that data transmission passing<br />
through.<br />
Display the packet sizes for data transmission in receiving<br />
and sending.<br />
Display the number of received and transmitted bytes per<br />
port.<br />
Display the number of the error occurred in data receiving<br />
and data sending.<br />
Display the number of the data lost in receiving and<br />
sending.<br />
Display the number of received frames filtered by the<br />
forwarding process.<br />
Check it to enable auto-refresh function.<br />
Click it to reload the page.<br />
Click it to clear the counters for all ports.<br />
4.13.5 Detailed Statistics<br />
This page display detailed statistics for WAN/LAN interface.<br />
Rx Packets<br />
Rx Octets<br />
Display the counting number of the packet received.<br />
Display the total received bytes.<br />
Vigor2130 Series User’s <strong>Guide</strong> 207
Rx Unicast<br />
Rx Broadcast<br />
Rx Pause<br />
RX 64 Bytes<br />
RX 65-127 Bytes<br />
RX 128-255 Bytes<br />
RX 256-511 Bytes<br />
RX 512-1023 Bytes<br />
RX 1024- 1526 Bytes<br />
RX 1527 Bytes<br />
Rx Low<br />
Rx Normal<br />
Rx Medium<br />
Rx High<br />
Rx Drops<br />
Rx CRC/Alignment<br />
Rx Undersize<br />
Rx Oversize<br />
Rx Fragments<br />
Rx Jabber<br />
Rx Filtered<br />
Tx Packets<br />
Tx Octets<br />
Tx Unicast<br />
Tx Multicast<br />
Tx Broadcast<br />
Display the counting number of the received unicast<br />
packet.<br />
Display the counting number of the received broadcast<br />
packet.<br />
Display the counting number of the received pause packet.<br />
Display the number of 64-byte frames in good and bad<br />
packets received.<br />
Display the number of 65 ~ 127-byte frames in good and<br />
bad packets received.<br />
Display the number of 128 ~ 255-byte frames in good and<br />
bad packets received.<br />
Display the number of 256 ~ 511-byte frames in good and<br />
bad packets received.<br />
Display the number of 512 ~ 1023-byte frames in good and<br />
bad packets received.<br />
Display the number of 1024-1522-byte frames in good and<br />
bad packets received.<br />
Display the number of 1527-byte frames in good and bad<br />
packets received.<br />
Display the low queue counter of the packet received.<br />
Display the normal queue counter of the packet received.<br />
Display the medium queue counter of the packet received.<br />
Display the high queue counter of the packet received.<br />
Display the number of frames dropped due to the lack of<br />
receiving buffer.<br />
Display the number of Alignment errors packets received.<br />
Display the number of short frames (
Tx Pause<br />
Tx 64 Bytes<br />
Tx 65-127 Bytes<br />
Tx 128-255 Bytes<br />
Tx 256-511 Bytes<br />
Tx 512-1023 Bytes<br />
Tx 1024- 1526 Bytes<br />
Tx 1527 Bytes:<br />
Tx Low<br />
Tx Normal<br />
Tx Medium<br />
Tx High<br />
Tx Drops<br />
Tx lat/Exc.Coll.<br />
Auto-refresh<br />
Refresh<br />
Clear<br />
4.13.6 MAC Address Table<br />
Show the counting number of the transmitted pause packet.<br />
Display the number of 64-byte frames in good and bad<br />
packets transmitted.<br />
Display the number of 65 ~ 127-byte frames in good and<br />
bad packets transmitted.<br />
Display the number of 128 ~ 255-byte frames in good and<br />
bad packets transmitted.<br />
Display the number of 256 ~ 511-byte frames in good and<br />
bad packets transmitted.<br />
Display the number of 512 ~ 1023-byte frames in good and<br />
bad packets transmitted.<br />
Display the number of 1024 ~ 1522-byt frames in good and<br />
bad packets transmitted.<br />
Display the number of 1527-byte frames in good and bad<br />
packets transmitted.<br />
Display the low queue counter of the packet transmitted.<br />
Display the normal queue counter of the packet<br />
transmitted.<br />
Display the medium queue counter of the packet received.<br />
Display the high queue counter of the packet received.<br />
Display the number of frames dropped due to excessive<br />
collision, late collision, or frame aging.<br />
Display the number of Frames late collision or excessive<br />
collision Error, which switch transmitted<br />
Check it to enable auto-refresh function.<br />
Click it to reload the page.<br />
Click it to clear the counters for all ports.<br />
The MAC Address Table contains up to 8192 entries, and is sorted first by VLAN ID, then by<br />
MAC address.<br />
Each page shows up to 999 entries from the MAC table, default being 20, selected through the<br />
"entries per page" input field. When first visited, the web page will show the first 20 entries<br />
from the beginning of the MAC Table. The first displayed will be the one with the lowest<br />
VLAN ID and the lowest MAC address found in the MAC Table.<br />
The Start from MAC address and VLAN input fields allow the user to select the starting<br />
point in the MAC Table. Clicking the Refresh button will update the displayed table starting<br />
from that or the closest next MAC Table match. In addition, the two input fields will assume<br />
the value of the first displayed entry, allowing for continuous refresh with the same start<br />
address.<br />
The button >> will use the last entry of the currently displayed VLAN/MAC address pairs as a<br />
basis for the next lookup. When the end is reached the text "no more entries" is shown in the<br />
displayed table, use the l
Type<br />
VLAN<br />
MAC Address<br />
Port Members<br />
Auto-refresh<br />
Refresh<br />
Clear<br />
Indicate whether the entry is a static or dynamic entry.<br />
Display the VLAN ID of that entry.<br />
Display the MAC address of that entry.<br />
Display the port of that entry.<br />
Check it to enable auto-refresh function.<br />
Click it to reload the page.<br />
Click it to clear the whole table.<br />
210<br />
Vigor2130 Series User’s <strong>Guide</strong>
4.13.7 DHCP Table<br />
The facility provides information on IP address assignments. This information is helpful in<br />
diagnosing network problems, such as IP address conflicts, etc.<br />
Click Diagnostics and click DHCP Table to open the web page.<br />
Computer Name<br />
IP Address<br />
MAC Address<br />
Expire Time<br />
Auto-refresh<br />
Refresh<br />
It displays the name of the computer accepted the assigned<br />
IP address by this router.<br />
It displays the IP address assigned by this router for<br />
specified PC.<br />
It displays the MAC address for the specified PC that<br />
DHCP assigned IP address for it.<br />
It displays the leased time of the specified PC.<br />
Check it to enable auto-refresh function.<br />
Click it to reload the page.<br />
Vigor2130 Series User’s <strong>Guide</strong> 211
4.13.8 Data Flow Monitor<br />
This page displays the running procedure for the IP address monitored and refreshes the data<br />
in an interval of several seconds. The IP address listed here is configured in Bandwidth<br />
Management. You have to enable IP bandwidth limit and IP session limit before invoke Data<br />
Flow Monitor. If not, a notification dialog box will appear to remind you enabling it.<br />
Click Diagnostics and click Data Flow Monitor to open the web page. You can click IP<br />
Address, TX rate, RX rate or Session link for arranging the data display.<br />
Auto-refresh<br />
Refresh<br />
Index<br />
IP Address<br />
TX rate (kbps)<br />
RX rate (kbps)<br />
Sessions<br />
Action<br />
Check it to enable auto-refresh function.<br />
Click this link to refresh this page manually.<br />
Display the number of the data flow.<br />
Display the IP address of the monitored device.<br />
Display the transmission speed of the monitored device.<br />
If "HNAT" is shown, that means the transmission is<br />
through Hardware NAT can't be computed.<br />
Display the receiving speed of the monitored device.<br />
If "HNAT" is shown, that means the transmission is<br />
through Hardware NAT can't be computed.<br />
Display the session number that you specified in Limit<br />
Session web page.<br />
Block - can prevent specified PC accessing into Internet<br />
within 5 minutes.<br />
212<br />
Vigor2130 Series User’s <strong>Guide</strong>
Unblock – the device with the IP address will be blocked<br />
in five minutes. The remaining time will be shown on the<br />
session column.<br />
4.13.9 Ports State<br />
Click Diagnostics and click Ports State to open the list page. There are for LAN ports and<br />
one WAN port in your router. Through this page, you can know which port is using and you<br />
can get the detailed statistics for each port by moving and clicking the mouse on the connected<br />
one.<br />
Auto-refresh<br />
Refresh<br />
Check it to enable auto-refresh function.<br />
Click it to reload the page if you change the LAN port<br />
connection. Or you can check Auto-refresh to reload the<br />
page by the system automatically.<br />
Vigor2130 Series User’s <strong>Guide</strong> 213
This page is left blank.<br />
214<br />
Vigor2130 Series User’s <strong>Guide</strong>
5 Trouble Shooting<br />
This section will guide you to solve abnormal situations if you cannot access into the Internet<br />
after installing the router and finishing the web configuration. Please follow sections below to<br />
check your basic installation status stage by stage.<br />
• Checking if the hardware status is OK or not.<br />
• Checking if the network connection settings on your computer are OK or not.<br />
• Pinging the router from your computer.<br />
• Checking if the ISP settings are OK or not.<br />
• Backing to factory default setting if necessary.<br />
If all above stages are done and the router still cannot run normally, it is the time for you to<br />
contact your dealer for advanced help.<br />
5.1 Checking If the Hardware Status Is OK or Not<br />
Follow the steps below to verify the hardware status.<br />
1. Check the power line and WLAN/LAN cable connections.<br />
Refer to “1.3 Hardware Installation” for details.<br />
2. Turn on the router. Make sure the ACT LED blink once per second and the<br />
correspondent LAN LED is bright.<br />
3. If not, it means that there is something wrong with the hardware status. Simply back to<br />
“1.3 Hardware Installation” to execute the hardware installation again. And then, try<br />
again.<br />
Vigor2130 Series User’s <strong>Guide</strong> 215
5.2 Checking If the Network Connection Settings on Your<br />
Computer Is OK or Not<br />
Sometimes the link failure occurs due to the wrong network connection settings. After trying<br />
the above section, if the link is stilled failed, please do the steps listed below to make sure the<br />
network connection settings is OK.<br />
For Windows<br />
<br />
The example is based on Windows XP. As to the examples for other operation<br />
systems, please refer to the similar steps or find support notes in<br />
www.draytek.com.<br />
1. Go to Control Panel and then double-click on Network Connections.<br />
2. Right-click on Local Area Connection and click on Properties.<br />
3. Select Internet Protocol (TCP/IP) and then click Properties.<br />
216<br />
Vigor2130 Series User’s <strong>Guide</strong>
4. Select Obtain an IP address automatically and Obtain DNS server address<br />
automatically.<br />
For MacOs<br />
1. Double click on the current used MacOs on the desktop.<br />
2. Open the Application folder and get into Network.<br />
3. On the Network screen, select Using DHCP from the drop down list of Configure IPv4.<br />
Vigor2130 Series User’s <strong>Guide</strong> 217
5.3 Pinging the Router from Your Computer<br />
The default gateway IP address of the router is 192.168.1.1. For some reason, you might need<br />
to use “ping” command to check the link status of the router. The most important thing is<br />
that the computer will receive a reply from 192.168.1.1. If not, please check the IP address<br />
of your computer. We suggest you setting the network connection as get IP automatically.<br />
(Please refer to the section 5.2)<br />
Please follow the steps below to ping the router correctly.<br />
For Windows<br />
1. Open the Command Prompt window (from Start menu> Run).<br />
2. Type command (for Windows 95/98/ME) or cmd (for Windows NT/ 2000/XP). The<br />
DOS command dialog will appear.<br />
3. Type ping 192.168.1.1 and press [Enter]. If the link is OK, the line of “Reply from<br />
192.168.1.1:bytes=32 time
5.4 Checking If the ISP Settings are OK or Not<br />
Open WAN>>Internet Access page and then check whether the ISP settings are set correctly.<br />
Use the Connection Type drop down list to choose Static IP/DHCP/PPPoE/PPTP/L2TP for<br />
reviewing the settings that you configured previously.<br />
Vigor2130 Series User’s <strong>Guide</strong> 219
For Static Users<br />
1. Choose Static IP as the connection type.<br />
2. Check if IP Address, IP Mask and IP Router are set correctly (must identify with the<br />
values from your ISP).<br />
For PPPoE Users<br />
1. Choose PPPoE as the connection type.<br />
2. Check if Username and Password are set correctly (must identify with the values from<br />
your ISP).<br />
220<br />
Vigor2130 Series User’s <strong>Guide</strong>
For PPTP/L2TP Users<br />
1. Choose PPTP/L2TP as the connection type.<br />
2. Check if Username, Password, IP address, Subnet Mask are entered with correct<br />
values that you get from your ISP.<br />
5.5 Forcing Vigor Router into TFTP Mode for Performing the<br />
Firmware Upgrade<br />
1. Press and hold the Factory Reset button. The system will power off and power on the<br />
Vigor Router.<br />
2. Release the Factory Reset button when the ACT LED and its neighbor LED blink<br />
simultaneously.<br />
There are different LED blinking methods in describing TFTP mode status:<br />
Vigor2130: ACT LED & its neighbor LED blink simultaneously.<br />
3. Change your PC IP address to 192.168.1.10.<br />
4. Open Firmware Upgrade Utility and key in Router IP 192.168.1.1 manually.<br />
5. Install Router Tools on one computer that connects to Vigor Router's LAN port.<br />
6. Make sure the computer can ping Vigor's LAN IP. ( Default IP is 192.168.1.1 )<br />
7. Run Router Tools >> Firmware Upgrade Utility.<br />
8. Input Vigor's LAN IP manually or use the . . .button to select.<br />
9. Indicate the firmware location.<br />
Note: There are two firmware types. The .rst firmware format will make the<br />
configurations be back to default settings after upgrading firmware. The .all<br />
firmware format will remain the former configurations after upgrading firmware.<br />
Vigor2130 Series User’s <strong>Guide</strong> 221
10. Input the Password if you have set one, then click Send.<br />
11. There is a bar showing the upgrading process.<br />
12. When the firmware upgrade is successful, the following window will pop up.<br />
222<br />
Vigor2130 Series User’s <strong>Guide</strong>
If the message of Request Timeout. Transfer Abort ! appears, please check if the connection<br />
between the computer and the Vigor is active or not. And, if the message of Incorrect/No file<br />
name. Transfer Abort ! appears, please check if the firmware you download is correct for<br />
your Vigor router.<br />
Note: Please turn off the Firewall protection while upgrading the firmware with Windows<br />
Vista. The Firewall function can be turned off via Control Panel >> Security Center >><br />
Firewall.<br />
Vigor2130 Series User’s <strong>Guide</strong> 223
5.6 Backing to Factory Default Setting If Necessary<br />
Sometimes, a wrong connection can be improved by returning to the default settings. Try to<br />
reset the router by software or hardware.<br />
Warning: After pressing factory default setting, you will loose all settings you did before.<br />
Make sure you have recorded all useful settings before you pressing.<br />
Software Reset<br />
You can reset the router to factory default via Web page.<br />
Go to System Maintenance and choose Reboot System on the web page. The following<br />
screen will appear. Choose Using factory default configuration and click OK. After few<br />
seconds, the router will return all the settings to the factory settings.<br />
Hardware Reset<br />
While the router is running (ACT LED blinking), press the Factory Reset button and hold for<br />
more than 5 seconds. When you see the ACT LED blinks rapidly, please release the button.<br />
Then, the router will restart with the default configuration.<br />
After restore the factory default setting, you can configure the settings for the router again to<br />
fit your personal request.<br />
224<br />
Vigor2130 Series User’s <strong>Guide</strong>
5.7 Contacting Your Dealer<br />
If the router still cannot work correctly after trying many efforts, please contact your dealer for<br />
further help right away. For any questions, please feel free to send e-mail to<br />
support@draytek.com.<br />
Vigor2130 Series User’s <strong>Guide</strong> 225