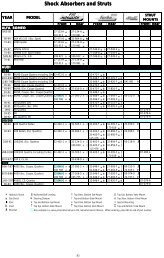
Koni Tech - PDF - Koni North America
Koni Tech - PDF - Koni North America
Koni Tech - PDF - Koni North America

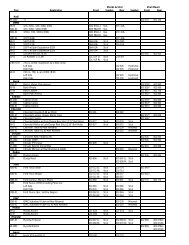
Create successful ePaper yourself
Turn your PDF publications into a flip-book with our unique Google optimized e-Paper software.
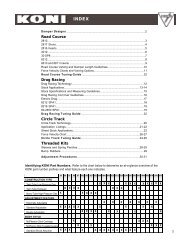
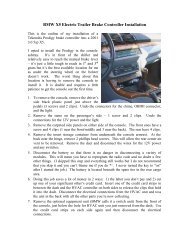
ADJUSTMENT<br />
PROCEDURES<br />
80, 82, 86, 87, 88, 90, 8040, 8240, 8640 SERIES<br />
REBOUND ADJUSTMENT PROCEDURES<br />
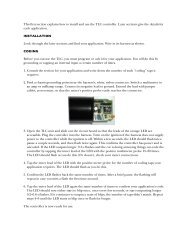
Remove the shock absorber from the vehicle and hold it<br />
vertically with the lower eye or pin attachment in a vise. Use<br />
clamp plates to prevent damage.<br />
Fully collapse the shock absorber, at the same time turning the<br />
dust cap or piston rod slowly to the left (counterclockwise),<br />
until it is felt that the cams of the adjusting nut engage in the<br />
recesses of the foot valve assembly.<br />
Some shock absorbers include a bump rubber concealed under<br />
the dust cover that must be removed prior to adjusting.<br />
The damper may have already been adjusted. Therefore check<br />
whether the shock absorber is in the unadjusted position or not<br />
by keeping it collapsed and gently turning further to the left<br />
counting at the same time the half turns until a stop is felt. Stop<br />
turning then and do not use force.<br />
Keeping the shock absorber collapsed, make 1 half turn (180 o )<br />
to the right (clockwise). In case of prior adjustment add the<br />
number of half turns previously found. The total range is about<br />
5 half turns.<br />
Pull the shock absorber out vertically without turning for at least<br />
1 cm to disengage the adjusting mechanism. The dust cap or<br />
piston rod may now be turned freely.<br />
ADJUSTING DIRECTION<br />
Clockwise = Firmer<br />
Counter Clockwise - Softer<br />
7