
Create successful ePaper yourself
Turn your PDF publications into a flip-book with our unique Google optimized e-Paper software.
HDMIFIX<br />
Programmable EDID Simulator<br />
Description<br />
The HDMIFIX is an user programmable EDID Simulator that<br />
manipulates the communication between source and display.<br />
The source only sees the EDID of the HDMIFIX and does not<br />
know about the hardware connected beyond the HDMIFIX.<br />
This ensures user controlled EDID with predictable results and<br />
faster switching times.<br />
BEWARE ! The manipulation of the automatic negotiation<br />
between source and display can cause incompatible resolutions<br />
outputted by the source resulting in a blank picture on the<br />
display !!<br />
480p@60Hz (resolution 1 of table 1) should result in a picture<br />
all the time -this is the minimum shared standard between the<br />
HDMI consumer and professional DVI world.<br />
The HDMIFIX has two operation modes. The standard mode<br />
allows assignement of one of the 60 Video EDID and the video<br />
output colorspace to one of the 10 user presets (01-10). All<br />
audio formats are turned active in this mode.<br />
PRESET 00 forwards the display EDID to the source, PRESET<br />
11 can lean EDID of any display attached at the HDMIFIX’s<br />
output and forward it to the attached source.<br />
Cycling through one of the 12 presets is the standard operation<br />
mode of the unit.<br />
Activation of the Standard Programming Mode:<br />
To activate Standard Programming Mode press the +10 button<br />
for 2 s while powering the unit. The unit displays “S” for 3<br />
seconds.<br />
In the standard mode you can assign one of the 60 output<br />
resolutions and define the colorspace you want the HDMIFIX<br />
to forward to the source. Pressing MODE one time will bring you<br />
to the video output (Table 2) settings (VIDEO LED is on). With<br />
+1 and +10 buttons you may select one of the 60 output<br />
resolutions. Pressing MODE again will bring you to the FMT<br />
setting (VIDEO and FMT LED is on).<br />
With +1 button you may cycle through the 3 available color<br />
space settings.<br />
If you use the unit with DVI sources that are true DVI then FMT<br />
changes will have no effect, as DVI only uses RGB color space.<br />
Pressing MODE again brings you back in the operation mode.<br />
The FMT LED will flash indicating that a HOTPLUG signal has<br />
been executed. The source should now start renegotiating the<br />
new settings with the HDMIFIX.<br />
The new setting will automatically be stored in the previous<br />
selected PRESET.<br />
Activation of the Expert Programming Mode:<br />
To activate Expert Programming Mode press the +1 button for<br />
2 s while powering the unit. The unit displays “E” for 3 seconds.<br />
In the expert mode you can assign one of the 60 output<br />
resolutions and define the colorspace you want the HDMIFIX<br />
to forward to the source.<br />
In addition to the standard mode, you can select one of 15<br />
audio formats (Table AUDIO 1), specify the numbers of audio<br />
channels (AUDIO 2), defining audio sample frequency<br />
(AUDIO 3) and specify the bit depth for the PCM audio modes<br />
(AUDIO 4). This is the MODE sequence that is available through<br />
repetitive button presses:<br />
Operation Sequence:<br />
VIDEO (00 -60) -> FMT (RGB, C2, C4) ->AUDIO 1 (00-15)<br />
->AUDIO 2 (2CH, 6 CH, 8CH) -> AUDIO 3 (F1-F7) and optional<br />
AUDIO 4 (r1,r2 und r3) for PCM audio modes.<br />
Once you return to the operation mode the unit will flash the<br />
FMT LED indicating that HOTPLUG has been executed. Your<br />
settings will automatically be saved in the previous selected<br />
PRESET.<br />
The source should now start renegotiating the EDID and start<br />
with the settings you have selected in the HDMIFIX.<br />
ATTENTION !<br />
Not all settings must have an effect on the behaviour of the<br />
source. This is varying from manufacturer and HDMI source as<br />
these may not use all functions specified in the HDMI standard.<br />
The HDMIFIX is offering you all kind of manipulations provided<br />
by the standard but has no control over the implementation of<br />
firmware in the individual sources.<br />
HOTPLUG -activating the settings<br />
The Hotplug signal is the signal that initiates the<br />
resynchronizing of the source. Once the source detects this<br />
signal it starts rereading the EDID.<br />
To force the EDID rereading at any time simply press the<br />
MODE button for 2s. The FMT LED will flash.<br />
Read EDID Save into PRESET 11<br />
HDMIFIX can learn the EDID of any display that is connected to<br />
the output connector. You may use any HDMI or DVI display.<br />
Please select PRESET 11.<br />
Press MODE (first) and (then) +10 simultanously until the<br />
display flashes.<br />
You have now succesfully stored the EDID of the attached<br />
display to the PRESET 11.<br />
You may use this as a reference for other installs or just use it<br />
with the current install to speed up switching times and ensure<br />
reliable operation. You would have to use one HDMIFIX for any<br />
of the sources that are in use.<br />
However we recommend to use one the 60 single output<br />
resolutions EDIDs as they will really force the source into the<br />
resolution that works best with your display, instead of using<br />
the one that is marked as “NATIVE” that is probably not the<br />
best choice.<br />
Give it a try and decide yourself !<br />
RS-232 Port<br />
HDMIFIX has a powerful control and monitoring interface.<br />
You may download new firmware, control the Presets from a<br />
remote system or monitor your adjustments and setting in a<br />
window as real text on your PC monitor.<br />
The settings are fixed 57600 BAUD, 8N1.<br />
For firmware updates and monitoring you can use the<br />
Hyperterminal program that is integrated in the Windows<br />
Accessories.<br />
A preadjusted configuration file for COM 1 can be downloaded<br />
from our website www.spatz-tech.com or www.spatz-tech.de.<br />
SPATZ Tel. +49-7335-921400<br />
Mühlhauser Str.5 Fax. +49-7335-921402<br />
73344 Gruibingen e-mail:spatz@spatz-tech.de<br />
Germany<br />
www.spatz-tech.de
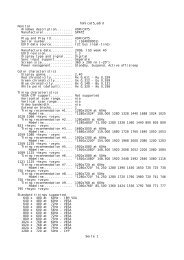
Monitoring<br />
Once the HDMIFIX is connected with your PC, all adjustments<br />
you are making are monitored on the windows screen.<br />
If you execute the LEARN mode the complete EDID file of the<br />
display will be shown on the screen.<br />
This powerful function makes the HDMIFIX a versatile tool for<br />
EDID analysis.<br />
FIRMWARE UPDATE (only for experts)<br />
Unfortunately we have learned that not all firmware of todays<br />
products is in a mature state forcing us to provide bug fixes for<br />
other vendors products.<br />
For this reason we have integrated a firmware update function<br />
that allows you to install new software in the HDMIFIX to<br />
correct problems or provide new functionality.<br />
To do so , you need the update file from our website “*.txt “<br />
and a terminal program like the Hyperterminal described<br />
already earlier.<br />
Please connect the RS-232 adaptor with COM 1 and execute the<br />
HDMIFIX.ht file from your desktop that you downloaded from<br />
our website. This config file will execute the integrated<br />
Hyperterminal program and adjust all necessary settings.<br />
To verify that you have a valid connection operate the HDMIFIX<br />
via front buttons. It will immediately start returning status<br />
messages on the screen.<br />
Now disconnect the HDMIFIX from power and repower it with<br />
the MODE button pressed for 5s. You can see the countdown<br />
sequence in the terminal window.<br />
Once the unit is ready to receive the file it will display “dL”<br />
in the display and the terminal window will show the message:<br />
„SOFTWARE DOWNLOAD Erasing Chip Ready“<br />
Transmit FIRMWARE to the unit<br />
Now open TRANSMISSION and select „SEND TEXTFILE“. You<br />
will have to specify the place where your firmware update file<br />
(e.g. „FX080307.txt“) is located.<br />
Once you have confirmed, the transmission will start<br />
immediately. The Video LED is flashing and after approx. 10s<br />
your update has finished.<br />
WARNING !!<br />
Do not remove the power while updating. Units damaged<br />
because of flashing them to death is not under warranty.<br />
RESET<br />
The HDMIFIX has 11 factory PRESETs that may be customized<br />
by the user. If you need to RESET the unit please follow this<br />
procedure.<br />
Press MODE and +1 simultanoulsy then power the unit and hold<br />
the buttons until all 3 LEDs are flashing. You have now<br />
succesfully restored the PRESET setting from Table 1.<br />
Technical Data<br />
POWER<br />
DC 5V, 1 x 2,1 mm,<br />
min. 400mA<br />
Video input<br />
DVI or HDMI<br />
Video output<br />
DVI or HDMI<br />
Supported resolutions 480i –1080p<br />
VGA-WUXGA, 2k<br />
Supported framerates 24-120 Hz<br />
Weight<br />
70g<br />
Dimensions<br />
105 x 76 x 30 mm<br />
Table 1 (Factory Presets):<br />
01) 720x480p/59.94<br />
02) 720x576p/50<br />
03) 1280x720p/60<br />
04) 1280x720p/50<br />
05) 1920x1080i/60<br />
06) 1920x1080i/50<br />
07) 1920x1080p/60<br />
08) 1920x1080p/50<br />
09) 1920x1080p/24<br />
10) 1024x768/60<br />
11) Iiyama B2403WS<br />
Table 2:<br />
01) 576i/50 02) 720x576p/50<br />
03) 1280x720p/50 04) 1920x1080i/50<br />
05) 1920x1080i/50 06) 1920x1080p/50<br />
07) 1920x1080p/50 08) 480i/59,94<br />
09) 640x480p/59,9 10) 720x480p/59,9<br />
11) 1280x720p/60 12) 1920x1080i/60<br />
13) 1920x1080p/60 14) 1920x1080p/24<br />
15) 1920x1080p/25 16) 1920x1080p/30<br />
17) reserved* 18) reserved*<br />
19) reserved* 20) 640x480/60<br />
21) 640x480/75 22) 848x480/60<br />
23) 800x600/50 24) 800x600/60<br />
25) 800x600/75 <strong>26</strong>) 1024x768/50<br />
27) 1024x768/60 28) 1024x768/75<br />
29) 1152x864/75 30) 1280x768/50<br />
31) 1280x768/60 32) 1280x768/75<br />
33) 1360x768/60 34) 1364x768/50<br />
35) 1364x768/60 36) 1364x768/75<br />
37) 1280x1024/50 38) 1280x1024/60<br />
39) 1280x1024/75 40) 1366x1024/60<br />
41) 1400x1050/50 42) 1400x1050/60<br />
43) 1400x1050/75 44) 1680x1050/60<br />
45) 1600x1200/50 46) 1600x1200/60<br />
47) 1920x1200/50 48) 1920x1200/60<br />
49) 2048x1080p/50 50) 2048x1080p/50<br />
51) 2048x1080p/60 52) reserved*<br />
53) reserved* 54) reserved*<br />
55) reserved* 56) reserved*<br />
57) reserved* 58) reserved*<br />
59) reserved* 60) reserved*<br />
FMT (Color Space)<br />
rb RGB<br />
c2 RGB + Component 4 :2:2<br />
c4 RGB + Component 4 :4 :4<br />
AUDIO 1 :<br />
01) LPCM 2.0 48kHz 24bit speaker=FL/FR<br />
02) DolbyDigital (AC-3) 5.1 48kHz 640<strong>kb</strong>ps max.<br />
speaker=FL/FR,LFE,FC,RL/RR<br />
03) MPEG-1 2.0 48kHz 192<strong>kb</strong>ps max.<br />
speaker=FL/FR<br />
04) MP3 2.0 48kHz 192<strong>kb</strong>ps max.<br />
speaker=FL/FR<br />
05) MPEG-2 (multichannel) 5.1 48kHz 528<strong>kb</strong>ps max.<br />
speaker=FL/FR,LFE,FC,RL/RR<br />
06) AAC5.1 48kHz 512<strong>kb</strong>ps max.<br />
speaker=FL/FR,LFE,FC,RL/RR<br />
07) DTS 5.1 48kHz 1536<strong>kb</strong>ps max.<br />
speaker=FL/FR,LFE,FC,RL/RR<br />
08) ATRAC 2.0 48kHz 292<strong>kb</strong>ps max.<br />
speaker=FL/FR<br />
09) 5.1 44. 1kHz (unspecified)<strong>kb</strong>ps max.<br />
speaker=FL/FR,LFE,FC,RL/RR<br />
10) 7.1 48kHz (max.)<strong>kb</strong>ps max.<br />
speaker=FL/FR,LFE,FC,RL/RR,RLC/RRC<br />
SPATZ Tel. +49-7335-921400<br />
Mühlhauser Str.5 Fax. +49-7335-921402<br />
73344 Gruibingen e-mail:spatz@spatz-tech.de<br />
Germany<br />
www.spatz-tech.de
11) 7.1 96kHz (min.)<strong>kb</strong>ps max.<br />
speaker=FL/FR,LFE,FC,RL/RR,RLC/RRC<br />
12) 7.1 96kHz (unspecified)<strong>kb</strong>ps max.<br />
speaker=FL/FR,LFE,FC,RL/RR,RLC/RRC<br />
13) (reserved) 5.1 96kHz (max.)<strong>kb</strong>ps max.<br />
speaker=FL/FR,LFE,FC,RL/RR,RLC/RRC<br />
14) (reserved) 5.1 96kHz (max.)<strong>kb</strong>ps max.<br />
speaker=FL/FR,LFE,FC,RL/RR,RLC/RRC<br />
15) (reserved) 5.1 96kHz (max.)<strong>kb</strong>ps max.<br />
speaker=FL/FR,LFE,FC,RL/RR,RLC/RRC<br />
AUDIO 2 :<br />
c2<br />
c6<br />
c8<br />
2 Kanal Audio<br />
6 Kanal Audio<br />
8 Kanal Audio<br />
AUDIO 3 :<br />
F1) 32kHz<br />
F2) 44.1kHz<br />
F3) 48kHz<br />
F4) 88.2kHz<br />
F5) 96kHz<br />
F6) 176kHz<br />
F7) 192kHz<br />
AUDIO 4 (only selectable with AUDIO 01 PCM Mode):<br />
r1<br />
r2<br />
r3<br />
16 Bit<br />
20 Bit<br />
24 Bit<br />
RS-232 Commands and Pinout<br />
To select Presets remotely please send following<br />
RS-232 commands<br />
Settings 57600 BAUD, 8N1<br />
P00 Selects PRESET 00<br />
P01 Selects PRESET 01<br />
P02 Selects PRESET 02<br />
P03 Selects PRESET 03<br />
P04 Selects PRESET 04<br />
P05 Selects PRESET 05<br />
P06 Selects PRESET 06<br />
P07 Selects PRESET 07<br />
P08 Selects PRESET 08<br />
P09 Selects PRESET 09<br />
P10 Selects PRESET 10<br />
P11 Selects PRESET 11<br />
HOT Generates Hotplug Signal<br />
RS-232 Pin Out<br />
3,5mm jack<br />
SubD 9-pin<br />
Tip Pin 3<br />
Ring Pin 2<br />
Ground Pin 5<br />
SPATZ Tel. +49-7335-921400<br />
Mühlhauser Str.5 Fax. +49-7335-921402<br />
73344 Gruibingen e-mail:spatz@spatz-tech.de<br />
Germany<br />
www.spatz-tech.de