The working principle of air-displacement pipettes - John Morris ...
The working principle of air-displacement pipettes - John Morris ...
The working principle of air-displacement pipettes - John Morris ...

You also want an ePaper? Increase the reach of your titles
YUMPU automatically turns print PDFs into web optimized ePapers that Google loves.
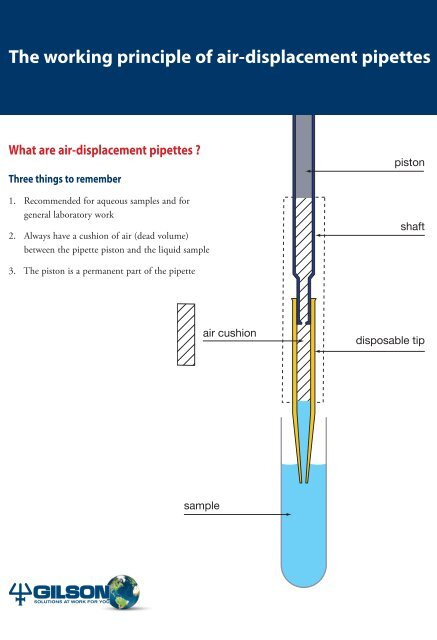
<strong>The</strong> <strong>working</strong> <strong>principle</strong> <strong>of</strong> <strong>air</strong>-<strong>displacement</strong> <strong>pipettes</strong><br />
What are <strong>air</strong>-<strong>displacement</strong> <strong>pipettes</strong> ?<br />
Three things to remember<br />
1. Recommended for aqueous samples and for<br />
general laboratory work<br />
2. Always have a cushion <strong>of</strong> <strong>air</strong> (dead volume)<br />
between the pipette piston and the liquid sample<br />
piston<br />
shaft<br />
3. <strong>The</strong> piston is a permanent part <strong>of</strong> the pipette<br />
<strong>air</strong> cushion<br />
disposable tip <br />
sample
How do <strong>air</strong>-<strong>displacement</strong> <strong>pipettes</strong> work?<br />
When the push-button is pressed on an <strong>air</strong>-<strong>displacement</strong> pipette, the piston inside the instrument<br />
moves down to let <strong>air</strong> out. Air is displaced by the piston. <strong>The</strong> volume <strong>of</strong> <strong>air</strong> displaced is equivalent to<br />
the volume <strong>of</strong> liquid aspirated.<br />
<strong>The</strong> schematic drawings (below) show how the piston determines the volume <strong>of</strong> <strong>air</strong> displaced and<br />
subsequently the volume <strong>of</strong> sample aspirated.<br />
One<br />
Two<br />
Three<br />
Four<br />
1<br />
0<br />
0<br />
Set the volume<br />
<strong>The</strong> required volume<br />
is set. <strong>The</strong><br />
piston moves to<br />
the appropriate<br />
position.<br />
Prepare for aspiration<br />
<strong>The</strong> push-button is<br />
pressed prior<br />
to sample aspiration.<br />
<strong>The</strong> piston descends<br />
and expels a volume<br />
<strong>of</strong> <strong>air</strong> equal to the<br />
selected volume <strong>of</strong><br />
liquid.<br />
Aspirate the sample<br />
As the push-button<br />
is released, a partial<br />
vacuum is created<br />
inside the tip. <strong>The</strong><br />
ambient atmospheric<br />
pressure<br />
forces the desired<br />
volume <strong>of</strong> liquid<br />
through the orifice<br />
into the tip.<br />
Dispense the sample<br />
<strong>The</strong> push-button is<br />
pressed again. Air<br />
pressure increases<br />
inside the shaft<br />
and the tip. <strong>The</strong><br />
compressed <strong>air</strong><br />
pushes the liquid<br />
out <strong>of</strong> the tip.
Air-<strong>displacement</strong> / Forward mode<br />
In general, the precision <strong>of</strong> the<br />
forward mode relies on precise<br />
draining by <strong>air</strong> pressure<br />
(<strong>air</strong>-<strong>displacement</strong> pipetters) or<br />
internal wiping <strong>of</strong> the pipette barrel<br />
(positive-<strong>displacement</strong> pipetters).<br />
1<br />
Preparation<br />
Hold the instrument in a nearly<br />
vertical position. Depress the plunger<br />
smoothly to the first stop position.<br />
2<br />
Aspiration<br />
Immerse the pipette tip in the<br />
liquid*. Allow the plunger to move up<br />
smoothly to the rest position. Wait one<br />
second so that all the liquid has time to<br />
move up into the tip.<br />
rest position<br />
first stop<br />
second stop or purge<br />
* <strong>The</strong> immersion depth <strong>of</strong> your tip can<br />
have a significant effect on your results. If<br />
the tip is immersed too deeply, droplets<br />
will form on the outside <strong>of</strong> the tip and<br />
they will be deposited along with your<br />
sample. If the tip is not immersed deeply<br />
enough, vortexing will occur and your<br />
pipette will not aspirate the selected<br />
volume.<br />
volume immersion depth<br />
µl mm<br />
0.1 - 1 1<br />
1 - 100 2-3<br />
101 - 1000 2-4<br />
1001 µl -10 ml 3-6
3 Distribution<br />
Purge<br />
4 5<br />
Home<br />
Place the pipette tip at an<br />
Wait one second, then depress<br />
Allow the plunger to move up<br />
angle (10 to 45°) against the the plunger to the second stop to the rest position.<br />
inside wall <strong>of</strong> the receiving position. This “blow-out” stroke<br />
vessel. Depress the plunger smoothly removes any remaining sample<br />
to the first stop position.<br />
from the tip. Remove pipette<br />
tip end from sidewall by sliding<br />
it up the wall.
Air-<strong>displacement</strong> / Reverse mode<br />
In reverse mode pipetting, the purge<br />
stroke is used during preparation.<br />
During aspiration, an amount<br />
<strong>of</strong> liquid equal to the amount <strong>of</strong><br />
purged <strong>air</strong> is added. This amount<br />
compensates for the liquid that<br />
remains as film inside the tip during<br />
dispensing.<br />
1<br />
Preparation<br />
Hold the instrument in a nearly<br />
vertical position. Depress the plunger<br />
smoothly to the second stop position.<br />
2<br />
Aspiration<br />
Immerse the pipette tip in the<br />
liquid*. Allow the plunger to move up<br />
smoothly to the rest position. Wait one<br />
second so that all the liquid has time to<br />
move up into the tip.<br />
rest position<br />
first stop<br />
second stop or purge
3 4 5<br />
Distribution<br />
Re-aspiration<br />
Complete purge<br />
Place the pipette tip at an<br />
If the pipette tip is to be reused<br />
Wait one second and purge. If<br />
angle (10 to 45°) against the for the same sample, maintain the pipette tip is not to be<br />
inside wall <strong>of</strong> the receiving the plunger in the intermediate re-used, depress the plunger to<br />
vessel. Depress the plunger position for subsequent immersion<br />
for the next pipetting cycle and priate waste container and then eject<br />
purge position over an appro-<br />
smoothly to the first stop<br />
position. Wait one second.<br />
restart operation 2.<br />
the tip.