product guide model 463720110 - Char-Broil Grills
product guide model 463720110 - Char-Broil Grills
product guide model 463720110 - Char-Broil Grills

You also want an ePaper? Increase the reach of your titles
YUMPU automatically turns print PDFs into web optimized ePapers that Google loves.
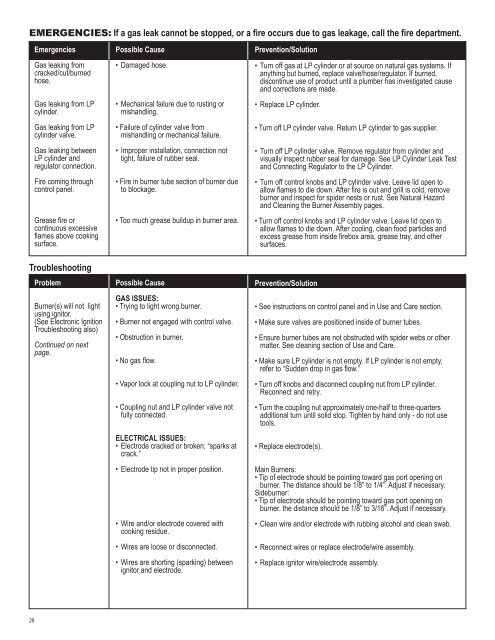
EMERGENCIES: If a gas leak cannot be stopped, or a fire occurs due to gas leakage, call the fire department.<br />
Emergencies<br />
Gas leaking from<br />
cracked/cut/burned<br />
hose.<br />
Gas leaking from LP<br />
cylinder.<br />
Gas leaking from LP<br />
cylinder valve.<br />
Gas leaking between<br />
LP cylinder and<br />
regulator connection.<br />
Fire coming through<br />
control panel.<br />
Grease fire or<br />
continuous excessive<br />
flames above cooking<br />
surface.<br />
Possible Cause<br />
• Damaged hose.<br />
• Mechanical failure due to rusting or<br />
mishandling.<br />
• Failure of cylinder valve from<br />
mishandling or mechanical failure.<br />
• Improper installation, connection not<br />
tight, failure of rubber seal.<br />
• Fire in burner tube section of burner due<br />
to blockage.<br />
• Too much grease buildup in burner area.<br />
Prevention/Solution<br />
• Turn off gas at LP cylinder or at source on natural gas systems. If<br />
anything but burned, replace valve/hose/regulator. If burned,<br />
discontinue use of <strong>product</strong> until a plumber has investigated cause<br />
and corrections are made.<br />
• Replace LP cylinder.<br />
• Turn off LP cylinder valve. Return LP cylinder to gas supplier.<br />
• Turn off LP cylinder valve. Remove regulator from cylinder and<br />
visually inspect rubber seal for damage. See LP Cylinder Leak Test<br />
and Connecting Regulator to the LP Cylinder.<br />
• Turn off control knobs and LP cylinder valve. Leave lid open to<br />
allow flames to die down. After fire is out and grill is cold, remove<br />
burner and inspect for spider nests or rust. See Natural Hazard<br />
and Cleaning the Burner Assembly pages.<br />
• Turn off control knobs and LP cylinder valve. Leave lid open to<br />
allow flames to die down. After cooling, clean food particles and<br />
excess grease from inside firebox area, grease tray, and other<br />
surfaces.<br />
Troubleshooting<br />
Problem<br />
Burner(s) will not light<br />
using ignitor.<br />
(See Electronic Ignition<br />
Troubleshooting also)<br />
Continued on next<br />
page.<br />
Possible Cause<br />
GAS ISSUES:<br />
• Trying to light wrong burner.<br />
• Burner not engaged with control valve.<br />
• Obstruction in burner.<br />
• No gas flow.<br />
• Vapor lock at coupling nut to LP cylinder.<br />
• Coupling nut and LP cylinder valve not<br />
fully connected.<br />
ELECTRICAL ISSUES:<br />
• Electrode cracked or broken; “sparks at<br />
crack.”<br />
• Electrode tip not in proper position.<br />
• Wire and/or electrode covered with<br />
cooking residue.<br />
• Wires are loose or disconnected.<br />
• Wires are shorting (sparking) between<br />
ignitor and electrode.<br />
Prevention/Solution<br />
• See instructions on control panel and in Use and Care section.<br />
• Make sure valves are positioned inside of burner tubes.<br />
• Ensure burner tubes are not obstructed with spider webs or other<br />
matter. See cleaning section of Use and Care.<br />
• Make sure LP cylinder is not empty. If LP cylinder is not empty,<br />
refer to “Sudden drop in gas flow.”<br />
• Turn off knobs and disconnect coupling nut from LP cylinder.<br />
Reconnect and retry.<br />
• Turn the coupling nut approximately one-half to three-quarters<br />
additional turn until solid stop. Tighten by hand only - do not use<br />
tools.<br />
• Replace electrode(s).<br />
Main Burners:<br />
• Tip of electrode should be pointing – toward + gas port opening on<br />
burner. The distance should be 1/8” to 1/4”. Adjust if necessary.<br />
Sideburner:<br />
• Tip of electrode should be pointing toward gas port opening on<br />
burner. the distance should be 1/8” to 3/16”. Adjust if necessary.<br />
• Clean wire and/or electrode with rubbing alcohol and clean swab.<br />
• Reconnect wires or replace electrode/wire assembly.<br />
• Replace ignitor wire/electrode assembly.<br />
28