- Page 1 and 2:
QNAP Turbo NAS Software User Manual
- Page 3 and 4:
...................................
- Page 5 and 6:
1. Notice Thank you for choosing th
- Page 7 and 8:
1.2 Symbols in this document Warnin
- Page 9 and 10:
2. Getting Started Web-based Setup
- Page 11 and 12:
2. Run the Finder. If the Finder is
- Page 13 and 14:
6. Click “START INSTALLATION” i
- Page 15 and 16:
2.1 Browse the CD-ROM The product C
- Page 17 and 18:
2.2 Hard Disk Drive Compatibility L
- Page 19 and 20:
LE D Co lo ur LE D S ta tus De s c
- Page 21 and 22:
2.4 Connect to the NAS Network Shar
- Page 23 and 24:
2.5 Connect to the NAS by a Web Bro
- Page 25 and 26:
4. The login portal will be shown.
- Page 27 and 28:
7. To switch to another application
- Page 29 and 30:
2.6 System Migration Users can migr
- Page 31 and 32:
Follow the steps below to perform s
- Page 33 and 34:
3.1 General Settings Sy ste m Adm i
- Page 35 and 36:
Da y light Sa v ing Tim e If your r
- Page 37 and 38:
3.2 Network TC P/IP (i) IP A d d r
- Page 39 and 40:
Jumbo Frame setting, select the app
- Page 42 and 43:
A d v a nc e d Op tio ns A Virtual
- Page 45 and 46:
4. Click the Edit button under “I
- Page 47 and 48:
Balance-alb (Adaptive Load Balancin
- Page 49 and 50:
Wi- F i To connect the NAS to a Wi-
- Page 51 and 52:
Click “Rescan” to search for av
- Page 53 and 54:
2 . Ma nua lly c o nne c t to a W i
- Page 55 and 56:
Click “Finish” after the NAS ha
- Page 57 and 58:
DDNS To allow remote access to the
- Page 59 and 60:
To use this function, select the op
- Page 61 and 62:
3.3 Service Binding No te : The ser
- Page 63 and 64:
3.4 Hardware Configure the hardware
- Page 65 and 66:
E na b le ha r d d is k s ta nd b y
- Page 67 and 68:
3.5 Security Se curity Le v e l Spe
- Page 69 and 70:
Im port SSL Se cure C e rtificate T
- Page 71 and 72:
C onfigure IM The NAS supports inst
- Page 73 and 74:
The authorized Windows Live Messeng
- Page 75:
Ale rt Notification Select the type
- Page 78 and 79:
Po we r o n/ p o we r o ff/ r e s t
- Page 80 and 81:
3.9 Back up/Restore Settings Ba c k
- Page 82 and 83:
Sy ste m C onne ction Logs The NAS
- Page 84 and 85:
On- line Use rs The information of
- Page 86 and 87:
3.11 Firmware Update Upda te F irm
- Page 88 and 89:
Login the NAS as an administrator.
- Page 90 and 91:
3.12 Restore to Factory Default To
- Page 92 and 93:
Dis k Co nfig ura tio n Single disk
- Page 94 and 95:
RAID 5 D isk Volume The data are st
- Page 96 and 97:
Ex pa nd C a pa city (Online RAID C
- Page 98 and 99:
When the description displays “Pl
- Page 100 and 101:
After changing the hard drives and
- Page 102 and 103:
Migra te (Online RAID Le v e l Migr
- Page 104 and 105:
Plug in the new 1TB hard drives to
- Page 106 and 107:
Select one or more available drives
- Page 108 and 109:
The NAS will enter “Read only”
- Page 110 and 111:
Add a ha rd driv e Follow the steps
- Page 112 and 113:
Bitm a p Bitmap improves the time f
- Page 114 and 115:
S ta nd a r d RA ID QNA P RA ID 5 S
- Page 116 and 117:
F urthe r info r m a tio n a b o ut
- Page 118 and 119:
RAID 10 * 6 1 Online RAID capacity
- Page 120 and 121:
RAID 5 * 3 4 Online RAID level migr
- Page 122 and 123:
4.4 Encrypted File System This feat
- Page 124 and 125:
A c tiv a te d is k v o lum e e nc
- Page 126 and 127:
5. Select “Yes” for the “Encr
- Page 128 and 129:
Be ha v io r o f a n e nc r y p te
- Page 130 and 131:
U nlo c k a d is k v o lum e m a nu
- Page 132 and 133:
The description below applies to no
- Page 134 and 135:
4. Upon successful creation the iSC
- Page 136 and 137:
3. Select to create an iSCSI target
- Page 138 and 139:
6. Enter the CHAP authentication se
- Page 140 and 141:
8. Confirm the settings and click
- Page 142 and 143:
4.5.2 Target Management Create iSCS
- Page 144 and 145:
4. Select the target to map the LUN
- Page 146 and 147:
Ite m S ta tus De s c r ip tio n iS
- Page 148 and 149:
Switch LUN mapping The description
- Page 150 and 151:
iSCSI LUN capacity expansion The NA
- Page 152 and 153:
Optimize iSCSI performance In the e
- Page 154 and 155:
4.5.2.1 Connect to the iSCSI target
- Page 156 and 157:
You may click “Advanced” to spe
- Page 158 and 159:
After disk initialization and forma
- Page 160 and 161:
Click the “Discover Targets” ta
- Page 162 and 163:
All the available iSCSI targets on
- Page 164 and 165:
Click the “Status” tab, select
- Page 166 and 167:
4.5.2.3 Connect to the iSCSI target
- Page 168 and 169:
4.5.3 Advanced ACL The description
- Page 170 and 171:
If no LUN masking policy is specifi
- Page 172 and 173:
4.5.4 LUN Backup The NAS supports b
- Page 174 and 175:
4. Specify the destination where th
- Page 176 and 177:
6. Specify the backup schedule. The
- Page 178 and 179:
9. The backup job is shown on the l
- Page 180 and 181:
3. Specify the protocol, IP address
- Page 182 and 183:
6. The settings will be shown. Ente
- Page 184 and 185:
Create an iSCSI LUN Snapshot Before
- Page 186 and 187:
5. Specify the snapshot schedule an
- Page 188 and 189:
9. Go to “iSCSI” > “Target Ma
- Page 190 and 191:
3. Login the NAS as an administrato
- Page 192 and 193:
Enter the target server IP and port
- Page 194 and 195:
Click “Finish” to exit the wiza
- Page 196 and 197:
5. Access Right Management Domain S
- Page 198 and 199:
5.1.1 Join the NAS to Active Direct
- Page 200 and 201:
Join the NAS to Activ e Dire ctory
- Page 202 and 203:
3. Enter the domain name of the dom
- Page 204 and 205:
6. Upon successful login to the dom
- Page 206 and 207:
Windows Server 2008 Check the AD se
- Page 208 and 209:
c. Go to “Local Policies” > “
- Page 210 and 211:
5.1.2 Connect the NAS to an LDAP Di
- Page 212 and 213:
5. Configure LDAP authentication op
- Page 214 and 215:
6. When the NAS is connected to an
- Page 216 and 217:
Co nfig ura tio n e x a m p le s :
- Page 218 and 219:
The following information is requir
- Page 220 and 221:
Create Multiple Users 1. To create
- Page 222 and 223:
4. Select to create a private netwo
- Page 224 and 225:
7. Check that the users have been c
- Page 226 and 227:
Import/Export Users You can import
- Page 228 and 229:
Im p o r t us e r s Before you impo
- Page 230 and 231:
6. Click “Finish” after the use
- Page 232 and 233:
CS V (E x c e l) 1. Open a new file
- Page 234 and 235:
5.3 User Groups A user group is a c
- Page 236 and 237:
1. To create a network share, click
- Page 238 and 239:
4. Select the way you want to speci
- Page 240 and 241:
6. Confirm the settings and click
- Page 242 and 243:
To delete a network share, select t
- Page 244 and 245:
Folder Permissions Configure folder
- Page 246 and 247:
Click “+ Add” to select more us
- Page 248 and 249:
Subfolder Permissions The NAS suppo
- Page 250 and 251:
No te : If you have specified “de
- Page 252 and 253:
Only the owner can delete the conte
- Page 254 and 255:
Microsoft Networking Host Access Co
- Page 256 and 257:
ISO Sha re F olde rs You can mount
- Page 258 and 259:
5. Confirm the settings and click
- Page 260 and 261:
F olde r Aggre ga tion You can aggr
- Page 262 and 263:
4. Click (Link Configuration) and e
- Page 264 and 265:
Adv a nce d Options “Advanced Fol
- Page 266 and 267:
5.5 Quota To allocate the disk volu
- Page 268 and 269:
6.1 Microsoft Networking Microsoft
- Page 270 and 271:
Adv a nce d Options W INS s e r v e
- Page 272 and 273:
6.2 Apple Networking To connect to
- Page 274 and 275:
Enter the connection information in
- Page 276 and 277:
Specify the access right to the net
- Page 278 and 279:
6.4 FTP Service When you turn on FT
- Page 280 and 281:
6.5 Telnet/SSH Turn on this option
- Page 282 and 283:
282
- Page 284 and 285:
To use Web Server, follow the steps
- Page 286 and 287:
Windows XP: 1. Right click “My Co
- Page 288 and 289:
4. Enter the URL of your NAS with t
- Page 290 and 291:
7. The network place has been creat
- Page 292 and 293:
Windows Vista If you are using Wind
- Page 294 and 295:
3. Select “Choose a custom networ
- Page 296 and 297:
6. Type a name for this network loc
- Page 298 and 299:
8. You can locate the web folder in
- Page 300 and 301:
Mac OS X Follow the steps below to
- Page 302 and 303:
Ubuntu Follow the steps below to co
- Page 304 and 305:
3. This WebDAV connection has been
- Page 306 and 307:
6.7.1 Virtual Host Virtual host is
- Page 308 and 309:
7. Continue to enter the informatio
- Page 310 and 311:
6.8 Network Service Discovery UPnP
- Page 312 and 313:
7. Applications Web File Manager 31
- Page 314 and 315:
You can upload, download, rename, m
- Page 316 and 317:
Download file i. Select a file or f
- Page 318 and 319:
Files/Folders Search The Web File M
- Page 320 and 321:
The ISO share will appear on the fo
- Page 322 and 323:
If the “Advanced Folder Permissio
- Page 324 and 325:
If the “Advanced Folder Permissio
- Page 326 and 327:
To remove the permissions on the li
- Page 328 and 329:
The following options are available
- Page 330 and 331:
To share the links by emails, selec
- Page 332 and 333:
4. Select either “System Users”
- Page 334 and 335:
Me dia C e nte r The folders and mu
- Page 336 and 337:
Browse the files in detailed view.
- Page 338 and 339:
View image files When viewing an im
- Page 340 and 341:
Select the playlist and click “Sa
- Page 342 and 343:
To copy the files from other locati
- Page 344 and 345:
Manage album To manage an album (fo
- Page 346 and 347:
Set album cover To set an image fil
- Page 348 and 349:
Slide Show Click to view multiple i
- Page 350 and 351:
Select the image files to publish.
- Page 352 and 353:
Play video The NAS supports playing
- Page 354 and 355:
My Juke box You can create playlist
- Page 356 and 357:
Enter the user information. The use
- Page 358 and 359:
Playlist Editor To create a playlis
- Page 360 and 361:
The name of a photo frame must be 1
- Page 362 and 363:
7.2.1 QMobile QMobile is an applica
- Page 364 and 365:
Get the download link automatically
- Page 366 and 367:
Co nfig ure the NA S s e tting s o
- Page 368 and 369:
No te : 1. For iPhone users This fe
- Page 370 and 371:
A d d S e r v e r Ma nua lly Enter
- Page 372 and 373:
U s e QMo b ile to m a na g e y o u
- Page 374 and 375:
Music view Video view 374
- Page 376 and 377:
Photo Source: Choose the photos fro
- Page 378 and 379:
3. My Favorites You may download th
- Page 380 and 381:
Downloaded files will be shown in
- Page 382 and 383:
Click “Add” to create a Playlis
- Page 384 and 385:
You can play the playlists created
- Page 386 and 387:
7.3 Photo Station The Photo Station
- Page 388 and 389:
4. Connect to the Photo Station fro
- Page 390 and 391:
Ic o n De s c r ip tio n Upload pho
- Page 392 and 393:
2. S ha r e p ho to s a nd v id e o
- Page 394 and 395:
2 .2 Pub lis h Select up to five im
- Page 396 and 397:
S ha r e Pr iv a te A lb um s Click
- Page 398 and 399:
3 .1 F ile up lo a d Under the “F
- Page 400 and 401:
4. E d it a n a lb um To upload or
- Page 402 and 403:
Or g a niz e p ho to s To organize
- Page 404 and 405:
404
- Page 406 and 407:
6. Vie w a v id e o Click a video t
- Page 408 and 409:
Enter the user name (max 32 charact
- Page 410 and 411:
7 .3 A d v a nc e d s e tting s Cus
- Page 412 and 413:
7.4 Music Station The Music Station
- Page 414 and 415:
The three main sections of the Musi
- Page 416 and 417:
2. Pla y lis t: The Music Station o
- Page 418 and 419:
TuneIn Radio: Search for the statio
- Page 420 and 421:
U p lo a d m us ic b y the we b int
- Page 422 and 423:
Before starting to play the music,
- Page 424 and 425:
Pla y m us ic file s Browse the con
- Page 426 and 427:
4. Click to select to use the defau
- Page 428 and 429:
Music Libra ry a nd Account Ma na g
- Page 430 and 431:
3. Enter the user name (max 32 char
- Page 432 and 433:
E d it a n a c c o unt To edit an a
- Page 434 and 435:
Cha ng e p a s s wo r d To change t
- Page 436 and 437:
7.5 Download Station The Download S
- Page 438 and 439:
Global Settings Download Schedule:
- Page 440 and 441:
FTP Connection: Specify the maximum
- Page 442 and 443:
Bandwidth Limit: Specify the maximu
- Page 444 and 445:
BT Search: Select the BT engines to
- Page 446 and 447:
Enter the host name or IP, user nam
- Page 448 and 449:
BT Downloa d To download a BT file,
- Page 450 and 451:
Ic o n De s c r ip tio n Start a do
- Page 452 and 453:
RSS F e e d You can subscribe to RS
- Page 454 and 455:
The common reasons for slow BT down
- Page 456 and 457:
2. Follow the instructions to insta
- Page 458 and 459:
7.6 Surveillance Station The Survei
- Page 460 and 461:
Use the Surv e illa nce Sta tion Cl
- Page 462 and 463:
Click “Test” on the right to en
- Page 464 and 465:
Co nfig ure y o ur NA T r o ute r (
- Page 466 and 467:
Co nne c t to the s na p s ho ts a
- Page 468 and 469:
To configure the iTunes server sett
- Page 470 and 471:
7.8 DLNA Media Server To allow DLNA
- Page 472 and 473:
Database Maintenance Reset root pas
- Page 474 and 475:
The selected add-ons and installati
- Page 476 and 477:
Offline Ins ta lla tio n To install
- Page 478 and 479:
E m a il No tific a tio n: The NAS
- Page 480 and 481:
3. The filters will be shown on the
- Page 482 and 483:
7.12 RADIUS Server The NAS can be c
- Page 484 and 485:
3. Create RADIUS users and their pa
- Page 486 and 487:
7.13 Backup Server Rsy nc Se rv e r
- Page 488 and 489:
You can specify the IP addresses or
- Page 490 and 491:
7.14 Antivirus Sta tus Use the anti
- Page 492 and 493:
Scan Jobs The NAS supports manual a
- Page 494 and 495:
5. Select to scan all the files in
- Page 496 and 497:
7. Specify the actions to take when
- Page 498 and 499:
Re ports View or download the repor
- Page 500 and 501:
7.15 TFTP Server Configure the NAS
- Page 502 and 503:
2. E na b le PPT P o r Op e nVPN s
- Page 504 and 505:
504
- Page 506 and 507:
2. Select “Connect to a workplace
- Page 508 and 509:
PPT P o n Ma c OS X 1 0 .7 1. Choos
- Page 510 and 511:
510
- Page 512 and 513:
PPT P o n iOS 5 1. Go to “Setting
- Page 514 and 515:
Op e nVPN o n W ind o ws 1. Downloa
- Page 516 and 517:
Op e nVPN o n Ma c 1. Download the
- Page 518 and 519:
Cr e a te LDA P U s e r s Under the
- Page 520 and 521:
Jo in a S e c o nd NA S to LDA P Do
- Page 522 and 523:
8. Backup Remote Replication 522 Cl
- Page 524 and 525:
4. Specify the destination folder,
- Page 526 and 527:
8. Click “Finish”. The job will
- Page 528 and 529:
To configure the timeout and retry
- Page 530 and 531:
RTRR Re plication Real-time Remote
- Page 532 and 533:
3. Select the sync locations. Make
- Page 534 and 535:
Re m o te r e p lic a tio n to NA S
- Page 536 and 537:
6. Select “Add More Folder Pairs
- Page 538 and 539:
8. To configure synchronization pol
- Page 540 and 541:
10. Enter a job name. Click “Next
- Page 542 and 543:
Ic o n De s c r ip tio n Enable con
- Page 544 and 545:
Specify the replication policy in
- Page 546 and 547:
You can view the job logs or downlo
- Page 548 and 549:
After setting up the Amazon S3 acco
- Page 550 and 551: After creating an account, click
- Page 552 and 553: Sy m form To use Symform cloud back
- Page 554 and 555: 554
- Page 556 and 557: Note about Symform service: Web adm
- Page 558 and 559: To use this function, follow the st
- Page 560 and 561: 3. Enter the user name and password
- Page 562 and 563: 8.4 External Drive The NAS supports
- Page 564 and 565: 4. Select the backup locations. a.
- Page 566 and 567: 6. Choose between real-time and sch
- Page 568 and 569: 8. Create filters for the backup jo
- Page 570 and 571: 11. Click “Finish” to exit the
- Page 572 and 573: To disable the backup schedule of a
- Page 574 and 575: Specify the backup policy in “Pol
- Page 576 and 577: 3. Go to “Job Logs” and click
- Page 578 and 579: No te : If there are multiple parti
- Page 580 and 581: 9. External Device External Storage
- Page 582 and 583: E nc r y p tio n m a na g e m e nt
- Page 584 and 585: 3. Click “Finish” to lock the d
- Page 586 and 587: 3. Enter the encryption password or
- Page 588 and 589: 3. Select to change the encryption
- Page 590 and 591: 9.2 USB Printer The NAS supports ne
- Page 592 and 593: E nte r IP a d d r e s s e s o r d
- Page 594 and 595: 2. Click “Add a printer”. 3. In
- Page 596 and 597: 6. The wizard will prompt you for t
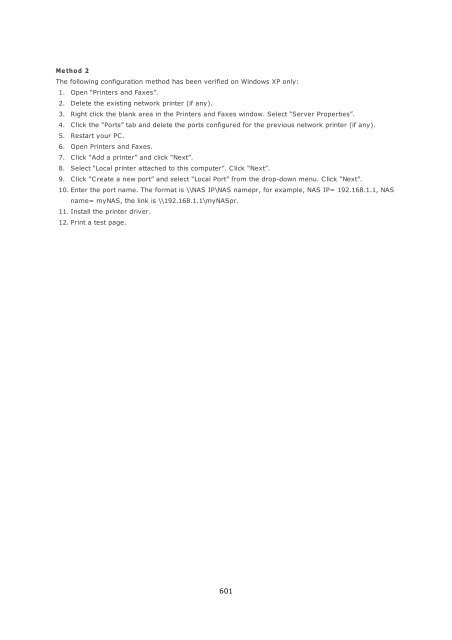
- Page 598 and 599: The following description applies t
- Page 602 and 603: 9.2.3 Mac OS 10.6 If you are using
- Page 604 and 605: 5. Additional options may be availa
- Page 606 and 607: 3. Go to “Print & Fax” on your
- Page 608 and 609: 7. Select the printer driver. 608
- Page 610 and 611: 9.2.5 Mac OS 10.4 If you are using
- Page 612 and 613: 4. Press and hold the “alt” key
- Page 614 and 615: 6. The printer appears on the print
- Page 616 and 617: 3. Click “Network Printer”, and
- Page 618 and 619: 7. Choose the correct printer model
- Page 620 and 621: 9.3 UPS Settings By enabling the UP
- Page 622 and 623: Network master mode A network UPS m
- Page 624 and 625: 624
- Page 626 and 627: 10.1 MyCloudNAS Wizard The first ti
- Page 628 and 629: 3. Select the ports to open on the
- Page 630 and 631: 5. A summary will be shown. You can
- Page 632 and 633: 7. Click the service icons and logi
- Page 634 and 635: 10.2 Configure MyCloudNAS Enable My
- Page 636 and 637: Set MyCloudNAS Access Code: Enter a
- Page 638 and 639: Click “Apply” to save the setti
- Page 640 and 641: Enter the email address. To send th
- Page 642 and 643: If the UPnP router is incompatible
- Page 644 and 645: 11. System Status System Informatio
- Page 646 and 647: 11.3 Resource Monitor You can view
- Page 648 and 649: Bandwidth Transfer: This tab provid
- Page 650 and 651:
12. Use the LCD Panel This feature
- Page 652 and 653:
To encrypt the disk volume*, select
- Page 654 and 655:
Phy s ic a l d is k In Physical dis
- Page 656 and 657:
Sy ste m Me ssa ge s When the NAS e
- Page 658 and 659:
Re g is te r DDNS s e r v ic e If t
- Page 660 and 661:
4. A confirmation email will be sen
- Page 662 and 663:
7. Login your account and click “
- Page 664 and 665:
Co nfig ure DDNS s e r v ic e o n Q
- Page 666 and 667:
Port F orwa rding If your NAS is lo
- Page 668 and 669:
Fill out your personal information
- Page 670 and 671:
While still logged in with Clickate
- Page 672 and 673:
2. S e t the S MS C s e tting s a n
- Page 674 and 675:
Se t up Em a il Ale rt Go to “Sys
- Page 676 and 677:
5. Go to “Notification” > “Al
- Page 678 and 679:
15. Set up UPnP Media Server for Me
- Page 680 and 681:
S e t up T wo nk y Me d ia S e r v
- Page 682 and 683:
S e t up the c o nne c tio n o f m
- Page 684 and 685:
Turn on the TV that is connected to
- Page 686 and 687:
If your TV does not provide an HDMI
- Page 688 and 689:
Next go to “Applications” > “
- Page 690 and 691:
S ta r t the p hp BB3 we b - b a s
- Page 692 and 693:
The installation compatibility page
- Page 694 and 695:
You should see “Tests passed” a
- Page 696 and 697:
phpBB3 creates all the database tab
- Page 698 and 699:
This is the front page of your fres
- Page 700 and 701:
17.1 System Restart/Shutdown By the
- Page 702 and 703:
By the F ind e r Run the Finder. Se
- Page 704 and 705:
18. GNU GENERAL PUBLIC LICENSE Vers
- Page 706 and 707:
The 'System Libraries' of an execut
- Page 708 and 709:
offer spare parts or customer suppo
- Page 710 and 711:
Additional terms, permissive or non
- Page 712 and 713:
Nothing in this License shall be co


