CHAMPIONS â BASIC RULES 01.12.2009 - Champions-Implants
CHAMPIONS â BASIC RULES 01.12.2009 - Champions-Implants
CHAMPIONS â BASIC RULES 01.12.2009 - Champions-Implants

You also want an ePaper? Increase the reach of your titles
YUMPU automatically turns print PDFs into web optimized ePapers that Google loves.
1<br />
<strong>CHAMPIONS</strong> – <strong>BASIC</strong> <strong>RULES</strong> <strong>01.12.2009</strong><br />
1. <strong>Champions</strong> basis rule: Planning<br />
For a fixed dental restoration, insert as many implants as possible. Pay attention to the jaw position. This means that when<br />
one can choose between inserting the implants in the frontal area and inserting them in the distal area, then one should opt<br />
for inserting the implants in the distal area. If possible, the canine and first premolar teeth should be supported. In<br />
addition, pay attention to the distribution of the implants/teeth on the jaw: for a fixed denture, there should be 4-5<br />
implants or fixed teeth in each quadrant. Dental implants can be connected with strong, natural teeth, (no intrusion) and<br />
all long-term studies have even shown that this connection is not just possible but actually recommended.<br />
2. <strong>Champions</strong> basic rule: Planning for the bone<br />
Preferably, the implant should be inserted in the bone that has already healed (more than 6 months of regeneration)<br />
instead of inserting it in the "freshly" extracted alveoli. If one has to implant in the alveolar area, then one should implant<br />
in the palatinal or lingual area rather than the vestibular area: "the vestibular bone is sensitive." For immediate<br />
implantations, one should try to insert implants in the bi- and trifurcation and septum areas and never in inflammatory<br />
osseous areas (e.g. Granuloma). The so-called “party-breakers”, which consist of non resorbable material, are to be<br />
avoided (alloplastic and bovine material) because otherwise, the “party”, that is the new natural bone formation, cannot<br />
take place!<br />
3. <strong>Champions</strong> basic rule: Planning and type of care<br />
If the denture is removable, for the tulips make sure that both quadrants are well supported: four teeth or implants in the<br />
lower jaw, six <strong>Champions</strong> in the upper jaw! Make sure that you connect (laser treated or glued) the MMTs (metal<br />
matrices) with a MEG or a tight wire (secondary splinting)! What is also possible: milled, connected zirconium<br />
frameworks! For this, square-shaped implants (at least six in the upper jaw and four in the lower jaw) are galvanized<br />
through milled zirconium crowns, which are primarily connected together with bars, or milled secondary structures are<br />
fitted on the implants (modified Ledermann school/"modifizierte Ledermann Schule). What a pleasure!<br />
For enquiries or questions, you can also contact our two certified partnership companies '<strong>Champions</strong> – Dental – Lab':<br />
- <strong>Champions</strong>- LAB Nord in Bad Schwartau:<br />
Master dental technician Mrs. Ramona Schmude: + 49- (0) 4518 - 83 62 01<br />
- <strong>Champions</strong>- LAB Süd in Armsheim:<br />
Master dental technician Mr. Harald Feldmann: + 49 - (0) 6734 - 96 08 43<br />
4. <strong>Champions</strong> basic rule: DRILLING<br />
If possible, start to drill both in the upper jaw and in the lower jaw 0,5 – 1 mm palatinally or lingually from the center of<br />
the jaw ridge. In the upper jaw, drill intermittently and rather palatinally. In the lower jaw, drill rather in a straight,<br />
axial direction or also vestibularly. Drill in the area where usually bone atrophy of both jaws occurs. Of course, you must<br />
feel the area (with your fingers!), and a transgingival "drill check" is necessary! The mucosa thickness (after anaesthesia)<br />
is measured either with the drill or with the cannula of the injection needle itself by placing an "endostop" over the<br />
respective instrument, by introducing the instrument transgingivally to the required implant position until reaching the<br />
bone, and then by placing the endostop onto the mucosa with a forcep. The results in mm are measured with a sterile<br />
measure unit. For the measurement of the mucosa thickness, the drills will have the laser marks 2, 4, 6 (the 8 mm-mark<br />
will still be missing, so the mark continues at 10 mm).<br />
The drilling speed should be 200-250 rotations/minute. There should be enough "passage" on the contra-angle (green or<br />
double green).<br />
A cooling is not absolutely necessary, but it is recommended for the D1 bone.<br />
The bone chips of the drills should be either collected (for re-implanting) or wiped off with a sterile swab. In this way,<br />
through drilling, the cut and compression can be more effective.<br />
5. <strong>Champions</strong> – basic rule: Drill – sequence…<br />
in the D1 bone in the lower jaw for all <strong>Champions</strong> implants with a diameter of 3,5 mm:<br />
Yellow-� black-� white<br />
in the D1 bone in the lower jaw for all <strong>Champions</strong> implants with a diameter of 3,0 mm:<br />
Yellow-� black-� Cylinder drill with a diameter of 2 mm<br />
Proceed in the following way when you do not use the white drill or the cylinder drill of a diameter of 2 mm: while drilling<br />
with the black drill, widen the bone cavity a little bit with this drill. When there are further difficulties while inserting the<br />
implant (for example, when a torque of over 60 Ncm has been reached! Please also read the instructions of use of the new<br />
torque wrench!!), then turn out the implant 4 times ¼ rotations (turn the torque wrench around from the metal insertion<br />
aid so that you see “OUT”) and turn it in 6 times ¼ rotations – proceed in this manner until the implant is completely<br />
inserted.
2<br />
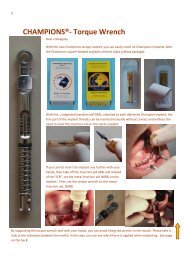
6. <strong>Champions</strong> – basic rule: Torque wrench<br />
The advantage of the new original <strong>Champions</strong>® wrench is that this wrench can be tightened with a torque ranging from<br />
10, 20, 30, 40, 50, 60, 70, 80 until ∞. The advantage: immediate loading can usually be achieved if once the torque of 40<br />
Ncm has been reached, the wrench bends. Then, readjust the torque wrench (with the small wheel at the bottom of the<br />
torque wrench) to 40 Ncm if the moving unit indicates the torque value of 40 Ncm! If you adjust the torque wrench only to<br />
20 Ncm, then the unit will never move to 70 Ncm. It is like the gearbox in a car: the reached torque should be reset so that<br />
you can “shift into the higher gear”! --� See 2 nd page of the new torque wrench instructions of <strong>01.12.2009</strong>! Make sure,<br />
especially for the tulips, not to tighten the wrench to a torque of over 80 Ncm: when a torque reaches more than 80 Ncm,<br />
the tulip head can break. When a square-shaped implant is tightened with a torque of over 100 Ncm, the square-shaped<br />
implant can break over the groove as well!<br />
7. <strong>Champions</strong> – basic rule: Implant diameter<br />
Always start with a 3,5 mm-diameter-implant!!--> Never start with an implant of a diameter of 4,5 mm in the lower jaw<br />
(also after using a yellow & black drill). In case the 3,5-diameter implant has not achieved its primary stability at 40 Ncm,<br />
then one can take this implant out and use it as an osteotome. Instead of this implant, one can then insert a 4,5 mmdiameter<br />
implant. After cleaning, the 3,5 diameter-implant can either be used again for this patient, or the implant can be<br />
sent back to <strong>Champions</strong>-<strong>Implants</strong> GmbH or exchanged by the company without charge. Please send back the cleaned<br />
implant with a “Nonconformity Report” (rinsed, autoclaved, without blood stains!) in the recipient with the corresponding<br />
sticker! The form “Nonconformity Report” can be downloaded in www.champions-forum.de (under “Download”). Since<br />
01.10.09, the access to the FORUM is for free for all customers.<br />
8. <strong>Champions</strong> – basic rule: If possible, implant at least 1-2 mm subcrestally!<br />
It is better to use a shorter implant and to insert it subcrestally than to use a longer implant and insert it equicrestally.<br />
9. <strong>Champions</strong> – basic rule: Immediate loading is ALWAYS possible with the <strong>Champions</strong>, when at least 2-3 implants or<br />
firm teeth can be connected to each other and if primary stability (40 - 70 Ncm) can be achieved!! The only exception<br />
where immediate loading is not always possible (but where the immediate restoration in non-occlusion is possible, also<br />
when there are protrusion movements!) single restoration for one-root, upper teeth (15-25)!!-� After the drainage,<br />
directly glue the implant or the cemented Prep Caps with the approximal surfaces of the adjacent teeth (evtl. areas<br />
underneath) by means of composite layers!<br />
Information for the patients about immediate loading<br />
The patient should be fully informed before surgery: especially for wearers of long-term temporaries for 8 weeks, the first<br />
4-5 days after surgery are not as critical as the time period of the 2 – 8 weeks after surgery. These 2-8 weeks after surgery<br />
are very critical!! The active participation of the patient is absolutely necessary! A loose temporary (for instance, with<br />
“TempBond”), for example in the 3 rd week (stability is at its lowest point!), is considered as the main reason for implant<br />
losses in general! If the temporaries get broken or loose, these must be fixed and repaired as quickly as possible.<br />
Otherwise, there can be shear forces and extra-axial loadings that cannot be controlled! In addition, the patient should eat<br />
soft food and must be informed of what foods, such as foods with sharp edges, should be avoided (e.g. carrots, rolls, crusts<br />
etc.).<br />
10. <strong>Champions</strong> – basic rule: Temporary restoration, temporary fit, and definitive fit<br />
Fit the temporary on the implants with Harvard, Implant Link or similar solid cement! Do not fit a temporary with<br />
TempBond for several weeks. By the way, you can separate the temporary bridge on one or two areas. Then, you can<br />
palpate the fragments with a bar since neither axial nor extra-axial forces have a negative impact on the implants! Shape<br />
the temporary very well in the basal areas of the implants (without any frictions): in this way, the temporary almost only<br />
stays in place with Harvard! After having fitted the framework, cement again with Harvard and glue the fragments<br />
together with the usual composite!<br />
For instance, for restorations for free-end cases or single tooth restorations, the integrated insertion aid can be separated<br />
over the groove with a separating disc. Then, place the insertion aid cement-free on the square-shaped implant and with<br />
your hands connect it with Bonding and composites by means of a bar! The temporary should stay hollow for at least 1<br />
mm and should not touch and irritate the gingiva! Make sure the definitive prosthodontic restoration is fit under hygienic<br />
conditions! There should be no vestibular or lingual “overhangings”!<br />
Many dentist colleagues also use an Impregum to fit the definitive prosthodontic restoration temporarily! In order to<br />
definitely fit the prosthodontic restoration, you can use any cement that is also used for the definitive fitting of dental<br />
crowns or bridges: Harvard, Ketac-Cem, Fuji Plus or Fuji IX… Pay attention to the passive fit of the superstructure on<br />
the implants. In addition, be aware of the approved occlusion concepts of the professional organizations (canine or<br />
balanced group guidance) with cusp and fissure reliefs that are not excessive!