CHAMPIONS®- Torque Wrench - Champions-Implants
CHAMPIONS®- Torque Wrench - Champions-Implants
CHAMPIONS®- Torque Wrench - Champions-Implants

You also want an ePaper? Increase the reach of your titles
YUMPU automatically turns print PDFs into web optimized ePapers that Google loves.
1<br />
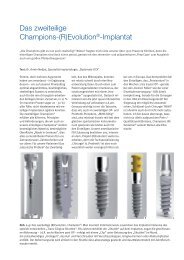
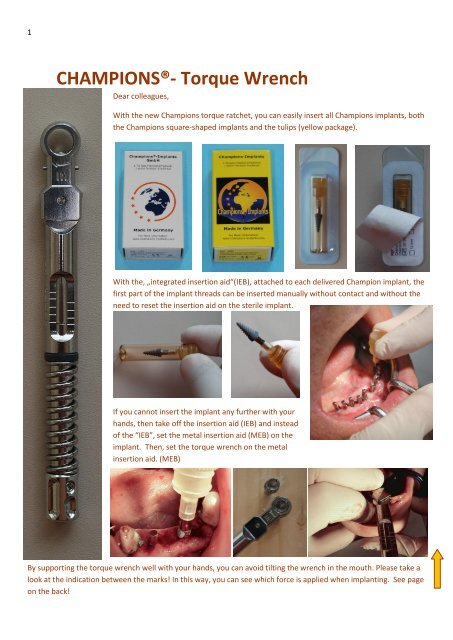
<strong>CHAMPIONS®</strong>- <strong>Torque</strong> <strong>Wrench</strong><br />
Dear colleagues,<br />
With the new <strong>Champions</strong> torque ratchet, you can easily insert all <strong>Champions</strong> implants, both<br />
the <strong>Champions</strong> square-shaped implants and the tulips (yellow package).<br />
With the, „integrated insertion aid“(IEB), attached to each delivered Champion implant, the<br />
first part of the implant threads can be inserted manually without contact and without the<br />
need to reset the insertion aid on the sterile implant.<br />
If you cannot insert the implant any further with your<br />
hands, then take off the insertion aid (IEB) and instead<br />
of the “IEB”, set the metal insertion aid (MEB) on the<br />
implant. Then, set the torque wrench on the metal<br />
insertion aid. (MEB)<br />
By supporting the torque wrench well with your hands, you can avoid tilting the wrench in the mouth. Please take a<br />
look at the indication between the marks! In this way, you can see which force is applied when implanting. See page<br />
on the back!
2<br />
When implanting, you should read the „IN“ from above.<br />
Please take a look at the indications on the left side of the torque wrench- you see the following<br />
indications:<br />
20 – 40 – 60 – 80 – endless (from the bottom to the top)<br />
Start to adjust the torque wrench at torques of 20, 30 or 40 Ncm (you can adjust the torque with the small wheel<br />
at the bottom end of the wrench) and when implanting, from above, observe the movement of the line in<br />
the middle of the indication!<br />
Ideally, a Champion implant should be inserted at a torque of 40 Ncm! However, if the torque wrench bends at a<br />
torque of 40 Ncm, do not yet stop inserting!<br />
This value only means that the implant can be loaded immediately, provided that it is not an implant for a missing<br />
single tooth in the upper jaw.<br />
PLEASE NOTE: If a torque of more than 60 Ncm has been reached, there are two possibilities:<br />
(Tulip heads can break at approximately 80 Ncm, <strong>Champions</strong>- implant threads or square-shaped implant heads can<br />
break at a torque of 100-120 Ncm):<br />
1) If a torque of more than 60 Ncm has been reached, take out the implant completely. In order to widen the<br />
bone cavity, use the black drill and eventually also the white three-square drill or the 2mm- twist drill.
3<br />
Depending on the diameter of the implant, use the following drills: the white drill for an implant of a<br />
diameter of 3,5 mm, the 2 mm – Twist drill for a Champion implant of a diameter of 3,0 mm<br />
2) If during implantation, you still have to insert the implant only 0,5 mm into the bone cavity: after four small<br />
„clicks“ (one click corresponds to approximately 1/8 rotation of the torque wrench), take out the implant<br />
(turn the wrench around from the metal insertion aid so that you see “OUT” instead of “IN”). After five to<br />
six “clicks”, insert the Champion implant again. Then, repeat the procedure when the drill of the bone cavity<br />
is long enough!