วิธี การ Install IOS Router Cisco - Jodoi
วิธี การ Install IOS Router Cisco - Jodoi
วิธี การ Install IOS Router Cisco - Jodoi

Create successful ePaper yourself
Turn your PDF publications into a flip-book with our unique Google optimized e-Paper software.
<strong>วิธี</strong><strong>การ</strong> <strong>Install</strong> <strong>IOS</strong> <strong>Router</strong> <strong>Cisco</strong><br />
นายเกรียงศักดิ์นามโคตร ( Mr.<strong>Jodoi</strong> ) เรียบเรียง<br />
ใน<strong>การ</strong>ทํางานของ <strong>Router</strong> <strong>Cisco</strong> นันอาจจะมี บางครัง ที router boot ไม่ขึน อาจเป็ นเพราะ File <strong>IOS</strong> เสีย หรือ<br />
มี<strong>การ</strong>ลบ File <strong>IOS</strong> ออกไปด้วยความผิดพลาด หรือด้วยสาเหตุประ<strong>การ</strong>ใดก็ตาม อาจจะขึนข้อความตามด้านล่าง<br />
<br />
Boot process failed...<br />
The system is unable to boot automatically. The BOOT<br />
environment variable needs to be set to a bootable<br />
image.<br />
rommon 1 ><br />
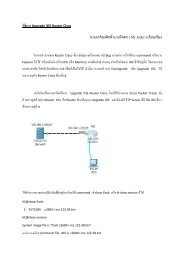
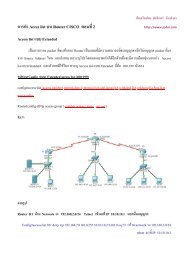
ต่อไปจะเป็ น<strong>การ</strong>สาธิต<strong>วิธี</strong><strong>การ</strong> <strong>Install</strong> <strong>IOS</strong> <strong>Router</strong> <strong>Cisco</strong> โดยใช้โปรแกรม <strong>Cisco</strong> Packet Tracer ดังตัวอย่าง<br />
รูปด้านล่าง <strong>Router</strong> HQ คือ <strong>Router</strong> ทีเราต้อง<strong>การ</strong> <strong>Install</strong> <strong>IOS</strong> และต้องมี TFTP Server ทีมี file <strong>IOS</strong> ทีเราต้อง<strong>การ</strong><br />
อยู่ด้วย
ให้ทดลอง ใช้ command dir flash: เพือตรวจสอบว่ามี file <strong>IOS</strong> อยู่หรือไม่ ดังด้านล่าง<br />
rommon 1 > dir flash:<br />
File size<br />
Checksum File name<br />
28282 bytes (0x6e7a) 0x6e7a sigdef-category.xml<br />
227537 bytes (0x378d1) 0x78d4 sigdef-default.xml<br />
ถ้าไม่มี หรือมีแต่ใช้ไม่ได้ ลองใช้ ? ดู จะพบ command tftpdnld เพือใช้ใน<strong>การ</strong> install <strong>IOS</strong> แบบ<br />
manual นันเอง โดยต้องกําหนด IP Address ของ <strong>Router</strong> และของ TFTP Server ให้ถูกต้อง รวมถึงกําหนดชือ file<br />
<strong>IOS</strong> ให้ถูกต้องด้วย<br />
rommon 1 > ?<br />
boot<br />
confreg<br />
dir<br />
help<br />
reset<br />
set<br />
tftpdnld<br />
unset<br />
boot up an external process<br />
configuration register utility<br />
list files in file system<br />
monitor builtin command help<br />
system reset<br />
display the monitor variables<br />
tftp image download<br />
unset a monitor variable<br />
ทดสอบพิมพ์ command tftpdnld จะเป็ นตามด้านล่าง<br />
rommon 2 > tftpdnld<br />
Missing or illegal ip address for variable IP_ADDRESS<br />
Illegal IP address.<br />
usage: tftpdnld
Use this command for disaster recovery only to recover an image via TFTP.<br />
Monitor variables are used to set up parameters for the transfer.<br />
(Syntax: "VARIABLE_NAME=value" and use "set" to show current variables.)<br />
"ctrl-c" or "break" stops the transfer before flash erase begins.<br />
The following variables are REQUIRED to be set for tftpdnld:<br />
IP_ADDRESS: The IP address for this unit<br />
IP_SUBNET_MASK: The subnet mask for this unit<br />
DEFAULT_GATEWAY: The default gateway for this unit<br />
TFTP_SERVER: The IP address of the server to fetch from<br />
TFTP_FILE: The filename to fetch<br />
The following variables are OPTIONAL:<br />
TFTP_VERBOSE: Print setting. 0=quiet, 1=progress(default), 2=verbose<br />
TFTP_RETRY_COUNT: Retry count for ARP and TFTP (default=7)<br />
TFTP_TIMEOUT: Overall timeout of operation in seconds (default=7200)<br />
TFTP_CHECKSUM: Perform checksum test on image, 0=no, 1=yes (default=1)<br />
FE_SPEED_MODE: 0=10/hdx, 1=10/fdx, 2=100/hdx, 3=100/fdx, 4=Auto(deflt)<br />
ต่อไปต้องใช้ command set เพือ set ค่าต่างๆทีต้อง<strong>การ</strong>ตามด้านล่าง<br />
rommon 3 > set<br />
PS1=rommon ! ><br />
rommon 5 > IP_ADDRESS=192.168.1.254<br />
rommon 6 > IP_SUBNET_MASK=255.255.255.0<br />
rommon 7 > DEFAULT_GATEWAY=192.168.1.254<br />
rommon 8 > TFTP_SERVER=192.168.1.100
ommon 9 > TFTP_FILE=c2600-ipbasek-9-mz.124-8.bin<br />
rommon 10 ><br />
ตรวจสอบความถูกต้องอีกครังด้วย command tftpdnld ตามด้านล่าง<br />
rommon 16 > tftpdnld<br />
IP_ADDRESS: 192.168.1.254<br />
IP_SUBNET_MASK: 255.255.255.0<br />
DEFAULT_GATEWAY: 192.168.1.254<br />
TFTP_SERVER: 192.168.1.100<br />
TFTP_FILE: c2600-ipbasek9-mz.124-8.bin<br />
Invoke this command for disaster recovery only.<br />
WARNING: all existing data in all partitions on flash will be lost!<br />
Do you wish to continue? y/n: [n]: y ( กด y เพือยืนยัน )<br />
ถ้าสําเร็จ เมือใช้ command dir flash: จะได้ตามด้านล่าง<br />
rommon 17 > dir flash:<br />
File size<br />
Checksum File name<br />
13169700 bytes (0xc8f424) 0xf4ec c2600-ipbasek9-mz.124-8.bin<br />
ทํา<strong>การ</strong> boot เครือง ด้วย command boot<br />
rommon 18 >boot<br />
ถ้าทําถูกต้องจะสามารถ boot <strong>Router</strong> ได้ ใน <strong>Router</strong> จริงก็ใช้หลัก<strong>การ</strong>เดียวกัน<br />
หวังว่าบทความนีคงจะก่อให้เกิด<br />
ประโยชน์ไม่มากก็น้อยสําหรับผู้ทีทํางานอยู่กับอุปกรณ์ <strong>Cisco</strong> นะครับ<br />
สนับสนนโดย ุ http://www.jodoi.com