Getting Over the Hump with After Effects - Graphic Exchange ...
Getting Over the Hump with After Effects - Graphic Exchange ...
Getting Over the Hump with After Effects - Graphic Exchange ...

You also want an ePaper? Increase the reach of your titles
YUMPU automatically turns print PDFs into web optimized ePapers that Google loves.
<strong>Getting</strong>over<br />
<strong>the</strong>hump<strong>with</strong><br />
Adobe<strong>After</strong><strong>Effects</strong><br />
While <strong>After</strong> <strong>Effects</strong> is <strong>the</strong> most complex of Adobe’s apps, developing a good working<br />
knowledge of <strong>the</strong> program is not beyond <strong>the</strong> average user of Illustrator or Photoshop.<br />
BY KIRBY FERGUSON<br />
Many of us have done it: downloaded a demo of Adobe <strong>After</strong><br />
<strong>Effects</strong>, eager to make <strong>the</strong> plunge into motion graphics. But we<br />
soon find ourselves unable to accomplish even <strong>the</strong> most basic<br />
of tasks in <strong>the</strong> program: set some type, draw a line, a circle, a<br />
square, anything. <strong>After</strong> a few more exasperating minutes, <strong>After</strong><br />
<strong>Effects</strong> is closed and probably never opened again.<br />
On first encounter, <strong>After</strong> <strong>Effects</strong> is frustrating to use not<br />
only because of its apparent complexity, but also because of its<br />
misleading familiarity. The program bears a superficial resemblance<br />
to o<strong>the</strong>r Adobe applications, but <strong>the</strong> way it functions is<br />
completely unique. And even if you’re familiar <strong>with</strong> Premiere,<br />
<strong>After</strong> <strong>Effects</strong>’ video editing cousin, you’re still no fur<strong>the</strong>r ahead<br />
because Premiere has no more in common <strong>with</strong> <strong>After</strong> <strong>Effects</strong><br />
than, say, Photoshop does.<br />
While <strong>After</strong> <strong>Effects</strong> is indeed <strong>the</strong> most complex of Adobe’s<br />
apps, developing a good working knowledge of <strong>the</strong> program is<br />
not beyond <strong>the</strong> average user of Illustrator or Photoshop (you<br />
may have forgotten: nei<strong>the</strong>r of which were particularly easy to<br />
learn). And you’re at a major advantage already because you<br />
know how to build graphics. Yes, good motion graphics skills<br />
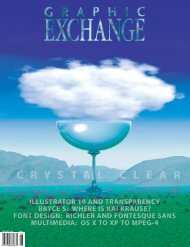
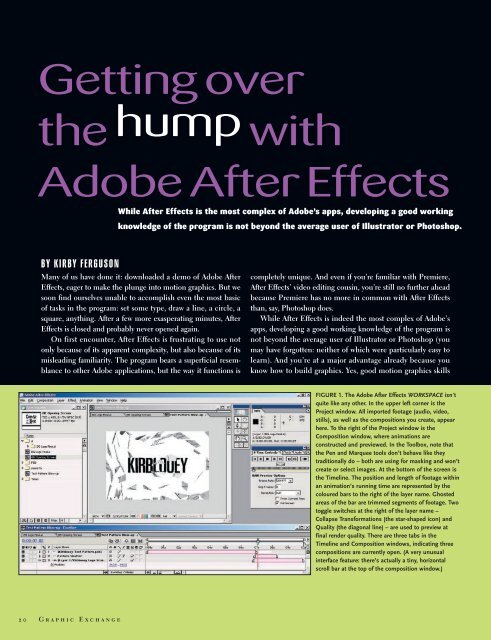
FIGURE 1. The Adobe <strong>After</strong> <strong>Effects</strong> WORKSPACE isn't<br />
quite like any o<strong>the</strong>r. In <strong>the</strong> upper left corner is <strong>the</strong><br />
Project window. All imported footage (audio, video,<br />
stills), as well as <strong>the</strong> compositions you create, appear<br />
here. To <strong>the</strong> right of <strong>the</strong> Project window is <strong>the</strong><br />
Composition window, where animations are<br />
constructed and previewed. In <strong>the</strong> Toolbox, note that<br />
<strong>the</strong> Pen and Marquee tools don’t behave like <strong>the</strong>y<br />
traditionally do – both are using for masking and won’t<br />
create or select images. At <strong>the</strong> bottom of <strong>the</strong> screen is<br />
<strong>the</strong> Timeline. The position and length of footage <strong>with</strong>in<br />
an animation’s running time are represented by <strong>the</strong><br />
coloured bars to <strong>the</strong> right of <strong>the</strong> layer name. Ghosted<br />
areas of <strong>the</strong> bar are trimmed segments of footage. Two<br />
toggle switches at <strong>the</strong> right of <strong>the</strong> layer name –<br />
Collapse Transformations (<strong>the</strong> star-shaped icon) and<br />
Quality (<strong>the</strong> diagonal line) – are used to preview at<br />
final render quality. There are three tabs in <strong>the</strong><br />
Timeline and Composition windows, indicating three<br />
compositions are currently open. (A very unusual<br />
interface feature: <strong>the</strong>re’s actually a tiny, horizontal<br />
scroll bar at <strong>the</strong> top of <strong>the</strong> composition window.)<br />
20 <strong>Graphic</strong> <strong>Exchange</strong>
are well <strong>with</strong>in <strong>the</strong> reach of most print and Web designers, all it<br />
takes is patience, determination, and documentation—which is<br />
where I come in.<br />
So download <strong>the</strong> <strong>After</strong> <strong>Effects</strong> demo again (go to<br />
www.adobe.com/aftereffects) and I’ll walk you through some basic<br />
tasks. We’ll approach this from <strong>the</strong> perspective of a print designer<br />
(ideally <strong>with</strong> some Web design experience too). For <strong>the</strong> sake of<br />
simplicity, I will grossly simplify all tasks and ignore enormous<br />
facets of <strong>the</strong> program, but such are <strong>the</strong> compromises of four-page<br />
tutorials. I won’t be touching <strong>After</strong> <strong>Effects</strong>’ more daunting features,<br />
such as Motion Math, Expressions and 3D, which are three<br />
areas that baffle even some experienced AE users.<br />
The final animation you create at <strong>the</strong> end of this tutorial will<br />
be a random mess, but <strong>the</strong> point here is to learn how <strong>After</strong> <strong>Effects</strong><br />
functions <strong>with</strong>out worrying about final results. Did you expect to<br />
make beautiful music <strong>the</strong> first time you picked up a guitar? No,<br />
you were thrilled when you strummed your first clean chord. So<br />
let’s start making a racket.<br />
ANIMATING AN ADOBE ILLUSTRATOR FILE<br />
Let’s import an Illustrator file (ei<strong>the</strong>r an EPS or native Illustrator)<br />
and apply a basic transformation.<br />
Choose File>Import>File or, better yet, hit Command-I (or<br />
double click an empty area of <strong>the</strong> project window). Drag this file<br />
from <strong>the</strong> project window to <strong>the</strong> timeline. (Dragging footage into<br />
<strong>the</strong> timeline will centre it <strong>with</strong>in <strong>the</strong> composition window; dragging<br />
it directly into <strong>the</strong> composition window will place its centre<br />
wherever you let go of <strong>the</strong> mouse.) The file appears in <strong>the</strong> composition<br />
window and becomes a layer in <strong>the</strong> timeline window, defaulting<br />
to a length of ten seconds. The bar to <strong>the</strong> right of <strong>the</strong> file<br />
name represents <strong>the</strong> file’s length and position <strong>with</strong>in <strong>the</strong> running<br />
time of <strong>the</strong> animation. If you wanted to reposition where this file<br />
appears <strong>with</strong>in your animation, just drag this colored bar to move<br />
<strong>the</strong> footage earlier or later in timeline. To trim footage, grab one<br />
of <strong>the</strong> grey handles from ei<strong>the</strong>r end of <strong>the</strong> bar.<br />
Now let’s animate <strong>the</strong> size of this graphic. In <strong>the</strong> timeline,<br />
click <strong>the</strong> arrow beside <strong>the</strong> layer and <strong>the</strong>n click <strong>the</strong> arrow beside<br />
“Transform”. The five properties that appear are <strong>the</strong> various kinds<br />
of transformations you can apply. (A 3D layer has many more, but<br />
we won’t get into that). Click <strong>the</strong> stopwatch beside <strong>the</strong> word<br />
“Scale” to set your first keyframe, <strong>the</strong>n grab <strong>the</strong> playhead and<br />
move it to about <strong>the</strong> one-second mark. Click <strong>the</strong> stopwatch icon<br />
beside “Scale” again to set <strong>the</strong> second keyframe. Now, click one<br />
of <strong>the</strong> Scale values and enter “300%”.<br />
Congrats, you’ve just created an animation that scales your artwork<br />
from 100% to 300%. That’s how tweening works in <strong>After</strong> <strong>Effects</strong>,<br />
and <strong>the</strong> o<strong>the</strong>r transformations work <strong>the</strong> same way. It’s pretty<br />
STARTING YOUR PROJECT<br />
Let’s cover some minimal basics <strong>the</strong>n go straight to getting our<br />
hands dirty.<br />
The files you create <strong>with</strong> <strong>After</strong> <strong>Effects</strong> are called projects. In<br />
essence, <strong>the</strong> project file tells <strong>After</strong> <strong>Effects</strong> how you’d like to combine<br />
your source files—<strong>the</strong> footage you import: audio, video, or<br />
stills. The individual animations you create <strong>with</strong> <strong>After</strong> <strong>Effects</strong> are<br />
called compositions (or comps, for short). You will not find any<br />
comps on your hard drive, only <strong>the</strong> project file. Like pages <strong>with</strong>in<br />
a Quark document, compositions can’t be opened individually,<br />
<strong>the</strong>y’re all embedded <strong>with</strong>in your project file. One project could<br />
contain dozens of compositions. You’ll see <strong>the</strong> project window in<br />
<strong>the</strong> upper-left corner of your screen. All <strong>the</strong> files you import and<br />
<strong>the</strong> compositions you create will appear here.<br />
See Figure 1 for an overview of <strong>the</strong> <strong>After</strong> <strong>Effects</strong> workspace.<br />
To begin, let’s create a new comp (this will simultaneously<br />
start a new project). Hit command-N (control-N on Windows).<br />
Select “Medium, 320 x 240” to create a low-resolution file we can<br />
preview quickly and <strong>with</strong> minimal memory demands. Call <strong>the</strong><br />
composition whatever you like and click OK. You now have a<br />
blank composition.<br />
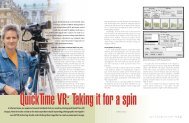
The PROJECT WINDOW<br />
is home to all your <strong>After</strong><br />
<strong>Effects</strong> footage. The file<br />
second from <strong>the</strong> bottom is<br />
a composition file; <strong>the</strong> rest<br />
of <strong>the</strong> files were imported.<br />
<strong>After</strong> <strong>Effects</strong>’ TIMELINE is where you'll spend much of your animation<br />
time. LiveMotion sports a similar, streamlined version of <strong>the</strong> AE timeline.<br />
For CRISP PREVIEWS of vector artwork, be<br />
sure to check <strong>the</strong> “Collapse Transformations/<br />
Continuously Rasterize” option in <strong>the</strong> timeline.
AFTER EFFECTS FAQ<br />
What is Adobe <strong>After</strong> <strong>Effects</strong>?<br />
<strong>After</strong> <strong>Effects</strong> is an application which allows you to create motion graphics and<br />
visual effects for broadcast and <strong>the</strong> Web. The program is used regularly and<br />
frequently in television and film production.<br />
What’s <strong>the</strong> difference between <strong>the</strong> standard version and <strong>the</strong><br />
Production Bundle?<br />
Unless you’re a professional in <strong>the</strong> motion graphics industry, don’t concern<br />
yourself <strong>with</strong> <strong>the</strong> extra features in <strong>the</strong> Production Bundle—<strong>the</strong> standard<br />
version is all you need. But visit www.adobe.com/aftereffects if you just gotta<br />
know what you’re missing.<br />
Why is <strong>After</strong> <strong>Effects</strong> worth learning?<br />
Remember <strong>the</strong> first time you saw Photoshop and your mind reeled at <strong>the</strong><br />
thought of all <strong>the</strong> things you could do? <strong>After</strong> <strong>Effects</strong> is every bit as exciting.<br />
It’s fun, it’s addictive, it’s staggeringly complex.<br />
Can my computer handle <strong>After</strong> <strong>Effects</strong>?<br />
If you purchased your computer <strong>with</strong>in <strong>the</strong> last year, it probably can. If you’re<br />
running a G4 or Pentium 4, you certainly have <strong>the</strong> processor power. A G3 will<br />
probably try your patience, but my Pentium 3 handles <strong>the</strong> program at a<br />
respectable clip. For real work, you need around 256 megs of RAM dedicated<br />
to <strong>the</strong> application. The more complex your project, <strong>the</strong> more horsepower<br />
you’ll need. Like Photoshop, <strong>After</strong> <strong>Effects</strong> will devour as much power as you<br />
can throw at it and still want more. However, you can probably make your<br />
way through this tutorial <strong>with</strong> 128 MB.<br />
Does <strong>After</strong> <strong>Effects</strong> run better on Mac or Windows?<br />
When it comes to performance, <strong>After</strong> <strong>Effects</strong> seems to run substantially faster<br />
on a PC. In July/2002 Chris White, pre-eminent tech-head at<br />
www.DigitalVideoEditing.com, published extensive tests which showed <strong>the</strong><br />
Mac (running OS 9 and X) being consistently and badly trounced by an array<br />
of different PCs. In real world use, I’ve found Apple’s take on <strong>the</strong> ‘megahertz<br />
myth’ to be a myth of its own. Of course, <strong>the</strong> Mac has compelling user<br />
experience advantages, but if raw performance is what you’re after, Wintel<br />
appears to boast superior speed for <strong>the</strong> moment.<br />
I can’t afford <strong>After</strong> <strong>Effects</strong>. What else can I buy?<br />
Unfortunately, nothing. For Windows, <strong>After</strong> <strong>Effects</strong> (priced at US$649) has no<br />
significant direct competition. If you’re only interested in adding basic<br />
animation to your video projects, your DV editor can probably handle that.<br />
The timeline in Macromedia Flash MX has dramatically improved, but<br />
Adobe’s under-appreciated LiveMotion is also a fine means of getting<br />
acquainted <strong>with</strong> <strong>After</strong> <strong>Effects</strong>’ timeline, although it only allows you to create<br />
Web animations. And <strong>the</strong>re are some who argue that <strong>After</strong> <strong>Effects</strong> itself is as<br />
good or better than ei<strong>the</strong>r for producing SWF files.<br />
Do I need a digital camcorder or DV footage?<br />
Absolutely not—no DV footage is needed to produce spectacular animations.<br />
easy and pretty powerful—you can accomplish quite a lot <strong>with</strong><br />
<strong>the</strong>se simple skills.<br />
Hit <strong>the</strong> “Home” key to return to <strong>the</strong> start of <strong>the</strong> timeline and<br />
press <strong>the</strong> space bar to preview <strong>the</strong> animation. There is one major<br />
problem: your smooth, resolution-independent file gets chunky<br />
when it scales up. Why? The image was only rasterized once<br />
when it was imported.<br />
To have it continuously rasterized, you need to check <strong>the</strong><br />
“Collapse Transformations/Continuously Rasterize” box in <strong>the</strong><br />
timeline—it’s <strong>the</strong> star-shaped icon to <strong>the</strong> right of <strong>the</strong> file name.<br />
For best quality previews, also click <strong>the</strong> “Quality” checkbox just to<br />
<strong>the</strong> right of “Collapse Transformations”. Remember that <strong>the</strong>se options<br />
will slow down your previews, so only use <strong>the</strong>m when you<br />
want <strong>the</strong> highest quality. Hit “Home” and <strong>the</strong>n <strong>the</strong> space-bar to<br />
see <strong>the</strong> difference this makes (<strong>the</strong>se options only affect <strong>the</strong> preview,<br />
not your rendered file).<br />
<strong>After</strong> <strong>Effects</strong> can also recognize layers in Illustrator and Photoshop<br />
files. For instance, you can place different body parts of a figure<br />
on each layer and animate <strong>the</strong>m separately. But for most of<br />
us, layering in Photoshop and Illustrator is an organizational function:<br />
as long as your image looks pretty, your layers can be a mess.<br />
In <strong>After</strong> <strong>Effects</strong>, you’ll want your layers to function as moveable<br />
sections of an image, so you’ll probably want to relayer and save a<br />
copy of your images before importing <strong>the</strong>m.<br />
IMPORTING A PHOTOSHOP FILE<br />
Now let’s import a Photoshop file and apply ano<strong>the</strong>r transformation.<br />
Hit command-I and select a Photoshop file <strong>with</strong> a transparent<br />
background from your hard drive. Notice that <strong>After</strong> <strong>Effects</strong><br />
recognizes Photoshop’s transparency and uses it as an alpha mask.<br />
Let’s animate <strong>the</strong> opacity of this image, but let’s do it quickly.<br />
Ra<strong>the</strong>r than twirling down arrows (which is slow and messy), select<br />
<strong>the</strong> layer name and hit “T”. This displays <strong>the</strong> “Opacity” property<br />
alone. (And why is <strong>the</strong> shortcut “T”? Well, because “O” was<br />
taken. Just think “T” as in “transparency”.) Below are <strong>the</strong> o<strong>the</strong>r<br />
keyboard shortcuts for transformations:<br />
P - Position S - Scale<br />
R - Rotation A - Anchor Point<br />
Hit “Home” to go to <strong>the</strong> start of <strong>the</strong> timeline. Click <strong>the</strong> stopwatch<br />
beside “Opacity” and decrease its value to 0%. Go to <strong>the</strong> 1<br />
second mark and increase <strong>the</strong> value to 100%. Because you already<br />
set your first keyframe, <strong>After</strong> <strong>Effects</strong> automatically creates a second<br />
keyframe when you adjust <strong>the</strong> opacity value. Hit “Home”<br />
and <strong>the</strong>n <strong>the</strong> spacebar to preview <strong>the</strong> animation. The image<br />
should fade in over <strong>the</strong> span of one second.<br />
Now let’s make this image move across <strong>the</strong> screen. Select <strong>the</strong><br />
layer and hit “P” to display <strong>the</strong> Position property. Let’s start this<br />
animation at <strong>the</strong> one-second mark, after <strong>the</strong> image has faded in.<br />
Go to <strong>the</strong> one second mark ei<strong>the</strong>r by dragging <strong>the</strong> playhead or<br />
clicking <strong>the</strong> time display in <strong>the</strong> upper-left of <strong>the</strong> timeline window<br />
and entering “100”. Move <strong>the</strong> image to <strong>the</strong> left of <strong>the</strong> composition<br />
window. Click <strong>the</strong> stopwatch to set your first keyframe. Now go to<br />
<strong>the</strong> two-second mark in <strong>the</strong> timeline. Move <strong>the</strong> image to <strong>the</strong> right<br />
of <strong>the</strong> composition window. Notice how a dotted line appears,<br />
showing you <strong>the</strong> motion path of <strong>the</strong> object.<br />
Hit <strong>the</strong> “Home” key to return to <strong>the</strong> start of <strong>the</strong> animation and<br />
<strong>the</strong>n <strong>the</strong> spacebar to preview <strong>the</strong> animation. The object fades in,<br />
<strong>the</strong>n moves from left to right. However, we don’t like <strong>the</strong> sudden<br />
starts and stops at beginning and end of <strong>the</strong> object’s motion—it<br />
looks too artificial. Select <strong>the</strong> Position keyframes by clicking and<br />
dragging a marquee around <strong>the</strong>m both, <strong>the</strong>n go to<br />
Animation>Keyframe Assistant>Easy Ease (or hit F9). This<br />
makes <strong>the</strong> start and end of <strong>the</strong> objects’ movements more gradual.<br />
Close this composition. You should now have two compositions<br />
in your Project window. Let’s create a third composition.<br />
22 <strong>Graphic</strong> <strong>Exchange</strong>
CREATING SOLIDS AND SETTING TYPE<br />
Let’s set a little type—so, where’s <strong>the</strong> text tool? Alas, things aren’t<br />
quite that simple in <strong>After</strong> <strong>Effects</strong>. There is no text tool (and no<br />
line tool and no circle tool and no polygon tool!). In order to create<br />
anything in <strong>After</strong> <strong>Effects</strong> (as opposed to importing it), you<br />
must start <strong>with</strong> what <strong>After</strong> <strong>Effects</strong> calls a “solid”. Solids are blocks<br />
of solid color which are typically masked or treated <strong>with</strong> an effect,<br />
and <strong>the</strong>y only exist in <strong>the</strong> timeline, not in <strong>the</strong> Project window. In<br />
order to create text, we need to create a solid first, <strong>the</strong>n apply an<br />
effect to it. Yes, I know this seems utterly bizarre, but you’ll get<br />
used to it.<br />
Control-click (right-click in Windows) in <strong>the</strong> timeline and go<br />
to New>Solid. A new layer appears in <strong>the</strong> timeline. Select it and<br />
go to Effect>Text>Basic Text. In <strong>the</strong> dialogue box, enter and format<br />
some text. The <strong>Effects</strong> window pops up when you’re done to<br />
display <strong>the</strong> text formatting properties. Notice <strong>the</strong> stopwatches next<br />
to each of <strong>the</strong> text formatting options? That indicates that all <strong>the</strong>se<br />
elements can be animated. There are a lot of possibilities here—<br />
but let’s not open this particular can of worms just yet.<br />
Let’s try applying ano<strong>the</strong>r quick effect, something more conventional.<br />
With <strong>the</strong> Type solid layer selected, go to Effect>Perspective>Drop<br />
Shadow. Adjust <strong>the</strong> drop shadow properties in <strong>the</strong><br />
Effect window to your liking. Hit F3 to show or hide all <strong>the</strong> effects<br />
that have been applied to a layer.<br />
NEST, PLEASE<br />
And for my final trick, we’ll throw toge<strong>the</strong>r all your hard work to<br />
illustrate one of <strong>After</strong> <strong>Effects</strong>’ most essential features: nesting.<br />
Create one more composition. Now, simply drag all three of<br />
your previous compositions from <strong>the</strong> project library and into <strong>the</strong><br />
timeline. Each one becomes a layer in <strong>the</strong> new composition.<br />
When you place a composition <strong>with</strong>in ano<strong>the</strong>r composition,<br />
that’s nesting. A nested composition <strong>the</strong>n behaves just like any<br />
o<strong>the</strong>r layer <strong>with</strong>in a composition. You can’t, however, edit <strong>the</strong><br />
nested composition. In order to do that, you have to open <strong>the</strong><br />
original comp.<br />
And why nest? Simple: to keep your timeline from becoming<br />
impossibly convoluted.<br />
Hit “Home” and <strong>the</strong>n <strong>the</strong> space bar to feast your eyes on what<br />
you’ve created.<br />
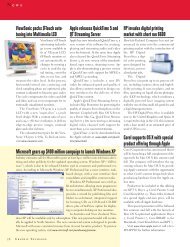
Select “IMPORT AS<br />
FOOTAGE” to have<br />
Illustrator or Photoshop<br />
layers import in individual<br />
<strong>After</strong> <strong>Effects</strong> layers.<br />
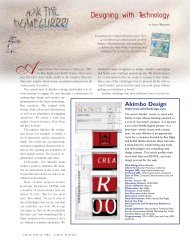
<strong>After</strong> <strong>Effects</strong>’ TOOL PALETTE may look familiar, but if you draw<br />
an object <strong>with</strong> that pen tool or try to select something <strong>with</strong> that<br />
marquee tool, you’ll get a surprise: both tools are used for<br />
masking and don’t actually create anything.<br />
If you’re going to create<br />
anything directly in <strong>After</strong><br />
<strong>Effects</strong> (ra<strong>the</strong>r than import it),<br />
you’ll need to start <strong>with</strong> a<br />
SOLID. It’s an unorthodox<br />
approach, bound to<br />
temporarily confuse <strong>the</strong><br />
average user of Photoshop<br />
or Illustrator.<br />
SETTING TYPE will also<br />
bewilder <strong>the</strong> seasoned<br />
desktop publisher. Type is<br />
created by first making a Solid<br />
layer, <strong>the</strong>n applying <strong>the</strong> “Basic<br />
Text” effect. Type formatting<br />
options can be seen here in<br />
<strong>the</strong> <strong>Effects</strong> palette.<br />
FINISHING IT OFF<br />
At last we’re done, and now you’d like to see a preview that’s representative<br />
of your final exported movie. Let’s do a RAM preview.<br />
Ei<strong>the</strong>r hit <strong>the</strong> play button on <strong>the</strong> right of <strong>the</strong> “Time Controls”<br />
palette or hit 0 on <strong>the</strong> number pad.<br />
What a mess, eh? But, hey—you made it all by yourself.<br />
Kirby Ferguson (e-mail me@kirbyferguson.com) recently completed work on<br />
his sketch comedy video, Goodie Bag. Currently carbon-based in Toronto, he<br />
can be found on <strong>the</strong> Web at www.kirblooey.com.<br />
For free <strong>After</strong> <strong>Effects</strong> tips and tutorials, you can’t you beat <strong>the</strong><br />
EXPERT CENTER at Adobe.com (registration required).<br />
<strong>Graphic</strong> <strong>Exchange</strong> 23