microSTATION USB-MIDI Setup guide - Korg
microSTATION USB-MIDI Setup guide - Korg
microSTATION USB-MIDI Setup guide - Korg

You also want an ePaper? Increase the reach of your titles
YUMPU automatically turns print PDFs into web optimized ePapers that Google loves.
<strong>USB</strong>-<strong>MIDI</strong> <strong>Setup</strong> <strong>guide</strong><br />
E<br />
2
<strong>USB</strong>-<strong>MIDI</strong> <strong>Setup</strong> <strong>guide</strong><br />
* Apple, Mac, Macintosh and Audio Units are<br />
trademarks of Apple Inc., registered in the US. and<br />
other countries.<br />
* Windows XP, Windows Vista, and Windows 7 are<br />
trademarks or registered trademarks of Microsoft<br />
Corporation in the U.S. and other counties.<br />
* Intel, Intel Core, and Pentium are trademarks of<br />
Intel Corporation in the U.S. and other countries.<br />
* VST is trademark of Steinberg Media Technologies<br />
GmbH.<br />
* RTAS is trademark or registered trademarks of<br />
Avid Technology, Inc., or its subsidiaries or<br />
divisions.<br />
* All product names and company names are the<br />
trademarks or registered trademarks of their<br />
respective owners.<br />
2
Introduction<br />
Introduction<br />
If the <strong>microSTATION</strong> is connected to your computer<br />
via <strong>USB</strong> or <strong>MIDI</strong>, performance data and settings can be<br />
transferred between the <strong>microSTATION</strong> and your<br />
computer.<br />
If you install the dedicated <strong>microSTATION</strong> Editor/<br />
Plug‐In Editor application to your computer, youʹll be<br />
able to use your computer to edit the <strong>microSTATION</strong>’s<br />
programs in detail, and use the <strong>microSTATION</strong> from<br />
within your host application as though it were a plugin.<br />
After you have read the “About the software” and<br />
“Operating requirements” section, set up your system<br />
as described in this <strong>guide</strong> and in the “<strong>microSTATION</strong><br />
Editor/Plug‐In Editor User Guide.”<br />
Connecting via <strong>USB</strong> cable<br />
1. Install the <strong>Korg</strong> <strong>USB</strong>‐<strong>MIDI</strong> driver from the<br />
included accessory disc.<br />
Windows: page 4, Mac: page 5.<br />
2. If you want to use the <strong>microSTATION</strong> Editor/Plug‐<br />
In Editor with your computer, you’ll have to install<br />
it from the included accessory disc.<br />
Windows: page 4, page 5<br />
3. Connect the <strong>microSTATION</strong>’s <strong>USB</strong> connector to a<br />
<strong>USB</strong> port on your computer.<br />
Please see page 7.<br />
4. Select the necessary settings in the<br />
<strong>microSTATION</strong>’s Global/Media mode.<br />
Please see page 8.<br />
5. Select the necessary settings on your computer.<br />
Refer to the owner’s manual of the software that you’re<br />
using. For examples of setting up the plug‐in editor in<br />
popular host applications, please refer to the<br />
“<strong>microSTATION</strong> Editor/Plug‐In Editor User Guide”<br />
(page 9).<br />
Making connections via <strong>MIDI</strong> cables<br />
If a <strong>MIDI</strong> interface is connected to your computer, you<br />
can connect the <strong>microSTATION</strong> to your computer via<br />
<strong>MIDI</strong> cables.<br />
1. Connect the <strong>microSTATION</strong>’s <strong>MIDI</strong> OUT and<br />
<strong>MIDI</strong> IN connectors to the <strong>MIDI</strong> interface’s <strong>MIDI</strong><br />
IN and <strong>MIDI</strong> OUT connectors respectively.<br />
Please see page 7.<br />
For details on your <strong>MIDI</strong> interface, refer to its<br />
owner’s manual.<br />
Some types of <strong>MIDI</strong> interfaces (commercially<br />
available) may be unable to receive or transmit the<br />
<strong>microSTATION</strong>’s <strong>MIDI</strong> exclusive messages.<br />
2. Adjust the necessary settings in the<br />
<strong>microSTATION</strong>’s Global/Media mode.<br />
“Global/Media mode settings on the microSTA‐<br />
TION” on page 8<br />
3. Adjust the necessary settings on your computer.<br />
For details on the required <strong>MIDI</strong> driver and connections,<br />
refer to the owner’s manual of your <strong>MIDI</strong><br />
interface. You can also refer to the owner’s manual<br />
of the software that you’re using.<br />
About the software<br />
The most recent versions of the applications on the<br />
accessory disc can be downloaded from the <strong>Korg</strong><br />
website (http://www.korg.com).<br />
Please note before use<br />
Copyright to all software included in this product is<br />
the property of <strong>Korg</strong> Inc.<br />
The license agreement for this software is provided<br />
separately. You must read this license agreement<br />
before you install this software. Your installation of this<br />
software will be taken to indicate your acceptance of<br />
this agreement.<br />
Operating requirements<br />
KORG <strong>USB</strong>-<strong>MIDI</strong> driver<br />
Windows<br />
Computer: <strong>USB</strong> port required (a <strong>USB</strong> host controller<br />
made by Intel is recommended)<br />
Operating system: Microsoft Windows XP Home<br />
Edition/Professional/x64 Edition Service Pack 3 or later<br />
Microsoft Windows Vista Service Pack 2 or later<br />
(including 64‐bit Edition)<br />
Microsoft Windows 7 (including 64‐bit Edition)<br />
Macintosh<br />
Computer: <strong>USB</strong> port required<br />
Operating system: Mac OS X 10.4.11 or later<br />
<strong>microSTATION</strong> Editor/Plug-In Editor<br />
Windows:<br />
• Computer<br />
CPU: Intel Pentium III / 1 GHz or better, Pentium<br />
D or Core Duo or better is recommended<br />
Memory: 512 MB or more (1 GB or more is<br />
recommended)<br />
Monitor: 1,024 x 768 pixels, 16‐bit color or better<br />
A computer that satisfies the operating requirements<br />
of Windows XP, Windows Vista or Windows 7 and has<br />
a <strong>USB</strong> port<br />
• Operating system<br />
Microsoft Windows XP Home Edition/Professional<br />
Edition Service Pack 3 or later, Windows Vista Service<br />
Pack 2 or later, and Windows 7<br />
However, only the stand‐alone version will run on 64‐<br />
bit editions of Windows 7 and Windows Vista Service<br />
Pack 2.<br />
Macintosh:<br />
• Computer<br />
CPU: Apple G4 800 MHz or better (Intel Mac is<br />
supported), G5 or Core Duo or better is<br />
recommended<br />
Memory: 512 MB or more (1 GB or more is<br />
recommended)<br />
Monitor: 1,024 x 768 pixels, 32,000 colors or better<br />
An Apple Macintosh computer that satisfies the<br />
operating requirements of Mac OS X and has a <strong>USB</strong><br />
port<br />
3
<strong>USB</strong>-<strong>MIDI</strong> <strong>Setup</strong> <strong>guide</strong><br />
4<br />
• Operating system<br />
Mac OS X version 10.4.11 or later<br />
* Formats supported by the <strong>microSTATION</strong> Plug‐In<br />
Editor:<br />
Windows: VST, RTAS<br />
Macintosh: VST, Audio Unit, RTAS<br />
* <strong>microSTATION</strong> Plug‐In Editor must also satisfy the<br />
operating requirements of the host application.<br />
You cannot run multiple instances of the<br />
<strong>microSTATION</strong> Editor and <strong>microSTATION</strong> Plug‐<br />
In Editor at the same time. This means that you<br />
can’t use this editor to edit two or more<br />
<strong>microSTATION</strong> units simultaneously.<br />
Installing the software<br />
Installing in Windows<br />
Note: In order to install or uninstall software in<br />
Windows, you must have Administrator privileges.<br />
Note: Before you connect the <strong>microSTATION</strong> to your<br />
computer via <strong>USB</strong>, you must use the <strong>microSTATION</strong><br />
application installer to install the KORG <strong>USB</strong>‐<strong>MIDI</strong><br />
Driver Tools.<br />
Using the <strong>microSTATION</strong> application installer<br />
The <strong>microSTATION</strong> application installer will install the<br />
KORG <strong>USB</strong>‐<strong>MIDI</strong> Driver Tools and the <strong>microSTATION</strong><br />
Editor/Plug‐In Editor.<br />
1. Insert the included accessory disc into your optical<br />
disc drive.<br />
Normally the “<strong>microSTATION</strong> Application<br />
Installer” will start up automatically.<br />
If your computer is set so the installer does not run<br />
automatically, double‐click “<strong>Korg</strong><strong>Setup</strong>.exe” on the<br />
accessory disc.<br />
2. From the list, select the applications that you want<br />
to install, and click [Install].<br />
The applications you selected will begin the installation<br />
process.<br />
If you want to connect the <strong>microSTATION</strong> to your<br />
computer via the <strong>USB</strong> port, you must install the<br />
<strong>Korg</strong> <strong>USB</strong>‐<strong>MIDI</strong> Driver Tools. Then from within the<br />
<strong>Korg</strong> <strong>USB</strong>‐<strong>MIDI</strong> Driver Tools, you will need to<br />
install the <strong>Korg</strong> <strong>USB</strong>‐<strong>MIDI</strong> driver. (“Installing the<br />
KORG <strong>USB</strong>‐<strong>MIDI</strong> driver” on page 4)<br />
3. Follow the on‐screen instructions to install the<br />
software.<br />
When you click the [Install] button for the microS‐<br />
TATION Editor/Plug‐In Editor in step 2, the “micro‐<br />
STATION Editor/Plug‐In Editor Installer” dialog<br />
box will appear.<br />
Select and install all desired components, such as,<br />
the Editor (Standalone), Plug‐In Editor (VST), and/<br />
or Plug‐In Editor (RTAS).<br />
For example if you want to install the stand‐alone<br />
version, click [Install Standalone Application].<br />
Follow the on‐screen instructions to proceed with<br />
the installation.<br />
If the installation was successful, click [Close].<br />
“<strong>microSTATION</strong> Editor/Plug‐In Editor Installer”<br />
will appear.<br />
Next you will install the plug‐in version(s) that you<br />
want to use. Using the procedure described above,<br />
begin with step 1 and install the plug‐in version(s)<br />
that you want to use.<br />
If you don’t want to install the VST or RTAS plug‐in<br />
version, click [Exit <strong>Setup</strong>] to end the installation.<br />
When you’ve finished installing the application(s)<br />
that you want, click [Exit <strong>Setup</strong>] to exit the installer.<br />
For details, please see the “<strong>microSTATION</strong> Editor/<br />
Plug‐In Editor User’s Guide” (PDF).<br />
4. When you’ve installed all of the selected software,<br />
exit the installer.<br />
Installing the KORG <strong>USB</strong>-<strong>MIDI</strong> driver<br />
Use the KORG <strong>USB</strong>‐<strong>MIDI</strong> Driver Tools to install the<br />
KORG <strong>USB</strong>‐<strong>MIDI</strong> driver.<br />
Before you continue, you must finish installing the<br />
KORG <strong>USB</strong>‐<strong>MIDI</strong> Driver Tools in your computer.<br />
1. Use a <strong>USB</strong> cable to connect your computer’s <strong>USB</strong><br />
port to the <strong>microSTATION</strong>’s <strong>USB</strong> connector. Then<br />
power‐on the <strong>microSTATION</strong>.<br />
When your computer first detects that the<br />
<strong>microSTATION</strong> is connected, the Windows default<br />
driver will be installed automatically. However<br />
since this driver is not the <strong>Korg</strong> <strong>USB</strong>‐<strong>MIDI</strong> driver,<br />
it cannot be used correctly.<br />
Note: If you are using Windows XP or Windows<br />
Vista, the driver must be installed separately for<br />
each <strong>USB</strong> port. If you connect the <strong>microSTATION</strong> to<br />
a <strong>USB</strong> port used to connect the <strong>microSTATION</strong><br />
other than the port that you previously used, you’ll<br />
need to install the KORG <strong>USB</strong>‐<strong>MIDI</strong> driver again<br />
using the same procedure listed above.<br />
2. From the taskbar, click [Start][All<br />
Programs][KORG][KORG <strong>USB</strong>‐<strong>MIDI</strong> Driver<br />
Tools][Install KORG <strong>USB</strong>‐<strong>MIDI</strong> device].<br />
The setup utility will start.<br />
3. Follow the on‐screen instructions to install the<br />
KORG <strong>USB</strong>‐<strong>MIDI</strong> driver.<br />
During the installation, if a dialog box regarding<br />
digital signatures appears with a message saying<br />
“.... has not passed Windows logo testing,” simply<br />
click [Continue] to proceed.
Installing the software<br />
If you are unable to proceed with the installation, it’s<br />
possible that your computer has been set to prohibit<br />
installation of unsigned drivers. Check the settings<br />
of your computer as described in “Allowing installation<br />
of drivers that are not digitally signed.”<br />
4. After you’ve installed the KORG <strong>USB</strong>‐<strong>MIDI</strong><br />
driver, exit the installer.<br />
If you are asked whether you want to restart, choose<br />
[Yes] to restart your computer.<br />
For more about installation, setup, or uninstallation<br />
of the KORG <strong>USB</strong>‐<strong>MIDI</strong> driver, refer to the installation<br />
manual (HTML).<br />
To view the manual, choose [Start][All Programs][KORG][KORG<br />
<strong>USB</strong>‐<strong>MIDI</strong> Driver<br />
Tools][Installation Manual].<br />
About the <strong>microSTATION</strong> and <strong>USB</strong>-<strong>MIDI</strong> driver<br />
ports<br />
KEYBOARD port<br />
Applications on your computer use this port to receive<br />
<strong>MIDI</strong> messages from the <strong>microSTATION</strong> (data from<br />
the keyboard and controllers).<br />
SOUND port<br />
Applications on your computer use this port to send<br />
<strong>MIDI</strong> messages to the <strong>microSTATION</strong>’s internal sound<br />
generator, making it produce sound.<br />
4. In the “What action do you want Windows to<br />
take?” area , choose [Ignore] or [Warn], and then<br />
click [OK].<br />
If necessary, you can change this setting back to its<br />
original state after you’ve installed the KORG <strong>USB</strong>‐<br />
<strong>MIDI</strong> driver.<br />
Installing and setting up the <strong>microSTATION</strong><br />
Editor/Plug-In Editor<br />
For details on installation, setup and using the<br />
<strong>microSTATION</strong> Editor/Plug‐In Editor, please see the<br />
“<strong>microSTATION</strong> Editor/Plug‐In Editor user’s <strong>guide</strong>”<br />
(PDF).<br />
Allowing installation of drivers that are not<br />
digitally signed (Windows only)<br />
If the computer you’re using has been set to forbid the<br />
installation of any drivers that are not digitally signed,<br />
you won’t be able to install the KORG <strong>USB</strong>‐<strong>MIDI</strong><br />
driver. Proceed as follows to change this setting so that<br />
you’ll be able to install the drivers.<br />
1. From the taskbar, click [Start][Control Panel] to<br />
access the control panel.<br />
2. In the control panel window, double‐click<br />
[System], and then click the [Hardware] tab.<br />
3. In “Drivers,” click [Driver Signing].<br />
Installing in Mac OS X<br />
Installing the software<br />
You’ll need to run the installer separately for each<br />
software item such as the KORG <strong>USB</strong>‐<strong>MIDI</strong> driver and<br />
the <strong>microSTATION</strong> Editor/Plug‐In Editor to install<br />
them one at a time.<br />
1. Insert the included accessory disc into the disc<br />
drive of your computer.<br />
2. On the accessory disc, double‐click the software<br />
installer (.pkg) to start up the installer.<br />
Each installer is located in the following folder.<br />
• KORG <strong>USB</strong>‐<strong>MIDI</strong> driver<br />
“KORG <strong>USB</strong>‐<strong>MIDI</strong> DRIVER” folder KORG<br />
<strong>USB</strong>‐<strong>MIDI</strong> DRIVER.pkg<br />
• <strong>microSTATION</strong> Editor<br />
“<strong>microSTATION</strong> Editor” folder <br />
<strong>microSTATION</strong> Editor.pkg<br />
3. Follow the on‐screen instructions to install each<br />
item of software such as the KORG <strong>USB</strong>‐<strong>MIDI</strong><br />
driver and <strong>microSTATION</strong> Editor.<br />
5
<strong>USB</strong>-<strong>MIDI</strong> <strong>Setup</strong> <strong>guide</strong><br />
If you intend to use the <strong>microSTATION</strong> with your<br />
computer via the <strong>USB</strong> port, you’ll need to install the<br />
KORG <strong>USB</strong>‐<strong>MIDI</strong> driver on your computer.<br />
When the <strong>microSTATION</strong> Editor/Plug‐In Editor has<br />
been installed successfully, restart your computer.<br />
On Mac OS X, the stand‐alone version and the plugin<br />
version are each installed in their own folder.<br />
About the <strong>microSTATION</strong> and <strong>USB</strong>-<strong>MIDI</strong> driver<br />
ports<br />
KEYBOARD port<br />
Applications on your computer use this port to receive<br />
<strong>MIDI</strong> messages from the <strong>microSTATION</strong> (data from<br />
the keyboard and controllers).<br />
SOUND port<br />
Applications on your computer use this port to send<br />
<strong>MIDI</strong> messages to the <strong>microSTATION</strong>’s internal sound<br />
generator, making it produce sound.<br />
Connecting a computer<br />
<strong>USB</strong> connection and setup<br />
Note: The <strong>USB</strong> connector of the <strong>microSTATION</strong> is only<br />
able to transmit and receive <strong>MIDI</strong> data.<br />
Before you connect the <strong>microSTATION</strong> to your<br />
computer via <strong>USB</strong>, you must install the KORG<br />
<strong>USB</strong>‐<strong>MIDI</strong> driver on your computer. If you’re<br />
using Windows XP or Windows Vista, you’ll need<br />
to install the driver for each <strong>USB</strong> port that you use.<br />
If you connect the <strong>microSTATION</strong> to a <strong>USB</strong> port<br />
other than the one you used when installing the<br />
KORG <strong>USB</strong>‐<strong>MIDI</strong> driver, you’ll need to install the<br />
driver again. For details, please see “Installing in<br />
Windows” on page 4.<br />
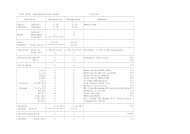
1. Using a <strong>USB</strong> cable, connect the <strong>USB</strong> connector of<br />
the <strong>microSTATION</strong> to the <strong>USB</strong> connector of your<br />
computer.<br />
<strong>USB</strong> cable<br />
INPUT<br />
INPUT<br />
AUDIO OUTPUT<br />
<strong>USB</strong><br />
Computer<br />
<strong>microSTATION</strong><br />
2. Adjust the necessary settings in the<br />
<strong>microSTATION</strong>’s Global/Media mode.<br />
For details, please see “Global/Media mode settings<br />
on the <strong>microSTATION</strong>” on page 8.<br />
3. Adjust the necessary settings on your computer.<br />
For details, please see the “<strong>microSTATION</strong> Editor/<br />
Plug‐In Editor user’s <strong>guide</strong>” (PDF).<br />
Using the <strong>microSTATION</strong> Editor/Plug-In Editor<br />
via a <strong>USB</strong> connection<br />
If you want to mix the <strong>microSTATION</strong>’s audio signals<br />
with the audio signals sent from your host application<br />
via your audio interface, or with audio signals from<br />
another sound module, make connections as<br />
illustrated below.<br />
Powered<br />
monitors<br />
INPUT<br />
INPUT<br />
Audio interface<br />
<strong>microSTATION</strong>’s audio signals<br />
Other audio signals<br />
<strong>MIDI</strong> signals<br />
<strong>USB</strong><br />
L/MONO<br />
R<br />
<strong>USB</strong><br />
Computer<br />
<strong>microSTATION</strong><br />
6
Verifying the functionality of the <strong>microSTATION</strong> Editor (stand-alone version)<br />
If you want to apply a plug‐in effect to the<br />
<strong>microSTATION</strong>’s audio signals, or control the<br />
<strong>microSTATION</strong>’s audio signals in your host application<br />
together with the audio data from the KORG Legacy<br />
Collection or other audio tracks, make the connections<br />
as illustrated below. Connect the devices appropriate<br />
for the host application that you’re using.<br />
L/<br />
MONO<br />
Connecting your computer via the<br />
<strong>MIDI</strong> connectors<br />
You can use a commercially available <strong>MIDI</strong> interface to<br />
connect the <strong>microSTATION</strong> to your computer.<br />
1. Connect the <strong>microSTATION</strong>’s <strong>MIDI</strong> OUT<br />
connector and <strong>MIDI</strong> IN connector to the <strong>MIDI</strong> IN<br />
port and <strong>MIDI</strong> OUT port of your <strong>MIDI</strong> interface.<br />
For details, refer to the manual included with your<br />
<strong>MIDI</strong> interface.<br />
Some <strong>USB</strong>‐<strong>MIDI</strong> interfaces may be unable to<br />
transmit or receive the <strong>microSTATION</strong>’s <strong>MIDI</strong><br />
exclusive messages.<br />
INPUT<br />
R<br />
<strong>microSTATION</strong><br />
INPUT<br />
INPUT<br />
Audio interface<br />
<strong>USB</strong><br />
INPUT<br />
AUDIO OUTPUT<br />
<strong>MIDI</strong> IN<br />
<strong>MIDI</strong> OUT<br />
Powered<br />
monitors<br />
<strong>microSTATION</strong><br />
2. Adjust the necessary settings in the<br />
<strong>microSTATION</strong>’s Global/Media mode.<br />
For details, please see “Global/Media mode settings<br />
on the <strong>microSTATION</strong>” on page 8.<br />
<strong>USB</strong><br />
<strong>microSTATION</strong>’s audio signals<br />
Other audio signals<br />
<strong>MIDI</strong> signals<br />
<strong>MIDI</strong> interface<br />
<strong>MIDI</strong> OUT<br />
<strong>MIDI</strong> IN<br />
Computer<br />
Computer<br />
Verifying the functionality of<br />
the <strong>microSTATION</strong> Editor<br />
(stand-alone version)<br />
Start up the <strong>microSTATION</strong> Editor (stand‐alone version)<br />
and verify that it works correctly.<br />
For details on how to set up and start the <strong>microSTATION</strong><br />
Plug‐In Editor, refer to the “<strong>microSTATION</strong> Editor/<br />
Plug‐In Editor user’s <strong>guide</strong>” (PDF) on page 6.<br />
Setting up the <strong>microSTATION</strong> Editor<br />
Before you verify that the software is functioning<br />
correctly, make sure that you’ve completed the following<br />
steps.<br />
• The <strong>microSTATION</strong>’s <strong>USB</strong> connector is connected to<br />
your computer’s <strong>USB</strong> port.<br />
• The <strong>microSTATION</strong> and your computer are both<br />
powered‐on.<br />
• The <strong>Korg</strong> <strong>USB</strong>‐<strong>MIDI</strong> driver is installed for the <strong>USB</strong><br />
port you’ll be using.<br />
• The <strong>microSTATION</strong> Editor (stand‐alone version) is<br />
installed on your computer.<br />
1. Start up the <strong>microSTATION</strong> Editor.<br />
Windows<br />
In the taskbar, click the [Start] button and then [All<br />
Programs]. From the menu, choose “KORG”–<br />
“<strong>microSTATION</strong>”–“<strong>microSTATION</strong> Editor” to start<br />
up the editor.<br />
Alternatively, you can navigate to the “KORG”<br />
folder–“<strong>microSTATION</strong>” folder, and double‐click<br />
the “<strong>microSTATION</strong> Editor.exe” icon located there.<br />
The “KORG” folder will be in the location that you<br />
selected when installing the software. By default, it<br />
will be in the “Program Files” folder.<br />
Macintosh<br />
Navigate to the “Applications” folder–“KORG”<br />
folder–“<strong>microSTATION</strong>” folder, and double click<br />
the “<strong>microSTATION</strong> Editor” icon.<br />
Navigate to the “Applications” folder–“KORG”<br />
folder–“<strong>microSTATION</strong>” folder, and double click<br />
the “<strong>microSTATION</strong> Editor” icon.<br />
• When you start up, data will be transmitted and<br />
received between the <strong>microSTATION</strong> and the<br />
<strong>microSTATION</strong> Editor. The <strong>microSTATION</strong>’s display<br />
will indicate “Now transmitting” and the<br />
<strong>microSTATION</strong> Editor will indicate<br />
“Synchronizing...” while the synchronization data is<br />
exchanged.<br />
2. Click the [A] selector at the left side of the realtime<br />
controls.<br />
The indications of the four knobs will be [CUTOFF],<br />
[RESONANCE], [EG INTENSITY], and [EG<br />
RELEASE].<br />
3. Use the four knobs of the realtime controls to vary<br />
the sound. Using the mouse to move the on‐screen<br />
knobs will have the same result as turning the four<br />
knobs on the <strong>microSTATION</strong> itself.<br />
7
<strong>USB</strong>-<strong>MIDI</strong> <strong>Setup</strong> <strong>guide</strong><br />
Global/Media mode settings<br />
on the <strong>microSTATION</strong><br />
If the <strong>microSTATION</strong> does not function correctly with<br />
your computer, check the following settings on the<br />
<strong>microSTATION</strong> itself.<br />
“Local Ctrl” settings<br />
The <strong>MIDI</strong> software on your computer might have an<br />
Echo Back function where messages that are received<br />
at <strong>MIDI</strong> IN/<strong>USB</strong> are retransmitted without change<br />
from <strong>MIDI</strong> OUT/<strong>USB</strong>.<br />
If your <strong>MIDI</strong> software’s Echo Back is turned on when<br />
the <strong>microSTATION</strong> is bi‐directionally connected with<br />
your computer, the <strong>microSTATION</strong>’s internal sound<br />
generator will receive duplicate messages (the<br />
internally generated messages as well as the messages<br />
received via echo‐back), which will cause problems<br />
such as each note being sounded twice.<br />
In such cases, you can solve the problem by turning the<br />
<strong>microSTATION</strong>’s local control setting Off so that the<br />
signal route is internally disconnected inside the<br />
<strong>microSTATION</strong>.<br />
With the factory settings, the <strong>microSTATION</strong>’s local<br />
control setting (“Local Ctrl”) is turned On.<br />
For details, please see “<strong>microSTATION</strong> Parameter<br />
<strong>guide</strong>” (PDF) page 61.<br />
Note: When using the <strong>microSTATION</strong> by itself, leave<br />
the local control setting (“Local Ctrl”) turned On. If this<br />
is Off, no sound will be produced when you play the<br />
<strong>microSTATION</strong>’s keyboard.<br />
The <strong>microSTATION</strong> Editor/Plug‐In Editor will<br />
automatically set the <strong>microSTATION</strong>’s local control<br />
setting to the appropriate state when the software<br />
starts up.<br />
<strong>MIDI</strong> Filter “SysEx” setting<br />
With the factory settings, the <strong>microSTATION</strong> is set so that<br />
it will not transmit or receive system exclusive messages<br />
(“SysEx” Off). (“<strong>microSTATION</strong> Parameter <strong>guide</strong>” on<br />
page 63)<br />
Since the <strong>microSTATION</strong> Editor/Plug‐In Editor use<br />
numerous <strong>MIDI</strong> system exclusive messages for<br />
communicating with the <strong>microSTATION</strong>, this setting of<br />
the <strong>microSTATION</strong> will automatically be turned On<br />
when the software starts up.<br />
If you are using a <strong>MIDI</strong> device or an application other<br />
than the <strong>microSTATION</strong> Editor/Plug‐In Editor and do not<br />
want system exclusive messages to be transmitted and<br />
received between it and the <strong>microSTATION</strong>, you’ll need<br />
to use the <strong>microSTATION</strong> to manually turn this setting<br />
On.<br />
If you perform any of the following operations on the<br />
<strong>microSTATION</strong> after the <strong>microSTATION</strong> Editor/<br />
Plug‐In Editor has finished starting up, subsequent<br />
communication will not be possible.<br />
• Turn <strong>MIDI</strong> Filter “SysEx” Off<br />
• On the <strong>microSTATION</strong>, use the “Load PCG”<br />
command with “All PCG” or “Global setting.”<br />
If the <strong>microSTATION</strong> Editor/Plug‐In Editor becomes<br />
unable to communicate with the <strong>microSTATION</strong>, please<br />
use the <strong>microSTATION</strong> itself to turn the <strong>MIDI</strong> Filter<br />
“SysEx” setting back On.<br />
Local<br />
OFF<br />
Control<br />
ON<br />
Arpeggiator<br />
<strong>MIDI</strong> IN Trigger<br />
Record<br />
Sequencer<br />
Local<br />
Control<br />
OFF<br />
ON<br />
Tone<br />
generator<br />
<strong>MIDI</strong> OUT<br />
While the internal sequencer is playing<br />
(The playback of the internal sequencer will not be sent to the arpeggiator.)<br />
<strong>MIDI</strong> IN<br />
Local<br />
Control<br />
OFF<br />
ON<br />
Play<br />
Sequencer<br />
Record<br />
Tone<br />
Generator<br />
<strong>MIDI</strong> OUT<br />
8
IMPORTANT NOTICE TO CONSUMERS<br />
This product has been manufactured according to strict specifications and voltage<br />
requirements that are applicable in the country in which it is intended that this product should<br />
be used. If you have purchased this product via the internet, through mail order, and/or via a<br />
telephone sale, you must verify that this product is intended to be used in the country in<br />
which you reside.<br />
WARNING: Use of this product in any country other than that for which it is intended could<br />
be dangerous and could invalidate the manufacturer’s or distributor’s warranty.<br />
Please also retain your receipt as proof of purchase otherwise your product may be<br />
disqualified from the manufacturer’s or distributor’s warranty.<br />
© 2010 KORG INC.<br />
4015-2 Yanokuchi, Inagi-city, Tokyo 206-0812 Japan