
You also want an ePaper? Increase the reach of your titles
YUMPU automatically turns print PDFs into web optimized ePapers that Google loves.
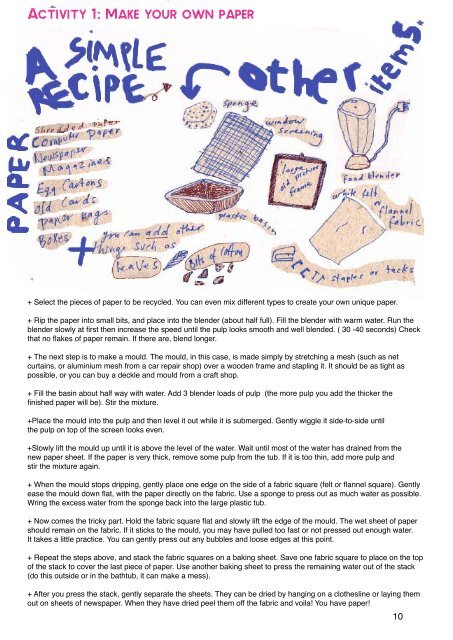
Activity 1: Make your own paper<br />
+ Select the pieces of paper to be recycled. You can even mix different types to create your own unique paper.<br />
+ Rip the paper into small bits, and place into the blender (about half full). Fill the blender with warm water. Run the<br />
blender slowly at first then increase the speed until the pulp looks smooth and well blended. ( 30 -40 seconds) Check<br />
that no flakes of paper remain. If there are, blend longer.<br />
+ The next step is to make a mould. The mould, in this case, is made simply by stretching a mesh (such as net<br />
curtains, or aluminium mesh from a car repair shop) over a wooden frame and stapling it. It should be as tight as<br />
possible, or you can buy a deckle and mould from a craft shop.<br />
+ Fill the basin about half way with water. Add 3 blender loads of pulp (the more pulp you add the thicker the<br />
finished paper will be). Stir the mixture.<br />
+Place the mould into the pulp and then level it out while it is submerged. Gently wiggle it side-to-side until<br />
the pulp on top of the screen looks even.<br />
+Slowly lift the mould up until it is above the level of the water. Wait until most of the water has drained from the<br />
new paper sheet. If the paper is very thick, remove some pulp from the tub. If it is too thin, add more pulp and<br />
stir the mixture again.<br />
+ When the mould stops dripping, gently place one edge on the side of a fabric square (felt or flannel square). Gently<br />
ease the mould down flat, with the paper directly on the fabric. Use a sponge to press out as much water as possible.<br />
Wring the excess water from the sponge back into the large plastic tub.<br />
+ Now comes the tricky part. Hold the fabric square flat and slowly lift the edge of the mould. The wet sheet of paper<br />
should remain on the fabric. If it sticks to the mould, you may have pulled too fast or not pressed out enough water.<br />
It takes a little practice. You can gently press out any bubbles and loose edges at this point.<br />
+ Repeat the steps above, and stack the fabric squares on a baking sheet. Save one fabric square to place on the top<br />
of the stack to cover the last piece of paper. Use another baking sheet to press the remaining water out of the stack<br />
(do this outside or in the bathtub, it can make a mess).<br />
+ After you press the stack, gently separate the sheets. They can be dried by hanging on a clothesline or laying them<br />
out on sheets of newspaper. When they have dried peel them off the fabric and voila! You have paper!<br />
10