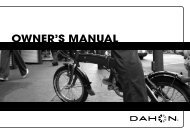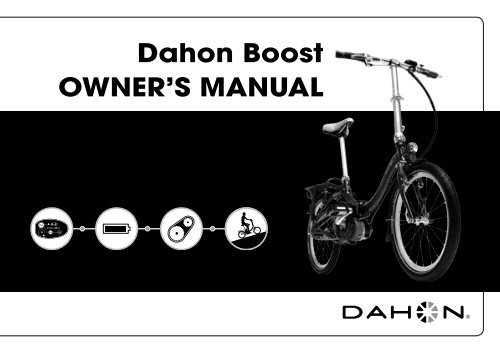
Dahon Boost OWNER'S MANUAL - NYCeWheels - Electric Bikes
Dahon Boost OWNER'S MANUAL - NYCeWheels - Electric Bikes
Dahon Boost OWNER'S MANUAL - NYCeWheels - Electric Bikes

You also want an ePaper? Increase the reach of your titles
YUMPU automatically turns print PDFs into web optimized ePapers that Google loves.
<strong>Dahon</strong> <strong>Boost</strong><br />
OWNER’S <strong>MANUAL</strong>
Contents<br />
Welcome/Intro.................................................................. 3<br />
What’s it called................................................................. 4<br />
Battery and Charger Operation...................................... 6<br />
Before the first use.....................................................................6<br />
Battery Hibernation Mode..........................................................6<br />
Normal Charging........................................................................6<br />
Charging with Installed battery................................................. 11<br />
Battery Key Lock......................................................................12<br />
Safety Precautions...................................................................12<br />
Battery..................................................................................12<br />
Battery Charger....................................................................12<br />
Location for Charging...........................................................12<br />
Range for Battery.....................................................................13<br />
Things you can do to increase performance........................13<br />
Battery Tips and Approximate Life.......................................13<br />
Battery Recycling.................................................................14<br />
How it all works.............................................................. 14<br />
<strong>Boost</strong> Technology.....................................................................14<br />
Controller Unit..........................................................................14<br />
1. On-Off Buttons.................................................................15<br />
2. Battery Level Indicator.....................................................15<br />
3. <strong>Boost</strong> Mode Indicator.......................................................15<br />
4. <strong>Boost</strong> Mode Button..........................................................16<br />
5 & 6 Front Light Function....................................................16<br />
General Operation...................................................................17<br />
Using the Hub Gears...............................................................17<br />
Riding without Assistance........................................................17<br />
Checks before Riding...............................................................17<br />
Service & Storage.......................................................... 18<br />
Service.....................................................................................18<br />
Checklist..............................................................................18<br />
Initial inspection after 2 months...........................................19<br />
From the second inspection on............................................19<br />
Cleaning...................................................................................19<br />
Storage....................................................................................19<br />
Long-Term Storage..................................................................19<br />
Operation After Long-Term Storage.........................................19<br />
Troubleshooting............................................................. 20<br />
Specifications................................................................. 23<br />
Motor Unit................................................................................23<br />
Battery......................................................................................23<br />
Battery Charger........................................................................23<br />
Warranty.......................................................................... 23<br />
<strong>Dahon</strong> Five-Year Limited Warranty..........................................23<br />
Lifetime Warranty Upgrade......................................................23<br />
Required Assembly at Time of Purchase.................................24<br />
Making a Warranty Claim.........................................................24<br />
Warrantee Exclusions..............................................................24<br />
2
Welcome/Intro<br />
• Completely read through all of the<br />
information in this manual before you start<br />
using you <strong>Dahon</strong> <strong>Boost</strong>.<br />
• Make sure to read the standard <strong>Dahon</strong><br />
Bicycle manual safety and general<br />
information for cycling.<br />
• The <strong>Dahon</strong> <strong>Boost</strong> is designed for on-road<br />
use only. Using it off-road, jumping or racing<br />
will risk serious injury and death to the user.<br />
• Always wear a correct-fitting helmet when<br />
riding any bicycle.<br />
• If you are unsure about anything or have<br />
question, please talk to your local <strong>Dahon</strong><br />
dealer. <strong>Dahon</strong> dealers are specialists in<br />
<strong>Dahon</strong> product information and advice. They<br />
are also a valuable source for all cycling<br />
product, riding and service information.<br />
• This product complies with European EPAC<br />
requirements according to EN 15194<br />
3
What’s it called<br />
A. General<br />
1. Assist Unit<br />
2. Chainwheel and integrated<br />
Torque sensor<br />
3. Battery<br />
4. Frame Latch<br />
5. Handlepost<br />
6. Handlebar Assembly<br />
7. Front light<br />
8. Rear light<br />
9. Battery Hanger Unit<br />
B. Handlebar Assembly<br />
1. Controller Unit<br />
2. 3-Speed Hub Gear shifter<br />
3. Left-hand Brake Lever<br />
4. Right-Hand Brake Lever<br />
4
c. battery and charger<br />
1. Battery<br />
2. <strong>Boost</strong> Batter Charger<br />
3. Power Source Plug<br />
4. Battery Charging Socket<br />
5. Charger Plug<br />
5
Battery and Charger Operation<br />
Charging can be done when the battery is on<br />
the bike or removed from it. For details, refer to<br />
“Normal Charging” and “Charging with installed<br />
battery”. When not charging, always pull out<br />
the charging plug from the battery and the<br />
power plug from the outlet before storing the<br />
battery charger.<br />
Normal Charging<br />
Press the off button on the controller unit.<br />
CAUTION: Do not remove the battery<br />
with the controller switch set to ON.<br />
Ignoring this could cause electrical shock.<br />
Before the First use<br />
CAUTION: The Battery must be fully<br />
charged before the first ride.<br />
Please make sure you allow the battery to<br />
complete a full charge cycle before installing it<br />
on the bike. Please read though and follow all<br />
of the safety precautions.<br />
Battery Hibernation Mode<br />
After 20 days of inactivity, the battery will place<br />
itself in Hibernation Mode. This is to help save<br />
loss of power and extend the life of the battery.<br />
To resume normal battery function, you will<br />
need to remove the battery from the bike and<br />
perform one standard charge cycle. Once<br />
standard charge cycle is complete, the battery<br />
will be ready to use again.<br />
Insert the battery lock key into the key hole of<br />
the battery-hanger unit.<br />
With the battery-lock key turned clockwise, pull<br />
out the battery.<br />
6
If the battery is wet or dirty, wipe it clean with a<br />
dry cloth.<br />
Insert the power plug into a power outlet.<br />
Insert the charging plug into the battery<br />
7
Indicating lamps of the battery charger<br />
Not Lit<br />
Not Lit<br />
Not Green Lit (solid)<br />
Not Orange Lit (solid)<br />
Green (solid)<br />
Green (solid)<br />
Orange (solid)<br />
Green (blinking)<br />
Lamp(s) Illuminated<br />
Status<br />
Li-ion BATTERY CHARGER<br />
Green (solid)<br />
POWER ON<br />
Green (blinking)<br />
CHARGING<br />
Green (solid)<br />
CHARGING COMPLETE<br />
SUNSTAR ENGINEERING INC.<br />
Orange (blinking)<br />
ERROR<br />
Orange (solid)<br />
STANDBY<br />
Green (solid)<br />
Green (solid)<br />
Green (blinking)<br />
Not Lit<br />
Not Lit<br />
Not Lit<br />
Green Not Lit (solid)<br />
Green Not Lit (solid)<br />
Not Lit<br />
Green (solid)<br />
Green<br />
Not Lit<br />
(solid)<br />
Green<br />
Orange<br />
(solid)<br />
(solid)<br />
Orange (solid)<br />
Not Green Lit<br />
(solid)<br />
Green (solid)<br />
Green (solid)<br />
Not Green Orange Lit<br />
(solid)<br />
Green (blinking)<br />
Green (blinking)<br />
Green (solid)<br />
Green (solid)<br />
Orange Green (solid)<br />
Green (solid) (blinking) (solid)<br />
Not<br />
Orange<br />
Lit<br />
(blinking)<br />
Not Lit<br />
Green (solid)<br />
Green (solid)<br />
Green (blinking) (solid)<br />
Green Not Orange Lit (solid) (blinking)<br />
Green (solid)<br />
Green<br />
Green<br />
(solid)<br />
(solid)<br />
Green (solid)<br />
Not Lit<br />
Green (solid)<br />
Green (solid)<br />
Orange (solid)<br />
Green Orange (solid)<br />
Green (solid)<br />
Green (solid)<br />
Orange Green (solid)<br />
Green (solid)<br />
Orange (blinking)<br />
Green Orange (solid) (blinking)<br />
Green (solid)<br />
Orange (solid)<br />
Orange (blinking)<br />
Charging<br />
Charging Completed.<br />
Power of AC 100 to 240 V is not being supplied<br />
(the power plug is not plugged into an outlet).<br />
The battery charger is being supplied with<br />
power, but the battery is not connected to<br />
the battery charger. Follow the procedure and<br />
insert the charging plug into the battery.<br />
It is possible that the temperature of the battery<br />
is too high or too low or that the voltage is too<br />
low. Charging does not start and the unit enters<br />
the standby status. As soon as the conditions<br />
are fulfilled, charging starts automatically (it is<br />
recommended to start charging after the battery<br />
temperature has become normal).<br />
The battery charger or the battery is abnormal.<br />
Stop use immediately and contact your dealer.<br />
Green (solid)<br />
Orange (blinking)<br />
8
• Remove the charging plug from the battery when both indicating lamps change to green<br />
indicating charging is completed.<br />
• Remove the power plug from the power outlet.<br />
9
Insert the battery into the battery-hanger unit<br />
until it clicks.<br />
Remove the battery lock key.<br />
10
Charging with Installed Battery<br />
It is possible to charge the battery installed on<br />
the bicycle as shown below.<br />
The charging method is the same as for<br />
charging the removed battery.<br />
CAUTION: Do not charge the battery<br />
with the controller switch set to ON.<br />
Ignoring this could cause fire.<br />
When not charging, always pull out the charging plug from the battery and the power plug from<br />
the outlet before storing the battery charger.<br />
11
Your <strong>Dahon</strong> <strong>Boost</strong> comes standard with 2<br />
battery lock keys; we suggest you keep<br />
one in a safe place for emergencies. <strong>Dahon</strong><br />
<strong>Boost</strong> bike keys may be duplicated by a<br />
qualified locksmith. Blank keys for the <strong>Dahon</strong><br />
<strong>Boost</strong> are available through your Authorized<br />
<strong>Dahon</strong> Dealer. Please record the key number<br />
for future reference and key replacement. If<br />
your keys are ever lost or stolen, contact your<br />
authorized <strong>Dahon</strong> dealer for replacement.<br />
12<br />
Safety Precautions<br />
These safety precautions are provided for your<br />
benefit to protect you and those around you.<br />
Please read and follow them carefully to avoid<br />
unnecessary injury, damage to the product, or<br />
damage to other property.<br />
Battery<br />
• Do not throw the battery into a fire.<br />
• Do not apply the battery to other<br />
appliances.<br />
• Use only the specified charger to charge<br />
the battery.<br />
• Do not disassemble or modify the battery.<br />
• Do not connect positive and negative<br />
terminals by using metallic objects.<br />
• Keep the battery away from water. Pouring<br />
water on the battery may result in a short<br />
circuit and overheating of the battery.<br />
• Do not submerge the battery. Soaking the<br />
battery in water may cause irreparable<br />
damage.<br />
Battery Charger<br />
• Do not disassemble or modify the battery<br />
charger.<br />
• Please use the battery charger with the<br />
battery in the kit.<br />
• Do not drop the battery charger.<br />
• Do not bring the terminals of the charging<br />
plug in contact with metal.<br />
• If you notice a strange smell or smoke,<br />
stop the charging procedure immediately!<br />
Take your battery and charger to your<br />
authorized <strong>Dahon</strong> dealer for service or<br />
replacement.<br />
• DO NOT CHARGE THE BATTERY FOR<br />
LONGER THAN 24 HOURS!! This could<br />
seriously reduce the life of the battery.<br />
Location for Charging<br />
Please perform charging at a location satisfying<br />
the following conditions.<br />
• A level and stable location<br />
• A location not exposed to rain or water<br />
• A location not exposed to direct sunlight<br />
• A location with good ventilation and no<br />
moisture<br />
• A location out of the reach of children and<br />
pets.<br />
• A location with a temperature from 0°C to<br />
45°C at the time of charging<br />
Do not use (discharge) the battery while<br />
charging.<br />
Always perform charging in an environment<br />
with a normal temperature (0ºC to 45ºC).<br />
NOTE: As the battery temperature is higher<br />
directly after riding, charging may not start, but<br />
this is not a defect. Charging will also not start<br />
when the temperature is too low (0ºC or lower).<br />
When the temperature inside the battery is<br />
not suitable, the orange charging standby<br />
lamp continues to flash, and charging starts<br />
when the temperature inside the battery is in<br />
the range from 0ºC to 45ºC. For this reason,<br />
charging may take time.
Range for Battery<br />
Running distance on one charge varies<br />
depending on rider’s weight, wind resistance,<br />
outdoor temperature, terrain, etc. Riders can<br />
expect to get up to 2 hours of battery life in<br />
normal flat conditions.<br />
Things you can do to increase<br />
performance:<br />
• Proper gear usage: Pedaling in the correct<br />
gear for the terrain will help save energy for<br />
both you and the battery.<br />
• Tires: Always make sure the tires are at the<br />
correct pressure as indicated on the sidewall.<br />
This will give lower rolling resistance<br />
and better performance. If your tires start to<br />
show excessive wear, replace them. New<br />
tires always perform better!<br />
• General Maintenance: Keeping the bicycle<br />
correctly adjusted and lubricated is important.<br />
Worn or misaligned parts can add drag<br />
and resistance which will reduce the range<br />
of the battery<br />
• Always start in Eco or Normal mode:<br />
Getting going always requires more energy<br />
than anything else. Avoid using Turbo mode<br />
to start or restart because this uses a lot of<br />
battery and will shorten the range.<br />
• Correctly charge and discharge your<br />
battery: Please follow all of the direction for<br />
charging and discharging. Once a battery<br />
has been mistreated, you can’t fix it.<br />
• Correctly store your Battery: Once again,<br />
please follow all of the directions for storage.<br />
• Always turn off the unit at the controller:<br />
Never just remove the battery to turn it off<br />
• Temperature: Both extreme high and low<br />
temperatures can drain the battery more<br />
quickly. So when it is really cold or hot, don’t<br />
expect to go as far or as long.<br />
• Wind: As with any cycling wind has a huge<br />
effect on performance. Any headwind will<br />
reduce the battery range. Strong headwinds<br />
can be worse than even the steepest hill for<br />
performance. Conversely, a good tailwind<br />
will allow you to travel much further than<br />
normal.<br />
• Hills: Like wind, hills play in important part<br />
in battery range. Going uphill for any length<br />
of time will reduce the range. Down hill the<br />
battery range will increase because the motor<br />
doesn’t have to work as hard. Also, try<br />
coasting (stop pedaling) or for longer down<br />
hills you can even turn the unit off to help<br />
increase range.<br />
• Road Conditions: Flat smooth roads will<br />
allow the bike to roll faster and the battery<br />
to last longer. Ridging on dirt, gravel, gravel,<br />
sand, and grassy surface will greatly effect<br />
battery life. So will bumpy or and rough<br />
surface.<br />
• Stop and Start: Since more energy is used<br />
during initial acceleration, riding in conditions<br />
that force you to start and stop often<br />
(i.e. city traffic) will cause the motor to use<br />
more energy.<br />
• Number of Battery Charges: Each time the<br />
batter is charged, it will loose its capacity to<br />
hold as much charge next time. These losses<br />
are very small during the life expectancy<br />
of the battery, but they will affect range to a<br />
degree.<br />
• Luggage: Luggage is weight that needs to<br />
be moved and this means the motor works<br />
harder so range will decrease when you<br />
carry luggage.<br />
• Rider Weight: A heaver rider will cause the<br />
motor to use more energy than with a lighter<br />
rider.<br />
Battery Tips and Approximate Life<br />
The <strong>Dahon</strong> <strong>Boost</strong> is equipped with a lithiumion<br />
battery. If used and maintained properly<br />
it should last approximately 500 charging<br />
cycles. The battery should be replaced when<br />
the riding distance with a full charge becomes<br />
notably short (in cold areas, the possible riding<br />
distance may be short even after charging).<br />
Please contact your dealer to purchase a<br />
replacement battery or to obtain warranty<br />
service if covered under the limited warranty.<br />
Some other ways to keep your battery<br />
in good condition include:<br />
• When the unit is not used for a long time,<br />
charge the battery once a year. After<br />
13
charging, use the battery until one red<br />
indicating lamp for the remaining battery<br />
charge is lit, and then store the battery<br />
again.<br />
• It is recommended to store the battery<br />
in a cool location (- 20°C to 20°C<br />
recommended).<br />
• When the charging has been completed,<br />
immediately disconnect the charging plug.<br />
• Do not recharge a battery immediately after<br />
it has completed a charge. The battery<br />
will not “charge twice”, and will likely be<br />
damaged if you do so.<br />
• Use and drain the battery as much as<br />
possible before charging.<br />
Battery Recycling<br />
At the end of a useful life, lithium-ion batteries<br />
are recyclable. Laws governing proper disposal<br />
and recycling of batteries vary according to<br />
locality. Please consult your dealer for advice<br />
about disposal or recycling according to your<br />
local law. The battery or recycled must be<br />
disposed of properly.<br />
Your <strong>Dahon</strong> <strong>Boost</strong> incorporates a state of<br />
the art electric assist unit and some pretty<br />
clever electronics. For performance, safety,<br />
and enjoyment is important to completely<br />
understand how these features operate. Even<br />
experienced cyclists should make sure they<br />
are familiar with the specific operations of the<br />
<strong>Boost</strong>. Make sure you read, and understand<br />
this part of the manual. If you do have any<br />
questions or are at all unclear, please contact<br />
your Authorized <strong>Dahon</strong> Dealer.<br />
<strong>Boost</strong> Technology<br />
<strong>Boost</strong> technology provides a smooth and<br />
powerful power-assisted ride based on your<br />
pedaling force, speed, and gearing. The<br />
system automatically knows how much power.<br />
Once you turn the unit on, all you have to do<br />
is start pedaling the system does the rest.<br />
Through the controller unit, you can then<br />
choose the level of assist you require based on<br />
the conditions.<br />
How it all works<br />
Controller Unit<br />
Located on the left-hand side of the handlebar,<br />
the controller looks like this:<br />
1. On-Off Buttons<br />
2. Battery Level Indicator<br />
3. <strong>Boost</strong> Level Indicator<br />
4. <strong>Boost</strong> Level Button<br />
5. Front Light On-Off Button<br />
6. Front Light Indicator Lamp<br />
14
1. On-Off Buttons<br />
• Gently press the ON button to activate the<br />
unit. The Battery level lights will flash for<br />
several seconds before becoming fixed at<br />
the current battery charge level.<br />
• The unit will start in the Normal mode, so<br />
both the left and middle <strong>Boost</strong> level indicator<br />
lamps should also come on.<br />
• NOTE: Always keep your feet off the pedals<br />
when setting the control-switch to “ON”.<br />
• The Chainwheel has a built-in sensor to<br />
detect the force with which the pedal is<br />
pressed. It is important that the no load is on<br />
the pedals when you first turn the unit on for<br />
correct operation.<br />
• To switch off the unit gently press the OFF<br />
button. This will turn the unit off and all<br />
lamps on the controller should go out.<br />
2. Battery Level Indicator<br />
Battery level is indicated by three lamps. It<br />
functions when the unit is turned on. They<br />
represent the level of charge currently in the<br />
battery.<br />
Status of the<br />
Lights<br />
Three Red lamps lit<br />
Two Red lamps lit<br />
One Red lamp lit<br />
One Red lamp<br />
flashing fast<br />
One Red lamp<br />
flashing slowly<br />
What it Means<br />
The Battery is full<br />
or above twothirds<br />
The remaining battery<br />
charge has<br />
decreased<br />
The batter charge<br />
is becoming low<br />
and should be recharged<br />
soon<br />
The battery is<br />
nearly completely<br />
discharged. Please<br />
charge the battery<br />
as soon as<br />
possible.<br />
The battery is completely<br />
discharged.<br />
Please charge the<br />
battery as soon as<br />
possible.<br />
3. <strong>Boost</strong> Mode Indicator<br />
The <strong>Boost</strong> mode or ‘power level’ is shown by<br />
three blue lamps. You can choose the boost<br />
level by using the <strong>Boost</strong> Level Button. You can<br />
choose between three <strong>Boost</strong> settings:<br />
• ECO Mode: (Indicated by single left hand<br />
lamp being lit)<br />
The most economical of the three <strong>Boost</strong><br />
Modes. The Eco mode will provide assistance<br />
up to 15kmh, but at lower power level<br />
than the Normal or <strong>Boost</strong> modes. The level<br />
of assistance gradual decreases as you approach<br />
15 kmh. Good for using on the flat or<br />
when you want to conserve battery charge.<br />
15
• Normal Mode: (Indicated by both the lefthand<br />
and middle lamps being lit)<br />
The Normal mode will also provide assistance<br />
up to 15kmh, but at a slightly higher<br />
assist ration than the ECO mode. As with<br />
the Eco Mode, the level of assistance<br />
gradual decreases as you approach 15 kmh<br />
Good for flat or rolling hills, or when you find<br />
you need a bit more power.<br />
• <strong>Boost</strong> Mode: (Indicated by all three lamps<br />
being lit)<br />
The <strong>Boost</strong> mode gives you maximum power<br />
and speed. Assistance starts as soon as<br />
you put pressure on the pedals and continues<br />
through to 25kmh. Assistance gradually<br />
decreases as you approach 25kmh. The<br />
<strong>Boost</strong> Mode is great for getting up hills, or if<br />
you have to go a short distance in a hurry.<br />
4. <strong>Boost</strong> Mode Button<br />
The <strong>Boost</strong> level button is used to switch between<br />
the three available <strong>Boost</strong> settings. Each<br />
time you press the button it will change in the<br />
following order:<br />
Normal > <strong>Boost</strong> > Eco > Normal<br />
5 & 6. Front Light Function<br />
The <strong>Boost</strong> uses an integrated LED front<br />
headlamp that is operated at the controller.<br />
The headlamp is turned on or off by pressing<br />
the light button (5). When the Front light is<br />
switched on, the headlamp indicator lamp (6)<br />
will glow yellow.<br />
NOTE: The <strong>Boost</strong> is also fitted with an independent<br />
rear light. This light is operated via a<br />
separate on/off switch and is not connected to<br />
the battery. For your safety please remember to<br />
turn on and off the rear light.<br />
16
General Operation<br />
• When you first turn on the unit, make sure<br />
there is no pressure on the pedals. Pressure<br />
or movement of the pedals affects the<br />
torque setting and can cause the unit to<br />
function incorrectly.<br />
• The <strong>Boost</strong> operates according to the force<br />
applied to the pedals. If there is no force on<br />
the pedals for five minutes after the ON button<br />
has been pressed, the unit will turn off<br />
to save battery charge.<br />
• Do not ride through deep puddles or heavy<br />
rain. If the assist unit is exposed to lots of<br />
water or submerged, electric shock may<br />
occur.<br />
• Always park the bicycle on a level surface.<br />
• Never lift the bicycle by the battery.<br />
Riding without Assistance<br />
The <strong>Boost</strong> has been designed as a lightweight<br />
folding bike. With the assist unit turned off it<br />
can be ridden as a normal bicycle.<br />
Checks before Riding<br />
• Here are some things to check before you<br />
start riding:<br />
• Make sure the battery is installed correctly.<br />
• Make sure to remove the battery lock key.<br />
• Make sure the battery has sufficient charge.<br />
• Perform all checks in the bicycle owners’<br />
manual.<br />
Using the Hub Gears<br />
Your <strong>Boost</strong> is fitted with a 3-speed internal<br />
geared rear hub. For general use and use<br />
of the bicycle without the Assist unit active,<br />
operation of these gears can be found in the<br />
standard <strong>Dahon</strong> Owners Manual.<br />
NOTE: Your <strong>Boost</strong> determines your overall<br />
speed based on how fast you are pedaling.<br />
All cut-off and assist level speeds are based<br />
on using the bicycle in the third (high) gear at<br />
the hub. Assistance cut-off speeds are greatly<br />
reduced when in the first and second gears.<br />
This is normal and allows usability for a variety<br />
of riding styles and levels.<br />
17
Service & Storage<br />
Service<br />
Your <strong>Dahon</strong> <strong>Boost</strong> will require the standard service requirements that are found in the bicycle manual. Please refer to instruction manual.<br />
Checklist<br />
The following checklist should be used for checking components specific to your <strong>Boost</strong> Bicycle:<br />
Inspect for<br />
Check if the assist unit is loosened or damaged.<br />
Check if the assist function operates normally or produces<br />
abnormal noise.<br />
Check if grease leaks from the assist unit.<br />
Check if the electric wiring is connected without slack or<br />
damage.<br />
Check if any cord is disconnected and each cord is mounted to<br />
the frame properly.<br />
Check if the battery lock key functions normally.<br />
Inspection term<br />
1st<br />
inspection<br />
2nd<br />
inspection<br />
3rd<br />
inspection<br />
4th<br />
inspection<br />
5th<br />
inspection<br />
6th<br />
inspection<br />
7th<br />
inspection<br />
2 months 6 months 12 months 18 months 24 months 30 months 36 months<br />
Check if the battery is mounted securely.<br />
Check if each indication lamp lights up or if any lamp indicates<br />
abnormality.<br />
Check if the battery is running short quickly.<br />
18
Initial inspection after 2 months<br />
• Approximately two months after your first<br />
use, you should check to make sure everything<br />
is tight and secure.<br />
• Inspect the bike and contact your dealer if<br />
you find a problem.<br />
From the second inspection on<br />
• To ensure your <strong>Boost</strong> continues to function<br />
correctly, you should have it inspected and<br />
serviced every six months The responsibility<br />
and expense for proper routine maintenance<br />
of this bicycle is your own responsibility.<br />
Cleaning<br />
It is important to keep all of the wiring, plugs<br />
and contact points clean and free form dirt,<br />
water, oil. Some things to remember:<br />
• After every ride it is good to give the bike a<br />
wipe over. This makes removing any dirt,<br />
grit much easier.<br />
• After riding in the rain or on wet roads,<br />
always clean and dry all components<br />
immediately.<br />
• Never spray water directly onto any part of<br />
the bicycle as this may cause damage on<br />
electric shock.<br />
• Avoid using any chemicals or strong cleaning<br />
agents on the electrical components.<br />
• Try using a dry, or slightly damp cloth to<br />
clean dirt and grit away..<br />
• Always be careful when cleaning around<br />
wires and connectors. Damage can occur if<br />
you pull or push wiring too vigorously.<br />
Storage<br />
It is important to store you bike correctly.<br />
Please ensure:<br />
• It is stored in a level and stable location.<br />
• A location with good ventilation and no<br />
moisture.<br />
• A location not exposed to rain or direct<br />
sunlight.<br />
• It is also a good idea to cover the bicycle for<br />
storage.<br />
Long-term Storage<br />
When your bike is to be stored for one month<br />
or longer. Please make sure to:<br />
• Make sure that only one red indicating lamp<br />
lit remains. If there are more lamps lit use<br />
the battery until only one light remains.<br />
• Store the battery at a suitable temperature<br />
(-20ºC to 20ºC recommended).<br />
• Charge once a year. After charging, store<br />
the battery again after using it until one red<br />
indicating lamp for the remaining battery<br />
charge is lit.<br />
Operation After long-term Storage<br />
After 20 days of inactivity, the battery will place<br />
itself in Hibernation Mode. This is to help save<br />
loss of power and extend the life of the battery.<br />
To resume normal battery function, you will<br />
need to remove the battery from the bike and<br />
perform a standard charge cycle. Once complete,<br />
the battery will be ready to use again.<br />
19
Troubleshooting<br />
When riding the bike<br />
Symptom Please Check Solution<br />
The pedals feel stiff.<br />
Vibrations are felt<br />
from the pedals<br />
Flashing indicating<br />
lamps of the controlswitch<br />
Are the indicator lamps on the controller lit?<br />
Is the battery installed?<br />
Is the battery locked securely?<br />
Has the battery been charged?<br />
Has the unit been inactive for five or more<br />
minutes?<br />
Have you set the control-switch to ON applying<br />
force to the pedals?<br />
Have you stopped the bike with your feet on<br />
the pedals or does this occur at the time of<br />
start?<br />
Does this occur while riding the bike normally?<br />
Are the left side two lamps flashing?<br />
Is the red lamp on the left flashing?<br />
Are the lamps flashing in a different pattern?<br />
Set the control-switch to ON<br />
Install the battery.<br />
Lock the battery securely.<br />
Charge the battery<br />
Automatic off function is operating. Set the<br />
control-switch to ON again.<br />
Set the control-switch once to OFF, and then set<br />
it again to ON without applying any force to the<br />
pedals.<br />
This is a characteristic of the motor and not an<br />
abnormality.<br />
A wire break of the pedal-force sensor (etc.) can<br />
be considered. Please return to your dealer for<br />
advice.<br />
The temperature of the assist unit is high. Set the<br />
control-switch to OFF and wait for the temperature<br />
to drop.<br />
The battery charge is nearly exhausted. Recharge<br />
as soon as possible.<br />
This indicates a problem with the Turbo unit.<br />
Please ask your dealer for a repair.<br />
20
When riding the bike<br />
Symptom Please Check Solution<br />
Short Possible<br />
Riding Distance<br />
Has the battery been charged?<br />
Has the battery been left unused for<br />
a long time?<br />
Have you been riding under severe<br />
conditions like uphill, bad roads, or<br />
similar?<br />
Riding up lots of hills Riding with<br />
frequent starts and stops<br />
Riding at high gear ratio<br />
Is the ambient air temperature low?<br />
Is the air temperature high?<br />
Is there foreign matter or dirt on the<br />
battery contacts?<br />
Has the battery been used for a long<br />
time?<br />
Is the tire air pressure normal?<br />
Is the brake adjusted correctly?<br />
Set the control-switch to ON<br />
Perform charging. Even when a completely charged battery is<br />
not used for a long time, the remaining charge may decrease<br />
because of natural discharge.<br />
The riding distance is shorter according to the road conditions,<br />
the gear position.<br />
Larger amount of battery power is consumed as the bicycle is<br />
used under high load conditions.<br />
Select the optimum position of the gear shift and/or Assist mode<br />
depending on uphill or downhill, head-wind or tail-wind, and your<br />
physical condition.<br />
In winter or in cold areas, the battery becomes cold, the capacity<br />
decreases because of the properties of the battery, and the riding<br />
distance becomes shorter<br />
When the battery is left at high temperatures, the remaining<br />
charge may decrease.<br />
Remove any attached foreign matter. Wipe off any dirt with a dry<br />
cloth.<br />
The battery may have reached the end of its life. Please replace<br />
the battery.<br />
Use a bike pump to inflate the tires<br />
Adjust the brake.<br />
21
Symptom Please Check Solution<br />
The charging<br />
plug cannot be<br />
inserted into the<br />
battery connector<br />
Is the orientation of the charging<br />
plug correct?<br />
The charging plug of the battery charger cannot be inserted<br />
when the orientation is not correct. Match the orientation of the<br />
charging plug and the charging connector and insert the plug.<br />
No charging<br />
Are the power plug and the charging<br />
plug plugged in?<br />
Check for correct connection of “power plug and outlet”, “power<br />
cable and battery charger”, and “charging plug and charging<br />
connector”.<br />
When the temperature of the battery is high (45ºC or higher) or<br />
low (0ºC or lower), charging standby is reached until the temperature<br />
of the battery is in the normal range. This is normal.<br />
Remove any attached foreign matter. Wipe off any dirt with a dry<br />
cloth.<br />
When charging is not started after some time (approximately 5<br />
hours) at normal temperature, the battery charger or the battery<br />
may be defective. Please contact your dealer for repair.<br />
An increased temperature is normal during and directly after<br />
charging and use.<br />
Immediately stop use and ask your dealer for a repair.<br />
When charging<br />
No charging<br />
(orange lighting)<br />
Is the battery hot or cold?<br />
Has the battery been left for a long<br />
time?<br />
In other cases than the above ones.<br />
The battery or<br />
the battery charger<br />
becomes hot.<br />
Does the temperature permit touching<br />
(40ºC to 60ºC)?<br />
Is it too hot to touch?<br />
Abnormal smell<br />
or smoke from<br />
the batter charger<br />
Immediately stop use and ask your dealer for a repair.<br />
No green flashing<br />
even after<br />
start of charging<br />
Immediately stop use and ask your dealer for a repair.<br />
22
Specifications<br />
Motor Unit<br />
• Type of Motor: DC Brushless.<br />
• Maximum Output: 250 W<br />
• Weight: 3,2kgs<br />
• Ambient Temperate for use: 0°C to 40°C<br />
• Ambient Temperate for storage: -5°C to<br />
60°C<br />
Battery<br />
• Type of Battery: Rechargeable lithium ion<br />
battery<br />
• Rated output voltage: DC26.6 V<br />
• Capacity: 5amp(133Wh)<br />
• Weight: 1.40kgs<br />
• Ambient Temperate for use: 0°C to 40°C<br />
• Ambient Temperate for storage: -5°C to<br />
60°C<br />
Battery Charger<br />
• Type: Switching regulator.<br />
• Power supply: AC 100 to 240 V, 50/60 Hz<br />
• Power consumption: 64 W<br />
• Rated output voltage: DC29 V, 1.75 A<br />
• Ambient Temperate for use: 0°C to 45°C<br />
• Ambient Temperate for storage: -20°C to<br />
60°C<br />
Warranty<br />
<strong>Dahon</strong> Five-Year Limited Warranty<br />
<strong>Dahon</strong> warrants its bicycle frames, handleposts,<br />
and rigid forks to be free from defects in<br />
materials and workmanship for a period of five<br />
years. <strong>Dahon</strong> warrants the assist motor unit,<br />
controller, and battery for a period of two years.<br />
In addition, <strong>Dahon</strong> warrants all original parts<br />
on the bicycle, excluding suspension forks and<br />
rear shocks, for a period of one year from the<br />
date of purchase. Suspension forks and rear<br />
shocks shall be covered by the warranty of<br />
their original manufacturers. This warranty is<br />
limited to the repair or replacement of a defective<br />
frame, fork, or defective part and is the sole<br />
remedy of the warranty.<br />
This warranty applies only to the original owner<br />
and is not transferable. This warranty only<br />
covers bicycles and components purchased<br />
through an authorized <strong>Dahon</strong> dealer and<br />
are only valid within the country in which the<br />
bicycle was purchased. The warranty does<br />
not cover normal wear and tear, improper assembly<br />
or follow-up maintenance, installation<br />
of parts or accessories not originally intended<br />
or compatible with the bicycle as sold, damage<br />
or failure due to accident, misuse or neglect, or<br />
modification of the frame, fork or components.<br />
Lifetime Warranty Upgrade<br />
The warranty on the frame, handlepost and<br />
rigid fork may be upgraded to a lifetime warranty<br />
if the original owner fills out the online<br />
registration card. The warranty is activated<br />
when the bicycle is tuned and adjusted by a<br />
professional mechanic before the owner’s first<br />
ride. To activate your <strong>Dahon</strong> warranty and Lifetime<br />
Frame Warranty, please visit our On-line<br />
Warranty Registration page:<br />
www.dahon.com/registration.htm.<br />
Registering your <strong>Dahon</strong> serves as proof of<br />
original ownership for future warranty issues.<br />
*Exclusions from the <strong>Dahon</strong> Five-Year Limited<br />
Warranty also apply to the lifetime frame<br />
warranty.<br />
Exclusions<br />
• For all city, road or trekking bikes, damage<br />
resulting from commercial use, accident,<br />
misuse, abuse, neglect or from anything<br />
other than normal and ordinary use of the<br />
product.<br />
• For all mountain bikes, damage resulting<br />
from uses beyond cross-country and<br />
marathon riding or from anything other than<br />
normal and ordinary use of the product.<br />
23
Required assembly when Purchased.<br />
An Authorized <strong>Dahon</strong> Dealer is required to<br />
assemble your <strong>Dahon</strong> brand electric vehicle,<br />
without charge, at the time of purchase.<br />
Making a Warranty Claim<br />
You must, at your own expense, deliver, mail or<br />
ship the damaged part, a photo of the defective<br />
part, and a description of the defect, together<br />
with both the original bill of sale and this limited<br />
warranty statement as proof of warranty<br />
coverage, to your place of purchase. A warranty<br />
registration card must be completed and<br />
received by <strong>Dahon</strong> before a warranty claim<br />
can be processed. The retailer from whom<br />
you bought your bicycle will contact <strong>Dahon</strong> to<br />
determine if the necessary repairs are covered<br />
by the warranty.<br />
EXCLUSIONS<br />
THE ABOVE WARRANTY, OR ANY IMPLIED<br />
WARRANTY, DOES NOT COVER NORMAL<br />
WEAR AND TEAR. ALL WARRANTIES ARE<br />
VOID IF THE ELECTRIC VEHICLE IS USED<br />
FOR OTHER THAN NORMAL ACTIVITIES,<br />
INCLUDING, BUT NOT LIMITED TO, FAILING<br />
TO FOLLOW THE OWNER’S <strong>MANUAL</strong> OR<br />
USING THE ELECTRIC VEHICLE FOR COM-<br />
MERCIAL ACTIVITIES OR IN COMPETITIVE<br />
EVENTS, AND TRAINING FOR SUCH ACTIVI-<br />
TIES OR EVENTS. DAHON MAKES NO OTH-<br />
ER WARRANTIES, EXPRESS OR IMPLIED.<br />
ALL IMPLIED WARRANTIES, INCLUDING<br />
THE WARRANTIES OF MERCHANTABILITY<br />
AND FITNESS FOR A PARTICULAR PUR-<br />
POSE, ARE LIMITED IN DURATION TO THAT<br />
OF THE EXPRESS WARRANTIES STATED<br />
ABOVE.<br />
NOTE: This warranty does not affect the statutory<br />
rights of the consumer. Where applicable,<br />
local laws will take precedent over this contract.<br />
24
Notes<br />
25
Notes<br />
26
Notes<br />
27
<strong>Dahon</strong> California INC.<br />
833 Meridian Street<br />
Duarte CA 91010<br />
1-800-442-3511<br />
<strong>Dahon</strong> TW<br />
8F-8, #6, Lane 609, Chung Hsin RD., Sec 5<br />
San Chung, Taipei Hsien ROC 241, Taiwan<br />
+886-2-2999-5623<br />
www.dahon.com<br />
© 2009 DAHON, BPSA<br />
2009.09.EN