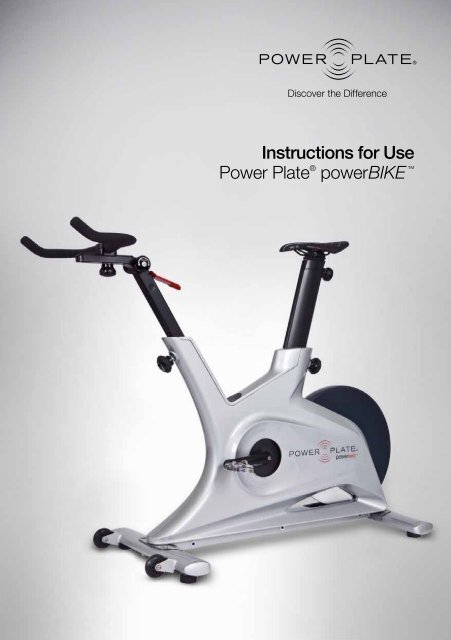
Instructions for Use Power Plate® powerBIKE™
Instructions for Use Power Plate® powerBIKE™
Instructions for Use Power Plate® powerBIKE™

You also want an ePaper? Increase the reach of your titles
YUMPU automatically turns print PDFs into web optimized ePapers that Google loves.
<strong>Instructions</strong> <strong>for</strong> <strong>Use</strong><br />
<strong>Power</strong> Plate ® powerBIKE
Contents<br />
Introduction<br />
Introduction<br />
01<br />
The <strong>Power</strong> Plate ® powerBIKE is a stationary bike which<br />
Important Safety <strong>Instructions</strong> 02<br />
Adjustment Guidelines 03<br />
Saddle Height Adjustment 03<br />
Saddle Horizontal Adjustment 03<br />
Handlebar Adjustment 04<br />
Pedals Adjustment 05<br />
Guidelines <strong>for</strong> <strong>Use</strong>/Functions and Features 05<br />
Vibration 05<br />
Resistance 06<br />
Brakes 06<br />
How to move the <strong>Power</strong>BIKE 07<br />
Maintenance 08<br />
Daily Maintenance 08<br />
Regular Maintenance 08<br />
Technical Specifications 09<br />
Certifications 09<br />
Warranty 09<br />
combines two individually validated exercise methods – cycling<br />
and vibration training. The effectiveness of both cycling and<br />
vibration training are each well-established and recognized<br />
independently – but this is the first ever mechanical stationary<br />
bike with integrated vibration technology.<br />
The integrated vibration technology in the pedals produces high<br />
frequency vibrations while revolving. This combination of cycling<br />
and vibration training provides simultaneous cardiovascular<br />
and strength training benefits. The vibrations increase workout<br />
intensity , but also prompt the stretch reflex, making this<br />
increased intensity seem easier to cope with. That means you<br />
can increase your workload and the amount of calories burned,<br />
thus improving your training results, without increasing the length<br />
of your workout.<br />
We hope you will enjoy using the <strong>Power</strong> Plate powerBIKE.<br />
Programs 10<br />
Contact and Support 12<br />
IMPORTANT !<br />
Read all precautions and instructions in this manual be<strong>for</strong>e using this equipment.<br />
Keep this manual <strong>for</strong> future reference. Improper assembly, maintenance or use can void<br />
the warranty terms.<br />
© 2011 <strong>Power</strong> Plate International Ltd and <strong>Power</strong> Plate North America, Inc. All rights reserved. <strong>Power</strong> <strong>Plate®</strong><br />
powerBIKE, the powerBIKE device, design and logo are registered trademarks and/or intellectual property<br />
of <strong>Power</strong> Plate International Ltd., <strong>Power</strong> Plate North America, Inc. and/or their affiliates. All other trademarks<br />
are the property of their respective owners. <strong>Power</strong> <strong>Plate®</strong> machines are protected under patents and design<br />
rights in numerous countries around the world. <strong>Power</strong> Plate retains all rights (including copyright, trademark<br />
and all other intellectual property rights) and in relation to all in<strong>for</strong>mation provided in this manual. You may<br />
not copy, publish or distribute any of the in<strong>for</strong>mation contained in this manual, or in any other documents<br />
published by <strong>Power</strong> Plate without its written permission.<br />
1
Important Safety <strong>Instructions</strong><br />
Adjustment Guidelines<br />
WARNING!<br />
To reduce the risk of serious injury, read<br />
the following important precautions<br />
and in<strong>for</strong>mation be<strong>for</strong>e operating the<br />
powerBIKE.<br />
1. It is the responsibility of the owner<br />
to ensure that all users of the<br />
powerBIKE are in<strong>for</strong>med of all<br />
warnings and precautions.<br />
2. Operate and maintain the powerBIKE,<br />
only as described in this manual.<br />
3. Keep the powerBIKE, indoors, away<br />
from moisture and dust. Do not<br />
place the powerBIKE, in a garage or<br />
covered patio or near water. Place<br />
the powerBIKE on a level surface.<br />
To protect the floor or carpet from<br />
damage, place a mat beneath the<br />
powerBIKE.<br />
4. Make sure that there is adequate<br />
room around the powerBIKE,<br />
5. Regularly inspect and properly<br />
tighten all parts of the powerBIKE, as<br />
recommended in this manual. Please<br />
replace defective parts immediately<br />
and do not use the powerBIKE until<br />
repair is per<strong>for</strong>med. Only use original<br />
parts from the manufacturer.<br />
6. Children under the age of 16<br />
should only be allowed to use the<br />
powerBIKE with parental consent<br />
and with guidance from a qualified<br />
instructor.<br />
7. The powerBIKE should not be used<br />
by persons weighing more than<br />
100kg / 220.462 lb<br />
8. Always wear appropriate athletic<br />
clothes and shoes while operating<br />
the powerBIKE. Do not wear loose<br />
clothes or shoes with loose laces that<br />
could become caught on powerBIKE.<br />
9. Be<strong>for</strong>e using the powerBIKE, make<br />
sure that you are familiar with the<br />
operation of the powerBIKE (see<br />
pages 3-7).<br />
10. The powerBIKE does not have an<br />
independently moving flywheel<br />
(wheel) so the pedals will continue to<br />
move together with the flywheel until<br />
the flywheel stops.<br />
11. Always regulate the flywheel<br />
resistance so that your pedalling<br />
motion is controlled (see page9).<br />
12. Keep your back straight while using<br />
the powerBIKE do not arch your<br />
back.<br />
13. If you feel pain or dizziness while<br />
exercising, stop immediately, rest and<br />
cool down.<br />
14. If replacement parts are needed, use<br />
only manufacturer supplied parts.<br />
Contact your local powerBIKE agent,<br />
distributor or retailer <strong>for</strong> advice.<br />
WARNING! Be<strong>for</strong>e beginning any<br />
exercise program, consult your<br />
physician. Read all instructions be<strong>for</strong>e<br />
using. Be aware that incorrect or<br />
extensive training may result in serious<br />
health injuries. The manufacturer<br />
assumes no responsibility <strong>for</strong> personal<br />
injury or property damage sustained<br />
by or through the use of this product.<br />
Always adjust the powerBIKE to the<br />
optimal position <strong>for</strong> your personal<br />
needs.<br />
The powerBIKE can be adjusted <strong>for</strong> maximum com<strong>for</strong>t and exercise effectiveness. The instructions below<br />
describe the approach to adjusting the powerBIKE to ensure optimal user com<strong>for</strong>t and ideal body positioning;<br />
you may choose to adjust the powerBIKE differently.<br />
Saddle height adjustment<br />
Sit on the saddle and slowly pedal until the left pedal is in the<br />
lowest position. Your knees should be slightly bent without<br />
dropping the hips. To avoid hyper-extending your knees, make<br />
sure that your legs are not completely straight.<br />
If the saddle is not at the correct height <strong>for</strong> your needs, it should<br />
be adjusted. The saddle height adjustment knob is located at the<br />
back of the column which holds<br />
the saddle shaft. Loosen the knob<br />
until the saddle moves up or down.<br />
Position the saddle at the optimum<br />
height <strong>for</strong> your requirements and<br />
tighten the knob so that the shaft<br />
stays firmly in place. Remount the<br />
powerBIKE and check that the<br />
saddle is in the correct position<br />
<strong>for</strong> your needs, based on the<br />
guidance above.<br />
Saddle horizontal adjustment<br />
Proper horizontal adjustment of the saddle is very important in<br />
avoiding injury to the knees. Sit on the saddle and move the<br />
pedals until the crank arms are in horizontal position. Using your<br />
<strong>for</strong>ward most leg as a marker, your kneecap should be directly<br />
above the center of the pedal<br />
so that a straight line is created<br />
between knee and center of<br />
the pedal (see the dotted line in<br />
image to the right).<br />
To adjust the horizontal position<br />
of the saddle, first dismount the<br />
powerBIKE. Next, loosen the<br />
rear adjustment knob which is<br />
positioned on the saddle shaft,<br />
just below the saddle itself and<br />
slide the saddle <strong>for</strong>wards or<br />
backwards as required, and then<br />
retighten the knob.<br />
2 3
Handlebar Adjustment<br />
Begin with the top of the handlebar at relatively the same<br />
height or just slightly higher than the top of the saddle (dotted<br />
horizontal line A in the drawing below) and at a neutral <strong>for</strong>e/<br />
aft position (see dotted vertical line B in drawing below). If your<br />
knees touch the handlebars or if you experience back discom<strong>for</strong>t<br />
while pedalling <strong>for</strong> extended periods of time, the height of the<br />
handlebars should be<br />
adjusted. First, dismount<br />
A<br />
the powerBIKE. Next,<br />
B<br />
turn the front adjustment<br />
knob (located at the top<br />
of the column which<br />
holds the handlebar shaft)<br />
counter clockwise, slide<br />
the handlebar post up or<br />
down, and then retighten<br />
the adjustment knob.<br />
Next, the horizontal position of the handlebar should be adjusted.<br />
If the handlebar is too close to the saddle, your breathing may<br />
feel restricted; if the handlebar is too far from the saddle, you<br />
may experience back discom<strong>for</strong>t. To adjust the horizontal<br />
position of the handlebar, first dismount the powerBIKE. Loosen<br />
the adjustment knob, located underneath the handlebar, and<br />
move the handlebars back or <strong>for</strong>ward to your preferred position.<br />
Tighten the adjustment knob firmly and remount the powerBIKE<br />
to check that the positioning is correct.<br />
The handlebar offers a wide variety of hand positions <strong>for</strong> personal<br />
preferences. Changing your hand position can change the<br />
angle of your back, neck, and arms. To minimize the stress on<br />
your muscles during your workouts, change your hand position<br />
frequently.<br />
RPM Freq (Hz)<br />
60 18<br />
70 21<br />
80 24<br />
90 27<br />
100 30<br />
110 33<br />
120 36<br />
130 39<br />
Pedals adjustment<br />
The pedals feature toe-clips on one side and SPD cleats on<br />
the opposite side. The toe-clip straps should be snug but not<br />
too tight.<br />
Guidelines <strong>for</strong> <strong>Use</strong> /<br />
Functions and features<br />
Vibration Frequency<br />
The vibration function can be turned on or off with the knob<br />
located on the left of the handlebar column. To turn the vibrations<br />
on, turn the left knob towards you - toward the back of the bike.<br />
To turn off the vibrations, turn the knob towards the front of<br />
the bike.<br />
The frequency of the vibration is determined by the revolving<br />
speed. The faster you pedal the higher the vibration frequency.<br />
The ratio between the vibration frequency and a pedal stroke is<br />
1:18. For example, if you pedal at 90 rotations per minute (RPM),<br />
the frequency of the vibration will be 27 Hz (27 vibrations per<br />
second). At 120 RPM the vibration frequency will be 36 Hz<br />
(36 vibrations per second). See table <strong>for</strong> more examples.<br />
Higher frequencies are not necessarily better or more intense.<br />
We advise that you pedal at your personal preferred RPM with<br />
variations up and down to simulate per<strong>for</strong>mance as much<br />
as possible See programs chapter <strong>for</strong> examples of training<br />
programs.<br />
IMPORTANT: Always start and end your session on the<br />
powerBIKE with the vibration turned off and resistance set to low.<br />
This helps to prepare you <strong>for</strong> your training session and also helps<br />
to maintain the mechanical operation of the powerBIKE.<br />
4 5
How to move the <strong>Power</strong>BIKE<br />
Resistance<br />
The resistance is applied by Eddy current. The resistance<br />
is generated by using magnets which act on the fly wheel.<br />
It may be adjusted with the resistance knob on the right<br />
side of the handlebar column. To increase the resistance,<br />
turn the knob away from you (clockwise - to the right).<br />
To decrease the resistance, turn the knob towards you<br />
(counter-clockwise - to the left)<br />
down and lift the back high enough so that the wheels under<br />
the front touch the ground. Roll the <strong>Power</strong>BIKE while holding the<br />
back end off the ground.<br />
Brakes<br />
To stop or slow down use the break lever on the<br />
handlebar shaft. To slow down or stop the bike press the<br />
break lever downwards.flywheel.<br />
If you need to move the powerBIKE push the handlebar<br />
6 7
Maintenance<br />
Regular maintenance must be per<strong>for</strong>med on the<br />
powerBIKE <strong>for</strong> optimal per<strong>for</strong>mance and longevity.<br />
Please read and follow all instructions below. If the<br />
powerBIKE is not maintained as described, components<br />
may wear excessively and the powerBIKE may become<br />
damaged. Improper maintenance will void the warranty<br />
terms. If you have questions about maintenance, contact<br />
your local distributor or refer to www.powerbike.com.<br />
Daily maintenance<br />
1. Make sure that the powerBIKE is level. If the powerBIKE<br />
rocks on your floor, turn the leveling feet underneath the<br />
front or rear stabilizer until the rocking motion is eliminated<br />
2. After each user finishes exercising, the powerBIKE<br />
should be disinfected and cleaned to maintain a hygienic<br />
environment. First, apply a disinfectant spray to the<br />
handlebars and the saddle. Dry the handlebars and the<br />
saddle using a lint-free cloth. Next, apply a small amount<br />
of disinfectant to a lint-free cloth and clean the adjustment<br />
knobs and the lock handles. Avoid using strong<br />
detergents on the powerBIKE frame.<br />
Regular maintenance<br />
Some parts of the powerBIKE may become loose as a<br />
result of repeated use. Check pedals, toe clips, and pedal<br />
straps, and make sure that they are properly tightened.<br />
Next, check all exposed screws, bolts, and nuts, and<br />
make sure that they are properly tightened. Finally, check<br />
the saddle to make sure that it is not loose or damaged.<br />
Technical Specifications<br />
Dimensions:<br />
Weight:<br />
Max. user weight:<br />
Certification<br />
Footprint: 55in w x 22in d / 140cm w x 56cm d<br />
Max. handlebar height: 41in / 103cm<br />
Max. saddle height: 44in / 113cm<br />
Total: 121lb / 55kg<br />
Flywheel: 23lb / 10.5kg<br />
220lb / 100kg<br />
BS EN 957-1:2005, BS EN 957-10:2005, ASTM F1250-00:2006<br />
Warranty<br />
Frame<br />
Parts<br />
Labor<br />
Wear Items<br />
5 years<br />
1 year<br />
1 year<br />
6 months<br />
Saddle Upholstery<br />
Pedal Clip & Strap<br />
Handlebar Grip<br />
Brake Felt<br />
8 9
Programs<br />
The programs below have been tested by multiple professional cyclists, but this does not guarantee that they<br />
are suited <strong>for</strong> everybody, or that results are assured. As with every <strong>for</strong>m of training, a combination of factors<br />
including diet, rest and other activities will also contribute to achieving the desired outcome.<br />
Be<strong>for</strong>e beginning any exercise program, you should consult your physician <strong>for</strong> a full medical checkup and<br />
obtain clearance to participate in physical exercise.<br />
powerBIKE: Beginner Ride<br />
Elapsed Time Duration Movement Resistance Cadence Vibration<br />
0:00–5:00 5 min Seated Level 1 (Low) 90–100 RPM Off<br />
5:00–6:00 1 min Seated Level 2 (Med) 90–100 RPM On<br />
6:00–7:00 1 min Seated Level 2 (Med) 90–100 RPM Off<br />
7:00–25:00 18 min Repeat minutes 5:00–7:00 nine times <strong>for</strong> a total of 10 intervals.<br />
25:00–30:00 5 min Seated Level 1 (Low) 90–100 RPM Off<br />
powerBIKE: Endurance Level 1<br />
Elapsed Time Duration Movement Resistance Cadence Vibration<br />
0:00–10:00 10 min Seated Level 1 (Low) 90 RPM On<br />
10:00–11:00 1 min Standing Level 4 (High) 70 RPM On<br />
11:00–12:00 1 min Seated Level 1 (Low) 90 RPM On<br />
12:00–13:00 1 min Seated Level 4 (High) 90 RPM On<br />
13:00–14:00 1 min Seated Level 1 (Low) 90 RPM On<br />
14:00–22:00 8 min Repeat minutes 10:00–14:00 two times <strong>for</strong> a total of three intervals.<br />
22:00–30:00 8 min Seated Level 1 (Low) 90 RPM On<br />
powerBIKE: Endurance Level 2<br />
Elapsed Time Duration Movement Resistance Cadence Vibration<br />
0:00–10:00 10 min Seated Level 1 (Low) 90 RPM On<br />
10:00–11:00 1 min Standing Level 4 (High) 70 RPM On<br />
11:00–12:00 1 min Seated Level 4 (High) 90 RPM On<br />
12:00–13:00 1 min Seated Level 1 (Low) 90 RPM On<br />
13:00–22:00 9 min Repeat minutes 10:00–13:00 three times <strong>for</strong> a total of four intervals.<br />
22:00–30:00 8 min Seated Level 1 (Low) 90 RPM On<br />
powerBIKE: Endurance Level 3<br />
Elapsed Time Duration Movement Resistance Cadence Vibration<br />
0:00–5:00 5 min Seated Level 1 (Low) 90 RPM On<br />
5:00–7:00 2 min Standing Level 4 / 5 (High / Very High) 70 RPM On<br />
7:00–8:00 1 min Seated Level 1 (Low) 90 RPM On<br />
8:00–10:00 2 min Seated Level 4 / 5 (High / Very High) 80 RPM On<br />
10:00–11:00 1 min Seated Level 1 (Low) 90 RPM On<br />
11:00–23:00 12 min Repeat minutes 5:00–11:00 two times <strong>for</strong> a total of three intervals.<br />
23:00–30:00 7 min Seated Level 1 (Low) 90 RPM On<br />
powerBIKE Intense Interval<br />
Elapsed Time Duration Movement Resistance Cadence Vibration<br />
0:00–10:00 10 min Seated Level 2 (Med) 90 RPM On<br />
10:00–10:15 15 sec Seated Level 5 (Very High) 100 RPM On<br />
10:15–10:30 15 sec Seated Level 1 (Low) 100 RPM On<br />
10:30–20:00 9 min,30 sec Repeat minutes 10:00–10:30 19 times <strong>for</strong> a total of 20 intervals.<br />
20:00–30:00 10 min Seated Level 1 (Low) 90 RPM On<br />
powerBIKE: Sprint<br />
Elapsed Time Duration Movement Resistance Cadence Vibration<br />
00:00–10:00 10 min Seated Level 1 (Low) 90 RPM On<br />
10:00–10:30 30 sec Seated Level 5 (Very High) Sprint On<br />
10:30–12:30 2 min Seated Level 1 (Low) 90 RPM On<br />
12:30–22:30 10 min Repeat minutes 10:00–12:30 four times <strong>for</strong> a total of five intervals.<br />
22:30–30:00 7 min, 30 sec Seated Level 1 (Low) 90 RPM On<br />
powerBIKE: Fat-Burning and Recovery<br />
Elapsed Time Duration Movement Resistance Cadence Vibration<br />
:0:00–10:00 10 min Seated Level 1 (Low) 80 RPM On<br />
10:00–11:00 1 min Standing Level 1 (Low) 70 RPM On<br />
11:00–12:00 1 min Seated Level 2 (Med) 90 RPM On<br />
12:00–20:00 8 min Repeat minutes 10:00–12:00 four times <strong>for</strong> a total of five intervals.<br />
20:00–30:00 10 min Seated Level 1 (Low) 80 RPM On<br />
10 11
Contact and Support<br />
Further in<strong>for</strong>mation can be found<br />
on the website www.powerbike.com<br />
or from your local powerBIKE <br />
representative.<br />
<strong>Power</strong> Plate International Ltd<br />
First Floor, 13 George Street<br />
London W1U 3 QJ<br />
United Kingdom<br />
T | +44 (0)20 7317 5000<br />
F | +44 (0)20 7317 5001<br />
info@powerplate.co.uk<br />
<strong>Power</strong> Plate North America Inc<br />
17900 Von Karman, Suite 125<br />
Irvine, CA USA 92614<br />
T | +1 949 863 1737<br />
F | +1 949 863 1216<br />
info@powerplate.com<br />
877.87.plate<br />
© Copyright 2011 <strong>Power</strong> Plate. All Rights Reserved.<br />
Rev. 1.0 – 30/MAR/2011