Axor Starck ShowerCollection Shower Planning - Hansgrohe
Axor Starck ShowerCollection Shower Planning - Hansgrohe
Axor Starck ShowerCollection Shower Planning - Hansgrohe

You also want an ePaper? Increase the reach of your titles
YUMPU automatically turns print PDFs into web optimized ePapers that Google loves.
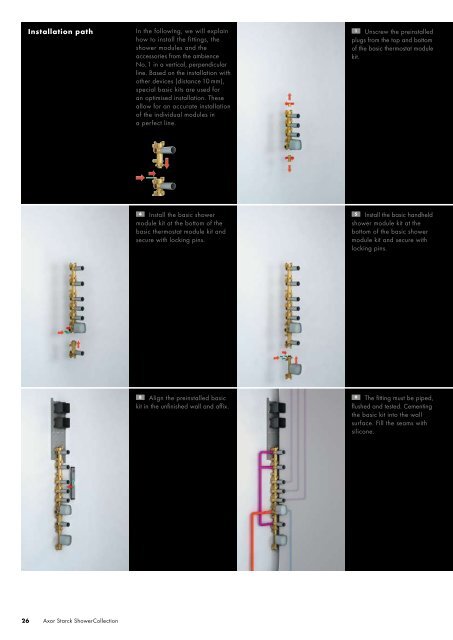
Installation path<br />
In the following, we will explain<br />
how to install the fittings, the<br />
shower modules and the<br />
accessories from the ambience<br />
No. 1 in a vertical, perpendicular<br />
line. Based on the installation with<br />
other devices (distance 10 mm),<br />
special basic kits are used for<br />
an optimised installation. These<br />
allow for an accurate installation<br />
of the individual modules in<br />
a perfect line.<br />
1 Unscrew the preinstalled<br />
plugs from the top and bottom<br />
of the basic thermostat module<br />
kit.<br />
4 Install the basic shower<br />
module kit at the bottom of the<br />
basic thermostat module kit and<br />
secure with locking pins.<br />
5 Install the basic handheld<br />
shower module kit at the<br />
bottom of the basic shower<br />
module kit and secure with<br />
locking pins.<br />
8 Align the preinstalled basic<br />
kit in the unfinished wall and affix.<br />
9 The fitting must be piped,<br />
flushed and tested. Cementing<br />
the basic kit into the wall<br />
surface. Fill the seams with<br />
silicone.<br />
26 <strong>Axor</strong> <strong>Starck</strong> <strong><strong>Shower</strong>Collection</strong>