Axor Starck ShowerCollection Shower Planning - Hansgrohe
Axor Starck ShowerCollection Shower Planning - Hansgrohe
Axor Starck ShowerCollection Shower Planning - Hansgrohe

You also want an ePaper? Increase the reach of your titles
YUMPU automatically turns print PDFs into web optimized ePapers that Google loves.
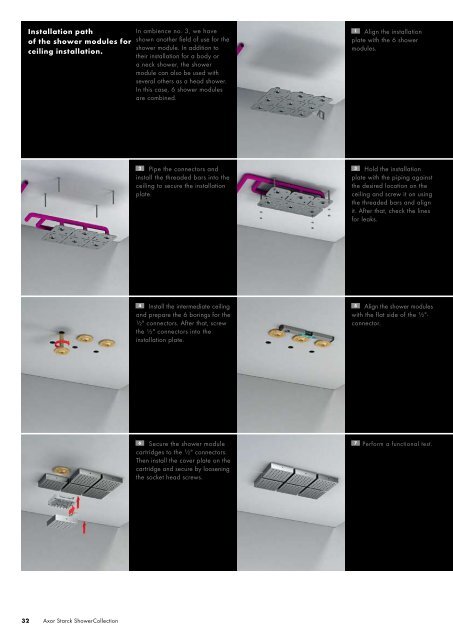
Installation path<br />
of the shower modules for<br />
ceiling installation.<br />
In ambience no. 3, we have<br />
shown another field of use for the<br />
shower module. In addition to<br />
their installation for a body or<br />
a neck shower, the shower<br />
module can also be used with<br />
several others as a head shower.<br />
In this case, 6 shower modules<br />
are combined.<br />
1 Align the installation<br />
plate with the 6 shower<br />
modules.<br />
2 Pipe the connectors and<br />
install the threaded bars into the<br />
ceiling to secure the installation<br />
plate.<br />
3 Hold the installation<br />
plate with the piping against<br />
the desired location on the<br />
ceiling and screw it on using<br />
the threaded bars and align<br />
it. After that, check the lines<br />
for leaks.<br />
4 Install the intermediate ceiling<br />
and prepare the 6 borings for the<br />
½" connectors. After that, screw<br />
the ½" connectors into the<br />
installation plate.<br />
5 Align the shower modules<br />
with the flat side of the ½"-<br />
connector.<br />
6 Secure the shower module<br />
cartridges to the ½" connectors.<br />
Then install the cover plate on the<br />
cartridge and secure by loosening<br />
the socket head screws.<br />
7 Perform a functional test.<br />
32 <strong>Axor</strong> <strong>Starck</strong> <strong><strong>Shower</strong>Collection</strong>