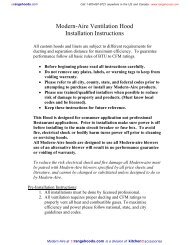
Installation Instructions - Fan / Light - Part 2 - KitchenSource.com
Installation Instructions - Fan / Light - Part 2 - KitchenSource.com
Installation Instructions - Fan / Light - Part 2 - KitchenSource.com

Create successful ePaper yourself
Turn your PDF publications into a flip-book with our unique Google optimized e-Paper software.
::bathroomsource.<strong>com</strong><br />
Call 1-800-667-8721 anywhere in the US and Canada - www.bathroomsource.<strong>com</strong><br />
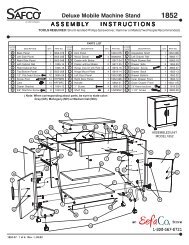
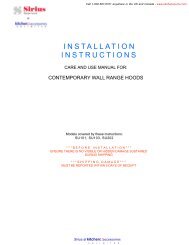
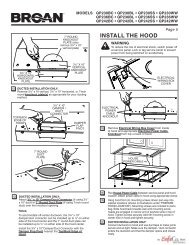
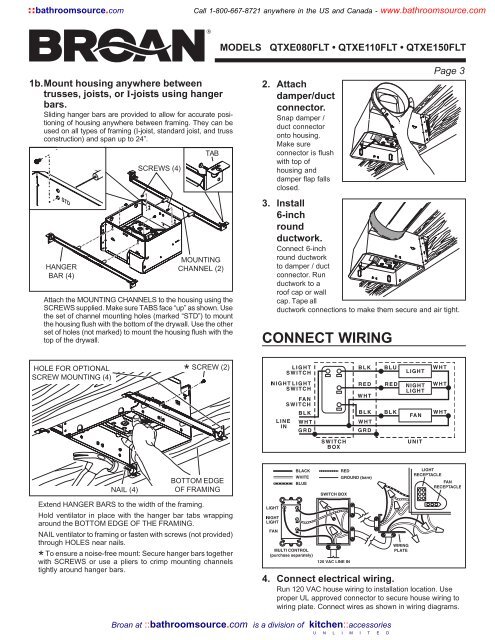
MODELS QTXE080FLT • QTXE110FLT • QTXE150FLT<br />
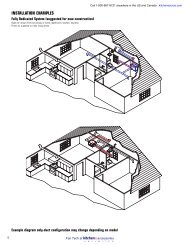
1b.Mount housing anywhere between<br />
trusses, joists, or I-joists using hanger<br />
bars.<br />
Sliding hanger bars are provided to allow for accurate positioning<br />
of housing anywhere between framing. They can be<br />
used on all types of framing (I-joist, standard joist, and truss<br />
construction) and span up to 24”.<br />
STD<br />
HANGER<br />
BAR (4)<br />
SCREWS (4)<br />
TAB<br />
MOUNTING<br />
CHANNEL (2)<br />
Attach the MOUNTING CHANNELS to the housing using the<br />
SCREWS supplied. Make sure TABS face “up” as shown. Use<br />
the set of channel mounting holes (marked “STD”) to mount<br />
the housing flush with the bottom of the drywall. Use the other<br />
set of holes (not marked) to mount the housing flush with the<br />
top of the drywall.<br />
2. Attach<br />
damper/duct<br />
connector.<br />
Snap damper /<br />
duct connector<br />
onto housing.<br />
Make sure<br />
connector is flush<br />
with top of<br />
housing and<br />
damper flap falls<br />
closed.<br />
CONNECT WIRING<br />
Page 3<br />
3. Install<br />
6-inch<br />
round<br />
ductwork.<br />
Connect 6-inch<br />
round ductwork<br />
to damper / duct<br />
connector. Run<br />
ductwork to a<br />
roof cap or wall<br />
cap. Tape all<br />
ductwork connections to make them secure and air tight.<br />
HOLE FOR OPTIONAL<br />
SCREW MOUNTING (4)<br />
*<br />
SCREW (2)<br />
NAIL (4)<br />
BOTTOM EDGE<br />
OF FRAMING<br />
Extend HANGER BARS to the width of the framing.<br />
Hold ventilator in place with the hanger bar tabs wrapping<br />
around the BOTTOM EDGE OF THE FRAMING.<br />
NAIL ventilator to framing or fasten with screws (not provided)<br />
through HOLES near nails.<br />
To ensure a noise-free mount: Secure hanger bars together<br />
* with SCREWS or use a pliers to crimp mounting channels<br />
tightly around hanger bars.<br />
4. Connect electrical wiring.<br />
Run 120 VAC house wiring to installation location. Use<br />
proper UL approved connector to secure house wiring to<br />
wiring plate. Connect wires as shown in wiring diagrams.<br />
Broan at ::bathroomsource.<strong>com</strong> is a division of kitchen::accessories<br />
U N L I M I T E D
::bathroomsource.<strong>com</strong><br />
Call 1-800-667-8721 anywhere in the US and Canada - www.bathroomsource.<strong>com</strong><br />
MODELS QTXE080FLT • QTXE110FLT • QTXE150FLT<br />
INSTALL GRILLE<br />
5. Finish ceiling.<br />
Install ceiling material. Cut out around housing.<br />
6. Attach grille<br />
to housing.<br />
Squeeze grille<br />
springs and insert<br />
them into slots on<br />
each side of<br />
housing.<br />
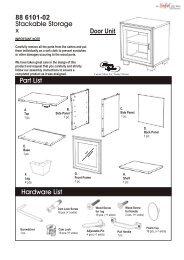
SERVICE PARTS<br />
22<br />
Page 4<br />
Replacement parts can<br />
be ordered on our<br />
website. Please visit us<br />
at www.broan.<strong>com</strong><br />
TAB<br />
22<br />
7. Push grille<br />
against ceiling.<br />
8. Remove<br />
light lens.<br />
Carefully insert a<br />
small flat-blade<br />
screwdriver<br />
between grille and<br />
lens. Pry lens out.<br />
9. Install light<br />
bulbs.<br />
Insert fluorescent<br />
bulb* (supplied)<br />
into its socket.<br />
Purchase a 4W<br />
incandescent<br />
night-light bulb<br />
and screw it into<br />
its socket.<br />
Replace lens.<br />
* Use only one of the following 42W fluorescent lamps:<br />
G.E. F42TBX827A4P/EOL or F42TBX830A4P/EOL<br />
PHILIPS PL-T 42W/827/4P/ALTO or PL-T 42W/830/4P/ALTO<br />
SYLVANIA CF42DT/E/IN/827 or CF42DT/E/IN/830<br />
NEMA Type CFTR42W/GX24q/827 or CFTR42W/GX24q/830<br />
Broan 97016888<br />
Key No. <strong>Part</strong> No. Description<br />
1 97016466 Housing<br />
2 97016450 Duct Connector-6"<br />
3 98010102 Wiring Plate<br />
4 99170245 Screw, #8-18 X .375(2 req’d)<br />
5 97016933 Wire Panel/Harness Assembly<br />
6 99020284 Blower Wheel<br />
7 99080562 Motor (QTXE080FLT)<br />
99080580 Motor (QTXE110FLT)<br />
99080565 Motor (QTXE150FLT)<br />
8 99100491 Isolator (4 req’d)<br />
9 97016901 Motor Plate<br />
10 99250959 Washer #8 (4 req’d)<br />
11 99260558 Nut, Hex Lock #8-32 (4 req’d)<br />
* 97016925 Blower Assembly (QTXE080FLT)<br />
* 97016906 Blower Assembly (QTXE110FLT)<br />
* 97016926 Blower Assembly (QTXE150FLT)(includes key nos. 6 thru 14)<br />
12 99500397 Insulation (QTXE150FLT only)<br />
13 99420648 Threaded Stud (QTXE150FLT only) (4 req’d)<br />
14 99260570 Plastic Nut (QTXE150FLT only) (4 req’d)<br />
15 97016864 Ballast Assembly<br />
16 99260423 Nut, Hex #8-32 (2 req’d)<br />
17 97016866 Grille Assembly (includes key nos. 18 & 20)<br />
18 99140199 Grille Spring (2 req’d)<br />
19 97016888 Bulb, 42W Fluorescent<br />
20 99111284 Lens<br />
21 99111293 Spacer (2 supplied)<br />
22 QTHB1 Hanger Bar Kit<br />
Order service parts by “<strong>Part</strong> No.” - not by “Key No.”<br />
Broan at ::bathroomsource.<strong>com</strong> is a division of kitchen::accessories<br />
U N L I M I T E D<br />
SERVICE NOTETo<br />
remove Blower Assembly:<br />
Unplug motor (7).<br />
Remove screw (4) from<br />
motor plate (9) flange.<br />
Find the single TAB on<br />
the motor plate (located<br />
next to the receptacle).<br />
Push up near motor plate<br />
tab while pushing out on<br />
side of housing. Or insert<br />
a straight-blade<br />
screwdriver into slot in<br />
housing (next to tab) and<br />
twist screwdriver.<br />
99043849A