Create successful ePaper yourself
Turn your PDF publications into a flip-book with our unique Google optimized e-Paper software.
the young<br />
<strong>british</strong> <strong>soldier</strong><br />
<strong>War</strong>gaming the battles <strong>of</strong> the<br />
Second Afghan <strong>War</strong> By Andy Hoare<br />
In <strong>War</strong>games Illustrated 288, we presented Andy Hoare’s article on the<br />
Second Afghan <strong>War</strong> and the his scenario for the Battle <strong>of</strong> Ahmed Khel.<br />
Andy also provided us with a lot more ideas on how to refight yor way<br />
through this <strong>War</strong>, and we thought we’d bring them to you here.<br />
Gaming the Battle<br />
<strong>of</strong> Ali Masjid<br />
This battle is essentially an improvised<br />
siege, though neither side was especially<br />
well equipped to conduct such an<br />
operation. As a wargame, a potential set<br />
up would see the Afghans occupying<br />
a fort on high ground, and the main<br />
British force advancing from the south<br />
towards it. Knowing that a second<br />
British force is executing a wide outflanking<br />
manoeuvre to the north, the<br />
defenders must essentially hold the<br />
attackers at bay for as long as possible,<br />
while their units slip away before the<br />
trap can be sprung. This makes a great<br />
‘timed scenario’, and it isn’t necessary<br />
that the flanking force be fielded – it can<br />
be assumed that if the Afghans cannot<br />
evacuate before a time limit expires,<br />
they lose.<br />
If you would rather zoom in on the<br />
action and represent the battle at the<br />
skirmish level, one phase <strong>of</strong> the battle<br />
would be ideal for such a game. At one<br />
point, the Third Brigade <strong>of</strong> the Peshawar<br />
Valley Field Force (consisting <strong>of</strong> the<br />
81st Loyal Lincolnshire Volunteers, the<br />
14th Sikhs and the 27th Bengal Native<br />
Infantry) came within storming distance<br />
<strong>of</strong> the fort before they were called <strong>of</strong>f<br />
as darkness drew in. The storming <strong>of</strong> a<br />
breach by men <strong>of</strong> any one <strong>of</strong> these units<br />
would make a great wargame, and again<br />
a time limit could be imposed, in this<br />
instance to take the breach before the<br />
withdrawal order is given.<br />
Gaming the Battle<br />
<strong>of</strong> Peiwar Kotal<br />
As a wargame, the Battle <strong>of</strong> Peiwar<br />
Kotal would see the Afghan regular<br />
army deployed in line along a ridge,<br />
with slopes on either side occupied by<br />
irregular tribesmen. The British side’s<br />
objective is to take the ridge, but the<br />
terrain and set up should make a frontal<br />
assault all but suicidal. The British<br />
therefore can only win by launching a<br />
flank attack through the wooded hills<br />
either side <strong>of</strong> the ridge, at which point<br />
the Afghans will retire.<br />
- Part 2<br />
For those preferring a skirmish, the<br />
storming <strong>of</strong> the Spingawi Kotal (the<br />
wooded ridge to the east <strong>of</strong> Peiwar<br />
Kotal) would make for a challenging<br />
game. This action saw the 72nd<br />
Highlanders and the 5th Ghurkhas carry<br />
the heights, opening the way for the<br />
flanking move that routed the Afghan<br />
line. Such a battle would be fought<br />
in open order amongst the trees, with<br />
both sides using troops familiar with<br />
such terrain. The objectives <strong>of</strong> would<br />
be simple – the British must assault up<br />
the wooded hillside and take the ridge,<br />
while the Afghan tribesmen must hold it.<br />
Gaming the Battle<br />
<strong>of</strong> Futtehabad<br />
For this battle, the set up is simple – the<br />
tribesmen are holding a sangar line at<br />
the summit <strong>of</strong> a slope, with streams<br />
running down each side. To set up a<br />
table in such a manner, the Afghans<br />
would be deployed along one short table<br />
edge, while the two long edges represent<br />
the line <strong>of</strong> the two mountain streams,<br />
and the British would deploy up to half<br />
way onto the table facing the tribesmen.<br />
The players, or, even better, a referee<br />
will need to invent a rule to compel the
tribesmen to charge when fired upon by<br />
the horse artillery. Perhaps the Afghans<br />
must test against their leadership<br />
quality to restrain themselves, or will<br />
automatically charge having taken a set<br />
number <strong>of</strong> casualties.<br />
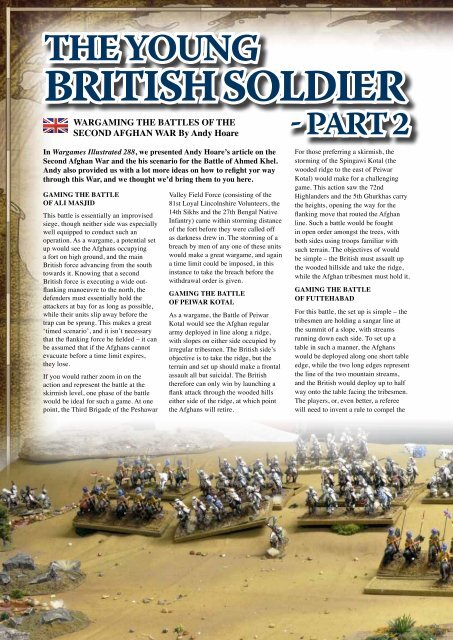
Theatre <strong>of</strong> Operations<br />
during the second<br />
Afghan <strong>War</strong>, 1878-81<br />
As a skirmish game, the Battle <strong>of</strong><br />
Futtehabad <strong>of</strong>fers several possibilities.<br />
One might feature the surviving<br />
tribesmen attempting to break out <strong>of</strong><br />
the trap into which they had charged,<br />
making for an interesting reversal <strong>of</strong><br />
the traditional image <strong>of</strong> the last few<br />
invaders conducting a last stand or<br />
desperate break out against a larger<br />
force <strong>of</strong> natives. Alternately, the idea <strong>of</strong><br />
the impassable streams on either <strong>of</strong> the<br />
battlefield could be explored – perhaps<br />
a small party (<strong>of</strong> Guides or Ghurkhas) is<br />
caught reconnoitring a flank, and must<br />
escape to inform their commander <strong>of</strong><br />
their findings.<br />
Gaming the Massacre<br />
at the Residency<br />
While it might be considered poor taste<br />
to game what was, in effect, a slaughter,<br />
the fight the Guides put up against<br />
the attackers was a heroic act and the<br />
sort <strong>of</strong> deed that wargamers have been<br />
recreating as long as there have been<br />
wargamers. The attack would best<br />
be represented at the skirmish scale,<br />
focusing perhaps on the defence <strong>of</strong> the<br />
residency grounds, attempts to break<br />
out, or on the final charge. A ‘realistic’<br />
objective would be to get a messenger<br />
out to appeal for aid rather than to<br />
repel the attackers, for that would<br />
be all but impossible. The defenders<br />
would therefore win not by inflicting<br />
casualties, but by holding <strong>of</strong>f the assault<br />
long enough for a messenger to escape.<br />
Above: Key Locations in the Second Afghan <strong>War</strong> - 1. Maiwand, 2. Kandahar, 3. Kabul, 4.<br />
Charasia, 5. Ahmed Khel, 6. Peiwar Kotal, 7. Fatehbad, 8. Landi Kotal, 9. Ali Masjid<br />
Map from Essential Histories 40 - The Anglo-Afghan <strong>War</strong>s1839-1919,<br />
© Osprey Publishing Ltd. www.ospreypublishing.com<br />
Gaming the Battle<br />
<strong>of</strong> Charasia<br />
As a wargame, this battle would be<br />
similar to the Battle <strong>of</strong> Ali Masjid, but<br />
the situation is made more pressing for<br />
the British because a large number <strong>of</strong><br />
Afghan tribesmen are closing on their<br />
rear. They must therefore defeat the<br />
main Afghan line within a set time limit,<br />
at which point it is assumed that the<br />
tribesmen enter play and change things<br />
significantly.<br />
As a skirmish, the action could focus on<br />
the rear, with small parties defending<br />
the baggage train against vengeful<br />
tribesmen. Perhaps the wagons,<br />
camels, elephants, etc. are defended<br />
by a mixed scratch force <strong>of</strong> sick and<br />
wounded British and Indian troops,<br />
plus larger numbers <strong>of</strong> civilians. Such<br />
confrontations were frequent throughout<br />
the course <strong>of</strong> the war, with tribesmen<br />
constantly harrying British supply lines.<br />
In this particular case, the skirmish is<br />
part <strong>of</strong> a larger action.
Perhaps both <strong>of</strong> the above battles could<br />
be fought, starting with the skirmish<br />
and culminating in the larger battle. For<br />
every turn the defenders <strong>of</strong> the baggage<br />
train can hold the raiders at bay, the<br />
attackers get an additional turn to defeat<br />
the foe in the main confrontation before<br />
the enemy arrive in their rear.<br />
Gaming the Battle <strong>of</strong> Kabul<br />
This battle would make a spectacular<br />
game, with a huge force <strong>of</strong> Afghan<br />
irregulars trying to take the cantonment,<br />
which is held by the classic ‘thin red<br />
line’ <strong>of</strong> British and Indian infantry<br />
(fighting in winter, many defenders may<br />
have worn the heavier red jackets in<br />
preference to the lighter khaki summer<br />
dress). The defenders should be well<br />
positioned, and able to field their gatling<br />
guns to murderous effect. The Afghans<br />
should be led by the Ghazi, who would<br />
certainly count as elite warriors. The<br />
attacker’s objective is a simple one –<br />
take the cantonment at all costs. Don’t<br />
forget that the battle started before<br />
dawn, so scenario special rules should<br />
reflect the low light conditions for the<br />
first few turns at least.<br />
As a skirmish game, the action could<br />
focus on the defence <strong>of</strong> the breach in the<br />
northeast corner <strong>of</strong> the cantonment. This<br />
occurred in the early morning, and so<br />
low light rules could be used for the first<br />
few turns. A game in which a handful <strong>of</strong><br />
heroes rally the defenders against a far<br />
superior force, perhaps having to hold<br />
out until other units can arrive to bolster<br />
them, would be a thrilling affair indeed!<br />
Gaming the battle<br />
<strong>of</strong> Ahmed Khel<br />
This battle is in many ways a fairly<br />
conventional affair, and the tabletop<br />
should feature a road passing along<br />
one long edge, and hills on the other.<br />
The British should be deployed along<br />
the road and the Afghan on the hills<br />
opposite. However, there are two<br />
considerations to make things more<br />
interesting. Firstly, several <strong>of</strong> the British<br />
units were caught <strong>of</strong>f guard, and this<br />
could be represented by having them<br />
pinned or otherwise unable to react<br />
properly for the first few turns <strong>of</strong> the<br />
game. The second complication is the<br />
thick dust thrown up by the high wind,<br />
and this should have an effect <strong>of</strong> the<br />
range <strong>of</strong> gunfire. The British should<br />
have a hard time engaging the oncoming<br />
horde from any sort <strong>of</strong> distance,<br />
meaning the action is determined at<br />
close range.<br />
While the main battle presents relatively<br />
few opportunities to fight skirmish<br />
scenarios, the events immediately<br />
preceding it do. With the force<br />
advancing in two separate brigades,<br />
word had to be passed between them<br />
so that they could form up to face the<br />
tribesmen shadowing their movement<br />
through the hills. A great little game<br />
is to be had therefore with messengers<br />
passing through the dangerous terrain<br />
between the two elements, dodging<br />
tribesmen as they go. The table could<br />
feature the road passing down its central<br />
length, and a small British staff section<br />
must get from one table edge to the<br />
other while small bands <strong>of</strong> Afghan<br />
tribesmen attempt to intercept them.<br />
Note: Andy presented a scenario for the<br />
Battle <strong>of</strong> Ahmed Khel in WI288<br />
Gaming the Battle<br />
<strong>of</strong> Maiwand<br />
This battle could easily be fought<br />
featuring the British deployed in a<br />
horseshoe formation, with the main<br />
ravine behind them along one table edge<br />
and the two short table edges being<br />
impassable to them. The main Afghan<br />
line would be deployed surrounding the<br />
British on all sides except their rear. Of<br />
course, with such a drastic mismatch<br />
in force the British are unlikely to win<br />
– the scenario is therefore about them<br />
making a good account <strong>of</strong> themselves,<br />
as they did on the day. The Afghan<br />
army could feature a banner bearer<br />
representing Malalai.
The numerous smaller actions fought<br />
in the aftermath <strong>of</strong> the collapse <strong>of</strong> the<br />
main line would make ideal skirmish<br />
scenarios. Small parties conducting<br />
desperate rearguard actions are simple<br />
to play out, but perhaps <strong>of</strong> more interest<br />
to the wargamer are the attempts by<br />
small, mixed and probably wounded<br />
groups to steal away through the walled<br />
enclosures and gardens <strong>of</strong> the village <strong>of</strong><br />
Khig. Perhaps the 66th’s mascot Bobby<br />
could even take part in these actions.<br />
This could take the form <strong>of</strong> a “cat and<br />
mouse” chase through the alleyways<br />
and buildings, not unlike a 19th Century<br />
version <strong>of</strong> the Battle <strong>of</strong> Mogadishu over<br />
a hundred years later!<br />
Gaming the Battle<br />
<strong>of</strong> Kandahar<br />
An interesting way to represent the<br />
Battle <strong>of</strong> Kandahar would be to position<br />
three or four small villages along the<br />
central length <strong>of</strong> a long table, and have<br />
the Afghan player secretly split his<br />
force between the defence <strong>of</strong> each. The<br />
British must fight their way up this line,<br />
winning the game by reaching the last<br />
position.<br />
As a skirmish game, the players or<br />
referee could invent a suitably thrilling<br />
climax to the war (especially if they<br />
have fought this series <strong>of</strong> games as a<br />
linked campaign). Though Ayub Khan<br />
escaped, and lived for another 35<br />
years, perhaps a small force could be<br />
dispatched in an attempt to capture him<br />
and his <strong>of</strong>ficers before they quit the field<br />
and cause more trouble for the British!<br />
Perhaps defended by an elite bodyguard,<br />
Ayub Khan must escape, while a small<br />
force <strong>of</strong> British and Indians seek to<br />
locate and capture him.<br />
Miniatures<br />
Players should have little or no trouble<br />
finding suitable miniatures for use in<br />
the battles <strong>of</strong> the Second Afghan <strong>War</strong>.<br />
Foundry produce several excellent<br />
ranges, including a selection <strong>of</strong> very<br />
characterful miniatures designed<br />
especially for the period and featuring<br />
oddities such as the Amir’s Highland<br />
Guard and a British <strong>of</strong>ficer wearing an<br />
Indian sheepskin pashteen to keep the<br />
cold weather at bay. For those wishing<br />
to collect a larger force <strong>of</strong> British,<br />
<strong>War</strong>games Factory’s British Firing<br />
Line set is ideal (Rorke’s Drift took<br />
place at the beginning <strong>of</strong> the second year<br />
<strong>of</strong> the war).<br />
For those more inclined to the skirmish<br />
scale, Foundry’s Darkest Africa<br />
range provides plenty <strong>of</strong> characterful<br />
miniatures, as do Askari Miniatures.<br />
British Forces in the<br />
Second Afghan <strong>War</strong><br />
The British fielded a wide range <strong>of</strong><br />
units in the Second Afghan <strong>War</strong>, with<br />
regiments coming from Britain and<br />
all over India. Scottish Highlanders<br />
fought alongside Nepalese Ghurkhas,<br />
Rifle regiments beside Punjabis, and<br />
Foot Regiments from the Midlands<br />
beside those from Baluchistan.<br />
Likewise, cavalry was drawn from an<br />
equally diverse range, and most <strong>of</strong> the<br />
thirteen or so brigades that made up<br />
the three field forces mixed battalions<br />
and regiments so that one European<br />
unit served in the same formation as<br />
two or sometimes three from India.<br />
Such a mixed force is a dream for<br />
most wargamers, whatever level they<br />
are playing at, from battalion-level<br />
confrontations right down to skirmishes.<br />
Afghan Forces<br />
The Afghans were split into two main<br />
groups – the regulars and the tribesmen.<br />
The regular Afghan army had been<br />
armed and equipped by the British in<br />
the aftermath <strong>of</strong> the First Afghan <strong>War</strong>,<br />
and in some cases actually carried old<br />
British weapons and wore elements <strong>of</strong><br />
worn out uniform. In addition, some<br />
elements <strong>of</strong> the regular army were very<br />
well equipped indeed, especially that<br />
which faced Burrows at the Battle <strong>of</strong><br />
Maiwand. Of particular interest to many<br />
wargamers are the Amir’s ‘Highland<br />
Guard,’ a unit styled after Britain’s<br />
Highlander regiments, complete with<br />
kilts, red coats and pith helmets.<br />
On the other hand, the Afghans <strong>of</strong>ten<br />
fielded large numbers <strong>of</strong> tribesmen,<br />
sometimes alongside the regulars, but,<br />
particularly in the last few battles <strong>of</strong><br />
the war, on their own. These carried the<br />
infamous jezail, as well as numerous<br />
weapons looted from the baggage trains<br />
<strong>of</strong> their enemies, and wore a wide range<br />
<strong>of</strong> non-uniformed, traditional dress.<br />
Uniforms<br />
The Second Afghan <strong>War</strong> represents<br />
an interesting period for the collector<br />
<strong>of</strong> British colonial forces, because it<br />
took place right on the cusp <strong>of</strong> the<br />
changeover from red coats to khaki.<br />
Contemporary paintings show both in<br />
use, and it is likely that both were worn<br />
by different units in the same field force.<br />
Often, the heavier red coats were worn<br />
in cold weather, and the lighter khaki<br />
dress in the heat <strong>of</strong> summer. As the<br />
battles <strong>of</strong> the war were fought in both<br />
the depths <strong>of</strong> winter and the height <strong>of</strong><br />
summer, players can (and should)<br />
use either.<br />
For details <strong>of</strong> both British and Afghan<br />
uniforms, Osprey’s MAA72 – The North<br />
West Frontier is a great resource.
<strong>War</strong>gaming Scenario:<br />
retreat from maiwand<br />
British & Indian Army vs Afghan Army & tribesmen, 27 July 1880, using Colonial adventures<br />
In the aftermath <strong>of</strong> the Battle <strong>of</strong> Maiwand, British and Indian<br />
troops fought a series <strong>of</strong> desperate rear guard actions as they<br />
fell back in the face <strong>of</strong> far superior numbers. This scenario<br />
is inspired by the aftermath as beleaguered survivors fought<br />
through the streets and walled gardens <strong>of</strong> the nearby village<br />
<strong>of</strong> Khig. The game pits a small band <strong>of</strong> heroes against a larger<br />
number <strong>of</strong> pursuers, almost like a 19th Century version <strong>of</strong> the<br />
events depicted in the novel and film Black Hawk Down!<br />
The Battle <strong>of</strong> Maiwand,<br />
27 July 1880<br />
THE BATTLEFIELD<br />
The table should be set up to represent a typical Afghan<br />
village, with compounds and similar structures clustered<br />
fairly close together in the centre <strong>of</strong> the table, and vegetation,<br />
irrigation ditches and the likes around its edges.<br />
AFGHAN ARMY<br />
The Afghans consist <strong>of</strong> a mix <strong>of</strong> pursuing forces. There are<br />
two ways <strong>of</strong> representing them, depending on the miniatures<br />
you have available. As both regular Afghan Army troops<br />
(the mutineers) and tribal warriors fought in the Battle <strong>of</strong><br />
Maiwand, you could use a force consisting <strong>of</strong> one or both<br />
types. Tribesmen are represented using the Afghans and<br />
Pathans list in the Colonial Adventures rulebook, while regular<br />
Afghan Army units could be represented using the Ottoman<br />
Empire supplemental army list available via the Two Hour<br />
<strong>War</strong>games website. The Afghans should field three bands any<br />
combinations <strong>of</strong> type (both types have their advantages and<br />
disadvantages in this scenario).<br />
In addition to the main forces, the Afghans have additional<br />
civilians available, as explained below.<br />
BRITISH AND INDIAN ARMY<br />
The British side consists <strong>of</strong> two elements. The first band<br />
consists <strong>of</strong> ten individual miniatures, each the survivor <strong>of</strong> a<br />
different element <strong>of</strong> the main army depending on the models<br />
you have available. You could use infantry, cavalry or artillery<br />
<strong>of</strong>ficers (though all should be on foot), members <strong>of</strong> the<br />
commissariat’s department, chaplains, surgeons and troops<br />
from any <strong>of</strong> the regiments that fought in the battle. Each has a<br />
Rep determined at random by rolling on the European Officer’s<br />
Rep Chart on page 6 <strong>of</strong> Colonial Adventures. Each model<br />
should be armed as per the miniature, with pistol, carbine or<br />
rifle. In addition, Bobby the mascot dog can accompany this<br />
group, and although not armed (apart from his sharp teeth!) he<br />
has a Rep <strong>of</strong> 8 and cannot be killed by any enemy with a lower<br />
Rep than him. The second unit on the British side is a band <strong>of</strong><br />
survivors from the 66th Foot, which should consist <strong>of</strong> around<br />
twenty infantry and a Leader. The troops have a Rep <strong>of</strong> 5, and<br />
the Leader 7.<br />
Bobby<br />
The mongrel mascot <strong>of</strong> the 66th Regiment, Bobby<br />
accompanied his regiment to Afghanistan, where during<br />
the Battle <strong>of</strong> Maiwand he was seen to bark at the enemy<br />
throughout the fight. Bobby was thought lost, but the<br />
retreating survivors discovered him following on behind,<br />
wounded, but as loyal as ever. Upon the regiment’s return<br />
to England, Bobby was presented with a DSO by Queen<br />
Victoria herself, but sadly survived no more than a year<br />
more, as he was run over by hansom cab.<br />
DEPLOYMENT<br />
• The group <strong>of</strong> survivors consisting <strong>of</strong> individual <strong>of</strong>ficers etc is<br />
placed anywhere inside the bounds <strong>of</strong> the village, except inside<br />
buildings or walled gardens.<br />
• Then the Afghans are deployed, anywhere within 6” <strong>of</strong> any<br />
table edge.<br />
• Lastly, the remnants <strong>of</strong> the 66th Foot are deployed anywhere<br />
the British player likes, except inside a building or walled<br />
garden, or within 12” <strong>of</strong> an enemy unit.<br />
• Roll for Activation as normal.<br />
SPECIAL RULES<br />
Villagers: Every time a model from the British side enters a<br />
building or attached walled garden, there is a chance he will<br />
be attacked by an irate villager. The first time a model does so,<br />
there is a 50% chance that d6+2 Civilians appear at the nearest<br />
opening on the building. These villagers come under the<br />
control <strong>of</strong> the Afghan player at the beginning <strong>of</strong> his next turn.<br />
OBJECTIVES<br />
The focus <strong>of</strong> this scenario is the British <strong>of</strong>ficers attempting<br />
to get clear <strong>of</strong> the disaster at Maiwand, and so the result is<br />
determined by the number that escape. The British win if they<br />
get half or more <strong>of</strong> the individual <strong>of</strong>ficers <strong>of</strong>f <strong>of</strong> the table,<br />
while any other result is a victory for the Afghans (though<br />
the papers back home will report a victory regardless!).<br />
Note that the remnants <strong>of</strong> the 66th do not count towards the<br />
victory conditions.


