ASA Astrograph Manual - Astro Systeme Austria
ASA Astrograph Manual - Astro Systeme Austria
ASA Astrograph Manual - Astro Systeme Austria

Create successful ePaper yourself
Turn your PDF publications into a flip-book with our unique Google optimized e-Paper software.
<strong>ASA</strong> <strong>Astro</strong>systeme GmbH Traklstraße 21 A-4600 Wels<br />
Tel. +43 (0) 72 42/21 14 46-30 office@astrosysteme.at www.astrosysteme.at<br />
INSTRUCTION MANUAL<br />
<strong>ASA</strong>-<strong><strong>Astro</strong>graph</strong>s<br />
<strong>ASA</strong>-<strong><strong>Astro</strong>graph</strong>s will provide you with outstanding images. Basic<br />
requirement to accomplish such results is a perfect collimation of the<br />
system. Basically collimation is carried out like with a common<br />
Newton-Telescope.<br />
Before starting up we recommend to remove the main mirror cell to familiarize with the function of the cell.<br />
Screws of the backcover<br />
Pullscrew<br />
Plasticscrews on the side<br />
Remove the cover plate by opening the three selflocking<br />
screws.<br />
To take the cell with the mirror out of the tube you<br />
have to remove the three pull screws. After it you can<br />
take out the cell with the mirror.<br />
The mirrors of the <strong>ASA</strong>-N Series 8” and 10” are glued<br />
to the cell. Please check if the three plastic-screws,<br />
which are pointing toward the mirror, currently do not<br />
touch the mirror.<br />
Basically the space is adjusted by the factory. May be<br />
something has changed caused by shipment.<br />
If the plastic screws are too close on the mirror this<br />
can cause stress to the mirror.<br />
Pushscrew<br />
Adjustable mounting brackets<br />
Plasticscrews on the side<br />
The mirrors of the <strong>ASA</strong>-N Series 12” and 16” are<br />
mounted on a 9-point floating cell. The mounting –<br />
brackets secure the mirror and should only touch the<br />
surface very gently. The 16” mirrors are secured with<br />
foam for shipment. Please remove the foam before<br />
starting up.<br />
<strong>ASA</strong> <strong><strong>Astro</strong>graph</strong>s Instruction <strong>Manual</strong>. 03/2009<br />
1
COLLIMATION<br />
Collimation screw<br />
Pull screw<br />
Push screw<br />
Locking screw<br />
Push screw<br />
After you have mounted the mirror cell back into<br />
the tube you can start with collimation. Attach the<br />
provided 2” adapter on the <strong>ASA</strong>-OK3 to employ your<br />
collimation tools. One can easily and fast collimate<br />
with a common Laser-Collimator. Furthermore we<br />
recommend the Cats Eye Collimation tools (Telecat XL<br />
and Autocollimator XL).<br />
Before start up with collimation consider that the<br />
three collimation screws on the secondary mirror<br />
overlap approximately 5 mm. The secondary should<br />
be secured by fixing the locking screw.<br />
Collimation of the main mirror has to be carried out<br />
with the Push and Pull screws. First of all open the<br />
Pull screws (counterclockwise) collimate with both<br />
Push screws beside left and right of the Pull screw.<br />
If you move the Push screw clockwise, you will move<br />
the mirror in direction off the focuser. If you move<br />
the Push screw counterclockwise, you will move the<br />
mirror in direction to the focuser.<br />
Tips:<br />
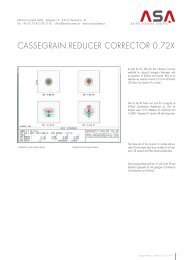
Regardless which collimation tools you are using – we recommend collimating at first the secondary mirror to the main mirror and then collimating the main mirror<br />
to the secondary. Check your collimation on the star!<br />
Perfect collimation can be done on a star out of<br />
focus. Select the highest magnification of your telescope.<br />
Focus the star and center the star in the<br />
FOV. Turn the star out of focus. You will see circles<br />
and a black shadow. Collimate as long as the all the<br />
shadow and the rings are centered.<br />
IMPORTANT:<br />
The offset of the shadow caused by coma is clearly<br />
visible the nearer one moves to focus. Thus it makes<br />
sense to judge the in and out of focus images short in<br />
front of the focus.<br />
Aligned<br />
Misaligned<br />
<strong>ASA</strong> <strong><strong>Astro</strong>graph</strong>s Instruction <strong>Manual</strong>. 03/2009<br />
2