Contents List of Figures List of tables - Porkka
Contents List of Figures List of tables - Porkka
Contents List of Figures List of tables - Porkka

You also want an ePaper? Increase the reach of your titles
YUMPU automatically turns print PDFs into web optimized ePapers that Google loves.
en<br />
• Remove the protection foil from the elements <strong>of</strong> the device (f. ex. from the inside <strong>of</strong> the device, display shelves,<br />
front fender beam)<br />
• If the user shall obtain a device partially disassembled to secure it during transportation, perform the following<br />
operations:<br />
1. Fix hooks in frame rails Fig.4 (p.15)<br />
2. Place shelves and/or baskets on hooks Fig.5 (p.16) and/or Fig.7 (p.16)<br />
3. (Concerns the devices with internal aggregate) Place the condensate container on the basis <strong>of</strong> the aggregate,<br />
under water outfl ow hose (does not concern devices with automatic condensate evaporation) Fig.9 (p.18)<br />
4. (Concerns the devices to be mounted on central aggregate) Defrosting water outfl ow is located under the<br />
bottom <strong>of</strong> the body (about 10mm from the back <strong>of</strong> the rack, in the middle part <strong>of</strong> the body), which needs to<br />
allow water outfl ow to the sewage grit.<br />
• The fi rst cleaning <strong>of</strong> the device should be provide right after unpacking, and before turning it on. The unit should<br />
be cleaned with water at a temperature not exceeding 40°C with a neutral detergent. For washing and cleaning<br />
the equipment it is prohibited to use products containing chlorine and sodium varieties, which destroy the protective<br />
layer and components <strong>of</strong> the device! Any residue <strong>of</strong> adhesives or silicone on metal elements should be removed<br />
only with extraction naphtha (not applicable to items made <strong>of</strong> plastic !). Do not use other organic solvents.<br />
When cleaning the unit is prohibited to use water jet. The unit should be cleaned with a wet rag.<br />
After installation <strong>of</strong> the device at the destination place it should be left to rest for at least 2 hours before<br />
turning it on (for devices with built in compressor) to set the level <strong>of</strong> refrigerant in order to prevent problems<br />
with starting up the aggregate.<br />
WARNING: Keep out the cooling circuit from damage!<br />
• Place the plug <strong>of</strong> the connecting cable directly in plug-in socket (it is forbidden to connect the device by means<br />
<strong>of</strong> extension cords or dividers!)<br />
• Turn on the main switch Fig.8/2 (p.16), which activates the thermostat, and then aggregate <strong>of</strong> the device<br />
• Set the temperature on thermostat control panel Fig.8/1 (p.16) (thermostat service details on p.21 or 22)<br />
• Turn on the lighting switch Fig.8/3 (p.16)<br />
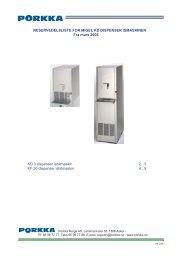
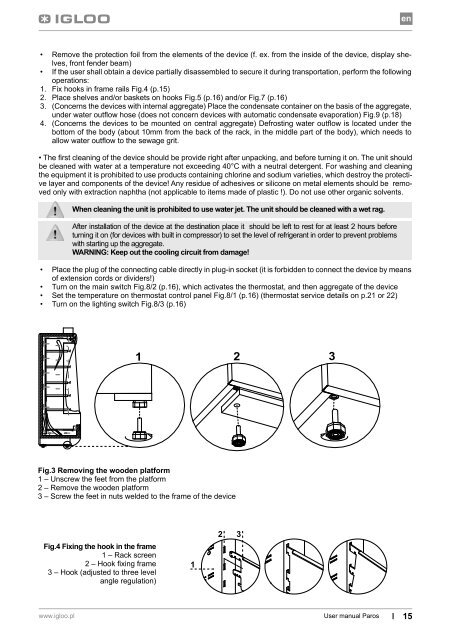
1 2 3<br />
Fig.3 Removing the wooden platform<br />
1 – Unscrew the feet from the platform<br />
2 – Remove the wooden platform<br />
3 – Screw the feet in nuts welded to the frame <strong>of</strong> the device<br />
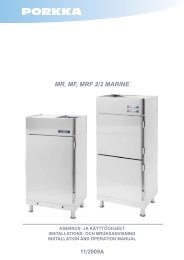
Fig.4 Fixing the hook in the frame<br />
1 – Rack screen<br />
2 – Hook fi xing frame<br />
3 – Hook (adjusted to three level<br />
angle regulation)<br />
1<br />
2 3<br />
www.igloo.pl<br />
User manual Paros<br />
15