Printing from home - Staffordshire University
Printing from home - Staffordshire University
Printing from home - Staffordshire University

You also want an ePaper? Increase the reach of your titles
YUMPU automatically turns print PDFs into web optimized ePapers that Google loves.
Reference: USER 209<br />
Issue date: May 2009<br />
Revised: March 2013<br />
Originator: M.Hewitt<br />
NEW DOCUMENT<br />
Connecting to the <strong>University</strong> printers (MFPs) <strong>from</strong> <strong>home</strong><br />
Information Services have implemented a system enabling staff and students to print to<br />
<strong>Staffordshire</strong> <strong>University</strong> printers over the Internet <strong>from</strong> Home or ResNet.<br />
Prints are stored on the Safecom system, and can be collected <strong>from</strong> any one of the MFP printers<br />
around the campuses.
Connecting <strong>from</strong> Windows XP<br />
Testing has shown that printing <strong>from</strong> Windows XP works best if the latest Service Pack (Service Pack 3)<br />
has been applied to the computer before connecting to the printers.<br />
On most computers this will have automatically happened via the Windows Update process, and no<br />
additional action will be required.<br />
If Windows update has been disabled, them a red shield will be displayed on the bottom right of the<br />
screen (as seen below). You should double click on the shield and Turn on Automatic updates.<br />
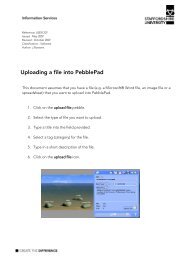
To install the <strong>University</strong> printers, use Internet Explorer, and browse to the URL<br />
https://crwnipp1.staffs.ac.uk/printers. When prompted, enter your <strong>University</strong> username and password.<br />
The username should be preceded with ‘staff\’ or ‘student\’.<br />
You will now see the printers that are accessible <strong>from</strong> off site. Click on the printer name for more<br />
information.<br />
2
The first time you request more information, the information bar may appear, saying ‘This website wants<br />
to run the following add-on: ‘Oleprn DLL’ <strong>from</strong> ‘Microsoft Corporation’.<br />
If the bar appears, right click on the information bar and select ‘Run Active X control’ to install the printer<br />
add-on.<br />
After selecting ‘Run Active X control’ you will be see a security warning, select ‘Run’.<br />
3
The printer information will now be redisplayed with a ‘Connect’ option in the Printer Actions area.<br />
To install the printer, click on ‘Connect’.<br />
At ‘Add Web Printer Connection’ click ‘Yes’.<br />
4
In the ’configure Internet port’ dialog box, click ‘use the specified user account’ and enter your<br />
<strong>University</strong> username and password, again preceded by ‘staff\’ or ‘student\’.<br />
As the printer is being installed a progress bar will be displayed. It may take several minutes for the<br />
install to complete.<br />
5
If you are prompted with a ‘Hardware Installation’ dialog box, click ‘Continue Anyway’.<br />
Once the progress bar has finished, you should be informed that ‘The printer has been installed on your<br />
machine’.<br />
6
The printers will display on your computer as either ‘Staffs Uni Colour LaserJet 9500 PCL6 on<br />
https://crwnipp1.staffs.ac.uk’ and ‘Staffs Uni HP LaserJet 9050 PCL6 on https://crwnipp1.staffs.ac.uk’...<br />
…or in some applications as \\https://crwnipp1.staffs.ac.uk\Staffs Uni Colour LaserJet 9500 PCL6 ‘ and<br />
\\https://crwnipp1.staffs.ac.uk \Staffs Uni HP LaserJet 9050 PCL6.<br />
7
Connecting <strong>from</strong> Windows 7 (or Vista)<br />
To install the <strong>University</strong> printers, use Internet Explorer, and browse to the URL<br />
https://crwnipp1.staffs.ac.uk/printers. When prompted, enter your <strong>University</strong> username and password<br />
and check the ‘Remember my password’ box. The username should be preceded with ‘staff\’ or<br />
‘student\’.<br />
IMPORTANT Ensure “Remember my password” is checked.<br />
You will now see the printers that are accessible <strong>from</strong> off site. Click on the printer name for more<br />
information.<br />
8
To install the printer, click on ‘Connect’.<br />
At ‘Add Web Printer Connection’ click Yes.<br />
As the printer is being installed a progress bar will be displayed. It may take several minutes for the<br />
install to complete.<br />
9
You may see an Internet Explorer Security Warning as the printer installation progresses;<br />
if so, click on ‘Allow’, to continue with the installation.<br />
You may also see a ‘User Account Control’ message, either in front of, or behind Internet explorer.<br />
Click on ‘Continue’ to proceed with the printer installation.<br />
10
When prompted with the ‘unsigned driver warning’ (either in front of or behind Internet explorer) click<br />
on ‘yes’ to continue.<br />
Once the progress bar has finished, you should be informed that ‘The printer has been installed on your<br />
machine’.<br />
By default other users of the computer will be able to see the printer, but will not be able to print to it,<br />
unless they visit the https://crwnipp1.staffs.ac.uk/printers site and log on.<br />
11
If you wish other users to be able to print to your Safecom queue, then open the Printers folder, rightclick<br />
the printer that you installed, click Run as administrator and then click Properties.<br />
If you are prompted for an administrator password or for confirmation, type your password, or click<br />
Continue.<br />
Click Ports, then in the port list, ensure that the HTTPS Internet port is checked then click Configure Port.<br />
12
Type the valid username (preceded by ‘staff\’ or ‘student\’) and password, then check the ‘use the same<br />
security settings for all users’ box and click OK.<br />
Where to go for more help or information<br />
You can get further help <strong>from</strong> the Information Services Help Desks at:<br />
Thompson Library: 01782 294771<br />
Brindley IT Centre: 01782 294135<br />
Octagon IT Centre: 01785 353339<br />
Online: www.staffs.ac.uk/ishelp<br />
Email: ask@staffs.ac.uk (for all IT and Library queries)<br />
All Microsoft ® product screenshots and references are used by permission of<br />
the Microsoft ® Corporation. Windows® operating system.<br />
13