Setting Up Your Air Bed - InnoMax
Setting Up Your Air Bed - InnoMax
Setting Up Your Air Bed - InnoMax
Create successful ePaper yourself
Turn your PDF publications into a flip-book with our unique Google optimized e-Paper software.
AIR SUPPORT ASSEMBLY INSTRUCTIONS<br />
1<br />
6<br />
4<br />
2<br />
5<br />
3<br />
7<br />
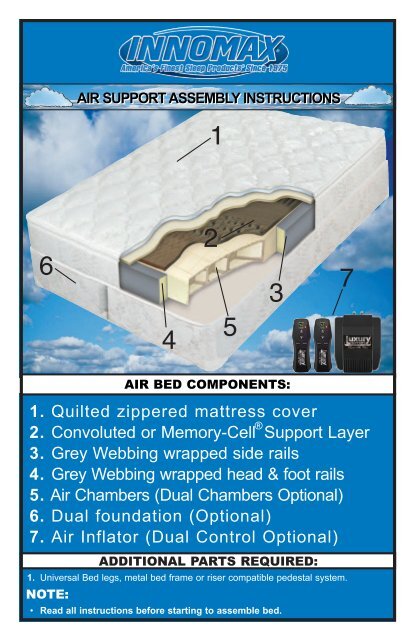
AIR BED COMPONENTS:<br />
1. Quilted zippered mattress cover<br />
®<br />
2. Convoluted or Memory-Cell Support Layer<br />
3. Grey Webbing wrapped side rails<br />
4. Grey Webbing wrapped head & foot rails<br />
5. <strong>Air</strong> Chambers (Dual Chambers Optional)<br />
6. Dual foundation (Optional)<br />
7. <strong>Air</strong> Inflator (Dual Control Optional)<br />
ADDITIONAL PARTS REQUIRED:<br />
1. Universal <strong>Bed</strong> legs, metal bed frame or riser compatible pedestal system.<br />
NOTE:<br />
• Read all instructions before starting to assemble bed.
AIR SUPPORT ASSEMBLY INSTRUCTIONS<br />
<strong>Setting</strong> <strong>Up</strong> <strong>Your</strong> <strong>Air</strong> <strong>Bed</strong>:<br />
1. Unpack the Box<br />
Take all of the components out of the box. You should have the following items:<br />
• Power Edge Support Rail System Includes:<br />
-Attached Head/Foot Rails<br />
-Attached Side Rail Assembly<br />
• Heavy Duty <strong>Air</strong> Chambers<br />
• <strong>Air</strong> Inflator Unit With Wired Hand Controls<br />
• Comfort Layer (Either Grey or White Material)<br />
• Mattress Cover/Pillow Top Enclosure<br />
• K or Q Split or Single T/F Foundation (Optional)<br />
2. <strong>Your</strong> entire Adjustable <strong>Air</strong> Support System can be easily assembled.<br />
First step, determine where your bed will be positioned and<br />
assemble the support frame. This can be a metal bed<br />
frame or a modern platform pedestal with drawers.<br />
Once this is complete, place your foundation in the<br />
frame with the open side down. Many platform pedestals<br />
do not require the use of a foundation. You may skip this step<br />
and move to number three.<br />
3. Unfold the mattress enclosure and completely unzip the cover.<br />
Insert the head and foot rail inside the cover. The head of the bed should be<br />
marked as head rail and will have two slits in the grey webbing material.<br />
This is for the exit of your air chamber hoses. The side rails are inserted in<br />
between the head and foot rails with the webbing as smooth as possible.<br />
Make sure the webbing does not run under the rails to the other side of the<br />
bed (SEE DIAGRAM A1). Doing so will make the grey webbing too short.<br />
The grey webbing in diagram A2 shows proper installation.<br />
A1<br />
Grey Webbing Running<br />
Under Rails<br />
A2<br />
Grey Webbing Running<br />
Straight Out From Rails<br />
INCORRECT<br />
CORRECT<br />
1
4.) Install the air chambers with the brass coupling on the bottom of the<br />
chamber. Push the air hose through the slits in the grey webbing and cover.<br />
The hose can be pulled through until they are snug inside the foam rail system.<br />
Note:<br />
If you have chosen the Synergy®<br />
Tri-Zone Support system, your<br />
chambers will be made of nylon<br />
polyurethane and will not have<br />
the brass coupling. The assembly<br />
of the Tri-Zone Chambers is<br />
easily completed by attaching the<br />
clear hose with the “Y” first. The<br />
short end of the “Y” connects to<br />
the Head chamber, with the long<br />
portion attaching to the Foot<br />
chamber (SEE DIAGRAM A1).<br />
The connection is a simple push<br />
and click (SEE DIAGRAM A2).<br />
The second clear hose attaches<br />
to the Mid-Body chamber in a<br />
similar push and click fashion.<br />
The chambers are placed inside<br />
A3<br />
the Power Edge<br />
rail system with<br />
the hoses along<br />
the outside edge<br />
(DIAGRAM A3).<br />
The hoses then<br />
exit at the head of the bed<br />
through the slits (DIAGRAM A4).<br />
It may be necessary to cut slits in<br />
the corner of the grey material to<br />
make the exit easier.<br />
A1<br />
A2<br />
A4<br />
2
5. Place the air inflation unit<br />
on the floor at the head of the<br />
bed with the air ports facing<br />
away from the bed. If the unit<br />
will be used on a hardwood<br />
or tile floor, it is recommended<br />
that a towel or other dampening<br />
material be placed under the<br />
unit to minimize vibration noise.<br />
Use A Surge Protector To<br />
*<br />
Prevent Pump Damage.<br />
POINT<br />
CONTROL<br />
TOWARDS<br />
FOOT<br />
WHEN<br />
FILLING<br />
TO<br />
INFLATE<br />
CORRECT<br />
SIDE OF<br />
BED.<br />
WALL<br />
RIGHT<br />
PORT<br />
LEFT<br />
PORT<br />
PLACE<br />
INFLATOR<br />
UNDER<br />
THE BED<br />
FRAME<br />
WITH<br />
THE<br />
PORTS<br />
FACING<br />
THE<br />
WALL.<br />
* If you have the Synergy Tri-Zone System, skip step 6 *<br />
6. The barrels on the end of the air hoses are designed to attach to the air<br />
port using the patented Twist N’ Lock system. The connection is made with<br />
a slight counter clockwise turn. To lock the connection, simply twist the entire<br />
barrel/hose clockwise to<br />
add tension to the support<br />
spring inside the hose.<br />
Slide the barrel over the air<br />
port coming from the inflator<br />
and gently release the<br />
connector in a counterclockwise<br />
fashion. This<br />
should snugly lock the<br />
barrel into place. It is<br />
important to double check<br />
this connection before<br />
proceeding to inflate the<br />
chambers. Failure to do so<br />
may result in a slow air loss<br />
which can affect your comfort. Inflate both sides of the<br />
mattress, one at a time, using the hand held control(s).<br />
If your inflator has the “<strong>Bed</strong> Fill” feature, simply push this<br />
button to fill the chamber automatically. If it does not have<br />
this button, press and hold the “Firm” Button until chamber<br />
is completely inflated. On digital inflators, the reading<br />
will be approximately 50 mmHg. For analog inflators, the<br />
pump will begin to slow down & will create a sputtering<br />
sound. This will signal a full chamber. The inflators are<br />
designed to prevent damage to the chamber from overfilling.<br />
3 Repeat this process for the opposite side of the bed.<br />
* DO NOT OVER TIGHTEN *
* If you have the Vulcanized <strong>Air</strong> System, skip step 7 *<br />
7. The Synergy® 4-port Digital inflator features two ports for each side of<br />
your bed. One controls the firmness of the head and foot chambers, while<br />
the other is for adjusting the<br />
mid-body chamber. The clear<br />
hose with the “Y” should<br />
be attached to the Head &<br />
Foot port, with the remaining<br />
hose going to the midbody<br />
port on the pump.<br />
Repeat this for the other<br />
side of the sleep system.<br />
To inflate the bed, the<br />
memory 2 button can be<br />
depressed and released,<br />
the bed will inflate to the<br />
highest setting (40 mmHg). The pump can only operate one side of the<br />
bed at a time. Repeat this for the other side.<br />
Note: Step 8 is not required for the Synergy® sleep system. Due to the<br />
size of the chambers the comfort layer is not needed.<br />
8. Place the comfort layer on top of<br />
the air chambers. This should<br />
completely cover the chambers and<br />
drop just inside the Power Edge<br />
Support Rail System.<br />
9. Zip up the cover/pillow top,<br />
install new mattress pad and<br />
sheets. Enjoy a great night’s rest.<br />
4
ISSUE<br />
Caution<br />
Inflator Pump Not<br />
Powering <strong>Up</strong><br />
Dual System<br />
Only Fills One<br />
Side<br />
Noise or<br />
Vibration Issue<br />
Troubleshooting Tips for<br />
Digital <strong>Air</strong> Inflators<br />
Digital <strong>Air</strong> Inflators: Only one control operates at a time.<br />
SUGGESTED ACTIONS<br />
1.) The Digital <strong>Air</strong> Sleep System MUST BE acclimated to room temperature for 24 hours prior<br />
to attempting to operate. Failure to do this may result in the Digtal <strong>Air</strong> Sleep System not<br />
functioning properly.<br />
1.) Use of a surge protector is recommended.<br />
2.) Make sure the electrical outlet is working and any appropriate light switches are turned on.<br />
3.) Make sure the surge protector is plugged in, reset to operate and that the power switch is turned on.<br />
4.) Unplug the pump from the power supply & plug it back in allowing the system to reboot.<br />
5.) Check the fuse in the back of the pump to see if it is blown.<br />
*If pump is still not working properly, contact authorized dealer for replacement.<br />
1.) Unplug the control that is not working and plug it back in making sure it is secure.<br />
2.) If no response, Switch the controls on the pump and try again.<br />
* If there is still no air coming from the non-working port, contact authorized dealer for<br />
pump replacement.<br />
* If air is now coming out of the previously non-working port, and the port that was previously<br />
working no longer works, contact authorized dealer for control replacement.<br />
1.) A towel placed underneath pump will help to quiet the noise especially if inflator is placed<br />
on wood, tile or linoleum floor.<br />
1.) The Digital readout on the hand control will vary depending on many external factors such as<br />
changes in temperature or exposure to direct sunlight, seasonal room temperature changes, bed<br />
temperature changes with or without sleeper, taking the reading while in bed or standing next to the<br />
bed.<br />
2.) Readings may differ when lying in a different position. For example, the digital readout may<br />
differ when laying on your side versus your back or stomach.<br />
Control<br />
Readout<br />
Differs From<br />
Time To Time<br />
3.) The digital readout will fluctuate during inflation and/or deflation. Once the button is released,<br />
briefly touch button once and the control and inflator will synchronize. The reading will then reflect<br />
the realtime pressure setting.<br />
4.) Readouts will differ when there is somebody on the bed versus nobody being on the bed.<br />
This is due to a difference in pressure on the air chamber when a body is in or out of the bed.<br />
To verify realtime readout once you've adjusted bed to your comfort preference and while lying<br />
on the bed in your normal sleep position, briefly touch the firm or soft key and the number should<br />
now represent a realtime readout on the control.<br />
Pump seems to<br />
operate slow<br />
Inflator Keeps Filling<br />
And Won't Stop<br />
Pump Reads High<br />
Without <strong>Air</strong> Chamber<br />
Attached<br />
Inflator Runs But No<br />
<strong>Air</strong> Flow Into <strong>Air</strong><br />
Chamber(s)<br />
5.) Check readout after layng in bed and again the next morning while still in bed. Then, repeat<br />
one more time the night after without making any changes to the sleeping conditions. Doing so<br />
will indicate whether there is a significant change in the readout.<br />
*If a significant number difference (such as 10) is noticed under consistent circumstances,<br />
contact authorized dealer for replacement.<br />
1.) The amount of padding and overall thickness of the top on your mattress will impact the<br />
ability to feel rapid changes in air pressure settings. This is normal and is not an issue with the<br />
inflator. The support provided by the air chamber & inflator is not compromised by thicker<br />
mattress tops, only the corresponding sensation of change is affected. Foam overlay insert for<br />
chamber(s) may optionally be positioned under chamber(s).<br />
* Contact authorized dealer for replacement pump. *
Troubleshooting Tips for<br />
<strong>Air</strong> Chambers<br />
ISSUE<br />
SUGGESTED ACTIONS<br />
1.) First, make sure the connection from the pump to the air chamber is secure. For best results,<br />
disconnect the hose from the pump, twist the hose clockwise 3 turns to spring-load, now when<br />
you put it back on the pump it will want to turn counterclockwise holding it onto the pump tight.<br />
2.) Nominal changes in readout may be caused by cooling of air after filling, temperature changes<br />
in general or may be noticed for a week or two after the system has been set up and acclimated.<br />
Potential <strong>Air</strong><br />
Loss in<br />
Chamber<br />
3.) Switch chamber connections to pump (right to left and vice versa) then reinflate to see if the same<br />
chamber is losing air.<br />
4.) Reinflate air chambers then disconnect air lock connectors from pump to see if chamber holds<br />
air.<br />
5.) O-Ring on Pump Connectors may occasionally need to be cleaned or replaced (available a<br />
hardware store).<br />
If issue persists, contact authorized dealer for replacement.<br />
*<br />
Checking<br />
for Connector<br />
leaks<br />
1.) Check connectors by filling the chamber with air, disconnect the hose from the pump, then<br />
submerge the fitting in a glass of water. If bubbles are coming out of the fitting, a small leak is<br />
present.<br />
*<br />
If the connector is leaking, contact authorized dealer for replacement.<br />
Troubleshooting Tips for<br />
<strong>Bed</strong> Assembly<br />
ISSUE<br />
SUGGESTED ACTIONS<br />
1.) If installed upside down or not completely unfolded Rails will not reach top to bottom or side<br />
to side. Properly install by inserting Top to Bottom Rails first. Slit holes in Top to Bottom sling<br />
material should be positioned at head of bed for threading <strong>Air</strong> Hoses to Pump. Side to Side Rails<br />
are then inserted to form dish with slit holes again positioned at head of bed. Labels adjacent to<br />
slit holes point to headboard to confirm right side up installation. Be sure that Rails and sling<br />
material is completely unfolded and installed right side up to verify correct size. Please note that<br />
Rails may bow in until <strong>Air</strong> Chambers are filled.<br />
Foam Rails<br />
Do Not<br />
Appear to<br />
be the<br />
Correct Size<br />
SIDE RAILS 2ND<br />
HEAD & FOOT RAILS<br />
FIRST<br />
CORRECT<br />
If Rails do not fit after verifying slings have been completely unfolded and are being installed<br />
*<br />
right side up, contact authorized dealer for replacement.


