Verona Swing Set Owner's Manual and Assembly ... - Instep.net
Verona Swing Set Owner's Manual and Assembly ... - Instep.net
Verona Swing Set Owner's Manual and Assembly ... - Instep.net

Create successful ePaper yourself
Turn your PDF publications into a flip-book with our unique Google optimized e-Paper software.
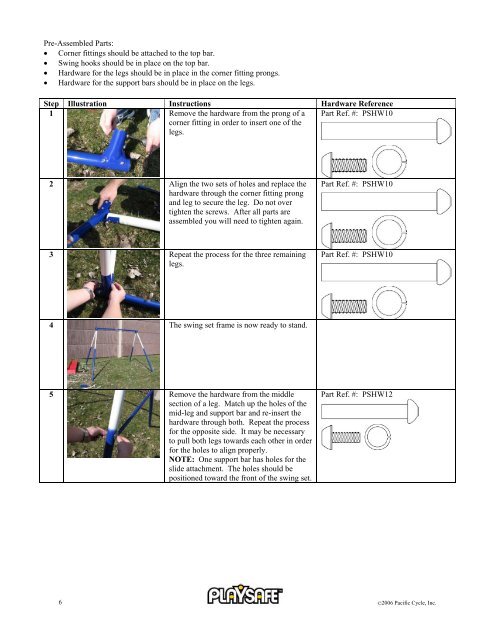
Pre-Assembled Parts:<br />
• Corner fittings should be attached to the top bar.<br />
• <strong>Swing</strong> hooks should be in place on the top bar.<br />
• Hardware for the legs should be in place in the corner fitting prongs.<br />
• Hardware for the support bars should be in place on the legs.<br />
Step Illustration Instructions Hardware Reference<br />
1 Remove the hardware from the prong of a<br />
corner fitting in order to insert one of the<br />
legs.<br />
Part Ref. #: PSHW10<br />
2 Align the two sets of holes <strong>and</strong> replace the<br />
hardware through the corner fitting prong<br />
<strong>and</strong> leg to secure the leg. Do not over<br />
tighten the screws. After all parts are<br />
assembled you will need to tighten again.<br />
Part Ref. #: PSHW10<br />
3 Repeat the process for the three remaining<br />
legs.<br />
Part Ref. #: PSHW10<br />
4 The swing set frame is now ready to st<strong>and</strong>.<br />
5 Remove the hardware from the middle<br />
section of a leg. Match up the holes of the<br />
mid-leg <strong>and</strong> support bar <strong>and</strong> re-insert the<br />
hardware through both. Repeat the process<br />
for the opposite side. It may be necessary<br />
to pull both legs towards each other in order<br />
for the holes to align properly.<br />
NOTE: One support bar has holes for the<br />
slide attachment. The holes should be<br />
positioned toward the front of the swing set.<br />
Part Ref. #: PSHW12<br />
6 ©2006 Pacific Cycle, Inc.