
You also want an ePaper? Increase the reach of your titles
YUMPU automatically turns print PDFs into web optimized ePapers that Google loves.
DVD Receiver<br />
DR-S501<br />
Instruction Manual<br />
Contents<br />
Overview .........................................2<br />
Connections..................................17<br />
Getting Started and Setting up ...29<br />
Basic Operations..........................31<br />
Playback Techniques ...................44<br />
Thank you for purchasing the <strong>Onkyo</strong> DVD<br />
receiver. Read this manual carefully before using<br />
your new DVD receiver. A good understanding<br />
of its features and operation will allow you to<br />
achieve optimum performance and enjoyment.<br />
Advanced Operations ..................52<br />
Detailed Settings ..........................55<br />
Keep this manual for future reference.<br />
Miscellaneous information ..........68<br />
Remote Control Codes List<br />
–The end of this manual–<br />
En
WARNING:<br />
TO REDUCE THE RISK OF FIRE OR ELECTRIC<br />
SHOCK, DO NOT EXPOSE THIS APPARATUS<br />
TO RAIN OR MOISTURE.<br />
CAUTION:<br />
TO REDUCE THE RISK OF ELECTRIC SHOCK,<br />
DO NOT REMOVE COVER (OR BACK). NO<br />
USER-SERVICEABLE PARTS INSIDE. REFER<br />
SERVICING TO QUALIFIED SERVICE<br />
PERSONNEL.<br />
WARNING<br />
RISK OF ELECTRIC SHOCK<br />
DO NOT OPEN<br />
AVIS<br />
RISQUE DE CHOC ELECTRIQUE<br />
NE PAS OUVRIR<br />
The lightning flash with arrowhead symbol, within an<br />
equilateral triangle, is intended to alert the user to the<br />
presence of uninsulated “dangerous voltage” within<br />
the product’s enclosure that may be of sufficient<br />
magnitude to constitute a risk of electric shock to<br />
persons.<br />
The exclamation point within an equilateral triangle is<br />
intended to alert the user to the presence of important<br />
operating and maintenance (servicing) instructions in<br />
the literature accompanying the appliance.<br />
2<br />
Important Safety Instructions<br />
1. Read these instructions.<br />
2. Keep these instructions.<br />
3. Heed all warnings.<br />
4. Follow all instructions.<br />
5. Do not use this apparatus near water.<br />
6. Clean only with dry cloth.<br />
7. Do not block any ventilation openings. Install in<br />
accordance with the manufacturer’s instructions.<br />
8. Do not install near any heat sources such as radiators,<br />
heat registers, stoves, or other apparatus<br />
(including amplifiers) that produce heat.<br />
9. Do not defeat the safety purpose of the polarized or<br />
grounding-type plug. A polarized plug has two<br />
blades with one wider than the other. A grounding<br />
type plug has two blades and a third grounding<br />
prong. The wide blade or the third prong are provided<br />
for your safety. If the provided plug does not<br />
fit into your outlet, consult an electrician for<br />
replacement of the obsolete outlet.<br />
10. Protect the power cord from being walked on or<br />
pinched particularly at plugs, convenience receptacles,<br />
and the point where they exit from the apparatus.<br />
11. Only use attachments/accessories specified by the<br />
manufacturer.<br />
12. Use only with the cart, stand, PORTABLE CART WARNING<br />
tripod, bracket, or table specified<br />
by the manufacturer, or<br />
sold with the apparatus.<br />
When a cart is used, use caution<br />
when moving the cart/<br />
apparatus combination to S3125A<br />
avoid injury from tip-over.<br />
13. Unplug this apparatus during lightning storms or<br />
when unused for long periods of time.<br />
14. Refer all servicing to qualified service personnel.<br />
Servicing is required when the apparatus has been<br />
damaged in any way, such as power-supply cord or<br />
plug is damaged, liquid has been spilled or objects<br />
have fallen into the apparatus, the apparatus has<br />
been exposed to rain or moisture, does not operate<br />
normally, or has been dropped.<br />
15. Damage Requiring Service<br />
Unplug the apparatus from the wall outlet and refer servicing<br />
to qualified service personnel under the following conditions:<br />
A. When the power-supply cord or plug is damaged,<br />
B. If liquid has been spilled, or objects have fallen<br />
into the apparatus,<br />
C. If the apparatus has been exposed to rain or<br />
water,<br />
D. If the apparatus does not operate normally by<br />
following the operating instructions. Adjust<br />
only those controls that are covered by the operating<br />
instructions as an improper adjustment of<br />
other controls may result in damage and will<br />
often require extensive work by a qualified technician<br />
to restore the apparatus to its normal<br />
operation,<br />
E. If the apparatus has been dropped or damaged in<br />
any way, and<br />
F. When the apparatus exhibits a distinct change in<br />
performance this indicates a need for service.<br />
16. Object and Liquid Entry<br />
Never push objects of any kind into the apparatus through<br />
openings as they may touch dangerous voltage points or<br />
short-out parts that could result in a fire or electric shock.<br />
The apparatus shall not be exposed to dripping or splashing<br />
and no objects filled with liquids, such as vases shall<br />
be placed on the apparatus.<br />
Don’t put candles or other burning objects on top of this<br />
unit.<br />
17. Batteries<br />
Always consider the environmental issues and follow local<br />
regulations when disposing of batteries.<br />
18. If you install the apparatus in a built-in installation,<br />
such as a bookcase or rack, ensure that there is adequate<br />
ventilation.<br />
Leave 20 cm (8") of free space at the top and sides and 10<br />
cm (4") at the rear. The rear edge of the shelf or board<br />
above the apparatus shall be set 10 cm (4") away from the<br />
rear panel or wall, creating a flue-like gap for warm air to<br />
escape.
Precautions<br />
1. Recording Copyright—Unless it’s for personal use<br />
only, recording copyrighted material is illegal without<br />
the permission of the copyright holder.<br />
2. AC Fuse—The AC fuse inside the unit is not userserviceable.<br />
If you cannot turn on the unit, contact<br />
your <strong>Onkyo</strong> dealer.<br />
3. Care—Occasionally you should dust the unit all<br />
over with a soft cloth. For stubborn stains, use a soft<br />
cloth dampened with a weak solution of mild detergent<br />
and water. Dry the unit immediately afterwards<br />
with a clean cloth. Don’t use abrasive cloths, thinners,<br />
alcohol, or other chemical solvents, because<br />
they may damage the finish or remove the panel lettering.<br />
4. Power<br />
WARNING<br />
BEFORE PLUGGING IN THE UNIT FOR THE<br />
FIRST TIME, READ THE FOLLOWING SEC-<br />
TION CAREFULLY.<br />
AC outlet voltages vary from country to country. Make<br />
sure that the voltage in your area meets the voltage<br />
requirements printed on the unit’s rear panel (e.g., AC 230<br />
V, 50 Hz or AC 120 V, 60 Hz).<br />
The power cord plug is used to disconnect this unit from<br />
the AC power source. Make sure that the plug is readily<br />
operable (easily accessible) at all times.<br />
Pressing the [STANDBY/ON] button to select Standby<br />
mode does not fully shutdown the unit. If you do not<br />
intend to use the unit for an extended period, remove the<br />
power cord from the AC outlet.<br />
5. Never Touch this Unit with Wet Hands—Never<br />
handle this unit or its power cord while your hands<br />
are wet or damp. If water or any other liquid gets<br />
inside this unit, have it checked by your <strong>Onkyo</strong><br />
dealer.<br />
6. Handling Notes<br />
• If you need to transport this unit, use the original<br />
packaging to pack it how it was when you originally<br />
bought it.<br />
• Do not leave rubber or plastic items on this unit<br />
for a long time, because they may leave marks on<br />
the case.<br />
• This unit’s top and rear panels may get warm<br />
after prolonged use. This is normal.<br />
• If you do not use this unit for a long time, it may<br />
not work properly the next time you turn it on, so<br />
be sure to use it occasionally.<br />
• When you’ve finished using this unit, remove all<br />
discs and turn off the power.<br />
7. Installing this Unit<br />
• Install this unit in a well-ventilated location.<br />
• Ensure that there’s adequate ventilation all<br />
around this unit, especially if it’s installed in an<br />
audio rack. If the ventilation is inadequate, the<br />
unit may overheat, leading to malfunction.<br />
• Do not expose this unit to direct sunlight or heat<br />
sources, because its internal temperature may<br />
rise, shortening the life of the optical pickup.<br />
• Avoid damp and dusty places, and places subject<br />
to vibrations from loudspeakers. Never put the<br />
unit on top of, or directly above a loudspeaker.<br />
• Install this unit horizontally. Never use it on its<br />
side or on a sloping surface, because it may cause<br />
a malfunction.<br />
• If you install this unit near a TV, radio, or VCR,<br />
the picture and sound quality may be affected. If<br />
this occurs, move this unit away from the TV,<br />
radio, or VCR.<br />
8. To Obtain a Clear Picture—This unit is a hightech,<br />
precision device. If the lens on the optical<br />
pickup, or the disc drive mechanism becomes dirty<br />
or worn, the picture quality may be affected. To<br />
maintain the best picture quality, we recommend<br />
regular inspection and maintenance (cleaning or<br />
worn part replacement) every 1,000 hours of use<br />
depending on the operating environment. Contact<br />
your <strong>Onkyo</strong> dealer for details.<br />
9. Moisture Condensation<br />
Moisture condensation may damage this unit.<br />
Read the following carefully:<br />
Moisture may condense on the lens of the optical<br />
pickup, one of the most important parts inside this<br />
unit.<br />
• Moisture condensation can occur in the following<br />
situations:<br />
– The unit is moved from a cold place to a warm<br />
place.<br />
– A heater is turned on, or cold air from an air<br />
conditioner is hitting the unit.<br />
– In the summer, when this unit is moved from<br />
an air conditioned room to a hot and humid<br />
place.<br />
– The unit is used in a humid place.<br />
• Do not use this unit when there’s the possibility<br />
of moisture condensation occurring. Doing so<br />
may damage your discs and certain parts inside<br />
this unit.<br />
If condensation does occur, remove all discs and<br />
leave this unit turned on for two to three hours. By<br />
this time, the unit will have warmed up and any condensation<br />
will have evaporated.<br />
3
Precautions—Continued<br />
10. Region Numbers—The DVD standard uses region<br />
numbers to control how discs can be played around<br />
the world, the world being divided into six regions.<br />
This unit will only play DVD discs that match its<br />
region number, which can be found on its rear panel<br />
(e.g., 1 , ALL ).<br />
11. About this Manual—This manual explains how to<br />
use all of this unit’s functions. Although the DVD<br />
standard offers many special features, not all discs<br />
use them all, so depending on the disc being played,<br />
this unit may not respond to certain functions. See<br />
the disc’s sleeve notes for supported features.<br />
This unit contains a semiconductor laser system and is<br />
classified as a “CLASS 1 LASER PRODUCT”. So, to<br />
use this model properly, read this Instruction Manual<br />
carefully. In case of any trouble, please contact the store<br />
where you purchased the unit.<br />
To prevent being exposed to the laser beam, do not try to<br />
open the enclosure.<br />
CAUTION:<br />
CLASS 1M VISIBLE AND INVISIBLE LASER<br />
RADIATION WHEN OPEN. DO NOT VIEW<br />
DIRECTLY WITH OPTICAL INSTRUMENTS.<br />
THIS PRODUCT UTILIZES A LASER. USE OF CON-<br />
TROLS OR ADJUSTMENTS OR PERFORMANCE<br />
OF PROCEDURES OTHER THAN THOSE SPECI-<br />
FIED HEREIN MAY RESULT IN HAZARDOUS<br />
RADIATION EXPOSURE.<br />
The label on the right is<br />
applied on the rear panel.<br />
1. This unit is a CLASS 1<br />
LASER PRODUCT and<br />
employs a laser inside the cabinet.<br />
2. To prevent the laser from being exposed, do not<br />
remove the cover. Refer servicing to qualified personnel.<br />
For European Models<br />
Declaration of Conformity<br />
We, ONKYO EUROPE<br />
ELECTRONICS GmbH<br />
LIEGNITZERSTRASSE 6,<br />
82194 GROEBENZELL,<br />
GERMANY<br />
declare in own responsibility, that the ONKYO product<br />
described in this instruction manual is in compliance with the<br />
corresponding technical standards such as EN60065,<br />
EN55013, EN55020 and EN61000-3-2, -3-3.<br />
GROEBENZELL, GERMANY<br />
K. MIYAGI<br />
ONKYO EUROPE ELECTRONICS GmbH<br />
4
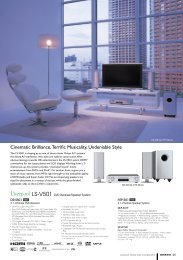
Supplied Accessories<br />
Make sure you have the following accessories:<br />
RC-704S<br />
Remote controller & 2 batteries (AA/R6)<br />
Video cable (RCA) (1.5 m)<br />
Indoor FM antenna<br />
AM loop antenna<br />
Power cord<br />
* In catalogs and on packaging, the letter at the end of<br />
the product name indicates the color. Specifications<br />
and operations are the same regardless of color.<br />
5
Introduction<br />
Features<br />
Highlights<br />
• Dolby *1 Digital, DTS *2<br />
• DVD-Video, Video CD, audio CD<br />
• MP3, WMA, *3 JPEG, DivX ®*4<br />
• DVD-Audio and Super Audio CD<br />
• CD-R/RW, DVD-R/RW, and DVD+R/RW compatible<br />
• HDMI *5 digital interface<br />
*1<br />
*2<br />
*3<br />
Manufactured under license from Dolby Laboratories.<br />
Dolby, Pro Logic, and the double-D symbol are trademarks of<br />
Dolby Laboratories.<br />
“DTS” is a registered trademark of DTS, Inc. and “96/24” is a<br />
trademark of DTS, Inc.<br />
Video<br />
• HDMI Pass-Thru<br />
(1080p Compatible; 1 Input/1 Output)<br />
• HDTV-Capable (50 MHz)<br />
• JPEG in High Definition<br />
• Advanced 108 MHz/14-bit video D/A converter<br />
• 2 Composite Video Inputs<br />
• Component and composite video outputs<br />
• 1 SCART Connector (European model only)<br />
• Repeat/A-B Repeat/Random/Memory playback<br />
• Supports 4:3 and 16:9 aspect ratio TVs<br />
• Three view modes providing a best-fit picture regardless<br />
of TV aspects<br />
• Picture Zoom Function<br />
• Parental Lock function<br />
• Screen Saver function<br />
Audio<br />
• 192 kHz/24-bit D/A converter<br />
• 2 Digital Inputs (1 Optical/1 Coaxial)<br />
• Theater-Dimensional *6 Virtual Surround<br />
• Direct Mode and Pure Audio Mode<br />
• Dynamic Range Control setting<br />
*4<br />
Windows Media, and the Windows logo are trademarks, or registered<br />
trademarks of Microsoft Corporation in the United<br />
States and/or other countries.<br />
DivX, DivX Certified, and associated logos are trademarks of<br />
DivX, Inc. and are used under license.<br />
*5<br />
HDMI, the HDMI logo and High-Definition Multimedia Interface<br />
are trademarks or registered trademarks of HDMI licensing<br />
LLC.<br />
*6 “Theater-Dimensional” is a trademark of <strong>Onkyo</strong> Corporation.<br />
* Apple and iPod are trademarks of Apple, Inc., registered in the<br />
U.S. and other countries.<br />
This product incorporates copyright protection technology that<br />
is protected by U.S. patents and other intellectual property<br />
rights. Use of this copyright protection technology must be<br />
authorized by Macrovision Corporation, and is intended for<br />
home and other limited consumer uses only unless otherwise<br />
authorized by Macrovision. Reverse engineering or disassembly<br />
is prohibited.<br />
Others<br />
• Compatible with RI Dock for iPod<br />
• A/V Sync Control Function (up to 100 ms)<br />
• 40 AM/FM Presets<br />
• 1/4-inch phone jack<br />
• Aluminum Front Panel, Volume and Input Selector<br />
Knob<br />
• Adjustable display brightness<br />
6
Contents<br />
Overview<br />
Important Safety Instructions .................................... 2<br />
Precautions ............................................................... 3<br />
Supplied Accessories................................................ 5<br />
Introduction ............................................................... 6<br />
Features ................................................................ 6<br />
Disc Notes............................................................. 8<br />
Before Using the DVD receiver ............................... 11<br />
Installing the Batteries......................................... 11<br />
Using the Remote Controller ............................... 11<br />
Front & Rear Panels................................................ 12<br />
Front Panel.......................................................... 12<br />
Display................................................................. 13<br />
Rear Panel .......................................................... 14<br />
Remote Controller ............................................... 15<br />
Connections<br />
Connecting the DVD receiver.................................. 17<br />
Placing the Speakers .......................................... 17<br />
Connecting Your Speakers ................................. 17<br />
Connecting Antenna............................................ 19<br />
AV Cables & Connectors..................................... 21<br />
Video Output/Video Setting Matrix ...................... 22<br />
Video Signal Flow Chart...................................... 22<br />
Before Making Any Connections......................... 23<br />
Basic Setup ......................................................... 23<br />
Connecting Your TV (video connection).............. 24<br />
Connecting Other AV Component....................... 25<br />
Connecting an RI Dock ....................................... 26<br />
Digital Audio Connection..................................... 26<br />
Connecting your HDTV or AV component<br />
with an HDMI connection.................................. 27<br />
Connecting the Power/Turning<br />
on the DVD receiver ............................................. 28<br />
Getting Started and Setting up<br />
Initial Setup ............................................................. 29<br />
First Time Setup.................................................. 29<br />
HDMI and Progressive Settings .............................. 30<br />
Setting the HDMI................................................. 30<br />
Selecting Progressive or Interlaced..................... 30<br />
Basic Operations<br />
Understanding Common Operations....................... 31<br />
Adjusting the Volume .......................................... 31<br />
Selecting the Input Source .................................. 31<br />
Using Headphones.............................................. 31<br />
Muting the DVD receiver ..................................... 32<br />
Using the Sleep Timer......................................... 32<br />
Adjusting Subwoofer Level.................................. 32<br />
Playing Discs........................................................... 33<br />
Starting, Pausing & Stopping Playback............... 33<br />
Select Next & Previous track/chapter.................. 34<br />
Fast Forward & Reverse ..................................... 35<br />
Forward Frame-by-Frame Playback.................... 35<br />
Navigating DVD & VCD Disc Menus................... 36<br />
Navigating CDs & Super Audio CDs ................... 36<br />
Navigating MP3, WMA & DivX Discs .................. 37<br />
Viewing a Slideshow of JPEG Images ................ 38<br />
Listening to the Radio ............................................. 39<br />
Using the Tuner................................................... 39<br />
Presetting AM/FM Stations.................................. 40<br />
Using RDS (European models only) ................... 41<br />
Using the Listening Modes...................................... 42<br />
Selecting Listening Modes .................................. 42<br />
About the Listening Modes.................................. 42<br />
Playback Techniques<br />
Advanced Playback................................................. 44<br />
Selecting Chapters/Titles/Tracks/Folders by<br />
Number ............................................................. 44<br />
Searching by Time............................................... 45<br />
Repeat Playback ................................................. 46<br />
A-B Repeat Playback .......................................... 46<br />
Random Playback ............................................... 47<br />
Memory Playback ................................................ 48<br />
Last Memory........................................................ 49<br />
Zooming............................................................... 50<br />
Selecting Camera Angles .................................... 50<br />
Selecting Soundtracks......................................... 51<br />
Selecting Subtitles ............................................... 51<br />
Advanced Operations<br />
Disc and Input Information ...................................... 52<br />
Displaying Information ......................................... 52<br />
Controlling Other Components................................ 53<br />
Controlling a TV connected<br />
to the DVD receiver........................................... 53<br />
Controlling an Apple iPod in RI Dock connected<br />
to the DVD receiver........................................... 54<br />
Detailed Settings<br />
Configuring the DVD receiver.................................. 55<br />
Setup Menu ......................................................... 55<br />
DVD Onscreen Setup Menus .................................. 58<br />
Using the Onscreen Setup Menus....................... 59<br />
Picture Menu ....................................................... 60<br />
Audio Menu ......................................................... 62<br />
Language Menu................................................... 63<br />
Display Menu....................................................... 65<br />
Operation Setting Menu....................................... 66<br />
Miscellaneous information<br />
Additional information.............................................. 68<br />
Resetting the receiver.......................................... 68<br />
DVD-Video regions.............................................. 68<br />
Disc Content Organization................................... 68<br />
Glossary .................................................................. 69<br />
Troubleshooting....................................................... 71<br />
Power .................................................................. 71<br />
Audio ................................................................... 71<br />
Video ................................................................... 72<br />
Tuner ................................................................... 73<br />
Remote Controller ............................................... 73<br />
Disc Playback ...................................................... 73<br />
Connection with External Devices ....................... 74<br />
Others.................................................................. 74<br />
HDMI Status Mode .............................................. 75<br />
Specifications .......................................................... 76<br />
Remote Control Codes List<br />
The end of this manual<br />
7
Introduction—Continued<br />
Disc Notes<br />
Supported Discs<br />
The DVD receiver supports the following discs.<br />
Disc Logo Format or file type<br />
• The DVD receiver does not support disc types not<br />
listed.<br />
• The DVD receiver supports 8 cm and 12 cm discs.<br />
• Don’t use discs with an unusual shape, such as those<br />
shown below, because you may damage the DVD<br />
receiver.<br />
DVD-Video *1<br />
DVD-Audio<br />
Super Audio<br />
CD<br />
DVD-R *2<br />
DVD-RW *2<br />
Video CD<br />
Audio CD *3<br />
CD-R *2<br />
CD-RW *2<br />
DVD-Audio<br />
Super Audio CD (single<br />
layer, dual layer, hybrid)<br />
DVD-Video, MP3, WMA,<br />
JPEG<br />
DVD-Video, MP3, WMA,<br />
JPEG<br />
Including PBC<br />
PCM<br />
Audio CD, MP3, WMA,<br />
JPEG, DivX<br />
Audio CD, MP3, WMA,<br />
JPEG<br />
• Don’t use discs that have residue from adhesive tape,<br />
rental discs with peeling labels, or discs with custommade<br />
labels or stickers. Doing so may damage the<br />
DVD receiver and you may not be able to remove the<br />
disc properly.<br />
About playing copy-controlled CDs<br />
Some copy-controlled CDs may not conform to official<br />
CD standards. They are special discs and may not play<br />
on the DVD receiver.<br />
Function Support<br />
The following icons are used throughout this manual to<br />
indicate which functions can be used with the various<br />
disc formats and file types.<br />
Icon<br />
DVD-V<br />
DVD-A<br />
Disc format or file type<br />
DVD-Video<br />
DVD-Audio<br />
JPEG CD<br />
JPEG<br />
– DVD+R/RW –<br />
The DVD receiver supports DVD+R/RW discs<br />
recorded in the following formats:<br />
• Discs recorded in DVD-Video mode.<br />
• Discs recorded in ISO 9660 Level 2 or Joliet<br />
format containing MP3, WMA, or JPEG files.<br />
*1 The DVD receiver’s region number is printed on the rear panel.<br />
If you attempt to play a disc intended for another region, the<br />
message appears onscreen.<br />
*2 MP3, WMA, and JPEG files are supported on discs recorded in<br />
ISO 9660 Level 2 or Joliet format. (See “MP3/WMA/JPEG<br />
Compatibility” on page 9 for more details.) However, some<br />
CD-R, CD-RW, DVD-R, and DVD-RW discs may not work<br />
properly for any of the following reasons: incomplete disc<br />
finalization, disc burner characteristics, disc characteristics, the<br />
disc is damaged or dirty, the disc contains only a small amount<br />
of data. Discs that contain different types of files, JPEG, MP3,<br />
WMA, DivX, and so on, are not supported. See the manual supplied<br />
with your disc burner for more information. Condensation<br />
or dirt on the optical pickup lens can also affect playback.<br />
*3 Some audio CDs feature copy protection that doesn’t conform<br />
to the official CD standard. Since these are nonstandard discs,<br />
they may not play properly in the DVD receiver.<br />
SACD<br />
VCD<br />
CD<br />
MP3<br />
WMA<br />
JPEG<br />
DivX<br />
About this Manual<br />
Super Audio CD<br />
Video CD<br />
Audio CD<br />
MP3 file<br />
WMA file<br />
JPEG file<br />
DivX ®<br />
This manual explains how to use all of the DVD<br />
receiver’s functions. Although the DVD standard offers<br />
many special features, not all discs use them all, so<br />
depending on the disc being played, the DVD receiver<br />
may not respond to certain functions. See your disc’s<br />
sleeve notes for supported features.<br />
When you attempt to use a DVD feature that is<br />
not available, this logo may appear onscreen,<br />
indicating that the feature is not supported by<br />
the current disc or by the DVD receiver.<br />
8
Introduction—Continued<br />
MP3/WMA/JPEG Compatibility<br />
• The DVD receiver can play/display MP3, WMA, and<br />
JPEG files recorded on CD-R, CD-RW, DVD-R,<br />
DVD-RW, DVD+R and DVD+RW discs.<br />
• Discs must be in ISO 9660 Level 2 or Joliet format<br />
(folders can be up to eight levels deep). Music files<br />
recorded on discs that use the HFS (hierarchical file<br />
system) cannot be played.<br />
• Discs must be finalized.<br />
• The DVD receiver can only recognize the first session<br />
on multisession discs.<br />
• You can determine the order in which the DVD<br />
receiver plays/displays your MP3/WMA songs and<br />
JPEG pictures by prefixing file and folder names with<br />
a three-digit number. For example 001.Root,<br />
002.Folder, and so on, and 001.Track.mp3,<br />
002.Track.mp3, and so on.<br />
• Only the first eight characters of folder and track names<br />
(excluding the filename extension) are displayed.<br />
• The folder numbered “001” appears as “ROOT” in the<br />
Disc Navigator.<br />
• The DVD receiver supports up to 255 folders and up<br />
to 255 files per folder.<br />
• If you try to play an incompatible file, the message<br />
“This format cannot be played.” appears on the display.<br />
■ MP3<br />
• MP3 files must be MPEG1 Audio Layer 3 format,<br />
44.1 or 48 kHz, fixed bit-rate.<br />
• MP3 files must have a “.mp3” or “.MP3” filename<br />
extension.<br />
• Variable bit-rates (VBR) from 32 kbps to 320 kbps are<br />
supported. (Playing times may display incorrectly<br />
with VBR.)<br />
Microsoft Corporation. WMA content can be encoded<br />
by using Windows Media ® Player version 7/7.1 or 8.<br />
About DivX<br />
DivX is a compressed digital video format created by the<br />
DivX® video codec from DivXNetworks, Inc. This<br />
receiver can play DivX video files burned on CD-R<br />
discs. When naming files on a disc prior to burning, keep<br />
in mind that by default they will be played in alphabetical<br />
order.<br />
DivX video compatibility<br />
• Official DivX ® Certified product.<br />
• Plays all versions of DivX ® video (including DivX ®<br />
6) with standard playback of DivX ® media files).<br />
DivX ® disc compatibility with this receiver is limited as<br />
follows:<br />
Playable discs<br />
File system<br />
File name<br />
Total number of<br />
folders<br />
Total number of<br />
files<br />
CD-R<br />
CD-RW not recommended<br />
ISO9660 Level 1, 2, or Joliet<br />
A file name should be in alphabet<br />
and numerals only, and must incorporate<br />
“AVI” extension.<br />
e.g. “*****.AVI”<br />
Less than 255<br />
Less than 255<br />
■ WMA<br />
• WMA files must have the copyright option turned off.<br />
• Sampling rates 44.1/48 kHz are supported.<br />
• Variable bit-rates (VBR) from 48 kbps to 192 kbps<br />
(44.1 kHz) and 128 kbps to 192 kbps (48 kHz) are<br />
supported. (Playing times may display incorrectly<br />
with VBR.)<br />
• WMA files must have a “.wma” or “.WMA” filename<br />
extension.<br />
■ JPEG<br />
• JPEG files must have a “.jpg” or “.JPG” filename<br />
extension.<br />
• JPEG files must be less than 5 megabytes in size.<br />
• JPEG files up to 5,700 x 3,800 pixels are supported.<br />
About WMA<br />
WMA is an acronym for Windows Media Audio and<br />
refers to an audio compression technology developed by<br />
9
Introduction—Continued<br />
Handling Discs<br />
• Never touch the underside of a disc. Always hold discs<br />
by the edge, as shown.<br />
Underside<br />
• Never attach adhesive tape or sticky labels to discs.<br />
Copyright<br />
It is forbidden by law to copy, broadcast, show, broadcast<br />
on cable, play in public, or rent copyrighted material<br />
without permission.<br />
DVD-Video discs are copy-protected, and any recordings<br />
made from these discs will be distorted.<br />
This product incorporates copyright protection technology<br />
that is protected by method claims of certain U.S.<br />
patents and other intellectual property rights owned by<br />
Macrovision Corporation and other rights owners. Use<br />
of this copyright-protection technology must be authorized<br />
by Macrovision Corporation, and is intended for<br />
home and other limited viewing uses only, unless otherwise<br />
authorized by Macrovision Corporation. Reverse<br />
engineering or disassembly is prohibited.<br />
Cleaning Discs<br />
• For best results, keep your discs clean. Fingerprints<br />
and dust can affect the sound and picture quality and<br />
should be removed as follows. Using a clean soft<br />
cloth, wipe from the center outwards, as shown. Never<br />
wipe in a circular direction.<br />
✔<br />
• To remove stubborn dust or dirt, wipe the disc with a<br />
damp soft cloth, and then dry it with a dry cloth.<br />
• Never use solvent-based cleaning fluids, such as thinner<br />
or benzine, commercially available cleaners, or<br />
antistatic sprays intended for vinyl records, because<br />
they may damage the disc.<br />
Storing Discs<br />
• Don’t store discs in places subject to direct sunlight, or<br />
near heat sources.<br />
• Don’t store discs in places subject to moisture or dust,<br />
such as in a bathroom or near a humidifier.<br />
• Always store discs in their cases and vertically. Stacking,<br />
or putting objects on unprotected discs may cause<br />
warping, scratches, or other damage.<br />
10
Before Using the DVD receiver<br />
Installing the Batteries<br />
1<br />
To open the battery compartment, press<br />
the small hollow and slide off the cover.<br />
Using the Remote Controller<br />
To use the remote controller, point it at the DVD<br />
receiver’s remote control sensor, as shown below.<br />
Remote control sensor<br />
DVD receiver<br />
Approx. 5 m<br />
2<br />
3<br />
Insert the two supplied batteries (AA/R6)<br />
in accordance with the polarity diagram<br />
inside the battery compartment.<br />
Put the cover onto the remote controller<br />
and slide it shut.<br />
Notes:<br />
• The remote controller may not work reliably if the<br />
DVD receiver is subjected to bright light, such as<br />
direct sunlight or inverter-type fluorescent lights.<br />
Keep this in mind when installing the DVD receiver.<br />
• If another remote controller of the same type is used in<br />
the same room, or the DVD receiver is installed close<br />
to equipment that uses infrared rays, the remote controller<br />
may not work reliably.<br />
• Don’t put anything, such as a book, on the remote controller,<br />
because the buttons may be pressed inadvertently,<br />
thereby draining the batteries.<br />
• The remote controller may not work reliably if the<br />
DVD receiver is installed in a rack behind colored<br />
glass doors. Keep this in mind when installing the<br />
DVD receiver.<br />
• The remote controller will not work if there’s an<br />
obstacle between it and the DVD receiver’s remote<br />
control sensor.<br />
Notes:<br />
• If the remote controller doesn’t work reliably, try<br />
replacing both batteries.<br />
• Don’t mix new and old batteries, or different types of<br />
batteries.<br />
• If you intend not to use the remote controller for a long<br />
time, remove the batteries to prevent possible leakage<br />
and corrosion.<br />
• Flat batteries should be removed as soon as possible to<br />
prevent possible leakage and corrosion.<br />
11
Front & Rear Panels<br />
For detailed information, refer to the pages in brackets.<br />
Front Panel<br />
<br />
<br />
<br />
<br />
<br />
STANDBY/ON button [28]<br />
This button is used to set the DVD receiver to On or<br />
Standby.<br />
STANDBY indicator [28]<br />
This indicator lights up when the DVD receiver is in<br />
Standby.<br />
INPUT selector [31] and indicator<br />
This selector is used to select from the following<br />
input sources: DVD, VIDEO 1, VIDEO 2/DOCK,<br />
FM, AM.<br />
Disc tray [33]<br />
Discs are loaded here.<br />
(open/close) button [33]<br />
This button is used to open and close the disc tray.<br />
The input source is automatically set to DVD.<br />
(stop) button [34]<br />
This button is used to stop playback.<br />
(play) button [33]<br />
This button is used to start playback.<br />
The input source is automatically set to DVD.<br />
MASTER VOLUME control [31] and indicator<br />
This control is used to adjust the volume of the<br />
DVD receiver to Min, 1 through 79, Max.<br />
PHONES jack [31]<br />
This 1/4-inch phone jack is for connecting a standard<br />
pair of stereo headphones for private listening.<br />
PURE AUDIO indicator [42]<br />
This indicator lights up when the Pure Audio listening<br />
mode is selected.<br />
PURE AUDIO button [42]<br />
Selects the Pure Audio listening mode.<br />
HDMI button [30]<br />
This button is used to turn HDMI on or off.<br />
HDMI indicator [30]<br />
This indicator lights up when a HDMI signal is<br />
being output.<br />
Remote control sensor [11]<br />
This sensor receives control signals from the remote<br />
controller.<br />
Previous/Next / buttons or TUNING/<br />
PRESET / buttons [34, 39]<br />
The Previous [ ] button is used to select the previous<br />
chapter or track. During playback it selects<br />
the beginning of the current track.<br />
The Next [ ] button is used to select the next<br />
chapter or track.<br />
When the AM or FM input source is selected, these<br />
buttons are used to tune the tuner, or select radio<br />
presets.<br />
(pause) button or PRESET/MEMORY<br />
button [33, 35, 40]<br />
This button is used to pause playback. While playback<br />
is paused, pressing this button moves the video<br />
forward one frame at a time.<br />
When the AM or FM input source is selected, this<br />
button is used to store the radio presets.<br />
12
Front & Rear Panels—Continued<br />
Display<br />
<br />
<br />
MUTING indicator<br />
This indicator flashes while the DVD receiver is<br />
muted.<br />
Tuning indicators<br />
AUTO: This indicator lights up when the Auto Tuning<br />
mode is selected, and disappears when the Manual<br />
Tuning mode is selected.<br />
: This indicator lights up when the DVD<br />
receiver is tuned into a radio station.<br />
FM ST: This indicator lights up when the DVD<br />
receiver is tuned to a stereo FM station.<br />
RDS (European model only): This indicator<br />
lights up when the DVD receiver is tuned to a radio<br />
station that supports RDS (Radio Data System).<br />
Listening mode & format indicators<br />
These indicators show the currently selected listening<br />
mode and the format of the playing disc.<br />
Playback mode indicators<br />
MEM: Lights up when memory playback is<br />
selected.<br />
RDM: Lights up when random playback is selected.<br />
REPEAT: Lights up when repeat playback is<br />
selected for all the tracks.<br />
REPEAT 1: Lights up when repeat playback is<br />
selected for a track.<br />
Disc type indicators<br />
These indicators show the type of disc loaded.<br />
Data type indicators<br />
These indicators show the type of data loaded.<br />
Disc operation indicators<br />
These indicators show the status of disc playback.<br />
DIGITAL indicator<br />
This indicator lights up when the digital audio signal<br />
input is used.<br />
ANALOG indicator<br />
This indicator lights up when the analog audio signal<br />
input is used.<br />
Camera angle indicator<br />
This indicator appears if the DVD-Video disc being<br />
played features multiple camera angles.<br />
SLEEP indicator<br />
This indicator lights up when the Sleep function has<br />
been set.<br />
GROUP indicator<br />
While stopped, the total number of groups on the current<br />
DVD-Audio disc is displayed here. During playback,<br />
the number of the current group is displayed.<br />
TITLE indicator<br />
During playback, the number of the current title is<br />
displayed.<br />
Message & time area<br />
Time information, such as total time, remaining<br />
time, and so on, is displayed here in hours, minutes,<br />
and seconds. Other messages are also displayed.<br />
CHP indicator<br />
This indicator appears while the number of the current<br />
chapter is being displayed.<br />
TRACK indicator<br />
This indicator appears while track numbers are<br />
being displayed. While stopped, the total number of<br />
tracks on the current SACD or audio CD are displayed.<br />
During playback, the number of the current<br />
track is displayed.<br />
PRGSV indicator<br />
This indicator appears when progressive video is<br />
being output by the component video output.<br />
TOTAL indicator<br />
This indicator appears while the total number or<br />
total time is being displayed.<br />
REMAIN indicator<br />
This indicator appears while the remaining time is<br />
being displayed.<br />
13
Front & Rear Panels—Continued<br />
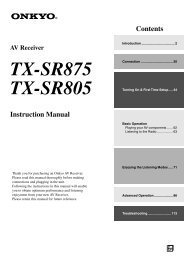
Rear Panel<br />
<br />
14<br />
SPEAKERS [18]<br />
These terminal posts are for connecting your front<br />
speakers.<br />
HDMI IN/OUT [27]<br />
HDMI (High Definition Multimedia Interface) connections<br />
carry digital audio and digital video.<br />
The HDMI input is for connecting components with<br />
HDMI outputs. The HDMI output is for connecting<br />
a TV or projector with an HDMI input.<br />
COMPONENT VIDEO OUTPUT [24]<br />
These jacks output component video and can be<br />
connected to an component video input on a TV or<br />
projector.<br />
VIDEO OUTPUT [23]<br />
This RCA connector can be used to connect a TV or<br />
projector with a composite video input.<br />
FM ANTENNA [19]<br />
This jack is for connecting an FM antenna.<br />
AM ANTENNA [19]<br />
These push terminals are for connecting an AM<br />
antenna.<br />
AV CONNECTOR (European model only) [24]<br />
This SCART output can be connected to a TV or<br />
projector with a SCART input. This SCART connector<br />
outputs 2-channel stereo audio, composite<br />
video, and RGB video.<br />
SPEAKER IMPEDANCE SELECTOR [18]<br />
This selector is used to select impedances of your<br />
speakers.<br />
If the impedance of any of front speakers is 4 ohms<br />
or more but less than 6, set the speaker impedance<br />
to “4~16”.<br />
OPTICAL DIGITAL AUDIO IN [26]<br />
This optical digital audio input can be connected to<br />
an optical digital audio output on a DVD recorder,<br />
or game console.<br />
This input is assigned for VIDEO 1 INPUT in<br />
default.<br />
<br />
<br />
If you output audio from this input during<br />
VIDEO 2/DOCK INPUT is selected, you must<br />
change the “Video2 Input” setting to “OPT” from<br />
“Coax” (page 55).<br />
COAXIAL DIGITAL AUDIO IN [26]<br />
This coaxial digital audio input can be connected to<br />
a coaxial digital audio output on a DVD recorder or<br />
game console.<br />
This input is assigned for VIDEO 2/DOCK INPUT<br />
in default.<br />
If you output audio from this input during VIDEO 1<br />
INPUT is selected, you must change the “Video1<br />
Input” setting to “Coax” from “OPT” (page 55).<br />
REMOTE CONTROL [26]<br />
This (Remote Interactive) jack can be connected<br />
to an jack on <strong>Onkyo</strong> RI Dock. The DVD<br />
receiver remote controller can then be used to control<br />
the RI Dock. To use , you must make an<br />
analog audio connection (RCA) between the DVD<br />
receiver and the RI Dock, even if they are connected<br />
digitally.<br />
VIDEO 1 INPUT [25]<br />
Here you can connect other video equipment. Input<br />
jacks include composite video and analog audio<br />
input.<br />
VIDEO 2/DOCK INPUT [26]<br />
Here you can connect <strong>Onkyo</strong> RI DOCK or other<br />
video equipment. Input jacks include composite<br />
video and analog audio input.<br />
SUBWOOFER PRE OUT [18]<br />
A powered subwoofer can be connected here.<br />
AC INLET [28]<br />
The supplied power cord is connected here. The<br />
other of the power cord should be connected to a<br />
suitable wall outlet.
Front & Rear Panels—Continued<br />
Remote Controller<br />
<br />
<br />
<br />
<br />
<br />
<br />
<br />
<br />
<br />
<br />
<br />
<br />
<br />
<br />
<br />
<br />
<br />
<br />
<br />
<br />
<br />
STANDBY/ON button* [28]<br />
This button is used to set the DVD receiver to<br />
Standby or turn on.<br />
Don’t turn on the DVD receiver until you’ve completed,<br />
and double checked all connections<br />
(pages 23–27).<br />
Number buttons* [44, 45, 66]<br />
These buttons are used to enter title, chapter, and<br />
track numbers and to enter times for locating specific<br />
points in time.<br />
CLR button [40, 44, 45, 49]<br />
This button is used to cancel various functions.<br />
TV Control buttons [53]<br />
These buttons are used to control a TV. You must<br />
enter the appropriate remote control code first.<br />
Disc and DVD receiver menu buttons<br />
TOP MENU button* [36, 38]<br />
With DVD discs, this button displays the main<br />
menu. With a JPEG disc, it displays thumbnails of<br />
the images. With a Video CD, it turns PBC on or<br />
off.<br />
MENU button* [36, 38]<br />
This button is used to display a menu on a DVD or<br />
to open the Disc Navigator when using a JPEG disc.<br />
Cursor / / / buttons* [36, 55, 59]<br />
These buttons are used to navigate menus.<br />
ENTER button* [36, 55, 59]<br />
This button is used to start playback of the selected<br />
title, chapter, or track, and to confirm settings.<br />
SETUP button [55, 59]<br />
This button is used to open and close the setup<br />
menus.<br />
RETURN button [55]<br />
This button is used to return to the previous display<br />
when changing settings.<br />
15
Front & Rear Panels—Continued<br />
Basic Playback buttons*<br />
Pause button [33, 35]<br />
This button is used to pause playback. While playback<br />
is paused, pressing this button moves the video<br />
forward one frame at a time.<br />
Play button [33]<br />
This button is used to start playback.<br />
Stop button [34]<br />
This button is used to stop playback.<br />
Fast Reverse/Fast Forward / buttons<br />
[35]<br />
These buttons are used for fast reverse and fast forward.<br />
Previous/Next / buttons [34]<br />
The Previous [ ] button is used to select the previous<br />
chapter or track. During playback it selects<br />
the beginning of the current track.<br />
The Next [ ] button is used to select the next<br />
chapter or track.<br />
Advanced Playback buttons<br />
AUDIO button [51]<br />
This button is used to select foreign language<br />
soundtracks and audio formats (e.g., Dolby Digital<br />
or DTS) on DVD-Video discs.<br />
SUBTITLE button [51]<br />
This button is used to select subtitles on<br />
DVD-Video discs.<br />
ANGLE button [50]<br />
This button is used to select camera angles on<br />
DVD-Video discs.<br />
RANDOM button* [47]<br />
This button is used with the Random function.<br />
REPEAT button* [46]<br />
This button is used to set the Repeat function.<br />
A-B button [46]<br />
This button is used to set the A-B Repeat function.<br />
DISPLAY button [52]<br />
This button is used to display information about the<br />
disc or the current input source. Press it repeatedly<br />
to display more information.<br />
ASPECT/ZOOM button [50, 60]<br />
This button is used to change the view mode. Pressing<br />
and holding it for a few seconds selects Zoom<br />
mode.<br />
RESOLUTION button [30]<br />
This button is used to select a video resolution for<br />
the HDMI OUT.<br />
SLEEP button [32]<br />
This button is used with the Sleep function.<br />
INPUT / button [31]<br />
This button is used to select the input sources.<br />
SEARCH button [40, 44, 45]<br />
This button is used to search for titles, chapters,<br />
groups, folders, tracks, and specific points in time.<br />
When the AM or FM input source is selected, you<br />
can tune into AM and FM stations directly by entering<br />
the appropriate frequency.<br />
MEMORY button [48]<br />
This button is used with the Memory function.<br />
When the AM or FM input source is selected, this<br />
button is used to store the radio presets.<br />
LAST MEMORY button [49]<br />
This button is used with the Last Memory function<br />
for DVD playback.<br />
MUTING button [32]<br />
This button is used to mute or unmute the DVD<br />
receiver.<br />
VOL / button [31]<br />
This button is used to adjust the volume of the DVD<br />
receiver.<br />
Tuner buttons<br />
TUNING / button [39]<br />
When the AM or FM input source is selected, the<br />
TUNING [ ]/[ ] buttons are used to tune the tuner.<br />
PRESET / buttons [40]<br />
When the AM or FM input source is selected, the<br />
PRESET [ ]/[ ] buttons are used to select radio<br />
presets.<br />
MODE button* [39]<br />
This button is used to select the Auto or Manual<br />
tuning mode.<br />
SUBWOOFER LEVEL button [32]<br />
This button is used to access the Subwoofer Level<br />
menu.<br />
Use the Left and Right [ ]/[ ] buttons to adjust the<br />
volume.<br />
LISTENING MODE button [42]<br />
This button is used to select the listening modes.<br />
* For buttons to control an Apple iPod in RI Dock with<br />
an RI connection, see page 54.<br />
16
Connecting the DVD receiver<br />
Placing the Speakers<br />
Front Left and Right Speakers<br />
• Place the front left and right speakers symmetrically<br />
and so that the distance from the listening position is<br />
the same.<br />
• When placing speakers, direct the speakers toward the<br />
position of the listener’s ears where the listener sits to<br />
enjoy music or movies.<br />
• Place the two speakers so that the heights of the two<br />
speakers are aligned. The ideal height for the speakers<br />
is the height of the listener’s ears.<br />
FL: Front left speaker<br />
FR: Front right speaker<br />
Subwoofer<br />
FL<br />
TV or screen<br />
FR<br />
Using a subwoofer greatly improves the volume level<br />
and sound quality of bass sounds. The subwoofer<br />
effect depends not only on the listening position but<br />
also on the shape of the listening room.<br />
• In general, place the subwoofer in a corner of the room<br />
or at a point 1/3 the width of the room.<br />
• Play a movie or music that contains high quality bass<br />
sounds to determine the subwoofer placement.<br />
Change the subwoofer’s position and check the effect,<br />
then select the position where the bass sounds are best<br />
heard.<br />
Connecting Your Speakers<br />
Speaker Connection Precautions<br />
Read the following before connecting your speakers:<br />
• You can connect speakers with an impedance of<br />
between 4 and 16 ohms. If the impedance of any of the<br />
connected speakers is 4 ohms or more, but less than 6<br />
ohms, be sure to set the speaker impedance to<br />
“4~16” (see page 18). If you use speakers with a<br />
lower impedance, and use the DVD receiver at high<br />
volume levels for a long period of time, the built-in<br />
protection circuit may be activated.<br />
• Disconnect the power cord from the wall outlet before<br />
making any connections.<br />
• Read the instructions supplied with your speakers.<br />
• Pay close attention to speaker wiring polarity. In other<br />
words, connect positive (+) terminals only to positive<br />
(+) terminals, and negative (–) terminals only to negative<br />
(–) terminals. If you get them the wrong way<br />
around, the sound will be out of phase and will sound<br />
unnatural.<br />
• Unnecessarily long, or very thin speaker cables may<br />
affect the sound quality and should be avoided.<br />
• Be careful not to short the<br />
positive and negative wires.<br />
Doing so may damage the<br />
DVD receiver.<br />
• Make sure the metal core of<br />
the wire does not have contact<br />
with the DVD receiver’s rear<br />
panel. Doing so may damage the DVD receiver.<br />
• Don’t connect more than one cable to each speaker<br />
terminal. Doing so may damage the DVD receiver.<br />
• Don’t connect one speaker to several terminals.<br />
Corner<br />
1/3 room<br />
length<br />
17
LINE INPUT<br />
Connecting the DVD receiver—Continued<br />
Connecting the Speaker Cables<br />
1<br />
Strip about 15 mm of insulation<br />
from the ends of the<br />
15 mm<br />
speaker cables, and twist<br />
the bare wires tightly, as<br />
shown.<br />
2<br />
Unscrew the terminal.<br />
3<br />
Fully insert the bare<br />
wires.<br />
4 Screw the terminal tight.<br />
The following illustration shows which speaker should<br />
be connected to each pair of terminals.<br />
Front right<br />
speaker<br />
Front left<br />
speaker<br />
Speaker Impedance<br />
If the impedance of any of front speakers is 4 ohms or<br />
more but less than 6, set the speaker impedance to<br />
“4~16”.<br />
SPEAKER IMPEDANCE<br />
SELECTOR<br />
Use the SPEAKER IMPEDANCE SELEC-<br />
TOR to select speaker impedance.<br />
4~16:<br />
Select if the impedance of any of speakers is 4<br />
ohms or more but less than 6.<br />
6~16:<br />
Select if the impedances of all speakers are<br />
between 6 and 16 ohms.<br />
Note:<br />
Change of the settings may be required for some speakers<br />
(see page 55).<br />
Connecting a Powered Subwoofer<br />
Using a suitable cable, connect the DVD receiver’s SUB-<br />
WOOFER PRE OUT to an input on your powered subwoofer,<br />
as shown.<br />
Powered<br />
subwoofer<br />
LINE INPUT<br />
18
Connecting the DVD receiver—Continued<br />
Connecting Antenna<br />
This section explains how to connect the supplied indoor<br />
FM antenna and AM loop antenna, and how to connect<br />
commercially available outdoor FM and AM antennas.<br />
The DVD receiver won’t pick up any radio signals without<br />
any antenna connected, so you must connect the<br />
antenna to use the tuner.<br />
Connecting the AM Loop Antenna<br />
The supplied indoor AM loop antenna is for indoor use<br />
only.<br />
1<br />
Assemble the AM loop antenna, inserting<br />
the tabs into the base, as shown.<br />
AM antenna push terminals<br />
FM antenna connector<br />
Connecting the Indoor FM Antenna<br />
The supplied indoor FM antenna is for indoor use only.<br />
1<br />
Attach the FM antenna, as shown.<br />
2<br />
Connect both wires of the AM loop<br />
antenna to the AM antenna push terminals,<br />
as shown.<br />
The antenna connection is polarity sensitive. Connect<br />
the black wire to the ground terminal ( ).<br />
Connect the other wire to the other terminal.<br />
Make sure that the wires are attached securely and<br />
that the push terminals are gripping the bare<br />
wires, not the insulation.<br />
Insert the plug fully<br />
into the jack.<br />
Once your DVD receiver is ready for use, you’ll<br />
need to tune into an FM radio station and adjust<br />
the position of the FM antenna to achieve the best<br />
possible reception.<br />
Push Insert wire Release<br />
2<br />
Use thumbtacks or something similar to<br />
fix the FM antenna into position.<br />
Thumbtacks, etc.<br />
Black<br />
Once your DVD receiver is ready for use, you’ll<br />
need to tune into an AM radio station and adjust<br />
the position of the AM antenna to achieve the best<br />
possible reception.<br />
Keep the antenna as far away as possible from<br />
your DVD receiver, TV, speaker cables, and<br />
power cords.<br />
Caution: Be careful that you don’t injure yourself<br />
when using thumbtacks.<br />
If you cannot achieve good reception with the supplied<br />
indoor AM loop antenna, try using it with a commercially<br />
available outdoor AM antenna (see page 20).<br />
If you cannot achieve good reception with the supplied<br />
indoor FM antenna, try a commercially available outdoor<br />
FM antenna instead (see page 20).<br />
19
Connecting the DVD receiver—Continued<br />
Connecting an Outdoor FM Antenna<br />
If you cannot achieve good reception with the supplied<br />
indoor FM antenna, try a commercially available outdoor<br />
FM antenna instead.<br />
Connecting an Outdoor AM Antenna<br />
If good reception cannot be achieved using the supplied<br />
AM loop antenna, an outdoor AM antenna can be used<br />
in addition to the loop antenna, as shown.<br />
Outdoor antenna<br />
Insulated antenna cable<br />
AM loop antenna<br />
Black<br />
Notes:<br />
• Outdoor FM antennas work best outside, but usable<br />
results can sometimes be obtained when installed in an<br />
attic or loft.<br />
• For best results, install the outdoor FM antenna well<br />
away from tall buildings, preferably with a clear line<br />
of sight to your local FM transmitter.<br />
• Outdoor antenna should be located away from possible<br />
noise sources, such as neon signs, busy roads, etc.<br />
• For safety reasons, outdoor antenna should be situated<br />
well away from power lines and other high-voltage<br />
equipment.<br />
• Outdoor antenna must be grounded in accordance<br />
with local regulations to prevent electrical shock hazards.<br />
White<br />
Outdoor AM antennas work best when installed outside<br />
horizontally, but good results can sometimes be obtained<br />
indoors by mounting horizontally above a window. Note<br />
that the AM loop antenna should be left connected.<br />
Outdoor antenna must be grounded in accordance with<br />
local regulations to prevent electrical shock hazards.<br />
■ Using a TV/FM Antenna Splitter<br />
It’s best not to use the same antenna for both FM and TV<br />
reception, as this can cause interference problems. If circumstances<br />
demand it, use a TV/FM antenna splitter, as<br />
shown.<br />
TV/FM antenna splitter<br />
To DVD receiver<br />
To TV (or VCR)<br />
20
Connecting the DVD receiver—Continued<br />
AV Cables & Connectors<br />
Video<br />
HDMI<br />
Component<br />
video<br />
Composite<br />
video<br />
(supplied)<br />
Scart<br />
(European<br />
model only)<br />
Y<br />
PB<br />
Cable Jack Description<br />
/<br />
CB<br />
PB<br />
Y<br />
CB<br />
P R / CR<br />
PR / CR<br />
/<br />
HDMI connections can carry uncompressed, standard<br />
or high definition digital video and digital<br />
audio, for the best picture and sound quality.<br />
Component video separates the luminance (Y) and<br />
color difference signals (PR, PB), providing the best<br />
picture quality. Some TV manufacturers label their<br />
component video inputs differently.<br />
Composite video can be found on virtually all TVs,<br />
VCRs, and video equipment.<br />
SCART connections carry analog audio and video<br />
(composite, RGB) all in one cable.<br />
Audio<br />
Optical digital<br />
Coaxial digital<br />
Cable Jack Description<br />
OPTICAL<br />
Optical digital audio connections provide better<br />
audio quality than analog connections.<br />
Coaxial digital audio connections provide better<br />
audio quality than analog connections.<br />
Analog<br />
RCA analog audio connectors can be found on virtually<br />
all AV components.<br />
21
Connecting the DVD receiver—Continued<br />
Video Output/Video Setting Matrix<br />
The following matrix shows how the video outputs work in relation to the various video settings.<br />
✓: Output<br />
Setting<br />
*1 No picture will be output from other than HDMI when you connect the TV that the native resolution is “720p” or “1080i”.<br />
*2 If your TV doesn’t support progressive scanning, you’ll get no picture.<br />
*3 If your TV doesn’t support the “HD Resolution” settings of “720p” and “1080i”, you’ll get no picture.<br />
*4 With the “SCART Output Setting”, you can choose “RGB” or composite video for the SCART output. However, when HDMI is<br />
on, you cannot select “RGB”. Also, when “RGB” is selected, nothing will be output by the component video output (see page 62).<br />
Video input signals flow through the DVD receiver as shown.<br />
HDMI input pass through HDMI output signals as it is.<br />
HDMI Output Setting (page 29, 30)<br />
On (default)<br />
Off<br />
HD Resolution (page 30) Progressive Setting (page 30)<br />
Video output<br />
480p / 576p<br />
Auto<br />
(default)<br />
720p, 1080i Progressive Interlace<br />
HDMI ✓ ✓ ✓ *3 No output No output<br />
Component ✓ *1 ✓ *2 No output ✓ *2 ✓<br />
Composite ✓ *1 ✓ No output ✓ ✓<br />
SCART *4 (European<br />
model only)<br />
✓ *1 ✓ No output ✓ ✓<br />
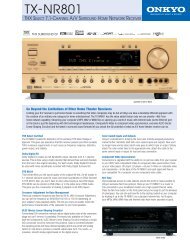
Video Signal Flow Chart<br />
Set top box, VCR, DVD recorder, etc.<br />
VIDEO 1<br />
HDMI Composite<br />
Composite<br />
HDMI IN V IN V IN<br />
VIDEO 2/DOCK<br />
DVD<br />
HDMI OUT<br />
VIDEO OUT<br />
COMPONENT OUT<br />
AV CONNECTOR<br />
HDMI<br />
Composite<br />
Component<br />
SCART<br />
TV, projector, etc.<br />
22
Connecting the DVD receiver—Continued<br />
Before Making Any Connections<br />
• Read the manuals supplied with your AV components.<br />
• Don’t connect the power cord until you’ve completed<br />
all audio and video connections.<br />
RCA AV Connection Color Coding<br />
RCA AV connections are usually color coded: red,<br />
white, and yellow. Use red plugs to connect right-channel<br />
audio inputs and outputs (typically labeled “R”). Use<br />
white plugs to connect left-channel audio inputs and outputs<br />
(typically labeled “L”). And use yellow plugs to<br />
connect composite video inputs and outputs.<br />
Analog audio<br />
Right (red)<br />
Right (red)<br />
Left (white)<br />
Left (white)<br />
Composite video (Supplied)<br />
(Yellow)<br />
(Yellow)<br />
• Push each plug in all the way to<br />
make a good connection (loose<br />
connections can cause noise or<br />
malfunctions).<br />
• To prevent interference, keep<br />
audio and video cables away from<br />
power cords and speaker cables.<br />
Optical Digital Jacks<br />
Right!<br />
Wrong!<br />
The DVD receiver’s optical digital connectors have a<br />
shutter-type cover that opens when an optical plug is<br />
inserted, and closes when it’s removed. Push the plug in<br />
all the way.<br />
Caution: To prevent shutter damage, hold the optical<br />
plug straight when inserting and removing.<br />
Basic Setup<br />
The setup described here is a basic setup that allows you to play discs using just the cables supplied with the receiver.<br />
TV<br />
Video cable<br />
(Supplied)<br />
VIDEO IN<br />
To power outlet<br />
Power cord<br />
(Supplied)<br />
This receiver is equipped with copy protection technology.<br />
Do not connect this receiver to your TV via a<br />
VCR using Video cable, as the picture from this<br />
receiver will not appear properly on your TV. (This<br />
receiver may also not be compatible with some combination<br />
TV/VCRs for the same reason; refer to the<br />
manufacturer for more information.)<br />
1. Connect the VIDEO OUTPUT jack to the composite<br />
video input on your TV.<br />
Use the supplied Video cable (RCA), connecting the<br />
yellow plug to the video output.<br />
See the following page if you want to use other cable<br />
for the video connection.<br />
2. Connect the supplied AC power cord to the AC<br />
INLET, then plug into a power outlet.<br />
23
Connecting the DVD receiver—Continued<br />
Connecting Your TV<br />
(video connection)<br />
• Connect the DVD receiver directly to your TV. If you<br />
connect the DVD receiver through a VCR, TV/VCR<br />
combination, or video selector, the picture may be distorted<br />
because DVD-Video discs are usually copy protected.<br />
Using SCART (European model only)<br />
If your TV has a SCART-type AV input, you can use a<br />
SCART cable to connect this receiver to your TV. This<br />
type of connection carries both the sound and the picture.<br />
• Use a SCART cable (not supplied) to connect the AV<br />
CONNECTOR to an AV input on your TV.<br />
Using Component Video<br />
You can use the component video output instead of the<br />
standard video out jack to connect this receiver to your<br />
TV (or other equipment).<br />
This will provide better quality picture than composite<br />
video.<br />
This jack cannot output the signal from composite<br />
video input.<br />
• Use a component video cable (not supplied) to connect<br />
the COMPONENT VIDEO OUTPUT jacks to a<br />
component video input on your TV (or monitor).<br />
If you connect the component video output to a TV or<br />
another component that doesn’t support progressive<br />
scanning, be sure to turn off HDMI (see page 30).<br />
You can set the component video output to Progressive<br />
or Interlaced (see page 30).<br />
TV<br />
SCART<br />
This connector can output composite video, or RGB<br />
video. The default setting is composite, which should<br />
work with all TVs. Consult the manual that came with<br />
your TV to see if you can use one of the higher quality<br />
settings. See page 62 for how to change the video output.<br />
COMPONENT<br />
VIDEO IN<br />
TV<br />
Y PB PR<br />
Compatibility of this unit with progressive-scan TVs.<br />
This receiver is compatible with progressive video<br />
Macro Vision System Copy Guard.<br />
CONSUMERS SHOULD NOTE THAT NOT ALL<br />
HIGH DEFINITION TELEVISION SETS ARE<br />
FULLY COMPATIBLE WITH THIS PRODUCT<br />
AND MAY CAUSE ARTIFACTS TO BE DIS-<br />
PLAYED IN THE PICTURE. IN CASE OF 525 OR<br />
625 PROGRESSIVE SCAN PICTURE PROBLEMS,<br />
IT IS RECOMMENDED THAT THE USER<br />
SWITCH THE CONNECTION TO THE “STAN-<br />
DARD DEFINITION” OUTPUT. IF THERE ARE<br />
QUESTIONS REGARDING OUR TV SET COM-<br />
PATIBILITY WITH THIS MODEL 525p AND 625p<br />
DVD RECEIVER, PLEASE CONTACT OUR CUS-<br />
TOMER SERVICE CENTER.<br />
24
Connecting the DVD receiver—Continued<br />
Connecting Other AV Component<br />
You can use an AV cable to connect VIDEO 1 INPUT L/R or V jack to your AV component such as a set top box, VCR,<br />
and DVD recorder.<br />
Connect your AV component’s analog audio and Video output jack to the DVD receiver’s VIDEO 1 INPUT L/R or V<br />
jack.<br />
VIDEO<br />
OUT<br />
AUDIO<br />
OUT<br />
L<br />
R<br />
Set top box,<br />
VCR, DVD<br />
Recorder<br />
Note:<br />
You can also use optical/coaxial digital cable instead of the audio cable (see page 26).<br />
25
Connecting the DVD receiver—Continued<br />
Connecting an RI Dock<br />
■ iPod with video or RI Dock with the OSD mode<br />
Connect your RI Dock’s analog audio output jacks<br />
and Video output jack to the DVD receiver’s<br />
VIDEO 2/DOCK INPUT L/R jacks and V jack.<br />
Connect the RI Dock with an cable. (<strong>Onkyo</strong><br />
DS-A1X/A2/A2X hookup shown below.)<br />
■ iPod without video<br />
Connect your RI Dock’s analog audio output jacks to<br />
the DVD receiver’s VIDEO 2/DOCK INPUT jacks.<br />
Connect the RI Dock with an cable. (<strong>Onkyo</strong><br />
DS-A1 hookup shown below.)<br />
Notes:<br />
• Set the RI Dock’s RI MODE switch to HDD or HDD/DOCK.<br />
• Press the INPUT [ ]/[ ] buttons to select “VIDEO2/DOCK”.<br />
• Refer to the RI Dock’s instruction manual.<br />
Digital Audio Connection<br />
You can use optical/coaxial digital cable instead of the audio cable when connecting with other AV components.<br />
Connect your AV component’s digital audio output jack to corresponding COAXIAL or OPTICAL DIGITAL AUDIO<br />
IN jack of the DVD receiver.<br />
You must assign that jack to an input (see page 57).<br />
Notes:<br />
Set top box,<br />
VCR, DVD<br />
Recorder<br />
OPTICAL<br />
COAXIAL<br />
Connect one<br />
or the other<br />
VIDEO<br />
OUT<br />
• Optical digital audio input is assigned for VIDEO 1<br />
INPUT in default.<br />
If you output audio from this input during VIDEO 2/<br />
DOCK INPUT is selected, you must change the<br />
“Video2 Input” setting to “OPT” from “Coax”.<br />
• Coaxial digital audio input is assigned for VIDEO 2/<br />
DOCK INPUT in default.<br />
If you output audio from this input during VIDEO 1<br />
INPUT is selected, you must change the “Video1<br />
Input” setting to “Coax” from “OPT”.<br />
26
Connecting the DVD receiver—Continued<br />
Connecting your HDTV or AV<br />
component with an HDMI connection<br />
This section shows how to connect the DVD receiver to<br />
an HDTV, projector, or game console that has an HDMI<br />
input/output socket.<br />
What is HDMI?<br />
HDMI (High Definition Multimedia Interface) is a new<br />
connection format that can carry uncompressed, standard<br />
or high definition digital video and digital audio.<br />
Until now, several separate video and audio cables have<br />
been required to connect AV components together. With<br />
HDMI, a single cable is all that’s necessary to achieve<br />
the best picture quality.<br />
HDMI video is compatible with DVI (Digital Visual<br />
Interface). To send HDMI video to a DVI input requires<br />
an HDMI-to-DVI cable. The DVD receiver supports<br />
HDCP (High-bandwidth Digital Content Protection),<br />
and for an HDMI-to-DVI connection to work, the other<br />
component must also support it. Note that this may not<br />
work with some DVI components.<br />
Using HDMI<br />
Use the HDMI cable (not supplied) to connect the DVD<br />
receiver’s HDMI OUT to an HDMI input on your TV.<br />
In the same manner, connect the DVD receiver’s HDMI<br />
IN to an HDMI OUT on the game console, etc.<br />
HDTV,<br />
projector<br />
HDMI<br />
IN<br />
HDMI<br />
IN<br />
HDMI cable<br />
(not supplied)<br />
HDMI cable<br />
(not supplied)<br />
HDMI<br />
HDMI<br />
Notes:<br />
• The DVD receiver supports HDCP (High-bandwidth<br />
Digital Content Protection), a protection system for<br />
digital video. HDMI components that you connect to<br />
the DVD receiver must also support HDCP.<br />
• The DVD receiver supports High-Definition Multimedia<br />
Interface Specification Information Version 1.0.<br />
HDMI & the DVD receiver<br />
■ Video<br />
The DVD receiver’s HDMI OUT supports the following<br />
video resolutions:<br />
• 720 x 480p (progressive), 60 Hz<br />
• 720 x 576p (progressive), 50 Hz<br />
• 1280 x 720p (progressive), 50/60 Hz<br />
• 1920 x 1080i (interlaced), 50/60 Hz<br />
If the connected HDTV or projector doesn’t support a<br />
resolution, you may get no picture.<br />
On the DVD receiver, you can select a resolution suitable<br />
for use with the connected HDTV or projector (see<br />
page 30).<br />
■ Audio Formats<br />
The DVD receiver’s HDMI OUT supports the following<br />
audio formats:<br />
• PCM (96 kHz, 48 kHz, 44.1 kHz)<br />
• Dolby Digital<br />
• DTS<br />
Notes:<br />
• If your HDMI-compatible TV or projector doesn’t<br />
support Dolby Digital and DTS, the HDMI OUT will<br />
not output digital audio in that format. In this case, set<br />
the “Digital/HDMI Audio Out” setting to “PCM” (see<br />
page 62).<br />
• If your TV doesn’t support digital audio at high sampling<br />
rates, set the “Linear PCM Out” setting to<br />
“Down Sample On”, so that it’s down sampled to<br />
below 48 kHz (see page 62).<br />
• Note that audio from SACD discs or audio from the<br />
multi channel area of a DVD-Audio discs is not output<br />
by the HDMI OUT.<br />
• The audio signal input from HDMI IN is not output<br />
from the speakers connected to the DVD receiver but<br />
only from the TV.<br />
With some TVs and input signals, no sound may be<br />
output. In these cases, set the connected device’s output<br />
to PCM.<br />
• Audio and video inputs from VIDEO 1 INPUT or<br />
VIDEO 2/DOCK INPUT are not be output from<br />
HDMI OUT.<br />
Game Console, etc.<br />
27
Connecting the Power/Turning on the DVD receiver<br />
Before connecting<br />
• Make sure that all the connections on pages 17–27 are<br />
complete (the connection to a TV is required).<br />
STANDBY/ON<br />
STANDBY indicator<br />
• Before unplugging the receiver from<br />
the power outlet, make sure you first<br />
switch it into standby.<br />
• For the above reasons, do not plug this<br />
receiver into a switched power supply<br />
found on some amplifiers and AV<br />
receivers.<br />
STANDBY/ON<br />
2<br />
DVD receiver<br />
Remote<br />
controller<br />
To a wall outlet<br />
Press [STANDBY/ON] button on<br />
the DVD receiver or the remote<br />
controller.<br />
Turn on your TV and select the<br />
input through which the DVD<br />
receiver is connected.<br />
The DVD receiver turns on and the<br />
STANDBY indicator turns off.<br />
• To put the DVD receiver in the standby<br />
mode, press [STANDBY/ON] on the<br />
DVD receiver, or [STANDBY/ON] on<br />
the remote controller.<br />
• While the STANDBY indicator lights<br />
up, the DVD receiver can receive signals<br />
from the remote controller.<br />
• Setting the [STANDBY/ON] button to<br />
standby does not shut off the power<br />
completely.<br />
1<br />
Plug the supplied power cord into<br />
the AC INLET and then into the<br />
power outlet on the wall.<br />
• Do not use a power cord other than the<br />
one supplied with the DVD receiver.<br />
The power cord supplied is designed<br />
for use with the DVD receiver and<br />
should not be used with any other<br />
device.<br />
• Never have the power cord disconnected<br />
from the DVD receiver while<br />
the other end is plugged into the wall<br />
outlet. Doing so may cause an electric<br />
shock. Always connect by plugging<br />
into the wall outlet last and disconnect<br />
by unplugging from the wall outlet<br />
first.<br />
Note:<br />
DVD receiver features a screen saver and an auto power<br />
off function. If the receiver is stopped and no button is<br />
pressed for 15 minutes, the screen saver starts (see<br />
page 65).<br />
28
Initial Setup<br />
This chapter explains the settings you need to make the<br />
very first time the DVD receiver is turned on.<br />
Basically this manual contains procedures using the<br />
remote controller.<br />
ENTER<br />
/ / /<br />
Here you need to make a few settings to get the DVD<br />
receiver up and running. You can change these settings<br />
later (see page 59).<br />
1<br />
Use the Up and Down [ ]/[ ]<br />
buttons to select “TV Shape”,<br />
and then press [ENTER].<br />
Select “4:3 Letter box” or “4:3 Pan<br />
Scan” if you have a 4:3 TV. Select<br />
“16:9 Widescreen” or “16:9 Compressed”<br />
if you have a widescreen TV.<br />
See page 60 for more information.<br />
Initial Setup<br />
TV Shape<br />
HDMI Output Setting<br />
On-Screen Language<br />
✔ 4:3 Letter box<br />
4:3 Pan Scan<br />
16:9 Widescreen<br />
16:9 Compressed<br />
The “HDMI Output Setting” menu<br />
appears next.<br />
First Time Setup<br />
The very first time you turn on the DVD receiver, the<br />
“Initial Setup” menu appears onscreen.<br />
Initial Setup<br />
TV Shape<br />
HDMI Output Setting<br />
On-Screen Language<br />
✔ 4:3 Letter box<br />
4:3 Pan Scan<br />
16:9 Widescreen<br />
16:9 Compressed<br />
2<br />
Use the Up and Down [ ]/[ ]<br />
buttons to select “On” or “Off”<br />
for “HDMI Output Setting”, and<br />
then press [ENTER].<br />
Select “On” to use the HDMI output.<br />
Initial Setup<br />
TV Shape<br />
HDMI Output Setting<br />
On-Screen Language<br />
: 4:3 Letter box<br />
✔ On<br />
Off<br />
The “On-Screen Language” menu<br />
appears next.<br />
3<br />
Use the Up and Down [ ]/[ ]<br />
buttons to select a language, and<br />
then press [ENTER].<br />
See page 63 for more information on<br />
the language options.<br />
TV Shape<br />
HDMI Output Setting<br />
On-Screen Language<br />
: 4:3 Letter box<br />
: On<br />
✔ <strong>English</strong><br />
Français<br />
Español<br />
Deutsch<br />
Italiano<br />
The “Initial Setup” menu closes and the<br />
setup is complete.<br />
The DVD receiver is now ready to use.<br />
Note:<br />
You can cancel the “Initial Setup” by pressing the<br />
[SETUP] button and complete the settings later by using<br />
the onscreen setup menus (see page 59).<br />
29
HDMI and Progressive Settings<br />
HDMI<br />
RESOLUTION<br />
Note:<br />
Stop playback before perform these settings.<br />
Setting the HDMI<br />
This section explains how to turn on the HDMI OUT and<br />
change the video resolution when your TV or projector<br />
is connected to the HDMI OUT.<br />
1<br />
2<br />
DVD receiver<br />
Remote controller<br />
Press the DVD receiver’s [HDMI]<br />
button to turn on HDMI.<br />
Press the [RESOLUTION] button<br />
repeatedly to change the HDMI<br />
resolution.<br />
The first button press displays the current<br />
resolution onscreen. Press the button<br />
again while the resolution is<br />
displayed to change the setting.<br />
The DVD receiver supports the following resolutions:<br />
AUTO:<br />
The resolution is automatically set to the native resolution<br />
of the TV connected to the HDMI OUT.<br />
If the DVD receiver does not support the TV’s native resolution<br />
setting, the resolution 480p/576p will be used.<br />
480p (480p / 576p) (default):<br />
The setting displayed depends on the country in which<br />
you purchased the DVD receiver.<br />
720 480p 60Hz or 720 576p 50Hz<br />
Also output by the DVD receiver’s analog video outputs.<br />
With this setting, component video output will be progressive.<br />
720p:<br />
1280 720p 50/60Hz<br />
Not output by the DVD receiver’s analog video outputs.<br />
1080i:<br />
1920 1080i 50/60Hz<br />
Not output by the DVD receiver’s analog video outputs.<br />
Tip:<br />
These settings can also be changed by using the onscreen<br />
setup menus (see pages 60, 61).<br />
Note:<br />
Be sure to choose a resolution that’s supported by your<br />
TV. If you select a resolution that your TV doesn’t support,<br />
there will be no picture.<br />
Selecting Progressive or Interlaced<br />
If your TV supports progressive video, you can set the<br />
DVD receiver to progressive and enjoy progressive<br />
video on your TV. If your TV doesn’t support progressive<br />
video, set the DVD receiver to interlaced.<br />
When HDMI output is at 480p/576p, the component<br />
video output is fixed at progressive and depending on the<br />
selected resolution there may be no output, so turn off<br />
the HDMI OUT before changing this setting.<br />
1<br />
2<br />
DVD receiver<br />
Remote controller<br />
Press the DVD receiver’s [HDMI]<br />
button to turn off HDMI.<br />
Use the [RESOLUTION] button to<br />
select “Progressive” or “Interlace”.<br />
The first button press displays the current<br />
setting onscreen. Press the button<br />
again while the setting is displayed to<br />
change the setting.<br />
The PRGSV indicator appears on the<br />
display when progressive is selected.<br />
30
Understanding Common Operations<br />
SLEEP<br />
INPUT<br />
/<br />
INPUT selector<br />
MASTER VOLUME control<br />
MUTING<br />
VOL<br />
/<br />
PHONES<br />
Adjusting the Volume<br />
When reproducing the audio and video signals from<br />
HDMI IN, select “VIDEO 1”.<br />
DVD receiver<br />
or<br />
Remote<br />
controller<br />
Using Headphones<br />
You can connect a pair of stereo headphones (1/4-inch<br />
phone plug) to the DVD receiver’s PHONES jack for private<br />
listening, as shown.<br />
Use the MASTER VOLUME control, or the remote controller’s<br />
VOL [ ]/[ ] button.<br />
The volume can be set to “Min”, “1” through “79”,<br />
“Max”.<br />
Depending on subwoofer level or listening mode, the<br />
maximum volume varies.<br />
Selecting the Input Source<br />
DVD receiver<br />
You can select DVD, FM, AM, or connected other AV<br />
component (set top box, <strong>Onkyo</strong> RI Dock) as the input<br />
source.<br />
Use the DVD receiver’s INPUT selector to select the<br />
input source.<br />
To select the input source with the remote controller,<br />
press the INPUT [ ] or [ ] button repeatedly.<br />
or<br />
Remote<br />
controller<br />
Notes:<br />
• Always turn down the volume before connecting your<br />
headphones.<br />
• The speakers are turned off while the headphones plug<br />
is inserted in the PHONES jack.<br />
• When you connect a pair of headphones, the listening<br />
mode is set to “Stereo”, unless it’s already set to “Stereo”,<br />
“Direct”, or “Pure Audio”.<br />
• Only the Stereo, Direct and Pure Audio listening<br />
modes can be used with headphones (the listening<br />
modes available also depend on the currently selected<br />
input source).<br />
DVD VIDEO 1 VIDEO 2/DOCK<br />
AM<br />
FM<br />
31
Understanding Common Operations—Continued<br />
Muting the DVD receiver<br />
You can temporarily mute the output of the DVD<br />
receiver.<br />
Remote controller<br />
Press the [MUTING] button.<br />
The output is muted and the MUTING<br />
indicator flashes on the display, as<br />
shown.<br />
MUTING<br />
To unmute the DVD receiver, press the<br />
[MUTING] button again, or adjust the<br />
volume.<br />
The Mute function is cancelled when<br />
the DVD receiver is set to Standby.<br />
Adjusting Subwoofer Level<br />
You can adjust the level of Subwoofer during playback.<br />
Remote controller<br />
Press the [SUBWOOFER LEVEL]<br />
button, and then use the Left and<br />
Right [ ]/[ ] buttons to adjust<br />
the volume.<br />
You can adjust the volume of Subwoofer<br />
from –15 dB to +12 dB in 1 dB<br />
steps.<br />
When you’ve finished, press the [SUB-<br />
WOOFER LEVEL] button again.<br />
Using the Sleep Timer<br />
With the sleep timer, you can set the DVD receiver to<br />
turn off automatically after a specified period.<br />
Remote controller<br />
Press the [SLEEP] button repeatedly<br />
to select the required sleep<br />
time.<br />
The sleep time can be set from 90 to 10<br />
minutes in 10 minute steps.<br />
The SLEEP indicator appears on the<br />
display when the sleep timer has been<br />
set. The specified sleep time appears on<br />
the display for about five seconds, then<br />
the previous display reappears.<br />
If you need to cancel the sleep timer, press the [SLEEP]<br />
button repeatedly until the SLEEP indicator disappears.<br />
To check the time remaining until the DVD receiver<br />
sleeps, press the [SLEEP] button. Note that if you press<br />
the [SLEEP] button while the sleep time is being displayed,<br />
you’ll shorten the sleep time by 10 minutes.<br />
32
Playing Discs<br />
This chapter covers basic playback. Advanced playback<br />
functions are covered in the “Advanced Playback” on<br />
page 44.<br />
/<br />
Starting, Pausing & Stopping<br />
Playback<br />
This section explains how to start, pause, and stop playback.<br />
■ Start<br />
DVD receiver<br />
Remote controller<br />
Tip:<br />
If you press the Play [ ] button, the disc<br />
tray will close and, depending on the<br />
type of disc, playback will start automatically.<br />
To start playback, press the Play<br />
[ ] button.<br />
Playback starts and the Play indicator<br />
appears on the display.<br />
If you’re playing a DVD-Video disc, or<br />
a VCD with PBC (Playback Control),<br />
you may need to start playback from a<br />
menu (see page 36).<br />
• For details on playing MP3, WMA,<br />
DivX, or JPEG picture discs, see<br />
pages 37 and 38.<br />
1<br />
DVD receiver<br />
Press Open/Close [ ] to open the<br />
disc tray.<br />
The input source is automatically set to<br />
DVD.<br />
■ Pause<br />
DVD receiver<br />
Remote controller<br />
To pause playback, press the<br />
Pause [ ] button.<br />
Playback pauses and the Pause indicator<br />
appears on the display.<br />
To restart playback, press the Play [ ]<br />
button. Playback restarts and the Pause<br />
indicator disappears.<br />
For DVD-Audio discs, pause cannot be<br />
used while a menu is displayed.<br />
2<br />
Load a disc.<br />
Load a disc with the label side facing up,<br />
using the disc tray guide to align the disc<br />
(if you’re loading a double-sided DVD<br />
disc, load it with the side you want to<br />
play face down).<br />
3<br />
Press Open/Close [ ].<br />
The disc tray closes and the relevant disc<br />
type indicator appears on the display.<br />
Note:<br />
Only load discs that are supported by the DVD receiver.<br />
See pages 8 to 10.<br />
33
Playing Discs—Continued<br />
■ Stop<br />
DVD receiver<br />
Remote controller<br />
To stop playback, press the Stop<br />
[ ] button.<br />
Playback stops and the Play indicator<br />
disappears.<br />
• When you stop playback of a<br />
DVD-Video disc, the DVD receiver<br />
remembers the point at which playback<br />
was stopped and “Resume”<br />
appears onscreen. To resume playback<br />
from that point, press the Play<br />
[ ] button. To cancel the “Resume”<br />
function, press the Stop [ ] button<br />
again. The Resume function is reset<br />
when the disc is removed from the<br />
DVD receiver.<br />
• With the Last Memory function you<br />
can resume playback from any point<br />
even if the disc has been removed<br />
(see page 49).<br />
Notes:<br />
• Prolonged display of the same picture or menu may<br />
cause irreparable damage to your TV screen known as<br />
screen burn-in. To prevent this, don’t keep playback<br />
paused for too long and always press the Stop [ ] button<br />
when you’ve finished playing a DVD disc or VCD.<br />
The DVD receiver features a screen saver to protect<br />
your TV from the effects of burn-in (see page 65).<br />
• With some DVD-Video discs, you may experience<br />
picture noise that is not normally visible with standard<br />
TV broadcasts. This is usually because DVD-Video<br />
uses a lot of high-resolution video data. The amount of<br />
noise, if any, will depend on your particular TV and<br />
the problem can sometimes be alleviated by turning<br />
down the TV’s sharpness control.<br />
Select Next & Previous track/chapter<br />
DVD-V DVD-A SACD VCD CD MP3 WMA DivX<br />
This section explains how to skip to the next and previous<br />
track and chapter.<br />
■ Select<br />
Next<br />
track/<br />
chapter<br />
DVD receiver<br />
Remote controller<br />
■ Select<br />
Previous<br />
track/<br />
chapter<br />
DVD receiver<br />
Remote controller<br />
JPEG<br />
During Playback, press the Next<br />
[ ] button to select next track/<br />
chapter.<br />
The Next track/chapter starts playback.<br />
During Playback, press the Previous<br />
[ ] button to select previous<br />
track/chapter.<br />
The first press selects the beginning of<br />
the current track.<br />
34
Playing Discs—Continued<br />
Forward Frame-by-Frame Playback<br />
DVD-V<br />
VCD<br />
With frame-by-frame playback you can view individual<br />
picture frames one at a time forward.<br />
■ Forward<br />
frame-byframe<br />
Press the Pause [ ] button.<br />
Press it repeatedly to view subsequent<br />
frames.<br />
To resume normal playback, press the<br />
Play [ ] button.<br />
Fast Forward & Reverse<br />
DVD-V DVD-A SACD VCD CD MP3 DivX<br />
This section explains how to fast forward and reverse.<br />
■ Fast<br />
forward<br />
■ Fast<br />
reverse<br />
During playback, press the [ ]<br />
button to start fast forward.<br />
Playback fast forwards and “ x2”<br />
appears onscreen.<br />
To change the fast-forward speed, press<br />
the [ ] button repeatedly to select:<br />
x2, x4, x8, x16.<br />
To resume normal playback, press the<br />
Play [ ] button.<br />
During playback, press the [ ]<br />
button to start fast reverse.<br />
Playback reverses and “ x2” appears<br />
onscreen.<br />
To change the fast-reverse speed, press<br />
the [ ] button repeatedly to select:<br />
x2, x4, x8, x16.<br />
To resume normal playback, press the<br />
Play [ ] button.<br />
Notes:<br />
• Fast forward and fast reverse may not always work at<br />
the speed shown onscreen.<br />
• For discs other than audio CDs, no sound is output<br />
during fast forward or fast reverse.<br />
• For DVD-Audio discs, fast forward and fast reverse<br />
cannot be used while a menu is displayed.<br />
35
Playing Discs—Continued<br />
Number<br />
buttons<br />
TOP MENU<br />
ENTER<br />
MENU<br />
/ / /<br />
• On some DVDs, to display the disc menu, press the<br />
[MENU] button.<br />
• Since the multichannel input source of DVD-Audio is<br />
down mixed, the output will be a processed audio. To<br />
output an original audio, select the 2-channel source.<br />
Some DVD-Audio discs may not be down mixed; in<br />
this case select the 2-channel source.<br />
To set VCD’s PBC on and off<br />
PBC menus can turned on or off by pressing the [TOP<br />
MENU] button.<br />
Navigating CDs & Super Audio CDs<br />
SACD<br />
CD<br />
This section explains how to play audio CDs and Super<br />
Audio CDs with the “Disc Navigator”.<br />
Navigating DVD & VCD Disc Menus<br />
DVD-V<br />
DVD-A<br />
VCD<br />
DVD-Video discs usually have a menu from which you<br />
can select titles, chapters, and other options, including<br />
soundtracks, subtitles, and audio formats (e.g., Dolby<br />
Digital or DTS). VCDs that support PBC (Playback<br />
Control) may also have an onscreen menu.<br />
1<br />
Load a DVD or VCD.<br />
With DVDs, a menu usually appears<br />
when the Play [ ] button is pressed. If<br />
it doesn’t, try pressing the [TOP<br />
MENU] button.<br />
With VCDs that support PBC, you may<br />
have to press the Play [ ] button to display<br />
the menu.<br />
2<br />
On a DVD menu, use the arrow<br />
[ ], [ ], [ ], [ ] buttons to<br />
select an item, and then press<br />
[ENTER].<br />
1<br />
Load an audio CD or Super Audio<br />
CD.<br />
The “Disc Navigator” appears.<br />
CDDA Disc<br />
-/13<br />
/Track01.CDA<br />
001. Track01<br />
002. Track02<br />
003. Track03<br />
004. Track04<br />
005. Track05<br />
006. Track06<br />
007. Track07<br />
008. Track08<br />
The tracks are displayed.<br />
Repeat<br />
Random<br />
:Off<br />
:Off<br />
2<br />
Use the Up and Down [ ]/[ ]<br />
buttons to select a track, and<br />
press [ENTER] to start playback.<br />
With SACDs, you can select the multichannel<br />
area, 2-channel area, or CD<br />
layer by pressing the [AUDIO] button.<br />
Since the multichannel area is down<br />
mixed, the output will be a processed<br />
audio.<br />
To output an original audio, select the<br />
2-channel area.<br />
CD<br />
On a VCD menu, use the number<br />
buttons to select the tracks.<br />
If the VCD’s menu consists of several<br />
pages, use the Next [ ] and Previous<br />
[ ] buttons to view them. During<br />
playback, you can return to the menu<br />
by pressing the [RETURN] button.<br />
Note:<br />
During random playback or memory playback, the arrow<br />
buttons cannot be used.<br />
36<br />
Notes:<br />
• Not all DVDs and VCDs have menus.<br />
• Menu operation varies from disc-to-disc. See the<br />
disc’s sleeve notes for details.
Playing Discs—Continued<br />
ENTER<br />
/ / /<br />
RETURN<br />
3<br />
Use the Up and Down [ ]/[ ]<br />
buttons to select tracks and subfolders<br />
in the open folder.<br />
To open a folder in the list, press the<br />
[ENTER] button. To close a folder (i.e.,<br />
move back up the directory tree), press<br />
the [RETURN] button. Alternatively,<br />
select the item at the top of the list and<br />
press the [ENTER] button.<br />
Use the Left and Right [ ]/[ ] buttons<br />
to display the other folders that contain<br />
playable tracks.<br />
Navigating MP3, WMA & DivX Discs<br />
MP3 WMA DivX<br />
4<br />
or<br />
To play the selected track, press<br />
the Play [ ] or [ENTER] button.<br />
If available, the ID3 tag information,<br />
(Title name, Artist name, Album name,<br />
and so on) will scroll across the bottom<br />
of the screen.<br />
This section explains how to play MP3, WMA, and<br />
DivX files with the “Disc Navigator”.<br />
1<br />
Load an MP3, WMA, or DivX disc.<br />
The “Disc Navigator” appears.<br />
DATA Disc – – – –<br />
1/3 -/5<br />
/mp3<br />
001. ROOT<br />
Repeat<br />
002. mp3<br />
Random<br />
003. MP3 music<br />
001. Track01<br />
002. Track02<br />
003. Track03<br />
004. Track04<br />
005. Track05<br />
:Off<br />
:Off<br />
Initially, the folders in the root directory<br />
are displayed.<br />
The DVD receiver numbers folders and<br />
tracks in hierarchical order. You can<br />
use these numbers to select folders and<br />
tracks directly with the Search function<br />
(see page 44).<br />
2<br />
To open a folder, use the Up and<br />
Down [ ]/[ ] buttons to select<br />
it, and then press [ENTER].<br />
The contents of the folder are displayed.<br />
Play Disc DATA<br />
2/3 3/11 00:00:29 00:03:58 00:04:27<br />
/mp3/03 Track03.MP3<br />
002. mp3<br />
Repeat :Off<br />
001. Track01 Random :Off<br />
002. Track02<br />
003. Track03<br />
004. Track04<br />
005. Track05<br />
006. Track06<br />
007. Track07<br />
Name: <strong>Onkyo</strong> Artist Name: <strong>Onkyo</strong> Album Name: <strong>Onkyo</strong><br />
For MP3 playback<br />
Subsequent tracks in the same folder<br />
are played in order.<br />
5<br />
Press the Stop [ ] button to stop<br />
playback.<br />
Note:<br />
During random playback or memory playback, the arrow<br />
buttons cannot be used.<br />
37
Playing Discs—Continued<br />
Viewing a Slideshow of JPEG Images<br />
This section explains how to display a slideshow of<br />
JPEG images on your TV.<br />
1<br />
Load a JPEG disc.<br />
The “Disc Navigator” appears.<br />
2<br />
JPEG<br />
Remote controller<br />
DATA Disc – – – –<br />
1/17 -/-<br />
/jpg<br />
001. jpg<br />
Repeat<br />
002. image0<br />
Random<br />
003. image1<br />
004. image2<br />
005. image3<br />
001. 001<br />
002. 002<br />
003. 003<br />
:Off<br />
:Off<br />
Initially, the folders in the root directory<br />
are displayed.<br />
The DVD receiver numbers folders and<br />
files in hierarchical order. You can use<br />
these numbers to select folders and files<br />
directly with the Search function (see<br />
page 44).<br />
To open a folder, use the Up and<br />
Down [ ]/[ ] buttons to select<br />
it, and then press [ENTER].<br />
The contents of the folder are displayed.<br />
4<br />
or<br />
To open a folder in the list, press the<br />
[ENTER] button. To close a folder (i.e.,<br />
move back up the directory tree), press<br />
the [RETURN] button. Alternatively,<br />
select the item at the top of the list and<br />
press the [ENTER] button.<br />
Use the Left and Right [ ]/[ ] buttons<br />
to display other folders that contain<br />
JPEG images.<br />
To play a slideshow, press the<br />
Play [ ] or [ENTER] button.<br />
Subsequent images are displayed in<br />
order, with each image being displayed<br />
for five seconds.<br />
To display an image for longer, press<br />
the Pause [ ] button. Press the Play<br />
[ ] button to resume.<br />
Use the Previous and Next [ ]/[ ]<br />
buttons to view the previous or next<br />
image.<br />
To flip a picture 180 degrees, use the<br />
Up and Down [ ]/[ ] buttons (not<br />
while zoomed in).<br />
To rotate a picture counterclockwise or<br />
clockwise, use the Left and Right [ ]/<br />
[ ] buttons (not while zoomed in).<br />
To zoom in or out, use the [ ] and<br />
[ ] buttons. While zoomed in, use the<br />
[ ]/[ ]/[ ]/[ ] buttons to move<br />
around the picture.<br />
5<br />
To stop the slideshow, press the<br />
Stop [ ] or [MENU] button.<br />
The slideshow stops automatically<br />
when all pictures have been displayed.<br />
or<br />
3<br />
Use the Up and Down [ ]/[ ]<br />
buttons to select images and<br />
subfolders in the open folder.<br />
A thumbnail-size preview for the currently<br />
selected image is displayed.<br />
DATA Disc – – – –<br />
1/17 -/-<br />
/image1/001.JPG<br />
005. image1<br />
Repeat :Off<br />
001. 001<br />
Random :Off<br />
002. 002<br />
003. 003<br />
004. 004<br />
005. 005<br />
006. 006<br />
007. 007<br />
W: 150 H: 120<br />
■ To display thumbnails<br />
To display thumbnails, in step 3, after opening the folder<br />
you want to display, press the [TOP MENU] button.<br />
Use the arrow [ ], [ ], [ ], [ ] buttons to select the<br />
thumbnails, and press [ENTER] to start a slideshow.<br />
Press the [MENU] button to return to the “Disc Navigator”.<br />
Use the Previous and Next [ ]/[ ] buttons to display<br />
other pages.<br />
■ About HD JPEG<br />
If your TV is connected via HDMI and the HDMI resolution<br />
is set to 720p or 1080i, you can view your JPEG<br />
images in high definition (see page 61).<br />
38
Listening to the Radio<br />
Number<br />
buttons<br />
INPUT /<br />
SEARCH<br />
MEMORY<br />
CLR<br />
Tuning into Radio Stations<br />
■ Auto Tuning Mode<br />
1<br />
Press the [MODE] button so that<br />
the AUTO indicator appears on<br />
the display.<br />
TUNING<br />
/<br />
DISPLAY<br />
PRESET /<br />
MODE<br />
2<br />
Press the TUNING [ ]/[ ] button.<br />
Searching stops when a station is<br />
found.<br />
To stop searching, press Stop [ ] button.<br />
When tuned into a station, the indicator appears.<br />
When tuned into a stereo FM station, the FM ST indicator<br />
appears on the display, as shown.<br />
AUTO<br />
FM ST<br />
Using the Tuner<br />
With the built-in tuner you can enjoy AM and FM radio<br />
stations. You can store your favorite stations as presets<br />
for quick selection.<br />
Listening to the Radio<br />
Use the INPUT [ ]/[ ] button to<br />
select either AM or FM.<br />
In this example, FM has been selected.<br />
AUTO FM ST<br />
Note:<br />
This procedure can also be performed on the DVD<br />
receiver by using its TUNING/PRESET [ ]/[ ] button.<br />
Press the TUNING/PRESET [ ]/[ ] button to start<br />
searching for a few seconds. Pressing the TUNING/<br />
PRESET [ ]/[ ] button again stops the searching.<br />
After this, press the button repeatedly to change the frequency<br />
one step at a time.<br />
■ Manual Tuning Mode<br />
1<br />
Press the [MODE] button so that<br />
the AUTO indicator disappears<br />
from the display.<br />
Band<br />
Frequency<br />
(Actual display depends on country)<br />
2<br />
HOLD<br />
Press and hold the TUNING [ ]/<br />
[ ] button.<br />
The frequency stops changing when<br />
you release the button.<br />
Press the buttons repeatedly to change<br />
the frequency one step at a time.<br />
Radio Frequency can be changed in 0.05 MHz steps for<br />
FM and 9 kHz steps for AM. You can change the interval<br />
of the steps for AM frequency (not European models)<br />
(see page 55).<br />
In Manual Tuning mode, FM stations will be in mono.<br />
Tuning into weak FM stereo stations<br />
If the signal from a stereo FM station is weak, it may be<br />
impossible to get good reception. In this case, switch to<br />
Manual Tuning mode and listen to the station in mono.<br />
39
Listening to the Radio—Continued<br />
■ Tuning into Stations by Frequency<br />
You can tune into AM and FM stations directly by entering<br />
the appropriate frequency.<br />
1<br />
Press the [SEARCH] button.<br />
Selecting Presets<br />
To select a preset, use the PRE-<br />
SET [ ]/[ ] buttons.<br />
2<br />
Within 8 seconds, use the number<br />
buttons to enter the frequency<br />
of the radio station.<br />
For example, to tune to 87.50 (FM),<br />
press 8, 7, 5, 0.<br />
Presetting AM/FM Stations<br />
You can store a combination of up to 40 of your favorite<br />
AM/FM radio stations as presets.<br />
1<br />
Tune into the AM/FM station that<br />
you want to store as a preset.<br />
2<br />
Press the [MEMORY] button.<br />
The preset number flashes.<br />
Notes:<br />
• This procedure can also be performed by using the<br />
number buttons.<br />
To enter, for example, “12”, press the [1] button followed<br />
by the [2] button.<br />
• This procedure can also be performed on the DVD<br />
receiver by using its TUNING/PRESET [ ]/[ ] button.<br />
Deleting Presets<br />
1<br />
Select the preset that you want to<br />
delete.<br />
See the previous section.<br />
2<br />
Press the [CLR] button twice.<br />
The preset is deleted and its number<br />
disappears from the display.<br />
3<br />
While the preset number is flashing<br />
(about 8 seconds), use the<br />
PRESET [ ]/[ ] buttons to<br />
select a preset from 1 through 40.<br />
4<br />
Press the [MEMORY] button<br />
again to store the station or<br />
channel.<br />
The station or channel is stored and the<br />
preset number stops flashing.<br />
Repeat this procedure for all of your<br />
favorite AM/FM radio stations.<br />
Note:<br />
This procedure can also be performed on the DVD<br />
receiver by using its [PRESET/MEMORY] button and<br />
TUNING/PRESET [ ]/[ ] button. First press the [PRE-<br />
SET/MEMORY] button, use TUNING/PRESET [ ]/<br />
[ ] button to select a preset and then press the [PRESET/<br />
MEMORY] button again.<br />
40
Listening to the Radio—Continued<br />
Using RDS (European models only)<br />
RDS only works with European models and only in<br />
areas where RDS broadcasts are available.<br />
When tuned into an RDS station, the RDS indicator<br />
appears.<br />
RDS indicator<br />
T - D DSP STEREO<br />
FM ST RDS<br />
■ What is RDS?<br />
RDS stands for Radio Data System and is a method of<br />
transmitting data in FM radio signals. It was developed<br />
by the European Broadcasting Union (EBU) and is available<br />
in most European countries. Many FM stations use<br />
it these days. In addition to displaying text information,<br />
RDS can also help you find radio stations by type (e.g.,<br />
news, sport, rock, etc.).<br />
The DVD receiver supports two types of RDS information:<br />
PS (Program Service)<br />
When tuned to an RDS station that’s broadcasting PS<br />
information, the station’s name will be displayed.<br />
RT (Radio Text)<br />
When tuned to an RDS station that’s broadcasting text<br />
information, the text will be shown on the display.<br />
Press the [DISPLAY] button<br />
repeatedly to show the following<br />
information.<br />
Frequency<br />
PS<br />
(Program Service name)<br />
RT (Radio Text)<br />
Notes:<br />
• In some cases, the text characters displayed on the<br />
DVD receiver may not be identical to those broadcast<br />
by the radio station. Also, unexpected characters may<br />
be displayed when unsupported characters are<br />
received. This is not a malfunction.<br />
• If the signal from an RDS station is weak, RDS data<br />
may be displayed intermittently or not at all.<br />
41
Using the Listening Modes<br />
Selecting Listening Modes<br />
See “About the Listening Modes” in the right column for<br />
detailed information about the listening modes.<br />
LISTENING<br />
MODE<br />
Press the [LISTENING MODE]<br />
button to select a listening mode.<br />
Pressing this button repeatedly cycles<br />
through all of the listening modes that<br />
can be used with the current input<br />
source.<br />
About the Listening Modes<br />
Pure Audio<br />
In this mode, the display and video circuitry are turned<br />
off, minimizing possible noise sources for the ultimate in<br />
high-fidelity reproduction.<br />
Direct<br />
In this mode, audio from the input source is output<br />
directly with minimal processing, providing high-fidelity<br />
reproduction.<br />
Stereo<br />
The selected input source is processed as a stereo signal<br />
and output by the front left and right speakers and the<br />
subwoofer if connected.<br />
T-D (Theater-Dimensional)<br />
With this mode you can enjoy a virtual 5.1 surround<br />
sound even with only two speakers. This works by controlling<br />
how sounds reach the listener’s left and right<br />
ears. Good results may not be possible if there’s too<br />
much reverb, so we recommend that you use this mode<br />
in an environment with little or no natural reverb.<br />
Notes:<br />
• T-D listening mode cannot be selected while headphones<br />
are connected to the DVD receiver.<br />
• During playback a DVD-Audio or SACD, T-D listening<br />
mode cannot be selected.<br />
• In the case of SCART connection, the output volume<br />
from the TV will be lower than other listening modes.<br />
Selecting Pure Audio Listening Mode on<br />
the DVD receiver<br />
Pure Audio listening mode can also be selected on the<br />
DVD receiver’s [PURE AUDIO] button.<br />
DVD receiver<br />
Press the [PURE AUDIO] button.<br />
Video output and display are turned off<br />
and PURE AUDIO indicator lights up.<br />
Pressing this button again will select<br />
the previous listening mode.<br />
42
Using the Listening Modes—Continued<br />
T-D (Theater-Dimensional) Listening Angle<br />
Setting<br />
With this setting, you can specify the angle of the front<br />
left and right speakers relative to the listening position.<br />
Processing for the Theater-Dimensional listening mode<br />
is based on this setting. Ideally, the front left and right<br />
speakers should be equidistant from the listening position<br />
and at an angle close to one of the three available<br />
settings.<br />
Front left speaker<br />
20/30/40°<br />
Front right speaker<br />
2<br />
Use the Up and Down [ ]/[ ]<br />
buttons to select “Angle”, and<br />
use the Left and Right [ ]/ [ ]<br />
buttons to select: “Narrow”,<br />
“Middle”, or “Wide”.<br />
Narrow: Select if the listening angle<br />
is 20 degrees.<br />
Middle: Select if the listening angle<br />
is 30 degrees (default).<br />
Wide: Select if the listening angle<br />
is 40 degrees.<br />
3<br />
When you’ve finished, press the<br />
[SETUP] button again.<br />
The setup menu closes.<br />
1<br />
Remote controller<br />
Press and hold the [SETUP] button<br />
for 3 seconds.<br />
When selecting the input other than<br />
DVD, just press the [SETUP] button.<br />
“Balance” appears on the display.<br />
Note:<br />
Only when the T-D listening mode is selected, this setting<br />
is available.<br />
HOLD<br />
Listening Mode and Receiver Settings<br />
Depending on the listening mode, the setup menu settings may be enabled/disabled as shown below.<br />
✔: available<br />
Listening Mode<br />
Settings Page # Pure Audio Direct Stereo T-D<br />
Speaker Output Balance 56 ✔ ✔<br />
Subwoofer Level 32 ✔ ✔<br />
Correcting Sound and Picture<br />
Sync<br />
*1 During playback a DVD-Audio or SACD, this setting is fixed at 100 Hz.<br />
*2 During playback a DVD-Audio or SACD, this setting is fixed at Small.<br />
56 ✔ ✔<br />
Crossover Frequency 57 ✔ *1 ✔<br />
Enabling/Disabling the Subwoofer 56 ✔ ✔<br />
Front Speakers Size 56 ✔ *2 ✔<br />
43
Advanced Playback<br />
Number<br />
buttons<br />
SEARCH<br />
2<br />
Use the number buttons to specify<br />
a title, chapter, or track number.<br />
To enter, for example, “12”, press the<br />
[1] button followed by the [2] button.<br />
Search<br />
Disc<br />
DVD-VIDEO<br />
Title<br />
Current/Total 12/ 19<br />
Chapter<br />
Current/Total 5/ 7<br />
ENTER<br />
Entered title number<br />
appears here<br />
Entered chapter number<br />
appears here<br />
Selecting Chapters/Titles/Tracks/<br />
Folders by Number<br />
DVD-A<br />
DVD-V SACD VCD CD MP3 WMA DivX<br />
With the “Search” function you can select chapters,<br />
titles, and tracks by number. To use the function with<br />
DVD, DVD playback is required.<br />
3<br />
or<br />
If you’re playing a DVD, MP3, WMA,<br />
or DivX disc, use the Left and Right<br />
[ ]/[ ] buttons to select the Title/<br />
Group/Folder and Chapter/Track fields.<br />
To clear a number, press the [CLR] button.<br />
Press the Play [ ] or [ENTER]<br />
button to start playback of the<br />
specified title, chapter, or track.<br />
1<br />
Press the [SEARCH] button.<br />
The “Search” window appears<br />
onscreen.<br />
This is what appears for DVDs.<br />
Disc<br />
DVD-VIDEO<br />
Search<br />
Title<br />
Chapter<br />
Current/Total 1/ 19 Current/Total - - -/ 78<br />
This is what appears for CDs.<br />
Disc<br />
CDDA<br />
Search<br />
Track<br />
Current/Total - -/ 10<br />
Notes:<br />
• During playback, you can select other chapters or<br />
tracks directly by using the number buttons (i.e., without<br />
pressing the [SEARCH] button). For example, to<br />
select chapter #2, simply press [2]. To select chapter<br />
#10, press [+10] and [0].<br />
• DVD-Video discs usually have menus for selecting<br />
titles and chapters.<br />
• When Video CD PBC is on, you can’t search for<br />
tracks. Turn PBC off first.<br />
• The [SEARCH] button cannot be used during random<br />
playback or memory playback.<br />
• Search may not work with some discs.<br />
44
Advanced Playback—Continued<br />
Number<br />
buttons<br />
SEARCH<br />
Notes:<br />
• In some cases, playback may start from a slightly different<br />
point to the one that you specify.<br />
• Time search may not work with some discs.<br />
• Time search cannot be used while a DVD-Video or<br />
Video CD menu is displayed onscreen.<br />
• The [SEARCH] button cannot be used during random<br />
playback or memory playback.<br />
ENTER<br />
Searching by Time<br />
DVD-A<br />
DVD-V<br />
SACD<br />
VCD<br />
CD<br />
With the “Search” function you can search by time.<br />
1<br />
During playback, press the<br />
[SEARCH] button twice.<br />
The “Search” window appears<br />
onscreen.<br />
Search<br />
Disc<br />
DVD-VIDEO<br />
Time<br />
-:- -:- -<br />
2<br />
Use the number buttons to enter<br />
a time.<br />
Time search only works within the current<br />
title or track.<br />
To enter, for example, 5 minutes, 30<br />
seconds, press [5] [3] [0] buttons.<br />
Disc<br />
DVD-VIDEO<br />
Search<br />
Time<br />
-:-5:30<br />
3<br />
To clear a number, press the [CLR] button.<br />
Press the Play [ ] or [ENTER]<br />
button to start playback of the<br />
specified time.<br />
or<br />
45
Advanced Playback—Continued<br />
A-B Repeat Playback<br />
DVD-V SACD VCD CD<br />
MP3<br />
REPEAT<br />
A–B<br />
With the “Repeat A-B” function you can play a specified<br />
section over-and-over again.<br />
1<br />
During playback, press the [A-B]<br />
button to set the A point (i.e., the<br />
start of the section you want to<br />
repeat).<br />
“Repeat A-” appears onscreen and<br />
“-R_A” appears on the display.<br />
Repeat Playback<br />
DVD-A DVD-V SACD VCD CD MP3 WMA JPEG<br />
With the “Repeat” function you can play a disc, title,<br />
chapter, group, track, or folder over-and-over again.<br />
1<br />
During playback, press the<br />
[REPEAT] button repeatedly to<br />
select a repeat option.<br />
The selected repeat option appears<br />
onscreen.<br />
The available options depend on the<br />
type of disc, as follows:<br />
DVD-Video: Chapter Repeat, Title<br />
Repeat, Disc Repeat, Repeat Off.<br />
DVD-Audio: Track Repeat, Group<br />
Repeat, Repeat Off.<br />
SACD, VCD, CD: Track Repeat, Disc<br />
Repeat, Repeat Off.<br />
MP3, JPEG, WMA: Track Repeat,<br />
Folder Repeat, Disc Repeat, Repeat<br />
Off.<br />
2<br />
Press the [A-B] button again to<br />
set the B point (i.e., the end of the<br />
section you want to repeat).<br />
Playback repeats between the A and B<br />
points, and “Repeat A-B” appears<br />
onscreen and “-R_AB” appears on the<br />
display.<br />
3<br />
To cancel A-B repeat playback,<br />
press the [A-B] button.<br />
Notes:<br />
• The “Repeat A-B” function may not work with some<br />
DVD-Video discs and VCDs that support PBC.<br />
• In some cases, the A and B points may be at slightly<br />
different points to the ones that you specify.<br />
2<br />
To cancel repeat playback, use<br />
the [REPEAT] button to select<br />
“Repeat Off”.<br />
Notes:<br />
• Repeat playback may not work with some discs.<br />
• If the “Memory Playback” function is on (see<br />
page 48), the selectable options are “Memory<br />
Repeat”, which plays the playlist repeatedly, and<br />
“Repeat Off”.<br />
• To use the Repeat function with a VCD that supports<br />
PBC, you must first turn off PBC (see page 36).<br />
46
Advanced Playback—Continued<br />
RANDOM<br />
• To use the “Random” function with a VCD that supports<br />
PBC, you must first turn off PBC (see page 36).<br />
• If the “Memory Playback” function is on (page 48),<br />
random playback is unavailable.<br />
• You can’t use the [SEARCH] button during random<br />
playback.<br />
• During random playback, the remote controller’s<br />
arrow [ ], [ ], [ ], [ ] buttons and number buttons<br />
don’t work with the “Disc Navigator”.<br />
• The “Random” function cannot be used with JPEG<br />
files.<br />
Random Playback<br />
DVD-V DVD-A SACD VCD CD MP3 WMA<br />
With the “Random” function you can enjoy a random<br />
selection of titles, chapters, groups, tracks, or folders.<br />
1<br />
During playback, press the [RAN-<br />
DOM] button repeatedly to select<br />
a random option.<br />
The selected random option appears<br />
onscreen.<br />
The options available depends on the<br />
type of disc, as follows:<br />
DVD-Video: Title Random, Disc Random,<br />
Random Off.<br />
DVD-Audio: Group Random, Random<br />
Off.<br />
SACD, VCD, CD: Disc Random, Random<br />
Off.<br />
MP3, WMA: Folder Random, Disc<br />
Random, Random Off.<br />
With the “Title Random” option, chapters<br />
within the current title are played at<br />
random. With the “Disc Random”<br />
option, titles, chapters, groups, tracks,<br />
or folders on the disc are played at random.<br />
Random playback begins after the current<br />
chapter or track has finished.<br />
Random playback stops automatically<br />
when all of the items have been played<br />
once.<br />
2<br />
To cancel random playback, use<br />
the [RANDOM] button to select<br />
“Random Off”.<br />
Notes:<br />
• Random playback may not work with some discs.<br />
47
Advanced Playback—Continued<br />
Number<br />
buttons<br />
ENTER<br />
Memory Playback<br />
DVD-V DVD-A SACD VCD CD MP3<br />
WMA<br />
MEMORY<br />
LAST<br />
MEMORY<br />
CLR<br />
/ / /<br />
With the “Memory Playback” function you can create<br />
your own memory list of titles, chapters, and tracks.<br />
1<br />
Press the [MEMORY] button.<br />
The “Memory List” window appears<br />
onscreen, as shown.<br />
Memory List<br />
No. Title/Folder Chapter/Track<br />
Current/Total 001 / 019 Current/Total --- / 078<br />
01 --- / 019<br />
--- / 078<br />
02 --- / 019<br />
--- / 078<br />
03 --- / 019<br />
--- / 078<br />
04 --- / 019<br />
--- / 078<br />
05 --- / 019<br />
--- / 078<br />
06 --- / 019<br />
--- / 078<br />
07 --- / 019<br />
--- / 078<br />
08 --- / 019<br />
--- / 078<br />
The top row ( ) is used to enter title/<br />
folder and chapter/track numbers.<br />
The steps in the memory list are numbered.<br />
2<br />
Enter the title/folder (group), and<br />
chapter/track numbers of the<br />
item you want to add to the memory<br />
list, and then press [ENTER].<br />
Use the remote controller’s Left/Right<br />
[ ]/[ ] buttons to select the parameters,<br />
and use the number buttons to<br />
enter the number.<br />
The new item is added to the memory<br />
list as step 01.<br />
3<br />
Repeat step 2 to add more items<br />
to the memory list.<br />
You can add up to 32 items to the memory<br />
list.<br />
4<br />
To play the memory list, press<br />
the Play [ ] button.<br />
The “Memory List” window must be<br />
open when you press the Play [ ] button.<br />
5<br />
To stop playback, press the Stop<br />
[ ] button.<br />
While playback is stopped, you can<br />
delete the memory list by pressing the<br />
[CLR] button.<br />
While playback is stopped, you can<br />
cancel the Memory Playback function<br />
by pressing the Stop [ ] button again.<br />
Adding New Items to the List<br />
1<br />
Use the Up/Down [ ]/[ ] buttons<br />
to select the step which you<br />
want to insert the new item, and<br />
then press the [ENTER] button.<br />
Memory List<br />
No. Title/Folder Chapter/Track<br />
Current/Total 001 / 019 Current/Total --- / 078<br />
01 005 / 019<br />
001 / 078<br />
02 002 / 019<br />
012 / 078<br />
03 --- / 019<br />
--- / 078<br />
04 003 / 019<br />
004 / 078<br />
05 010 / 019<br />
003 / 078<br />
06 --- / 019<br />
--- / 078<br />
07 --- / 019<br />
--- / 078<br />
08 --- / 019<br />
--- / 078<br />
2<br />
Enter the title/folder (group), and<br />
chapter/track numbers of the<br />
item to be inserted.<br />
Use the remote controller’s Left/Right<br />
[ ]/[ ] buttons to select the parameters,<br />
and use the number buttons to<br />
enter the number.<br />
3<br />
Press the [ENTER] button.<br />
The new item is inserted into the memory<br />
list and subsequent items move<br />
down the list.<br />
48
Advanced Playback—Continued<br />
Deleting Items from the List<br />
Editing Steps<br />
Use the Up/Down [ ]/[ ] buttons<br />
to select it, and then press<br />
the [CLR] button.<br />
The item is deleted and subsequent<br />
items move up the list.<br />
1<br />
Use the Up/Down [ ]/[ ] buttons<br />
to select the step.<br />
2<br />
Use the Left/Right [ ]/[ ] buttons<br />
and number buttons to edit<br />
the title/folder (group) or chapter/<br />
track numbers, and then press<br />
[ENTER].<br />
Last Memory<br />
DVD-V<br />
With the “Last Memory” function you can resume playback<br />
from where you left off even if the disc has been<br />
removed and the DVD receiver has been set to Standby.<br />
“Last Memory” also remembers the soundtrack and subtitle<br />
settings you were using.<br />
1<br />
During DVD playback, press the<br />
[LAST MEMORY] button.<br />
The last memory point for the disc is<br />
stored, “Last Mem” appears on the display.<br />
If the [LAST MEMORY] button is<br />
pressed again, the last memory point is<br />
updated.<br />
2<br />
To stop playback, press the Stop<br />
[ ] button.<br />
Now you may remove the disc<br />
and turn off the DVD receiver.<br />
3<br />
To resume playback, load the<br />
disc, and then press the Play [ ]<br />
button.<br />
The “Last Memory” dialog box<br />
appears.<br />
Last Memory is set.<br />
Start playback from memory location?<br />
Yes No Memory Clear<br />
4<br />
To resume playback from the last<br />
memory point, select “Yes”, and<br />
then press [ENTER].<br />
To start playback from the present<br />
point, select “No”, and then press<br />
[ENTER].<br />
To delete the last memory point, select<br />
“Memory Clear”, and then press<br />
[ENTER].<br />
Notes:<br />
• To close the “Memory List” window, press the<br />
[RETURN] button.<br />
• The memory list will be deleted when the DVD<br />
receiver is set to Standby or the disc tray is opened.<br />
• To use this function with a VCD that supports PBC,<br />
you must first turn off PBC.<br />
• The Memory Playback function cannot be used with<br />
some discs.<br />
• JPEG images can be added to the memory list, however,<br />
they will not be displayed.<br />
Notes:<br />
• The “Last Memory” function can store the last point<br />
for up to six DVDs. When you set the “Last Memory”<br />
function for a seventh disc, the first disc’s settings are<br />
deleted.<br />
• The “Last Memory” function will not work while a<br />
menu is being displayed onscreen.<br />
• The “Last Memory” function may not work with some<br />
DVDs.<br />
49
Advanced Playback—Continued<br />
Selecting Camera Angles<br />
DVD-V<br />
ZOOM<br />
/ / /<br />
ANGLE<br />
Some DVDs feature multiple camera angles that allow<br />
you to view scenes from different angles. When a DVD<br />
features multiple camera angles, the camera indicator<br />
appears on the display. Such discs usually have the camera<br />
angle logo ( ) printed on the sleeve.<br />
Press the [ANGLE] button<br />
repeatedly to cycle through the<br />
available camera angles.<br />
The number of the currently selected<br />
camera angle appears onscreen. For<br />
example, on a disc with three camera<br />
angles, you’d see 1/3, 2/3, and 3/3.<br />
Zooming<br />
With the Zoom function you can enlarge any part of the<br />
picture.<br />
1<br />
DVD-V<br />
VCD<br />
JPEG<br />
During playback or while playback<br />
is paused, press and hold<br />
the [ZOOM] button for 3 seconds.<br />
“Zoom x1.0” appears onscreen.<br />
Notes:<br />
• With some DVDs you may not be able to select different<br />
camera angles even though the camera indicator<br />
is displayed.<br />
• With some DVDs you can select camera angles from<br />
a menu.<br />
HOLD<br />
2<br />
Press the [ZOOM] again repeatedly<br />
to Zoom in.<br />
The number of zoom steps available<br />
depends on the resolution of the disc or<br />
file.<br />
After the maximum zoom, the picture<br />
returns to its normal size.<br />
3<br />
To see other areas of the picture<br />
while zoomed, use the remote<br />
controller’s arrow [ ], [ ], [ ],<br />
[ ] buttons.<br />
Notes:<br />
• The Zoom function may not work with some discs.<br />
• The Zoom function cannot be used with HD JPEG.<br />
• The Zoom function cannot be used with disc menus.<br />
50
Advanced Playback—Continued<br />
AUDIO<br />
SUBTITLE<br />
Selecting Subtitles<br />
DVD-V<br />
Some DVD-Video discs feature subtitles in several languages.<br />
See the disc’s sleeve notes for details.<br />
During playback, press the [SUB-<br />
TITLE] button repeatedly to cycle<br />
through the available subtitles.<br />
The name of the selected subtitle<br />
appears onscreen for several seconds.<br />
To turn off subtitles, use the [SUBTI-<br />
TLE] button to select “Off”.<br />
Selecting Soundtracks<br />
DVD-V DVD-A SACD<br />
Some DVD-Video discs feature soundtracks in several<br />
languages or audio formats (e.g., Dolby Digital or DTS).<br />
Music DVD-Video discs and DVD-Audio discs sometimes<br />
feature audio in several formats, such as PCM,<br />
Dolby Digital, or DTS. See the disc’s sleeve notes for<br />
details.<br />
Notes:<br />
• When you stop playback and cancel the “Resume”<br />
function (see page 34), the subtitle language will<br />
revert to your default subtitle language (see page 63),<br />
or the disc’s default subtitle language.<br />
• With some DVDs you can select subtitles from a<br />
menu, and you may not be able to select subtitles during<br />
playback.<br />
During playback, press the<br />
[AUDIO] button repeatedly to<br />
cycle through the available<br />
soundtracks.<br />
The name of the selected soundtrack<br />
appears onscreen for several seconds.<br />
For SACDs, you can select the multichannel<br />
area, 2-channel area, or CD<br />
layer. If you make a selection during<br />
playback, playback will stop.<br />
Notes:<br />
• With DVD-Video discs, when you stop playback and<br />
cancel the “Resume” function (see page 34), the<br />
soundtrack language will revert to your default language<br />
(see page 63), or the disc’s default language.<br />
• With some discs, selecting another soundtrack may<br />
cause the picture to skip momentarily.<br />
• With some DVDs you need to select soundtracks from<br />
a menu, and you may not be able to select other<br />
soundtracks during playback.<br />
• Since the multichannel input source of SACD and<br />
DVD-Audio is down mixed, the output will be a processed<br />
audio. To output an original audio, select the 2-<br />
channel source. Some DVD-Audio discs may not be<br />
down mixed; in this case select the 2-channel source.<br />
51
Disc and Input Information<br />
52<br />
Displaying Information<br />
You can display various information about the current<br />
disc, or input source as follows.<br />
Remote controller<br />
Disc Information<br />
Press the [DISPLAY] button<br />
repeatedly to cycle though the<br />
available information.<br />
During playback of a disc, various<br />
information appears onscreen.<br />
The operating status (e.g., Stop, Play,<br />
Resume) and disc type information is<br />
displayed along the top of the screen.<br />
The information displayed depends on the type of disc,<br />
as follows:<br />
■ DVD-Video<br />
Onscreen:<br />
• Current/total title number, elapsed title time, remaining<br />
title time, total title time, selected soundtrack,<br />
selected subtitle, and the number of available camera<br />
angles.<br />
• Current/total chapter number, elapsed chapter time,<br />
remaining chapter time, and total chapter time.<br />
Display:<br />
• Elapsed chapter time<br />
• Remaining title time<br />
■ DVD-Audio<br />
Onscreen:<br />
• Current/total track number, elapsed track time,<br />
remaining track time, total track time, and selected<br />
soundtrack.<br />
• Current/total group number, elapsed group time,<br />
remaining group time, and total group time.<br />
Display:<br />
• Elapsed track time<br />
• Remaining track time<br />
• Elapsed disc time<br />
■ Video CD<br />
Onscreen:<br />
• Current/total track number, elapsed track time,<br />
remaining track time, and total track time.<br />
• Current/total track number, elapsed track time,<br />
remaining disc time, and total disc time.<br />
Display:<br />
• Elapsed track time<br />
• Remaining track time<br />
• Elapsed disc time<br />
• Remaining disc time<br />
Note:<br />
If PBC is on, no information is displayed when the [DIS-<br />
PLAY] button is pressed.<br />
■ Audio CD, Super Audio CD<br />
Onscreen:<br />
• Current/total track number, elapsed track time,<br />
remaining track time, and total track time.<br />
• Current/total track number, elapsed disc time, remaining<br />
disc time, and total disc time.<br />
Display:<br />
• Elapsed track time<br />
• Remaining track time<br />
• Elapsed disc time<br />
• Remaining disc time<br />
■ MP3, WMA<br />
Onscreen:<br />
• Current/total folder number, current/total track number<br />
in the folder, elapsed track time, remaining track<br />
time (MP3 only), and total track time (MP3 only).<br />
Display:<br />
• Elapsed track time<br />
• File name<br />
• Folder name<br />
• Total number of folders<br />
■ JPEG<br />
Display:<br />
• Folder number, track number<br />
• File name<br />
• Folder name<br />
• Total number of folders<br />
■ DivX<br />
Onscreen:<br />
• Current/total track number, elapsed track time,<br />
remaining track time, total track time, selected<br />
soundtrack, and selected subtitle.<br />
Display:<br />
• Elapsed track time<br />
• File name<br />
• Folder name<br />
• Total number of folders<br />
Input Information<br />
The information displayed depends on the type of input<br />
source, as follows:<br />
Display:<br />
• Input source<br />
• Signal format*<br />
• Listening mode<br />
* If the input signal is analog, no format information is<br />
displayed.
Controlling Other Components<br />
Controlling a TV connected to the<br />
DVD receiver<br />
You can control a TV. You must enter the appropriate<br />
remote control code first.<br />
Number<br />
buttons<br />
TV<br />
ENTER<br />
4<br />
Point the remote controller at the<br />
TV, and check the operation.<br />
If the remote controller doesn’t work as<br />
expected, and several remote codes are<br />
listed, try each one in turn and use the<br />
one that works best.<br />
Note:<br />
The remote control codes provided are correct at the time<br />
of printing, but are subject to change.<br />
Controlling a TV<br />
To control a TV, point the remote controller at it and use<br />
the buttons explained below. With some TVs, certain<br />
buttons may not work as expected, and some may not<br />
work at all.<br />
Entering Remote Control Codes<br />
1<br />
Look up the appropriate remote<br />
control code in the “Remote Control<br />
Codes list” at the end of this<br />
manual.<br />
<br />
<br />
<br />
<br />
2<br />
Hold down the TV [ ] and<br />
[ENTER] buttons for about 3 seconds.<br />
HOLD<br />
HOLD<br />
3<br />
Within 30 seconds, use the number<br />
buttons to enter the 4-digit<br />
remote control code.<br />
TV [ ]<br />
Sets the TV to Standby or On.<br />
TV [INPUT]<br />
Selects the TV’s AV input.<br />
TV VOL [ ]/[ ]<br />
Adjusts the TV’s volume.<br />
TV [CH +/–]<br />
Selects channels on the TV.<br />
53
Controlling Other Components—Continued<br />
54<br />
Controlling an Apple iPod in RI Dock<br />
connected to the DVD receiver<br />
When operating an Apple iPod in RI Dock with an<br />
connection, you can control it by DVD receiver’s remote<br />
controller.<br />
When Using an RI Dock:<br />
• Connect the RI Dock to the VIDEO 2/DOCK INPUT<br />
jacks (see page 26).<br />
• Set the RI Dock’s RI MODE switch to HDD or HDD/<br />
DOCK.<br />
• See to the RI Dock’s instruction manual for more<br />
information.<br />
Press the INPUT [ ]/[ ]buttons to select<br />
“VIDEO 2/DOCK”.<br />
<br />
<br />
<br />
<br />
<br />
<br />
<br />
<br />
<br />
<br />
<br />
<br />
<br />
<br />
<br />
<br />
STANDBY/ON button<br />
Sets the iPod to Standby or On.<br />
PLAYLIST [ ]/[ ] buttons*<br />
Used to select the previous or next playlist on the<br />
iPod.<br />
ALBUM [ ]/[ ] button*<br />
Selects the next or previous album.<br />
TOP MENU button*<br />
Used to access menus.<br />
Arrow [ ]/[ ] and ENTER buttons*<br />
Used to navigate menus and select items.<br />
Pause [ ] button<br />
Pauses playback. (With 3rd generation iPods, it<br />
works as a Play/Pause button.)<br />
Rewind [ ] button<br />
Press and hold to rewind.<br />
Fast Forward [ ] button<br />
Press and hold to fast forward.<br />
RANDOM button*<br />
Used with the shuffle function.<br />
REPEAT button*<br />
Used with the repeat function.<br />
MENU button<br />
Works as a Mode button when used with a DS-A2/<br />
A2X RI Dock.<br />
PLAY [ ] button<br />
Starts playback. If the component is off, it will turn<br />
on automatically. (With 3rd generation iPods, this<br />
button works as a Play/Pause button.)<br />
Stop [ ] button<br />
Stops playback and displays a menu.<br />
Next [ ] button<br />
Selects the next song.<br />
Previous [ ] button<br />
Restarts the current song. Press it twice to select the<br />
previous song.<br />
MODE button*<br />
Turns on the backlight for 30 seconds.<br />
* Buttons marked with an asterisk (*)<br />
are not supported<br />
by 3rd generation iPods.<br />
Notes:<br />
• Auto Power On Function<br />
If you start iPod playback while the DVD receiver is<br />
on Standby, the DVD receiver will automatically turn<br />
on and select VIDEO2/DOCK input. Then, your iPod<br />
will start playback.<br />
• Direct Change Function<br />
If you start iPod playback while listening to another<br />
input source, the DVD receiver will automatically<br />
select VIDEO2/DOCK input.<br />
• When you don’t listen to the iPod, stop playback. The<br />
direct change function activates at the change of tracks<br />
to automatically change the input to VIDEO2/DOCK.
Configuring the DVD receiver<br />
Setup Menu<br />
Here you can configure the DVD receiver in this menu on display.<br />
The configurations are common for the all input settings excluding “AVSync”, “Video1 Input”, “Video2 Input”, and<br />
“AMFreq”.<br />
1<br />
Remote controller<br />
Press and hold the [SETUP] button<br />
for 3 seconds.<br />
When selecting the input other than<br />
DVD, just press the [SETUP] button.<br />
“Balance” appears on the display.<br />
2<br />
Use the Up and Down [ ]/[ ]<br />
buttons to select the menus and<br />
use the Left and Right [ ]/[ ]<br />
buttons to select settings.<br />
HOLD<br />
3<br />
When you’ve finished, press the<br />
[SETUP] button again.<br />
The setup menu closes.<br />
Press the [RETURN] button to return<br />
previous display.<br />
For detailed information, refer to the pages in brackets.<br />
Balance: 0<br />
Speakers Output Balance [56]<br />
SW Level: 0<br />
Subwoofer Level [32]<br />
Operations<br />
AVSync: 0ms<br />
Correcting Sound<br />
and Picture Sync [56]<br />
Xover :100Hz<br />
Crossover Frequency [57]<br />
Angle:Middle<br />
T-D Listening Angle *1 [43]<br />
L Night:Off<br />
Late Night Function [56]<br />
Dimmer : 1<br />
Display Brightness [56]<br />
Advanced<br />
AMFreq: 9kHz<br />
AM Frequency Step Setup *2 [57]<br />
Video1 Input<br />
Video2 Input<br />
Subwfr: Yes<br />
Enabling/Disabling<br />
the Subwoofer [56]<br />
Input :OPT<br />
Audio Input Setup [57]<br />
Format :Auto<br />
Digital Input Signal<br />
Formats [57]<br />
Lock Setup<br />
Front :Small<br />
Lock Setup [56] Front Speakers Size [56]<br />
*1 Only when the T-D listening<br />
mode is selected, this setting<br />
is available.<br />
*2 Not European models<br />
55
Configuring the DVD receiver—Continued<br />
Speakers Output Balance<br />
Here you can adjust the output balance of speakers.<br />
The balance can be adjusted from “L + 12” to “R + 12”<br />
in 1 steps.<br />
Note:<br />
When the listening mode is set to “Direct” or “Pure<br />
Audio”, no effect will be produced.<br />
Correcting Sound and Picture Sync<br />
When using progressive scanning on your DVD receiver,<br />
you may find that the picture and sound are out of sync.<br />
With this setting, you can correct this by delaying the<br />
audio signals.<br />
• You can set it from 0 to 100 milliseconds (msec) in 20<br />
millisecond steps.<br />
• The setting is available for each input source other<br />
than FM and AM.<br />
Note:<br />
When the listening mode is set to “Direct” or “Pure<br />
Audio”, no effect will be produced.<br />
Late Night Function (Dolby Digital only)<br />
With the Late Night function, you can reduce the<br />
dynamic range of Dolby Digital material so that you can<br />
still hear quiet parts even when listening at low volume<br />
levels—ideal for watching movies late at night when you<br />
don’t want to disturb anyone.<br />
Off: Late Night function off (default).<br />
Low: Small reduction in dynamic range.<br />
High: Big reduction in dynamic range.<br />
Lock Setup<br />
With this preference, you can protect your settings by<br />
locking the setup menus.<br />
When the setup menus are locked, you cannot change<br />
any setting.<br />
Locked: Setup menus locked.<br />
Unlocked: Setup menus not locked.<br />
Enabling/Disabling the Subwoofer<br />
This section explains how to specify enabling/disabling<br />
the subwoofer.<br />
Yes: Select if a subwoofer is connected.<br />
No: Select if no subwoofer is connected.<br />
Front Speakers Size<br />
This section explains how to specify<br />
front speakers sizes.<br />
For speakers with a cone diameter<br />
larger than 16 cm, specify “Large”.<br />
For those with a smaller diameter,<br />
specify “Small”. The crossover frequency<br />
can be changed on page 57.<br />
Cone diameter<br />
Small: Select if the front speakers are small.<br />
Large: Select if the front speakers are large.<br />
Notes:<br />
• If the “Enabling/Disabling the Subwoofer” the above<br />
is set to “No”, this setting is fixed at “Large”.<br />
• When the listening mode is set to “Direct” or “Pure<br />
Audio”, no effect will be produced.<br />
Notes:<br />
• Depending on the design of the contents, there are<br />
some materials that will show no effect even when the<br />
Late Night mode is operating.<br />
• The Late Night function resets to the default when the<br />
DVD receiver is set to Standby.<br />
Display Brightness<br />
You can adjust the brightness of the display.<br />
1: Normal + INPUT selector and MASTER<br />
VOLUME light on.<br />
2: Normal + INPUT selector and MASTER<br />
VOLUME light off.<br />
3: Dim + INPUT selector and MASTER VOL-<br />
UME light off.<br />
4: Dimmer + INPUT selector and MASTER<br />
VOLUME light off.<br />
56
Configuring the DVD receiver—Continued<br />
Crossover Frequency<br />
This setting only applies to the speakers that you specified<br />
as “Small” in the “Front Speakers Size” on page 56.<br />
To get the best bass performance from your speaker system,<br />
you need to set the crossover frequency according<br />
to the size and frequency response of your speakers.<br />
Use the diameter of the smallest speaker in your system<br />
when choosing the crossover frequency.<br />
Speaker cone diameter Crossover frequency<br />
Over 20 cm<br />
40/50/60 Hz*<br />
16–20 cm 80 Hz<br />
13–16 cm 100 Hz(default)<br />
9–13 cm 120 Hz<br />
9 cm 150/200 Hz*<br />
*Choose the setting suitable for the speaker.<br />
Notes:<br />
• For a more accurate setting, look up the frequency<br />
response in the manuals supplied with your speakers<br />
and set accordingly.<br />
• Choose a higher crossover frequency if you want more<br />
sound from your subwoofer.<br />
• When a DVD-Audio or an SACD is played in the Stereo<br />
listening mode, no effect will be produced.<br />
• When the listening mode is set to Direct, or Pure<br />
Audio, no effect will be produced.<br />
AM Frequency Step Setup<br />
(not European models)<br />
You must specify the AM frequency step used in your<br />
area. Note that when this setting is changed, all radio<br />
presets are deleted.<br />
10 kHz: Select if 10 kHz steps are used in your area.<br />
9kHz: Select if 9 kHz steps are used in your area.<br />
Audio Input Setup<br />
If you connect a component to a digital input jack, you<br />
must assign that jack to an input. For example, if you<br />
connect your DVD recorder to the COAXIAL DIGITAL<br />
AUDIO IN jack, you should assign that jack to the<br />
“Video 1 input”. By default, the COAXIAL DIGITAL<br />
AUDIO IN jack is assigned to the “Video 2 input”,<br />
although this can be changed.<br />
Here are the default assignments.<br />
Input<br />
VIDEO 1 INPUT<br />
VIDEO 2/DOCK INPUT<br />
OPT: optical digital audio input<br />
Coax: coaxial digital audio input<br />
ANA: analog audio input<br />
Note:<br />
The same audio input cannot be simultaneously assigned<br />
to both VIDEO 1 INPUT and VIDEO 2/DOCK INPUT.<br />
Digital Input Signal Formats<br />
Default assignment<br />
OPT<br />
Coax<br />
The digital input signal formats are available only for the<br />
input sources that you have assigned a digital input jack<br />
(see above).<br />
Normally, the DVD receiver detects the signal format<br />
automatically. However, if you experience either of the<br />
following issues when playing PCM or DTS material,<br />
you can manually set the signal format to PCM or DTS:<br />
• If the beginnings of tracks from a PCM source are cut<br />
off, try setting the format to PCM.<br />
• If noise is produced when fast forwarding or reversing<br />
a DTS CD, try setting the format to DTS.<br />
DTS or PCM: The DTS or PCM indicator, depending<br />
on which format you have set, flashes, and only signals<br />
in that format are output. Digital signals in other formats<br />
are ignored.<br />
Auto (default): The format is detected automatically. If<br />
no digital input signal is present, the corresponding analog<br />
input is used instead.<br />
57
DVD Onscreen Setup Menus<br />
This chapter explains the various functions and settings of the onscreen setup menus.<br />
Functions and settings are arranged into six menus: Picture, Audio, Language, Display, Operation Setting, and Initial<br />
Setup.<br />
The following table lists all the functions and settings, with a brief description and page number where you can find full<br />
details.<br />
Menu Setting Description Page #<br />
Picture<br />
Audio<br />
Language<br />
Display<br />
TV Shape Select the aspect ratio that matches your TV. 60<br />
View Mode Stretch the picture to fit your TV screen. 60<br />
HDMI Output Setting Turn HDMI video output on or off. 60<br />
Progressive Setting<br />
Set the component video output to progressive or<br />
interlaced.<br />
61<br />
HD Resolution Select the video resolution for the HDMI OUT. 61<br />
HD JPEG Mode<br />
For displaying JPEG images at a high resolution on a<br />
HDTV.<br />
61<br />
Video Black Level Choose a video black level. 61<br />
Brightness Adjust the picture brightness. 61<br />
Sharpness Adjust the picture sharpness. 61<br />
PAL Output Setting Convert the disc’s video format to NTSC or PAL. 62<br />
SCART Output Setting<br />
(European model only)<br />
Digital/HDMI Audio Out<br />
Linear PCM Out<br />
Selects the video format for the SCART output: RGB<br />
or composite.<br />
Settings for the digital signal output by the HDMI digital<br />
audio outputs.<br />
Select whether or not the DVD receiver down samples<br />
digital audio.<br />
On-Screen Language<br />
Select a language for the onscreen setup menus and<br />
messages.<br />
63<br />
Disc Menu Language Select your preferred language for disc menus. 63<br />
Audio Language Select your preferred language for soundtracks. 63<br />
Subtitle Language Select your preferred language for subtitles. 63<br />
DivX Subtitle Select your preferred language for DivX subtitle. 65<br />
On-Screen Display Turn on or off onscreen messages and indicators. 65<br />
On-Screen Display Color<br />
Select a color for onscreen setup menus and messages.<br />
Background<br />
Select a background color for when playback is<br />
stopped.<br />
65<br />
Screen Saver Set the Screen Saver function. 65<br />
62<br />
62<br />
62<br />
65<br />
58
DVD Onscreen Setup Menus—Continued<br />
Menu Setting Description Page #<br />
Operation<br />
Setting<br />
Parental Lock Set the Parental Lock function. 66<br />
Security Code Change the security code for use with parental lock. 66<br />
DVD Priority Contents<br />
Determines what’s played on DVD-Audio discs with<br />
DVD-Video contents.<br />
SACD Priority Contents<br />
Determines how the SACD multichannel and 2-channel<br />
area and the CD area are played.<br />
67<br />
DivX Registration Displays your DivX VOD registration code 67<br />
67<br />
Initial Setup TV Shape This menu appears automatically the very first time<br />
HDMI Output Setting<br />
you turn on your DVD receiver. (These settings are<br />
On-Screen Language<br />
available in other menus.)<br />
29<br />
Using the Onscreen Setup Menus<br />
This section explains how to navigate the onscreen setup menus.<br />
2<br />
Use the arrow [ ]/[ ]/[ ]/[ ]<br />
buttons to navigate the menus,<br />
INPUT /<br />
and press the [ENTER] button to<br />
see the available options.<br />
ENTER<br />
SETUP<br />
/ / /<br />
3<br />
Use the Up/Down [ ]/[ ] buttons<br />
to select the options, and<br />
press the [ENTER] button to confirm<br />
your selection.<br />
1<br />
Press the INPUT [ ]/[ ] buttons<br />
to select “DVD”, and then press<br />
the [SETUP] button.<br />
The onscreen setup menu appears, as<br />
shown.<br />
4<br />
When you’ve finished, press the<br />
[SETUP] button again.<br />
The onscreen setup menu closes.<br />
Picture<br />
TV Shape<br />
View Mode<br />
HDMI Output Setting<br />
Progressive Setting<br />
HD Resolution<br />
HD JPEG mode<br />
Video Black Level<br />
Brightness<br />
Sharpness<br />
: 4:3 Letter box<br />
: Normal<br />
: On<br />
: Progressive<br />
: 480p / 576p<br />
: Off<br />
: Light<br />
: 4<br />
: 4<br />
59
DVD Onscreen Setup Menus—Continued<br />
Picture Menu<br />
TV Shape<br />
With this setting you can select a picture format to match<br />
the aspect ratio of your TV.<br />
4:3 Letter box (default):<br />
Choose this option if you have a<br />
standard TV (4:3 aspect ratio).<br />
When you watch widescreen<br />
DVD-Video movies, the entire picture<br />
will be visible and there will be<br />
black bars at the top and bottom of<br />
the screen, as shown.<br />
4:3 Pan Scan:<br />
Choose this option if you have a<br />
standard TV (4:3 aspect ratio) and<br />
want to use the full height of the<br />
screen when watching widescreen<br />
DVD-Video movies. In order to use<br />
the full height of the screen, the picture<br />
will be cropped on both sides, as shown. This option<br />
won’t work with discs that don’t support pan and scan.<br />
16:9 Widescreen:<br />
Choose this option if you have a widescreen TV (16:9<br />
aspect ratio). Depends on TV, the picture appears<br />
stretched when watching programs in 4:3 format.<br />
16:9 Compressed:<br />
Choose this option if you have<br />
a widescreen TV (16:9 aspect<br />
ratio) and the picture appears<br />
stretched when watching programs<br />
in 4:3 format. This<br />
option will correct the issue.<br />
Notes:<br />
• This setting does not apply to DVD menus.<br />
• When the HDMI OUT signal is at a resolution of 720p<br />
or 1080i, programs in 4:3 format will appear stretched,<br />
so we recommend that you select the “16:9 Compressed”<br />
option.<br />
• With some DVD-Video discs this setting may have no<br />
effect. See the disc’s sleeve notes to see which picture<br />
format is used.<br />
View Mode<br />
With this setting you can adjust the aspect of the picture<br />
so that it fits your TV screen. Due to your TV’s aspect<br />
ratio setting and the DVD’s aspect ratio, black bars may<br />
appear above and below the picture or at the sides and the<br />
aspect of the picture may be unsuitable. In this case, use<br />
this setting to adjust the aspect of the picture as you like.<br />
Normal (default):<br />
The picture is displayed in its original aspect ratio.<br />
View Mode1:<br />
The picture is stretched horizontally to make it fit the<br />
height of the screen.<br />
View Mode2:<br />
The picture is stretched vertically to make it fit the width<br />
of the screen.<br />
View Mode3:<br />
The picture is stretched horizontally and vertically.<br />
Tip:<br />
The view mode can also be changed by<br />
using the remote controller’s [ASPECT]<br />
button.<br />
Note:<br />
This setting does not apply to DVD menus.<br />
HDMI Output Setting<br />
With this setting you can turn the HDMI video output on<br />
or off. See page 30 for more information.<br />
On (default):<br />
Video is output by the HDMI OUT.<br />
Off:<br />
Video is not output by the HDMI OUT.<br />
Tip:<br />
This setting can also be changed by using the [HDMI]<br />
button on the front panel (see page 30).<br />
Note:<br />
When this setting is set to “On”, video is output by the<br />
analog video outputs only when the “HD Resolution” is<br />
set to “480p (480p / 576p)”.<br />
60
DVD Onscreen Setup Menus—Continued<br />
Progressive Setting<br />
With this setting you can set the component video output<br />
to progressive or interlaced. While the “HDMI Output<br />
Setting” is set to “On”, this setting is fixed at “Progressive”<br />
and cannot be changed. See page 30 for more<br />
information.<br />
Interlace:<br />
Component video output is interlaced.<br />
Progressive (default):<br />
Component video output is progressive.<br />
Tip:<br />
When the “HDMI Output Setting” is set to “Off”, you<br />
can also change this setting by using the remote controller’s<br />
[RESOLUTION] button (see page 30).<br />
HD Resolution<br />
With this setting you can set the video resolution for the<br />
HDMI OUT. See page 30 for more information.<br />
Auto:<br />
The resolution is automatically set to the native resolution<br />
of the TV connected to the HDMI OUT.<br />
480p (480p / 576p) (default):<br />
The setting displayed depends on the country in which<br />
you purchased the DVD receiver.<br />
720 x 480p 60 Hz or 720 x 576p 50 Hz<br />
720p:<br />
1280 x 720p 50/60 Hz<br />
1080i:<br />
1920 x 1080i 50/60 Hz<br />
Tip:<br />
When the “HDMI Output Setting” is set to “On”, you<br />
can also change this setting by using the remote controller’s<br />
[RESOLUTION] button (see page 30).<br />
Note:<br />
Initially, the DVD receiver is configured to output both<br />
HDMI and analog video. However, if after changing the<br />
resolution settings there’s no picture, with the analog<br />
video connection or HDMI connection in place, press<br />
the [RESOLUTION] button repeatedly to restore the<br />
picture.<br />
HD JPEG Mode<br />
If your TV is connected to the HDMI OUT and the<br />
HDMI resolution is set to 720p or 1080i, this setting<br />
allows you to display your JPEG pictures in high definition.<br />
On:<br />
JPEG pictures displayed in high definition.<br />
Off (default):<br />
JPEG pictures displayed as normal.<br />
Notes:<br />
• If your TV is connected to a video output other than<br />
the HDMI OUT, or the HDMI output resolution is set<br />
to something other than 720p or 1080i, even if this setting<br />
is set to “On”, your JPEG pictures will not be displayed<br />
in high definition.<br />
• When using HD JPEG, it may take a while to display<br />
each picture. And the Zoom function cannot be used.<br />
Also, onscreen status messages such as “Play” and<br />
“Stop” are not displayed.<br />
Video Black Level<br />
With this setting you can adjust the picture blackness for<br />
the analog video outputs. It does not affect the component<br />
video output when its set to progressive.<br />
Light:<br />
Blacks are lighter, and the entire picture becomes lighter.<br />
Dark:<br />
Blacks are darker, and the entire picture becomes darker.<br />
Brightness<br />
With this setting you can adjust the picture brightness.<br />
Level 1-7:<br />
“1” is the darkest. “7” is the brightest. The default brightness<br />
is “4 (standard)”.<br />
Sharpness<br />
With this setting you can adjust the picture sharpness.<br />
Level 1-7:<br />
“1” is the softest. “7” is the sharpest. The default sharpness<br />
is “4 (standard)”.<br />
61
DVD Onscreen Setup Menus—Continued<br />
PAL Output Setting<br />
With this setting you can specify how the DVD receiver<br />
outputs video signals when playing NTSC format<br />
DVD-Video discs or Video CDs.<br />
Auto (default):<br />
Use this option if your TV supports both PAL and<br />
NTSC. The DVD receiver does not convert the video format.<br />
When you play a PAL disc, the video output will be<br />
PAL format. And when you play an NTSC disc, it’ll be<br />
NTSC format.<br />
NTSC:<br />
Use this option if your TV doesn’t support PAL playback,<br />
or the picture is distorted when watching PAL<br />
discs. The DVD receiver will convert PAL format video<br />
signals to NTSC-compatible format.<br />
PAL:<br />
Use this option if your TV doesn’t support NTSC playback,<br />
or the picture is distorted when watching NTSC<br />
discs. The DVD receiver will convert NTSC format<br />
video signals to PAL-compatible format.<br />
Note:<br />
If you select the wrong setting by mistake and loose the<br />
picture, while pressing and holding the Next [ ] button<br />
on the front panel, press the [STANDBY/ON] button<br />
on the front panel repeatedly to get picture.<br />
SCART Output Setting<br />
(European model only)<br />
With this setting you can select the video format to be<br />
used for the SCART AV CONNECTOR: RGB or composite<br />
video. Before changing this setting, refer to your<br />
TV’s manual to see if its SCART input can accept video<br />
signals in these formats.<br />
Composite (default):<br />
Composite video offers standard quality.<br />
RGB:<br />
This format offers the best picture quality.<br />
Notes:<br />
• If you select a format that is not supported by your TV,<br />
the setup menu may disappear from the screen. If this<br />
happens, switch off your equipment, connect the DVD<br />
receiver to your TV with a composite video cable, and<br />
then change this setting.<br />
• When “RGB” is selected, nothing is output by the<br />
component video output and HDMI output.<br />
Audio Menu<br />
Digital/HDMI Audio Out<br />
With this setting you can configure the HDMI digital<br />
output.<br />
All (default):<br />
Dolby Digital and DTS signals are output as they are.<br />
If your TV or amp doesn’t support higher sampling rates,<br />
set the “Linear PCM Out” setting to “Down Sample On”<br />
(below).<br />
PCM:<br />
Dolby Digital and DTS signals are down mixed to 2<br />
channels and output as PCM. If your TV doesn’t support<br />
Dolby Digital and DTS, choose this option. Audio from<br />
speakers connected to DVD receiver is also changed to<br />
PCM.<br />
Note:<br />
MPEG is output as PCM regardless of this setting.<br />
Linear PCM Out<br />
With this setting you can configure the DVD receiver to<br />
output digital audio with higher sampling rates (e.g.,<br />
88.2 kHz, 96 kHz) as it is or to down sample it to 48 kHz<br />
or below.<br />
If the TV you connect to the DVD receiver’s HDMI output<br />
supports 96 kHz digital audio, select “Down Sample<br />
Off”. Otherwise, select “Down Sample On”.<br />
Down Sample On:<br />
Source of 48 kHz or more is down sampled to 48 or<br />
44.1 kHz.<br />
Down Sample Off (default):<br />
Sources are output as they are.<br />
Notes:<br />
• Some copy-protected DVD-Video discs may use<br />
96 kHz digital audio only for D/A conversion to the<br />
analog audio outputs.<br />
• With some discs, even if you select “Down Sample<br />
Off”, the digital audio will be down sampled, and in<br />
some cases may not be output by the DVD receiver’s<br />
HDMI output.<br />
62
DVD Onscreen Setup Menus—Continued<br />
Language Menu<br />
On-Screen Language<br />
With this setting you can select a language for the<br />
onscreen setup menus and messages.<br />
Select one of the displayed languages.<br />
Disc Menu Language<br />
With this setting you can select your preferred language<br />
for disc menus. When you play a DVD-Video disc with<br />
multiple language disc menus, your preferred language<br />
will be selected automatically.<br />
Select “Others” if the language you want is not displayed.<br />
See “Selecting Other Languages” on page 64.<br />
Notes:<br />
• Not all DVD-Video discs have menus in multiple languages.<br />
• Even if a DVD-Video disc has menus in multiple languages,<br />
this setting may not always work.<br />
• If a DVD has only one menu language, that will be<br />
used.<br />
• With some DVD-Video discs you can select languages<br />
from a menu.<br />
Subtitle Language<br />
With this setting you can select your preferred language<br />
for subtitles. When you play a DVD-Video disc with<br />
multiple language subtitles, your preferred language will<br />
be selected automatically.<br />
Select “No Subtitle” if you don’t want subtitles displayed.<br />
Select “Others” if the language you want is not<br />
displayed. See “Selecting Other Languages” on page 64.<br />
Notes:<br />
• Not all DVD-Video discs have subtitles.<br />
• Even if a DVD-Video disc has subtitles in multiple<br />
languages, this setting may not always work.<br />
• If a DVD has only one subtitle language, that will be<br />
used.<br />
• With some DVD-Video discs you can select subtitles<br />
from a menu.<br />
Audio Language<br />
With this setting you can select your preferred language<br />
for soundtracks. When you play a DVD-Video disc with<br />
multiple language soundtracks, your preferred language<br />
will be selected automatically.<br />
Select “Others” if the language you want is not displayed.<br />
See “Selecting Other Languages” on page 64.<br />
Notes:<br />
• Not all DVD-Video discs have soundtracks in multiple<br />
languages.<br />
• Even if a DVD-Video disc has soundtracks in multiple<br />
languages, this setting may not always work.<br />
• If a DVD has only one soundtrack, that will be used.<br />
• With some DVD-Video discs you can select languages<br />
from a menu.<br />
63
DVD Onscreen Setup Menus—Continued<br />
64<br />
■ Selecting Other Languages<br />
This section explains how to select other languages for<br />
disc menus, audio, and subtitles.<br />
1<br />
Remote controller<br />
Select “Others” from the “Disc<br />
Menu Language”, “Audio Language”,<br />
or “Subtitle Language”<br />
menu, and then press [ENTER].<br />
2<br />
Use the Left/Right [ ]/[ ] buttons<br />
to select the code.<br />
Use the Up/Down [ ]/[ ] buttons to<br />
enter a language code.<br />
See adjacent table for language codes.<br />
3<br />
When you’ve finished, press the<br />
[ENTER] button.<br />
Use this list when specifying other languages.<br />
Language Code Language Code<br />
Japanese JA Kirghiz KY<br />
<strong>English</strong> EN Latin LA<br />
French FR Lingala LN<br />
German DE Laothian LO<br />
Italian IT Lithuanian LT<br />
Spanish ES Latvian LV<br />
Chinese ZH Malagasy MG<br />
Dutch NL Maori MI<br />
Portuguese PT Macedonian MK<br />
Swedish SV Malayalam ML<br />
Russian RU Mongolian MN<br />
Korean KO Moldavian MO<br />
Greek EL Marathi MR<br />
Afar AA Malay MS<br />
Abkhazian AB Maltese MT<br />
Afrikaans AF Burmese MY<br />
Amharic AM Nauru NA<br />
Arabic AR Nepali NE<br />
Assamese AS Norwegian NO<br />
Aymara AY Occitan OC<br />
Azerbaijani AZ Oromo OM<br />
Bashkir BA Oriya OR<br />
Byelorussian BE Panjabi PA<br />
Bulgarian BG Polish PL<br />
Bihari BH Pashto, Pushto PS<br />
Bislama BI Quechua QU<br />
Bengali BN Rhaeto-Romance RM<br />
Language Code Language Code<br />
Tibetan BO Kirundi RN<br />
Breton BR Romanian RO<br />
Catalan CA Kinyarwanda RW<br />
Corsican CO Sanskrit SA<br />
Czech CS Sindhi SD<br />
Welsh CY Sangho SG<br />
Danish DA Serbo-Croatian SH<br />
Bhutani DZ Sinhalese SI<br />
Esperanto EO Slovak SK<br />
Estonian ET Slovenian SL<br />
Basque EU Samoan SM<br />
Persian FA Shona SN<br />
Finnish FI Somali SO<br />
Fiji FJ Albanian SQ<br />
Faroese FO Serbian SR<br />
Frisian FY Siswati SS<br />
Irish GA Sesotho ST<br />
Scots-Gaelic GD Sundanese SU<br />
Galician GL Swahili SW<br />
Guarani GN Tamil TA<br />
Gujarati GU Telugu TE<br />
Hausa HA Tajik TG<br />
Hindi HI Thai TH<br />
Croatian HR Tigrinya TI<br />
Hungarian HU Turkmen TK<br />
Armenian HY Tagalog TL<br />
Interlingua IA Setswana TN<br />
Interlingue IE Tonga TO<br />
Inupiak IK Turkish TR<br />
Indonesian IN Tsonga TS<br />
Icelandic IS Tatar TT<br />
Hebrew IW Twi TW<br />
Yiddish JI Ukrainian UK<br />
Javanese JW Urdu UR<br />
Georgian KA Uzbek UZ<br />
Kazakh KK Vietnamese VI<br />
Greenlandic KL Volapük VO<br />
Cambodian KM Wolof WO<br />
Kannada KN Xhosa XH<br />
Kashmiri KS Yoruba YO<br />
Kurdish KU Zulu ZU
DVD Onscreen Setup Menus—Continued<br />
DivX Subtitle<br />
Some DivX video discs include subtitles in one or more<br />
languages. The disc packaging will usually inform you<br />
about which subtitle languages are available.<br />
With this setting you can select your preferred language<br />
for DivX subtitles. When you play a DivX disc with multiple<br />
language subtitles, your preferred language will be<br />
selected automatically.<br />
You can select DivX subtitle languages by region:<br />
Unicode (UTF-8):<br />
Unicode encoding scheme. Two bytes are used to encode<br />
each character.<br />
Western European<br />
Turkish<br />
Central European<br />
Cyrillic<br />
Greek<br />
Hebrew<br />
Arabic<br />
Baltic<br />
Vietnam<br />
Note:<br />
Some external subtitle files may display incorrectly or<br />
not at all.<br />
Display Menu<br />
On-Screen Display<br />
With this setting you can turn on or off onscreen messages,<br />
such as “Play”, “Stop”, and “Resume”.<br />
Off:<br />
Onscreen messages are not displayed.<br />
On (default):<br />
Onscreen messages are displayed.<br />
On-Screen Display Color<br />
With this setting you can set the color and theme of the<br />
Disc navigation window.<br />
Sapphire<br />
Pearl<br />
Amethyst<br />
Garnet<br />
Background<br />
With this setting you can select the color of the background<br />
that’s displayed when the DVD receiver is<br />
stopped.<br />
Blue<br />
Gray<br />
Graphic:<br />
The theme picture specified for the “On-Screen Display<br />
Color” setting is used.<br />
Screen Saver<br />
With the Screen Saver function you can protect your TV<br />
against screen burn-in, which can occur when the same<br />
image or menu is displayed for a long time.<br />
Off:<br />
Screen saver off.<br />
On (default):<br />
Screen saver on.<br />
When the “Screen Saver” function is set to “On”, and<br />
playback is stopped for 15 minutes, the Screen Saver<br />
function automatically displays a moving image.<br />
Once the screen saver has been activated, you can cancel<br />
it by pressing either the Play [ ] button.<br />
65
DVD Onscreen Setup Menus—Continued<br />
Operation Setting Menu<br />
Setting the Parental Lock<br />
With the Parental Lock function you can block access to<br />
certain scenes that the authors have flagged as being<br />
unsuitable for children.<br />
1<br />
Select “Operation Setting” menu<br />
in the setup.<br />
2<br />
Remote controller<br />
Use the Up/Down [ ]/[ ] buttons<br />
to select “Parental Lock”,<br />
and then press the [ENTER] button.<br />
The password (security code) input<br />
screen appears.<br />
• Discs with parental lock may cut certain scenes,<br />
replace certain scenes with children-friendly scenes,<br />
or prevent playback of the entire disc.<br />
Change the Security Code<br />
To change the Security Code, confirm your existing code<br />
then enter a new one.<br />
1<br />
Select “Operation Setting” menu<br />
in the setup.<br />
2<br />
Remote controller<br />
Use the Up/Down [ ]/[ ] buttons<br />
to select “Security Code”,<br />
and then press the [ENTER] button.<br />
The password (security code) input<br />
screen appears.<br />
3<br />
Enter the security code using the<br />
remote controller’s number buttons,<br />
and then press the [ENTER]<br />
button.<br />
The default security code is “8888”.<br />
You can change the security code in the<br />
next section.<br />
3<br />
Enter the existing security code<br />
using the remote controller’s<br />
number buttons, and then press<br />
the [ENTER] button.<br />
The default security code is “8888”.<br />
Even if a new security code has been<br />
entered, the code “8888” can still be<br />
used.<br />
Once the security code has been<br />
entered, the new security code input<br />
screen appears.<br />
4<br />
Use the Up/Down [ ]/[ ] buttons<br />
to change the level of parental<br />
lock, and then press the<br />
[ENTER] button.<br />
At level 8 parental lock is off, with level<br />
1 being the strictest level.<br />
4<br />
Enter the new security code<br />
using the remote controller’s<br />
number buttons, and then press<br />
the [ENTER] button.<br />
The new security code has been set.<br />
Notes:<br />
• When entering a security code, you can use the [CLR]<br />
button to delete the numbers entered so far, if necessary.<br />
• Not all discs use parental lock. See the disc’s sleeve<br />
notes for details.<br />
Note:<br />
If you forget your security code, enter “8888” instead.<br />
“8888” is a security code that can always be used.<br />
66
DVD Onscreen Setup Menus—Continued<br />
DVD Priority Contents<br />
This setting determines what is played when a<br />
DVD-Audio disc also contains DVD-Video material.<br />
DVD-AUDIO (default):<br />
The DVD-Audio material is played.<br />
DVD-VIDEO:<br />
The DVD-Video material is played.<br />
SACD Priority Contents<br />
SACDs have two separate areas for storing audio<br />
tracks—one for multichannel audio, the other for 2-<br />
channel stereo audio. In addition, hybrid SACDs have<br />
an extra layer for playback in standard CD players.<br />
With this setting you can determine how SACDs are<br />
played by the DVD receiver.<br />
2 ch Area (default):<br />
The 2-channel stereo audio tracks are played.<br />
Multi ch Area:<br />
The multichannel audio tracks are played.<br />
CD Area:<br />
The CD layer of hybrid SACDs is played.<br />
Note:<br />
This setting determines which area of the disc is played<br />
initially. If “Multi ch Area” is selected, and an SACD<br />
that contains no multichannel area is loaded, the 2-channel<br />
area will be played.<br />
DivX ® Registration<br />
To play DivX VOD (video on demand) content on this<br />
DVD receiver, you first need to register it with your<br />
DivX VOD content provider. You do this by generating<br />
a DivX VOD registration code, which you then submit to<br />
your provider.<br />
Your 8-digit registration code is displayed.<br />
Burn DivX VOD content that you download to a blank<br />
CD-R.<br />
DivX® Video On Demand<br />
Your registration code is:<br />
01234567<br />
(http://www.divx.com/vod)<br />
OK<br />
Make a note of the code as you will need it when you<br />
register with a DivX VOD provider.<br />
Important:<br />
DivX VOD content is protected by DRM (digital rights<br />
management). This restricts playback of content to specific,<br />
registered devices.<br />
67
Additional information<br />
Resetting the receiver<br />
Use this procedure to reset all the receiver’s settings to<br />
the factory default.<br />
Note that resetting the DVD receiver will delete your<br />
radio presets and custom settings.<br />
1<br />
Turn on the DVD receiver.<br />
Disc Content Organization<br />
■ DVD-Video Format<br />
DVD-Video discs contain titles, which are usually subdivided<br />
into chapters.<br />
Title 1<br />
Title 2<br />
Chapter 1 Chapter 2 Chapter 1 Chapter 2<br />
2<br />
DVD receiver<br />
HOLD<br />
Using the front panel buttons, hold<br />
down the Stop [ ] button and<br />
press [STANDBY/ON] button.<br />
“DVD Clear” appears on the display.<br />
When the reset is complete, and the DVD<br />
receiver enters Standby mode.<br />
■ DVD-Audio<br />
DVD-Audio discs contain groups and tracks.<br />
Track 1<br />
DVD-Video<br />
Group 1<br />
Group 2<br />
Track 2 Track 3 Track 1 Track 2<br />
DVD-Audio<br />
DVD-Video regions<br />
All DVD-Video discs carry a region mark on the case<br />
somewhere that indicates which region(s) of the world<br />
the disc is compatible with. Your DVD receiver also has<br />
a region mark, which you can find on the rear panel.<br />
Discs from incompatible regions will not play in this<br />
receiver. Discs marked “ALL” will play in any player.<br />
The diagram below shows the various DVD regions of<br />
the world.<br />
■ SACD<br />
SACDs have two separate areas for storing audio<br />
tracks—one for multichannel audio, the other for 2-<br />
channel stereo audio. In addition, hybrid SACDs have an<br />
extra layer for playback in standard CD players.<br />
Multichannel area<br />
Track 1 Track 2 Track 3<br />
SACD<br />
CD layer of a hybrid SACD<br />
■ VCD<br />
VCDs contain video tracks.<br />
Stereo area<br />
Track 1 Track 2 Track 3<br />
Track 1 Track 2 Track 3 Track 4<br />
1<br />
4<br />
2<br />
2<br />
5<br />
5<br />
6<br />
3<br />
4<br />
2<br />
1<br />
Video CD<br />
■ Audio CD Format<br />
Audio CDs contain tracks.<br />
Track 1 Track 2 Track 3 Track 4 Track 5<br />
Audio CD<br />
68
Additional information—Continued<br />
■ MP3, WMA, JPEG & DivX Files<br />
MP3, WMA, JPEG, and DivX files are typically organized<br />
into folders. The DVD receiver handles MP3,<br />
WMA, JPEG, and DivX files as tracks.<br />
ROOT 001<br />
MP3/WMA/JPEG/DivX (CD-R/RW, DVD-R/RW,<br />
DVD+R/RW)<br />
Folder 1<br />
001<br />
Track<br />
001.mp3<br />
(001.wma)<br />
010.mp3<br />
(010.wma)<br />
011.mp3<br />
(011.wma)<br />
Folder 2<br />
002<br />
012.mp3<br />
(012.wma)<br />
020.mp3<br />
(020.wma)<br />
004<br />
Glossary<br />
Analog audio<br />
An electrical signal that directly represents sound. Compare<br />
this to digital audio which can be an electrical signal,<br />
but is an indirect representation of sound. See also<br />
“Digital audio.”<br />
Aspect ratio<br />
The width of a TV screen relative to its height. Conventional<br />
TVs are 4:3 (in other words, the screen is almost<br />
square); widescreen models are 16:9 (the screen is<br />
almost twice as wide as it is high).<br />
Digital audio<br />
An indirect representation of sound by numbers. During<br />
recording, the sound is measured at discrete intervals<br />
(44,100 times a second for CD audio) by an analog-todigital<br />
converter, generating a stream of numbers.<br />
On playback, a digital-to-analog converter generates an<br />
analog signal based on these numbers. See also “Sampling<br />
frequency” and “Analog audio.”<br />
DivX<br />
DivX is a media technology created by DivX, Inc. DivX<br />
media files contain compressed video. DivX files can<br />
also include advanced media features like menus, subtitles,<br />
and alternate audio tracks.<br />
Dolby Digital<br />
Using a maximum of 5.1 channels of audio, this high<br />
quality surround system is used in many of the finer<br />
movie theaters around the world.<br />
The display shows which channels are active, for example<br />
showing 3/2.1. The 3 being the two front channels<br />
and the center channel; the 2 being the surround channels,<br />
and the .1 being the LFE channel.<br />
Down Mix<br />
Down mixing reduces the number of surround-sound<br />
channels and mixes the multi-channel audio that is used<br />
in Dolby Digital and DTS so that the audio matches the<br />
number of speakers and other elements of the output<br />
environment.<br />
DRM<br />
DRM (digital rights management) is a type of server<br />
software developed to enable secure distribution of paid<br />
content over the web, recently incorporated by WMA<br />
(Windows Media Audio).<br />
DTS<br />
DTS stands for Digital Theater Systems. DTS is a surround<br />
system different from Dolby Digital that has<br />
become a popular surround sound format for movies.<br />
69
Glossary—Continued<br />
Dynamic range<br />
The difference between the quietest and loudest sounds<br />
possible in an audio signal (without distorting or getting<br />
lost in noise).<br />
Dolby Digital and DTS soundtracks are capable of a very<br />
wide dynamic range, delivering dramatic cinema-like<br />
effects.<br />
File extension<br />
A tag added to the end of a filename to indicate the type<br />
of file. For example, “.mp3” indicates an MP3 file.<br />
HD<br />
Abbreviation for high definition, as in HDTV (high-definition<br />
TV).<br />
HDCP (High-bandwidth Digital Content Protection)<br />
The video encryption technology developed by Intel for<br />
HDMI/DVI. It’s designed to protect video content and<br />
requires a HDCP-compatible device to display the<br />
encrypted video.<br />
HDMI<br />
HDMI (High-Definition Multimedia Interface) is a highspeed<br />
digital interface which has the capability to support<br />
standard, enhanced, or high-definition video plus<br />
standard to multichannel surround-sound audio on a single<br />
digital connection. HDMI features include uncompressed<br />
digital video, a bandwidth of up to 5 gigabytes<br />
per second and communication between the AV source<br />
and AV devices such as DTVs.<br />
ISO 9660 format<br />
International standard for the volume and file structure<br />
of CD-ROM discs.<br />
JPEG<br />
A file format used for still images, such as photographs<br />
and illustrations. JPEG files are identified by the file<br />
extension “.jpg” or “.JPG”. Most digital cameras use this<br />
format.<br />
LFE<br />
LFE refers to the low-frequency effect sounds that are<br />
used in Dolby Digital and DTS. Generally, the subwoofers<br />
function more effectively when these sounds are contained<br />
in the signal from the disc or other media.<br />
MP3<br />
MP3 (MPEG1 audio layer 3) is a compressed audio file<br />
format. Files are recognized by their file extension<br />
“.mp3” or “.MP3”.<br />
MPEG video<br />
The video format used for Video CDs and DVDs. Video<br />
CD uses the older MPEG-1 standard, while DVD uses<br />
the newer and much better quality MPEG-2 standard.<br />
NTSC (National Television Standards Committee)<br />
This is one broadcasting system for color televisions,<br />
and is used in the U.S., Korea, Central and South America,<br />
Japan, and other countries.The system consists of<br />
525 horizontal scan lines, and is divided into 30 frames<br />
per second. It uses an interlacing method which skips<br />
every other scan line to produce an image (field) with<br />
one-half of the full resolution, and displays 60 such<br />
fields per second.<br />
PAL (Phase alternation by line)<br />
This is one broadcasting system for color televisions,<br />
and is used primarily in Europe.This system consists of<br />
625 horizontal scan lines. It uses an interlacing method<br />
with 25 frames (50 fields) per second.The vertical resolution<br />
is higher than NTSC, however the frame rate is<br />
lower.<br />
PBC (PlayBack Control) (Video CD only)<br />
A system of navigating a Video CD through on-screen<br />
menus recorded onto the disc. Especially good for discs<br />
that you would normally not watch from beginning to<br />
end all at once—karaoke discs, for example.<br />
PCM (Pulse Code Modulation)<br />
The most common system of encoding digital audio,<br />
found on CDs and DAT. Excellent quality, but requires a<br />
lot of data compared to formats such as Dolby Digital.<br />
Progressive scan video<br />
All the lines that make up a video picture are updated in<br />
one pass (compared to interlace which takes two passes<br />
to update the whole picture).<br />
Regions (DVD-Video only)<br />
These associate discs and players with particular areas of<br />
the world. This unit will only play discs that have compatible<br />
region codes. You can find the region code of<br />
your unit by looking on the rear panel. Some discs are<br />
compatible with more than one region (or all regions).<br />
Sampling frequency<br />
The rate at which sound is measured to be turned into<br />
digital audio data. The higher the rate, the better the<br />
sound quality, but the more digital information is generated.<br />
Standard CD audio has a sampling frequency of<br />
44.1kHz, which means 44,100 samples (measurements)<br />
per second. See also “Digital audio.”<br />
T-D (Theater-Dimensional)<br />
This is a virtual surround-sound technology that was<br />
developed by <strong>Onkyo</strong> Corporation. For details, see<br />
page 42.<br />
WMA<br />
WMA is short for Windows Media Audio and refers to<br />
an audio compression technology developed by<br />
Microsoft Corporation. WMA data can be encoded by<br />
using Windows Media Player version 8.<br />
70
Troubleshooting<br />
If you have any trouble using the DVD receiver, look for<br />
a solution in this section. If you can’t resolve the issue<br />
yourself, contact your <strong>Onkyo</strong> dealer.<br />
The DVD receiver does not work or shows no reaction.<br />
Power<br />
DVD receiver<br />
HOLD<br />
Press and hold Stop [ ] button for 10 seconds to<br />
forcibly shut down the DVD receiver.<br />
The power to the system is not turned on<br />
• Make sure that the power cord is plugged into the AC<br />
outlet. Make sure that the other end of the power cord<br />
is properly connected to the DVD receiver’s AC<br />
INLET (page 23).<br />
• Unplug the power cord from the AC outlet, wait for 10<br />
seconds or more, then plug the cable in again.<br />
The power is turned off during the operation<br />
• If the SLEEP indicator is lit on the display, the Sleep<br />
timer is functioning. Cancel the Sleep timer (page 32).<br />
• If the STANDBY indicator is blinking on and off, the<br />
built-in protection circuit is activated. Be careful not<br />
to short the positive and negative wires.<br />
The DVD receiver turns off as soon as it’s turned on<br />
• The amp protection circuit has been activated.<br />
Remove the power cord from the wall outlet immediately.<br />
Disconnect all speaker cables and input sources,<br />
and leave the DVD receiver with its power cord disconnected<br />
for 1 hour. After that, reconnect the power<br />
cord and set the volume to maximum. If the DVD<br />
receiver stays on, set the volume to minimum, disconnect<br />
the power cord, and reconnect your speakers and<br />
input sources. If the DVD receiver turns off when you<br />
set the volume to maximum, disconnect the power<br />
cord, and contact your <strong>Onkyo</strong> dealer.<br />
Audio<br />
The sound is not heard or very quiet<br />
• Make sure the power cord is plugged into an AC outlet.<br />
• Make sure that all audio connecting plugs are pushed<br />
in all the way (page 23).<br />
• Make sure that none of the connecting cables are bent,<br />
twisted, or damaged.<br />
• Make sure that the speakers are connected correctly<br />
and the speaker cables’core wires touch only the<br />
speaker connectors (page 17).<br />
• Check to make sure that the volume level is not set to<br />
minimum (page 31).<br />
• Make sure that the input source is properly selected<br />
(page 31).<br />
• Check to make sure the muting function is not<br />
engaged. If the MUTING indicator is flashing, the<br />
sound is muted. Cancel the muting function (page 32).<br />
• When the headphones are connected, the speakers do<br />
not output any sound. Disconnect the headphones<br />
(page 31).<br />
• Make sure that the digital input source is assigned<br />
properly (page 57).<br />
• Check the digital audio output setting on the connected<br />
device. On some game consoles, such as those<br />
that support DVD, the default setting is off.<br />
• The audio signal input from HDMI IN is not output<br />
from the speakers connected to the DVD receiver.<br />
Make the analog or digital connection (pages 25, 26).<br />
There’s no sound with a certain signal format<br />
• Check the digital audio output setting on the connected<br />
device. On some game consoles, such as those<br />
that support DVD, the default setting is off.<br />
Sound is not good<br />
• Make sure that the speaker cords are connected correctly.<br />
Check their polarity (+/) (page 17).<br />
• Connect the analog audio cables (RCA) firmly<br />
(page 23).<br />
• Sound quality could be affected by a strong magnetic<br />
field, such as a TV set. Locate such a device far from<br />
the DVD receiver.<br />
• If you have any devices that emit high intensity radio<br />
waves near the DVD receiver, such as a cellular phone<br />
in operation (calling), noise may be generated.<br />
• The DVD receiver uses a rotating unit whose precision<br />
instrument generates faint hissing sound while reading<br />
a disc during playing back or searching a track; you<br />
may hear it in a silent environment.<br />
• Using cable ties to bundle audio cables with power<br />
cord, speaker cables, and so on may degrade the audio<br />
performance, so don’t do it.<br />
71
Troubleshooting—Continued<br />
The subwoofer produces no sound<br />
• When you play source material that contains no information<br />
in the LFE channel, the subwoofer produces<br />
no sound.<br />
• Make sure the subwoofer is configured correctly<br />
(page 55).<br />
Headphones makes noise or no sound<br />
• There may be a bad contact. Clean up the headphones<br />
terminal. For information on how to clean up, see the<br />
instruction manual attached to the headphones. Otherwise,<br />
verify the cord of the headphones which may be<br />
broken.<br />
Sound Quality<br />
• The sound quality becomes stable when 10 to 30 minutes<br />
have passed after the power was turned on.<br />
• Using cable ties to bundle audio cables with speaker<br />
cables may degrade the audio performance, so don’t<br />
do it.<br />
The Late Night function doesn’t work<br />
• Make sure the source material is Dolby Digital.<br />
The beginning of audio received by an HDMI IN can’t<br />
be heard<br />
• Since it takes longer to identify the format of an<br />
HDMI signal than it does for other digital audio signals,<br />
audio output may not start immediately.<br />
There’s no sound to your TV connected to an HDMI<br />
OUT<br />
• You won’t hear any sound from the HDMI OUT if<br />
your TV only supports DVI.<br />
• Change the HDMI setting on your TV to HDMI.<br />
• Your TV doesn’t support Dolby or DTS. Change the<br />
“Digital/HDMI Audio Out” setting to “PCM”<br />
(page 62).<br />
• Your TV doesn’t support 88.2 kHz, 96 kHz, 176.4<br />
kHz or 196 kHz PCM. Change the “Linear PCM Out”<br />
setting to “Down Sample On” (page 62).<br />
The TV audio with SCART connection is strange. The<br />
volume is too low. There’s no bass sound.<br />
• When listening to the TV audio with SCART connection,<br />
set the listening mode to “Stereo” or “Direct”.<br />
• When outputting the subwoofer’s audio from the TV,<br />
set the “Subwfr” setting to “No” (page 55).<br />
Video<br />
There’s no picture<br />
• Make sure that all video connecting plugs are pushed<br />
in all the way (page 23).<br />
• Make sure that each video component is properly connected.<br />
(pages 23-27)<br />
• If the video source is connected to an HDMI input,<br />
your TV must be connected to the HDMI OUT<br />
(page 27). Your TV input must be changed to HDMI.<br />
• While the Pure Audio listening mode is selected, the<br />
video circuitry is turned off.<br />
• On your TV, make sure that the video input to which<br />
the DVD receiver is connected is selected.<br />
• The “PAL Output Setting” is set wrong for your TV.<br />
Change the “PAL Output Setting” to suit your TV<br />
(page 62).<br />
• The “SCART Output Setting” is set wrong for your<br />
TV. Make sure your TV supports the selected video<br />
output format (page 62).<br />
There’s no picture from a source connected to an<br />
HDMI IN<br />
• The TV or display does not support the current video<br />
resolution and you need to select another resolution on<br />
your AV component.<br />
There’s no picture to your TV connected to an HDMI<br />
OUT<br />
• The HDMI Output Setting is set to Off or your TV<br />
doesn’t support HDMI Resolution settings of 720p<br />
and 1080i (page 30).<br />
• Try pressing the [HDMI] button on the front panel<br />
repeatedly to switch the HDMI Output Setting to on,<br />
and then pressing the [RESOLUTION] button on the<br />
remote controller repeatedly to get picture (page 30).<br />
• If the DVD receiver is connected to your AV component,<br />
try connecting it directly to your TV. It will not<br />
work if you connect to a component that doesn’t support<br />
HDCP (page 27).<br />
There’s no picture to your TV connected to an<br />
Component Video Output<br />
• Your TV does not support progressive scanning, and<br />
the HDMI Output Setting is on.<br />
While the HDMI Output Setting is on, the component<br />
video output outputs progressive video.<br />
Try pressing the [HDMI] button on the front panel<br />
repeatedly to switch the HDMI Output Setting to off,<br />
and then pressing the [RESOLUTION] button repeatedly<br />
to switch to Interlaced (page 30).<br />
• Press the [RESOLUTION] button repeatedly to select<br />
480p (480p/576p) (page 30).<br />
There’s no picture to your TV connected to an<br />
Composite Video Output<br />
• Try pressing the [RESOLUTION] button on the<br />
remote controller repeatedly to get picture (page 22).<br />
72
Troubleshooting—Continued<br />
Tuner<br />
Reception is noisy, FM stereo reception is noisy, or<br />
the FM ST indicator doesn’t appear<br />
• Relocate your antenna.<br />
• Move the DVD receiver away from your TV or computer.<br />
• When listening to an AM station, operating the remote<br />
controller may cause noise.<br />
• Passing cars and airplanes can cause interference.<br />
• Concrete walls weaken radio signals.<br />
• If nothing improves the reception, install an outdoor<br />
antenna.<br />
Remote Controller<br />
The remote controller doesn’t work<br />
• Make sure that the batteries are installed with the correct<br />
polarity (page 11).<br />
• Install new batteries. Don’t mix different types of batteries,<br />
or old and new batteries (page 11).<br />
• Make sure that the remote controller is not too far<br />
away from the DVD receiver, and that there’s no<br />
obstruction between the remote controller and the<br />
DVD receiver’s remote control sensor (page 11).<br />
• Make sure that the DVD receiver is not subjected to<br />
direct sunshine or inverter-type fluorescent lights.<br />
Relocate if necessary.<br />
• If the DVD receiver is installed in a rack or cabinet<br />
with colored-glass doors, the remote controller may<br />
not work reliably when the doors are closed.<br />
• When using the remote controller to control other<br />
manufacturers’ AV components, some buttons may<br />
not work as expected.<br />
Can’t control a TV<br />
• Make sure you’ve entered the correct remote control<br />
code.<br />
• To control another manufacturer’s TV, point the<br />
remote controller at the component. Be sure to enter<br />
the appropriate remote control code first (page 53).<br />
Can’t control an RI Dock<br />
• Make sure that the cable and analog audio cable<br />
are connected properly. Connecting only an cable<br />
won’t work (page 26).<br />
• To control an RI Dock that’s connected via , point<br />
the remote controller at the DVD receiver.<br />
The functions don’t work<br />
• To use , you must make an connection and an<br />
analog audio connection (RCA) between the component<br />
and DVD receiver, even if they are connected<br />
digitally (page 26).<br />
Disc Playback<br />
The disc won’t play or is automatically ejected after<br />
loading<br />
• Make sure the disc is free from dirt and dust and is not<br />
damaged (page 10).<br />
• Make sure the disc is loaded with the label side face up<br />
and aligned properly in the disc tray guide.<br />
• If the region number on a DVD-Video disc does not<br />
match the number on the receiver, the disc cannot be<br />
used (page 68).<br />
• Condensation inside the receiver: Allow time for condensation<br />
to evaporate. Avoid using the player near an<br />
air-conditioning unit.<br />
• Reload the disc with the label side face up.<br />
• If the Parental Lock function is active, defeat it or<br />
change the level (page 66).<br />
The disc doesn’t play in the correct order<br />
• Defeat special playback modes such as Repeat Play,<br />
Memory Playback, and Random Playback<br />
(pages 46–48.)<br />
Track numbers cannot be stored when setting<br />
MEMORY playback<br />
• Make sure that the disc has been loaded, and the<br />
track(s) you try to program are included on the disc.<br />
It takes a long time until playback starts<br />
• It may take time for the DVD receiver to load and read<br />
a CD or DVD that contains many tracks.<br />
New settings made in the onscreen setup menus<br />
while a disc is playing are ineffective<br />
• Some settings can be changed while a disc is playing,<br />
but are not effective until the disc is stopped then<br />
restarted: Press the Stop [ ] button, then start playback<br />
again.<br />
Screen is stretched or aspect does not change<br />
• The “TV Shape” setting in the onscreen setup menu<br />
is incorrect. See page 60 for how to set it correctly for<br />
your TV/monitor.<br />
Picture disturbance during playback or the picture is<br />
dark<br />
• This receiver is compatible with Macro-Vision System<br />
copy guard. Some discs include a copy prevention<br />
signal, and when this type of disc is played back,<br />
stripes etc., may appear on some sections of the picture<br />
depending on the TV. This is not a malfunction.<br />
• Due to the receiver’s copy protection circuits, connection<br />
of this device through a VCR or an AV selector<br />
may prevent recording or cause picture problems. This<br />
is not a malfunction.<br />
73
Troubleshooting—Continued<br />
No sound, or sound is distorted<br />
• No sound is output when scanning discs other than<br />
audio CDs and SACDs.<br />
• Check that the disc is free from dust and dirt, and that<br />
it is not damaged (page 10).<br />
• Check that the plugs and terminals are free of dirt,<br />
oxide, etc. and clean if necessary. Also check the cable<br />
for damage.<br />
Noticeable difference in DVD and CD volume<br />
• This is due to differences in the audio format and is not<br />
a malfunction.<br />
DVD-Audio playback stops<br />
• The disc may have been illegally copied.<br />
Can’t watch the DVD-Video<br />
• With some DVD-Video Discs, you need to select an<br />
audio output format from a menu.<br />
Can’t watch the DVD-Video material on a DVD-Audio<br />
disc<br />
• Set the “DVD Priority Contents” setting to<br />
“DVD-VIDEO” (page 67).<br />
Can’t play the multichannel area of a hybrid SACD<br />
• Set the “SACD Priority Contents” setting to “Multi ch<br />
Area” (page 67).<br />
Can’t play MP3 and JPEG discs<br />
• Use only ISO 9660 Level 2 format discs (page 9).<br />
• The disc has not been finalized. Finalize the disc<br />
(page 9).<br />
Can’t select MP3 files<br />
• MP3 files without a “.mp3” or “.MP3” filename extension<br />
are not recognized.<br />
• The MP3 disc is a multisession disc. Only files in the<br />
first session of a multisession disc can be played<br />
(page 9).<br />
Can’t play WMA files<br />
• WMA files without a “.wma” or “.WMA” filename<br />
extension are not recognized.<br />
• The WMA file’s copyright option is on. Don’t use the<br />
copyright option (page 9).<br />
Can’t view JPEG files<br />
• JPEG files without a “.jpg” or “.JPG” or “.JPEG” filename<br />
extension are not recognized.<br />
• The JPEG file is too big. Use JPEG files that are less<br />
than 5 megabytes (page 9).<br />
Can’t play a DivX file<br />
• Make sure the DivX file was encoded with the predetermined<br />
format (page 9).<br />
DivX plays but there’s no sound<br />
• Try re-encoding the file with a supported audio format.<br />
Connection with External Devices<br />
No sound is heard from the connected device<br />
• Make sure that the optical digital cable is not bent over<br />
or damaged.<br />
• Set the “Digital/HDMI Audio Out” to “PCM”,<br />
because the TV supports only PCM signals.<br />
The turntable sounds still<br />
• Make sure if the turntable has built in phono equalizer.<br />
• If the turntable has no phono equalizer built in, you<br />
must provide one separately.<br />
The turntable makes no sound<br />
• If your turntable uses an MC cartridge, you must connect<br />
an MC transformer or an MC head amp.<br />
The Colors of the TV Picture Bleed<br />
• Locate the speakers far from the TV.<br />
Others<br />
The display doesn’t work<br />
• The display is turned off when the Pure Audio listening<br />
mode is selected (page 42).<br />
The DVD receiver contains a microcomputer for signal<br />
processing and control functions. In very rare situations,<br />
severe interference, noise from an external source, or<br />
static electricity may cause it to lockup. In the unlikely<br />
event that this happens, unplug the power cord from the<br />
wall outlet, wait at least five seconds, and then plug it<br />
back in again.<br />
Before disconnecting the power cord from the wall outlet,<br />
set the DVD receiver to Standby.<br />
74
Troubleshooting—Continued<br />
HDMI Status Mode<br />
If you’re using an HDMI connection and there’s no picture or sound, you can check the status of the HDMI connection<br />
by pressing and holding down the DVD receiver’s [DISPLAY] button for 10 seconds until a message ID appears on the<br />
display. Look up the message ID in the following tables and check the HDMI connections and settings on both the DVD<br />
receiver and the connected component.<br />
HDMI connection and HDMI-related settings status<br />
Displayed ID<br />
MSG ID 001<br />
MSG ID 015<br />
MSG ID 021<br />
MSG ID 022<br />
MSG ID 023<br />
MSG ID 024<br />
Message<br />
Turn the DVD receiver and the connected component off, then turn them on again. Make sure that<br />
the connected component is working properly and that the DVD receiver’s HDMI settings are configured<br />
suitably for that component.<br />
Input is selected other than DVD or VIDEO1. No output from HDMI OUT.<br />
When the DVD or VIDEO1 input is selected, the HDMI Output Setting is set to Off. Change it to On<br />
(page 30).<br />
Check the settings and connections of the TV and component connected to DVD receiver.<br />
Pure Audio listening mode is selected. Set other listening modes.<br />
No picture from the HDMI connection<br />
Displayed ID<br />
Message<br />
MSG ID 002 The “HDMI Output Setting” is set to “Off”. Change it to “On” (page 30).<br />
MSG ID 003<br />
MSG ID 004<br />
MSG ID 005<br />
MSG ID 006<br />
MSG ID 007<br />
MSG ID 008<br />
MSG ID 009<br />
The HDMI cable may not be connected properly. Check the connection. Also, make sure the HDMI<br />
input on the TV is correctly configured to received HDMI.<br />
Make sure the HDMI input on the TV is correctly configured to received HDMI.<br />
The connected component may not support HDCP. Make sure the connected component supports<br />
HDCP.<br />
Turn the DVD receiver and the connected component off, then turn them on again.<br />
The DVD receiver may be connected to the other component’s DVI jack. Some TVs may not properly<br />
receive the video output by the DVD receiver. Also, with a DVI connection, there will be no<br />
sound.<br />
The DVD receiver’s “HD Resolution” setting is set to “720p” or “1080i”. If your TV doesn’t support<br />
these resolutions, select another resolution (page 30).<br />
The connected component may not be receiving the HDMI signal properly.<br />
Try selecting another resolution on the DVD receiver (page 30).<br />
No sound from the HDMI connection<br />
Displayed ID<br />
MSG ID 011<br />
MSG ID 014<br />
MSG ID 012<br />
MSG ID 013<br />
MSG ID 016<br />
MSG ID 017<br />
MSG ID 020<br />
Message<br />
The connected component may not support 96 kHz PCM. Set the DVD receiver’s “Linear PCM<br />
Out” setting to “Down Sample On” (page 62).<br />
The connected component may not support Dolby Digital. Set the DVD receiver’s “Digital/HDMI<br />
Audio Out” setting to “PCM” (page 62).<br />
The connected component may not support DTS. Set the DVD receiver’s “Digital/HDMI Audio Out”<br />
setting to “PCM” (page 62).<br />
Audio from SACDs is not output by the HDMI OUT.<br />
75
Specifications<br />
Amplifier Section<br />
Rated Output Power (IEC)<br />
2 ch 50 W at 6 ohms, 1 kHz, 2 ch driven<br />
THD (Total Harmonic Distortion)<br />
0.9% (Power Rated)<br />
0.08% (1 kHz, 1 W)<br />
Input Sensitivity and Impedance<br />
200 mV/47 k (LINE)<br />
Frequency Response 5 Hz - 100 kHz/+1 dB - 3 dB (Direct mode)<br />
Signal to Noise Ratio 106 dB (LINE, IHF-A)<br />
Speaker Impedance 4 - or 6 - 16 <br />
Video Section<br />
Signal System PAL/NTSC<br />
Composite Video Output/Impedance<br />
1.0 V (p-p)/75 negative sync, RCA<br />
Component Video Output/Impedance<br />
Y: 1.0 V (p-p)/75 <br />
PB/PR: 0.7 V (p-p)/75 RCA/ phono<br />
AV Connector (European model only)<br />
1.0 V (p-p)/75 , Scart<br />
Component Video Frequency Response<br />
5 Hz - 50 MHz - 3 dB<br />
■ Video Inputs<br />
HDMI<br />
Composite<br />
■ Video Outputs<br />
HDMI<br />
OUT<br />
Component<br />
OUT<br />
Composite<br />
VIDEO OUTPUT<br />
■ Audio Inputs<br />
Digital Inputs Optical: 1<br />
Coaxial: 1<br />
Analog Inputs VIDEO1, VIDEO2/DOCK<br />
■ Audio Outputs<br />
Subwoofer Pre Output 1<br />
Speaker Outputs FL, FR<br />
Phones 1<br />
IN<br />
VIDEO1, VIDEO2/DOCK<br />
Specifications and features are subject to change without<br />
notice.<br />
Tuner Section<br />
FM Tuning Frequency Range<br />
87.5 MHz - 108.0 MHz<br />
AM Tuning Frequency Range<br />
European: 522 kHz - 1611 kHz<br />
Others: 522/530 kHz - 1611/1710 kHz<br />
Preset Channel 40<br />
General<br />
Power Supply<br />
Power Consumption<br />
Stand-by Power Consumption<br />
0.4 W<br />
Dimensions (W H D)<br />
European: AC 230 V, 50 Hz<br />
Others: AC 220 V, 50/60 Hz<br />
115 W<br />
435 90 415 mm<br />
Weight<br />
8.6 kg<br />
Operation Condition Temperature and Humidity<br />
5°C–35°C (41°F–95°F), 5%–85%<br />
Disc Compatibility SACD, DVD-Audio, DVD-Video, DVD-<br />
R/RW (VIDEO), DVD+R/RW, CD, CD-<br />
R/RW, Video CD, MP3, WMA, JPEG,<br />
DivX<br />
Disc that have not been property finalized<br />
may only be partially playable or not<br />
playable at all<br />
76
Remote Control Codes List<br />
TV<br />
888 0264<br />
Acura 0009<br />
Addison<br />
0092, 0108, 0653,<br />
1150<br />
Admiral 0093, 0463<br />
Advent<br />
0761, 0783, 0815,<br />
0817, 0842<br />
Aiko 0092<br />
Aiwa 1916<br />
0009, 0030, 0208,<br />
Akai<br />
0264, 0361, 0602,<br />
0672, 0702, 0753,<br />
0812, 1935<br />
Akura 0264<br />
Alba 0009, 0037, 0371<br />
Albatron 0700, 0843<br />
Alfide 0672<br />
America Action 0180<br />
Amstrad<br />
0009, 0037, 0171,<br />
0371, 0433<br />
Anam<br />
0009, 0161, 0180,<br />
0250, 0700<br />
Anam National 0161, 0250, 0650<br />
Anhua 0051<br />
Anitech 0009<br />
0009, 0030, 0060,<br />
0092, 0093, 0108,<br />
AOC<br />
0178, 0180, 0451,<br />
0474, 1150<br />
Aolinpike 0264<br />
Apex Digital<br />
0748, 0765, 0767,<br />
0879, 1217<br />
Audinac 0180<br />
Audiosonic 0037, 0109<br />
Audiovox<br />
0092, 0180, 0451,<br />
0623, 0802, 0875<br />
Aventura 0171<br />
Awa 0009<br />
Baihe 0009, 0264<br />
Baile 0001, 0009, 0661<br />
Baird 0343<br />
Baohuashi 0264<br />
Baosheng 0009, 0817<br />
Barco 0556<br />
Basic Line 0009<br />
Baur 0037, 0361, 0512<br />
Baysonic 0180<br />
Beaumark 0178<br />
Beijing<br />
0001, 0009, 0208,<br />
0226, 0264, 0661,<br />
0812, 0817<br />
TV<br />
Beko 0714<br />
Bell & Howell 0154<br />
BenQ 1032<br />
Beon 0037<br />
Blaupunkt 0195<br />
Blue Sky<br />
0556, 1037, 1254,<br />
1314<br />
BPL 0208, 0896<br />
Bradford 0180<br />
Brandt 0109, 0335<br />
Broksonic 0236, 0463, 1935<br />
Bush<br />
0009, 0037, 0371,<br />
0698, 1037<br />
C-Tech 0896<br />
Caihong 0009, 0817<br />
Cailing 0748<br />
Candle 0030, 0056, 0186<br />
Carnivale 0030<br />
Carver 0054, 0170<br />
Cascade 0009<br />
Cathay 0037<br />
CCE 0037<br />
Celebrity 0000<br />
Celera 0765<br />
Celestial 0767<br />
Centrex 0780<br />
Centurion 0037<br />
CGE 0074<br />
Changcheng<br />
0001, 0009, 0051,<br />
0264, 0661, 0817<br />
Changfei 0009, 0817<br />
Changfeng 0264, 0753, 0817<br />
Changhai 0009, 0817<br />
0009, 0156, 0264,<br />
Changhong 0508, 0765, 0767,<br />
0783, 0817, 1156<br />
Chengdu 0009, 0817<br />
Ching Tai 0009, 0092, 0474<br />
0000, 0009, 0092,<br />
Chun Yun 0161, 0180, 0474,<br />
0700, 0843, 1150<br />
Chunfeng 0009, 0264<br />
Chung Hsin<br />
0053, 0108, 0180,<br />
0474, 1150<br />
Chunsun 0009, 0817<br />
Cimline 0009<br />
Cinema 0672<br />
Cineral 0092, 0451<br />
Citizen<br />
0030, 0056, 0060,<br />
0092, 0186, 1935<br />
TV<br />
Clarion 0180<br />
Clarivox 0037<br />
Commercial<br />
Solutions<br />
0047, 1447<br />
Concerto 0056<br />
Conrac 0808<br />
0009, 0145, 0156,<br />
Conrowa 0264, 0698, 0753,<br />
1156<br />
Contec 0009, 0180<br />
Craig 0161, 0180<br />
Crosley 0054, 0074<br />
Crown<br />
Crown Mustang<br />
0009, 0037, 0180,<br />
0418, 0672<br />
0672<br />
0030, 0047, 0054,<br />
0056, 0060, 0093,<br />
Curtis Mathes 0145, 0154, 0166,<br />
0451, 0702, 1147,<br />
1347<br />
CXC 0180<br />
0009, 0030, 0037,<br />
0056, 0092, 0108,<br />
0154, 0170, 0178,<br />
Daewoo 0180, 0451, 0474,<br />
0623, 0634, 0661,<br />
0672, 0700, 0880,<br />
1150, 1661<br />
Dansai 0037<br />
Dayton 0009<br />
Dayu 0661<br />
De Graaf 0208<br />
Decca 0037<br />
Dell 1080, 1178<br />
Denon 0145, 0511<br />
Denver 0587<br />
Dick Smith<br />
Electronics<br />
0698<br />
Digatron 0037<br />
Digital Life 0780<br />
Digitor 0037, 0698<br />
Digix 0880<br />
Dixi 0009, 0037<br />
Dongda 0009<br />
Donghai 0009<br />
DSE 0698<br />
Dumont 0017<br />
Durabrand<br />
0171, 0178, 0180,<br />
0463, 1034<br />
77
Remote Control Codes List—Continued<br />
78<br />
TV<br />
ECE 0037<br />
Electroband 0000<br />
Electrograph 1755<br />
Electrohome 0463<br />
Elektra 0017, 1661<br />
Elin 0037<br />
Elta 0009<br />
0154, 0171, 0178,<br />
Emerson 0180, 0236, 0361,<br />
0463, 0623<br />
Envision 0030, 0813<br />
Erres 0037<br />
ESA 0171, 0812<br />
Ether 0009, 0030, 0161<br />
Etron 0009<br />
Feilang 0009<br />
Feilu 0009, 0817<br />
Feiyan 0264<br />
Feiyue 0009, 0817<br />
Ferguson<br />
0037, 0109, 0335,<br />
0343, 0560<br />
Fidelity 0361<br />
Finlandia 0208, 0346<br />
Finlux 0037, 0346<br />
Firstar 0009, 0236<br />
Firstline 0009<br />
Fisher 0154, 0208<br />
Flint 0455<br />
Formenti 0037<br />
Fortress 0093<br />
Frontech 0264<br />
Funai<br />
0171, 0180, 0264,<br />
0342<br />
Furi 0145, 0264, 0817<br />
Futuretech 0180<br />
Ganxin 0817<br />
Gateway 1755, 1756<br />
0030, 0047, 0051,<br />
GE<br />
0092, 0178, 0180,<br />
0451, 0560, 1347,<br />
1447, 1454<br />
GEC 0037<br />
Geloso 0009<br />
General 0186<br />
Gibralter 0017, 0030<br />
0186, 0683, 0809,<br />
Fujitsu<br />
0853, 1181<br />
Fujitsu General 0186<br />
Fujitsu Siemens<br />
1163<br />
TV<br />
Gintai 0474, 1150<br />
Go Video 0886<br />
0001, 0030, 0037,<br />
GoldStar 0056, 0109, 0154,<br />
0178, 1150, 1378<br />
Goodmans<br />
0037, 0343, 0360,<br />
0371, 0634<br />
Gradiente 0053, 0056, 0170<br />
Graetz 0361, 0714<br />
Granada 0037, 0208<br />
Grandin 0610, 0865, 0880<br />
0037, 0195, 0556,<br />
Grundig 0587, 0672, 0706,<br />
1935<br />
Grunpy 0180<br />
Haier<br />
0037, 0508, 0587,<br />
0698, 0896, 1034<br />
Haihong 0009<br />
Haiyan 0264, 0817<br />
Hallmark 0178<br />
Hankook<br />
0030, 0056, 0178,<br />
0180<br />
Hanseatic<br />
0037, 0361, 0556,<br />
0661, 0808<br />
Harman/Kardon<br />
0054<br />
Harvard 0180<br />
Harwa 0773<br />
Havermy 0093<br />
HCM 0009<br />
Helios 0865<br />
Hello Kitty 0451<br />
Himitsu 0180<br />
Hinari 0009, 0037<br />
Hisawa 0455<br />
Hisense<br />
0009, 0145, 0156,<br />
0508, 0556, 0748,<br />
0753, 0780, 1156<br />
0009, 0030, 0056,<br />
0092, 0109, 0145,<br />
0156, 0178, 0186,<br />
Hitachi 0225, 0474, 0508,<br />
1037, 1145, 1150,<br />
1156, 1245, 1256,<br />
1378<br />
Hitec 0698<br />
Hoeher 0865<br />
Hongmei<br />
0009, 0093, 0264,<br />
0817<br />
Hongyan 0264, 0817<br />
Hua Tun 0009, 1150<br />
Huafa 0009, 0145<br />
TV<br />
Huanghaimei 0009<br />
Huanghe 0009, 0817<br />
Huanglong 0009<br />
Huangshan 0009, 0264, 0817<br />
Huanyu 0264, 0817<br />
Huaqiang 0264<br />
Huari 0145, 0264<br />
Huodateji 0051<br />
Hypson 0037, 0264<br />
Hyundai 0849, 0865<br />
ICE 0264, 0371<br />
Imperial 0074, 0418<br />
0001, 0009, 0264,<br />
Imperial Crown<br />
0661<br />
Indiana 0037<br />
Infinity 0054<br />
Innova 0037<br />
Insignia 0171<br />
Inteq 0017<br />
Interfunk 0037, 0361, 0512<br />
Intervision 0037, 0264<br />
IRT 0451, 0698, 1661<br />
ITS 0371<br />
ITT 0361<br />
JBL 0054<br />
JCB 0000<br />
Jean<br />
0009, 0051, 0092,<br />
0156, 0236, 0474<br />
Jensen 0761, 0815, 0817<br />
Jiahua 0051<br />
JiaLiCai 0009, 0264<br />
Jinfeng<br />
0051, 0208, 0226,<br />
0817<br />
Jinque 0009, 0264, 0817<br />
Jinta 0009, 0264<br />
0009, 0037, 0054,<br />
Jinxing 0145, 0156, 0264,<br />
0556, 0698, 0817<br />
Juhua 0264, 0817<br />
JVC<br />
0053, 0160, 0371,<br />
0463, 0508, 0606,<br />
0653, 0683, 0731,<br />
1172, 1253
Remote Control Codes List—Continued<br />
TV<br />
Kaige 0009, 0264, 0817<br />
Kaisui 0009<br />
Kanghua 0896<br />
Kangli<br />
0001, 0009, 0264,<br />
0661, 0817<br />
Kangyi 0009, 0264<br />
Karcher 0610<br />
Kathrein 0556<br />
KEC 0180<br />
Kendo 0037<br />
Kenwood 0030<br />
Khind 0706, 0896<br />
Kioto 0054, 0556, 0706<br />
KLH 0765, 0767<br />
KLL 0037<br />
0053, 0108, 0150,<br />
Kolin<br />
0180, 0474, 1150,<br />
1331<br />
Kongque 0009, 0264, 0817<br />
Konka 0037, 0587, 0817<br />
Korpel 0037<br />
Kost 1262, 1483<br />
Koyoda 0009<br />
KTV 0030, 0180<br />
Kuaile 0009, 0264<br />
Kulun 0009<br />
Kunlun<br />
0051, 0208, 0226,<br />
0264, 0661, 0817<br />
L&S Electronic 0808<br />
Leyco 0037, 0264<br />
0001, 0030, 0037,<br />
0056, 0060, 0108,<br />
0178, 0442, 0474,<br />
LG<br />
0644, 0700, 0714,<br />
0856, 1178, 1265,<br />
1378<br />
Liesenk & Tter 0037<br />
Lihua 0817<br />
Local India TV<br />
Local Malaysia<br />
TV<br />
0009, 0208, 0264,<br />
0371, 0602<br />
0698<br />
Loewe<br />
0136, 0512, 0633,<br />
0790<br />
Logik 0001, 1217<br />
Longjiang 0264, 0817<br />
Luxman 0056<br />
Luxor 0361<br />
LXI<br />
0047, 0054, 0154,<br />
0156, 0178<br />
TV<br />
M & S 0054<br />
M Electronic<br />
0009, 0037, 0109,<br />
0346, 0480<br />
0030, 0054, 0186,<br />
Magnavox 0706, 0780, 0802,<br />
1254, 1454<br />
Manesth 0264<br />
Marantz<br />
0030, 0037, 0054,<br />
0556, 0704, 0855<br />
Mark 0037<br />
Mastro<br />
0053, 0698, 0706,<br />
0780<br />
Matsui<br />
0009, 0035, 0037,<br />
0208, 0371, 0443<br />
Matsushita 0161, 0250, 0650<br />
Maxent 1755<br />
Meck 0698<br />
Mediator 0037<br />
Medion<br />
0808, 0880, 1037,<br />
1248<br />
Megapower 0700<br />
Megatron 0145, 0178<br />
Meile 0264, 0817<br />
Memorex<br />
0009, 0150, 0154,<br />
0178, 0463, 1037<br />
Mercury 0001<br />
Mermaid 0037<br />
Metronic 0625<br />
Metz 0388, 0447, 0746<br />
MGA 0030, 0150, 0178<br />
Micromaxx 0808<br />
Microstar 0808<br />
Midland 0017, 0047, 0051<br />
0030, 0056, 0093,<br />
0108, 0150, 0154,<br />
0178, 0180, 0236,<br />
Mitsubishi<br />
0250, 0474, 0512,<br />
0817, 0836, 1150,<br />
1171, 1182, 1250<br />
Monivision 0700, 0843<br />
Motorola 0093<br />
MTC<br />
0030, 0056, 0060,<br />
0512<br />
Mudan<br />
0009, 0051, 0208,<br />
0226, 0264, 0817<br />
Multitech 0009, 0180<br />
Murphy 0474<br />
Myryad 0556<br />
NAD<br />
0156, 0178, 0361,<br />
0866<br />
Nanbao 0009, 0264<br />
TV<br />
Nansheng 0264, 0817<br />
National<br />
0051, 0208, 0226,<br />
0508<br />
0009, 0030, 0051,<br />
0053, 0056, 0154,<br />
0156, 0170, 0178,<br />
NEC<br />
0186, 0264, 0455,<br />
0474, 0508, 0704,<br />
0817, 1150, 1378,<br />
1456, 1704<br />
Neckermann 0037, 0556<br />
NEI 0037<br />
Neovia 0865<br />
Netsat 0037<br />
NetTV 1755<br />
Newave<br />
0009, 0092, 0093,<br />
0161, 0178, 1150<br />
Nikkai 0035, 0037, 0264<br />
Nikko 0030, 0092, 0178<br />
Noblex 0154<br />
Nokia 0361, 0480, 0606<br />
Norcent 0748, 0824<br />
Nordmende 0109, 0343, 0560<br />
NTC 0092<br />
Oceanic 0361<br />
Olevia 1144, 1240, 1331<br />
Onida 0053, 1253<br />
Onwa 0180, 0433<br />
Optimus<br />
0154, 0166, 0250,<br />
0650<br />
Optonica 0093<br />
0037, 0236, 0443,<br />
Orion 0463, 0474, 0880,<br />
1463<br />
Osaki 0264, 0474<br />
Otto Versand<br />
0037, 0343, 0512,<br />
0556<br />
79
Remote Control Codes List—Continued<br />
80<br />
TV<br />
Palladium 0418<br />
Palsonic 0773<br />
Panama 0264<br />
Panasonic<br />
0037, 0051, 0054,<br />
0161, 0208, 0226,<br />
0250, 0508, 0650,<br />
0896, 1168, 1175,<br />
1177<br />
0009, 0051, 0208,<br />
0226, 0264, 0508,<br />
Panda<br />
0698, 0706, 0780,<br />
0817<br />
Pausa 0009<br />
Penney<br />
Philco<br />
0030, 0047, 0051,<br />
0060, 0156, 0178,<br />
1347, 1378<br />
0030, 0037, 0054,<br />
0056, 0074, 0145,<br />
0178, 0180, 0186,<br />
0463, 0474, 1661<br />
0000, 0030, 0037,<br />
0051, 0054, 0056,<br />
Philips 0092, 0108, 0178,<br />
0186, 0474, 0556,<br />
0690, 1454, 1483<br />
Phonola 0037<br />
Pilot 0030, 0706<br />
Pioneer<br />
0109, 0166, 0679,<br />
0760, 0866<br />
0765, 0865, 1262,<br />
Polaroid 1276, 1314, 1341,<br />
1498<br />
Portland 0092<br />
Prima<br />
0761, 0783, 0815,<br />
0817<br />
Princeton 0700<br />
Prism 0051<br />
Profex 0009, 0361<br />
Proscan 0047, 1347, 1447<br />
Protech<br />
0009, 0037, 0264,<br />
0418<br />
0001, 0009, 0030,<br />
Proton 0056, 0178, 0474,<br />
0644<br />
Proview 1498<br />
Pulsar 0017<br />
Pye 0037<br />
Qingdao<br />
0051, 0208, 0226,<br />
0264, 0817<br />
Quasar 0051, 0250, 0650<br />
Quelle<br />
0037, 0074, 0361,<br />
0512<br />
R-Line 0037<br />
TV<br />
Radiola 0037<br />
RadioShack<br />
RCA<br />
0030, 0047, 0056,<br />
0154, 0178, 0180<br />
0000, 0030, 0047,<br />
0060, 0090, 0092,<br />
0178, 0618, 0679,<br />
1047, 1147, 1247,<br />
1347, 1447, 1454,<br />
1547<br />
Realistic<br />
0030, 0056, 0154,<br />
0178, 0180<br />
Rediffusion 0361<br />
Relisys 0865<br />
Reoc 0714<br />
Revox 0037<br />
Rex 0264<br />
Roadstar 0009, 0264, 0418<br />
Rowa<br />
0009, 0037, 0698,<br />
0712, 0748, 0817<br />
Runco 0017, 0030<br />
Ruyi 0817<br />
Saba 0109, 0335, 0343<br />
Sagem 0610<br />
Saige 0009, 0817<br />
Saisho 0009, 0264<br />
Salora 0361<br />
Sampo<br />
0009, 0030, 0092,<br />
0093, 0154, 0171,<br />
0178, 0474, 0650,<br />
0700, 1755<br />
0009, 0030, 0037,<br />
0056, 0060, 0090,<br />
0092, 0154, 0156,<br />
0178, 0208, 0226,<br />
Samsung 0264, 0474, 0556,<br />
0587, 0618, 0644,<br />
0702, 0766, 0812,<br />
0814, 0817, 1060,<br />
1150<br />
Sanjian 0264<br />
Sansei 0451<br />
Sansui 0463, 0706, 1935<br />
0088, 0145, 0154,<br />
0156, 0180, 0208,<br />
Sanyo 0264, 0376, 0424,<br />
0474, 0508, 1150,<br />
1179<br />
Sanyuan 0009, 0093, 0817<br />
SBR 0037<br />
Sceptre 1217<br />
Schaub Lorenz 0361<br />
Schneider 0037, 0371, 0394<br />
Scotch 0178<br />
TV<br />
Scott 0178, 0180, 0236<br />
0047, 0054, 0056,<br />
Sears 0154, 0156, 0171,<br />
0178<br />
SEG 0264, 1037, 1163<br />
Semivox 0180<br />
Semp 0156, 1356<br />
Sentra 0035<br />
Shancha 0264, 0817<br />
Shanghai<br />
0009, 0208, 0226,<br />
0264, 0817<br />
Shaofeng 0145, 0817<br />
0009, 0030, 0093,<br />
0256, 0474, 0650,<br />
Sharp<br />
0787, 0818, 1165,<br />
1193<br />
Shen Ying 0009, 0092, 0474<br />
Shencai 0009, 0145, 0264<br />
Sheng Chia<br />
0009, 0093, 0236,<br />
0474, 1150<br />
Shenyang<br />
0009, 0264, 0753,<br />
0817<br />
Sherwood 0009<br />
Siemens 0037, 0195<br />
Signet 1262<br />
Simpson 0186<br />
SKY 0037<br />
Sky Brazil 0880<br />
Skygiant 0180<br />
0009, 0037, 0264,<br />
Skyworth 0698, 0748, 0753,<br />
0817<br />
Sliding 0865, 0880<br />
Songba 0009<br />
Sonitron 0208<br />
Sonoko 0009, 0037<br />
Sonolor 0208<br />
Sontec 0037<br />
0000, 0650, 1100,<br />
Sony<br />
1167, 1300, 1505,<br />
1651<br />
Soundesign 0178, 0180, 0186<br />
Soundwave 0037, 0418<br />
Sowa<br />
0051, 0060, 0092,<br />
0156, 0178, 0226,<br />
0474, 1150
Remote Control Codes List—Continued<br />
SVA<br />
0587, 0748, 0865,<br />
0870, 0871<br />
Swisstec 0880<br />
Sylvania<br />
0030, 0054, 0171,<br />
1314<br />
Symphonic 0171, 0180<br />
0000, 0060, 0092,<br />
Synco 0093, 0178, 0451,<br />
0474<br />
Syntax 1144, 1240, 1331<br />
Sysline 0037<br />
T+A 0447<br />
Tacico<br />
0009, 0092, 0178,<br />
0474, 1150<br />
Tai Yi 0009, 1150<br />
Taishan 0009, 0817<br />
Tandy 0093<br />
Tashiko 0092, 0650, 1150<br />
0009, 0037, 0051,<br />
0054, 0060, 0154,<br />
Tatung<br />
0156, 0474, 1150,<br />
1156, 1254, 1756<br />
TCL 0698, 0706<br />
TCM 0808<br />
0009, 0037, 0264,<br />
Teac<br />
0418, 0455, 0698,<br />
0706, 0712, 1037,<br />
1755<br />
Technics 0051, 0250, 0650<br />
Technisson 0714<br />
Techview 0847<br />
Techwood 0051, 0056, 1163<br />
Teco<br />
0009, 0051, 0092,<br />
0093, 0178, 0264,<br />
0474, 0653<br />
0054, 0056, 0060,<br />
Teknika 0092, 0150, 0180,<br />
0186<br />
Teleavia 0343<br />
TV<br />
Squareview 0171<br />
SSS 0180<br />
Standard 0009<br />
Starlite 0180<br />
Studio Experience<br />
0843<br />
Sunkai 0865<br />
Superscan 0093, 0864<br />
Supra 0056<br />
Supreme 0000<br />
Susumu 0474<br />
TV<br />
0056, 0074, 0109,<br />
Telefunken 0335, 0343, 0625,<br />
0702, 0896<br />
Teletech 0009<br />
Teleton 0186<br />
Tera 0030, 0092, 0474<br />
Tevion 0767<br />
Texla 0780<br />
Thomson<br />
0109, 0343, 0560,<br />
0625, 1447<br />
Thorn<br />
0035, 0037, 0074,<br />
0343, 0361, 0512<br />
Thorn-Ferguson<br />
0343<br />
Tiane 0093, 0817<br />
TMK 0056, 0178<br />
TNCi 0017<br />
Tobo 0009, 0264, 0748<br />
Tongguang 0264<br />
Tongtel 0780<br />
Tophouse 0180<br />
0009, 0035, 0060,<br />
0093, 0145, 0154,<br />
0156, 0161, 0264,<br />
0508, 0509, 0618,<br />
Toshiba 0644, 0650, 0845,<br />
1150, 1156, 1169,<br />
1173, 1256, 1265,<br />
1356, 1456, 1508,<br />
1656, 1704, 1935<br />
TRANS-continents<br />
0865<br />
Transonic 0587, 0698, 0712<br />
Tuntex<br />
0009, 0030, 0092,<br />
0474<br />
TVS 0463<br />
Universum<br />
0037, 0074, 0264,<br />
0346, 0474<br />
V7 Videoseven 1755<br />
Vector<br />
Research<br />
0030<br />
Vestel 0037<br />
Victor<br />
0053, 0160, 0250,<br />
0376, 0650, 0653<br />
Videocon 0037, 0508<br />
Vidikron 0054<br />
Vidtech 0178<br />
Viewsonic<br />
0857, 0864, 0885,<br />
1755<br />
Vizio 0864, 0885, 1756<br />
Voxson 0178<br />
TV<br />
Wards<br />
0030, 0054, 0056,<br />
0178, 0866, 1156<br />
Warumaia 0661<br />
Watson 0037<br />
Waycon 0156<br />
Weipai 0009<br />
Westinghouse 0885, 0889, 1282<br />
White Westinghouse<br />
Xenius 0661<br />
0037, 0186, 0463,<br />
0623<br />
Xiahua<br />
0009, 0264, 0698,<br />
0773, 0817<br />
Xianghai 0009<br />
Xiangyang 0264<br />
Xiangyu 0009<br />
Xihu 0264, 0817<br />
Xingfu 0009<br />
Xinghai 0264<br />
Xoro 1217<br />
Yamaha 0030<br />
Yapshe 0250<br />
Yingge 0009<br />
Yoko 0037, 0264<br />
Yonggu 0009<br />
Youlanasi 0817<br />
Yousida 0009<br />
Yuhang 0009<br />
Zenith<br />
0017, 0092, 0178,<br />
0463, 1265<br />
ZhuHai 0009<br />
Zonda 0698<br />
TV/DVD Combination<br />
Akai 1935<br />
Broksonic 1935<br />
Bush 0698, 1037<br />
Citizen 1935<br />
Denver 0587<br />
Grundig 1935<br />
Sansui 1935<br />
Toshiba 1935<br />
Transonic 0587<br />
81
82<br />
Memo
Memo<br />
83
*Memo<br />
Sales & Product Planning Div. : 2-1, Nisshin-cho, Neyagawa-shi, OSAKA 572-8540, JAPAN<br />
Tel: 072-831-8023 Fax: 072-831-8124<br />
ONKYO U.S.A. CORPORATION<br />
18 Park Way, Upper Saddle River, N.J. 07458, U.S.A.<br />
Tel: 201-785-2600 Fax: 201-785-2650 http://www.us.onkyo.com/<br />
ONKYO EUROPE ELECTRONICS GmbH<br />
Liegnitzerstrasse 6, 82194 Groebenzell, GERMANY<br />
Tel: +49-8142-4401-0 Fax: +49-8142-4401-555 http://www.eu.onkyo.com/<br />
ONKYO EUROPE UK Office<br />
Suite 1, Gregories Court, Gregories Road, Beaconsfield, Buckinghamshire, HP9 1HQ<br />
UNITED KINGDOM Tel: +44-(0)1494-681515 Fax: +44(0)-1494-680452<br />
ONKYO CHINA LIMITED<br />
Unit 1&12, 9/F, Ever Gain PlazaTower 1, 88, Container Port Road, Kwai Chung,<br />
N.T., HONG KONG Tel: 852-2429-3118 Fax: 852-2428-9039<br />
http://www.ch.onkyo.com/<br />
HOMEPAGE<br />
http://www.onkyo.com/<br />
Y0708-1<br />
SN 29344555<br />
(C) Copyright 2007 ONKYO CORPORATION Japan. All rights reserved.<br />
84<br />
* 2 9 3 4 4 5 5 5 *