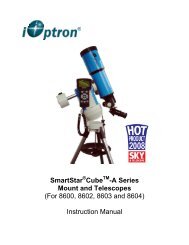
SmartStar MiniTower Instruction Manual - iOptron
SmartStar MiniTower Instruction Manual - iOptron
SmartStar MiniTower Instruction Manual - iOptron

Create successful ePaper yourself
Turn your PDF publications into a flip-book with our unique Google optimized e-Paper software.
<strong>SmartStar</strong> ® <strong>MiniTower</strong> TM<br />
<strong>Instruction</strong> <strong>Manual</strong>
Table of Content<br />
Table of Content ............................................................................................................................. 2<br />
1. <strong>MiniTower</strong> TM Overview.............................................................................................................. 4<br />
1.1. <strong>MiniTower</strong> TM Features......................................................................................................... 4<br />
1.2. <strong>MiniTower</strong> TM Components .................................................................................................. 7<br />
2. <strong>MiniTower</strong> TM Assembly ............................................................................................................. 8<br />
2.1. <strong>MiniTower</strong> Assembly .......................................................................................................... 9<br />
2.2. OTA Mounting and Balancing........................................................................................... 11<br />
2.3. Operate a <strong>MiniTower</strong> on Batteries..................................................................................... 12<br />
3. GoToNova ® 8401 Hand Controller .......................................................................................... 13<br />
3.1. Key Description ................................................................................................................. 13<br />
3.2. The LCD Screen ................................................................................................................ 14<br />
3.3. Connection to a Computer ................................................................................................. 14<br />
4. Getting Started .......................................................................................................................... 16<br />
4.1. Level and Align the Mount................................................................................................ 16<br />
4.1.1. Level the Mount.......................................................................................................... 16<br />
4.1.2. Initial Positions ........................................................................................................... 16<br />
4.2. Setting Up the Mount......................................................................................................... 17<br />
4.2.1. Set Up Time Zone....................................................................................................... 17<br />
4.2.2. Set Up Daylight Saving Time..................................................................................... 18<br />
4.2.3. Set Mount Type........................................................................................................... 19<br />
4.2.4. Set Anti-backlash........................................................................................................ 19<br />
4.2.5. Go to the Moon ........................................................................................................... 20<br />
4.2.6. Initial Star Alignment ................................................................................................. 20<br />
4.3. Turn Off the Mount............................................................................................................ 21<br />
5. Use the <strong>MiniTower</strong> ................................................................................................................... 22<br />
5.1. <strong>Manual</strong> Operation of a Telescope...................................................................................... 22<br />
5.2. Slew to an Object............................................................................................................... 22<br />
5.2.1. Planets, Sun, Moon ..................................................................................................... 22<br />
5.2.2. Deep sky objects ......................................................................................................... 22<br />
5.2.3. Comets ........................................................................................................................ 23<br />
5.2.4. Asteroids ..................................................................................................................... 23<br />
5.2.5. Stars: ........................................................................................................................... 23<br />
5.2.6. Constellations.............................................................................................................. 23<br />
5.2.7. User Objects................................................................................................................ 23<br />
5.2.8. Enter R.A. DEC .......................................................................................................... 23<br />
5.3. Sync to Target.................................................................................................................... 23<br />
5.4. Electric Focuser ................................................................................................................. 24<br />
5.5. Set Up Controller ............................................................................................................... 24<br />
5.5.1. Set Up Local Time...................................................................................................... 24<br />
5.5.2. Set Up Site .................................................................................................................. 24<br />
5.5.3. Set N/S Hemisphere.................................................................................................... 24<br />
5.5.4. Set Display Contrast ................................................................................................... 24<br />
5.5.5. Set Eyepiece Light ...................................................................................................... 24<br />
5.5.6. Set Backlight............................................................................................................... 24<br />
2
5.5.7. Set Anti-backlash........................................................................................................ 24<br />
5.5.8. Set Key Beep............................................................................................................... 24<br />
5.5.9. Set Mount Type........................................................................................................... 24<br />
5.5.10. Reset All.................................................................................................................... 24<br />
5.5.11. Update Firmware ...................................................................................................... 25<br />
5.5.12. Set gear ratio ............................................................................................................. 25<br />
5.5.13. Set Language............................................................................................................. 25<br />
5.6. Align .................................................................................................................................. 25<br />
5.6.1. One Star Align ............................................................................................................ 25<br />
5.6.2. Two Star Align............................................................................................................ 25<br />
5.6.3. Three-Star Align ......................................................................................................... 25<br />
5.6.4. Dis R.A axis error ....................................................................................................... 25<br />
5.6.5. Test Anti-backlash ...................................................................................................... 26<br />
5.6.6. Polaris Position ........................................................................................................... 26<br />
5.7. PEC Option ........................................................................................................................ 26<br />
5.8. Set Up Tracking ................................................................................................................. 26<br />
5.9. User Objects....................................................................................................................... 26<br />
5.10. Auto Guide....................................................................................................................... 26<br />
5.11. Park Scope ....................................................................................................................... 26<br />
5.12. To Park Position............................................................................................................... 26<br />
6. Maintenance and Servicing....................................................................................................... 27<br />
6.1. Maintenance....................................................................................................................... 27<br />
6.2. Troubleshooting ................................................................................................................. 27<br />
6.3. <strong>iOptron</strong> Customer Service.................................................................................................. 28<br />
Appendix A. Technical Specifications ......................................................................................... 29<br />
Appendix B. GoToNova ® 8401 HC MENU STRUCTURE ........................................................ 30<br />
Appendix C. GoToNova ® Star List .............................................................................................. 32<br />
Appendix D. Set Up USB-PC Connection ................................................................................... 38<br />
Appendix E. Firmware Upgrade................................................................................................... 45<br />
Appendix F. Use a PC to Control an <strong>iOptron</strong> Mount ................................................................... 48<br />
IOPTRON TWO YEAR TELESCOPE, MOUNT, AND CONTROLLER WARRANTY ........ 49<br />
WARNING!<br />
NEVER USE A TELESCOPE TO LOOK AT THE SUN!<br />
Looking at or near the Sun will cause instant and irreversible damage to your eye.<br />
Children should always have adult supervision while observing.<br />
June 2011 V2.2<br />
<strong>iOptron</strong> reserves the rights to revise this instruction without notice. Actual color/contents/design may differ from those described<br />
in this instruction.<br />
3
1. <strong>MiniTower</strong> TM Overview<br />
1.1. <strong>MiniTower</strong> TM Features<br />
<strong>MiniTower</strong> TM is the perfect combination of capacity and portability.<br />
‣ 25 lbs of Payload<br />
Born out of the popular <strong>iOptron</strong> Cube TM , The <strong>MiniTower</strong> TM is the ultimate observing<br />
solution for people who are searching for a capable and portable GOTO telescope mount to<br />
counter light pollution in their backyards and for travel convenience. With a standard payload of<br />
25 lbs, a rock solid 1.5” stainless steel tripod, metal worm and gear and two dovetail adaptors,<br />
The <strong>MiniTower</strong> TM is capable of handling various optical tube assemblies (OTAs). A 10-lbs<br />
counter weight and a secondary dovetail holder are provided for balancing an OTA weights<br />
more than 10 lbs, or for a secondary OTA.<br />
Figure 1. <strong>MiniTower</strong> Mount and Tripod<br />
4
‣ Extremely Portable<br />
With all the standard components (excluding the tripod) fitted in an aluminum alloy metal<br />
case, The <strong>MiniTower</strong> TM can easily travel in a car or taken as airline luggage. The system takes<br />
about 10 minutes to assemble. This unlimited portability combined with the internal GPS gives<br />
amateur astronomers real flexibility in selecting an observing site.<br />
Figure 2. <strong>MiniTower</strong> in a aluminum case<br />
‣ Accurate GOTO and Tracking<br />
Equipped with our GoToNova ® GOTO technology, the <strong>MiniTower</strong> TM is one of the most<br />
powerful and accurate GOTO mounts available on the market. The standard 8401 hand<br />
controller offers a superb navigation experience with an 8-line LCD backlit display, over<br />
120,000-object database, and a USB port for easy connection with ASCOM compliant PC<br />
planetarium programs. With a great GOTO accuracy and the GoToNova ® precision autotracking,<br />
the <strong>MiniTower</strong> TM will consistently bring the celestial object of your choice to the center<br />
of the eyepiece and keep tracking for hours.<br />
5
‣ Additional Unique Features<br />
Equipped with additional features such as automatic over-current protection, automatic<br />
clutch protection for both axes, easy 3-point level adjustment, dual scope setup with two<br />
dovetails and more-- The <strong>MiniTower</strong> TM is one of the most user-friendly GOTO mounts available<br />
today.<br />
Figure 3. <strong>MiniTower</strong> with dual scope setup<br />
6
1.2. <strong>MiniTower</strong> TM Components 1<br />
Shown in the picture:<br />
Figure 4. <strong>MiniTower</strong> Components<br />
1. Tripod Lock<br />
2. Tripod Support<br />
3. Tripod Knob<br />
4. Tripod Rod<br />
5. Level Adjustment Lock (not<br />
available on later version)<br />
6. Level Adjustment Knob<br />
7. Tripod<br />
8. Mount Base<br />
9. Primary Dovetail Lock<br />
10. Primary Dovetail Holder<br />
11. Azimuth Clutch Lock<br />
12. South Alignment Mark<br />
13. Altitude Clutch Lock<br />
14. Counter Balance Shaft Lock<br />
15. Secondary Dovetail Holder Lock<br />
16. Secondary Dovetail Holder<br />
17. Secondary Dovetail Lock<br />
18. Counter Balance Shaft<br />
19. Bubble Level Indicator<br />
Not shown in the picture:<br />
8401 Hand Controller<br />
Controller Cable<br />
AC Adapter<br />
12V DC Adapter with Car Lighter Plug<br />
USB Cable<br />
Counter Weight<br />
Counter Weight Lock Pin<br />
Counter Weight Lock<br />
Hard Travel Case<br />
1 The contents may vary without notice.<br />
7
2. <strong>MiniTower</strong> TM Assembly<br />
There are two shipping boxes. One box contains the hard case and mount components.<br />
The other box contains the tripod and counterweight.<br />
You may find that your tripod differs from the one shown here. Later models have star<br />
shaped Level Adjustment Screws (#6) without Level Adjustment Lock (#5) (based on customer<br />
feedback).<br />
Figure 5. <strong>MiniTower</strong> packages<br />
8
2.1. <strong>MiniTower</strong> Assembly<br />
1. Setup tripod. Extend tripod legs to full extension. Then lock<br />
legs using the lock knobs on sides.<br />
Next expand the legs out to their maximum position.<br />
Washer<br />
Figure 6<br />
2. Assemble the three prong washer and azimuth clutch lock<br />
(#11) onto the mount base<br />
#11<br />
Figure 7<br />
#5<br />
#6<br />
3. Adjust level adjustment screws<br />
(#6) upward 5 mm. Carefully position<br />
telescope mount onto the tripod by<br />
aligning the three holes on the<br />
bottom of the mount base (#8) to the<br />
three level adjustment screws (#6)<br />
on the top of the tripod (#7), hold the<br />
mount with your hands.<br />
Note: later models have the black<br />
star knobs (right photo)<br />
#4 Rod<br />
#3 Knob<br />
#2<br />
#1<br />
Figure 9<br />
Figure 8<br />
4. Secure the mount to the tripod by using the long tripod rod<br />
(#4). Hand tighten the rod into the bottom of the mount by<br />
turning the tripod knob (#3).<br />
Next, slide tripod support (#2) onto bottom of rod (#4). Position<br />
the three edges to fit against the three tripod legs. Then hand<br />
tighten tripod lock knob (#1) to secure the tripod support in<br />
place.<br />
9
#10<br />
#9<br />
5. Attach an OTA to the primary dovetail holder (#10) using the<br />
primary dovetail lock (#9).<br />
Tighten both the azimuth clutch lock (#11) and the altitude<br />
clutch lock (#13)<br />
#18<br />
#14<br />
Figure 10<br />
Figure 11<br />
6. Plug one end of supplied 6pin RJ-11 cable into either one of<br />
the two HBX (Handbox) sockets on the mount; plug the other<br />
end into the GoToNova 8401 hand controller. Plug in 12V<br />
power cable.<br />
Turn on power. Now you are ready to observe. Use the 4 Arrow<br />
keys (▲▼◄►) to rotate the scope Up, Down, Left, and Right.<br />
Use the number key to change the slew speed from the slowest<br />
(1:1X) to the fastest (9:MAX).<br />
The other HBX is reserved for accessories, such as electronic<br />
focuser, laser pointer and autoguider adapter. DO NOT plug<br />
non-<strong>iOptron</strong> accessories into the unit to avoid damaging<br />
the mount or accessories.<br />
7. This step allows you to attach the counterweight or a second<br />
scope. (note: if you have a light scope less than 10 lbs. on the<br />
primary side, then attaching a counterweight is optional).<br />
#13<br />
First, make sure the altitude clutch lock (#13) is tight. Screw the<br />
counter balance shaft (#18) into the threaded hole inside the<br />
altitude clutch lock (#13) and tighten the counter balance shaft<br />
lock (#14).<br />
Figure 12<br />
If you are attaching a second scope, do not add the<br />
counterweight. Instead, skip to Step 10 to add a second<br />
scope.<br />
groove<br />
8. Slide the counterweight onto the counterbalance shaft (#18).<br />
Next, insert the brass pin into the hole on the counterweight.<br />
Figure 13<br />
10
Lock<br />
9. Secure the counterweight by tightening the lock knob.<br />
Counter weight is heavy. Please handle with care<br />
to avoid injury!<br />
#17<br />
Figure 14<br />
#16<br />
This step is for attaching a second scope.<br />
10. Attach Secondary Dovetail Holder (#16) by tightening the<br />
holder lock (#15) onto the counterweight shaft (#18).<br />
After sliding your scope into the dovetail holder—secure the<br />
scope by tightening the secondary lock (#17)<br />
#15<br />
Figure 15<br />
2.2. OTA Mounting and Balancing<br />
The <strong>iOptron</strong> <strong>MiniTower</strong> can handle various OTAs. A dovetail plate is needed to mount<br />
an OTA onto the <strong>MiniTower</strong> mount. The width of the <strong>MiniTower</strong> TM dovetail holder is 1.75”.<br />
Most telescopes come with a dovetail plate installed on the bottom of the telescope. If<br />
the size of dovetail plate does not match un-screw the plate and install an appropriate dovetail<br />
plate that matches the holder. 1.75” dovetail plates are available from <strong>iOptron</strong> at<br />
www.<strong>iOptron</strong>.com (part number #8422) or visit an online or local camera store.<br />
Some telescopes may not have screw holes on the bottom. In this case you may need<br />
compatible mounting rings to attach the dovetail plate. The size of the mounting rings should<br />
match the aperture of your OTA.<br />
The counter weight (CW) is always helpful to balance the OTA in order to have smooth<br />
and accurate GOTO and tracking. The heavier the OTA, the more necessary it is to use a CW.<br />
For lightweight OTAs, i.e. 5-6 lbs, however, the CW may not be necessary.<br />
If you have a secondary OTA on the secondary dovetail holder, make sure you align it<br />
with the primary OTA. This alignment is done easier during the daytime. Point the primary<br />
telescope to a target at a remote building or flagpole and center the target in the eyepiece.<br />
Loosen the secondary dovetail holder lock (#15). Rotate the secondary OTA around the counter<br />
balance shaft (#18). Center the object in the eyepiece of the secondary OTA. If the secondary<br />
OTA is tilted, it can be adjusted by two tilting adjustment screws as shown in Figure 16 (M6 x<br />
12mm Allen set screws, not supplied).<br />
11
M6 set screws<br />
Figure 16. Secondary Dovetail and set screws<br />
A combination of a light OTA and a CW can be used to balance a heavier primary OTA.<br />
2.3. Operate a <strong>MiniTower</strong> on Batteries<br />
Open the battery compartment door to install batteries. Pull the battery holder out from<br />
the mount carefully, making sure not to pull the wires loose. Insert 8 AA batteries (not included)<br />
according to the diagram on the holder. Replace the battery holder back to the battery<br />
compartment and replace the cover. (See Figure 17)<br />
Figure 17. Battery compartment for <strong>MiniTower</strong><br />
The mount will draw a significant amount of current when performing GOTO and slew<br />
operations. The battery operation time varies depending on the battery quality and how often<br />
the mount slews or GOTOs. It could last from couple of hours to tens of hours. Use only fresh<br />
batteries and do not mix fresh and old batteries. Insufficient battery power may cause error<br />
messages.<br />
12
3. GoToNova ® 8401 Hand Controller<br />
HBX<br />
Port<br />
USB<br />
Port<br />
Figure 18. GoToNova 8401 Hand Controller<br />
GoToNova ® 8401 hand controller (HC) is the standard controller for a <strong>MiniTower</strong>, as<br />
shown in Figure 18.<br />
3.1. Key Description<br />
• MENU: Press “MENU” to enter the Main Menu.<br />
• BACK: Move back to the previous screen, or end/cancel current operation, such as<br />
slewing.<br />
• ENTER: Confirm an input, go to the next menu, select a choice, or slew the telescope<br />
to a selected object.<br />
• Arrow (▲▼►◄): Press ▲▼ buttons to move a telescope along the DEC direction,<br />
►◄ to move a telescope along the RA direction. Brows the menu or move the cursor<br />
in operating menu.<br />
13
• Number Keys: Input numerical values. Also used to adjust speeds (1: 1X; 2: 2X; 3: 8X;<br />
4: 16X; 5: 64X; 6: 128X; 7: 256X; 8: 512X; 9: MAX)<br />
• Light Key(☼): Turns on/off the red LED reading light on the back of the controller.<br />
• ? Key: For help or extra information.<br />
• STOP/0 Key: Stop/Start tracking.<br />
• HBX (Handbox) port: connect the HC to <strong>MiniTower</strong> mount using a 6-wire RJ11 cable.<br />
• USB port: connect the HC to a Computer via a USB cable.<br />
3.2. The LCD Screen<br />
The 8401 HC is designed to use for both <strong>iOptron</strong>’s equatorial (EQ) mount, such as the<br />
<strong>SmartStar</strong> ® -PR GOTO German Equatorial Mount and the GoToNova ® Equatorial Kit, and<br />
AltAzimuth (A/A) mount, which includes all <strong>SmartStar</strong> ® GOTO mounts and telescopes. It<br />
consists of a large 8-line LCD screen, which displays all the information as shown in Figure 19.<br />
The user interface is simple and easy to learn.<br />
Figure 19. 8401 HC LCD Information Screen<br />
• GPS status: When the power is turned on, it shows “GPS ON”, which means a GPS<br />
receiver is connected. When the GPS receiver finds the satellite and receives GPS<br />
signal, it shows “GPS OK”. The “GPS OK” may turn off after few minutes.<br />
• Slew speed: It has 9 speeds: 1X, 2X, 8X, 16X, 64X, 128X, 256X(1º/sec),<br />
512X(2º/sec), MAX(~4º/sec).<br />
• Tracking speed: It has 4 speeds: Cel (celestial), Sol (Solar), Lun (Lunar), Def (user<br />
defined)<br />
• Mount Type: EQ is equatorial and A/A altazimuth.<br />
3.3. Connection to a Computer<br />
The GoToNova hand controller has a USB port which can be connected to a computer.<br />
This will allow Firmware Upgrading, Database Updating, or Planetarium application. A<br />
USB2COM driver is needed to simulate the USB port to a RS-232 serial port. (see Appendix D)<br />
14
The <strong>MiniTower</strong> TM can be controlled by a number of popular astronomy software<br />
programs. For astronomy software that does not have an embedded <strong>iOptron</strong> mount driver, an<br />
ASCOM driver and related platform are needed. Please refer to Appendix F for more<br />
information.<br />
15
4. Getting Started<br />
In order to experience the full GOTO capability of GoToNova ®<br />
important to set up the mount correctly before observation.<br />
technology it is very<br />
4.1. Level and Align the Mount<br />
4.1.1. Level the Mount.<br />
Leveling is critical for a good GOTO and tracking accuracy.<br />
First, loosen tripod rod (#4) and tripod lock (#1) a little. Then<br />
loosen azimuth clutch lock (#11) half turn. Check the bubble level<br />
indicator (#19), adjust the level adjustment screws (#6), and center the<br />
bubble in the indicator. Turn the mount by a hand and make sure that<br />
the mount is leveled on all sides while turning. Adjust the level<br />
adjustment screws again if the bubble is not centered while turning.<br />
If your mount is equipped with level adjustment locks (#5 in<br />
Figure 8), after the bubble is centered, hold the level adjustment screws<br />
(#6) with one hand, and tighten the level adjustment lock (#5) with<br />
another hand. If the mount level needs to be re-adjusted, loose the level<br />
adjustment lock (#5) first.<br />
Figure 20<br />
Tighten the azimuth clutch lock (#11). Tighten the tripod knob<br />
(#3). Tighten the tripod lock (#1). Make sure the mount is always<br />
leveled.<br />
4.1.2. Initial Positions<br />
Each time the Mount is turned on, the default position is Parking Position, i.e., altitude is<br />
90º0’0” and azimuth is 180º0’0”, which means the “SOUTH” mark is pointing to south and the<br />
telescope is pointing straight up at the zenith. To set the Park Position, you can:<br />
Face the South. Align the Mount to south by<br />
turning the South mark facing south. An additional<br />
compass is needed. There are two ways to do so. One<br />
is loosen the azimuth clutch lock (#11) a little and<br />
manually turn the Mount to face south. Then tighten the<br />
azimuth clutch lock again. The other is turn on the<br />
mount. Turn the mount facing south using hand control.<br />
Then turn off the power. Note: Do not put the compass<br />
directly on top of the mount. The motor parts of the<br />
mount could affect the pointing accuracy of the<br />
compass.<br />
2) Up<br />
1) South<br />
#13<br />
Point to Zenith. Unlock the altitude clutch lock<br />
(#13) and rotate the telescope to point up directed at the<br />
Zenith. A torpedo level may help.<br />
Figure 21<br />
16
spin.<br />
Once it is straight re-tighten the altitude lock to make sure OTA is secure and will not<br />
4.2. Setting Up the Mount<br />
A <strong>MiniTower</strong> is equipped with a GPS receiver, which will receive the local time, longitude<br />
and latitude information from satellites after the link is established. However, manual input is still<br />
needed for time zone and Daylight Saving setting.<br />
A clear sky outside is needed for GPS to communicate well with the satellites.<br />
4.2.1. Set Up Time Zone<br />
Press MENU button, from the main menu, scroll down and select “Set up controller”<br />
Select and slew<br />
Sync. to target<br />
Electronic focuser<br />
Set up controller<br />
Align<br />
PEC option<br />
Set up Tracking<br />
User objects<br />
Press ENTER. Scroll down and select “Set up site”<br />
Set up Local Time<br />
Set up site<br />
Set N/S hemisphere<br />
Set display contrast<br />
Set Eyepiece light<br />
Set Backlight<br />
Set anti-backlash<br />
Set Key Beep<br />
Press ENTER. The longitude and latitude coordinates will be updated when the GPS<br />
picks up satellite signals. “W/E” means west/east hemisphere; “N/S” means north/south<br />
hemisphere; “d” means degree; “m” means minute; and “s” means second.<br />
Set up site info:<br />
Longitude:<br />
W071d27m47s<br />
Latitude:<br />
N42d15m40s<br />
300 Min. behind UT<br />
If for any reason your GPS can’t pick up a signal you can manually enter the GPS<br />
coordinates. Press ◄ or ► key to move the cursor and using ▲ or ▼ key to toggle between<br />
“W” and “E”, “N” and “S”, using number key to change the numbers. It is always a good idea to<br />
do your home work to get the GPS coordinates before traveling to a new observation site.
The site coordinates information can be found from internet, such as GPSVisualizer<br />
(http://www.gpsvisualizer.com/geocode), by entering the city name or address. In case you only<br />
find the site information in decimal format you can convert them into d:m:s format by multiplying<br />
the decimal numbers by 60. For example, N47.53 can be changed to N47º31'48”: 47.53º = 47º<br />
+0.53º, 0.53º=0.53x60'=31.8', 0.8'=0.8x60"=48". Therefore, 47.53º=47º31'48" or 47d31m48s.<br />
Same as N47º31.8’: 31.8’=31’+0.8’, 0.8’=0.8x60”=48”.<br />
Press ◄ or ► key, move the cursor to the bottom of the screen to set the time zone<br />
information (add or subtract 60 minutes per time zone). Enter minutes “ahead of” or “behind” UT<br />
(universal time).<br />
• New York City is 300 minutes “behind” UT<br />
• Los Angeles is 480 minutes “behind” UT<br />
• Rome is 60 minutes “ahead of” UT<br />
• Beijing is 480 minutes “ahead of” UT<br />
• Sydney is 600 minutes “ahead of” UT<br />
All the time zones in North America are behind UT, as shown in the following table. So<br />
make sure it shows “behind” instead of “ahead of” UT.<br />
Time Zone Hawaii Alaska Pacific Mountain Central Eastern<br />
Hour behind UT -10 -9 -8 -7 -6 -5<br />
Enter Minutes 600 540 480 420 360 300<br />
To adjust minutes, move the cursor to each digit and use the number keys to input<br />
number directly. To change the “behind” or “ahead of” UT, move the cursor to “ahead” and using<br />
▲ or ▼ key to toggle between “behind” and “ahead”. When the number is correct, press<br />
ENTER and go back to the previous screen.<br />
For other parts of the world you can find your “time zone” information online at websites<br />
such as http://www.timeanddate.com/worldclock/. DO NOT COUNT DAYLIGHT SAVING TIME.<br />
4.2.2. Set Up Daylight Saving Time<br />
Scroll up and select “Set up local Time”<br />
Set up Local Time<br />
Set up site<br />
Set N/S hemisphere<br />
Set display contrast<br />
Set Eyepiece light<br />
Set Backlight<br />
Set anti-backlash<br />
Set Key Beep<br />
Press ENTER.<br />
Set local time:<br />
2008-06-01 11:55:09<br />
Daylight Saving Time Y<br />
18
Use the ◄ or ► key to move the cursor to the bottom of the screen, use the ▲ or ▼<br />
button to toggle between “Y” and “N”. Press ENTER to go back the previous screen. The local<br />
time also can be manually entered in case of GPS malfunction or testing the mount inside.<br />
The time and site information will be stored inside HC memory chip. If you are not<br />
traveling to other observation site, they do not need to be changed.<br />
4.2.3. Set Mount Type<br />
For the <strong>MiniTower</strong>, set the hand controller to Alt/Azi mount. Scroll down and select “Set<br />
Mount Type”,<br />
Set up site<br />
Set N/S hemisphere<br />
Set display contrast<br />
Set Eyepiece light<br />
Set Backlight<br />
Set anti-backlash<br />
Set Key Beep<br />
Set Mount Type<br />
Press Enter.<br />
Equatorial Mount<br />
Alt/Azi Mount<br />
Select Alt/Azi mount and press ENTER to go back the previous screen.<br />
4.2.4. Set Anti-backlash<br />
For an Alt/Azi operation, both R.A. and DEC anti-backlash should be set to 0 step.<br />
Scroll down and select “Set anti-backlash”<br />
Set up Local Time<br />
Set up site<br />
Set N/S hemisphere<br />
Set display contrast<br />
Set Eyepiece light<br />
Set Backlight<br />
Set anti-backlash<br />
Set Key Beep<br />
Press ENTER. A R.A. anti-backlash will display:<br />
19
R.A. anti-backlash:<br />
0150 steps<br />
One steps equal to<br />
1.5 arc second.<br />
To adjust steps move the cursor to each digit and use the number keys to input number<br />
directly. Press ENTER – “DEC anti-backlash” will display:<br />
DEC anti-backlash:<br />
0150 steps<br />
One steps equal to<br />
1.5 arc second.<br />
Move the cursor to each digit and use the number keys to set the anti-backlash to 0.<br />
Press ENTER to go back the previous screen.<br />
Press BACK button to go back to main menu.<br />
4.2.5. Go to the Moon<br />
After performing these set-ups the mount is ready to GOTO and track objects. One of<br />
the most common objects is the Moon.<br />
To slew to the Moon, press MENU button. Select “Select and slew” by pressing the<br />
ENTER button. Select “Planets, Sun, Moon”, and use the ▲ or ▼ buttons to select Moon. Press<br />
ENTER. The telescope will automatically slew to the Moon and lock on. It will automatically<br />
begin to track once it locks on. Use the arrow keys to center the Moon in your eyepiece if it is<br />
not centered. Or for better performance use Sync to Target (see instructions later).<br />
4.2.6. Initial Star Alignment<br />
A simple star alignment/synchronization can be performed to improve the GOTO and<br />
tracking accuracy. To do so, after slew the mount to an object, such as Moon, press MENU<br />
button, scroll down to “Sync To Target”, follow the on-screen instruction and press ENTER.<br />
An alternate way is to perform a “One Star Align”. To do so, press MENU button, scroll<br />
down to “Align”, select “One Star Align” and press ENTER. The screen will display a list of bright<br />
stars for you to select from. Select an object using ▲ or ▼ key. Then press ENTER. Next use<br />
the arrow keys to slew to the object until it is centered in your eyepiece. Then press ENTER.<br />
You may need to use the number keys to change the slewing speed to make the<br />
centering procedure easier.<br />
20
4.3. Turn Off the Mount<br />
When you are finished observing it is recommended to return the mount to Park<br />
Position. If the mount is not moved then no initial set up is needed when you turn on the mount<br />
next time. To park the telescope press the MENU button, scroll down to “Park Telescope” and<br />
press ENTER. Once the telescope returns to Park Position turn the power off.<br />
21
5. Use the <strong>MiniTower</strong><br />
5.1. <strong>Manual</strong> Operation of a Telescope<br />
You may observe land and astronomical objects using hand controller’s arrow keys.<br />
After the telescope was assembled (referring to Section 2. Telescope Assembly), flip the<br />
I/O switch on the telescope mount to turn on the mount. Use ►,◄,▼ or ▲ buttons to point the<br />
telescope to the desired object. You may need to use the number keys to change the slewing<br />
speed. Simply press a number while slewing to change the slew speed.<br />
5.2. Slew to an Object<br />
Press the MENU button. From the main menu, select “Select and Slew.” Select an object<br />
that you would like to observe and press the ENTER key.<br />
The GoToNova ® 8401 hand controller has a database of over 120,000 objects. Use the<br />
► or ◄ buttons to move the cursor and the ▼▲ buttons to change the individual number. The<br />
check mark (√) indicates the object is above the horizon, and a cross mark (X) means it is below<br />
the horizon. In some catalogs, those stars below the horizon may not display on the hand<br />
controller.<br />
5.2.1. Planets, Sun, Moon<br />
There are 10 objects in the Solar system catalog.<br />
5.2.2. Deep sky objects<br />
This menu includes objects outside our Solar system such as galaxies, star clusters,<br />
quasars, and nebulae.<br />
• Named Deepsky Objects: consists of 60 deep sky objects with their common names.<br />
A list of named deep sky objects is attached in Appendix C.<br />
• Messier Catalog: consists of all 110 objects.<br />
• NGC IC Catalog: consists of 7840 objects in NGC catalog and 5386 objects in IC<br />
catalog. To select an object from NGC or IC catalog, move the cursor to NGC,<br />
using▲ or ▼ button to toggle between NGC and IC. Then move the cursor to<br />
numerical position and use the number button to select the object.<br />
• UGC Catalog: consists of 12939 objects.<br />
• MCG Catalog: consists of 29004 objects. They are listed numerically from MCG+15<br />
to MCG-05.<br />
• Caldwell Catalog: consists of 109 objects.<br />
• Abell Catalog: consists of 2712 objects.<br />
• Herschel Catalog: consists of 400 objects.<br />
22
5.2.3. Comets<br />
This catalog contains up to 190 comets. This database is customer upgradeable.<br />
5.2.4. Asteroids<br />
5.2.5. Stars:<br />
This catalog contains up to 4096 asteroids. This database is customer upgradeable.<br />
• Named Stars: consists of 191 stars with their common names. They are listed<br />
alphabetically. A list is attached in Appendix C.<br />
• Double Stars: consists of 40 double stars. A list is attached in Appendix C.<br />
• GCVS Variable Stars: consists of 38624 GCVS variable stars. They are listed<br />
numerically.<br />
• SAO Catalog: consists of 26584 SAO catalog objects. They are listed numerically.<br />
5.2.6. Constellations<br />
This catalog consists of 88 modern constellations with their names. They are listed<br />
alphabetically. A list is attached in Appendix C.<br />
5.2.7. User Objects<br />
This catalog can consist up to 256 user predefined objects. These objects need to be<br />
entered before they can be selected for slewing.<br />
5.2.8. Enter R.A. DEC<br />
Here you can go to a target by entering its R.A. and DEC numbers.<br />
5.3. Sync to Target<br />
This operation will match the telescope's current coordinates to Target Right Ascension<br />
and Declination. After slew to an object, press MENU—then scroll to “Sync to Target” and press<br />
ENTER. Follow the screen to do the sync. Using this function will re-calibrate the computer to<br />
the selected object. Multiple syncs can be performed if needed.<br />
“Sync to Target” will only work after “Select and slew” is performed. Otherwise, the<br />
system may perform incorrectly. You can change the slewing speed to make the centering<br />
procedure easier. Simply press a number (1 through 9) to change the speed. The default slew<br />
speed is 64X.<br />
“Sync to Target” has the similar performance that “One Star Align” has and will greatly<br />
improve the GOTO accuracy locally. It is very useful for finding a faint object near a bright star.<br />
23
5.4. Electric Focuser<br />
For future use.<br />
5.5. Set Up Controller<br />
5.5.1. Set Up Local Time<br />
Refer to 4.2.2.<br />
5.5.2. Set Up Site<br />
Refer to 4.2.1.<br />
5.5.3. Set N/S Hemisphere<br />
Set northern or southern hemisphere.<br />
5.5.4. Set Display Contrast<br />
Use arrow keys to adjust LCD display contrast.<br />
5.5.5. Set Eyepiece Light<br />
If you have an illuminated-reticule eyepiece or illuminated polar scope, and it is<br />
supported by GOTONOVA hand controller-- use this option to adjust the light intensity.<br />
5.5.6. Set Backlight<br />
Adjust LCD and keypad backlight.<br />
5.5.7. Set Anti-backlash<br />
Use Array Keys to move the cursor and Number Keys to change the number. 0 is<br />
suggested for Alt/Azi mount.<br />
5.5.8. Set Key Beep<br />
Turn the key beep on/off.<br />
5.5.9. Set Mount Type<br />
Set the <strong>MiniTower</strong> as an Alt/Azi mount. <strong>iOptron</strong> does not recommend and support for<br />
equatorial operation of the <strong>MiniTower</strong>, although it could be used as a EQ mount.<br />
5.5.10. Reset All<br />
Reset all settings to factory default data.<br />
24
5.5.11. Update Firmware<br />
Firmware updating using <strong>iOptron</strong> Downloader through USB port on hand controller.<br />
(Refer to Appendix E.)<br />
5.5.12. Set gear ratio<br />
Not supported.<br />
5.5.13. Set Language<br />
Select hand controller display language in English or French.<br />
5.6. Align<br />
This function is used for aligning the telescope.<br />
5.6.1. One Star Align<br />
From the main menu select “Align”. Select “One Star Align”. Use ▲ and ▼ buttons to<br />
select a star and press ENTER. A list of align planets or stars that are above the horizon is<br />
computed based on your local time and location. Use arrow buttons to move the telescope and<br />
center the star in your eyepiece. You can use the number buttons to change the slew speed.<br />
Press ENTER when finished. If your setup is leveled well, one star alignment should be<br />
sufficient for good GOTO accuracy. To increase the accuracy you may choose to do two star<br />
alignment.<br />
5.6.2. Two Star Align<br />
Two star alignment will increase the GOTO accuracy of the mount. It is suggested to do<br />
two star alignment after one star alignment. Two star alignment requires a wider view of the sky,<br />
since the two align stars need to be far apart. Select “Two Star Align” in the Align menu. When<br />
you finish the first star, the system will prompt you to choose the second star. If the star you<br />
choose is too close to the first one, the system will let you choose another one. When you are<br />
aligned with the second star, two star alignment is finished. You can reject the suggested star if<br />
it is blocked by the tree or behind the house.<br />
“Two Star Align” results will be overridden if “One Star Align” or “Sync. to Target” is<br />
performed after “Two Star Align.”<br />
5.6.3. Three-Star Align<br />
Not supported.<br />
5.6.4. Dis R.A axis error<br />
Not supported for Alt/Azi mode.<br />
25
5.6.5. Test Anti-backlash<br />
Not supported for Alt/Azi mode..<br />
5.6.6. Polaris Position<br />
This shows Polaris position.<br />
5.7. PEC Option<br />
Not supported.<br />
5.8. Set Up Tracking<br />
A user can set up tracking in the main menu by selecting “Set up tracking”. Then the<br />
user can select “Sidereal speed”, “Solar speed”, “Lunar speed”, and “User defined speed”. For<br />
“User defined speed” this can be adjusted from 91% to 109% of sidereal speed by pressing the<br />
▲or ▼ buttons.<br />
5.9. User Objects<br />
Besides various star lists available in the hand controller --you can add, edit or delete<br />
your own user-defined objects. All data you enter is supposedly J2000.0 epoch.<br />
5.10. Auto Guide<br />
This function is not supported in Alt/Azi mode.<br />
5.11. Park Scope<br />
This procedure only needs to be done if you do not move your telescope mount after you<br />
power off the GoToNova. Celestial pole pointing error will be stored to flash memory and<br />
recalled when you power on again.<br />
5.12. To Park Position<br />
This moves your telescope to park position. When power is turned on--the mount<br />
assumes the physical position is the park position. This is its reference point for all other<br />
objects.<br />
26
6. Maintenance and Servicing<br />
6.1. Maintenance<br />
The <strong>MiniTower</strong> is designed to be maintenance free. Do not overload the mount. Do not<br />
drop the mount which will damage the mount or affect the GOTO tracking accuracy<br />
permanently. Use a wet cloth to clean the mount and hand controller. Do not use solvent.<br />
If your mount is not to be used for an extended period, dismount the OTAs and<br />
counterweight. Remove the batteries from the battery holder if they were installed.<br />
6.2. Troubleshooting<br />
The following suggestions may be helpful for the operation of the <strong>MiniTower</strong>. More<br />
information can be found in our online FAQ section (www.<strong>iOptron</strong>.com then click on “support”).<br />
1. Error Message “Warning! DEC. (or R.A.) driver motor over current. Please check<br />
balance.”<br />
(1) Check if the mount or OTA is blocked by any obstructions.<br />
(2) Try to operate the mount without an OTA.<br />
(3) Check the power supply. This is a common reason for this message and<br />
unexpected slew behavior or movement. which include:<br />
• Batteries: Are the batteries fresh? How long have they been used? (frequent<br />
slewing and GOTO will deplete battery power very quickly)<br />
• AC or DC adapter: Check the plugs to the mount and to the power outlet.<br />
• Extension cord: Make sure the cord is in good condition. Power drop along the<br />
extension cord has been known to cause this error message. Also check all the<br />
plugs and connections.<br />
(4) Check the hand controller cord. Unplug it and re-plug into the other HBX port.<br />
2. Error Message “Warning! Can not communicate with DEC motor controller.”<br />
(1) Check the hand controller cord. Unplug it and re-plug into another HBX port.<br />
(2) Check the power supply, which include:<br />
• Using the battery? Is the battery fresh? How long it has been used? (frequent<br />
slew and GOTO will deplete battery power very quickly)<br />
• Using AC or DC adapter? Check the plugs to the mount and to the power outlet.<br />
• Using extension cord? Make sure the cord is in good condition. Power drop along<br />
the extension cord was known to cause the problem. Also check all the plugs and<br />
connections.<br />
3. The object is jumping up and down in the eyepiece or over-slewed, and other<br />
unexpected slew behavior or movement.<br />
(1) Use most updated firmware.<br />
(2) Set backlash to 0 in both DEC and RA.<br />
(3) Check the power supply, which include:<br />
• Using the battery? Is the battery fresh? How long it has been used? (frequent<br />
slew and GOTO will deplete battery power very quickly)<br />
27
• Using AC or DC adapter? Check the plugs to the mount and to the power outlet.<br />
• Using extension cord? Make sure the cord is in good condition. Power drop along<br />
the extension cord was known to cause the problem. Also check all the plugs and<br />
connections.<br />
(4) System balancing.<br />
4. Star Alignment accuracy; GOTO accuracy<br />
(1) Leveling (very important).<br />
(2) Site information (minutes ahead or behind UT, DST).<br />
(3) System balancing.<br />
(4) Use most updated firmware.<br />
(5) Select right mount type (A/A).<br />
(6) Set backlash to 0 in both DEC and RA.<br />
(7) Check the power supply, which include:<br />
• Using the battery? Is the battery fresh? How long it has been used? (frequent<br />
slew and GOTO will deplete battery power very quickly)<br />
• Using AC or DC adapter? Check the plugs to the mount and to the power outlet.<br />
• Using extension cord? Make sure the cord is in good condition. Power drop along<br />
the extension cord was known to cause the problem. Also check all the plugs and<br />
connections.<br />
6.3. <strong>iOptron</strong> Customer Service<br />
If you have a question concerning your <strong>MiniTower</strong> contact the <strong>iOptron</strong> Customer Service<br />
Department. Customer Service hours are 9:00 AM to 5:00 PM, Eastern Time, Monday through<br />
Friday. In the unlikely event that the <strong>MiniTower</strong> requires factory servicing or repairs, write or call<br />
the <strong>iOptron</strong> Customer Service Department first to receive an RMA# before returning the<br />
telescope to the factory. Please provide details as to the nature of the problem as well as your<br />
name, address, and daytime telephone number. We have found that most problems can be<br />
resolved via e-mails or by telephone calls. So please contact <strong>iOptron</strong> first to avoid returning the<br />
telescope for repair. It is strongly suggested that to send technical questions to<br />
support@ioptron.com. Call toll free in the U.S. 866.399.4587 or 1.781.569.0200.<br />
28
Appendix A. Technical Specifications<br />
Mount<br />
Body Materials<br />
Motor<br />
Gear<br />
Bearing<br />
Speed<br />
GPS<br />
GOTO System<br />
Resolution<br />
Tracking<br />
Payload<br />
Second Payload<br />
Tripod<br />
Battery<br />
Power Requirement<br />
USB Port<br />
Protocol<br />
Firmware Upgrade<br />
PC Computer Control<br />
Weight with tripod<br />
AltAzimuth Mount<br />
Die-cast Aluminum<br />
Dual-Axis DC Servomotor, DC12V<br />
Aluminum worm wheel/brass worm gear<br />
4 conical steel ball bearings<br />
Dual-Axis, 9-Gear, Electronic<br />
(1×,2×,8×,16×,64×,128×,256×,512×,MAX)<br />
32-channel GPS<br />
GoToNova ® 120,000+ objects database<br />
1 Arc Sec.<br />
Automatic<br />
25 lb<br />
8 lb<br />
1.5” Stainless Steel<br />
AA x 8(Not Included)<br />
DC 12V±2V, >1.2A<br />
Yes<br />
ASCOM<br />
Yes<br />
Yes<br />
42 lbs<br />
29
Appendix B. GoToNova ® 8401 HC MENU STRUCTURE<br />
MENU<br />
Select and Slew<br />
Sync. To Target<br />
Electric Focuser<br />
Planets, Sun, Moon<br />
Deep Sky Objects<br />
Comets<br />
Asteroids<br />
Stars<br />
Constellations<br />
User Objects<br />
Enter R.A. and DEC<br />
Focus<br />
Set Anti-backlash<br />
Mercury<br />
Venus<br />
Mars<br />
Jupiter<br />
Saturn<br />
Uranus<br />
Neptune<br />
Pluto<br />
Sun<br />
Moon<br />
Named Deepsky Object<br />
Messier Catalog<br />
NGC IC Catalog<br />
UGC Catalog<br />
MCG Catalog<br />
Caldwell Catalog<br />
Abell Catalog<br />
Herschel Catalog<br />
Named Stars<br />
Double Stars<br />
GCVS Variable Stars<br />
SAO Catalog<br />
30
Set Up Controller<br />
Align<br />
PEC Option<br />
Set Up Tracking<br />
User Objects<br />
Set Up Local Time<br />
Set Up Site<br />
Set N/S Hemisphere<br />
Set Display Contrast<br />
Set Eyepiece Light<br />
Set Backlight<br />
Set Anti-backslash<br />
Set Key Beep<br />
Set Mount Type<br />
Reset All<br />
Upgrade Firmware<br />
Set Gear Ratio<br />
Set Language<br />
Easy One Star Align<br />
One Star Align<br />
Two Star Align<br />
Three Star Align<br />
Disp. R.A. Axis Error<br />
Test Anti-backslash<br />
Polaris Position<br />
PEC Play Back<br />
Record PEC<br />
Delete PEC Record<br />
Sidereal Speed<br />
Solar Speed<br />
Lunar Speed<br />
User Defined Speed<br />
Add A New Record<br />
Modify Records<br />
Delete One Record<br />
Erase All Records<br />
Auto Guide<br />
Park Scope<br />
To Park Position<br />
31
Appendix C. GoToNova ® Star List<br />
GoToNova Deep Sky Object List<br />
for 8401, 8402 and 8403<br />
ID No. OBJECT NGC # Messier # IC# A(Abell) U(UGC)<br />
1 Andromeda Galaxy 224 31<br />
2 Barnards Galaxy 6822<br />
3 Beehive Cluster 2632 44<br />
4 Blackeye Galaxy 4926 64<br />
5 Blinking Planetary Nebula 6826<br />
6 Blue Flash Nebula 6905<br />
7 Blue Planetary 3918<br />
8 Blue Snowball Nebula 7662<br />
9 Box Nebula 6309<br />
10 Bubble Nebula 7635<br />
11 Bipolar Nebula 6302<br />
12 Butterfly Cluster 6405 6<br />
13 California Nebula 1499<br />
14 Cat's Eye Nebula 6543<br />
15 Cocoon Nebula 5146<br />
16 Cone Nebula 2264<br />
17 Cork Nebula 650-51 76<br />
18 Crab Nebula 1952 1<br />
19 Crescent Nebula 6888<br />
20 Draco Dwarf 10822<br />
21 Duck Nebula 2359<br />
22 Dumbbell Nebula 6853 27<br />
23 Eagle Nebula 16<br />
24 Eight-Burst Nebula 3132<br />
25 Eskimo Nebula 2392<br />
26 Flaming Star Nebula 405<br />
27 Ghost of Jupiter 3242<br />
28 Great Cluster 6205 13<br />
29 Helix Nebula 7293<br />
30 Hercules Galaxy Cluster 2151<br />
31 Hind's Variable Nebula 1555<br />
32 Hubble's Variable Nebula 2261<br />
33 Integral Sign Galaxy 3697<br />
34 Jewel Box Cluster 4755<br />
32
35 Keyhole Nebula 3372<br />
36 Lagoon Nebula 6523 8<br />
37 Little Gem 6445<br />
38 Little Gem Nebula 6818<br />
39 Little Ghost Nebula 6369<br />
40 North American Nebula 7000<br />
41 Omega Nebula 6618 17<br />
42 Orion Nebula 1976 42<br />
43 Owl Nebula 3587 97<br />
44 Pelican Nebula 5070<br />
45 Phantom Streak Nebula 6741<br />
46 Pinwheel Galaxy 598 33<br />
47 Pleiades 45<br />
48 Ring Nebula 6720 57<br />
49 Ring Tail Galaxy 4038<br />
50 Rosette Nebula 2237<br />
51 Saturn Nebula 7009<br />
52 Sextans B Dwarf 5373<br />
53 Small Magellanic Cloud 292<br />
54 Sombrero Galaxy 4594 104<br />
55 Spindle Galaxy 3115<br />
56 Tank Track Nebula 2024<br />
57 Trifid Nebula 6514 20<br />
58 Ursa Minor Dwarf 9749<br />
59 Whirlpool Galaxy 5194 51<br />
60 Wild Duck Cluster 6705 11<br />
33
Messier<br />
This table is licensed under the GNU Free Documentation License. It uses material from the<br />
Wikipedia article List of Messier objects<br />
34
Modern Constellations<br />
No. Constellation Abbreviation No. Constellation Abbreviation<br />
1 Andromeda And 45 Lacerta Lac<br />
2 Antlia Ant 46 Leo Leo<br />
3 Apus Aps 47 Leo Minor LMi<br />
4 Aquarius Aqr 48 Lepus Lep<br />
5 Aquila Aql 49 Libra Lib<br />
6 Ara Ara 50 Lupus Lup<br />
7 Aries Ari 51 Lynx Lyn<br />
8 Auriga Aur 52 Lyra Lyr<br />
9 Boötes Boo 53 Mensa Men<br />
10 Caelum Cae 54 Microscopium Mic<br />
11 Camelopardalis Cam 55 Monoceros Mon<br />
12 Cancer Cnc 56 Musca Mus<br />
13 Canes Venatici CVn 57 Norma Nor<br />
14 Canis Major CMa 58 Octans Oct<br />
15 Canis Minor CMi 59 Ophiuchus Oph<br />
16 Capricornus Cap 60 Orion Ori<br />
17 Carina Car 61 Pavo Pav<br />
18 Cassiopeia Cas 62 Pegasus Peg<br />
19 Centaurus Cen 63 Perseus Per<br />
20 Cepheus Cep 64 Phoenix Phe<br />
21 Cetus Cet 65 Pictor Pic<br />
22 Chamaeleon Cha 66 Pisces Psc<br />
23 Circinus Cir 67 Piscis Austrinus PsA<br />
24 Columba Col 68 Puppis Pup<br />
25 Coma Berenices Com 69 Pyxis Pyx<br />
26 Corona Australis CrA 70 Reticulum Ret<br />
27 Corona Borealis CrB 71 Sagitta Sge<br />
28 Corvus Crv 72 Sagittarius Sgr<br />
29 Crater Crt 73 Scorpius Sco<br />
30 Crux Cru 74 Sculptor Scl<br />
31 Cygnus Cyg 75 Scutum Sct<br />
32 Delphinus Del 76 Serpens Ser<br />
33 Dorado Dor 77 Sextans Sex<br />
34 Draco Dra 78 Taurus Tau<br />
35 Equuleus Equ 79 Telescopium Tel<br />
36 Eridanus Eri 80 Triangulum Tri<br />
37 Fornax For 81 Triangulum Australe TrA<br />
38 Gemini Gem 82 Tucana Tuc<br />
39 Grus Gru 83 Ursa Major UMa<br />
40 Hercules Her 84 Ursa Minor UMi<br />
41 Horologium Hor 85 Vela Vel<br />
42 Hydra Hya 86 Virgo Vir<br />
43 Hydrus Hyi 87 Volans Vol<br />
44 Indus Ind 88 Vulpecula Vul<br />
35
GoToNova Named Star List<br />
001 Acamar 049 Ascella 097 Kaus Australis 145 Rassalas<br />
002 Achernar 050 Asellus Australis 098 Kaus Borealis 146 Rasagethi<br />
003 Acrux 051 Asellus Borealis 099 Kaus Media 147 Rasalhague<br />
004 Acubens 052 Aspidiske 100 Keid 148 Rastaba<br />
005 Adhafera 053 Atik 101 Kitalpha 149 Regulus<br />
006 Adhara 054 Atlas 102 Kochab 150 Rigel<br />
007 Al Na’ir 055 Atria 103 Kornephoros 151 Rigel Kentaurus<br />
008 Albali 056 Avoir 104 Kurhah 152 Ruchbah<br />
009 Alberio 057 Azha 105 Lesath 153 Rukbat<br />
010 Alchibar 058 Baten Kaitos 106 Maia 154 Sabik<br />
011 Alcor 059 Beid 107 Marfik 155 Sadachbia<br />
012 Alcyone 060 Bellatrix 108 Markab 156 Sadalbari<br />
013 Aldebaran 061 Betelgeuse 109 Matar 157 Sadalmelik<br />
014 Alderamin 062 Biham 110 Mebsuta 158 Sadalsuud<br />
015 Alfirk 063 Canopus 111 Megrez 159 Sadr<br />
016 Algedi 064 Capella 112 Meissa 160 Saiph<br />
017 Algenib 065 Caph 113 Mekbuda 161 Scheat<br />
018 Algiebra 066 Castor 114 Menkalinan 162 Schedar<br />
019 Algol 067 Celabrai 115 Menkar 163 Seginus<br />
020 Algorab 068 Celaeno 116 Menkent 164 Shaula<br />
021 Alhena 069 Chara 117 Menkib 165 Sheiak<br />
022 Alioth 070 Chertan 118 Merak 166 Sheratan<br />
023 Alkaid 071 Cor Caroli 119 Merope 167 Sirius<br />
024 Alkalurops 072 Cursa 120 Mesartim 168 Skat<br />
025 Alkes 073 Dabih 121 Miaplacidus 169 Spica<br />
026 Almach 074 Deneb 122 Mintaka 170 Sterope<br />
027 Alnasl 075 Deneb Algedi 123 Mira 171 Sulafat<br />
028 Alnilam 076 Deneb Kaitos 124 Mirach 172 Syrma<br />
029 Alnitak 077 Denebola 125 Mirfak 173 Talitha<br />
030 Alphard 078 Dubhe 126 Mirzam 174 Tania Australis<br />
031 Alphecca 079 Edasich 127 Mizar 175 Tania Borealis<br />
032 Alpheratz 080 Electra 128 Muphrid 176 Tarazed<br />
033 Alrakis 081 Elnath 129 Muscida 177 Taygeta<br />
034 Alrescha 082 Eltanin 130 Nashira 178 Thuban<br />
035 Alshain 083 Enif 131 Nekkar 179 Unukalhai<br />
036 Altair 084 Errai 132 Nihal 180 Vega<br />
037 Altais 085 Fomalhaut 133 Nunki 181 Vindemiatrix<br />
038 Alterf 086 Furud 134 Nusakan 182 Wasat<br />
039 Aludra 087 Gacrux 135 Peacock 183 Wazn<br />
040 Alula Australis 088 Giausar 136 Phact 184 Yed Posterior<br />
041 Alula Borealis 089 Gienah 137 Phecda 185 Yed Prior<br />
042 Alya 090 Gomeisa 138 Pherkad 186 Zaniah<br />
043 Ancha 091 Graffias 139 Pleione 187 Zaurak<br />
044 Ankaa 092 Groombridge 1830 140 Polaris 188 Zavijava<br />
045 Antares 093 Grumium 141 Pollux 189 Zosma<br />
046 Arcturus 094 Hamal 142 Porrima 190 Zubenelgenubi<br />
047 Arkab 095 Homan 143 Procyon 191 Zubeneschamali<br />
048 Arneb 096 Izar 144 Propus<br />
36
GoToNova Double Star List<br />
No. Object Const SAO Name<br />
1 Eta Cas 21732 Achird<br />
2 Alpha Psc 110291 Alrisha<br />
3 Theta Per 38288<br />
4 Alpha For 168373 Fornacis<br />
5 Alpha Aur 40186 Capella<br />
6 Sigma Ori 132406<br />
7 Mu Ori 113389<br />
8 Alpha CMa 151881 Sirius<br />
9 Delta Gem 79294 Wasat<br />
10 Alpha Gem 60198 Castor<br />
11 Alpha CMi 115756<br />
12 Epsilon Hya 117112<br />
13 HR 3579 42642<br />
14 Kapa UMa 42661<br />
15 Psi Vel 221234<br />
16 Gamma Leo 81298 Algieba<br />
17 HR 4167 222199<br />
18 Mu Vel 222321<br />
19 Alpha UMa 15384 Dubhe<br />
20 Zeta UMa 28737 Mizar<br />
21 Iota Leo 99587<br />
22 Gamma Cen 223603<br />
23 Gamma Vir 138917 Porrima<br />
24 Beta Mus 252019<br />
25 HR 5089 204545<br />
26 Alpha Cen 252838<br />
27 Zeta Boo 101145<br />
28 Gamma Lup 225938<br />
29 Gamma CrA 83958<br />
30 Xi Sco 159665<br />
31 Alpha Sco 184415 Antares<br />
32 Lambda Oph 121658 Marfic<br />
33 Zeta Her 65485<br />
34 Eta Oph 160332 Sabik<br />
35 70 Oph 123107<br />
36 Zeta Sgr 187600 Ascella<br />
37 Delta Cyg 48796<br />
38 Beta Del 106316 Rotanev<br />
39 Tau Cyg 71121<br />
40 Epsilon Lyr 67310 double double<br />
37
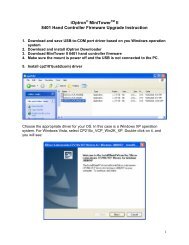
Appendix D. Set Up USB-PC Connection<br />
1. Download USB2COM driver (cp2102.zip file for 8401) from <strong>iOptron</strong> Website<br />
2. Install cp2101(usb2com) driver<br />
Choose the appropriate driver for your OS. In this case is a Windows XP operation system.<br />
Double click on it, and you will see:<br />
Click “Next”.<br />
38
Select “I accept the terms of license agreement”, and click “Next”<br />
Using the default installation path, c:\SiLabs\MCU\CP210x, or specify your own path by click<br />
“Change”. Click “Next”. Then click “Install”.<br />
39
When finished installation, click “Finish”<br />
3. Plug the USB cable to the USB port on your PC, plug the other end of the USB cable<br />
to hand controller. Turn on the power on the mount.<br />
4. Install the Hardware<br />
The computer will find a new hardware and show the following screen<br />
Select “No, not this time” and click “Next”.<br />
40
Select “Install from a list or specific location” and click “Next”.<br />
Select “Search for the best driver in these locations,” and check “Include this location in the<br />
search.”<br />
Click on “Browse” and select the cp210x driver from directory<br />
c:\SiLabs\MCU\CP210x\Win2K_XP, click OK.<br />
41
Click “Next”. The computer will start to install the driver for the USB2COM. When the installation<br />
is done, click “Finish”.<br />
If the computer shows “find a new hardware” screen again, just repeat the steps in this section<br />
again.<br />
42
Now your computer should be ready for Firmware Upgrading; computer communication with the<br />
mount via ASCOM platform; and planetarium software applications. However, you need to find<br />
assigned COM port number for the USB connection. To do so, right click “My Computer”, and<br />
click “Properties”<br />
Click “Hardware”, click “Device Manager”<br />
43
Double click on “Ports (COM & LPT)”. Find the COM number and write it down (in the following<br />
figure, it is COM4)<br />
44
Appendix E. Firmware Upgrade<br />
1. Download and install Firmware Downloader from <strong>iOptron</strong> Website<br />
2. Double click and open “<strong>iOptron</strong> Downloader”<br />
On the interface, select appropriate port using pull-down menu (in this case, COM4):<br />
45
Click “Open Data File” and select the appropriate “.bin” file that matches your hand controller.<br />
Then click “Open”. Select “Main Program” in Update Type.<br />
Click “Start Download”<br />
It shows “Please reset GoToNova[GOTOSTAR], waiting for connection…”<br />
On the hand controller, press “MENU”, and using ▼▲ scroll to select “Set u controller”, press<br />
“ENTER”, then select “Upgrade firmware”, press “ENTER” and the upgrade will start.<br />
46
The upgrade is complete. Turn your mount power off then on again.<br />
Typical Errors:<br />
1. Invalid Port Number: in Device Manager: make sure you have the correct COM port<br />
number for CP210x.<br />
2. Screen is now blank: Wrong “.bin” file: make sure you have the correct “.bin” file for<br />
firmware upgrade.<br />
3. Wrong downloader: you should use <strong>iOptron</strong> Downloader instead of the Flash<br />
Downloader.<br />
4. Use cp210x driver provided by <strong>iOptron</strong>. The newest version from SiLab may not work<br />
properly for <strong>iOptron</strong>’s hand controller.<br />
47
Appendix F. Use a PC to Control an <strong>iOptron</strong> Mount<br />
In general you need the followings to use a PC to control an <strong>iOptron</strong> mount:<br />
1. Download USB2COM driver from <strong>iOptron</strong> website http://www.ioptron.com, click on<br />
Support, select GoToNova Hand Controllers. For 8401 hand controller, download<br />
cp2102.zip or CP210x VCP driver depends on your windows operation system;<br />
2. Install USB2COM to establish the connection between the mount and the PC (see<br />
instruction in you telescope manual);<br />
3. Download and install ASCOM Platform from http://www.ascom-standards.org/<br />
4. Download and install <strong>iOptron</strong> Telescope ASCOM drive from <strong>iOptron</strong> website, click on<br />
Support, select ASCOM Driver.<br />
5. Planetarium software support ASCOM protocol. Follow software instruction to select<br />
<strong>iOptron</strong> Telescope.<br />
Some company has integrated <strong>iOptron</strong>’s products into their planetarium software, such<br />
as Voyage and The Sky X Pro. Therefore, an ASCOM plug-in will not be needed. Most<br />
planetarium software can be used to control <strong>iOptron</strong>’s product via ASCOM.<br />
48
IOPTRON TWO YEAR TELESCOPE, MOUNT, AND CONTROLLER WARRANTY<br />
A. <strong>iOptron</strong> warrants your telescope, mount, or controller to be free from defects in materials and workmanship for two years. <strong>iOptron</strong><br />
will repair or replace such product or part which, upon inspection by <strong>iOptron</strong>, is found to be defective in materials or workmanship.<br />
As a condition to the obligation of <strong>iOptron</strong> to repair or replace such product, the product must be returned to <strong>iOptron</strong> together with<br />
proof-of-purchase satisfactory to <strong>iOptron</strong>.<br />
B. The Proper Return Authorization Number must be obtained from <strong>iOptron</strong> in advance of return. Call <strong>iOptron</strong> at 1.866.399.4587 to<br />
receive the number to be displayed on the outside of your shipping container.<br />
All returns must be accompanied by a written statement stating the name, address, and daytime telephone number of the owner,<br />
together with a brief description of any claimed defects. Parts or product for which replacement is made shall become the property<br />
of <strong>iOptron</strong>.<br />
The customer shall be responsible for all costs of transportation and insurance, both to and from the factory of <strong>iOptron</strong>, and shall be<br />
required to prepay such costs.<br />
<strong>iOptron</strong> shall use reasonable efforts to repair or replace any telescope, mount, or controller covered by this warranty within thirty<br />
days of receipt. In the event repair or replacement shall require more than thirty days, <strong>iOptron</strong> shall notify the customer accordingly.<br />
<strong>iOptron</strong> reserves the right to replace any product which has been discontinued from its product line with a new product of<br />
comparable value and function.<br />
This warranty shall be void and of no force of effect in the event a covered product has been modified in design or function, or<br />
subjected to abuse, misuse, mishandling or unauthorized repair. Further, product malfunction or deterioration due to normal wear is<br />
not covered by this warranty.<br />
IOPTRON DISCLAIMS ANY WARRANTIES, EXPRESS OR IMPLIED, WHETHER OF MERCHANTABILITY OF FITNESS FOR A<br />
PARTICULAR USE, EXCEPT AS EXPRESSLY SET FORTH HERE. THE SOLE OBLIGATION OF IOPTRON UNDER THIS<br />
LIMITED WARRANTY SHALL BE TO REPAIR OR REPLACE THE COVERED PRODUCT, IN ACCORDANCE WITH THE TERMS<br />
SET FORTH HERE. IOPTRON EXPRESSLY DISCLAIMS ANY LOST PROFITS, GENERAL, SPECIAL, INDIRECT OR<br />
CONSEQUENTIAL DAMAGES WHICH MAY RESULT FROM BREACH OF ANY WARRANTY, OR ARISING OUT OF THE USE<br />
OR INABILITY TO USE ANY IOPTRON PRODUCT. ANY WARRANTIES WHICH ARE IMPLIED AND WHICH CANNOT BE<br />
DISCLAIMED SHALL BE LIMITED IN DURATION TO A TERM OF TWO YEARS FROM THE DATE OF ORIGINAL RETAIL<br />
PURCHASE.<br />
Some states do not allow the exclusion or limitation of incidental or consequential damages or limitation on how long an implied<br />
warranty lasts, so the above limitations and exclusions may not apply to you.<br />
This warranty gives you specific legal rights, and you may also have other rights which vary from state to state.<br />
<strong>iOptron</strong> reserves the right to modify or discontinue, without prior notice to you, any model or style telescope.<br />
If warranty problems arise, or if you need assistance in using your telescope, mount, or controller contact:<br />
<strong>iOptron</strong> Corporation<br />
Customer Service Department<br />
6E Gill Street<br />
Woburn, MA 01801<br />
www.ioptron.com<br />
support@ioptron.com<br />
Tel. (781)569-0200<br />
Fax. (781)935-2860<br />
Monday-Friday 9AM-5PM EST<br />
NOTE: This warranty is valid to U.S.A. and Canadian customers who have purchased this product from an authorized <strong>iOptron</strong><br />
dealer in the U.S.A. or Canada or directly from <strong>iOptron</strong>. Warranty outside the U.S.A. and Canada is valid only to customers who<br />
purchased from an <strong>iOptron</strong> Distributor or Authorized <strong>iOptron</strong> Dealer in the specific country. Please contact them for any warranty<br />
49