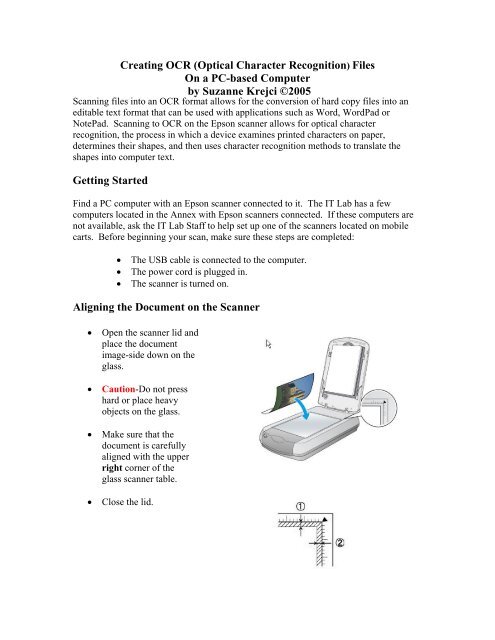
Creating OCR (Optical Character Recognition) Files
Creating OCR (Optical Character Recognition) Files
Creating OCR (Optical Character Recognition) Files

Create successful ePaper yourself
Turn your PDF publications into a flip-book with our unique Google optimized e-Paper software.
<strong>Creating</strong> <strong>OCR</strong> (<strong>Optical</strong> <strong>Character</strong> <strong>Recognition</strong>) <strong>Files</strong><br />
On a PC-based Computer<br />
by Suzanne Krejci ©2005<br />
Scanning files into an <strong>OCR</strong> format allows for the conversion of hard copy files into an<br />
editable text format that can be used with applications such as Word, WordPad or<br />
NotePad. Scanning to <strong>OCR</strong> on the Epson scanner allows for optical character<br />
recognition, the process in which a device examines printed characters on paper,<br />
determines their shapes, and then uses character recognition methods to translate the<br />
shapes into computer text.<br />
Getting Started<br />
Find a PC computer with an Epson scanner connected to it. The IT Lab has a few<br />
computers located in the Annex with Epson scanners connected. If these computers are<br />
not available, ask the IT Lab Staff to help set up one of the scanners located on mobile<br />
carts. Before beginning your scan, make sure these steps are completed:<br />
• The USB cable is connected to the computer.<br />
• The power cord is plugged in.<br />
• The scanner is turned on.<br />
Aligning the Document on the Scanner<br />
• Open the scanner lid and<br />
place the document<br />
image-side down on the<br />
glass.<br />
• Caution-Do not press<br />
hard or place heavy<br />
objects on the glass.<br />
• Make sure that the<br />
document is carefully<br />
aligned with the upper<br />
right corner of the<br />
glass scanner table.<br />
• Close the lid.
Using Epson Smart Panel to Scan to <strong>OCR</strong><br />
• Go to the Start Menu and<br />
navigate to Programs/Epson<br />
Scanning/Epson Smart Panel.<br />
• Open the Smart Panel.<br />
• Check the device settings to<br />
insure that the scanner you<br />
are using is the device<br />
selected.<br />
• Click on the Scan to <strong>OCR</strong><br />
button.<br />
• The Scan to <strong>OCR</strong> menu will open.<br />
• Select the desired Paper<br />
Size.<br />
• Choose the Scan Mode.<br />
If the document does<br />
not need to be in color,<br />
then select black and<br />
white.<br />
• If you would like to<br />
preview the document<br />
before scanning, click<br />
on the Preview button.<br />
• When ready, select the<br />
Scan button.
• Once scanning is complete, the Verify Assistant will open. Your document<br />
should appear in one of the verify boxes. If you have more documents to scan,<br />
choose Scan More. You can rename files in the Verify Assistant. If you are<br />
finished scanning, click on the Finish button.<br />
Converting <strong>Files</strong><br />
• After clicking on the Finish button,<br />
the <strong>OCR</strong> Assistant will open.<br />
• The <strong>OCR</strong> Assistant allows the user<br />
to select language and document<br />
layout options.<br />
• Choose the desired language that<br />
you want the document converted<br />
into. Many diacritical marks will<br />
be recognized by the <strong>OCR</strong><br />
software.<br />
• Leave the default <strong>OCR</strong> Engine<br />
selection at Presto! <strong>OCR</strong>.<br />
• Choose the Document Layout that<br />
is desired. The All Pages in one<br />
document selection will assemble<br />
all the pages that have been scanned into one document.<br />
• Choose Paragraph designation. If the Same as original document option is<br />
selected, the <strong>OCR</strong> software will maintain the original formatting and paragraph<br />
returns.<br />
• Click on the Recognize button to convert the document to an <strong>OCR</strong> file.
Saving <strong>Files</strong><br />
• After the file has been<br />
converted to an <strong>OCR</strong><br />
document, the Launch<br />
Assistant opens.<br />
• The default applications in<br />
the launch assistant are<br />
WordPad or NotePad. In<br />
order to convert the file into a<br />
Microsoft Word document,<br />
first select WordPad and<br />
click Launch.<br />
File in WordPad<br />
• WordPad will open with the<br />
converted scanned text.<br />
• Save the file as a RTF file (rich text<br />
format). Specify the file name and<br />
the location where the file should be<br />
saved.<br />
• Close WordPad and navigate to the<br />
file. Double click on the file.<br />
• The file will open in Microsoft<br />
Word.<br />
File in Word<br />
• Navigate to Save as…, and save the file as a<br />
Word Document.<br />
In Conclusion<br />
• Check the Word file for accuracy. Some<br />
inaccuracies may have been introduced in the<br />
<strong>OCR</strong> conversion process.