
Create successful ePaper yourself
Turn your PDF publications into a flip-book with our unique Google optimized e-Paper software.
<strong>Hot</strong> <strong>Welding</strong> <strong>Itec</strong> ® Contract floors.<br />
1. Preconditions<br />
<strong>Itec</strong> ® floor coverings from the <strong>IVC</strong> <strong>Group</strong> are developed for commercial, industrial and<br />
residential applications. They are heterogeneous floor coverings with varying qualities<br />
that contain different thicknesses of layers. When seam welding <strong>Itec</strong> ® Contract Floors,<br />
the best results are achieved by paying particular attention to the welding of the top<br />
layers. It is recommended that the grooving depth must conform to the thickness of top<br />
layer, and should be to a minimum depth of 0.5mm. Seams should be cut in a straight<br />
line and gaps up to 0.5mm wide can be hot welded.<br />
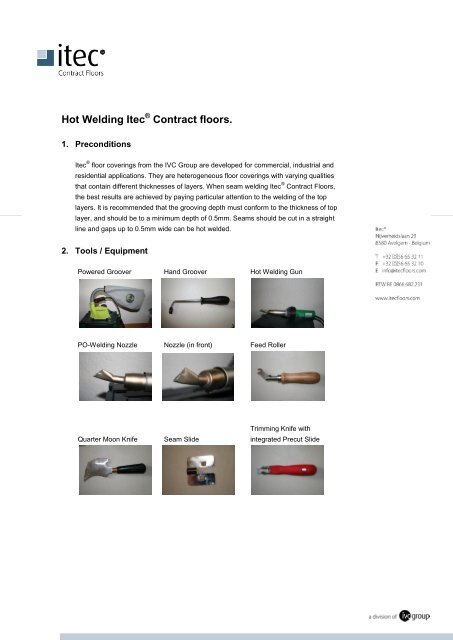
2. Tools / Equipment<br />
Powered Groover Hand Groover <strong>Hot</strong> <strong>Welding</strong> Gun<br />
PO-<strong>Welding</strong> Nozzle Nozzle (in front) Feed Roller<br />
Trimming Knife with<br />
Quarter Moon Knife Seam Slide integrated Precut Slide
3. Conditions<br />
Smooth and close seams. Gap width must not exceed 0.5mm.<br />
Preparation<br />
Grooving must conform to the thickness of top layer and should be to a minimum depth<br />
of 0.5mm. Floor coverings with a top layer greater than 0.5mm must be grooved in<br />
relation to the stated depth of the top layer.<br />
Powered Grooving Grooving by hand Grooving wall junctions<br />
4. <strong>Welding</strong><br />
A welding gun or automatic welder must be adjusted and warmed to 440°C before<br />
welding commences.<br />
The <strong>Welding</strong> speed must be approximately 3m/min and attention should be paid to the<br />
floor temperature and performance of the welding gun or automatic welder at all times.
Before turning on the welding rod, ensure that adjacent walls or skirting are adequately<br />
protected from potential damage caused by excess heat from the welding machine.<br />
Continue the welding process across the entire length of the seam.<br />
Once complete, check that no visible gaps remain along the seam and that the rods sit<br />
perfectly.<br />
Once the rods have cooled, there are a number of different options available to trim the<br />
seam.<br />
1A. Procedure using a quarter moon knife with seam sledge.
1B. Procedure using a quarter moon knife without seam sledge.<br />
2A. Procedure using a MOZART seam trimmer with seam sledge.<br />
2B. Procedure using a MOZART seam trimmer without seam sledge.<br />
In almost every case, the process will involve welding in two directions that will result in<br />
seams meeting at a central junction. When this is the case, please use following<br />
directions.<br />
Start welding from the opposite direction until both ends meet. Once the rod has cooled,<br />
trim the seam as described above.<br />
Final result after correct procedure is carried out.
Please note that the welding rods must be trimmed in two stages (A + B) and the second<br />
stage (1B & 2B) should take place when the rods have cooled to room temperature.<br />
Trimming after the cooling process will ensure the smoothest finish possible.<br />
5. Important Advice.<br />
These recommendations should not be considered as a comprehensive and complete<br />
guide.<br />
<strong>Itec</strong> ® Contract Floors do not recommend the use of speedweld style nozzles for welding<br />
as they may damage the protective layer. This is in addition to the installation procedures<br />
described above. We cannot make any guarantees for the quality and success of your<br />
work.<br />
For further questions on the installation, welding, maintenance and use of <strong>Itec</strong> ® Contract<br />
Floors please contact our technical staff.<br />
Avelgem, July 2010