

Dakar Slash (#5804) - Manual - Traxxas
Dakar Slash (#5804) - Manual - Traxxas
Dakar Slash (#5804) - Manual - Traxxas

You also want an ePaper? Increase the reach of your titles
YUMPU automatically turns print PDFs into web optimized ePapers that Google loves.
TRAXXAS TQ 2.4GHz RADIO SYSTEM<br />
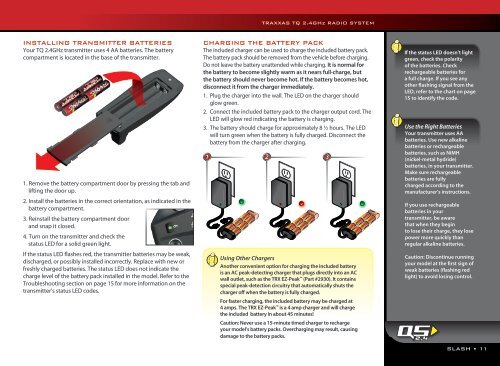
INSTALLING TRANSMITTER BATTERIES<br />
Your TQ 2.4GHz transmitter uses 4 AA batteries. The battery<br />
compartment is located in the base of the transmitter.<br />
1. Remove the battery compartment door by pressing the tab and<br />
lifting the door up.<br />
2. Install the batteries in the correct orientation, as indicated in the<br />
battery compartment.<br />
3. Reinstall the battery compartment door<br />
and snap it closed.<br />
4. Turn on the transmitter and check the<br />
status LED for a solid green light.<br />
If the status LED flashes red, the transmitter batteries may be weak,<br />
discharged, or possibly installed incorrectly. Replace with new or<br />
freshly charged batteries. The status LED does not indicate the<br />
charge level of the battery pack installed in the model. Refer to the<br />
Troubleshooting section on page 15 for more information on the<br />
transmitter’s status LED codes.<br />
CHARGING THE BATTERY PACK<br />
The included charger can be used to charge the included battery pack.<br />
The battery pack should be removed from the vehicle before charging.<br />
Do not leave the battery unattended while charging. It is normal for<br />
the battery to become slightly warm as it nears full-charge, but<br />
the battery should never become hot. If the battery becomes hot,<br />
disconnect it from the charger immediately.<br />
1. Plug the charger into the wall. The LED on the charger should<br />
glow green.<br />
2. Connect the included battery pack to the charger output cord. The<br />
LED will glow red indicating the battery is charging.<br />
3. The battery should charge for approximately 8 ½ hours. The LED<br />
will turn green when the battery is fully charged. Disconnect the<br />
battery from the charger after charging.<br />
1<br />
2 3<br />
Using Other Chargers<br />
Another convenient option for charging the included battery<br />
is an AC peak-detecting charger that plugs directly into an AC<br />
wall outlet, such as the TRX EZ-Peak (Part #2930). It contains<br />
special peak-detection circuitry that automatically shuts the<br />
charger off when the battery is fully charged.<br />
For faster charging, the included battery may be charged at<br />
4 amps. The TRX EZ-Peak is a 4 amp charger and will charge<br />
the included battery in about 45 minutes!<br />
Caution: Never use a 15-minute timed charger to recharge<br />
your model’s battery packs. Overcharging may result, causing<br />
damage to the battery packs. 2,4<br />
If the status LED doesn’t light<br />
green, check the polarity<br />
of the batteries. Check<br />
rechargeable batteries for<br />
a full charge. If you see any<br />
other flashing signal from the<br />
LED, refer to the chart on page<br />
15 to identify the code.<br />
Use the Right Batteries<br />
Your transmitter uses AA<br />
batteries. Use new alkaline<br />
batteries or rechargeable<br />
batteries, such as NiMH<br />
(nickel-metal hydride)<br />
batteries, in your transmitter.<br />
Make sure rechargeable<br />
batteries are fully<br />
charged according to the<br />
manufacturer’s instructions.<br />
If you use rechargeable<br />
batteries in your<br />
transmitter, be aware<br />
that when they begin<br />
to lose their charge, they lose<br />
power more quickly than<br />
regular alkaline batteries.<br />
Caution: Discontinue running<br />
your model at the first sign of<br />
weak batteries (flashing red<br />
light) to avoid losing control.<br />
SLASH • 11


