COMPACT - Bio-Circle
COMPACT - Bio-Circle
COMPACT - Bio-Circle

You also want an ePaper? Increase the reach of your titles
YUMPU automatically turns print PDFs into web optimized ePapers that Google loves.
<strong>COMPACT</strong><br />
Betriebsanleitung<br />
Operating Instructions<br />
Mode d´emploi<br />
Libretto d’istruzioni<br />
G50026
Operating instructions <strong>Bio</strong>-<strong>Circle</strong> compact – English<br />
11. Zulassungen<br />
Thank you for purchasing the <strong>Bio</strong>-<strong>Circle</strong> compact.<br />
Da die Geräte strengen Sicherheitsnormen entsprechen, dürfen defekte Teile nur durch Originalteile<br />
ersetzt werden. Ersatzteillisten können beim Hersteller angefordert werden. <strong>Bio</strong>-<strong>Circle</strong> compact erfüllt<br />
die CE-Kennzeichnungskriterien. Die Konformitätserklärung senden wir auf Wunsch gerne zu.<br />
12. Gewährleistung<br />
CB Chemie und <strong>Bio</strong>technologie GmbH garantiert für die handwerkliche Qualität und die Verwendung<br />
einwandfreier Materialien.<br />
Die Gewährleistung erstreckt sich über einen Zeitraum von 12 Monaten für die Maschine ausgenommen<br />
Verschleißteile.<br />
Die Gewährleistung erstreckt sich nicht auf Defekte aufgrund von normalen Verschleiß, Beschädigung<br />
oder Defekte die nach Ansicht von CB Chemie und <strong>Bio</strong>technologie GmbH auf missbräuchliche<br />
Verwendung zurückzuführen sind.<br />
Teile und Komponenten, die sich nach Überprüfung durch CB Chemie und <strong>Bio</strong>technologie GmbH<br />
als defekt von Material- oder Herstellungsmängel erweisen, werden repariert oder ausgewechselt.<br />
Der Kunde verliert sämtliche Gewährleistungsansprüche, wenn er an dem gelieferten Gegenstand<br />
ohne vorherige Zustimmung Änderungen oder Instandsetzungen vornimmt oder vornehmen lässt.<br />
Die Gewährleistung beginnt mit Rechnungsdatum bzw. Auslieferung der Anlage.<br />
This operating instruction has been designed to give you all information<br />
on the <strong>Bio</strong>-<strong>Circle</strong> compact.<br />
To ensure perfect functioning of your <strong>Bio</strong>-<strong>Circle</strong> compact, carefully<br />
read this operating instruction before using the machine.<br />
Familiarize yourself with this unit's operation, its particular features,<br />
applications and limitations. You will also find useful tips on safety<br />
and maintenance.<br />
CB Chemie und <strong>Bio</strong>technologie GmbH<br />
Should you need more information<br />
please call our<br />
Service Hotline<br />
+49 (0)5241 9443-0<br />
E<br />
D<br />
20 21
Operating instructions <strong>Bio</strong>-<strong>Circle</strong> compact – English<br />
Table of Contents<br />
1. General Points<br />
1.<br />
General Points<br />
23<br />
These operating instructions are applicable to the <strong>Bio</strong>-<strong>Circle</strong> compact Parts Washer. It specifies<br />
the information necessary for its correct handling and usage and covers the initial set up, operation,<br />
2.<br />
Fundamental Safety Instructions<br />
23<br />
maintenance, shut down and waste disposal. The warnings and advices mentioned in these instruction<br />
are to be observed and adhered to. If the product is used in accordance with the regulations corre-<br />
3.<br />
Product Description<br />
sponding to these operating instruction we will be liable in line with our guarantee conditions.<br />
3.1 Assembly and Mode of Operation<br />
24<br />
Keep these operating instructions in a safe place. They are designed to help with practical usage of the<br />
3.2 Intended Use<br />
27<br />
Parts Washer and should be at the users disposal at the location where the Parts Washer is being used.<br />
No modifications or alterations must made to the product without authorisation from the man-<br />
4.<br />
Technical Data<br />
27<br />
ufacturer. The manufacturer will not be liable for any modifications made without its authorisation<br />
and the guarantee will expire and cease to be valid.<br />
5.<br />
Start Up<br />
28<br />
Key to Safety Instructions<br />
6.<br />
Operating Instructions<br />
29<br />
Danger symbol<br />
You will find this symbol next to all safety instructions relevant to damage prevention (personal injury,<br />
7.<br />
Maintenance<br />
30<br />
material damage). Take note of this instruction and behave cautiously!<br />
8.<br />
Notes for Waste Disposal<br />
32<br />
Prohibition symbol<br />
You will find this symbol next to all prohibition instructions where failure to comply with these could result<br />
9.<br />
Trouble Shooting Guide<br />
32<br />
in direct personal injury and material damage. It is mandatory that prohibition symbols are complied with!<br />
10.<br />
Diagram Showing Electrical Connections<br />
34<br />
2. Fundamental Safety Instructions<br />
11.<br />
Regulations<br />
36<br />
Every person who works with the product must be familiar with the content of the operating instructions.<br />
These operating instructions are a part of the unit and must be available to the operating staff at all<br />
12.<br />
Terms of Guarantee<br />
36<br />
times. The operating staff are to be shown the operating instructions and the danger symbols and<br />
prohibition symbols in particular must be pointed out to them.This unit is equipped with a 3-conductor<br />
power cord and 3-prong grounding cap. It must be connected to a correspondingly grounded power<br />
outlet protected by a class A Ground Fault Circuit Interrupter (GFCI) to prevent electric shock hazard.<br />
Please have this checked and tested by a specialist in electrics!<br />
Before connecting this unit, check that the voltage shown on the rating plate is the same as of the<br />
power source. Operating this unit on a voltage other than specified on its rating plate may result in<br />
personal injury to the user and damage to the unit.<br />
The unit must only be operated by those people authorised to do so.<br />
Your <strong>Bio</strong>-<strong>Circle</strong> machine is equipped with magnet inserted underneath the course filter in the sink,<br />
always handle it with care, as it will shatter if dropped and may cause injuries. Keep magnet away<br />
from electronic devices and magnetic media such as floppy disc, credit cards and computer monitors.<br />
Keep magnet away from pacemakers.<br />
E<br />
D<br />
22 23
Operating instructions <strong>Bio</strong>-<strong>Circle</strong> compact – English<br />
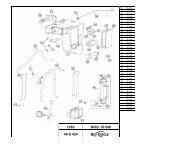
3. Product Description<br />
3.1 Assembly and Mode of Operation 1<br />
2<br />
3<br />
4<br />
5<br />
6<br />
7<br />
8<br />
9<br />
10<br />
11<br />
12<br />
13<br />
14<br />
16<br />
17<br />
18<br />
19<br />
20<br />
21<br />
22<br />
23<br />
24<br />
25<br />
26<br />
27<br />
28<br />
29<br />
30<br />
32<br />
33<br />
34<br />
35<br />
36<br />
37<br />
38<br />
Sink only<br />
Magnet<br />
Stainless mesh basket<br />
Stainless strainer lid<br />
Swivel fitting ½ in barb<br />
Flex faucet complete<br />
3-way-valve<br />
Hose clamp size H<br />
brush hose ⅜"<br />
Fitting ½ in /GHM<br />
Flow through brush<br />
Filter bracket<br />
Fitting ¾" MPT x ½" barb elbow<br />
Filter housing<br />
Base<br />
Sink rod<br />
Damper assembly<br />
Replacement RMU 230 V, reconditioned<br />
Filter cartridge (see page 33)<br />
Buld head fitting<br />
Drain valve assembly<br />
Threded nipple<br />
Nylon loop strap<br />
Pump switch consisting of:<br />
Pump switch contact<br />
Push button for pump switch<br />
Valve handle<br />
Cover for RMU with gasket<br />
Power cord 230 V<br />
O-ring<br />
Gasket for cover<br />
Sink gasket<br />
Filter bag bracket with 3 screws<br />
Hose clamp size F<br />
46 IN hose ½ IN<br />
Evaporation barrier<br />
Power cord warning label<br />
1 IN hose adapter<br />
Order No.<br />
G48D362<br />
G48D309<br />
G48D308<br />
G48D307<br />
G484437<br />
G48D373<br />
G48D301<br />
G21826<br />
G23026<br />
G48D302<br />
G20726<br />
G48D313<br />
G484431<br />
G48D314<br />
G48D361<br />
G48D319<br />
D48D310<br />
G53326<br />
G484317<br />
G55B026<br />
G552024<br />
G484433<br />
G48D347<br />
G48D346<br />
G48D413<br />
G484507<br />
G24326<br />
G48D398<br />
G484508<br />
G48D320<br />
G54826<br />
G25826<br />
G484543<br />
G484542<br />
G552025<br />
E<br />
D<br />
24 25
Operating instructions <strong>Bio</strong>-<strong>Circle</strong> compact – English<br />
Order No.<br />
5<br />
7<br />
10<br />
15<br />
16<br />
17<br />
18<br />
19<br />
20<br />
22<br />
24<br />
38<br />
39<br />
42<br />
45<br />
46<br />
47<br />
49<br />
50<br />
52<br />
54<br />
59<br />
63<br />
66<br />
70<br />
71<br />
75<br />
76<br />
77<br />
Main switch knob<br />
Rail<br />
Terminal end bracket<br />
Main power switch contact<br />
Pump switch consisting of:<br />
Pump switch contact<br />
Push button for pump switch<br />
Terminal assembly 230 V<br />
Filter intake fitting ¾ MPT/½ IN barb elbow<br />
Cover for RMU with gasket<br />
Gasket for cover<br />
⅜ IN. Strain relief<br />
Air pump 230 V<br />
Power cord 230 V<br />
Power cord warning label<br />
Pump hose ½ IN<br />
Hose clamp size H<br />
Air diffuser<br />
Air tube<br />
Fluid pump 230 V<br />
Main float switch 230 V<br />
Air diffuser bracket<br />
Red LED<br />
Pump support<br />
Pump support gasket<br />
Pump support plug<br />
Temperature limiting switch<br />
Thermostat<br />
Heater gasket<br />
Air pump strap<br />
Heater 230 V<br />
G484511<br />
G484510<br />
G484354<br />
G484514<br />
G48D347<br />
G48D346<br />
G484534<br />
G484431<br />
G484507<br />
G484508<br />
G484528<br />
G23926<br />
G24326<br />
48-D 549<br />
G21826<br />
G484340<br />
G484527<br />
G20126<br />
G48D327<br />
G48D525<br />
G53826<br />
G484512<br />
G484521<br />
G484522<br />
G53726<br />
G53626<br />
G484524<br />
G484523<br />
G484520<br />
E<br />
D<br />
26 27
Operating instructions <strong>Bio</strong>-<strong>Circle</strong> compact – English<br />
The pump is electrically operated and pumps the cleaning liquid through the connecting tube to the<br />
3-way ball valve. Depending on its position the cleaner can either be propelled to the sink via the<br />
tube with the brush or via the versatile jointed hose. The work piece is located in the interior of the<br />
table and can be cleaned there. The used cleaning liquid runs through the sinks centered filter back<br />
Comparison between conventional Parts Cleaner with Cold Cleaner and<br />
<strong>Bio</strong>-<strong>Circle</strong> Parts Cleaner<br />
3.2 Intended Use<br />
The parts washer is an environmentally sound<br />
piece of equipment designed to efficiently clean<br />
machine parts, motors, casing or other parts covered<br />
in oil and fat with the aid of <strong>Bio</strong>-<strong>Circle</strong> Liquid,<br />
a biological cleaning liquid.<br />
<strong>Bio</strong>-<strong>Circle</strong> Liquid<br />
A02026 <strong>Bio</strong>-<strong>Circle</strong> L container 20 l<br />
A20026 <strong>Bio</strong>-<strong>Circle</strong> L drum 200 l<br />
Cold<br />
Cleaner<br />
<strong>Bio</strong>-<strong>Circle</strong><br />
<strong>Bio</strong>-<strong>Circle</strong> L<br />
What is the effect of increased<br />
contamination?<br />
saturation of the cleaning liquid<br />
– cleaning effect falls off<br />
good stable<br />
results the<br />
whole time<br />
What contaminations<br />
can be removed ?<br />
Organique, apolar (grease, oil)<br />
Inorganique, polar (salts)<br />
Inorganique, apolar (iron fillings, dust)<br />
Very good results<br />
Poor results<br />
Poor results<br />
Very good results<br />
Very good results<br />
Good results<br />
What materials can be cleaned?<br />
Stainless steel<br />
Steel<br />
Aluminium<br />
Non-ferrous heavy metals<br />
Very good results<br />
Very good results<br />
Very good results<br />
Very good results<br />
Very good results<br />
Very good results<br />
Very good results<br />
Very good results<br />
Safety and health provisions for workers<br />
4. Technical Data<br />
Health damage<br />
(Source: Reinigen und Entfetten, BG Maschinenbau- und Metall-BG 1997)<br />
Damage to the nervous system<br />
Damage to the skin<br />
Damage to the liver<br />
Damage to the kidneys<br />
Damage to the blood cells<br />
Mutagens and teratogenes<br />
Cancerogen<br />
Cold<br />
Cleaner<br />
Toluene, xylenes, trichlorethylene,<br />
benzenes (hexane isomers, pentane,<br />
heptane, octane)<br />
Yes<br />
Dichlormethane, Trichlorethylene,<br />
Toluene, xylenes, methanol, ethanol<br />
Trichlorethylene, Kerosene, Petrol/<br />
gasoline, Hexane, heptane, toluene,<br />
xylene, alcohols<br />
Toluenne, benzene<br />
Organic solvents<br />
Benzene<br />
<strong>Bio</strong>-<strong>Circle</strong><br />
<strong>Bio</strong>-<strong>Circle</strong> L<br />
none<br />
none<br />
none<br />
none<br />
none<br />
none<br />
none<br />
Dimensions<br />
Working height<br />
Usable workspace<br />
Weight when empty<br />
Load capacity<br />
Operational tank capacity<br />
Minimum tank capacity<br />
Maximum tank capacity<br />
Tank material<br />
Power input<br />
Electrical connection<br />
Heating<br />
Level switch<br />
Temperature<br />
Pump<br />
Operating temperature<br />
900 x 600 x 1120 mm (35 x 24 x 44 inches)<br />
1040 mm (41 inches)<br />
740 mm x 540 mm (29 wide x 21 deep inches)<br />
45 kg<br />
100 kg<br />
80 l<br />
60 l<br />
100 l<br />
PE LD<br />
approx. 750 W<br />
230 V ~, 50 Hz<br />
750 W, stainless steel<br />
Minimum fill level, approx. 60 l<br />
approx. 41 °C – factory set<br />
40 W, 380 l/hr<br />
15 to 48 °C<br />
E<br />
D<br />
28 29
Operating instructions <strong>Bio</strong>-<strong>Circle</strong> compact – English<br />
5. Start Up<br />
6. Operation Instruction<br />
After removing the packaging, check the casing and control for any possible transport damage. Should<br />
transport damage be detected, do not connect the machine to the mains. Instead report the damage to<br />
the carrier and to CB Chemie und <strong>Bio</strong>technologie GmbH. The original packaging must be retained.<br />
Place the unit in a dry and stable place of your choice. The ground must be even. If necessary<br />
level the ground out with suitable material. Ensure that the drain valve is closed. Use only the<br />
genuine <strong>Bio</strong>-<strong>Circle</strong> L Cleaning Liquid. To fill to the optimum volume, 80 l should be required.<br />
Do not overfill!<br />
Other cleaning liquids, such as cleaner solvents, disinfectants and alkaline cleaner, for example<br />
must not be used!<br />
On/Off<br />
On/Off<br />
Liquid Level Lines<br />
Main Power switch Power switch Pump<br />
Maximum<br />
100 l<br />
80 l<br />
60 l Minimum<br />
Turn the cleaning pump ON pressing Power switch Pump. Wet the sink, parts to be cleaned and<br />
any brushes prior to cleaning; this will prevent grease and dirt from sticking to the surfaces.<br />
The maximum load of 100 kg must not be exceeded!<br />
Depending on the positioning of the 3-way control valve, cleaning can occur via:<br />
Washing by means of a versatile jointed hose with nozzle.<br />
Cleaning with flow-through cleaning brush.<br />
In middle position both outlets are open.<br />
After the cleaning process has ended<br />
switch off the pump again.<br />
Note: Any parts susceptible to corrosion<br />
should not be left in the sink after cleaning.<br />
Connect the unit to the electricity supply.<br />
Please ensure that the current entry provided by the customer is furnished with an ELCB (Earth<br />
Leakage Circuit Breaker - FI switch). Turn main power switch to “I”.<br />
Note: Do not turn ON the main power switch with no liquid inside the machine.<br />
The heater starts to warm up the cleaning liquid to operating temperature.<br />
Allow heater to warm <strong>Bio</strong>-<strong>Circle</strong> L solution to working temperature for optimal cleaning efficiency.<br />
When the solution has reached its proper working temperature of approx. 41º C (This will take approx.<br />
4 hours with a liquid at 20 °C), periodically, the heater will turn itself ON.<br />
Never turn off the <strong>Bio</strong>-<strong>Circle</strong> unit unless for servicing or longer periods of non-use (more than<br />
two weeks, see chapter 6. Operation instructions). Once the correct temperature has been reached,<br />
the unit is ready for use.<br />
As with all parts cleaners, excess grease and oil should be disposed of prior to washing. Do not<br />
use this unit as a waste dump. Do not introduce disinfectants, solvents, brake fluid, engine coolant,<br />
chlorinated, acidic or alkaline solutions into this system. Do not add water.<br />
The optimal temperature for the activity of microorganisms and therefore for the breakdown of oil<br />
is approx. 41 °C. Therefore leave the unit always switched on.<br />
For optimal activity of microorganisms and thus of the breakdown of oil, it is essential that the microorganisms<br />
have a supply of oxygen. This is why an air sprinkler has to be permanently switched<br />
on, which guarantees the required oxygen supply for the microorganisms. If the unit is switched off,<br />
or fails because of a defect, the result is that the microorganisms become inactive.<br />
If the unit is to be idle for more than two weeks, it is recommended to turn the unit off. Make sure the<br />
surface of the liquid is not covered with oil. If necessary skim off or absorb any accumulation of oil.<br />
E<br />
D<br />
30 31
Operating instructions <strong>Bio</strong>-<strong>Circle</strong> compact – English<br />
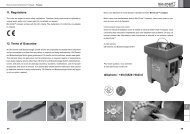
7. Maintenance<br />
Warning! Before beginning to work on fixtures, make sure that there is no electrical current.<br />
Pull the plug from the mains! Check that the unit has no current!<br />
For maintenance purposes the table can be opened sideways.<br />
Filters<br />
The parts washer is equipped with three-part filtration system: a coarse filter on the surface of the<br />
sink, underneath a stainless steel filter for finer material or other impurities and then a magnet. It<br />
is recommended to clean these filters<br />
and the magnet outside the parts washer<br />
daily. Take the filters and the magnet<br />
out of the sink, wash out and clean with<br />
water. Underneath the sink a filter bag<br />
can be installed, check this regulary and<br />
empty or change if necessary.<br />
For order/re-order:<br />
G54826 bracket for filterbag including 3 screws<br />
G54426 filterbag polyproylene felt 5 μm<br />
G54526 filterbag polyproylene felt 25 μm<br />
G54626 filterbag Nylon 50μm, re-useable<br />
G54726 filterbag Nylon 100 μm, re-useable<br />
Liquid Filter<br />
The filter housing is installed on the right back of the unit. It is to be checked weekly and if necessary<br />
changed. Release the filter cartridge by<br />
turning anti-clockwise. Remove the filter For order/re-order:<br />
and put in a new one. When screwing G22726 <strong>Bio</strong>-<strong>Circle</strong> replacement filter 100 µm (6-pack)<br />
on the filter cartridge take care that it fits G22826 <strong>Bio</strong>-<strong>Circle</strong> replacement filter 200 µm (6-pack)<br />
correctly. Alternatively a reusable Nylon G22026 <strong>Bio</strong>-<strong>Circle</strong> Nylon Filter Support<br />
filter can be installed.<br />
G21926 <strong>Bio</strong>-<strong>Circle</strong> Nylon Filter 350 µm<br />
Maintenance position (table)<br />
Drain flap<br />
This unit is equipped with a flap located underneath the coarse filter and magnet to slow down<br />
evaporation, if too much evaporation occurs, verify that flap moves freely.<br />
Fill Level<br />
Monitor the fill level regularly by means of the markings on the wall of the container, because of<br />
liquid losses due to evaporation and manual take out. If the fill-up height falls below the minimum<br />
level, heating and pump will be switched off automatically for safety reasons, this will be indicated by<br />
lightning the red LED. Ensure that float switch floats freely in the liquid.<br />
Annual maintenance<br />
It is recommended that your <strong>Bio</strong>-<strong>Circle</strong> compact is inspected and cleaned annually to perform at<br />
optimal efficiency. Depending on the application non-digestible matter can accumulate as sludge at<br />
the bottom of the tank over time, which can negatively affect the bioremediation activity.<br />
To facilitate the removal of the sludge turn the main power switch to “O” and unplug unit. Connect a<br />
hose to drain valve and fully open the valve, wait a few seconds and then close the valve. Repeat<br />
these steps 3 times to remove most of the sludge.<br />
Alternatively open the sink and empty the unit from all the cleaning solution using a hand pump until<br />
the sludge becomes visible. If cleaning solution is still cleaning well, save it for re-use. Remove the<br />
sludge and clean the tank walls and pumps. After that refill the unit, turn it on and allow solution to<br />
warm-up to its proper working temperature of approx. 41 ºC before cleaning parts.<br />
Visually inspect pumps, tubing and connections. Replace parts that show excessive wear.<br />
E<br />
D<br />
32 33
Operating instructions <strong>Bio</strong>-<strong>Circle</strong> compact – English<br />
8. Notes for Waste Disposal<br />
Cleaning of the parts takes place with an alkalescent, biodegradable, non-toxic cleaning agent in a warm<br />
aqueous solution. Used <strong>Bio</strong>-<strong>Circle</strong> L can usually be added to your other oil-water waste (such as water<br />
soluble cutting fluids) for disposal. Taking into account local regulations, residual liquid can be supplied to<br />
a purification plant. The waste code numbers that are valid for the application can be extracted from the<br />
European Waste Directive and should be adhered to at all times.<br />
9. Trouble Shooting Guide<br />
Warning! Before beginning to work on fixtures, make sure that there is no electrical current. Pull the<br />
plug from the mains! Check that the unit has no current!<br />
3. The high temperature switch is activated: push up the white pin at the high limit switch. If there is<br />
a low click sound to hear, the high limit switch had released.<br />
Attention: the high limit switch can only be reset, if the temperature has fallen below approx. 40 °C.<br />
Causes for the high limit switch release:<br />
1. The aeration has stopped, because of low convection the temperature at the heater raised to much.<br />
2. The level is to low and, due to a level sensor failure, the heater was not switched of.<br />
3. The temperature regulator has a failure, please check the liquid temperature.<br />
Debug and push up the white pin at the high limit switch. A gentle click-noise shows that the highlimit-switch<br />
has opened. Check for cause.<br />
Sink fills up<br />
Sink will fill up if the filters or magnet are dirty or clogged. Remove filters and clean all parts. Ensure the drain<br />
flap moves freely.<br />
No or weak liquid flow from nozzle or flow-through brush<br />
The rubber hose may be pinched along its length. Ensure the hose is not kinked or squeezed. Also, filter<br />
could be dirty or clogged, remove filter cartridge and replace with new one.<br />
Cleaning Pump does not work<br />
Please check for blocked pump filter or filter cartridge. Check electrical connections. Check liquid level,<br />
pumps stops if level is low.<br />
No more aeration<br />
Aeration has stopped but air pump is still running.<br />
Check if the air hose is pinched somewhere along its length.<br />
Check if the air diffuser is attached to the end of the air hose next to the pumps and clean or replace it<br />
if necessary.<br />
Turn main power switch to “0”, unplug the unit, remove the cover of control module and check whether the<br />
air hose is not disconnected from the air pump or pinched somewhere along its length.<br />
The failure of the heater could have different causes:<br />
1. The level is below minimum (indicated by red LED): the heater will be stopped automatically.<br />
2. Heater defect: check for electrical flux and connections. The resistance of the heater should be approx.<br />
43 Ohm, if the value varies significant, the heater needs to be changed.<br />
Sensor high<br />
temperature<br />
fail safe<br />
fail safe<br />
(high temperature switch)<br />
Attention: A reset is only possible<br />
after cooling down!<br />
temperature regulator<br />
Solution does not clean well anymore<br />
The bioremediation process may have been reduced or prevented by the introduction of inadequate<br />
substances or an unfavourable environment. Depending on the situation, replacing all or part of the<br />
cleaning solution to re-start the system may be required. For a re-start take approx. 40 l out of the<br />
tank and replace by new <strong>Bio</strong>-<strong>Circle</strong> Liquid. After approx. 5 days the liquid gains its original ability<br />
to break down oil and fat impurities. A restart with part of the used liquid will only be possible, if the<br />
microorganisms are not “poisoned” (for example by solvents, disinfectants or alkaline cleaner). In<br />
case of doubt better change the complete liquid.<br />
Solution Odour<br />
It is normal that the solution may emit a apple odour at start-up. As oil and grease are introduced into<br />
the cleaning solution, this odour will diminish leaving only a faint, pleasant scent.<br />
E<br />
D<br />
34 35
Operating instructions <strong>Bio</strong>-<strong>Circle</strong> compact – English<br />
10. Diagram showing electrical Connections<br />
Clamp:<br />
4. (B): to level switch<br />
(D): from 2D<br />
1. (A, B, C): power supply<br />
(D, E): to main switch<br />
5. (B, C): air pump<br />
(D, E): from main switch<br />
2. (B, C): pump switch<br />
(D): from 4D<br />
(E): to 6E<br />
3. (B, C): from level switch<br />
(D): to temperaturcontroller<br />
(E): signal-light (L)<br />
6. (A, B, C): liquid pump<br />
(D): to high temperature switch<br />
(E): from 2E<br />
7. (A, B, C): heater<br />
(D): from high temperature switch<br />
(E): from temperaturcontroller<br />
E<br />
D<br />
36 37
Mode d´emploi du <strong>Bio</strong>-<strong>Circle</strong> compact – Français<br />
11. Regulations<br />
The units are subject to strict safety regulations. Therefore, faulty parts must be replaced by<br />
original spare parts only. A spare part list is available on request.<br />
<strong>Bio</strong>-<strong>Circle</strong> compact comply with the CE criteria. The declaration of conformity is available<br />
on request.<br />
Nous vous remercions d'avoir choisi le <strong>Bio</strong>-<strong>Circle</strong> compact<br />
Plus vous serez familiarisé avec le <strong>Bio</strong>-<strong>Circle</strong>compact,<br />
mieux vous pourrez exploiter cet appareil.<br />
C'est pourquoi nous vous prions de lire attentivement ce mode d´emploi avant de mettre<br />
le <strong>Bio</strong>-<strong>Circle</strong>compact en service. Vous y trouverez des indications importantes pour<br />
une utilisation sans problème, ainsi que des informations importantes relatives à la sécurité<br />
et à la maintenance du <strong>Bio</strong>-<strong>Circle</strong>compact.<br />
12. Terms of Guarantee<br />
CB Chemie und <strong>Bio</strong>technologie GmbH<br />
All CB Chemie und <strong>Bio</strong>technologie GmbH articles are inspected and tested before shipment<br />
and are warranted to be free from any defect in material and faulty workmanship. CB Chemie<br />
und <strong>Bio</strong>technologie GmbH gives guarantee of 12 months on the machines, except wear parts.<br />
This warranty does not apply when normal maintenance is required, repairs or replacements<br />
have been made by anyone other than CB Chemie und <strong>Bio</strong>technologie GmbH authorized personnel,<br />
and does not cover any damage caused by accidents, modifications, use of improper<br />
accessories, and abuse or misuse. If an examination shows that the malfunction was caused<br />
by defective material or faulty workmanship, CB Chemie und <strong>Bio</strong>technologie GmbH will repair<br />
(or at our option, replace).<br />
Si vous avez des questions, n'hésitez<br />
pas à nous contacter au<br />
+49 (0)5241 9443-0<br />
F<br />
E<br />
D<br />
38 39
Technical Support:<br />
Telefon: +49 (0)5241 9443- 0<br />
Telefax: +49 (0)5241 9443- 44<br />
E-Mail: service@cb-chemie.de<br />
AL3 2010<br />
CB Chemie und <strong>Bio</strong>technologie GmbH<br />
CB Chemie und <strong>Bio</strong>technologie GmbH<br />
Berensweg 200<br />
D-33334 Gütersloh<br />
Telefon: +49 (0)5241 9443-0<br />
Telefax: +49 (0)5241 9443-44<br />
bio-chem SEPRO Surface Technology GmbH<br />
Winetzhammerstraße 4<br />
A - 4030 Linz<br />
Telefon: +43 (0)732 37 62 62<br />
Telefax: +43 (0)732 37 62 60<br />
WALTER CB-AG<br />
Lettenstrasse 6<br />
CH-6343 Rotkreuz<br />
Telefon: +41 (0)41 878 11 66<br />
Telefax: +41 (0)41 878 13 47<br />
E-Mail: service@cb-chemie.de<br />
www.cb-chemie.de<br />
E-Mail: service@bio-chem.at<br />
www.bio-chem.at<br />
E-Mail: info@walter-cb.ch<br />
www.walter-cb.ch