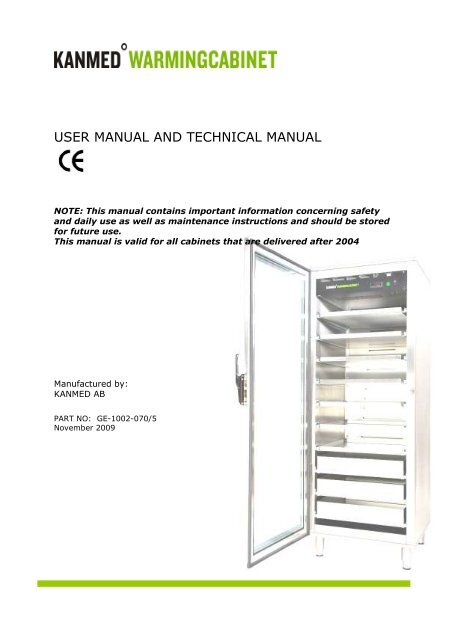
USER MANUAL AND TECHNICAL MANUAL - Kanmed
USER MANUAL AND TECHNICAL MANUAL - Kanmed
USER MANUAL AND TECHNICAL MANUAL - Kanmed

Create successful ePaper yourself
Turn your PDF publications into a flip-book with our unique Google optimized e-Paper software.
<strong>USER</strong> <strong>MANUAL</strong> <strong>AND</strong> <strong>TECHNICAL</strong> <strong>MANUAL</strong><br />
NOTE: This manual contains important information concerning safety<br />
and daily use as well as maintenance instructions and should be stored<br />
for future use.<br />
This manual is valid for all cabinets that are delivered after 2004<br />
Manufactured by:<br />
KANMED AB<br />
PART NO: GE-1002-070/5<br />
November 2009
<strong>USER</strong> and <strong>TECHNICAL</strong> <strong>MANUAL</strong> KANMED WARMING CABINET Page 2 of 12<br />
Note:<br />
The preset maximum temperature is normally 42 0 C.<br />
However the Cabinet can be ordered with 50 0 C as the maximum temperature.<br />
These cabinets are marked on the front panel with a 50 0 C label.<br />
Make sure that the contents in the Cabinet can withstand this temperature.<br />
Table of contents<br />
TABLE OF CONTENTS 2<br />
1. SAFETY INSTRUCTIONS 3<br />
2. GENERAL DESCRIPTION 4<br />
3. DESCRIPTION OF FUNCTION 4<br />
4. <strong>TECHNICAL</strong> 5<br />
5. UNPACKING <strong>AND</strong> PACKING LIST 5<br />
6. INSTALLATION 6<br />
7. USING THE CABINET 6<br />
8. MAINTENANCE <strong>AND</strong> TROUBLE SHOOTING 7<br />
9. ACCESSORIES <strong>AND</strong> SPARE PARTS 9<br />
10. WARRANTY 9<br />
11. CIRCUIT DIAGRAM FOR CABINETS DELIVERED FROM 2004 -2009 10<br />
12. CIRCUIT DIAGRAM FOR CABINETS DELIVERED FROM 2009 11
<strong>USER</strong> and <strong>TECHNICAL</strong> <strong>MANUAL</strong> KANMED WARMING CABINET Page 3 of 12<br />
1. SAFETY INSTRUCTIONS<br />
INTENDED USE<br />
<strong>Kanmed</strong> Warning Cabinet GE-1380-XX is primarily intended for warming of Gel Pads, blankets,<br />
fluids, up to a temperature of 42°C (or 50 0 C if your cabinet is configured to 50 0 C)<br />
<strong>Kanmed</strong> Warning Cabinet shall be used by trained hospital staff according to this user manual and<br />
in accordance with normal hospital routines.<br />
It is NOT intended for warming of Blood Products and Nutritional Products.<br />
IMPORTANT SAFETY ADVICE<br />
• Adjust the cabinet so that it is correctly positioned, vertically and horizontally.<br />
• Secure the cabinet to the wall using the built in brackets at the top.<br />
• Note! If the cabinet is not secured to a wall, don’t’ pull out more than one shelf/basket at<br />
a time.<br />
• The intention of the wheels is to facilitate moving the Cabinet for easy cleaning under and<br />
behind the Cabinet<br />
• Cabinet on wheel are not intended for transport of hospital products<br />
• Cabinets on wheels must be rolled slowly and with great care.<br />
• Never pull out all shelves/baskets at the same time. The cabinet can tilt forward if it is not<br />
secured to the wall.<br />
• Do not overload the shelves/baskets. Maximum load on a shelf is 8 kilos. (Max 2 pcs. of<br />
<strong>Kanmed</strong> Gel Pads (45x50x1.5))<br />
• Maximum load in a basket is 20kg.<br />
• Do not overfill the top shelf - there must be at least 5 cm's free space to ensure air<br />
circulation.<br />
• Don't block the ventilation holes at the inside rear of the cabinet.<br />
• Be extra careful with contents if your cabinet is a model that can be set up to 50 0 C. Risk of<br />
burning patients.<br />
• Do not warm Blood Products and Nutritional Products in the Cabinet<br />
• Risk of burning. If your Cabinet is set to 50°C you must check that the contents are not<br />
too warm when they reach the patient.<br />
EXPLANATION OF SYMBOLS<br />
Consult Users Manual<br />
O OFF<br />
I ON<br />
~ AC current<br />
UP button, rises temperature<br />
DOWN button, decreases temperature<br />
SET button, for displaying desired temperature
<strong>USER</strong> and <strong>TECHNICAL</strong> <strong>MANUAL</strong> KANMED WARMING CABINET Page 4 of 12<br />
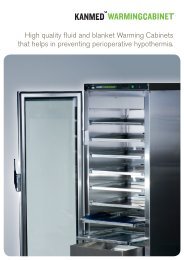
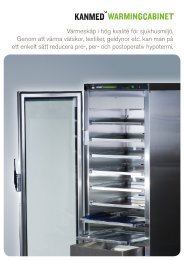
2. GENERAL DESCRIPTION<br />
THE CABINET<br />
The cabinet is made of stainless steel and insulated in order to reduce heat loss to ambience and to<br />
reduce noise. For the same reason the door is double glassed.<br />
THE HEATING COMPARTMENT<br />
Heating element, fan, thermostat, temperature regulator/indicator and electrical connections are all<br />
placed on a "shelf" at the top of the cabinet. A spare fan is also included and mounted in the<br />
heating compartment. The heating compartment is kept in place by a small screw that, when<br />
loosened, allows the whole heating compartment to be pulled completely out to make service quick<br />
and easy.<br />
THE SHELVES-BASKETS<br />
The shelves/baskets run on wheels and can be pulled fully out until they are automatically stopped.<br />
To completely remove the shelves/basket for cleaning or repositioning, lift the front of about 5 cm<br />
upwards and remove it.<br />
EXTRA SHELVES- EXTRA BASKETS<br />
Extra shelves/baskets and rails are available.<br />
Mount the rails with the screws supplied using the prepared mounting holes and then push the<br />
shelf/basket in place by holding the front higher than the rear.<br />
3. Description of function<br />
The warming cabinet and its contents are warmed by warm air heated by a 800 Watt warming<br />
element. The hot air is circulated by a fan and distributed evenly through the outlets at the rear of<br />
the cabinet. The temperature is regulated, by the temperature regulator T1 to the set temperature.<br />
Thermostat T2 functions as an over temperature protection and will take over the temperature<br />
control in case the air temperature exceeds 45°C. At the same time the red lamp on the front panel<br />
will be lit to indicate that there is a malfunction. Inside the heating element there is an additional<br />
over temperature protection that is self-resetting. It will be activated in case the fan stops or goes<br />
too slow.<br />
NOTE: If the red over temperature lamp is lit there is an error that requires a technician.
<strong>USER</strong> and <strong>TECHNICAL</strong> <strong>MANUAL</strong> KANMED WARMING CABINET Page 5 of 12<br />
4. Technical<br />
ELECTRICAL DATA:<br />
Voltage<br />
220-240 Volt AC<br />
Power max. 800 Watt *)<br />
Frequency<br />
50 / 60 Hz<br />
Fuses<br />
T 6,3A L250V<br />
PHYSICAL DATA Cabinet GE-1380<br />
GE-1380/90<br />
Height 175 cm 90 cm<br />
Width 66 cm 66 cm<br />
Dept 60 cm 60 cm<br />
Weight About 180 Kg About 110 Kg<br />
Inner volume About 410 L About 180 L<br />
GE-41500 Shelves inner measure<br />
Height<br />
Width<br />
Dept<br />
GE-41600 Basket inner measure<br />
Height<br />
Width<br />
Dept<br />
2 cm (edge)<br />
52 cm<br />
50 cm<br />
13cm<br />
52cm<br />
50cm<br />
TEMPERATURES<br />
Accuracy ± 1°C<br />
Hysteresis (T2 over temp.)<br />
4°C max<br />
42 0 C ST<strong>AND</strong>ARD CABINET<br />
Working temperature of circulating air 35°C – 42°C, selectable in steps of 1°C<br />
Over temperature protection. Visual alarm 45°C<br />
50 0 C ST<strong>AND</strong>ARD CABINET<br />
Working temperature of circulating air 35°C – 50°C, selectable in steps of 1°C<br />
Over temperature protection. Visual alarm At about 52°C<br />
WARMING CAPACITY<br />
Warming of 10 gel pads GE-455015<br />
45 x 50 x 1.5 cm from 22°C to 40°.<br />
MODE OF OPERATION<br />
CE - MARKING<br />
3 hours<br />
Designed for continuous use<br />
According to 89/366/EEC and 93/68/EEC<br />
(EN 60601-1-2, EN55011 (1991)<br />
*) The nominal effect of the heating element 800 W. Due to the thermostat regulation the average<br />
power consumption is about 150- 300 W<br />
Expected Lifetime<br />
<strong>Kanmed</strong> warrants a safe lifetime of 10 years from first day of use. This is under the condition that<br />
the unit has been serviced according to the user and or service manual and that the unit has not<br />
been modified or changed in any way or for any reason.<br />
5. UNPACKING <strong>AND</strong> PACKING LIST<br />
The cabinet is when shipped from <strong>Kanmed</strong> carefully packed. Check for damages and report them<br />
immediately to your supplier. Damages reported after the cabinet has been brought into use are<br />
not accepted.
<strong>USER</strong> and <strong>TECHNICAL</strong> <strong>MANUAL</strong> KANMED WARMING CABINET Page 6 of 12<br />
6. INSTALLATION<br />
Adjust the feet so that the cabinet is levelled. Connect the cabinet to a grounded power outlet.<br />
NOTE: Always secure the cabinets to a wall by using the built in top brackets to avoid the<br />
risk of tipping forward at unfortunate circumstances.<br />
7. USING THE CABINET<br />
7.1 GENERAL ADVICE<br />
Open the door and switch on the Cabinet with the green power switch at the upper right side.<br />
Check the set temperature and adjust if necessary according to 7.2<br />
7.2 TEMPERATURE ADJUSTMENT <strong>AND</strong> INDICATION<br />
The display shows the actual working temperature in the cabinet in o C as long as the ON/OFF<br />
switch is on and the door is closed.<br />
The set temperature is indicated when the set button is pressed.<br />
Every time the warming is switched on (ON/OFF or closing door), the set value is automatically set<br />
to the set value that was valid at the previous switch off of the warming.<br />
The working temperature can be selected in steps of 1 o C within the range of 35 to 42 o C (or 50 o C)<br />
Old version of regulator (700-0659)<br />
out<br />
°F<br />
°C<br />
set<br />
Newer version of Regulator (Part No: 700-0821)<br />
SET<br />
UP<br />
Down<br />
Press set button to show the set (selected) temperature.<br />
The set value is shown and the OUT lamp blinks for 2 sec.<br />
Press UP arrow within 2 sec. for temperature rise until desired value is shown in the<br />
display.<br />
Press DOWN arrow within 2sec. for temperature decrease until desired value is<br />
shown in the display.
<strong>USER</strong> and <strong>TECHNICAL</strong> <strong>MANUAL</strong> KANMED WARMING CABINET Page 7 of 12<br />
8. MAINTENANCE <strong>AND</strong> TROUBLE SHOOTING<br />
8.1 CLEANING<br />
Clean and disinfect with normal detergents. If hepatitis or HIV is suspected then use stronger<br />
disinfectants.<br />
8.2 TEMPERATURE CONTROL/CALIBRATION<br />
To be performed yearly by a qualified technician only.<br />
GENERAL INFORMATION<br />
Power Cable: Check the integrity of the power cable and verify proper earth connection.<br />
The working temperature is regulated by the temperature regulator T1 and the over temperature<br />
protection by capillary thermostat T2. When checking calibration of T1 and T2, their value is<br />
compared to the value of precision thermometer with an air sensor. The sensor T2 can be adjusted<br />
through a hole in the bottom of the heating compartment.<br />
Place the sensor of the precision thermometer in the middle of the cabinet. Allow at least 3 hours<br />
for proper warming up.<br />
8.2.1 TEMPERATURE REGULATION<br />
INFORMATION ABOUT TEMPERATURE MEASUREMENT <strong>AND</strong> CALIBRATION<br />
T1 is a powered microprocessor temperature regulator/indicator that has resolution of 1°C.<br />
Corrections can be done through a series of pushing’s on the regulator buttons according to the<br />
description below.<br />
PROCEDURE<br />
Place the external control sensor as described under GENERAL INFORMATION above.<br />
Start the warming and wait until the temperature is stable (at least 12 hours). Compare the<br />
external control thermometer with the set temperature and if the deviation is bigger than +/-1°C<br />
adjust as follows.<br />
Old regulator type (700-0659)<br />
1. Press UP and DOWN exactly simultaneously (only one beep may be heard, if you don’t<br />
succeed then repeat) and keep buttons pressed for 5 sec until the indicator display shows<br />
“PA”<br />
2. Press one time on UP, then the display shows ┌┘1,( parameter for calibration of sensors)<br />
3. Press SET once and within 2 sec on UP or DOWN to compensate for the noted temperature<br />
difference, one press gives the change of 1°C.<br />
For example: The display shows 42°C but the external control temperature shows 39°C.<br />
The difference is -3°C, to compensate this difference press three times on DOWN button<br />
(the earlier value will drop with 3 degrees)<br />
4. Store the new calibrated value by pressing UP and DOWN simultaneously (only one beep<br />
may be heard, if you don’t succeed- .repeat) and keep pressed for 5 sec until the indicator<br />
display shows the actual temperature.<br />
5. Make a new measurement of the temperature and control that T1:s shown value compares<br />
to that of the external thermometer
<strong>USER</strong> and <strong>TECHNICAL</strong> <strong>MANUAL</strong> KANMED WARMING CABINET Page 8 of 12<br />
Regulator type No 700-0821<br />
1. Press UP and DOWN exactly simultaneously ( and ) (only one beep may be heard, if you<br />
don’t succeed- .repeat) and keep buttons pressed for 5 sec until the indicator display shows<br />
“PA”.<br />
2. Press one time.<br />
3. Press within 15s until -19 is displayed.<br />
4. Press one time.<br />
5. Press UP and DOWN exactly simultaneously ( and ) until “SP1” is displayed<br />
6. To change a parameter press or button till parameter “CA1” is received.<br />
7. Press SET once and within 2 sec on or button to enter the noted temperature<br />
difference. press SET again<br />
For example: The display shows 50°C but the external control temperature shows 47°C. The<br />
difference is -3°C, to compensate this difference press on DOWN button (Store the new<br />
calibrated value by pressing UP and DOWN simultaneously (only one beep may be heard, if you<br />
don’t succeed- .repeat) and keep pressed for 5 sec until the indicator display shows the actual<br />
temperature.<br />
8. Cycle the power to Off and On to set the new values.<br />
9. Make a new measurement of the temperature and control that T1:s shown value compares to<br />
that of the external thermometer.<br />
8.2.2 OVER TEMPERATURE<br />
INFORMATION ABOUT TEMPERATURE MEASUREMENT <strong>AND</strong> CALIBRATION<br />
The temperature sensor T2 is a capillary thermostat. In the <strong>Kanmed</strong> cabinet its hysteretic is 4°C<br />
max. When delivered T2 is set to 2°C above the maximum value of T1 ( 42°C or 50°C). The<br />
activation of T2 is identified by a clear click sound as well as by the red over temperature lamp is lit<br />
The procedure described below is a simplified method to check and if necessary adjust T2<br />
PROCEDURE<br />
1. First check the temperature regulation as described under 8.2.1 above. Set the regulator<br />
T1 on max .setting (42°C)<br />
If the cabinet is cold, let it first get proper warm for at least 12 hours, before the<br />
measure/calibration is done. Check that the cabinet warms to the max temperature setting.<br />
2. Adjust the set temperature by turning T2: s adjustment screw (you find it through the hole<br />
on the underneath of the shelve) with a screwdriver. Turn the adjustment screw fully<br />
clockwise (+). Now Turn counter clockwise back to activation (one click sounds), turn again<br />
clockwise past the activation point in tiny steps ( a new click sounds)<br />
3. Check that you don’t activate the over temperature indication when run the cabinet in<br />
normal operation ( with T1 prepared on 42°C ) If this should happen you have to repeat the<br />
procedure and set T2:s activation point a bit higher<br />
8.3 TROUBLE SHOOTING<br />
If the warming is not starting, check as follows:<br />
• Power cable connected (UK only - and plug fuse OK)?<br />
• Power in the wall socket?<br />
• Cabinet fuses OK?<br />
• Power Switch on (If power is OK it will show a green light)<br />
• Is the fan rotating? It shall start as soon as the power switch is On. If it is not rotating, making<br />
a strange noise or rotates slowly it must be changed.<br />
• Is the heating element getting too warm? The heating element has a self resetting over<br />
temperature protection (85°C) and two 1000W heating wire loops. Only one of the 1000W<br />
heating wires is being used. If it breaks, the second can be used instead. If the temperature<br />
protection cuts out the element frequently, there is not enough airflow through the element.<br />
• Check the fan and that the air intake under the heating compartment is not blocked.<br />
NOTE: All checking that involves opening the heating compartment must be done by a<br />
qualified technician.
<strong>USER</strong> and <strong>TECHNICAL</strong> <strong>MANUAL</strong> KANMED WARMING CABINET Page 9 of 12<br />
9. ACCESSORIES <strong>AND</strong> SPARE PARTS<br />
ACCESSORIES<br />
Part no Description Quantity<br />
GE-41500 Shelf 1<br />
GE-41600 Basket 1<br />
SPARE PARTS<br />
Part no Description Quantity<br />
700-0180 Mains power switch 1<br />
700-0181 Safety switch at door 1(old<br />
cabinets)<br />
700-0183 Fan 1<br />
700-0184 Heating Element 1<br />
700-0457 Temperature sensor 1<br />
700-0456 Transformer 1<br />
700-0659 Temperature regulator 1(old<br />
model)<br />
700-0821 New Temperature regulator<br />
700-0660 Diode 1N4005 1(old<br />
model)<br />
700-0661 Capacitor 100 µF 63V 1(old<br />
model)<br />
700-0185 Thermostat 1<br />
700-0187 Red lamp 1<br />
700-0201 Glass for door to cabinet 175 cm high 1<br />
700-0211 Glass for door to cabinet 90 cm high 1<br />
700-0202 Handle for door 1<br />
700-0203 Wall mounting bracket 2<br />
700-0669 Door gasket 2 m<br />
700-0205 Set of screws 1<br />
700-0206 Foot for cabinet 1<br />
700-0453 Front panel label WC 1002, adhesive 1<br />
700-0208 Fuse holder 1<br />
700-0209 Fuse T6,3A 10<br />
700-0460 Fuse T50mA 10<br />
700-0462 Relais 1<br />
10. WARRANTY<br />
<strong>Kanmed</strong> warrants the purchaser that the Warming Cabinet is free from defects in material and<br />
workmanship for a period of 12 month from the date of delivery.<br />
The sole obligation of <strong>Kanmed</strong> with respect to any such defect is limited to the repair with new or<br />
re-manufactured parts or, at the discretion of <strong>Kanmed</strong>, replacement of the equipment or refunding<br />
of the purchase price.<br />
This warranty shall not apply if the product has been modified, adjusted or repaired other than by<br />
<strong>Kanmed</strong> or by organisations authorised by <strong>Kanmed</strong> or modified, adjusted or repaired not in<br />
accordance with written instructions provided by <strong>Kanmed</strong> or if the equipment has been subject to<br />
misuse, negligence or accident.<br />
These warranties are made on the condition that prompt notification of a defect is given to <strong>Kanmed</strong><br />
or its authorised dealers within the warranty period.<br />
<strong>Kanmed</strong> shall have the sole right to determine whether a defect exists.<br />
<strong>Kanmed</strong> shall not in any case be liable for special or consequential damages arising from the<br />
breach of warranty, breach of contract, negligence or any other legal theory.
<strong>USER</strong> and <strong>TECHNICAL</strong> <strong>MANUAL</strong> KANMED WARMING CABINET Page 10 of 12<br />
11. CIRCUIT DIAGRAM for cabinets delivered from 2004 -2009<br />
8 12<br />
9<br />
1000 W 1000 W<br />
M<br />
6<br />
5<br />
FK 400A<br />
11<br />
K1<br />
AC 12V<br />
- + J-tc<br />
1 12<br />
14 13<br />
12<br />
7<br />
10<br />
19<br />
11<br />
2 3 8 9 10 11<br />
NY 1N4005<br />
Red<br />
Blue<br />
+<br />
-<br />
+<br />
-<br />
20<br />
100µF/63V<br />
8<br />
9<br />
17 18<br />
1<br />
2<br />
4<br />
13<br />
10<br />
L<br />
1<br />
3<br />
2a 2<br />
7<br />
230 / 12 V<br />
N<br />
2<br />
4<br />
1a<br />
1<br />
16<br />
6,3 A ON/OFF<br />
50 mA<br />
1. Connection socket<br />
2. F1 Fuse 6,3A<br />
4. S2 Main switch<br />
5. T1 Temperature regulator<br />
6. T2 Over temperature protection<br />
7. L1 Warning lamp red – over temperature warning<br />
8. M1 Fan<br />
9. G1 Temperature sensor<br />
10. TR Transformer<br />
11. RE Relays<br />
12. HE Heating element<br />
13. F2 Fuses 50mA
<strong>USER</strong> and <strong>TECHNICAL</strong> <strong>MANUAL</strong> KANMED WARMING CABINET Page 11 of 12<br />
12. CIRCUIT DIAGRAM for cabinets delivered from 2009<br />
8 12<br />
9<br />
1000 W 1000 W<br />
M<br />
6<br />
5<br />
EVK411<br />
11<br />
K1<br />
AC 12V<br />
- + J-tc<br />
1 12<br />
14 13<br />
12<br />
10<br />
19<br />
2 3 8 9 10 11<br />
7<br />
Red<br />
Blue<br />
17 18<br />
8<br />
9<br />
1<br />
2<br />
4<br />
13 10<br />
L<br />
1<br />
3<br />
2a 2<br />
230 / 12 V<br />
N<br />
2<br />
4<br />
1a<br />
1<br />
6,3 A ON/OFF<br />
50 mA<br />
1. Connection socket<br />
2. F1 Fuse 6,3A<br />
4. S2 Main switch<br />
5. T1 Temperature regulator<br />
6. T2 Over temperature protection<br />
7. L1 Warning lamp red – over temperature warning<br />
8. M1 Fan<br />
9. G1 Temperature sensor<br />
10. TR Transformer<br />
12. HE Heating element<br />
13. F2 Fuses 50mA
<strong>USER</strong> and <strong>TECHNICAL</strong> <strong>MANUAL</strong> KANMED WARMING CABINET Page 12 of 12<br />
<strong>Kanmed</strong> AB<br />
Gårdsfogdevägen 18B<br />
S-168 66 BROMMA<br />
SWEDEN<br />
Tel +46 (0)8 564 80 630<br />
Fax +46 (0)8 564 80 639<br />
E-Mail: info@kanmed.se<br />
Home page: www.kanmed.se<br />
DISTRIBUTED BY: