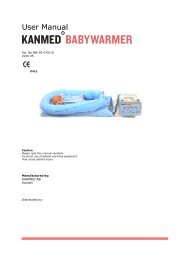
User Manual - Kanmed
User Manual - Kanmed
User Manual - Kanmed

Create successful ePaper yourself
Turn your PDF publications into a flip-book with our unique Google optimized e-Paper software.
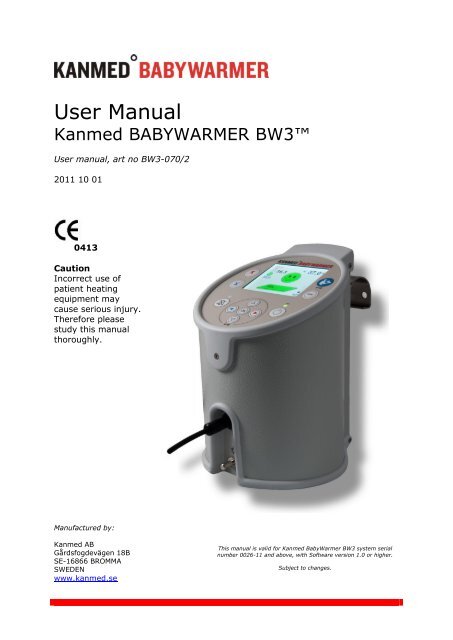
<strong>User</strong> <strong>Manual</strong><br />
<strong>Kanmed</strong> BABYWARMER BW3<br />
<strong>User</strong> manual, art no BW3-070/2<br />
2011 10 01<br />
0413<br />
Caution<br />
Incorrect use of<br />
patient heating<br />
equipment may<br />
cause serious injury.<br />
Therefore please<br />
study this manual<br />
thoroughly.<br />
Manufactured by:<br />
<strong>Kanmed</strong> AB<br />
Gårdsfogdevägen 18B<br />
SE-16866 BROMMA<br />
SWEDEN<br />
www.kanmed.se<br />
This manual is valid for <strong>Kanmed</strong> BabyWarmer BW3 system serial<br />
number 0026-11 and above, with Software version 1.0 or higher.<br />
Subject to changes.
Contents<br />
Page 2 of 28<br />
<strong>User</strong> <strong>Manual</strong> BW3-070/2<br />
1 <strong>Kanmed</strong> BabyWarmer BW3 - Quick instruction ............................................................... 3<br />
2 Safety Instructions ...................................................................................................... 4<br />
3 General description ..................................................................................................... 5<br />
4 Description of functions ............................................................................................. 11<br />
5 Getting ready for the baby ......................................................................................... 15<br />
6 Daily use and practical hints ....................................................................................... 15<br />
7 Cleaning and maintenance ......................................................................................... 17<br />
8 Alarm functions, indication and actions ........................................................................ 18<br />
9 Control of Safety functions ......................................................................................... 21<br />
10 Accessories, Spare parts and technical documentation ................................................. 22<br />
11 Technical data ........................................................................................................ 23<br />
12 Warranty ............................................................................................................... 25<br />
13 Disposal ................................................................................................................. 25<br />
14 EMC COMPATIBILITY STATEMENT ............................................................................. 26<br />
NOTE: This user manual contains important safety information and must be read thoroughly before use,<br />
and must be saved for future reference.<br />
<strong>Kanmed</strong> BabyWarmer BW3 and the <strong>Kanmed</strong> Baby Bed<br />
The perfect combination
1 <strong>Kanmed</strong> BabyWarmer BW3 - Quick instruction<br />
Leave the system constantly switched on - to be ready for instant use!<br />
Refer to the <strong>User</strong>s manual whenever in doubt.<br />
Page 3 of 28<br />
<strong>User</strong> <strong>Manual</strong> BW3-070/2<br />
Filling the Water Mattress<br />
� Fill the Water Mattress with warm water (about 35 0 C). Fill to the Max H2O level mark. Check by holding the Water<br />
Mattress upright. Add one complete bottle of <strong>Kanmed</strong> Water Conditioner. Write the expiry date on the Water<br />
Mattress. (one year forward)<br />
� There must be no air in the Water Mattress. Place the Water Mattress on a flat surface. Grip the open mattress hole<br />
to lift the mattress and press all air bubbles out. Lower the hole and close it properly.<br />
Using the <strong>Kanmed</strong> Gel Mattress<br />
� If the Gel Mattress mode is selected, note that the heat transfer is less than that of water. Also note that the actual<br />
Gel surface temperature may vary from the displayed temperature setting.<br />
Inserting the Heating Pad and selected mattress into the <strong>Kanmed</strong> Baby Nest<br />
� Place the selected mattress upside down on a flat surface. Insert the Heating Pad in the pocket with its printed text<br />
towards the mattress. Turn the mattress over again.<br />
� Insert the mattress with Heating Pad into the Nest pocket. Use the opening in the head end of the Nest to assist in<br />
fitting the Nest to the mattress.<br />
� You can use the BW3 without the <strong>Kanmed</strong> Baby Nest but it simplifies the positioning of the baby.<br />
Preparing the bed<br />
� Ensure that the bed has drain-holes in the bottom (when the Water Mattress is used).<br />
� Place the BabyWarmer nest package on the bed mattress.<br />
� Protect the Nest with a sheet that is soft but not thick.<br />
Connecting the Control Unit<br />
� Connect the mains power cable at the bottom of the Control Unit and hang it over the small hook.<br />
� Connect the Heating Pad at the back of the Control Unit. Be gentle, and fit the connector the correct way. Tighten<br />
the connector screws gently.<br />
� Place and secure the Control Unit in a safe place where the display can be clearly seen.<br />
� Press the start button on the front panel and observe that the self test performs correctly.<br />
� During the self test, check that the correct mattress mode (H2O or GEL) is set. Change mode if required.<br />
Placing the baby<br />
� Only when the desired temperature is reached (green smiley-indication), should you place the baby on the<br />
mattress.<br />
� Position the lightly dressed baby (nappy, long arm T-shirt, bare legs (and a cap on very small ones)) on its back in<br />
the Nest. Other positions are subject to approval from authorised staff and local protocols.<br />
� Adjust the Nest size by pulling the string. Hide the string under the mattress.<br />
� Cover the baby with suitable cover, such as 1-3 layers of soft cotton blankets.<br />
Temperature setting<br />
� All babies are individuals and their temperature must be controlled frequently until you are familiar with the baby’s<br />
reaction to the set temperature. Overheating is often caused by covering the baby too much.<br />
� When the Water Mattress is used, 37 0 C- 37,5 0 C is a good starting temperature for slightly hypothermic babies and<br />
for babies weighing about 1000g.<br />
� 36.5 0 C - 37 0 C is the most common temperature for babies weighing more than 1200g<br />
� As the baby’s weight increases, the temperature is primarily controlled by changing the amount of blankets that<br />
cover the baby and secondly by changing the set temperature.<br />
� When the lightly dressed and covered baby is maintaining body temperature with a Water Mattress temperature of<br />
about 35.5 - 36 0 C, then the baby is probably ready for a standard cot that has no additional warming.<br />
� If the Gel Mattress is being used, try setting the temperature to 37-38 0 C in order to compensate for the heat loss in<br />
the Gel Mattress. Otherwise the same operating instructions apply, but beware of the reduced warming efficiency of<br />
the Gel Mattress. Connecting a skin type temp sensor to the unit may be helpful in obtaining the right temperature.<br />
Maintenance<br />
� Wash the re-usable <strong>Kanmed</strong> Nest at maximum 90 0 C. Preferably 60 0 C. Tumble dry it. <strong>Kanmed</strong> recommends changing<br />
the Baby Nest once a year.<br />
� Disinfect the surface of the Mattress, the Control Unit, Gel Mattress and the Heating Pad.<br />
� Check the water level in the Water Mattress frequently and remove any air. Replace the Water Mattress once a<br />
year.<br />
� See the user’s manual for further maintenance instructions and periodical safety checks.
2 Safety Instructions<br />
Page 4 of 28<br />
<strong>User</strong> <strong>Manual</strong> BW3-070/2<br />
Please study this manual thoroughly and you will find the <strong>Kanmed</strong> BabyWarmer BW3 to be both safe and<br />
easy to use.<br />
Intended use<br />
The intended use of the <strong>Kanmed</strong> BabyWarmer BW3 is to keep newborn and premature babies normothermic.<br />
<strong>Kanmed</strong> BabyWarmer BW3 is designed for hospital use only.<br />
It must be used according to the instructions in the manual and according to established clinical routines<br />
and by qualified personnel.<br />
Essential Performance<br />
The automatic system supervision will safeguard any malfunction that may have influence on the<br />
performance of the system. If used according to this instruction manual, and if the warning information is<br />
taken into account, no unacceptable patient risks should occur. However, always monitor the patient's vital<br />
signs and adapt the use after the patient's actual requirements.<br />
Warning<br />
� Proper Use. To ensure optimal performance and to prevent incorrect use, the user manual must be<br />
read completely before the system is being used. Only use genuine <strong>Kanmed</strong> BabyWarmer parts<br />
together with the BW3 control unit.<br />
� System Malfunction. If the BabyWarmer BW3 self test does not perform correctly or the system<br />
displays an alarm or error message, or the Control Unit has been dropped, received mechanical<br />
damage etc., it must be examined by a qualified technician before being used. If it is suspected that<br />
the BabyWarmer BW3 is not operating properly, immediately consult a qualified technician for advice<br />
and do not use it.<br />
� Never use the BabyWarmer BW3 without a <strong>Kanmed</strong> Water or Gel Mattress!<br />
� Electrical Hazard The system must always be connected to a mains power outlet with proper<br />
protective grounding. Always remove the mains power cable before cleaning the Control Unit.<br />
� Body temperature. The temperature monitor is intended for added safety purposes only, please use<br />
a dedicated hospital grade precision thermometer, and a method in accordance to hospital procedures<br />
for precise measurements of the patients actual body temperature.<br />
� Never place a baby face down on the <strong>Kanmed</strong> Mattresses or in the BabyWarmer Nest unless this is<br />
ordered by responsible staff.<br />
� A cold mattress, or a mattress which is cooling down due to the heating being switched off, will<br />
decrease the body temperature of the baby. Likewise, a too warm mattress can induce fever.<br />
Caution<br />
� Be aware that the acoustic alarm has a reduced sound level of 55dBA (adapted for use in silent<br />
environments, e.g. a neonatal ward).<br />
� Always fill the Water Mattress to the required level before the unit is brought into use. Preferably fill<br />
with lukewarm water at around 35 0 C.<br />
� Replace the Water Mattress periodically as indicated on the Water Mattress (after about 12 months of<br />
use).<br />
� Don't fold or bend the Heating Pad sharply, don't pull the Heating Pad cable or use it for carrying the<br />
Heating Pad.<br />
� Make sure that the text side of the Heating Pad is facing the Mattress.<br />
� Make sure that there are at least 2 drain holes in the bottom of the bed if using the Water Mattress.<br />
� Make sure that the adjusting string is placed outside the Baby Nest to prevent it from interfering with<br />
the baby.<br />
� Check the mattress temperature regularly.<br />
� Check the temperature of the baby regularly.<br />
� Continue to use appropriate monitoring of vital signs.<br />
� Before first use, please clean everything according to your standard hospital routines and to<br />
instructions in the user manual. Always wash a new re-usable Baby Nest before first use.<br />
� Please note that the control unit BW3 shall be placed standing on a flat surface, or mounted with the<br />
front end up, having the display clearly visible.<br />
� The BW3 may not be interfaced with any other electrical system. If this is done a new “system” is<br />
created per definition, and the safety classification of the BW3 may be effected. Please be aware that<br />
use of HF surgical instruments or similar devices may interfere with the BW3 and may require special<br />
precautions regarding potential equalization etc.<br />
� The <strong>Kanmed</strong> Gel Mattress may not be used without its integrated aluminium-plate.
3 General description<br />
Symbols<br />
Page 5 of 28<br />
<strong>User</strong> <strong>Manual</strong> BW3-070/2<br />
Display the graph screen during operation. Move highlighted selection in MENU.<br />
Display the status screen during operation. Move highlighted selection in MENU. Also<br />
part of the keyboard lock.<br />
Decrease temperature, or change highlighted selection in MENU<br />
Increase temperature, or change highlighted selection in MENU.<br />
OK, ENTER, select highlighted item in MENU.<br />
High Temperature Alarm Limit for the temperature monitor. When pushed, the<br />
display changes to "adjust high alarm level screen" (Note: This function is only<br />
selectable when an external temperature sensor is connected).<br />
Low Temperature Alarm Limit for the temperature monitor. When pushed, the display<br />
changes to "adjust low alarm level screen". (Note: This function is only selectable<br />
when an external temperature sensor is connected).<br />
ON/OFF<br />
Information symbol (Read the <strong>Manual</strong>) The push button is part of the keyboard lock.<br />
Alarm Silence<br />
Menu. (Note: This function is only selectable the unit is in stand by!)<br />
Marking under the buttons related to the keyboard lock.<br />
Alarm LED<br />
Colour:<br />
Red/Yellow<br />
Power LED<br />
Colour: Green<br />
Red flash = High Priority Alarms<br />
Yellow flash = Medium Priority Alerts<br />
Yellow constant light = A medium alarm has been silenced<br />
Off = No power connected<br />
Slow flash = Stand by mode<br />
Constant light = Active mode
60 o<br />
2<br />
Risk of explosion in the presence of<br />
inflammable gases.<br />
Safety class BF, Defibrillator safe.<br />
Machine washable at max. 60 0 C<br />
No dry cleaning.<br />
Page 6 of 28<br />
<strong>User</strong> <strong>Manual</strong> BW3-070/2<br />
Earth potential equalisation<br />
connection point.<br />
IPX7 Water proof Heating Pad.<br />
Can be centrifuged at low speed.<br />
Tumble-dry<br />
Fulfils MDD93/42/ECC. (Notified Body 0413 = Intertek Semko AB, Sweden).<br />
Disposable (single patient use only), shall not be reused.<br />
H2O Water (Heating Pad) /////// GEL (Heating Pad)<br />
System Description<br />
The <strong>Kanmed</strong> Baby Warmer BW3 standard kit consists of 4 major components:<br />
� Control Unit<br />
� Heating Pad<br />
� Water or Gel Mattress<br />
� <strong>Kanmed</strong> Baby Nest<br />
Control Unit, BW3-020<br />
The Control Unit can be connected to any mains AC power supply voltage between 100 - 240 V AC at 50 or<br />
60 Hz frequency, or can be powered from a 12 Volts battery. See the technical section for details.<br />
60 o
Top Panel Layout<br />
Front panel<br />
Bottom Panel<br />
The YSI400 compatible temperature<br />
sensor (T) and optional earth potential<br />
equalisation grounding is connected here.<br />
Page 7 of 28<br />
1. Display<br />
2. Keyboard<br />
lock button<br />
3. Menu button<br />
<strong>User</strong> <strong>Manual</strong> BW3-070/2<br />
4. Power indication, LED<br />
5. ON/OFF button<br />
6. Navigation Pad, with<br />
second keyboard<br />
lock button<br />
7. Alarm silence button<br />
8. Alarm indication LED<br />
9. Temperature monitor<br />
Low alarm limit button<br />
10. Temperature monitor<br />
High alarm limit button<br />
The Bottom Panel contains information about<br />
manufacturer, part number, serial number,<br />
voltage, etc.<br />
The mains power connector is located in the deep<br />
bottom of the unit. The Heating Pad connector and<br />
the battery power input are also accessible here.
The Heating Pad, BW3-003<br />
Page 8 of 28<br />
<strong>User</strong> <strong>Manual</strong> BW3-070/2<br />
The Heating Pad consists of an electric element with four integrated temperature sensors. The design and<br />
construction of the Heating Pad has reduced the magnetic and electrical fields to normal background levels<br />
and thereby making them harmless. The Heating Pad voltage is 24V DC.<br />
See technical data for information about warming up times.<br />
Location of the integrated<br />
temperature sensors.<br />
T1 and T3: temperature of the Mattress<br />
T2 and T4: temperature of the Heating<br />
element<br />
Explanation of the markings on the Heating Pad<br />
The Water Mattress<br />
1. Read the manual!<br />
2. Always use a <strong>Kanmed</strong> Water (H 2O)<br />
or Gel (//////) Mattress.<br />
Never place a baby directly on<br />
the Heating Pad!<br />
3. The Heating Pad must be inserted in the<br />
pocket under the Mattress.<br />
(This is best done if the Mattress is placed<br />
upside down on a flat surface).<br />
When filled to the level mark a standard Water Mattress contains about 4.2 litres of water. Always add<br />
<strong>Kanmed</strong> Water Conditioner when the Water Mattress is filled. The water level should be checked frequently<br />
and water must be added if required. Big air bubbles must be removed. When used for the first time,<br />
please write the date of expiry in the box (one year into the future).<br />
Explanation of the markings on the Water Mattress<br />
1. Instructions for <strong>Kanmed</strong> Water<br />
Mattresses<br />
Fill with tap water up to the MAX indication line.<br />
Add one Bottle of <strong>Kanmed</strong> Water Conditioner BW-<br />
50-029.<br />
Change water when the water is below the MIN<br />
level line and add one bottle of <strong>Kanmed</strong> Water<br />
Conditioner BW-50-029.
The Gel Mattress<br />
Page 9 of 28<br />
<strong>User</strong> <strong>Manual</strong> BW3-070/2<br />
2. Fill the Water Mattress to the Max H 2O<br />
level mark. Maximum water temperature<br />
40 0 C.<br />
Add carefully a whole bottle of <strong>Kanmed</strong> Water<br />
Conditioner. Follow the caution instruction on<br />
the Water Conditioner package.<br />
3. Remove air bubbles, very important! Place<br />
the Water Mattress on a flat surface and lift<br />
the filling hole properly upwards.(20cm.)<br />
Press the air bubbles towards the filling hole<br />
repeatedly until all major air bubbles are<br />
expelled while at she same time lowering the<br />
filling hole. Fit the screw cork firmly. Check<br />
for major air bubbles on a regular basis.<br />
4. Turn the Water Mattress upside down and<br />
insert the Heating Pad in the pocket with the<br />
markings facing the Water Mattress. The<br />
Water Mattress and the Heating Pad is<br />
inserted into the <strong>Kanmed</strong> Baby Nest.<br />
A <strong>Kanmed</strong> Gel Mattress may be used as an alternative to the standard Water Mattress. Please observe that<br />
when a Gel Mattress is used, the heating capacity of the <strong>Kanmed</strong> BabyWarmer system is reduced<br />
(compared to water). The indicated temperature is an estimated temperature value and may differ from<br />
actual spot temperature readings on the Gel Mattress surface. In GEL-mode there is a 2,0° C offset added<br />
to the Heating Pad temperature (compared to the set temperature) to compensate for the lesser heat<br />
conductivity of the Gel Mattress.<br />
<strong>Kanmed</strong> (extra soft pebble surfaced)<br />
Gel Mattress<br />
NOTE: The Gel Mattress may never be used without it's integrated aluminium-plate which must be<br />
situated under the Heating Pad
The <strong>Kanmed</strong> Baby Nest<br />
Page 10 of 28<br />
<strong>User</strong> <strong>Manual</strong> BW3-070/2<br />
Several different types and sizes of <strong>Kanmed</strong> Baby Nests are available. Please check with your local supplier<br />
or on the internet www.kanmed.se<br />
The <strong>Kanmed</strong> Baby Nest is intended to facilitate correct positioning, and to create a tight and cosy<br />
environment for the baby. By pulling the strings one can adjust the collar from being wide open and flat to<br />
become a tight raised wall around the baby. The Baby Nest has a pocket into which the Mattress and<br />
Heating Pad is inserted.<br />
BW50-025 Blue, Yellow and Pink<br />
BW50-027 Twin BW50-200 Disposable BW50-025 XL<br />
BW50-250 Disposable Cover
4 Description of functions<br />
Display indications - Normal Operating Mode<br />
Temp monitor<br />
symbols.<br />
Displayed only<br />
when sensor<br />
connected.<br />
High temp<br />
alarm level<br />
Quick Indicator<br />
Green = OK<br />
Red = > High alarm<br />
Blue = < Low alarm<br />
Low temp<br />
alarm level<br />
Start and Self Test<br />
YSI-sensor<br />
temperature<br />
Page 11 of 28<br />
Mattress<br />
selection<br />
indicator<br />
Quick Indicator<br />
Green = OK<br />
Red = too warm<br />
Blue = too cold<br />
Quick Indicator<br />
Green = OK<br />
Red = > Set temp<br />
Blue = < Set temp<br />
<strong>User</strong> <strong>Manual</strong> BW3-070/2<br />
Set temperature<br />
Heating Power indicator<br />
Every time the Control Unit is switched on it performs a Self Test of all functions and the internal safety<br />
circuits. If the Control Unit does not detect any faults, the warming will start automatically at the factory<br />
pre-set temperature of 37 O C. The warming will not start if any errors are detected.<br />
See section 9 for full information<br />
If the unit does not perform the Self Test exactly as described in this manual - do not use the<br />
device!<br />
Connect the control unit to mains power supply and to the Heating Pad, check that the mains indicator LED<br />
blinks. Press Start/Standby and check that the Self Test performs as described in section 9.
Normal operation<br />
Page 12 of 28<br />
<strong>User</strong> <strong>Manual</strong> BW3-070/2<br />
When the self test has been successfully performed, the warming will automatically commence. Make sure<br />
that the correct mattress type is selected (H2O or GEL). If an incorrect mattress type is chosen, the<br />
heating performance will either be reduced, or a Heating Pad alarm will be activated after some time of<br />
operation. Adjust the set temperature as required. The running conditions are showed by the colours of the<br />
icons.<br />
Key lock function<br />
Temperature settings<br />
When temperature settings<br />
below 35°C or above 37°C<br />
are to be selected, the unit<br />
will alert the operator by<br />
prompting for confirmation<br />
(press LEFT or/RIGHT key<br />
and OK for confirmation)<br />
After 30 sec of operation, the key lock function will activate (if selected ON in the set up menu) and the<br />
key lock symbol will be displayed in the bottom left corner of the display. This is a safety feature<br />
implemented to prevent involuntary changes of any operation setting. In order to unlock the keyboard and<br />
change any setting, or to turn the unit off, please press one of the two key lock buttons once, and within 5<br />
seconds press the other key lock button. The key symbol in the bottom left corner of the display will then<br />
disappear and the unit will accept any command.<br />
Temperature Monitor<br />
BW3-099 YSI Skin Temperature Sensor<br />
The temperature monitor function will automatically be activated as<br />
soon as an YSI400 compatible (skin) temperature sensor is fitted to the<br />
6,3 mm phono type (T) front intake. The temperature of the sensor will<br />
be displayed in the upper left corner of the display.<br />
Place the temperature sensor according to your standard routines.<br />
It is possible to set high- and low temperature alarm levels. The high level default setting is 42 °C and the<br />
low setting is OFF (--- = low temp alert not activated). If the sensor-temperature exceeds the upper temp<br />
limit, the thermometer icon flashes red, the alarm LED flashes yellow and an acoustic signal is emitted. If<br />
the sensor-temperature falls below the set low temp limit, the thermometer icon will flash blue, the alarm<br />
LED flash yellow and an acoustic signal is emitted. The acoustic alarm may be silenced for 2 minutes by<br />
pressing the Alarm key. During the time of silenced alarm, the yellow alarm LED will be on.<br />
Note: If the temperature sensor initially is colder than the low alarm level, the thermometer icon will<br />
display blue, but the alarm will not be activated (the alarm will only trigger when the YSI temperature is<br />
falling, from a reading higher than the LOW alarm limit.
Setting alarm limits for the temperature monitor<br />
The upper temp alert limit is accessed by<br />
pressing the High Temp alarm key.<br />
Change the value using the left/right keys.<br />
Confirm the setting by pressing the "OK"<br />
button.<br />
The Low temp alert limit is accessed by<br />
pressing the Low Temp alarm key.<br />
Change the value using the left/right buttons.<br />
Confirm the setting by pressing the "OK"<br />
button.<br />
Alarms<br />
Please see section 8 Alarms<br />
Menu Mode<br />
The "Menu Mode" is selectable only when the Control Unit is in stand by.<br />
Page 13 of 28<br />
<strong>User</strong> <strong>Manual</strong> BW3-070/2<br />
Select function. Move the red box with the UP/DOWN/LEFT/RIGHT arrows, press OK to select.<br />
1 Technical Status<br />
1 Technical status 3 Temp Histogram<br />
2 Settings 4 Alarm LOG Data<br />
T1 – T4: Temperature sensor readings<br />
R2 – R2: Internal reference<br />
UT: Internal CU temperature<br />
YSI: YSI sensor temperature.<br />
Vin: Heating Pad voltage<br />
DC: Heating Pad Current<br />
Note: Heating Pad Current is always 0 A in MENU<br />
mode. Press right arrow one time for a 5 sec long<br />
heating pulse. The reading should display 2,0 ± 0,2<br />
A<br />
Runtime: Accumulated running<br />
hours of the CU.<br />
Program: Main SW version<br />
End the session by pressing MENU<br />
Note: Technical status screen also accessible<br />
in operating mode. Just press the DOWN key.
2 Settings<br />
Select function with the up/down keys (moves the<br />
red box), change selected parameter with the<br />
left/right keys (move the blue boxes).<br />
- Mattress type selection<br />
- Key lock On/Off<br />
- Alarm sound Hi/Low<br />
- Display back light level<br />
(A = screen saver function off)<br />
End the session by pressing MENU.<br />
3 Temp Histogram<br />
A graphical diagram of the temperature curves<br />
from the last 4 hours of operation.<br />
Press RIGHT key for the colour guide.<br />
End the session by pressing MENU<br />
Note: Temp Histogram also accessible in operating<br />
mode. Just press UP key.<br />
Red: Mattress temperature reading<br />
Black: Set temperature<br />
Blue: Temperature sensor reading<br />
4 Alarm Log Data, page 1<br />
Display a log record of alarms and recent events.<br />
Press RIGHT key for page 2<br />
Press DOWN key (repeatedly) to display older<br />
events.<br />
YSI temperature alarms are coded as 30 and 31<br />
End the session by pressing MENU<br />
Alarm Log Data, page 2<br />
Press LEFT key for page 1<br />
Press DOWN key (repeatedly) to display older<br />
events.<br />
End the session by pressing MENU<br />
Page 14 of 28<br />
<strong>User</strong> <strong>Manual</strong> BW3-070/2
5 Preparing the <strong>Kanmed</strong> BabyWarmer<br />
Page 15 of 28<br />
<strong>User</strong> <strong>Manual</strong> BW3-070/2<br />
� Ensure that all parts are available and in good working condition.<br />
� Study the safety instructions in this manual<br />
� The unit shall always be left switched on so that it is ready for the next baby.<br />
� Always place the <strong>Kanmed</strong> BabyWarmer Nest package on the standard mattress of a baby cot, or any<br />
other heat insulating surface.<br />
Inserting the Heating Pad and selected Mattress into the <strong>Kanmed</strong> Baby Nest<br />
� Place the selected mattress upside down on a flat surface. Insert the Heating Pad in the pocket with its<br />
printed text towards the mattress. Turn the mattress over again.<br />
� Insert the mattress with Heating Pad into the <strong>Kanmed</strong> Bay Nest pocket. Use the opening in the head<br />
end of the Nest to assist in fitting the Nest to the mattress.<br />
� You may use the <strong>Kanmed</strong> BabyWarmer without a <strong>Kanmed</strong> Nest but the Nest facilitates correct<br />
positioning of the baby.<br />
Preparing the bed<br />
� Ensure that the bed has drain-holes in the bottom if you use the Water Mattress<br />
� Always place the BabyWarmer nest package on an insulating bed mattress.<br />
� Protect the Nest with a sheet that is soft but not too thick.<br />
Connecting the Control unit<br />
� Connect the mains power cable at the bottom of the Control Unit and guide the cable over the small<br />
hook.<br />
� Connect the Heating Pad at the bottom of the Control Unit. Be gentle, and fit the connector correctly.<br />
Tighten the connector screws gently.<br />
� Place and secure the Control Unit in a safe place where its display can be seen.<br />
� Press the start button on the front panel and observe that the self test performs correctly.<br />
� During the self test, check that the correct mattress type (H2O or GEL) is set. Change mode if required<br />
by pressing the RIGHT or LEFT key during the Self Test.<br />
6 Mattress selction, Adjustments and Areas of use<br />
<strong>Kanmed</strong> Water Mattress<br />
Suitable for all babies until very little warming is needed.<br />
The Water Mattress is superior in conducting warmth to the baby thereby ensuring optimal weight gain. It<br />
should therefore be the first choice.<br />
The warm soft Water Mattress has a calming and relaxing effect on the baby and ensures better sleep<br />
quality. Its softness prevents skin damage and many customers reports that it helps to form a nice shape<br />
of the babies head.<br />
The Water Mattress is also a heat buffer and will only loose about 1,5°C per hour in case of power<br />
interruption<br />
<strong>Kanmed</strong> (special soft pebble surfaced) Gel Mattress<br />
The <strong>Kanmed</strong> Gel Mattress is for new born or near full term babies in need of some additional warming.<br />
The heat conduction is not as good as water. It is not as soft as the Water Mattress.<br />
Therefore attention shall be paid to the baby’s temperature and to its weight gain.<br />
Note: The Gel Mattress must not be used without the integrated aluminium plate. Only <strong>Kanmed</strong> Gel<br />
Mattress will function with the BW3<br />
Warning: If the Gel Mattress is covered with several layers of material, to make the bed softer, then the<br />
heat transfer will be greatly reduced - which in turn may reduce the warming efficiency therefore probably<br />
affecting the baby's weight gain.<br />
Placing the baby<br />
� Only when the desired set temperature is reached (indicated by a green smiley), you should place the<br />
baby in the Nest.<br />
� Position the lightly dressed baby (nappy, long arm T-shirt, bare legs and a cap on very small ones) on<br />
its back (unless otherwise prescribed by responsible medical staff) in the Nest.<br />
� Adjust the Nest size by pulling the string. Hide the cord under the mattress.<br />
� Cover the baby with suitable cover, such as 1-3 layers of suitable blankets.
Page 16 of 28<br />
<strong>User</strong> <strong>Manual</strong> BW3-070/2<br />
Temperature setting<br />
� All babies are individuals and their temperature must be controlled frequently until you are familiar<br />
with the baby’s reaction to the set temperature. Overheating is often caused by covering the baby too<br />
much.<br />
� When the Water Mattress is used, 37-37 0 C is a good starting temperature for slightly hypothermic<br />
babies and for babies weighing about 1000g.<br />
� 36.5 0 C - 37 0 C is the most common temperature for babies weighing more than 1200g<br />
� As the baby’s weight increases, the temperature is primarily controlled by changing the amount of<br />
blankets that cover the baby and secondly by changing the set temperature.<br />
� When the lightly dressed and covered baby is maintaining body temperature with a Water Mattress<br />
temperature of about 35.5 - 36 0 C, then the baby is most often ready for a standard cot that has no<br />
warming.<br />
� If the Gel Mattress is being used, try setting the temperature to 37-38 0 C in order to compensate for<br />
the heat loss in the Gel Mattress. Otherwise the same operating instructions apply, but beware of the<br />
reduced warming efficiency of the Gel Mattress. Connecting a skin type temp sensor to the unit may be<br />
helpful in obtaining the right temperature<br />
Neonatal intensive care units, Level II units, Intermediate care units, Step down units, etc.<br />
In the neonatal care the <strong>Kanmed</strong> BabyWarmer with the Water Mattress is used to ensure an optimal<br />
warming of all babies, from 800 g and up 3000g or untill the baby gets too warm. Optimal warming also<br />
ensures optimal growth rate. <strong>Kanmed</strong> BabyWarmer can replace the incubator when the baby is mainly in<br />
need of the warming. Vital signs monitoring, oxygen support or CPAP can easily be continued on the<br />
<strong>Kanmed</strong> BabyWarmer and the <strong>Kanmed</strong> Baby Bed<br />
The <strong>Kanmed</strong> BabyWarmer with Water Mattress can also be used inside an incubator to help obtain correct<br />
and stable body temperature, especially in older single wall units and on “modern” units where the whole<br />
top goes up.<br />
NOTE : Using the <strong>Kanmed</strong> BabyWarmer inside an incubator is the sole responsibility of the hospital. The<br />
function and temperature regulation of the <strong>Kanmed</strong> BabyWarmer is not influenced by the incubator.<br />
Delivery Wards<br />
<strong>Kanmed</strong> BW3 can be used to warm children that for different reasons have lost heat post delivery.<br />
<strong>Kanmed</strong> BW3 is also perfect for keeping newborn babies warm until the mother is able to / wants to warm<br />
the baby herself.<br />
Try the Water Mattress for children in need of a soft warm support, for instance children suffering from<br />
hydrocephalus, fractures, pain after delivery with a forceps or a suction device, colicky pains, etc.<br />
In rooms with low temperatures the <strong>Kanmed</strong> BabyWarmer will help keeping the baby warm..<br />
If only modest heating is needed then the Gel Mattress is and ideal alternative to the Water Mattress.<br />
Maternity Wards<br />
Low birth weight or premature babies that do not need all the resources of an intensive care department<br />
but need support to stay warm can thanks to the <strong>Kanmed</strong> BW3 be kept with the mother in the ward.<br />
Babies with a weight between 1800gram and 2500 gram, born around pregnancy week 35 - 38, are often<br />
not capable of maintaining a normal body temperature during their first days after birth. The <strong>Kanmed</strong><br />
BabyWarmer keeps them at normal body temperature and assists them to stay with their mothers.<br />
Unsettled, stressed and screaming babies can often find a soothing and relaxing environment on the warm<br />
Water Mattress thereby relieving the staff and the parents. The Gel Mattress can also be used but be aware<br />
of the limited warming capacity compared to the Water Mattress.<br />
NIDCAP, Developmental Care and Kangaroo care<br />
In these treatment modalities the sleeping, rest and positioning of the baby plays an essential role. The<br />
warm soft Water Mattress resembles the warmth of a mother’s skin therefore making the <strong>Kanmed</strong><br />
BabyWarmer the ideal tool to ensure quality sleep.<br />
Photo therapy<br />
<strong>Kanmed</strong> BabyWarmer is well suited for Photo therapy using an overhead lamp, and especially for new blue<br />
LED lights that does not radiate any heat. Using the <strong>Kanmed</strong> Gel Pad is a practical option if the warming<br />
capacity is considered enough – otherwise choose the Water Mattress.<br />
Transport of babies inside the hospital using the Water Mattress<br />
If the child is normally covered and in a standard cot, the Water Mattress temperature will only drop about<br />
1.5 0 C per hour when the power is disconnected and under normal temperature conditions.<br />
Please note: A Gel Mattress cools of much faster (>5 0 C / h).<br />
When transporting in an ambulance (ground or air)<br />
The <strong>Kanmed</strong> BabyWarmer can be powered with the <strong>Kanmed</strong> battery cable kit. During transport it will keep<br />
the baby warm and the Water Mattress will provide a soft shock-absorbing support. Note that local<br />
restrictions and rules may apply for transport of patients.
7 Cleaning and maintenance<br />
Cleaning and disinfecting<br />
Page 17 of 28<br />
<strong>User</strong> <strong>Manual</strong> BW3-070/2<br />
The user of <strong>Kanmed</strong> equipment must not use any methods for cleaning and decontamination other than<br />
those recommended by <strong>Kanmed</strong>. If necessary then check with <strong>Kanmed</strong> that these methods may not harm<br />
the equipment. However <strong>Kanmed</strong> equipment withstands all cleaning and disinfection agents commonly<br />
used on hospital equipment. Do not autoclave any parts. Protect yourself according to hospital routines.<br />
Control Unit<br />
� Remove the mains cable and the Heating Pad.<br />
� Wipe with a cloth moistened with cleaning and disinfectant liquid that you normally use for technical<br />
equipment. Always be careful, especially when using flammable agents (e.g. alcohol) so that no liquid<br />
unintentionally enters the Control Unit.<br />
� Always clean between patients or according to hospital routines.<br />
Water Mattress<br />
� Add <strong>Kanmed</strong> Water Conditioner from day one!<br />
� Clean with water and wipe off with a cloth moistened with the cleaning and disinfectant liquids<br />
normally used for plastics.<br />
� If HIV or Hepatitis is suspected cleaning can be done with much stronger agents such as ethyl alcohol<br />
(50 %), formaldehyde or chloramines.<br />
� Always clean between patients or according to hospital routines.<br />
Gel Mattress<br />
� Use same method as for the Water Mattress.<br />
� Always clean between patients or according to hospital routines.<br />
Heating Pad<br />
� Use same method as for the Water Mattress.<br />
� Avoid fluids in the connector.<br />
� Always clean between patients or according to hospital routines.<br />
<strong>Kanmed</strong> Baby Nest (re-usable type).<br />
� Normally machine washed at temperatures up to 60 O C.<br />
� Centrifuge at low to medium speed.<br />
� Always dry tumble.<br />
� If needed, the Nest can withstand 90 degree washing but this will shorten the lifetime.<br />
� Check for damages after washing.<br />
� Always wash between patients or per your own routines.<br />
<strong>Kanmed</strong> Baby Nest (single patient type).<br />
� Check for damages before use.<br />
� Always replace between patients.<br />
Periodical exchanges<br />
The Water Mattress<br />
The Water Mattress should be changed at least every year to avoid leakages.<br />
Do not forget to add a bottle of <strong>Kanmed</strong> Water Conditioner when filling the Water Mattress, when you<br />
change water or add more water.<br />
<strong>Kanmed</strong> Baby Nest<br />
The Baby Nest is a consumable. The <strong>Kanmed</strong> Baby Nest must be changed as soon as it shows signs of<br />
damage or wear, or at least after one year of use.<br />
Disposable Nests (single patient type) are also available, please contact your local distributor or visit<br />
www.kanmed.se for more information.
Periodical Checks<br />
Recommended checks To be done by Interval<br />
Page 18 of 28<br />
<strong>User</strong> <strong>Manual</strong> BW3-070/2<br />
Water level in the Water Mattress, Heating Pad, The user Every time the bed is<br />
Baby Nest - are they clean and undamaged?<br />
made<br />
Cables and connectors - clean and undamaged? The user At each start<br />
Correct self test at start The user At each start<br />
Check of safety systems as per chapter 9 Technician or user Every year<br />
Electronics safety test (as per hospital routine) Technician Every year<br />
Temperature check as below Technician or user Every year or when in<br />
doubt<br />
Temperature Check<br />
To perform the temperature check a precision thermometer preferably with a skin type sensor is needed.<br />
The built in temperature monitor with an YSI400 type sensor (having an specified accuracy better than<br />
±0,2°C) may be used.<br />
Note: In this procedure the standard type <strong>Kanmed</strong> Water Mattress must be used.<br />
� Make up the bed as for normal use and place the temperature sensor in the centre on top of, and<br />
fixed in direct contact with the Water Mattress (e.g. using a surgical tape or similar). Cover the sensor<br />
with some insulating material. Check that there is no air in the Water Mattress.<br />
� Set the temperature to 37 O C and allow the system to settle temperature in steady state (note, this<br />
may take several hours).<br />
� Check that the precision thermometer (or the built in temperature monitor) and the Control Unit<br />
displays the same reading, allowed difference ± 0.7 O C.<br />
8 Alarm functions, indication and actions<br />
Temperature monitor alerts<br />
These alerts relates to the built in temperature monitor, and does not effect the function of the<br />
BabyWarmer. The temperature monitor is only activated when an YSI400 compatible temperature sensor<br />
is connected. If a temperature monitor alarm condition is detected, the alarm is activated, indicated on the<br />
display by a flashing thermometer icon, audio signal and the yellow LED. After pressing the alarm button,<br />
the alarm will be silenced for 2 minutes. If the alarm condition remains, the alarm will return.<br />
Indication Description / Operator action<br />
(FLASHING)<br />
(FLASHING)<br />
High temperature. The measured sensor temperature is higher than the<br />
set high alarm limit<br />
Action: Check the settings and the patient's actual body temperature.<br />
Remember that the Water Mattress cools slowly.<br />
Temperature OK! (Normally displayed). The measured sensor<br />
temperature is in between the High- and Low alarm limits.<br />
Low temperature. The measured sensor temperature is lower than the<br />
set low alarm limit.<br />
Action: Check that the temperature sensor is properly applied to the<br />
patient. Check that the BabyWarmer system is working in a correct way,<br />
and that right temperature settings are used. If the sensor temperature is<br />
rising, but not yet reached up to the Low alarm level, the indicator<br />
indicates blue but not flashing (no alarm condition!).
Quick indications<br />
Page 19 of 28<br />
<strong>User</strong> <strong>Manual</strong> BW3-070/2<br />
Informative system messages only, the system will continue operation as normal. The colour of the face<br />
icon depends on a combination of the mattress temperature and the YSI400 temperature sensor.<br />
Indication Description / Operator action<br />
Excess heat / Slow cooling / High temp alarm. The mattress has a higher<br />
temperature than the set value or the temperature monitor YSI400 sensor is<br />
warmer than the Hi temp alarm level<br />
Action: Will normally occur after the set value has been reduced from a higher<br />
value. The settings should always be checked, and if found necessary, the patient<br />
may be temporary removed (and cooled down).<br />
Within limits! Set temperature has been reached and the temperature monitor is<br />
within the alarm levels (if a sensor is connected). The system is ready for use<br />
provided that a correct set temperature has been chosen.<br />
Low heat / Slow heating / Low temp alarm. The mattress has not reached the<br />
set temperature or the temperature monitor YSI400 sensor is colder than the Lo<br />
temp alarm level (if a sensor is connected). Will normally occur when a cold start is<br />
being performed.<br />
Action: Check the temperature monitor sensor. All settings should be checked. If<br />
a cold start has been performed, the patient should not be placed on the mattress<br />
before the indication has turned green.<br />
High mattress temperature. The calculated temperature is more than 0,8°C<br />
warmer than the set value. The mattress temperature is displayed in the icon.<br />
Within limits! The calculated temperature is within ±0,8°C of the set value.<br />
Low mattress temperature. The calculated temperature is lower than 0,8°C<br />
below the set value. The mattress temperature is displayed in the icon.<br />
Medium priority errors and alarms<br />
When a medium priority error is detected, the alarm is activated (error code on display, audio signal and<br />
the error LED blinks yellow.). After pressing the alarm button, the unit will continue to operate normally for<br />
2 minutes. If the error condition remains, the alarm will return.<br />
Code Description Action Note<br />
20<br />
21<br />
22<br />
23<br />
24<br />
Low H2O Temp alarm. The<br />
calculated Water Mattress<br />
temperature is more than 1°C below<br />
the set value.<br />
Low GEL Temp alarm. The<br />
calculated Gel Mattress<br />
temperature is more than 1°C below<br />
the set value.<br />
High Temp alarm. The calculated<br />
Gel- or Water Mattress<br />
temperature exceeds the set value<br />
by 1°C or more.<br />
Error in the temperature monitor<br />
interface.<br />
Defect YSI400 temperature<br />
sensor<br />
Reset the alarm. Check the actual Water Mattress<br />
temperature. If there is a logical explanation (e.g. a heavy<br />
thermal load on the Pad, an extra large Water Mattress<br />
being used etc), then make necessary corrections. Restart<br />
the system. If the alarm re-occurs, the system should be<br />
analyzed and/or replaced.<br />
Reset the alarm. Check the actual Gel Mattress<br />
temperature. If there is a logical explanation (e.g. a heavy<br />
thermal load on the Pad), then make necessary corrections.<br />
Restart the system. If the alarm re-occurs, the system<br />
should be analyzed and/or replaced.<br />
Reset the alarm. If there is a logical explanation (e.g. the<br />
set value lower than the room temperature, the mattress<br />
effected by a radiant warming light or similar), then make<br />
the necessary corrections. Restart the system. If the alarm<br />
re-occurs, the system should be analyzed and/or replaced.<br />
The system should be analyzed and/or replaced.<br />
The external temperature sensor needs to be replaced.<br />
This alarm is only<br />
activated in H2Omode<br />
4 hours after<br />
system start or after<br />
any set temp<br />
adjustment.<br />
This alarm is only<br />
activated in GELmode<br />
4 hours after<br />
system start or after<br />
any set temp<br />
adjustment.<br />
This alarm is only<br />
activated 4 hours<br />
after system start or<br />
after any set temp<br />
adjustment.
High priority alarms<br />
Page 20 of 28<br />
<strong>User</strong> <strong>Manual</strong> BW3-070/2<br />
If a high priority error is detected, the heating is switched off and the alarm is activated (the error code is<br />
displayed, audio signal emitted and the red LED flashing). After pressing the Alarm button, the unit goes to<br />
stand by. If a restart is performed, please carefully observe that a correct self test is being performed.<br />
Code Description Action<br />
01<br />
02<br />
03<br />
04<br />
05<br />
06<br />
07<br />
08<br />
09<br />
10<br />
11<br />
12<br />
13<br />
14<br />
Power loss has occurred during normal operation. The power alarm can be silenced by the operator by pressing the<br />
alarm button for about 2 seconds. When power is restored, reset the<br />
alarm and restart the unit .<br />
High H2O temp alarm: The calculated H2O-<br />
Mattress temperature (thermistor T1 or T3) has<br />
exceeded 41°C for more than 30 sec.<br />
Measuring error: The independent Hard Ware<br />
based safety circuit has detected that the H2O<br />
thermistor T3 render a higher reading than 42°C or<br />
the element thermistor T4 more than 43°C, or the<br />
internal reference deviates more than 1 %.<br />
High GEL temp alarm: The calculated Gel<br />
Mattress temperature (thermistor T2 or T4) has<br />
exceeded 45°C (peak reading).<br />
Sensor error A: Thermistor T1 or T2, or the<br />
measuring circuit is faulty (open loop).<br />
Sensor error B: Thermistor T3 or T4, or the<br />
measuring circuit is faulty (open loop).<br />
Sensor error C: Thermistor T1, T2, T3 or T4, or<br />
the measuring circuit is faulty (rendering a value<br />
grater than 49°C).<br />
Regulator error: The heating Pad output has been<br />
active (or inactive) for more than 120 consecutive<br />
sec, indicating an error in the output circuit.<br />
High internal temperature: The Control Unit's<br />
internal temperature has exceeded 60°C.<br />
Safety relay malfunction: The safety relay does<br />
not operate properly.<br />
Too high current in the Heating Pad: Internal<br />
short circuit detected in the PAD.<br />
Uneven Heating Pad temp in H2O mode: Unnatural<br />
temperature differences (> 1,4° C )<br />
measured between the two H2O thermistors T1 and<br />
T3.<br />
DC power error. The Heating Pad voltage is either<br />
lower than 9 V, or higher than 28 V.<br />
Uneven Heating Pad temp in GEL mode: Unnatural<br />
temperature differences measured between<br />
the two H2O thermistors T1 and T2, OR between T3<br />
and T4. During the first two hours after a cold start,<br />
the maximum allowed temperature difference is 8°<br />
C, thereafter 4° C.<br />
Reset the alarm. Check the actual Water Mattress temperature. If<br />
there is a logical explanation (e.g. a external heat source affecting the<br />
Heating Pad), then make necessary corrections. Restart the unit.<br />
Check that the self test performs OK. If the alarm re-occurs, the<br />
system should be analyzed and/or replaced.<br />
Reset the alarm. Check the actual Water Mattress temperature. If<br />
there is a logical explanation (e.g. an external heat source affecting<br />
the Heating Pad), then make necessary corrections. Restart the unit.<br />
Check that the self test performs OK. If the alarm re-occurs, the<br />
system should be analyzed and/or replaced.<br />
Reset the alarm. Check the actual mattress temperature. If there is a<br />
logical explanation (e.g. an external heat source affecting the heating<br />
pad), then make necessary corrections. Restart the unit. Check that<br />
the self test performs OK. If the alarm re-occurs, the system should be<br />
analyzed and/or replaced.<br />
Reset the alarm. Replace the Heating Pad. Restart the system. Check<br />
that the self test performs OK. If the alarm re-occurs, the system<br />
should be analyzed and/or replaced.<br />
Reset the alarm. Replace the Heating Pad. Restart the system. Check<br />
that the self test performs OK. If the alarm re-occurs, the system<br />
should be analyzed and/or replaced.<br />
Reset the alarm. Replace the Heating Pad. Restart the system. Check<br />
that the self test performs OK. If the alarm re-occurs, the system<br />
should be analyzed and/or replaced.<br />
The Control Unit should be replaced and the faulty unit analyzed by an<br />
authorized technician.<br />
Reset the alarm. If there is a logical explanation (e.g. an external heat<br />
source affecting the Control Unit), then make necessary corrections.<br />
Restart the unit. Check that the self test performs OK. If the alarm reoccurs,<br />
the system should be analyzed and/or replaced.<br />
The Control Unit must be replaced and the faulty unit analyzed by an<br />
authorized technician.<br />
The Control Unit and the Heating Pad must be replaced and the faulty<br />
system analyzed by an authorized technician.<br />
Reset the alarm. If there is a logical explanation (e.g. a heavily tilted<br />
bed during warming up phase, low water level in the Water Mattress,<br />
external heat source or high thermal load affecting one of the<br />
thermistors), then make necessary corrections. Restart the unit. Check<br />
that the self test performs OK. If the alarm re-occurs, the system<br />
should be analyzed and/or replaced.<br />
If the control unit is fed by external DC batteries, check the external<br />
supply voltage and the adapter. If the unit is fed by mains AC Power<br />
and this alarm occurs, the control unit should be analyzed and/or<br />
replaced.<br />
Reset the alarm. If there is a logical explanation (e.g. a Gel Mattress<br />
without aluminium plate is used, external heat source or high thermal<br />
load affecting the Heating Pad), then make necessary corrections.<br />
Restart the unit. Check that the self test performs OK. If the alarm reoccurs,<br />
the system should be analyzed and/or replaced.
9 Control of Safety functions<br />
Test instructions<br />
Page 21 of 28<br />
<strong>User</strong> <strong>Manual</strong> BW3-070/2<br />
Self test at start<br />
Connect the Control Unit to mains supply and connect the Heating Pad. Check that the mains indicator LED<br />
blinks.<br />
Press Start/Standby and check that the following happens in the order described below.<br />
1. The selected mattress mode is displayed.<br />
2. Clicking from the safety relay can be heard<br />
3. The Control Unit symbol turns green<br />
4. The Heating Pad symbol turns green<br />
5. A short "beep" is emitted<br />
6. The system starts operating at 37 o C<br />
1) Self test in progress. The selected mattress mode is displayed (GEL<br />
or H2O). NOTE: Change of mode is now possible by pressing LEFT or<br />
RIGHT arrow, as indicated on the display. If the mattress mode is<br />
changed the unit will re-start the self test.<br />
2) Self Test Ready. The Control Unit and the Heating Pad symbol turns<br />
green<br />
A short "beep" is emitted and the red alarm LED flashes one time.<br />
The Control Units software version is displayed.<br />
Testing the uneven Heating Pad temperature alarm in H 2O mode.<br />
Start the system in H2O-mode, at 37°C without any mattress placed on the Heating Pad. The Alarm 12<br />
should be received within 15 minutes. (Note: Alarm 08 can sometimes occur as a consequence of the first<br />
alarm).<br />
Testing the uneven Heating Pad temperature alarm (GEL mode).<br />
Start the system in GEL-mode, at 37°C without any mattress placed on the heating Pad. The Alarm 14<br />
should be received within 15 minutes. (Note: Alarm 08 can sometimes occur as a consequence of the first<br />
alarm).<br />
Mains Power failure alarm<br />
This test is performed on a system with Mattress and a Heating Pad.<br />
1. Start the warming<br />
2. After about one minute, select a temperature different from 37 o C and make a note of it.<br />
3. Wait about 2 minutes and then disconnect the supply voltage by pulling out the mains plug.<br />
4. Check that the Control Unit alarm indicator starts to blink and that the acoustic alarm beeps<br />
intermittently for at least 10 minutes<br />
5. Switch on supply voltage again and check that the Power alarm is displayed. Press the alarm button.<br />
6. Restart and check that the warming starts at the set temperature selected before the power<br />
interruption.
Page 22 of 28<br />
<strong>User</strong> <strong>Manual</strong> BW3-070/2<br />
10 Accessories, Spare parts and Technical documentation<br />
Other accessories, mattress types and sizes may be available. Your local supplier has all information about<br />
available accessories or log on to www.kanmed.se<br />
<strong>User</strong> <strong>Manual</strong>s in other languages can also be downloaded from the <strong>Kanmed</strong> web page.<br />
Article number Description Quantity<br />
BW3-001 Complete <strong>Kanmed</strong> Baby Warmer kit with Water Mattress 1<br />
BW3-020 Control Unit BW3 1<br />
BW3-003 Heating Pad 1<br />
BW-50-003 Water Mattress 4,5 litre (standard) 600 x 270 mm 1<br />
BW-50-029 <strong>Kanmed</strong> Water Conditioner 118 ml 20<br />
GE-602815 Gel Pad with pocket 600 x 280 x 15 mm 1<br />
BW-50-025 Baby Nest blue (re-usable) 650/400 x 350 mm 1<br />
BW-50-025-P Baby Nest pink (re-usable) 650/400 x 350 mm 1<br />
BW-50-025-Y Baby Nest yellow (re-usable) 650/400 x 350 mm 1<br />
BW-50-25XL Baby Nest Extra Large<br />
BW-50-200 Baby Nest white disposable (single patient) 650 x 350 mm 10<br />
BW-50-250 Disposable Baby Nest cover 600 x 850 mm 100<br />
BW3-070 Instruction manual, English 1<br />
BW3-079 Service manual, English 1<br />
BW3-007 Battery Cable (power adapter) for 12 V batteries 1<br />
BW3-0837 Pole Clamp 1<br />
BW3-099 YSI Temperature Sensor 1<br />
Spare parts<br />
<strong>Kanmed</strong> or your local distributor will provide a spare part price list as well as a service manual that<br />
contains all information necessary to perform diagnostics, maintenance and repairs to the extent<br />
permitted by <strong>Kanmed</strong>.<br />
Please note, no repairs of the PCBs are permitted, exchange units only.<br />
699-1171 Mains Cord 230V (Swedish plug) 1<br />
400-009 Power supply unit 1<br />
400-005 Heating Pad and Power interface board 1<br />
400-003 YSI-sensor interface board 1<br />
400-001 Main PCB 1<br />
400-020 Top assembly, including the display panel 1<br />
400-0152 Plastic bottom part 1<br />
400-017 Label set 1<br />
400-0194 Back cover plate 1<br />
400-007 LED-Display 1<br />
400-023 Internal Cable kit 1
11 Technical data<br />
Heating Pad, BW3-003<br />
Page 23 of 28<br />
<strong>User</strong> <strong>Manual</strong> BW3-070/2<br />
Voltage 24 Volt DC from Control Unit BW3 when powered from mains power, or 12/24 V DC<br />
when powering from 12/24V battery source<br />
Power consumption 50 Watt, 10 Watt when the Control Unit is powered from a 12 Volt battery<br />
Dimensions and Weight 580 x 250 mm / 0,5 kg<br />
Length of connection cable 1,2 m<br />
Material cover PVC<br />
Watertight Yes<br />
Conductivity - surface Not electrically conductive<br />
Radiation No measurable magnetic and electrical fields<br />
Life expectancy The lifetime for the BW3 Heating Pad is expected to be more than 2 years. This is<br />
Control Unit, BW3-020<br />
under the condition that the pad has been handled and maintained according to the<br />
user manual.<br />
Mains power / Frequency 100 - 240V AC / 50/60 Hz<br />
Battery power 24V DC 12V DC (with limited warming capacity)<br />
Power consumption Max 100 VA (peak value). Average consumption, approximately 15 VA<br />
Temperature settings<br />
available<br />
25 O C - 35 O C in steps of 0,5 O C<br />
35 O C - 38 O C in steps of 0,1 O C<br />
Regulating accuracy Better than ±1.0 O C<br />
Display resolution 0.1 O C<br />
Auditory Alarm 55 dBA normal, 45 dBA reduced sound level at 1 m horizontally<br />
Note: Sound level is adapted to a quiet environment, delivery- or maternity ward<br />
etc.<br />
Over temperature alarm At a water temperature of 39.5 � 0,5 O C, in GEL mode 40,0 � 1 O C<br />
Dimensions and Weight Height 200 mm, Width 140 mm, Diameter 150 mm. Weight 1400 g<br />
Fuses Primary fuses; built in to the power supply<br />
Mode of operation Designed for continuous use<br />
Secondary fuses; built in to the Heating Pad interface board<br />
Water protection Drip proof when installed according to instructions<br />
Life expectancy <strong>Kanmed</strong> warrants a safe lifetime for the BW3 Control unit of 10 years from first day<br />
Water Mattress, BW-50-003<br />
of use. This is under the condition that the unit has been used and serviced according<br />
to the user and or service manual and that the unit has not been modified or<br />
changed in any way or for any reason.<br />
Dimensions and Weight Length 600 mm, With 270 mm, Height 30 mm,<br />
Material Medical Grade PVC<br />
<strong>Kanmed</strong> Water Conditioner<br />
recommended<br />
Other sizes might be available. Please contact your local supplier.<br />
Weight about 0.2 kg (not filled), about 4.5 kg (filled with water)<br />
<strong>Kanmed</strong> Bottle 118 ml fluid<br />
Contents: Active ingredients: N-Alkyl,N-Didecyl-N,N-dimethyl ammonium chloride<br />
(BTC8358), CAS No:68424-85-1: 13% Inaktiv substans 87%<br />
Life expectancy The safe lifetime for the Water Mattress is at least 1 year from first day of use. This is<br />
Gel Mattress, GE-602815<br />
under the condition that the Water Mattress has been handled and maintained<br />
according to the user manual.<br />
Dimensions and Weight Length 600 mm, With 280 mm, Height 15 mm, Weight about 2,3 kg.<br />
Material AKTON viscoelastic polymer sealed in a polyether urethane (PU) film.<br />
Life expectancy The safe lifetime for the Gel Mattress is several years from first day of use. This is<br />
under the condition that the Gel Mattress has been handled and maintained according<br />
to the user manual and that the surface is unbroken.
<strong>Kanmed</strong> Baby Nest BW50-025 (re-usable type)<br />
Page 24 of 28<br />
<strong>User</strong> <strong>Manual</strong> BW3-070/2<br />
Dimensions and weight Length 650 mm, Width 450 mm Height 50 mm flattened. About 600g<br />
Material Cover: High quality ÖKOTEX grade cotton and polyester<br />
Filling of collar: Polyester fibre.<br />
Washing Recommended temperature 60 0 C, Can tolerate 90 0 C but this will shorten lifetime<br />
Always tumble dry<br />
Various colours, sizes and materials are available. Please contact your local supplier.<br />
<strong>Kanmed</strong> Baby Nest BW50-200 (disposable type)<br />
Dimensions Length 650 mm, Width 450 mm Height 50 mm<br />
Material Cover: Non woven spunbond polypropylene, 40 g / m 2<br />
Filling of collar: Thermoloft DW, Libeltex AB, Bredaryd.<br />
Various sizes and types may be available. Please contact your local supplier.<br />
Warming Capacity<br />
Std. <strong>Kanmed</strong> Water Mattress<br />
(It is recommended to fill the<br />
Water Mattress with luke<br />
warm water)<br />
Gel Mattress<br />
Safety Standards<br />
About 4-6 0 C per hour.<br />
(Room temperature about 22 0 C and filled with 4,5 litres of water and placed on the<br />
mattress of a baby bed and covered with a double sheet. Connected to mains AC-<br />
power, or directly to a 24V battery, or with the BW3-007 Battery Cable (12 to 24 V<br />
DC power adapter).<br />
About 8-10 0 C per hour.<br />
(Room temperature about 22 0 C and placed on the mattress of a baby bed and<br />
covered with the Nest and a sheet. Connected to mains AC-power, or to a 24V<br />
battery, or with the BW3-007 Battery Cable (12 to 24 V DC power adapter).<br />
Standards EN 60 601-1 , EN 60 601-1-2, EN 60 601-2-35<br />
Protection type BF, Defibrillator safe Class I<br />
CE marking Fulfils MDD 93/42 EEC. MDD class IIB. (EC 0413= Intertek SEMKO, Sweden)<br />
Environmental Conditions, normal use<br />
Temperature / Humidity +10 to + 34 O C / 10 - 90%, non condensing<br />
Environmental Conditions, storage and transport<br />
Temperature / Humidity - 25 to + 50 O C / 10 - 100%, non condensing<br />
EMC Guidelines<br />
Connection to battery<br />
Modifications<br />
The <strong>Kanmed</strong> BW3 Baby Warming system should not be used adjacent to, or stacked<br />
with other equipment. If adjacent or stacked use is necessary, the <strong>Kanmed</strong> BW3 Baby<br />
warming system should be observed to verify normal operation in the configuration in<br />
which it is used.<br />
Additional EMC information is found in the user manual and in the service manual<br />
If the Control Unit is to be connected to a battery (12V DC, from a vehicle etc.) use<br />
the <strong>Kanmed</strong> Battery Cable BW3-007 that increases the voltage to 24V DC. Connect<br />
the battery cable to the Battery inlet below the Heating Pad connector on the Control<br />
Unit. Connect the other end (fitted with a DIN 4165 plug) to the vehicles cigarette<br />
lighter socket or similar outlet.<br />
If the Control Unit is powered directly from a 24 V battery source, then note that the<br />
centre pin of the DC power inlet is + (positive).<br />
Make sure that the power outlet is able to supply minimum of 3 A DC.<br />
(The 2,5/5,5 mm power inlet of the BW3 Control Unit is internally fuse-, and polarity<br />
protected.)<br />
Any modifications on the Control Unit, Heating Pad, Gel- or Water Mattress will void<br />
<strong>Kanmed</strong>’s responsibilities totally and are not allowed without the written consent of<br />
<strong>Kanmed</strong>.
12 Warranty<br />
Page 25 of 28<br />
<strong>User</strong> <strong>Manual</strong> BW3-070/2<br />
<strong>Kanmed</strong> warrants the purchaser that the Control Unit BW3 and/or Heating Pad BW3-003 are free from<br />
defects in material and workmanship for a period of 12 month from the date of delivery.<br />
The <strong>Kanmed</strong> Baby Nest, Water and Gel Mattresses and other associated parts are warranted to be free of<br />
defects at the time of delivery.<br />
The sole obligation of <strong>Kanmed</strong> with respect to any such defect is limited to the repair with new or remanufactured<br />
parts or, at the discretion of <strong>Kanmed</strong>, replacement of the equipment or refunding of the<br />
purchase price.<br />
This warranty shall not apply if the product has been modified, adjusted or repaired other than by <strong>Kanmed</strong><br />
or by organisations authorised by <strong>Kanmed</strong> or modified, adjusted or repaired not in accordance with written<br />
instructions provided by <strong>Kanmed</strong>. Neither shall the warranty apply if the equipment has been subject to<br />
misuse, negligence or accident.<br />
These warranties are made on the condition that prompt notification of a defect is given to <strong>Kanmed</strong> or its<br />
authorised dealers within the warranty period.<br />
<strong>Kanmed</strong> shall have the sole right to determine whether a defect exists.<br />
<strong>Kanmed</strong> shall not in any case be liable for special or consequential damages arising from the breach of<br />
warranty, breach of contract, negligence or any other legal theory.<br />
13 Disposal<br />
When the <strong>Kanmed</strong> BabyWarmer have reached end of life, it should be recycled in accordance<br />
with the EU 2002/96/EC (WEEE) directive if applicable.
14 EMC COMPATIBILITY STATEMENT<br />
Page 26 of 28<br />
<strong>User</strong> <strong>Manual</strong> BW3-070/2<br />
EMC Guidelines for the BabyWarmer BW3 system<br />
� Portable and mobile RF communications equipment can affect MEDICAL ELECTRICAL EQUIPMENT.<br />
� The <strong>Kanmed</strong> BabyWarmer BW3 system should not be used adjacent to, or stacked with other equipment. If<br />
adjacent or stacked use is necessary, the <strong>Kanmed</strong> BabyWarmer BW3 system should be observed to verify normal<br />
operation in the configuration in which it is used.<br />
Guidance and manufacturer’s declaration - electromagnetic emissions<br />
The <strong>Kanmed</strong> BabyWarmer BW3 system is intended for use in the electromagnetic environment specified below. The customer<br />
or the user of the <strong>Kanmed</strong> BabyWarmer BW3 should assure that it is used in such an environment.<br />
Emission test Compliance Electromagnetic environment - guidance<br />
RF emissions<br />
CISPR 11 Group 1<br />
RF emissions<br />
CISPR 11<br />
Harmonic emissions<br />
IEC 61000-3-2<br />
Voltage fluctuations/<br />
flicker emissions<br />
IEC 61000-3-3<br />
Class B<br />
Class B<br />
Complies<br />
<strong>Kanmed</strong> BabyWarmer BW3 system uses RF energy only for its internal<br />
function. Therefore, its RF emissions are very low and are not likely to<br />
cause any interference in nearby electronic equipment.<br />
The <strong>Kanmed</strong> BabyWarmer BW3 system is suitable for use in all<br />
establishments, including domestic establishments and those directly<br />
connected to the public low-voltage power supply network that<br />
supplies buildings used for domestic purposes.<br />
Recommended separation distances between portable and mobile RF communications equipment and the <strong>Kanmed</strong><br />
BabyWarmer BW3 system.<br />
The <strong>Kanmed</strong> BabyWarmer BW3 system is intended for use in the electromagnetic environment in which radiated RF disturbances<br />
are controlled. The customer or the user of the <strong>Kanmed</strong> BabyWarmer BW3 system can help prevent electromagnetic interference<br />
by maintaining a minimum distance between portable and mobile RF communications equipment (transmitters) and the <strong>Kanmed</strong><br />
BabyWarmer BW3 system as recommended below, according to the maximum output power of the communications equipment.<br />
Rated maximum<br />
output power of<br />
transmitter<br />
W<br />
150 kHz to 80 MHz<br />
d = 1,17 √ P<br />
Separation distance according to frequency of transmitter<br />
m<br />
80 MHz to 800<br />
MHz<br />
d = 1,17 √ P<br />
800 MHz to 2,5 GHz<br />
d = 2,33 √ P<br />
0,01 0,2 m 0,2 m 0,3 m<br />
0,1 0,4 m 0,4 m 1,6 m<br />
1 1,2 m 1,2 m 2,3 m<br />
10 3,7 m 3,7 m 7,4 m<br />
100 11,7 m 11,7 m 23,3 m<br />
For transmitters rated at a maximum output power not listed above, the recommended separation distance d in metres (m) can<br />
be established using the equation applicable to the frequency of the transmitter, where P is the maximum output power rating in<br />
watts (W) according to the transmitter manufacturer.<br />
Note 1: At 80 MHz and 800 MHz, the separation distance for the higher frequency range applies.<br />
Note 2: These guidelines may not apply in all situations. Electromagnetic propagation is affected by absorption and reflection from<br />
structures, objects and people.<br />
Guidance and manufacturer’s declaration - electromagnetic immunity<br />
The <strong>Kanmed</strong> BabyWarmer BW3 system is intended for use in the electromagnetic environment specified below. The customer or<br />
the user of the <strong>Kanmed</strong> BabyWarmer BW3 system assures that it is used in such an environment.<br />
immunity test IEC 60601 test level Compliance level<br />
Electromagnetic<br />
environment - guidance<br />
Electrostatic discharge (ESD)<br />
Floors should be wood,<br />
IEC 61000-4-2 ±6 kV contact<br />
±6 kV contact<br />
concrete or ceramic tile. If<br />
±8 kV air<br />
±8 kV air<br />
floors are covered with<br />
synthetic material, the
Electrical fast transient/burst<br />
IEC 61000-4-4<br />
Surge<br />
IEC 61000-4-5<br />
Voltage dips, short interruptions<br />
and voltage variations on the<br />
power supply input lines<br />
IEC 61000-4-11<br />
Power frequency (50 Hz)<br />
magnetic field<br />
IEC 61000-4-8<br />
Page 27 of 28<br />
±2 kV for power supply lines<br />
±1 kV for input/output lines<br />
±1 kV differential mode<br />
±2 kV common mode<br />
95% dip in UT )<br />
for 0,5 cycle<br />
40% UT<br />
(60% dip in UT )<br />
for 5 cycles<br />
70% UT<br />
(30% dip in UT )<br />
for 25 cycles<br />
95% dip in UT )<br />
for 5 sec<br />
3 A/m 3 A/m<br />
Note: UT is the AC mains voltage prior to application of the test level<br />
±2 kV for power supply lines<br />
±1 kV for input/output lines<br />
±1 kV differential mode<br />
±2 kV common mode<br />
95% dip in UT )<br />
for 0,5 cycle<br />
40% UT<br />
(60% dip in UT )<br />
for 5 cycles<br />
70% UT<br />
(30% dip in UT )<br />
for 25 cycles<br />
95% dip in UT )<br />
for 5 sec<br />
Guidance and manufacturer’s declaration - electromagnetic immunity<br />
<strong>User</strong> <strong>Manual</strong> BW3-070/2<br />
relative humidity should be<br />
at least 30%<br />
Mains power quality should<br />
be that of a typical<br />
commercial or hospital<br />
environment<br />
Mains power quality should<br />
be that of a typical<br />
commercial or hospital<br />
environment.<br />
If continued operation during<br />
power mains interruptions, it<br />
is recommended that the<br />
<strong>Kanmed</strong> BabyWarmer BW3<br />
system be powered from an<br />
uninterruptible power supply<br />
unit (UPS)<br />
Power frequency magnetic<br />
fields should be at levels<br />
characteristic of a typical<br />
location in a typical<br />
commercial or hospital<br />
environment<br />
The <strong>Kanmed</strong> BabyWarmer BW3 system is intended for use in the electromagnetic environment specified below. The customer or the user of the<br />
<strong>Kanmed</strong> BabyWarmer BW3 system should assure that it is used in such an environment.<br />
Immunity test<br />
Conducted RF<br />
IEC 61000-4-6<br />
Radiated RF<br />
IEC 61000-4-3<br />
Note 1:<br />
Note 2:<br />
IEC 60601 test level<br />
3 Vrms<br />
150 kHz to 80 MHz<br />
3 V/m<br />
80 MHz to 2,5 GHz<br />
Compliance<br />
level<br />
3 Vrms<br />
3 V/m<br />
At 80 MHz and 800 MHz, the higher frequency range applies.<br />
Electromagnetic environment - guidance<br />
Portable and mobile RF communications equipment should be<br />
used no closer to any part of the <strong>Kanmed</strong> BabyWarmer BW3<br />
system, including cables, than the recommended separation<br />
distance calculated from the equation applicable to the<br />
frequency of the transmitter.<br />
Recommended separation distance<br />
d = 1,17 √ P<br />
d = 1,17 √ P 80 MHz to 800 MHz<br />
d = 2,33 √ P 800 MHz to 2,5 GHz<br />
Where P is the maximum output power rating of the transmitter<br />
in watts (W) according to the transmitter manufacturer and d is<br />
the recommended separation distance in metres (m).<br />
Field strengths from fixed RF transmitters, as determined by an<br />
electromagnetic site survey*, should be less than the<br />
compliance level in each frequency range**<br />
Interference may occur in the vicinity of equipment marked with<br />
the following symbol:<br />
These guidelines may not apply in all situations. Electromagnetic propagation is affected by absorption and reflection from<br />
structures, objects and people.<br />
* Field strengths from fixed transmitters, such as base stations for radio (cellular/cordless) telephones and land mobile radios, amateur radio, AM<br />
and FM radio broadcast and TV broadcast cannot be predicted theoretically with accuracy. To access the electromagnetic environment due to fixed<br />
RF transmitters, an electromagnetic site survey should be considered. If the measured field strength in the location in which the <strong>Kanmed</strong><br />
BabyWarmer BW3 system is used exceeds the applicable RF compliance level above, the <strong>Kanmed</strong> BabyWarmer BW3 system should be observed to<br />
verify normal operation. If abnormal performance is observed, additional measures may be necessary, such as reorienting or relocating the BW3.<br />
** Over the frequency range of 150 kHz to 80 MHz, field strength should be less than 3 V/m.
<strong>Kanmed</strong> AB<br />
Gårdsfogdevägen 18B<br />
SE-168 66 BROMMA – Stockholm<br />
Sweden<br />
Telephone +46 8 56 48 06 30<br />
Telefax +46 8 56 48 06 39<br />
E-Mail: info@kanmed.se<br />
Web page: www.kanmed.se<br />
Distributed by:<br />
Page 28 of 28<br />
<strong>User</strong> <strong>Manual</strong> BW3-070/2