Operation Manual - Key Digital
Operation Manual - Key Digital
Operation Manual - Key Digital

You also want an ePaper? Increase the reach of your titles
YUMPU automatically turns print PDFs into web optimized ePapers that Google loves.
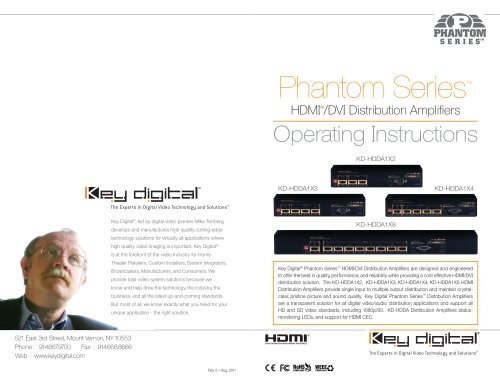
Phantom Series<br />
HDMI ® /DVI Distribution Amplifiers<br />
Operating Instructions<br />
KD-HDDA1X2<br />
KD-HDDA1X3<br />
KD-HDDA1X4<br />
<strong>Key</strong> <strong>Digital</strong> ® , led by digital video pioneer Mike Tsinberg,<br />
develops and manufactures high quality, cutting-edge<br />
technology solutions for virtually all applications where<br />
high quality video imaging is important. <strong>Key</strong> <strong>Digital</strong> ®<br />
is at the forefront of the video industry for Home<br />
Theater Retailers, Custom Installers, System Integrators,<br />
Broadcasters, Manufacturers, and Consumers. We<br />
provide total video system solutions because we<br />
know and help drive the technology, the industry, the<br />
business, and all the latest up-and-coming standards.<br />
But most of all, we know exactly what you need for your<br />
unique application - the right solution.<br />
KD-HDDA1X8<br />
<strong>Key</strong> <strong>Digital</strong> ® Phantom Series HDMI/DVI Distribution Amplifiers are designed and engineered<br />
to offer the best in quality, performance, and reliability while providing a cost effective HDMI/DVI<br />
distribution solution. The KD-HDDA1X2, KD-HDDA1X3, KD-HDDA1X4, KD-HDDA1X8 HDMI<br />
Distribution Amplifiers provide single input to multiple output distribution and maintain crystalclear,<br />
pristine picture and sound quality. <strong>Key</strong> <strong>Digital</strong> Phantom Series Distribution Amplifiers<br />
are a transparent solution for all digital video/audio distribution applications and support all<br />
HD and SD video standards, including 1080p/60. KD-HDDA Distribution Amplifiers statusmonitoring<br />
LEDs, and support for HDMI CEC.<br />
521 East 3rd Street, Mount Vernon, NY 10553<br />
Phone :: 914.667.9700 Fax :: 914.668.8666<br />
Web :: www.keydigital.com<br />
Rev 2 – Aug. 2011
CAT6/STP<br />
DVI Video*<br />
Page 4 Page 1<br />
Display 1<br />
eo*<br />
KD-HDDA1X4<br />
Quick Setup Guide<br />
RS-232<br />
DVI Video*<br />
KD-BBTX<br />
CAT6/STP<br />
Up to 300’<br />
DVI Video*<br />
Display 2<br />
Table of Contents<br />
½½<br />
Step 1: Find a safe and convenient location to mount or place your KD-HDDA unit<br />
½½<br />
Step 2: EDID Begin Control with the KD-HDDA unit and all input/output devices turned off with<br />
power cables removed<br />
½½<br />
Step 3: Connect your HDMI or DVI-D source device to the input port of your KD-HDDA unit<br />
½½<br />
Step 4: Connect your HDMI or DVI-D displays to the output port of your KD-HDDA unit<br />
DVI<br />
½½<br />
Step 5: Be sure the <strong>Operation</strong><br />
CAT6/STP<br />
Audio<br />
Mode Switch is set to the “Normal” position<br />
½½<br />
Step 6: Connect power to the KD-HDDA unit<br />
½½<br />
Step 7: Power on input/output devices<br />
<strong>Digital</strong> ® HDMI to DVI adapters,<br />
DMI and KD-MFHDMI<br />
EDID Control<br />
KD-HDDA1X4<br />
RS-232<br />
KD-BBRX<br />
HDMI/DVI *<br />
CAT6/STP<br />
Up to 300’<br />
KD-BBTX<br />
HDMI/DVI * CAT6/STP<br />
HDMI/DVI *<br />
Display 1<br />
Display 2<br />
DVI Video*<br />
DVI Video*<br />
Introduction . . . . . . . . . . . . . . . . . . . . . . . . . . . . . . . . . . . . . . . . . . . . . . . . . . . . . . . . . . . . . . . . 2<br />
Display 3<br />
About KD-HDDA1X2; KD-HDDA1X3; KD-HDDA1X4; KD-HDDA1X8 . . . . . . . . . . . . . . . . . 2<br />
DVI Applications for KD-HDDA1X2; KD-HDDA1X3; KD-HDDA1X4; KD-HDDA1X8 . . . . . . . . . . . 2<br />
Display 4<br />
Accessories. . . . . . . . . . . . . . . . . . . . . . . . . . . . . . . . . . . . . . . . . . . . . . . . . . . . . . . . . . . . . . . . 3<br />
Installation and <strong>Operation</strong>. . . . . . . . . . . . . . . . . . . . . . . . . . . . . . . . . . . . . . . . . . . . . . . . . . . . . . 3<br />
EDID Control Settings . . . . . . . . . . . . . . . . . . . . . . . . . . . . . . . . . . . . . . . . . . . . . . . . . . . . . . . . 3<br />
Firmware Upgrades . . . . . . . . . . . . . . . . . . . . . . . . . . . . . . . . . . . . . . . . . . . . . . . . . . . . . . . . . . 4<br />
Terminology . . . . . . . . . . . . . . . . . . . . . . . . . . . . . . . . . . . . . . . . . . . . . . . . . . . . . . . . . . . . . . . . 5<br />
Mechanical / Technical Specifications . . . . . . . . . . . . . . . . . . . . . . . . . . . . . . . . . . . . . . . . . . . . 6<br />
Important Product Warnings . . . . . . . . . . . . . . . . . . . . . . . . . . . . . . . . . . . . . . . . . . . . . . . . . . . 7<br />
Safety Instructions . . . . . . . . . . . . . . . . . . . . . . . . . . . . . . . . . . . . . . . . . . . . . . . . . . . . . . . . . . . 7<br />
How to Contact <strong>Key</strong> <strong>Digital</strong> ® . . . . . . . . . . . . . . . . . . . . . . . . . . . . . . . . . . . . . . . . . . . . . . . . . . . . 8<br />
Warranty Information . . . . . . . . . . . . . . . . . . . . . . . . . . . . . . . . . . . . . . . . . . . . . . . . . . . . . . . . . 9<br />
HDMI/DVI *<br />
Display 3<br />
Cable Box<br />
HDMI/DVI * HDMI/DVI * HDMI/DVI *<br />
HDMI/DVI*<br />
CAT6/STP<br />
Audio<br />
*To connect DVI use <strong>Key</strong> <strong>Digital</strong> ® HDMI to DVI adapters,<br />
part numbers KD-FMHDMI and KD-MFHDMI<br />
Audio Rcvr.<br />
Audio<br />
Audio<br />
Speakers<br />
Sub-Woofer<br />
Display 4<br />
Audio<br />
Speakers<br />
Always follow the instructions provided in this Operating <strong>Manual</strong>.<br />
Note: No signal conversion is done on the KD-HDDA1X2; KD-HDDA1X3; KD-HDDA1X4; KD-HDDA1X8.<br />
If input signal is HDMI output signal will be HDMI. If input signal is DVI output signal will be DVI.<br />
© 2011 <strong>Key</strong> <strong>Digital</strong>, Inc. All rights reserved.
Page 2 Page 3<br />
Introduction<br />
Thank you for purchasing a <strong>Key</strong> <strong>Digital</strong> Phantom Series KD-HDDA HDMI Distribution Amplifier.<br />
KD-HDDA Distribution Amplifiers are designed to interface your HDMI or DVI-D source device, such<br />
as DVD player, Satellite Box, <strong>Digital</strong> Video Recorder (DVR), Set Top Box, or PC to multiple HDMI or<br />
DVI-D compatible displays.<br />
About the KD-HDDA1X2; KD-HDDA1X3; KD-HDDA1X4; KD-HDDA1X8<br />
½½<br />
Distribution of one HDMI input to multiple (2, 3, 4 or 8) HDMI outputs<br />
½½<br />
Supports all SD, HD, and VESA (VGA, SVGA, XGA, WXGA, SXGA, UXGA) resolutions up to<br />
1080p (60Hz & 50Hz)<br />
»»<br />
SD & HD: 480i, 480p, 720p, 1080i, 1080p<br />
»»<br />
VESA / DVI: From 640x480p up to 1920x1080p<br />
½½<br />
EDID Control featuring 4 internal library settings or auto EDID selection of display<br />
½½<br />
Supports signal rates up to 10.2 Gb per second<br />
KD-BBRX<br />
½½<br />
Supports HDMI and DVI-D<br />
HDMI/DVI *<br />
CAT6/STP<br />
Display 1<br />
½Cable ½ Compliant Box with HDCP copyright protection<br />
HDMI/DVI *<br />
½½<br />
Compliant with all HDMI ® versions<br />
Up to 300’<br />
KD-HDDA1X4<br />
HDMI/DVI<br />
½½<br />
Supports CEC (Consumer Electronics Control)<br />
KD-BBTX<br />
*<br />
Display 2<br />
CAT6/STP<br />
½½<br />
Input and Output status indicated by LED lights HDMI/DVI *<br />
RS-232<br />
½½<br />
Firmware upgradable<br />
HDMI/DVI *<br />
Display 3<br />
½½<br />
Rack mountable<br />
HDMI/DVI<br />
DVI Applications for KD-HDDA1X2; KD-HDDA1X3; KD-HDDA1X4;<br />
*<br />
Audio<br />
Audio Rcvr.<br />
Speakers<br />
HDMI/DVI<br />
KD-HDDA1X8<br />
CAT6/STP<br />
Audio<br />
HDMI/DVI *<br />
Audio<br />
Audio Speakers<br />
KD-HDDA Distribution Amplifiers can also be used with DVI-D sources and displays. For these<br />
applications, *To connect DVI, use HDMI use to DVI adapters DVI to HDMI (<strong>Key</strong> <strong>Digital</strong> model number KD-MFHDMI or KD-FMHDMI) adapters.<br />
Note that while HDMI supports both video and audio over an HDMI cable, DVI-D supports only<br />
video.<br />
Desktop PC<br />
DVI Video*<br />
Accessories<br />
EDID Control<br />
EDID Control<br />
*To connect DVI use <strong>Key</strong> <strong>Digital</strong> ® HDMI to DVI adapters,<br />
part numbers KD-FMHDMI and KD-MFHDMI<br />
KD-HDDA1X4<br />
DVI<br />
CAT6/STP<br />
Audio<br />
½ External power supply: 5V 3A<br />
CAT6/STP<br />
Display 1<br />
½ Rack Ears ½ Operating Instructions ½ Warranty Card<br />
KD-HDDA1X4<br />
RS-232<br />
RS-232<br />
DVI Video*<br />
KD-BBRX<br />
KD-BBTX<br />
CAT6/STP<br />
KD-BBRX<br />
CAT6/STP<br />
HDMI/DVI *<br />
Up to 300’<br />
KD-BBTX<br />
HDMI/DVI * CAT6/STP<br />
Up to 300’<br />
Sub-Woofer<br />
DVI Video*<br />
DVI Video*<br />
DVI Video*<br />
DVI Video*<br />
Display 4<br />
Display 1<br />
Display 2<br />
Display 3<br />
Display 4<br />
Installation and <strong>Operation</strong><br />
Before permanently securing the unit for final installation of cabling behind walls or ceilings, test<br />
for proper operation of the unit and the cables in your system. It is recommended that you leave<br />
enough ventilation space to provide sufficient airflow and cooling, especially if you are going to<br />
leave the unit powered at all times.<br />
Active Input / Output LED Indicators<br />
½½<br />
The front LED indicators indicate that a valid HDMI / DVI-D<br />
connection is made between the KD-HDDA unit and each<br />
Input / Output.<br />
EDID Control Settings<br />
At times, your HDMI sources and display may not synchronize properly. This is<br />
when EDID* control should be utilized. KD-HDDA Distribution Amps feature an<br />
internal library of default settings that ensure that your HDMI source’s output is<br />
compatible with the display devices.<br />
ON<br />
OFF<br />
1 2 3<br />
= 101<br />
Dip Switch Configurations:<br />
NOTE: the DIP settings are 0 = down / off and 1 = up / on.<br />
Please reset the unit by either unplugging and plugging the<br />
HDMI connections, or via a power cycle for the new settings<br />
to take effect.<br />
Configuration Description<br />
000 Auto selection of highest common EDID of output devices<br />
001 EDID copied from first connected output regardless of output number (1-8)<br />
010 Video = 1080i, Audio = L/R Stereo<br />
011 Video = 1080i, Audio = All Audio formats including HDMI 1.3a/b<br />
100 Video = 3D 1080p, Audio = L/R Stereo<br />
101 Video = 3D 1080p, Audio = All Audio formats including HDMI 1.3a/b<br />
110 Video = 1080p Audio =L/R Stereo<br />
111 Video = 1080p Audio = All Audio formats including HDMI 1.3a/b<br />
All Others Highest common EDID of output devices<br />
Example of EDID Auto Select:<br />
If one of your system’s displays supports 1080p, however the second display only supports up to<br />
1080i (does not support 1080p), then the highest common EDID format supported is 1080i. By<br />
choosing the Auto Select EDID Setting, your KD-HDDA unit will inform your source device to output<br />
1080i in order to ensure that all displays receive a supported signal.<br />
*EDID (Extended display identification data) is a data structure provided by a display to describe its capabilities to a<br />
source device.<br />
HDMI/DVI *<br />
Display 2
Page 4 Page 5<br />
Firmware Upgrades<br />
From time-to-time, <strong>Key</strong> <strong>Digital</strong> provides updates for the firmware that operates and controls your<br />
KD-HDDA unit. These updates are optional, and you should only perform upgrades as provided<br />
and instructed by <strong>Key</strong> <strong>Digital</strong>. Periodically check out web site at www.keydigital.com for the latest<br />
firmware updates for your unit.<br />
Firmware Upgrade Procedure<br />
1. Make sure you have the required equipment for upgrading your KD-HDDA device:<br />
»»<br />
a. PC with a serial port capable of 57600 Baud Rate<br />
»»<br />
b. Straight male-female DB9 serial cable no longer that 10 ft.<br />
Note: Null modem cable is NOT supported.<br />
2. Download desired firmware from www.keydigital.com. Unzip the firmware ZIP file to any<br />
directory on your PC.<br />
3. Make sure that no devices are using the Serial COM port on your PC.<br />
4. Disconnect Power from the KD-HDDA unit.<br />
5. Set the rear panel <strong>Operation</strong> switch to “Program”.<br />
6. Connect an RS-232 cable to the serial port on your PC and the other end to the RS-232 port<br />
on the rear panel of the KD-HDDA unit.<br />
7. Double-click the “UartBootLoader.exe” file. The <strong>Key</strong> <strong>Digital</strong> BootLoader window will pop up.<br />
8. Reconnect Power to the KD-HDDA unit.<br />
9. Select the correct port used for your computer’s RS-232 connection.<br />
10. Push “Open File” button and select firmware file (file extension .hex)<br />
11. Press “Start” button<br />
12. When the firmware had been updated, disconnect the power supply from your KD-HDDA unit.<br />
The power supply MUST be disconnected (either from the back of your unit or from the wall<br />
outlet) to have a complete power shutdown reset.<br />
13. Disconnect the RS-232 cable between the unit and your PC.<br />
14. With the power disconnected, set the rear-panel <strong>Operation</strong> switch to “Normal” mode.<br />
15. Reconnect the power supply to your KD-HDDA unit. The firmware upgrade is now complete<br />
and your KD-HDDA unit is now ready for operation.<br />
Terminology<br />
Below is a list of terms and acronyms that reoccur in this Owner’s <strong>Manual</strong> and are commonly<br />
referred to in the A/V Industry:<br />
CEC<br />
DVI-D<br />
EDID<br />
VESA<br />
HDCP<br />
HDMI<br />
Consumer<br />
Electronics<br />
Control<br />
<strong>Digital</strong> Video<br />
Interface – <strong>Digital</strong><br />
Extended Display<br />
Identification Data<br />
Video Electronics<br />
Standards<br />
Association<br />
High-Bandwidth<br />
<strong>Digital</strong> Content<br />
Protection<br />
High-Definition<br />
Multimedia<br />
Interface<br />
An optional protocol used in HDMI systems that allows HDMI<br />
devices to pass control functions along to all devices within the<br />
system.<br />
A digital interface standard created by the <strong>Digital</strong> Display Working<br />
Group (DDWG) to convert analog video signals into digital video<br />
signals to accommodate digital monitors. Typically used for PC<br />
monitors, the video portion of HDMI is compatible with DVI-D<br />
using simple adapters.<br />
A VESA standard data format that contains basic information<br />
about a monitor and its capabilities. Information includes vendor<br />
information, maximum image size, color characteristics, factory<br />
pre-set timings, frequency range limits, and character strings for<br />
the monitor name and serial number.<br />
An international standards body for computer graphics founded<br />
in the late 1980s by NEC Home Electronics and eight other video<br />
display adapter manufacturers.<br />
The copy protection scheme adopted for use with HDMI/DVI.<br />
An uncompressed , all-digital audio/video interface that supports<br />
over one cable standard, enhanced, and high-definition video, and<br />
multi-channel audio.<br />
IR Infrared IR, like the infrared remote control. Simply point the front of an IR<br />
remote control unit towards the IR sensor on the product to be<br />
controlled.<br />
LED<br />
Light Emitting<br />
Diode<br />
Small light bulbs that illuminate to indicate a selection, and are<br />
used as status indicators
Page 6 Page 7<br />
Mechanical / Technical Specifications<br />
Inputs<br />
Outputs<br />
Bandwidth<br />
Compliance With<br />
HDMI Standard<br />
Link<br />
Deep Color Support<br />
Lossless<br />
Compressed <strong>Digital</strong><br />
Audio<br />
DDC Signal (Data)<br />
HDMI Video/Audio<br />
Signal<br />
HDMI Connector<br />
I2C Communication<br />
1 HDMI Connector<br />
8/4/3/2 HDMI Connectors<br />
TMDS bandwidth 10.2 Gb/s<br />
Supports HDMI1.3+, HDMI1.2, HDMI1.1, DVI1.1 and HDCP<br />
Single Link: 1080p/60, 12 bit color depth, 1920x1200 max<br />
Supports digital video formats in Deep Color Mode at up to 12 bits/<br />
color<br />
Supports lossless compressed digital audio<br />
(Dolby ® TrueHD, Dolby ® <strong>Digital</strong> Plus and DTS -HD Master Audio)<br />
Input DDC Signal: 5 Volts p-p (TTL)<br />
Input Video Signal: 1.2 Volts p-p<br />
HDMI Connector: Type A, 19 Pin Female<br />
EDID and HDCP Bi-Directional Transparency from Display to Source<br />
EDID Control Active outputs connected via HDMI, or from internal library of default 4<br />
EDID settings<br />
Power Source 5 Volt DC @ 3 Amp, 100-240 VAC, 50-60 Hz<br />
Dimensions<br />
KD-HDDA1X2, 1X3, 1X4 – W=8.5”, H=1.75”, D=4”<br />
KD-HDDA1X8 – W=17”, H=1.75”, D=4”<br />
Weight<br />
KD-HDDA1X2, 1X3, 1X4 – 2 Lbs<br />
KD-HDDA1X84 – 3.2 Lbs<br />
Important Product Warnings:<br />
1. Connect all cables before providing power to the unit.<br />
2. Test for proper operation before securing unit behind walls or in hard to access spaces.<br />
3. If installing the unit into wall or mounting bracket into sheet-rock, provide proper screw support<br />
with bolts or sheet-rock anchors.<br />
Safety Instructions.<br />
Please be sure to follow these instructions for safe operation of your unit.<br />
1. Read and follow all instructions.<br />
2. Heed all warnings.<br />
3. Do not use this device near water.<br />
4. Clean only with dry cloth.<br />
5. Install in accordance with the manufacturer’s instructions.<br />
6. Do not install near any heat sources such as radiators, heat registers, stoves, or other<br />
apparatus (including amplifiers) that produce heat.<br />
7. Only use attachments/accessories specified by the manufacturer.<br />
8. Refer all servicing to qualified service personnel. Servicing is required when the device has<br />
been damaged in any way including:<br />
»»<br />
Damage to the power supply or power plug<br />
»»<br />
Exposure to rain or moisture<br />
You MUST use the Power Supply provided with your unit or you VOID<br />
the <strong>Key</strong> <strong>Digital</strong> ® Warranty and risk damage to your unit and associated equipment.
Page 8 Page 9<br />
How to Contact <strong>Key</strong> <strong>Digital</strong> ®<br />
System Design Group (SDG)<br />
For system design questions please contact us at:<br />
½½<br />
Phone: 914-667-9700<br />
½½<br />
E-mail: sdg@keydigital.com<br />
Warranty Information<br />
All <strong>Key</strong> <strong>Digital</strong> ® products are built to high manufacturing standards and should provide years of<br />
trouble-free operation. They are backed by a limited two-year parts and labor warranty.<br />
<strong>Key</strong> <strong>Digital</strong> Trainings<br />
For questions about <strong>Key</strong> <strong>Digital</strong> ® Trainings please contact us at:<br />
½½<br />
Phone: 914-667-9700<br />
½½<br />
E-mail: training@keydigital.com<br />
Customer Support<br />
For customer support questions please contact us at:<br />
½½<br />
Phone: 914-667-9700<br />
½½<br />
E-mail: customersupport@keydigital.com<br />
Technical Support<br />
For technical questions about using <strong>Key</strong> <strong>Digital</strong> ® products, please contact us at:<br />
½½<br />
Phone: 914-667-9700<br />
½½<br />
E-mail: tech@keydigital.com<br />
Marketing and Public Relations:<br />
For marketing and public relations information, please contact us at:<br />
½½<br />
Phone: 914-667-9700<br />
½½<br />
E-mail: marketing@keydigital.com<br />
Repairs and Warranty Service<br />
Should your product require warranty service or repair, please obtain a <strong>Key</strong> <strong>Digital</strong> ® Return Material<br />
Authorization (RMA) number by contacting us at:<br />
½½<br />
Phone: 914-667-9700<br />
½½<br />
E-mail: rma@keydigital.com<br />
Feedback<br />
Please email any comments/questions about the manual to:<br />
½½<br />
E-mail: customersupport@keydigital.com