Viking Professional Coffee Maker – Use And Care Instructions - Illy
Viking Professional Coffee Maker – Use And Care Instructions - Illy
Viking Professional Coffee Maker – Use And Care Instructions - Illy

You also want an ePaper? Increase the reach of your titles
YUMPU automatically turns print PDFs into web optimized ePapers that Google loves.
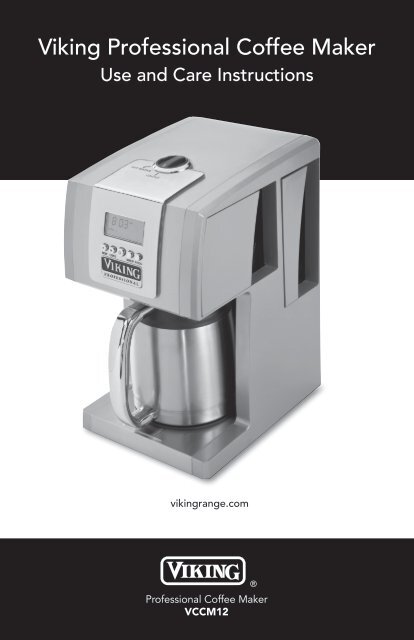
<strong>Viking</strong> <strong>Professional</strong> <strong>Coffee</strong> <strong>Maker</strong><br />
<strong>Use</strong> and <strong>Care</strong> <strong>Instructions</strong><br />
vikingrange.com<br />
®<br />
<strong>Professional</strong> <strong>Coffee</strong> <strong>Maker</strong><br />
VCCM12
Congratulations! You have just purchased<br />
a <strong>Viking</strong> <strong>Professional</strong> <strong>Coffee</strong> <strong>Maker</strong>. The<br />
professional grade coffee maker offers a<br />
heavy duty look and feel, but may be used<br />
for making gourmet coffee. This unit offers<br />
a variety of features, a Sure-Temp brew-<br />
ing system, cup select, programmable<br />
brewing, and a 12 cup thermal stainless<br />
steel carafe.<br />
2
Table of Contents<br />
5 Important Safeguards<br />
6 Using your <strong>Viking</strong> <strong>Coffee</strong> <strong>Maker</strong><br />
8 Installing the carbon water filter<br />
9 Preparing the unit for use<br />
9 Setting the clock time<br />
10 Setting the programmed time<br />
11 Brewing Options<br />
12 Brewing <strong>Instructions</strong><br />
13 Cleaning <strong>Instructions</strong><br />
13 Serving<br />
13 Removing calcium buildup<br />
14 Troubleshooting<br />
14 Helpful Hints<br />
15 Warranty<br />
4
IMPORTANT SAFEGUARDS<br />
When using electrical appliances, consideration should always be given to basic<br />
safety precautions including the following:<br />
• Read all instructions.<br />
• Do not touch hot surfaces<br />
• Do not place on or near a hot gas or electric burner, or in a heated oven.<br />
• To disconnect, turn off; then remove plug from wall outlet.<br />
• Do not place cord, plugs, or brewer in water or any other liquid.<br />
• This appliance should not be used by children, and care should be taken<br />
when operated near children.<br />
• Unplug from outlet when not in use and before cleaning. Allow to cool before<br />
putting on or taking off parts and before cleaning the appliance.<br />
• Do not operate the coffee maker with a damaged cord or plug or after the<br />
coffee maker malfunctions or has been damaged in any manner. Please<br />
call 1-800-216-5775 to speak with the <strong>Viking</strong> Culinary Warranty and Service<br />
Center.<br />
• The use of an accessory not evaluated for use with this coffee maker may<br />
cause fire, electric shock, or other possible injury.<br />
• Do not use outdoors.<br />
• Do not let cord hang over edge of table or counter, or touch hot surfaces.<br />
• This coffee maker is for household use only; it is not intended or warranted for<br />
commercial use.<br />
• Do not use coffee maker for anything other than its intended use.<br />
• Do not remove filter basket while brewing.<br />
• The carafe is designed for use with this coffee maker only. It must never be<br />
used on a range top or in a microwave.<br />
• Do not use a carafe with a cracked, loose, weakened or damaged handle.<br />
• Do not clean carafe with cleansers, steel wool pads, or other abrasive materials.<br />
• Allow brew basket to drain before removing to avoid scalding.<br />
• Using permanent filters with paper filters may cause the brew basket to clog<br />
or possibly overflow.<br />
• Screw lid securely onto carafe before brewing and one-half turn before<br />
serving any beverages.<br />
• To protect against fire, electrical shock and injury to persons, do not immerse<br />
cord, plug or appliance in water or liquid.<br />
• Any service to the unit should be performed by an authorized <strong>Viking</strong> Range<br />
Corporation service agent or representative.<br />
• Do not pour liquids, other than water and/or descaling solution specified in<br />
this manual, into water reservoir.<br />
5
Using Your <strong>Viking</strong><br />
<strong>Coffee</strong> <strong>Maker</strong><br />
6
Hot Water<br />
Bypass<br />
Intuitive<br />
Programmable<br />
Display<br />
7<br />
Convenient<br />
Removable<br />
Water Reservoir<br />
Removable<br />
Brew Basket<br />
SureTemp<br />
Brewing System<br />
12 cup Stainless<br />
Steel Thermal<br />
Carafe
SAVE THESE INSTRUCTIONS<br />
Installing the carbon water filter<br />
Detach the filter holder and remove the carbon water filter from the packaging in<br />
water reservoir. Soak the filter in cold water for approximately 10 minutes (this is<br />
only necessary with new filters being used for the first time). Place the carbon water<br />
filter inside the holder and secure. Place the filter holder inside the water reservoir<br />
in the molded, circular retainer. The carbon water filter should be changed every<br />
3 months for optimal taste or more frequently (as specific conditions may dictate.)<br />
Carbon water filters are available from your local dealer, service center (1-800-<br />
216-5775), or at vikingrange.com.<br />
The first letter of each month is molded on the filter holder, and may be selected<br />
as a reminder to change the carbon filter when required depending on the<br />
hardness of the water. See illustration below.<br />
The filter should be used at all times to enhance the flavor of your coffee, as<br />
well as remove some impurities from water. The filter may need to be changed<br />
more frequently when used in areas with hard water. Your panel will display “dcl”<br />
when descaling is needed. A clogged filter will slow down the flow of water and<br />
damage the unit.<br />
Filter Holder<br />
Carbon Filter<br />
Rotate for<br />
Selection<br />
8<br />
Removable<br />
Water Reservoir
Preparing the unit for use<br />
• Locate unit on a solid, level countertop near an electrical supply. Plug unit<br />
into electrical outlet. Place empty carafe on the designated deck, under<br />
spray head. Carafe lid must be securely closed for coffee maker to function<br />
properly.<br />
• The system must be primed only when the coffee maker is used for the<br />
first time. The following are the instructions for priming:<br />
• Remove the water reservoir on the right side of the coffee maker; fill with<br />
cold water to the max fill line. Replace water reservoir into the unit.<br />
• LCD will show “PRI” and flash to alert user unit must be primed.<br />
• Press both the DISP and PROG button simultaneously. Release and the<br />
pump will come on, approximately two cups of water will be pumped into<br />
the boiler and into the carafe. The carafe icon is on to indicate priming in<br />
progress.<br />
• The pump will automatically stop. The unit will go back to stand by mode.<br />
• Empty and clean carafe of any water.<br />
• You are now ready to begin brewing.<br />
• Brew only water the first time to thoroughly clean the unit before brewing<br />
coffee. You will notice the pump running intermittently.<br />
• The coffee maker will not properly brew if unit is not primed correctly.<br />
Setup <strong>Instructions</strong><br />
Please read these setup instructions before using this coffee maker.<br />
Failure to follow the instructions may result in injury or voiding of manufacturer’s<br />
warranty.<br />
Setting the clock time<br />
Plug coffee maker into electrical outlet. Press the Hour (H) and Minute (M) button<br />
simultaneously to activate the clock setting mode. Press Hour (H) button to set<br />
hour and Minute (M) button to set minute. Either button may be held down to<br />
advance rapidly. To confirm time press the Hour (H) and Minute (M) buttons<br />
simultaneously, release them, press the ON/OFF button, or leave with no key<br />
touch for 30 seconds.<br />
9
Setting the programmed time<br />
• Press the PROG (Program) button once until the PROG display appears.<br />
• Press the CUPS button until the desired number of cups is reached.<br />
• Press the PROG button once until the Bell icon is displayed.<br />
• Press Hour (H) or Minute (M) button to set the desired program time. If buttons<br />
are held down this will cause fast advance of hour and minute display.<br />
• Press the PROG button again, bell icon on and PROG icon off. Hour and<br />
Minute display will go back to clock display.<br />
• The Bell icon will be displayed to indicate program mode has been<br />
activated.<br />
• When this time is reached, the heater will heat the water, the pump will start<br />
to cycle, and brewing automatically begins at the designated time.<br />
• To discontinue the program feature, simply press the PROG button until the<br />
Bell icon disappears.<br />
• The clock program time must be reprogrammed after power is lost, due to a<br />
power outage, or being unplugged.<br />
Program Icon<br />
Icon is lit when PROG time<br />
is shown for setting program<br />
time<br />
Cup Select Icon<br />
Number of cups to be<br />
brewed (4-12 Cups)<br />
Hour Display/Clock Display<br />
Clock and Program Time<br />
Minute Display/Cup Select 4-12<br />
On/Off<br />
Note: If icons continue to blink, the parts are not properly installed and must be removed and properly<br />
replaced before brewing begins.<br />
10<br />
Brew<br />
Bell Icon<br />
Unit is programmed to brew at set time<br />
Program<br />
Water Reservoir Icon<br />
On: Water is heating<br />
Flashing: Water reservoir<br />
is not filled, properly installed,<br />
or unit may need to be descaled<br />
Brew Basket Icon<br />
Flashing: Brew basket is not<br />
properly installed<br />
Brew Icon<br />
On: <strong>Coffee</strong> <strong>Maker</strong> is now brewing
Brewing Options<br />
1Cup Select may be used for cups<br />
4-12. Cup size is approximately<br />
5 oz.<br />
2<br />
3<br />
4<br />
The Reservoir icon will flash when<br />
the water reservoir is either empty<br />
or not properly installed. If coffee<br />
maker runs out of water while<br />
brewing, fill reservoir, replace<br />
and press ON/OFF button to set<br />
remaining cups to be brewed. Press<br />
BREW button to continue brewing.<br />
Hot tea and hot water may also be brewed. Firmly seat the knob<br />
on the top of the unit to the desired setting. The Hot Water<br />
setting bypasses the filter basket. The tea basket attached to<br />
head of carafe may be used for tea making. Tea<br />
bags or leaves may<br />
be inserted into<br />
the optional basket<br />
attached to the head<br />
of the carafe. When<br />
using the tea basket,<br />
brew only four to ten<br />
cups.<br />
BrewBreak stops the coffee flow from the brew basket into<br />
the carafe for a short period. When the carafe is removed,<br />
BrewBreak may be used to pour a cup of coffee before the<br />
whole carafe is brewed. The carafe must be replaced within<br />
20 seconds after removal or coffee will overflow in the brew<br />
basket. The carafe must be replaced under the spray head for<br />
continued brewing.<br />
Note: BrewBreak is not functional during the hot water<br />
bypass feature.<br />
Please note: Pump will cycle on and off during brewing cycle.<br />
11
Brewing <strong>Instructions</strong><br />
1Remove the water reservoir on the right<br />
side of the coffee maker; fill with water to<br />
the “max” fill line. Replace water reservoir<br />
into the unit.<br />
2<br />
3<br />
Remove the brew basket from the<br />
coffee maker. Insert the proper filter.<br />
The permanent or #4 paper cone<br />
filter may be used. Add coffee. Do<br />
not use a paper filter and permanent<br />
filter simultaneously, this may cause an<br />
overflow.<br />
Replace the brew basket into the unit. Make<br />
sure the carafe lid is securely screwed on and<br />
place the empty carafe under the spray head.<br />
4Press ON/OFF then the cup SELECT button<br />
to select the number of cups to be brewed.<br />
Press the BREW button to begin brewing. The<br />
unit will begin heating and please allow several<br />
minutes before brewing begins. When brewing<br />
is complete, the unit will turn off and only the<br />
clock will display.<br />
12
Cleaning <strong>Instructions</strong><br />
Hand wash the carafe, removable water reservoir, and filter basket in hot, soapy<br />
water. Dry thoroughly. When cleaning carafe, user should thoroughly rinse both<br />
the carafe and the carafe lid. Wipe unit with a damp cloth and avoid using harsh<br />
cleaners. Placing parts/accessories in the dishwasher is not recommended.<br />
Serving<br />
For serving coffee, from the closed l position half turn<br />
counterclockwise to the open m position on the carafe lid.<br />
Close carafe by turning clockwise to the closed l position<br />
to allow heat to stay contained. Turning the lid past the<br />
recommended open position may result in over pour or spill.<br />
Caution, will be very hot, steam may rise when opening.<br />
Removing calcium build-up<br />
Calcium deposits from water may build-up in your <strong>Viking</strong> <strong>Professional</strong> <strong>Coffee</strong><br />
<strong>Maker</strong> and should be removed to maintain brewing efficiency and coffee quality.<br />
As a rule, calcium build-up should be removed every two to three months. Local<br />
water conditions or more frequent use of coffee maker may require more frequent<br />
calcium removal.<br />
• Fill carafe one quarter full of vinegar, and then add cold tap water to the<br />
top. Pour the water/vinegar mixture into water reservoir. Replace reservoir<br />
into unit.<br />
• Place the empty carafe under the spray head and follow regular brewing<br />
instructions. After the water/vinegar mixture has been cycled through, turn<br />
the machine off.<br />
• Rinse by cycling two to three more carafes of plain cold tap water or until<br />
vinegar is gone.<br />
• Do not pour any liquid other than cold tap water with vinegar into water<br />
reservoir while cleaning.<br />
When “dcl” is shown on screen, descaling must be<br />
performed. Failure to descale may damage unit and<br />
void warranty.<br />
Once decalcification has been completed and coffee maker has been flushed with clear<br />
water, the flashing “dcl” can be removed from the display by pressing and holding the<br />
BREW button.<br />
13
Troubleshooting<br />
• If water reservoir icon is flashing the unit may need to be descaled. See page 13.<br />
• The water or brew basket icon appears and flashes. The flashing unit indicates<br />
which part is not properly installed. Detach and reattach to unit.<br />
• The overflow of water may occur if the user a) uses more than<br />
one paper filter b) uses too finely ground coffee, c) uses a permanent<br />
filter with a paper filter, d) unit is not properly cleaned,<br />
e) carafe has been removed during brewing (see page 11). If this<br />
happens, never remove the filter basket while brewing. Turn the<br />
machine off and unplug. Wait 15 minutes for the unit to cool and<br />
remove the filter basket and empty the grounds and filters.<br />
• If the coffee maker is left in areas that may be subjected to freezing temperatures<br />
(such as vacation home), before brewing make sure the unit is brought to a<br />
temperature above freezing for at least 1 hour.<br />
• When the coffee maker is used in areas of high altitudes, the water temperature<br />
will be less than normal. The temperature of the water will decrease as the altitude<br />
increases.<br />
• If “dcl” is shown on the display, please descale unit before continuing operation.<br />
See page 13.<br />
Helpful Hints<br />
• Rinse the carafe with hot water before use. This heats the carafe and will help<br />
keep the coffee warmer longer.<br />
• Never use more than 16 tablespoons (3 oz./84g by weight) of coffee in the<br />
paper or permanent filter. This may cause overflow in the brew basket.<br />
• Always fill the water reservoir to the “MAX” fill line before brewing.<br />
• When using the Hot Water bypass feature and tea basket for tea-making, users<br />
may need to purchase a separate carafe.<br />
14
One-Year Full Warranty<br />
<strong>Viking</strong> <strong>Professional</strong> <strong>Coffee</strong> <strong>Maker</strong>s/attachments/accessories are warranted to<br />
be free from defective materials or workmanship in normal household use for a<br />
period of one year (12 months) from the date of original retail purchase. <strong>Viking</strong><br />
Range Corporation, warrantor, agrees to repair or replace, at its option, any coffee<br />
maker which fails or is found to be defective during the warranty period.<br />
Painted and decorative items are warranted to be free from defective materials<br />
or workmanship for a period of ninety (90) days from the date of original retail<br />
purchase. Any defects must be reported to <strong>Viking</strong> Range Corporation (1-800-<br />
216-5775) within ninety (90) days from date of original purchase. <strong>Viking</strong> Range<br />
Corporation uses the most-up-to-date processes and best materials available to<br />
produce all color finishes. However, slight color variation between units may be<br />
noticed because of differences in kitchen lighting, product locations, and other<br />
factors.<br />
This warranty shall apply to products purchased and located only in the United<br />
States. Products must be purchased in the country where service is requested.<br />
Warranty labor shall be performed by an authorized <strong>Viking</strong> Range Corporation<br />
service agency or representative. Warranty shall not apply to damage resulting<br />
from abuse, accident, natural disaster, and loss of electrical power to the product<br />
for any reason, alteration, outdoor use, improper operation or repair or service of<br />
the product by anyone other than an authorized <strong>Viking</strong> Range Corporation service<br />
agency or representative. Warranty shall not apply for service failures resulting<br />
from the use of water having high mineral content, and/or any liquid other than<br />
water which is placed in the water reservoir and cycled through the system. This<br />
warranty does not apply to commercial usage. Warrantor is not responsible for<br />
consequential or incidental damage whether arising out of breach of warranty,<br />
breach of contract, or otherwise. Some jurisdictions do not allow the exclusion<br />
or limitation of incidental or consequential damages, so the above limitation or<br />
exclusion may not apply to you.<br />
The return of the Owner Registration Card is not a condition of warranty coverage.<br />
You should, however, return the Owner Registration Card so that <strong>Viking</strong> Range<br />
Corporation may contact you should any question of safety arise which should<br />
affect you.<br />
To arrange for (warranty) service, simply contact <strong>Viking</strong> Range Corporation by<br />
calling 1-800-216-5775, 8:30 A.M. to 5:00 P.M. (Central Standard Time) Monday<br />
thru Friday. If you prefer, you may write: <strong>Viking</strong> Range Corporation, P.O. Box 956,<br />
Greenwood, Mississippi (MS) 38935. The following information will be required:<br />
date of original purchase (a copy of sale receipt), model and serial numbers<br />
(located on bottom of unit), and a brief description of what has occurred with the<br />
product.<br />
15
<strong>Viking</strong> Range Corporation<br />
111 Front Street<br />
Greenwood, Mississippi 38930 USA<br />
(662) 455-1200<br />
For product information,<br />
call 1-888-VIKING1 (845-4641)<br />
or visit the <strong>Viking</strong> website at<br />
vikingrange.com<br />
© 2011, <strong>Viking</strong> Range Corporation<br />
Specifications subject to change without notice.<br />
F20474a