2 The OMR 200S optical mark reader - Datawin Gmbh
2 The OMR 200S optical mark reader - Datawin Gmbh
2 The OMR 200S optical mark reader - Datawin Gmbh
Create successful ePaper yourself
Turn your PDF publications into a flip-book with our unique Google optimized e-Paper software.
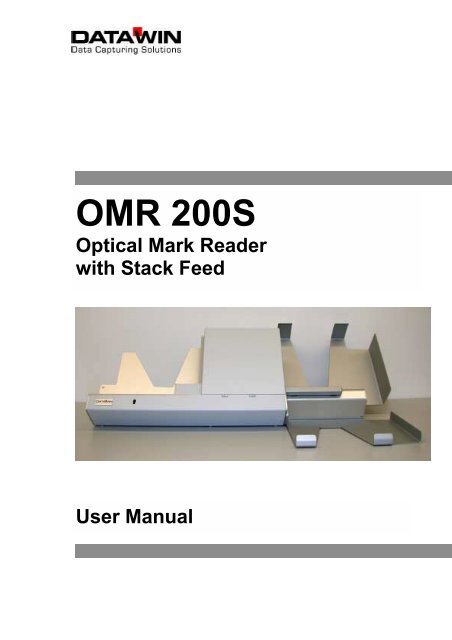
<strong>OMR</strong> <strong>200S</strong><br />
Optical Mark Reader<br />
with Stack Feed<br />
User Manual
Publisher:<br />
DATAWIN GmbH<br />
Etzstraße 37<br />
D-84030 Ergolding<br />
Tel. : + 49 (0)871-43 05 99 0<br />
Fax: + 49 (0)871-43 05 99 29<br />
E-Mail: service@datawin.de<br />
Web: http://www.datawin.de<br />
Printed in Germany<br />
Subject to alteration<br />
Windows is a registered trade<strong>mark</strong> of the Microsoft Corporation.<br />
Copyright © DATAWIN GmbH<br />
All rights reserved<br />
This manual is the intellectual property of DATAWIN GmbH.<br />
Unauthorized use, duplication or distribution are prohibited.<br />
Any reproduction of the contents of this manual, in whole or in part, without written permission of DATAWIN<br />
GmbH is forbidden.<br />
Edition October 2006/1.2<br />
DATAWIN GmbH <strong>OMR</strong> <strong>200S</strong> – User Manual 2
Table of Contents<br />
1 Introduction ....................................................................................................1-1<br />
1.1 About this manual.............................................................................................1-1<br />
1.1.1 Typographical notes .........................................................................................1-1<br />
1.2 Information about unpacking the <strong>mark</strong> <strong>reader</strong>...................................................1-2<br />
1.2.1 Unpacking the optional sorting tray...................................................................1-3<br />
1.2.2 Scope of the delivery ........................................................................................1-4<br />
1.3 Device related safety information......................................................................1-5<br />
1.3.1 Conformity ........................................................................................................1-5<br />
1.3.2 Precautionary measures for transportation, storage and installation.................1-5<br />
1.3.3 Selection of the work site..................................................................................1-5<br />
2 <strong>The</strong> <strong>OMR</strong> <strong>200S</strong> <strong>optical</strong> <strong>mark</strong> <strong>reader</strong>...............................................................2-1<br />
2.1 Functional components.....................................................................................2-1<br />
2.2 Document processing – from intake to output...................................................2-3<br />
2.2.1 Automatic document intake...............................................................................2-3<br />
2.2.2 Transport path ..................................................................................................2-4<br />
2.2.3 Read stations ...................................................................................................2-4<br />
2.2.4 Document output ..............................................................................................2-5<br />
2.2.5 Optional sorter..................................................................................................2-5<br />
2.2.6 Optional printer.................................................................................................2-6<br />
3 Assembling and installing the <strong>reader</strong> ...........................................................3-1<br />
3.1 Assembling the standard output tray.................................................................3-1<br />
3.2 Assembling the optional sorter..........................................................................3-2<br />
3.3 Mains connection data......................................................................................3-3<br />
3.4 Data interface ...................................................................................................3-3<br />
3.5 PC connection ..................................................................................................3-4<br />
3.5.1 Minimum requirements on the PC.....................................................................3-4<br />
3.5.2 Connecting the <strong>reader</strong> and the PC....................................................................3-4<br />
3.6 Software ...........................................................................................................3-5<br />
3.6.1 Interface firmware.............................................................................................3-5<br />
3.6.2 Read software ..................................................................................................3-5<br />
3.7 Testing the read functions ................................................................................3-5<br />
3.8 De-installing the <strong>reader</strong>.....................................................................................3-5<br />
4 Operation of the <strong>reader</strong> ..................................................................................4-1<br />
4.1 Loading the stack of documents .......................................................................4-1<br />
4.2 Starting the read process..................................................................................4-1<br />
4.2.1 Display of the operating status..........................................................................4-2<br />
4.3 Eliminating document jams...............................................................................4-3<br />
4.3.1 Opening and closing the scanner cover............................................................4-3<br />
4.3.2 Removing documents.......................................................................................4-4<br />
4.4 Trouble shooting...............................................................................................4-5<br />
5 Setting, adjusting and cleaning the <strong>reader</strong>...................................................5-1<br />
5.1 Setting the <strong>OMR</strong> read head ..............................................................................5-1<br />
DATAWIN GmbH <strong>OMR</strong> <strong>200S</strong> – User Manual 3
5.1.1 Basic setting "standard document" ...................................................................5-1<br />
5.1.2 Adjusting the lateral setting of the <strong>OMR</strong> read head...........................................5-2<br />
5.1.3 Adjusting the lateral setting of the lower <strong>OMR</strong> read head (option) ....................5-3<br />
5.1.4 Effect of the read head setting on the scanning result.......................................5-4<br />
5.2 Setting the bar code read head.........................................................................5-5<br />
5.3 Replacing the disks of the feed rollers ..............................................................5-6<br />
5.4 Replacing the rings of the intake rollers ............................................................5-6<br />
5.5 Setting the document isolation..........................................................................5-7<br />
5.6 Cleaning the document transport path ..............................................................5-9<br />
5.7 Replacing ink cartridges in the optional printer................................................5-10<br />
5.8 General information on cleaning the <strong>OMR</strong> <strong>200S</strong>.............................................5-11<br />
5.8.1 Cleaning the transport rollers..........................................................................5-11<br />
5.8.2 Cleaning the light barriers...............................................................................5-12<br />
5.8.3 Cleaning the read windows of the <strong>OMR</strong> and of the bar code read heads........5-12<br />
5.8.4 Cleaning the housing surface .........................................................................5-12<br />
6 Requirements on the documents ..................................................................6-1<br />
6.1 External characteristics.....................................................................................6-1<br />
6.2 Prescriptions and recommendations concerning <strong>OMR</strong> <strong>mark</strong>s...........................6-2<br />
6.2.1 <strong>The</strong> <strong>mark</strong> field...................................................................................................6-2<br />
6.2.2 Correct <strong>mark</strong>s...................................................................................................6-3<br />
6.2.3 Marking errors ..................................................................................................6-3<br />
6.2.4 Reliable <strong>mark</strong>ing instruments............................................................................6-4<br />
6.3 DATAWIN <strong>OMR</strong> document specifications.........................................................6-5<br />
6.3.1 Standard document ..........................................................................................6-5<br />
6.3.2 Scanning window..............................................................................................6-7<br />
6.3.3 Bar codes labels and imprints...........................................................................6-8<br />
6.3.4 Permissible document colors for red light and infrared light scanning ...............6-9<br />
DATAWIN GmbH <strong>OMR</strong> <strong>200S</strong> – User Manual 4
1 Introduction<br />
1.1 About this manual<br />
This manual is intended for users who are entrusted with the setting up,<br />
installation and operation of the <strong>OMR</strong> <strong>200S</strong> <strong>optical</strong> <strong>mark</strong> <strong>reader</strong> (<strong>OMR</strong> = Optical<br />
Mark Recognition).<br />
• Part 1 provides information about<br />
– unpacking and storing the device and device related safety information<br />
– connection to the mains source and authorization as well as<br />
– the requirements on the operating environment.<br />
• Part 2 informs you about the main mode of operation.<br />
• Part 3 describes<br />
– the assembly of the document output tray and<br />
– the installation of the <strong>OMR</strong> <strong>200S</strong> – from connection to the PC up to<br />
conducting a test run.<br />
• Part 4 provides tips and information to facilitate faultless operation of the<br />
<strong>OMR</strong> <strong>200S</strong>.<br />
• Part 5 shows how you can increase the reading reliability:<br />
– by mechanical adjustments in the <strong>reader</strong> and<br />
– by a simple cleaning procedure of the <strong>OMR</strong> <strong>200S</strong>.<br />
• Part 6 describes the requirements on the documents to be processed.<br />
1.1.1 Typographical notes<br />
Ị This symbol calls your attention to particular items that absolutely must be<br />
observed.<br />
♦ This symbol always appears before process sequences and it simultaneously<br />
indicates the chronological sequence.<br />
DATAWIN GmbH <strong>OMR</strong> <strong>200S</strong> – User Manual 1-1
1.2 Information about unpacking the <strong>mark</strong> <strong>reader</strong><br />
<strong>The</strong> two small boxes inside the<br />
cardboard box contain accessories<br />
and the document output tray.<br />
If the <strong>reader</strong> was delivered with the<br />
optional sorting tray instead of the<br />
simple output tray, the sorter is<br />
packed separately.<br />
♦ Grasp the <strong>reader</strong> by the filling<br />
materials mounted on the left and<br />
right sides of the device and lift it<br />
carefully, straight upwards out of<br />
the cardboard box without tilting it.<br />
<strong>The</strong> device weighs about 11 kg.<br />
♦ Set the <strong>reader</strong> down vertically on the intended work surface with the intake<br />
tray towards the top. Remove the two pieces of filling material on the sides,<br />
one after the other, and place the <strong>reader</strong> on its feet (round adjustable feet).<br />
Ị Caution!<br />
When setting up the <strong>reader</strong>, take care not to<br />
grasp the device at the top near the (closed)<br />
scanner cover nor at the intake tray; only<br />
grasp it at the back housing cover and below at<br />
the base plate.<br />
<strong>The</strong> scanner cover is not locked! It could swing open dangerously which<br />
might result in the device falling out of your hands onto the work surface!<br />
DATAWIN GmbH <strong>OMR</strong> <strong>200S</strong> – User Manual 1-2
♦ Remove the output tray from the packaging and place it to the right of the<br />
<strong>reader</strong> on the work desk.<br />
You can read about how to assemble the <strong>reader</strong> and the output tray<br />
in section 3.1.<br />
1.2.1 Unpacking the optional sorting tray<br />
<strong>The</strong> optional sorting tray with two<br />
output compartments is delivered in<br />
its own packaging.<br />
♦ Remove the upper piece of filling<br />
material.<br />
♦ Grasp the sorting tray at the<br />
ejection mechanics between the<br />
two sorting compartments and lift it<br />
out of the packaging. This device<br />
weighs 2.6 kg.<br />
Ị When lifting out the sorting tray, please do not grasp it at the upper cover of the<br />
sorting drive since this might cause misalignment of the ejection mechanics.<br />
♦<br />
DATAWIN GmbH <strong>OMR</strong> <strong>200S</strong> – User Manual 1-3
Place the sorting tray to the right of the <strong>reader</strong> on the work desk.<br />
You can read about how to assemble the <strong>reader</strong> and the output tray<br />
compartments in section 3.2.<br />
Ị Save the entire original packing for later transportation and shipping of the<br />
<strong>mark</strong> <strong>reader</strong> and the sorting tray.<br />
Devices that are sent back to suppliers for maintenance or repair work are<br />
always returned in their original boxes (possibly at cost of the sender).<br />
1.2.2 Scope of the delivery<br />
Check to make sure that the delivery is complete. All accessories required for the<br />
connection and operation of the <strong>OMR</strong> <strong>200S</strong> are included in the delivery:<br />
– mains cable<br />
– data cable<br />
– CD ROM with installation software and manual<br />
If something is missing or if damages occurred during transportation, please<br />
contact your supplier.<br />
DATAWIN GmbH <strong>OMR</strong> <strong>200S</strong> – User Manual 1-4
1.3 Device related safety information<br />
1.3.1 Conformity<br />
<strong>The</strong> <strong>OMR</strong> <strong>200S</strong> <strong>reader</strong> conforms to the CE standards and guidelines for data<br />
processing devices (design according to VDE 0805/5.90, interference<br />
suppression according to VDE 0871-B). It can be operated continuously under<br />
normal room conditions.<br />
1.3.2 Precautionary measures for transportation, storage and installation<br />
Please observe the following points regarding the transportation and installation<br />
of the <strong>reader</strong>:<br />
Transportation and storage<br />
Ị Transportation of the <strong>reader</strong> should only be effected in the original packing. It<br />
protects against shocks and inadmissible strains on the mechanical parts.<br />
Ị Please take the ambient conditions into consideration when transporting or<br />
storing the <strong>reader</strong>.<br />
Mains connection and authorization<br />
Ị <strong>The</strong> <strong>reader</strong> may only be operated when connected to a grounded shockproof<br />
outlet. Industrially operated mains networks often exhibit substantial, loaddependent<br />
interference peaks (powerful motors, electrical welding plants, etc.).<br />
<strong>The</strong> <strong>OMR</strong> <strong>200S</strong> <strong>reader</strong> is protected against such interference to a great extent,<br />
but if interference is present, try to use a network used for EDP or select a<br />
mains supply that is free of interference.<br />
Ị Never open the housing of the <strong>reader</strong> and never remove any housing parts.<br />
Ị Always turn the <strong>reader</strong> off via the mains switch before carrying out any<br />
adjustments or cleaning operations.<br />
Ị It is forbidden to effect changes or modifications to the <strong>reader</strong> that are not<br />
stated in this manual. <strong>The</strong> manufacturer of the device will decline any form of<br />
guarantee demand and will not accept any service clauses if it can be<br />
demonstrated that the <strong>reader</strong> was manipulated or damaged by unauthorized<br />
persons.<br />
1.3.3 Selection of the work site<br />
Take care to assure that the <strong>OMR</strong> <strong>200S</strong> is exposed to appropriate operating<br />
conditions. This is important in assuring faultless functioning of the <strong>reader</strong>:<br />
Ị <strong>The</strong> <strong>reader</strong> must stand on a stable, horizontal and level surface. Its dimensions<br />
are 550 x 330 x 220, with the optional sorting tray 900 x 600 x 220 (L x W x H<br />
in mm). <strong>The</strong> device weighs 11 kg, if equipped with the sorting tray it weighs<br />
13.6 kg. Vibrations at the work site should be avoided.<br />
DATAWIN GmbH <strong>OMR</strong> <strong>200S</strong> – User Manual 1-5
Ị <strong>The</strong> permissible ambient temperature for operation of the <strong>reader</strong> is +10° C to<br />
+40° C (50° F to 104° F). <strong>The</strong>refore, check to assure that the device is shielded<br />
against sources of heat such as direct sunlight, radiators, spotlights or other<br />
sources of light that produce heat.<br />
Sunlight or foreign sources of light applied to the scanning unit may also have<br />
an influence on the read sensitivity under unfavorable circumstances.<br />
Ị <strong>The</strong> permissible relative humidity amounts to 40 - 60%, condensation free.<br />
Ị It must be possible to lay all cables (mains cables and data cables) without<br />
buckling and without tensile stress. Take care to identify stumbling pitfalls.<br />
Ị <strong>The</strong> <strong>OMR</strong> <strong>200S</strong> corresponds to the requirements regarding interference<br />
emission and resistance to jamming (ESD) as specified by the CE guidelines.<br />
In order to assure complete interference immunity, shielded data cables with<br />
connector casings of metal or with metallic connector casings must be used.<br />
Ị Take care that the device is not operated in surroundings that are<br />
contaminated by dust or oil. Air currents caused e. g. by windows that are<br />
continually left open, by passageways or ventilators, may lead to the increased<br />
production of dust and this in turn may necessitate shorter maintenance and<br />
cleaning intervals.<br />
Ị <strong>The</strong> work site must afford sufficient space for the handling of the documents.<br />
DATAWIN GmbH <strong>OMR</strong> <strong>200S</strong> – User Manual 1-6
2 <strong>The</strong> <strong>OMR</strong> <strong>200S</strong> <strong>optical</strong> <strong>mark</strong> <strong>reader</strong><br />
This chapter provides information about the most important system components,<br />
their designations and arrangement and describes the basic mode of operation.<br />
<strong>The</strong> uniform designation employed here in the description of the individual<br />
components of the <strong>reader</strong> will simplify understanding of the reading procedure,<br />
the operation of the device and of the maintenance work.<br />
2.1 Functional components<br />
<strong>The</strong> <strong>OMR</strong> <strong>200S</strong> is an <strong>optical</strong> <strong>mark</strong> document <strong>reader</strong> with stack feed. It was<br />
designed as a high-capacity desk <strong>reader</strong> with the greatest possible operating<br />
ease for efficient data input. <strong>The</strong> configuration of the device permits the<br />
implementation of optionally up to two <strong>OMR</strong> read heads (scanning strips), two<br />
bar code read heads, an ink jet printer (HP ink jet printer) and a sorter with two<br />
sorting trays.<br />
<strong>The</strong> <strong>reader</strong> operates with a CPU of the latest generation that guarantees high<br />
reliability and speed for the data input directly from the document into the<br />
computer.<br />
<strong>The</strong> figure shows the <strong>OMR</strong> <strong>200S</strong> with the optional sorting tray compartments:<br />
1<br />
2<br />
3<br />
4<br />
1 Display of the operating status<br />
2 Document intake tray<br />
3 Automatic document intake<br />
4 Hinged upper scanner cover<br />
5 Document output tray or "good" compartment (with optional sorter)<br />
6 "Bad" compartment (with optional sorter)<br />
7 Ejection mechanics for the output tray compartments<br />
DATAWIN GmbH <strong>OMR</strong> <strong>200S</strong> – User Manual 2-1<br />
6<br />
5<br />
7
<strong>The</strong> figure shows the <strong>OMR</strong> <strong>200S</strong> with the scanner cover swung open with two<br />
<strong>OMR</strong> read heads, one bar code read head and a printer:<br />
8<br />
9<br />
8 Upper and lower (option double head) <strong>mark</strong> scanners (<strong>OMR</strong>)<br />
9 Bar code read head<br />
10 Printer<br />
10<br />
DATAWIN GmbH <strong>OMR</strong> <strong>200S</strong> – User Manual 2-2
2.2 Document processing – from intake to output<br />
2.2.1 Automatic document intake<br />
<strong>The</strong> documents are automatically taken from a stack on the document intake<br />
tray. <strong>The</strong> topmost sheet is thereby "pulled off". A special intake system consisting<br />
of two feed rollers, two intake rollers and a reverse belt, the so-called separating<br />
belt, assures the safe "isolation" of the documents. You can set the interval<br />
between the separating belt and the first intake roller according to the documents<br />
in use.<br />
<strong>The</strong> stack of documents lies – flush against the lower and right-hand edges –<br />
with its right lower corner beneath the feed rollers of the intake system. <strong>The</strong><br />
document intake tray can accommodate up to 100 sheets (DIN A4, 80 g/m²).<br />
<strong>The</strong> presence of documents in the intake tray is monitored by a light barrier, and<br />
the document isolation as well. After the last document has been processed, the<br />
read procedure is stopped.<br />
DATAWIN GmbH <strong>OMR</strong> <strong>200S</strong> – User Manual 2-3
2.2.2 Transport path<br />
<strong>The</strong> documents that are drawn in are moved successively across a number of<br />
transport rollers. <strong>The</strong> figure below shows the transport path of the documents<br />
(with opened scanner cover). <strong>The</strong> documents thereby pass the read stations<br />
(<strong>OMR</strong> read head/s and bar code read head/s) and the printer. <strong>The</strong> transport<br />
speed amounts to up to 1.2 m/s, the read rate lies at a max. of 6,000 DIN A4<br />
documents/hr.<br />
2.2.3 Read stations<br />
Depending upon the application, the<br />
<strong>OMR</strong> <strong>200S</strong> can be equipped with up<br />
to two bar code read heads and with<br />
up to two <strong>optical</strong> <strong>mark</strong> read heads<br />
(scanning strips for the front and<br />
back sides of the document). To<br />
protect against dirt, the read stations<br />
are covered by protective glass.<br />
<strong>The</strong> <strong>optical</strong> <strong>mark</strong> read heads,<br />
depending upon the requirements for<br />
usage, can be designed for<br />
document scanning with infrared or<br />
with red light. <strong>The</strong> scanning strips<br />
achieve a <strong>mark</strong> density of 40 tracks<br />
(1/5" interval) or 48 tracks (1/6"<br />
interval).<br />
<strong>The</strong> read heads are visible after the<br />
upper scanner cover is opened.<br />
Optional (lower)<br />
read station<br />
<strong>OMR</strong> read window Bar code<br />
read window<br />
Opened<br />
scanner cover<br />
DATAWIN GmbH <strong>OMR</strong> <strong>200S</strong> – User Manual 2-4
2.2.4 Document output<br />
<strong>The</strong> documents are deposited in the output tray after they have passed the read<br />
stations. If the read result is evaluated as "bad", the read procedure is<br />
interrupted. <strong>The</strong> faulty document can then be removed and the read procedure<br />
started anew.<br />
2.2.5 Optional sorter<br />
If a twofold sorter is connected (subsequent connection is also possible) the<br />
documents are deposited either in the "good" or the "bad" tray, depending upon<br />
the results of the read process. In this case the read process is not interrupted<br />
and a manual response is not required.<br />
DATAWIN GmbH <strong>OMR</strong> <strong>200S</strong> – User Manual 2-5
2.2.6 Optional printer<br />
<strong>The</strong> printer is designed for alphanumeric character output with a density of up to<br />
8 characters/25.4 mm and up to 50 characters per document. <strong>The</strong> printout is<br />
produced on the front side of the document. <strong>The</strong> mounting space is located<br />
between the last two transport rollers. <strong>The</strong> information to be printed, e. g. a<br />
document number or the designation of the processing procedure, is<br />
parameterized in the read software.<br />
Information on how to exchange ink cartridges is contained in section 5.7.<br />
DATAWIN GmbH <strong>OMR</strong> <strong>200S</strong> – User Manual 2-6
3 Assembling and installing the <strong>reader</strong><br />
This chapter describes how to assemble the <strong>reader</strong> and how to proceed with the<br />
installation - from connection to a host (PC) up to conducting a test run.<br />
3.1 Assembling the standard output tray<br />
♦ To attach the output tray to the <strong>reader</strong>, position it so that the two guide pins fit<br />
into the corresponding bore holes of the <strong>reader</strong>.<br />
Guide pins<br />
♦ First, screw in the upper countersunk head screw, then the lower one. <strong>The</strong>n<br />
tighten both screws.<br />
Now you can install the <strong>reader</strong> (see section 3.3).<br />
DATAWIN GmbH <strong>OMR</strong> <strong>200S</strong> – User Manual 3-1
3.2 Assembling the optional sorter<br />
Two guide pins on the support plate<br />
of the sorter assure that it will attach<br />
exactly to the <strong>reader</strong>. Connection to<br />
the <strong>reader</strong> control is established by<br />
means of an integrated connecting<br />
plug.<br />
Guide pins<br />
Ị In case your <strong>reader</strong> is already equipped with the standard output tray, you<br />
must of course remove this before mounting the sorting trays. (To do this,<br />
loosen the two countersunk head screws and detach the output tray from the<br />
<strong>reader</strong>, see section 3.1).<br />
♦ Position the sorter close to the <strong>reader</strong> so that the two guide pins fit into the<br />
corresponding bore holes and the connecting plug connects to the socket of<br />
the <strong>reader</strong>.<br />
♦ As described for the assembly of the standard output tray (see section 3.1)<br />
screw in first of all the upper countersunk head screw and then the lower one.<br />
Subsequently tighten both screws.<br />
Now you can install the <strong>reader</strong> (see the next section).<br />
Connecting plug<br />
DATAWIN GmbH <strong>OMR</strong> <strong>200S</strong> – User Manual 3-2
3.3 Mains connection data<br />
<strong>The</strong> power supply of the <strong>OMR</strong> <strong>200S</strong> is designed for the following voltage and<br />
frequency ranges:<br />
• Power supply: 230 V, 50 Hz (0,6 A)<br />
115 V, 60 Hz (1,2 A)<br />
• Current consumption: max. 100 W<br />
(with all options)<br />
Normally no special provisions or settings of the voltage supply are required for<br />
the operation of the <strong>OMR</strong> <strong>200S</strong>. However, check whether the existing mains<br />
voltage actually corresponds to the values on the type plate of the <strong>reader</strong>.<br />
3.4 Data interface<br />
<strong>The</strong> serial interface of the <strong>reader</strong> is executed as a 9-pin socket terminal strip. <strong>The</strong><br />
simplest connection is a "three-wire" connection without hardware handshake.<br />
Bridges on the side of the <strong>reader</strong> are not necessary. <strong>The</strong> basic parameterization<br />
of the <strong>reader</strong> supports this operating mode.<br />
Pin assignments<br />
Pin "three-wire" assignment complete assignment<br />
Pin 2 TxD TxD<br />
Pin 3 RxD RxD<br />
Pin 5 SGND GND<br />
Pin 6 DTR (+12 V are present after "power on")<br />
Pin 7 CTS<br />
Pin 8 RTS (+12 V are present after INIT)<br />
DATAWIN GmbH <strong>OMR</strong> <strong>200S</strong> – User Manual 3-3
3.5 PC connection<br />
3.5.1 Minimum requirements on the PC<br />
<strong>The</strong> minimum requirements on the PC can nowadays be fulfilled by every<br />
commercially available system. If the test program "<strong>OMR</strong>-Test" is to be installed<br />
(see the "<strong>OMR</strong> <strong>200S</strong> Technical Operating and Service Manual"), then a CD drive<br />
must be connected.<br />
3.5.2 Connecting the <strong>reader</strong> and the PC<br />
♦ Run down the operating system of the PC and turn the PC off.<br />
♦ Insert the mains plug into the connector of the <strong>reader</strong> and then the mains cable<br />
plug into a mains socket.<br />
♦ Connect the interface cable to an unoccupied RS232 connector of the PC and<br />
tighten the data plug with the respective screws.<br />
Mains switch<br />
Mains plug<br />
PC connector<br />
♦ Connect the data cable to the connecting socket of the <strong>reader</strong> and tighten the<br />
plug here as well.<br />
♦ Turn on the <strong>reader</strong> by means of the mains switch.<br />
♦ Turn on the PC and run up the operating system.<br />
DATAWIN GmbH <strong>OMR</strong> <strong>200S</strong> – User Manual 3-4
3.6 Software<br />
<strong>The</strong> control of the <strong>reader</strong> is effected by means of device-specific interface<br />
firmware and – via the connected PC – by means of read software designed<br />
according to the user application.<br />
3.6.1 Interface firmware<br />
<strong>The</strong> communication between the <strong>OMR</strong> <strong>200S</strong> and the PC is controlled via the<br />
interface firmware, consisting of<br />
• the standard interface and<br />
• the interpreter interface<br />
How to read out and set the interface parameters is described in separate<br />
manuals.<br />
3.6.2 Read software<br />
<strong>The</strong> read program itself defines the processing of the <strong>mark</strong>s and bar codes that<br />
are read out on the PC. This program is always adapted to the respective<br />
application of the <strong>OMR</strong> <strong>200S</strong>. How to install this software on your PC and how to<br />
work with it is described in a separate manual.<br />
3.7 Testing the read functions<br />
Upon completion of the installation steps the <strong>reader</strong> is ready for operation and<br />
you can test the reading of the <strong>mark</strong>ed documents. Check hereby if the <strong>reader</strong><br />
operates faultlessly and if all the functions are executed in accordance with the<br />
intended practical usage. Conduct the test only with documents that you will<br />
actually use in practical operation. In this regard, also note the document<br />
specifications contained in chapter 6.<br />
<strong>The</strong> special test program "<strong>OMR</strong>-Test" is also at your disposal for certain test and<br />
functional settings of the <strong>reader</strong>. <strong>The</strong> mode of operation of this test program is<br />
described in the manual "<strong>OMR</strong> <strong>200S</strong> Technical Operating and Service Manual".<br />
3.8 De-installing the <strong>reader</strong><br />
♦ De-install the read software on the PC if it is present.<br />
♦ Run down the operating system of the PC and turn off the PC.<br />
♦ Turn off the <strong>reader</strong>.<br />
♦ Loosen and unplug the connector of the data cable at the PC and at the<br />
<strong>reader</strong>.<br />
♦ Unplug the connector of the <strong>reader</strong> mains supply cable.<br />
DATAWIN GmbH <strong>OMR</strong> <strong>200S</strong> – User Manual 3-5
4 Operation of the <strong>reader</strong><br />
This chapter provides you with tips and information to assure faultless operation<br />
of the <strong>OMR</strong> <strong>200S</strong>.<br />
4.1 Loading the stack of documents<br />
After the <strong>reader</strong> is turned on, the document intake tray runs down to the lowest<br />
position so that documents can be inserted. This also happens after the last<br />
document has been processed.<br />
♦ Take the stack of documents (approx. 100 sheets), see to it that it is flush at<br />
the bottom and at the right side and insert it into the intake tray.<br />
4.2 Starting the read process<br />
♦ Start the read procedure from the PC.<br />
<strong>The</strong> stack of documents will automatically be raised to the proper intake height<br />
and the first document will be drawn in.<br />
Ị Since the documents are drawn in from the top, do not insert more documents<br />
while the read procedure is in progress, but wait until the last document has<br />
been processed.<br />
After the last document the read procedure will terminate autonomously and the<br />
intake tray will be run down to the bottom position.<br />
DATAWIN GmbH <strong>OMR</strong> <strong>200S</strong> – User Manual 4-1
4.2.1 Display of the operating status<br />
<strong>The</strong> following table shows the standard displays:<br />
LED<br />
Red Green<br />
Significance<br />
Off steady-burning Reader is ready for operation.<br />
steady-burning steady-burning Document has been drawn in, the data has not yet<br />
been called.<br />
Off steady-burning Document ejection, still ready for operation.<br />
Both LEDs blinking<br />
simultaneously<br />
Both LEDs blinking<br />
alternately<br />
Double document detected. LEDs blink until the<br />
document is removed, then "ready for operation".<br />
Transportation fault, document intake or ejection jam;<br />
LEDs continue blinking until the fault is eliminated<br />
(document removed); then "ready for operation".<br />
Ị It is possible that other operating modes or display statuses are parameterized<br />
by the application software. In that case, they are documented in a special<br />
software description.<br />
DATAWIN GmbH <strong>OMR</strong> <strong>200S</strong> – User Manual 4-2
4.3 Eliminating document jams<br />
<strong>The</strong> <strong>reader</strong> is equipped with light barriers that on the one hand monitor the<br />
position of the documents and on the other assure that the transport motor only<br />
starts when a document is actually lying positioned correctly on the document<br />
guide.<br />
<strong>The</strong> light barriers monitor the faultless feed of the documents, their correct<br />
separation and they prevent two documents from being drawn in at the same<br />
time.<br />
When a document gets jammed in the paper pathway during transportation, this<br />
is detected by the missing presence of the document at the corresponding light<br />
barrier and the read procedure is interrupted.<br />
4.3.1 Opening and closing the scanner cover<br />
<strong>The</strong> scanner cover must only be opened in case of a document jam, to clean the<br />
read stations or for adjustment operations:<br />
♦ Open the scanner cover by pushing lightly at the upper end of the document<br />
intake. Carefully swing the cover on the hinge towards the front until it lies on<br />
the work desk.<br />
♦ To close it again, lift the cover towards the front and then swing it towards the<br />
back until you hear that the guide pin of the base plate has latched into place.<br />
Ị When closing the cover, please do not allow it to fall backwards onto the base<br />
plate.<br />
DATAWIN GmbH <strong>OMR</strong> <strong>200S</strong> – User Manual 4-3
4.3.2 Removing documents<br />
♦ Open the scanner cover and check to determine the reason for the document<br />
jam (e. g. wrinkled document, dog-ears, poorly glued bar code label).<br />
♦ Replace in the intake tray the documents caught in the jam and possibly any<br />
other documents to be fed in and restart the read procedure.<br />
DATAWIN GmbH <strong>OMR</strong> <strong>200S</strong> – User Manual 4-4
4.4 Trouble shooting<br />
Problems that may possibly arise are listed in the following table. <strong>The</strong> measures<br />
described often help to eliminate the errors.<br />
Read errors<br />
Problem Measure<br />
Recognition of the <strong>mark</strong>s is becoming<br />
increasingly poorer<br />
Marks are partially not recognized,<br />
especially at the beginning and/or end of<br />
the document<br />
Marks are recognized at places where<br />
there are no <strong>mark</strong>s, especially at the<br />
beginning and/or end of the document<br />
Document transport<br />
♦ Check if the scanner is dirty.<br />
If necessary, clean the covers<br />
(protective glass covers) of the read<br />
heads<br />
(see section 5.6).<br />
♦ Check if the setting for the scanning<br />
height is correct or if it possibly should<br />
be adjusted<br />
(see section 5.1).<br />
♦ Check if the edges of the documents are<br />
straight.<br />
♦ Check if the transport rollers are dirty<br />
(see section 5.6).<br />
♦ Check if the edges of the documents are<br />
straight.<br />
♦ Check if the transport rollers are dirty<br />
(see section 5.6).<br />
No documents are drawn in ♦ Open the scanner cover and check the<br />
transport path. Remove any foreign<br />
objects without force.<br />
♦ Smooth out the document and flatten<br />
down dog-ears if applicable.<br />
♦ Check if bar code labels are not properly<br />
glued or if they are turned up at the<br />
corners.<br />
♦ Check whether the application software<br />
is running. Is the feed-in command from<br />
the PC missing or was the data of a<br />
document previously read not called?<br />
♦ Turn the <strong>reader</strong> off and after about<br />
3 sec. turn it on again. Start the PC<br />
again according to the software<br />
description.<br />
<strong>The</strong> document is drawn in but is not<br />
scanned completely.<br />
<strong>The</strong> ejection behavior is not defined.<br />
♦ Check if the transport rollers are dirty<br />
(see section 5.6).<br />
♦ Contact your supplier if you are using<br />
documents that have clock <strong>mark</strong>s that<br />
are wider than those prescribed and that<br />
thus do not correspond to the document<br />
specification.<br />
DATAWIN GmbH <strong>OMR</strong> <strong>200S</strong> – User Manual 4-5
Document output<br />
Problem Measure<br />
<strong>The</strong> documents are drawn in correctly, the<br />
read data is transmitted to the PC, but the<br />
<strong>reader</strong> does not output the documents.<br />
Only after a document has been removed<br />
manually is the next document drawn in.<br />
If none of the measures described above<br />
have helped:<br />
♦ Clean all the light barriers in the<br />
transport path (see section 5.6).<br />
♦ Check if the interface cable is firmly<br />
connected.<br />
If these measures still do not remedy the<br />
situation please contact DATAWIN:<br />
Hotline: +49 17 33 87 45 27<br />
Fax: +49 871 43 05 99 29<br />
Email: service@datawin.de<br />
DATAWIN GmbH <strong>OMR</strong> <strong>200S</strong> – User Manual 4-6
5 Setting, adjusting and cleaning the <strong>reader</strong><br />
This chapter describes how you can set the read stations by means of simple<br />
mechanical adjustments to correspond to the documents to be read. Moreover,<br />
you will learn how to set the document isolation and how to clean the device<br />
without great effort to increase the read accuracy. For these operations you will<br />
need a cross-tip screwdriver (size 1, 300 mm) as well as two hexagon socket<br />
screw keys (1.5 and 2.5 mm). <strong>The</strong>se tools are included in the scope of delivery of<br />
the <strong>OMR</strong> <strong>200S</strong>.<br />
5.1 Setting the <strong>OMR</strong> read head<br />
In the manufacture and printing of <strong>mark</strong> documents a particular dimensional field<br />
must be exactly adhered to. Besides this, the clock <strong>mark</strong> track and the <strong>mark</strong>ing<br />
area must run exactly parallel to the edge of the document that is transported<br />
along the document stopper during the read process. On documents that are<br />
printed or cut askew, the clock <strong>mark</strong> track and the <strong>mark</strong>ing area are spread<br />
across the entire document outside of the dimensional field. <strong>The</strong>se deviations in<br />
dimension can be compensated within a certain tolerance range by means of a<br />
lateral “shifting” of the <strong>OMR</strong> scanning strip.<br />
5.1.1 Basic setting "standard document"<br />
<strong>The</strong> <strong>mark</strong> scanning is set at the factory to correspond to a "standard document".<br />
<strong>The</strong> table below shows the distances (in mm) based on a sample of 40 track<br />
scanning with <strong>mark</strong> spacing of 1/5". <strong>The</strong> dimensions A and H are decisive for the<br />
correct lateral setting of the <strong>OMR</strong> read head. When these dimensions, due to<br />
inaccurate printing or cutting of the documents, are smaller or larger (deviations<br />
max. -1 to +3 mm), compensation can be achieved by corresponding adjustment<br />
Document stopper<br />
min. norm. max.<br />
A 13.97<br />
B 5.08<br />
C 10<br />
D 1 4<br />
E 1.5<br />
F 3.0<br />
G 10<br />
H 7.62<br />
I 5.08<br />
DATAWIN GmbH <strong>OMR</strong> <strong>200S</strong> – User Manual 5-1
<strong>The</strong> read head must be adjusted when <strong>mark</strong>s on the document (even quite solid<br />
<strong>mark</strong>s) that do not fill out the entire width of the <strong>mark</strong> field, are not scanned at all<br />
or are only scanned in an inaccurate manner. It is also typical that <strong>mark</strong>s are<br />
recognized although they are actually too short or are situated clearly off-center<br />
in the <strong>mark</strong> field.<br />
5.1.2 Adjusting the lateral setting of the <strong>OMR</strong> read head<br />
♦ Open the scanner cover.<br />
On the front side of the scanner cover there is an opening for the setting screw<br />
of the scanning strip:<br />
<strong>The</strong> position at which the document stopper is located during the read process<br />
is designated by a reference line on the base plate of the read head.<br />
♦ Insert the hexagon socket screw key into the opening and turn it<br />
– clockwise: the scanning strip is set further away from the edge of the<br />
document (edge with the clock <strong>mark</strong>), that is, away from the reference line.<br />
– counter-clockwise: the scanning strip is set closer to the edge of the<br />
document (edge with the clock <strong>mark</strong>), that is, closer to the reference line.<br />
With one rotation of the hexagon socket screw key the scanning strip is shifted<br />
by 0.5 mm in the respective rotational direction. Additional information about<br />
DATAWIN GmbH <strong>OMR</strong> <strong>200S</strong> – User Manual 5-2
adjusting the scanning strip is to be found in section 5.1.4 “Effect of the read<br />
head setting on the scanning result”.<br />
♦ Subsequently conduct a test run with original documents to check the setting of<br />
the read head.<br />
5.1.3 Adjusting the lateral setting of the lower <strong>OMR</strong> read head (option)<br />
♦ Open the scanner cover.<br />
At the front of the lower scanner cover there is also an opening for the setting<br />
screw for the adjustment of the scanning strip:<br />
♦ Insert the hexagon socket screw key into the opening and turn it<br />
– clockwise: the scanning strip is set further away from the edge of the<br />
document (edge with the clock <strong>mark</strong>), that is, away from the reference line.<br />
– counter-clockwise: the scanning strip is set closer to the edge of the<br />
document (edge with the clock <strong>mark</strong>), that is, closer to the reference line.<br />
With one rotation of the hexagon socket screw key the scanning strip is shifted<br />
by 0.5 mm in the respective rotational direction. Additional information about<br />
adjusting the scanning strip is to be found in section 5.1.4 “Effect of the read<br />
head setting on the scanning result”.<br />
♦ Subsequently conduct a test run with original documents to check the setting of<br />
the read head.<br />
DATAWIN GmbH <strong>OMR</strong> <strong>200S</strong> – User Manual 5-3
5.1.4 Effect of the read head setting on the scanning result<br />
On the basis of examples of various <strong>mark</strong> types and <strong>mark</strong> positions the following<br />
table shows how the scanning result is dependent upon the lateral setting of the<br />
read head. <strong>The</strong> test points (examples 4, 5, 6, 7) are also to be found on the<br />
DATAWIN test document, with the aid of which you can quickly obtain information<br />
about the setting of the read head and accordingly correct the setting of the<br />
scanning strip.<br />
Marking examples:<br />
Scanning<br />
strip is set<br />
correctly.<br />
Interval from<br />
scanning strip to<br />
reference line<br />
too slight for<br />
document<br />
Comments on the <strong>mark</strong>ing Scanning<br />
Interval from<br />
scanning strip to<br />
reference line too<br />
large for<br />
document<br />
1 Correct Accurate Accurate Accurate<br />
2 Correct Accurate Accurate Accurate<br />
3 Correct Accurate No No<br />
4 Test point: middle Accurate No No<br />
5 Test point: lower edge No No Yes<br />
6 Test point: upper edge No Yes No<br />
7 Test point: upper & lower edges No Yes Yes<br />
8 Sloppy, bleeding <strong>mark</strong> Inaccurate No Inaccurate<br />
9 Bleeding <strong>mark</strong> Inaccurate Accurate Inaccurate<br />
10 Short, bleeding <strong>mark</strong><br />
(as with an old ball point pen)<br />
*)<br />
Clock <strong>mark</strong> track<br />
Document edge (reference line)<br />
Inaccurate No Accurate<br />
Ị A<br />
If the interval from the scanning strip to the reference line is too slight, enlarge<br />
the size of the interval by turning the hexagon socket screw key clockwise.<br />
Ị B<br />
If the interval from the scanning strip to the reference line is too large, reduce<br />
the size of the interval by turning the hexagon socket screw key counterclockwise<br />
DATAWIN GmbH <strong>OMR</strong> <strong>200S</strong> – User Manual 5-4<br />
A*<br />
B*
5.2 Setting the bar code read head<br />
To achieve proper recognition of the bar code, the bar code read head must pass<br />
over the code to be read - the middle of the code as far as this is possible - while<br />
the document is being transported.<br />
You can easily check the setting of the bar code read head and, if necessary,<br />
correct it:<br />
♦ Open the scanner cover.<br />
♦ Place one of the bar code documents to be processed on the scanning unit in<br />
such a manner that the edge on which the clock track is located lies flush along<br />
the reference line of the base plate. This reference line identifies the guiding<br />
line for the edge of the document during the read procedure.<br />
<strong>The</strong>re is an opening located next to the window of the bar code read head; the<br />
adjusting screw for the read head is behind this opening:<br />
Clock track<br />
Reference line<br />
Hexagon socket screw key<br />
Bar code read head<br />
♦ Insert the hexagon socket screw key into the bore hole and by turning the key,<br />
position the bar code read head above the middle of the bar code that is<br />
printed or glued onto the document.<br />
DATAWIN GmbH <strong>OMR</strong> <strong>200S</strong> – User Manual 5-5
5.3 Replacing the disks of the feed rollers<br />
During the course of longer operation, rough and dirty paper surfaces cause wear<br />
on the soft and securely gripping disks (silicone) of the two large feed rollers. You<br />
will notice this when the drawing-in behavior of the <strong>reader</strong> deteriorates. This is<br />
usually a sign that the feed disks have less than the permissible minimum<br />
diameter (28 mm Ø ).<br />
Each feed roller is equipped with three such disks; you can pull off the disks one<br />
after the other.<br />
♦ Open the scanner cover.<br />
♦ One after another, pull off toward the front the three individual disks of the first<br />
feed roller.<br />
♦ Mount the new disks one after another, pushing them backwards on the roller.<br />
♦ Replace the disks of the second feed roller in similar manner.<br />
Ị Check to assure that the new disks rotate properly and do not strike on<br />
the sides.<br />
5.4 Replacing the rings of the intake rollers<br />
<strong>The</strong> soft silicone rings of the intake rollers can also become dirty or show signs of<br />
wear during the course of longer operation. You will notice this when the drawingin<br />
behavior of the <strong>reader</strong> deteriorates. <strong>The</strong> first roller is equipped with one ring,<br />
the second roller with two rings. <strong>The</strong>y can be pulled off separately one after the<br />
other. <strong>The</strong> intake rollers are visible when the scanner cover is opened.<br />
♦ Open the scanner cover.<br />
♦ Pull the ring off the first intake roller towards the side.<br />
♦ Place the new ring onto the roller and take care to assure that the ring lies<br />
properly in the roller groove.<br />
♦ Also pull the two rings off the second intake roller, one after the other.<br />
♦ Place the two new rings onto the roller, one after the other, and take care to<br />
assure that each ring lies properly in its roller groove.<br />
Ị Check to assure that the new rings rotate properly and do not strike on<br />
the sides.<br />
DATAWIN GmbH <strong>OMR</strong> <strong>200S</strong> – User Manual 5-6
5.5 Setting the document isolation<br />
<strong>The</strong> document isolation is designed for a wide variety of paper qualities and<br />
surfaces and it thus operates very reliably. <strong>The</strong> two larger feed rollers by means<br />
of their turning, draw off the first sheet of paper from the stack of documents and<br />
lead it into the feed-in slot and then on to the intake rollers. <strong>The</strong> separating belt<br />
lying below the first intake roller moves slowly and contrary to the direction of the<br />
document; it brakes additional sheets if they are also drawn in and restrains<br />
them. <strong>The</strong> interval between the separating belt and the intake roller is adjustable.<br />
Feed rollers<br />
Normally the interval must only be corrected if the automatic intake unit does not<br />
function satisfactorily due to the thickness of the documents being processed.<br />
Before you adjust the separating belt because of unreliable drawing in of the<br />
documents, first check the interval between the belt and the rollers (see the next<br />
page):<br />
♦ Open the scanner cover.<br />
♦ First of all clean the feed rollers, the intake rollers and the separating belt with<br />
a cloth that is lightly saturated with spirits of wine and then test the intake<br />
behavior.<br />
Only in the event that you do not<br />
notice an improvement, take the<br />
following steps:<br />
♦ Take a document and insert it<br />
between the intake roller and the<br />
separating belt.<br />
Separating belt<br />
♦ Move the sheet of paper back and<br />
forth. It should be possible to move<br />
the sheet easily and smoothly<br />
without rubbing and it should be<br />
free of play.<br />
Intake rollers<br />
DATAWIN GmbH <strong>OMR</strong> <strong>200S</strong> – User Manual 5-7
If the result is not satisfactory, adjust the separating belt accordingly. To do this<br />
you will need a cross-tip screwdriver as tool.<br />
♦ If the sheet of paper can now be moved very easily, turn the setting screw (red<br />
arrow) in the clockwise direction until the setting has tightened. If it is too tight,<br />
turn the setting screw to the left.<br />
♦ Now to check the setting, attempt to push two sheets of paper between the<br />
intake roller and the separating belt. Strong resistance must be noticeable.<br />
<strong>The</strong> document isolation is then set correctly.<br />
Ị <strong>The</strong> error often occurs, that the interval between the roller and the belt is<br />
set too narrowly.<br />
DATAWIN GmbH <strong>OMR</strong> <strong>200S</strong> – User Manual 5-8
5.6 Cleaning the document transport path<br />
<strong>The</strong> <strong>OMR</strong> <strong>200S</strong> is insensitive to a great degree to the usual "office dust". Only in<br />
the case of very soiled documents or documents that have a rough surface may it<br />
be necessary during the course of longer operation to clean the paper path from<br />
the isolation of the documents up to the output tray.<br />
Among other things a vacuum cleaner equipped with a narrow nozzle should be<br />
available as tool. For this cleaning you do not need to loosen any screws.<br />
Tools: vacuum cleaner, cleaning brush, spirits of wine, cleaning cloth<br />
Ị When you are working with spirits of wine, be sure that there are no<br />
burning objects (cigarettes or similar) in the environment of the working<br />
place.<br />
♦ Turn off the <strong>reader</strong> and open the scanner cover.<br />
♦ Carefully clean the document transport path with the vacuum cleaner.<br />
Use the brush to loosen any stubborn, adhering dirt.<br />
♦ Clean the protective glass surfaces of the read stations using a lint-free<br />
cleaning cloth. If required, saturate it lightly beforehand with spirits of wine.<br />
♦ Also clean the transport rollers with a cloth lightly saturated with spirits of wine.<br />
DATAWIN GmbH <strong>OMR</strong> <strong>200S</strong> – User Manual 5-9
5.7 Replacing ink cartridges in the optional printer<br />
<strong>The</strong> printer is located on the right side of the paper pathway, immediately in front<br />
of the document output.<br />
A clip locks the installed ink cartridge in<br />
place in the printer.<br />
♦ Tilt the clip forwards and lift out the<br />
cartridge towards the top.<br />
♦ Place the new cartridge in the printer<br />
and tilt the clip backwards again.<br />
<strong>The</strong> printer is again ready for<br />
operation.<br />
Cartridge unlocked<br />
DATAWIN GmbH <strong>OMR</strong> <strong>200S</strong> – User Manual 5-10
5.8 General information on cleaning the <strong>OMR</strong> <strong>200S</strong><br />
DATAWIN document <strong>reader</strong>s are designed for ease of maintenance. Very few<br />
maintenance and service operations are necessary and these can be carried out<br />
to a great extent without tools. It is only hypothetically possible to specify<br />
cleaning cycles since soiling and also wear and tear of the individual components<br />
of the <strong>reader</strong> depend largely on the operating and ambient conditions of usage,<br />
such as<br />
– dust contents, humidity and flow of the ambient air,<br />
– abrasive properties of the document materials and printing,<br />
– general degree of soiling of the documents,<br />
– daily volume of documents processed,<br />
– weight of the documents.<br />
Cleaning cycles may be established based on empirical values gathered in the<br />
course of regular <strong>optical</strong> checks and from the cycles of read errors that require<br />
maintenance operations. For <strong>reader</strong>s that are used in conditions that are not<br />
extremely inclement, cleaning of the transport system should be effected after<br />
approximately 100,000 documents have been read.<br />
Even for devices that are not in regular operation, dust accumulates on the<br />
silicone rollers that is pressed and compacted during subsequent read processes<br />
and that then leads to smoothing and hardening of the surfaces.<br />
Ị Independent of the volume of documents processed, you should therefore<br />
clean the transport rollers regularly at least once a month.<br />
This routine cleaning requires about 5 minutes time; no special tools are needed.<br />
• Transport rollers and the read window are cleaned with<br />
– methylated spirits (or alcohol),<br />
– cotton swabs,<br />
– and a lint-free cloth.<br />
• Light barriers and transport slits should be blown out. To do this you can<br />
use the following<br />
– a compressed air can (available at photo shops) or<br />
– a vacuum cleaner with a narrow nozzle,<br />
(or, instead of these you can simply blow them out forcefully yourself!)<br />
• Housing surfaces and the surfaces traversed by the documents can best<br />
be cleaned with silicone-free hard wax from an automotive supplier.<br />
Ị When you are working with spirits of wine, be sure that there are no<br />
burning objects (cigarettes or similar) in the environment of the working<br />
place.<br />
5.8.1 Cleaning the transport rollers<br />
♦ Turn the <strong>reader</strong> off and open the scanner cover.<br />
♦ Using a cotton swab that has been saturated with spirits of wine (it may be<br />
DATAWIN GmbH <strong>OMR</strong> <strong>200S</strong> – User Manual 5-11
strongly saturated), clean the silicone rollers. If necessary, turn the double<br />
transport roller with your thumbs; all the other rollers will also turn accordingly.<br />
Change swabs as soon as they become soiled.<br />
Ị If you turn the transport roller by hand, please take care to assure that the<br />
cotton swab is not pulled in between the pressure roller and the silicone rollers.<br />
5.8.2 Cleaning the light barriers<br />
In general the light barriers are not very susceptible to soiling. However, in case<br />
you are using documents that are particularly affected by dust and produce<br />
rubbed-off particles, it may happen that such particles collect and they may<br />
unfortunately be deposited right in front of a light barrier.<br />
♦ Turn the <strong>reader</strong> off and open the scanner cover.<br />
♦ Clean the light barrier windows using a sturdy brush, compressed air or a<br />
vacuum cleaner (or simply a forceful breath of air).<br />
5.8.3 Cleaning the read windows of the <strong>OMR</strong> and of the bar code read heads<br />
♦ Turn the <strong>reader</strong> off and open the scanner cover.<br />
♦ Rub the read windows clean using a lint-free cloth (in case of persistent dirt,<br />
possibly saturate the cloth with spirits of wine). Take care to assure that all<br />
residues of correction fluids and glues have definitely been removed.<br />
5.8.4 Cleaning the housing surface<br />
♦ Use a brush or similar to free the surfaces of the <strong>reader</strong> housing from dust. In<br />
addition, long-term protection can be achieved if you apply silicone-free hard<br />
wax to the surfaces.<br />
<strong>The</strong> operating behavior of the <strong>reader</strong> will be positively influenced if you also<br />
polish<br />
– the guide plates in the scanner cover,<br />
– the document bed of the intake tray and<br />
– the document stoppers<br />
with silicone-free hard wax. Your <strong>reader</strong> was also treated with this wax before<br />
it was delivered.<br />
♦ If the surfaces of the document transport path no longer permit easy gliding of<br />
the documents because they have become soiled, you can optimize the route<br />
that the documents traverse by renewed polishing.<br />
Ị In carrying out these operations, be absolutely certain that the parts of the<br />
transportation mechanics (all rotating parts of the <strong>reader</strong>) do not come in<br />
contact with the wax. For safety sake, when polishing the surfaces that the<br />
documents pass across in areas near the read windows, cover the respective<br />
rollers with paper. If despite this, rollers come into contact with the wax, you<br />
must clean them again very carefully with spirits of wine.<br />
DATAWIN GmbH <strong>OMR</strong> <strong>200S</strong> – User Manual 5-12
6 Requirements on the documents<br />
This chapter describes the requirements on the documents to be processed and<br />
provides tips on the <strong>OMR</strong> <strong>mark</strong>s to ensure smooth operation of the <strong>OMR</strong> <strong>200S</strong>.<br />
6.1 External characteristics<br />
Good read results presuppose good quality of the documents to be processed.<br />
<strong>The</strong>refore, certain minimum requirements must be taken into consideration.<br />
Prerequisite for the accurate scanning of the <strong>mark</strong>s on the documents is a<br />
straight and unimpaired transportation of the documents through the reading<br />
stations.<br />
<strong>The</strong> external characteristics of the documents to be read are also important:<br />
Ị Do not place any wrinkled, rolled or folded documents into the <strong>reader</strong>.<br />
If necessary, smooth out the document beforehand and eliminate any dogears.<br />
Ị <strong>The</strong> use of correction fluids is forbidden!<br />
Nevertheless, in the event that a document was treated with correction fluid,<br />
please assure that the fluid has dried completely. Otherwise there is danger<br />
that dirt may pass into the transportation mechanism and into the scanning unit<br />
which could lead to reading inaccuracies.<br />
Ị Improperly glued bar code labels may also cause transportation disturbances.<br />
<strong>The</strong>refore, please press down the edges of the labels firmly.<br />
DATAWIN GmbH <strong>OMR</strong> <strong>200S</strong> – User Manual 6-1
6.2 Prescriptions and recommendations concerning<br />
<strong>OMR</strong> <strong>mark</strong>s<br />
6.2.1 <strong>The</strong> <strong>mark</strong> field<br />
Read track 2<br />
Mark field (print on the document)<br />
Shadow mask of the <strong>mark</strong> scanning<br />
Read track 1<br />
Scan window (theoretical)<br />
Clock <strong>mark</strong> (print on the document)<br />
Edge of the document<br />
Transportation direction<br />
<strong>The</strong> <strong>mark</strong> field identifies the position of the <strong>mark</strong>ing on the document. Where the<br />
scan window is positioned within the <strong>mark</strong> field is determined by<br />
– the grid size of the scanning established by the <strong>reader</strong><br />
(here 1/5" distance from one read track to the next read track)<br />
– the width of the clock <strong>mark</strong> (document design) and<br />
– the size and form of the scan mask (shadow mask)<br />
DATAWIN GmbH <strong>OMR</strong> <strong>200S</strong> – User Manual 6-2
6.2.2 Correct <strong>mark</strong>s<br />
A shadow mask with a diameter of 1 mm is used in the <strong>OMR</strong> <strong>200S</strong>. This insures<br />
the exact separation of the individual tracks and at the same time it enables the<br />
acquisition of <strong>mark</strong>ing crosses. Moreover, because of the scanning that strongly<br />
emphasizes the middle section, miscut documents, off-center <strong>mark</strong>s and <strong>mark</strong>s<br />
that protrude are compensated for by means of generous tolerances. However,<br />
for this it is prerequisite that the entire <strong>mark</strong> field is utilized for the <strong>mark</strong>s.<br />
Both the position and the size of the read window can be influenced to a great<br />
extent by means of the parameterization of the <strong>reader</strong> in the interface program.<br />
Ị As basic principle however, the following applies: a <strong>mark</strong> can be recognized<br />
only in the read window depicted above. <strong>The</strong>refore, the better that the <strong>mark</strong><br />
field is filled by the <strong>mark</strong> (bar, cross) across the entire length, the more<br />
accurately will this <strong>mark</strong> be recognized under unfavorable circumstances<br />
(unsteady document transport, documents cut or printed off straight). And also<br />
– the firmer the <strong>mark</strong> is, the more accurately can the automatic interference<br />
masking select a <strong>mark</strong> and distinguish it from surrounding document dirt.<br />
6.2.3 Marking errors<br />
Several typical <strong>mark</strong>ing errors are displayed here:<br />
Ị Continuous <strong>mark</strong>s are not permissible!<br />
A white interval of at least 1 mm must be maintained between the <strong>mark</strong>s.<br />
DATAWIN GmbH <strong>OMR</strong> <strong>200S</strong> – User Manual 6-3
6.2.4 Reliable <strong>mark</strong>ing instruments<br />
<strong>The</strong> table below shows which <strong>mark</strong>ing instruments are best suited for the<br />
respectively utilized signal (infrared/red light).<br />
Utilized Signal<br />
Marking instrument Infrared scanning Red light scanning<br />
Pencil HB very good very good<br />
Pencil H good good<br />
Pentel <strong>mark</strong>er useless very good<br />
Staedler 318 useless very good<br />
Ball point pen black dubious good<br />
Ball point pen blue useless good<br />
Ball point pen green useless good<br />
Ball point pen red useless useless<br />
Endorsing ink violet no signal dubious<br />
Endorsing ink blue no signal very good<br />
Toner * very good very good<br />
Printing ink * very good very good<br />
* for preprinted <strong>mark</strong>s, e. g. document type<br />
<strong>The</strong> clock track is always scanned with infrared light, independent of the signal<br />
utilized by the <strong>mark</strong> scanning.<br />
DATAWIN GmbH <strong>OMR</strong> <strong>200S</strong> – User Manual 6-4
6.3 DATAWIN <strong>OMR</strong> document specifications<br />
(Version 040615)<br />
6.3.1 Standard document<br />
Standard document 12 (16) tracks, spacing ¼"<br />
(All dimensions in mm)<br />
D<br />
B<br />
C<br />
norm.<br />
DATAWIN GmbH <strong>OMR</strong> <strong>200S</strong> – User Manual 6-5<br />
A<br />
A<br />
B<br />
C<br />
D<br />
6.35<br />
n x A<br />
6.35<br />
5.0<br />
Standard document 40 tracks, spacing 1/5"<br />
Standard document 16 (18) tracks, spacing 1/5"<br />
(All dimensions in mm)<br />
min. norm. max.<br />
A<br />
B<br />
C<br />
D<br />
E<br />
F<br />
G<br />
H<br />
I<br />
10<br />
1<br />
1.5 1 )<br />
10<br />
13.97 2 )<br />
5.08<br />
3.0<br />
7.62 2 )<br />
5.08<br />
4
Standard document 48 tracks, spacing 1/6"<br />
(All dimensions in mm)<br />
min. norm. max.<br />
DATAWIN GmbH <strong>OMR</strong> <strong>200S</strong> – User Manual 6-6<br />
A<br />
B<br />
C<br />
D<br />
E<br />
F<br />
G<br />
H<br />
I<br />
10<br />
1<br />
1.5 1 )<br />
10<br />
11.43 2 )<br />
4.23<br />
3.0<br />
8.89 2 )<br />
3.81<br />
1 ) Can be smaller for special coding techniques, according to the manufacturer.<br />
2 ) DATAWIN <strong>mark</strong> <strong>reader</strong>s permit a scanning shift of -1 +3 mm.<br />
However, the dimensions A and H must then deviate in the same direction and by the<br />
same values.<br />
Document quality<br />
Mechanical properties as per DIN 6723/6724<br />
Optical features: OCR quality as per DIN 66223<br />
PCS value for clock <strong>mark</strong>s: > 60%<br />
Document format<br />
(length in transport direction > width)<br />
Type of<br />
<strong>reader</strong><br />
Min. document<br />
(mm)<br />
Max. document<br />
(mm)<br />
4<br />
Paper weight (g/m 2 )<br />
As per DIN 19307<br />
<strong>OMR</strong> <strong>200S</strong> 150 x 100 305 x 230 80 - 140
6.3.2 Scanning window<br />
Mark field<br />
(document design)<br />
Spacer frame<br />
(not visible)<br />
<strong>The</strong>oretical scanning range<br />
Clock track<br />
Dimensions: A = min. 1.0 mm<br />
B = 1.0 mm<br />
C = min. 0.5 mm<br />
Marks (and readable print on<br />
documents) are recognized in the<br />
"theoretical scanning range"<br />
shown on the left.<br />
If no specific scanning procedures<br />
are used to mask black print (scan<br />
mode, window definition), it is<br />
recommended that no readable<br />
inscriptions and graphics be<br />
applied in the area of the displayed<br />
"spacer frame".<br />
<strong>The</strong> spacer frame is dimensioned<br />
in such a manner that minor deviations<br />
in document design, cut<br />
and transport are compensated.<br />
DATAWIN GmbH <strong>OMR</strong> <strong>200S</strong> – User Manual 6-7
6.3.3 Bar codes labels and imprints<br />
Dimension<br />
(s. sketch)<br />
A Distance to<br />
document end<br />
Designation Min. mm Max. mm Comment<br />
35 – Distance of last bar code module to<br />
document edge<br />
B White margin 10 – Area before the first and after the last<br />
bar code module that must be white<br />
or in blind print<br />
C Distance between<br />
2 bar code tracks<br />
D Distance to lower<br />
edge of the doc<br />
– <strong>OMR</strong> <strong>200S</strong><br />
11 55 Only for "double bar code" option.<br />
Greater distances on request.<br />
Please note: the distance requested<br />
by the customer is set in the factory<br />
and cannot be changed.<br />
Distance of the bar code module to<br />
the lower edge of the document.<br />
20 195<br />
<strong>The</strong> area of the clock <strong>mark</strong>s must<br />
always remain free!<br />
During the scanning of the bar code by the document <strong>reader</strong>, the bar code read<br />
head must be able to scan the whole bar code in at least one diagonal. <strong>The</strong>refore<br />
it is best in any case to print the bar code as high as possible in order e. g. to be<br />
able to compensate gluing inaccuracies.<br />
DATAWIN GmbH <strong>OMR</strong> <strong>200S</strong> – User Manual 6-8
6.3.4 Permissible document colors for red light and infrared light scanning<br />
Measurements with blind colors of the ink manufacturer "Zeller & Gmelin"<br />
(% specification corresponds to the blind color unwanted signal)<br />
Scanning: infrared light: 950 nm red light: 635 nm<br />
Print color Color no. Value<br />
%<br />
Comment Value<br />
%<br />
paper white < 1 < 1<br />
Comment<br />
yellow 63376 3 good 4 still good<br />
yellow 64400 3 good 4 still good<br />
yellow 64401 < 1 very good < 1 very good<br />
orange 63079 2 very good 4 good<br />
red 62429 2 very good < 1 very good<br />
red 63082 2 very good 4 still good<br />
red 63112 2 very good 4 still good<br />
red 65108 < 1 very good < 1 very good<br />
red 65204 < 1 very good 4 still good<br />
red 65205 2 very good 4 still good<br />
violet 63081 3 good 12 dubious<br />
blue 62432 3 good 44 useless<br />
blue 63893 2 very good 32 useless<br />
blue 65107 2 very good 16 poor<br />
blue-green 63892 3 good 44 useless<br />
blue-green 65109 < 1 very good 24 useless<br />
green 62431 3 good 48 useless<br />
green 63483 < 1 very good 44 useless<br />
green 63505 3 good 36 useless<br />
green 64513 3 good 80 useless<br />
yellow-green 63891 3 good 48 useless<br />
brown 62433 4 still good 16 poor<br />
brown shade<br />
(1 g/m 2 )<br />
brown shade<br />
(2 g/m 2 )<br />
18482 2 very good 24 useless<br />
18482 2 very good 40 useless<br />
<strong>The</strong> blind color "violet", classified under red light as "dubious" should be avoided<br />
if possible or only used after consultation with the manufacturer!<br />
DATAWIN GmbH <strong>OMR</strong> <strong>200S</strong> – User Manual 6-9


