Montagehinweise Mounting Instructions - BikerFactory
Montagehinweise Mounting Instructions - BikerFactory
Montagehinweise Mounting Instructions - BikerFactory

You also want an ePaper? Increase the reach of your titles
YUMPU automatically turns print PDFs into web optimized ePapers that Google loves.
!<br />
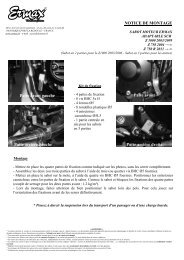
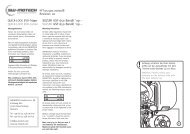
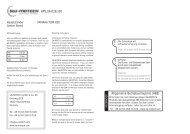
Achtung: Nach erfolgreicher Montage<br />
des Tankunterrings den Tankoberring<br />
aufsetzen und dessen zukünftige<br />
Position am Tankrucksack ermitteln<br />
und makieren. Anschließend an den<br />
gekennzeichneten Stellen mit einem<br />
geeigneten Bohrer (5,5 mm) Löcher<br />
bohren und den Tankoberring gemäß<br />
Anbauanleitung mit dem Tankrucksack<br />
und der vernieteten Verstärkungsplatte<br />
verschrauben.<br />
TRT.00.475.102<br />
7<br />
1<br />
!<br />
Note: After the tankring assembly is<br />
complete and mounted to the<br />
motorcycle, place the tankbag on top<br />
of the motorcycle on the desired<br />
position. While the tankbag is in place,<br />
mark the position of the four drilling<br />
points. Pierce the four holes with 5,5<br />
mm drill.<br />
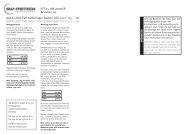
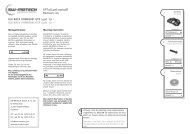
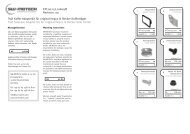
Nach erfolgreicher Montage des<br />
Tankoberrings am Tankrucksack die<br />
Zugleinen mit dem Verschlussbolzen<br />
verbinden und Überlänge entfernen.<br />
After the mounting of the tankbag is<br />
completed, tie the pull-cord on the<br />
lockbolt and trim the excess length.<br />
6mm<br />
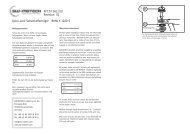
Rastbolzen verschrauben und sicherstellen,<br />
dass der Verschlussbolzen 6mm Spiel hat.<br />
Gewinde bitte mit flüssiger Schraubensicherung<br />
(z. B. Loctite) einkleben.<br />
Tighten the lock bolt so that the tip protrudes<br />
6mm. Please use liquide thread lock (Loctite)<br />
to fix the thread of the lock bolt.<br />
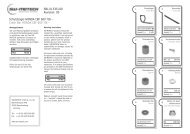
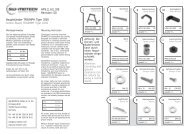
!<br />
Achtung:<br />
Fahrtrichtung<br />
Driving direction<br />
!<br />
Bitte<br />
Wir übernehmen keine<br />
Haftung bei Brüchen durch zu<br />
festes oder falsches Anziehen<br />
der Schrauben!<br />
Attention: We do not guarantee<br />
against breakage due to overtightening<br />
of screws. Once tighened,<br />
screws (7) should not protude more<br />
then 5 mm beyond the end of the<br />
lock nut (5).<br />
beim<br />
Bohren ein<br />
Holzstück auf<br />
der Gegenseite<br />
unterlegen!<br />
When drilling, use a piece<br />
of wood on the opposite<br />
side to support to material!<br />
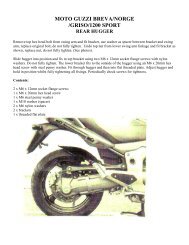
Hier<br />
D<br />
r<br />
il<br />
bohren!<br />
l<br />
5,5<br />
mm<br />
e<br />
h<br />
!<br />
r e<br />
6<br />
5<br />
Hier<br />
D<br />
r<br />
il<br />
bohren!<br />
l<br />
5,5<br />
mm<br />
e<br />
h<br />
!<br />
r e<br />
!<br />
Mit Mutter verschrauben<br />
und kontern.<br />
Mount and secure with nut.<br />
3<br />
4<br />
2<br />
6<br />
5<br />
6<br />
5