Power Quality Solutions BR7000-Soft V5.3 Manual
Power Quality Solutions BR7000-Soft V5.3 Manual
Power Quality Solutions BR7000-Soft V5.3 Manual

Create successful ePaper yourself
Turn your PDF publications into a flip-book with our unique Google optimized e-Paper software.
<strong>Power</strong> <strong>Quality</strong> <strong>Solutions</strong><br />
<strong>BR7000</strong>-<strong>Soft</strong> <strong>V5.3</strong> <strong>Manual</strong><br />
Windows-<strong>Soft</strong>ware for<br />
<strong>Power</strong> Factor Controllers<br />
BR6000 V5.0, <strong>BR7000</strong>, MMI7000 for<br />
parameterization, visualization, recording<br />
and analysis of grid parameters<br />
<strong>BR7000</strong>-<strong>Soft</strong> <strong>V5.3</strong> Short Form <strong>Manual</strong> Ed. 5 REV.08/10 1
Content<br />
1. General 3<br />
2. Preparation of the device 4<br />
3. Installation 5<br />
4. Start of program/start options 6<br />
4.1 Connect (automatic) 7<br />
4.2 Load file 8<br />
4.3 Demo-Mode 8<br />
4.4 Start-options (connection) 9<br />
5. Display-Mode (grid parameters) 10<br />
5.1 Adjustment of display 11<br />
5.2 Grid parameter table 12<br />
5.3 Maximum grid parameters 13<br />
5.4 Internal error-memory 14<br />
5.5 Display stage information 15<br />
6. Configuration manager 17<br />
7. Recording of grid parameters 18<br />
8. Analysis Tool 21<br />
9. Graphical display of harmonics 25<br />
10. Error messages (selection & display) 26<br />
<strong>BR7000</strong>-<strong>Soft</strong> <strong>V5.3</strong> Short Form <strong>Manual</strong> Ed. 5 REV.08/10 2
1. General<br />
Main features and benefits of the software:<br />
Comfortable and editable Display mode of all measured grid parameters<br />
Compact overview about all Stage information's in the controller<br />
Record grid parameters (free selectable) over a longer time<br />
Graphical Analysis with the recorded parameters<br />
Show voltage & current Harmonics in real-time as bargraph (FFT)<br />
Read-out, edit, store and write all internal parameters / settings of the<br />
connected <strong>Power</strong> Factor Controller with a comfortable Configuration-<br />
Manager<br />
The software is compatible with following devices:<br />
- <strong>Power</strong> Factor Controller BR6000-R12/S485 from version 5.0 onwards<br />
- Dynamic P.F. Controller BR6000-T12/S from version 5.0 onwards<br />
- Hybrid P.F. Controller BR6000-T6R6/S from version 5.0 onwards<br />
- <strong>Power</strong> Factor Controller <strong>BR7000</strong> - all software versions<br />
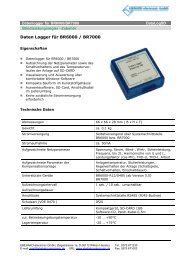
- Multi-Measuring-Interface MMI7000-S/ -E - all software versions<br />
<strong>BR7000</strong>-<strong>Soft</strong> <strong>V5.3</strong> Short Form <strong>Manual</strong> Ed. 5 REV.08/10 3
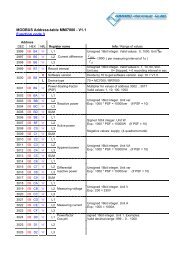
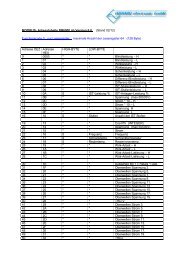
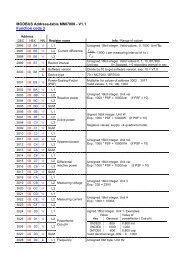
2. Preparation of the device<br />
To connect the <strong>Power</strong> Factor Controller with the computer, at the device<br />
the following settings have to be done:<br />
Expert Mode 1 (Password: 6343)<br />
Type of device<br />
BR6000<br />
<strong>BR7000</strong><br />
MMI7000-S /-E<br />
COM1<br />
MMI7000-S<br />
COM2<br />
Menu<br />
19 Protocol<br />
21 Address<br />
15 Protocol<br />
17 Address<br />
3 Protocol<br />
5 Address<br />
16 Protocol<br />
18 Address<br />
Requested setting<br />
[Modbus RTU]<br />
[ n ] must only exist once for a BUS<br />
[Modbus RTU]<br />
[ n ] must only exist once for a BUS<br />
[Modbus RTU]<br />
[ n ] must only exist once for a BUS<br />
[Modbus RTU]<br />
[ n ] must only exist once for a BUS<br />
To enable the communication between several devices and a PC, all<br />
devices must have the same baud rates, but different addresses. In case<br />
the values in the controller have changed, it may happen that the option<br />
Load file does not work appear→ a new search has to be done<br />
(Automatically) and the result has to be stored.<br />
If the controller is not in “auto-mode” (cos phi), a connection to the<br />
computer is not possible. In this case the error message „No connection!“<br />
will appear.<br />
NOTE:<br />
The best way to get a direct connection to a PC via USB-interface is to use<br />
the USB-Adapter “CV-USB485” (ordering code B44066R3333E230)<br />
<strong>BR7000</strong>-<strong>Soft</strong> <strong>V5.3</strong> Short Form <strong>Manual</strong> Ed. 5 REV.08/10 4
3. Installation<br />
The program installation is done via executable file “setup.exe” of the CD<br />
to a freely determinable folder (standard setup-program).<br />
Please note that user has to be logged in as administrator.<br />
<strong>BR7000</strong>-<strong>Soft</strong> <strong>V5.3</strong> Short Form <strong>Manual</strong> Ed. 5 REV.08/10 5
4. Start of program / start options<br />
Program start is either done via the icon generated on the desktop or by<br />
double click on the file “<strong>BR7000</strong><strong>Soft</strong>.exe” in the installation folder.<br />
The underneath shown start window of the program appears:<br />
Start options<br />
<strong>BR7000</strong>-<strong>Soft</strong> <strong>V5.3</strong> Short Form <strong>Manual</strong> Ed. 5 REV.08/10 6
Start of program/ start options<br />
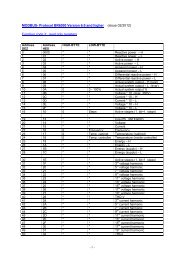
4.1. Connect<br />
1. Interface settings<br />
Select “Auto” to search all parameters (COM 1-20, Address 1-31, Baud rate<br />
4800, 9600, 18200, 36400). Please note that this could take some minutes.<br />
If you know one or more interface settings, choose them manually in the list<br />
boxes. Then the devices will be found much faster.<br />
2. Find devices<br />
Press the “Search” button to find devices connected with the computer. The<br />
line under this button displays the actual search status. However, if you<br />
found all known devices you can stop the search at any time.<br />
3. Networkmode<br />
If the answer from the device takes longer, because of signal delays, you can<br />
increase this option to get a stabile connection.<br />
Result table<br />
Connected devices will appear in the table. Click “Edit” if you want to enter a<br />
new device/input name. “Activate” all devices you want to connect with the<br />
software.<br />
Connect<br />
Press this button to connect activated devices with the software and enter to<br />
the main screen.<br />
Cancel / Abort<br />
To exit the window and enter the main screen press “Cancel”. If searching is<br />
in progress press “Abort” to stop. Founded devices will be lost in the table.<br />
<strong>BR7000</strong>-<strong>Soft</strong> <strong>V5.3</strong> Short Form <strong>Manual</strong> Ed. 5 REV.08/10 7
Start of program/ start options<br />
4.2 Load file<br />
In the dialogue Load connection file a (already stored) connection file can<br />
be loaded. To create this file see section 4.4 Start options. In this file all<br />
information about earlier connected devices are stored.<br />
With the button “Open” a<br />
dialogue appears, identical to<br />
the window in 4.1. There are<br />
all stored devices in the table<br />
and you can select the<br />
requested devices to connect<br />
them.<br />
4.3 Demo-Mode<br />
No connection with a device is<br />
needed for the Demo-Mode<br />
(BR6000 V5.0 is simulated).<br />
Nevertheless, a big part of the<br />
features can be demonstrated.<br />
Note: The following options are not available in Demo-Mode:<br />
- Configuration-Manager<br />
- Stage-Information<br />
<strong>BR7000</strong>-<strong>Soft</strong> <strong>V5.3</strong> Short Form <strong>Manual</strong> Ed. 5 REV.08/10 8
Start of program/ start options<br />
4.4 Start options (Connection)<br />
After the devices have been connected, a connection file should be<br />
generated.<br />
Connection / Connect devices opens a dialogue identical to the window<br />
in chapter 4.1<br />
Via Connection / Save current connection the actual interface-settings<br />
can be stored. Using this connection file saved searching for devices<br />
when starts the program next time (with the same devices)<br />
<strong>BR7000</strong>-<strong>Soft</strong> <strong>V5.3</strong> Short Form <strong>Manual</strong> Ed. 5 REV.08/10 9
5. Display mode (grid parameters)<br />
The display-mode is made for a comfortable display of all measured grid<br />
parameters during online operation.<br />
By pressing the colored buttons 3 different display-orders with up to 12<br />
different parameters (each) can be displayed.<br />
By selection of “Display options” a free configuration of numbers and<br />
contents of the display is possible.<br />
<strong>BR7000</strong>-<strong>Soft</strong> <strong>V5.3</strong> Short Form <strong>Manual</strong> Ed. 5 REV.08/10 10
5.1 Display mode (Adjustment of display)<br />
Display options:<br />
In the field “Screen Name” a name for the screen can be created. It will be<br />
automatically shown at the colored buttons.<br />
In the group Display 1-12 the devices (top) and grid parameters (bottom)<br />
can be selected.<br />
With “OK” the settings will be confirmed.<br />
For changing the values in another view (e.g. Displaymode 2), return to the<br />
main window before.<br />
<strong>BR7000</strong>-<strong>Soft</strong> <strong>V5.3</strong> Short Form <strong>Manual</strong> Ed. 5 REV.08/10 11
5.2 Grid parameter table<br />
Grid parameter table:<br />
- This window is located in Display/Grid parameter table and gives a<br />
review of all parameters from all devices and inputs<br />
- Parameters that are not supported by the device/input stay empty<br />
- To close this window choose any other option from the main menu<br />
<strong>BR7000</strong>-<strong>Soft</strong> <strong>V5.3</strong> Short Form <strong>Manual</strong> Ed. 5 REV.08/10 12
5.3 Maximum grid parameter<br />
Maximum grid parameter:<br />
- This window is located in Display/ Maximum grid parameter and shows<br />
all max. values from the selected device with date and time stamp*.<br />
- Value and time stamp* are stored at the device.<br />
- Reset maximum values clears the max. value memory at the device**.<br />
Password for expert mode 1 (6343) is needed to reset!<br />
- To close this window choose any other option from the main menu<br />
Select device<br />
* <strong>BR7000</strong> and MMI7000 only<br />
** BR6000 V5.1 and higher only<br />
<strong>BR7000</strong>-<strong>Soft</strong> <strong>V5.3</strong> Short Form <strong>Manual</strong> Ed. 5 REV.08/10 13
5.4 Internal error-memory<br />
Internal error-memory*:<br />
- This window is located in Display/ Error- Memory and displayed the last<br />
8 error messages. Number 1 is the latest error.<br />
- Error code is stored at the device.<br />
- Using the button “Reset error-memory” and enter the password of<br />
expert mode 1 ( 6343 ) will clear the internal error memory of the device.<br />
- To close this window choose any other option from the main menu<br />
Select device<br />
* BR6000 V5.1 and higher only<br />
<strong>BR7000</strong>-<strong>Soft</strong> <strong>V5.3</strong> Short Form <strong>Manual</strong> Ed. 5 REV.08/10 14
5.5 Display mode (Stage information)<br />
Stage- Information*:<br />
By using the button “Show” in the group Stage-Information the following<br />
window will appear:<br />
Select device<br />
Select a device with the attendant tap.<br />
Grid- table displays important and actual grid-parameters.<br />
The next table shows following stage-information:<br />
Stage: Relay name K1 – K13 / K15 (backside of controller)<br />
Reference: Depending of the controller-mode:<br />
compare with controller manual and service-menu<br />
* <strong>BR7000</strong>, BR6000 only (Hybrid- & Dynamic PFC are not supported)<br />
<strong>BR7000</strong>-<strong>Soft</strong> <strong>V5.3</strong> Short Form <strong>Manual</strong> Ed. 5 REV.08/10 15
5.5 Display mode (Stage information)<br />
Relay:<br />
Grid:<br />
Status:<br />
closed switch: stage active; open switch: stage inactive<br />
capacitor connection in the grid (depends on the controller-mode)<br />
- Automatic (stage used for automatic controlling)<br />
- Fix (stage is fix connected to the grid, no controlling)<br />
- Off (stage is disconnected to the grid, no controlling)<br />
> Endstop (stage not existing, because out of end-stop)<br />
Switching cycle:<br />
Duty [h:mm]:<br />
Stage valency:<br />
Stage power:<br />
Print:<br />
numbers of switching operations of this stage.<br />
cumulated operation time of the particular step.<br />
describes the ratio of the capacitor branch. If a stage<br />
is not switched to Automatic, e.g. it is not used for<br />
compensation, its rating is inactive.<br />
indicates the power of the step (in kvar). Also<br />
applicable here: if the stage is not in Automatic, it is<br />
marked as “---”.<br />
Printing the table to archive switching cycles and duty<br />
time of the stages.<br />
Reset switching cycles*: Reset counter for switching cycles at the<br />
controller e.g. after contactors are replaced.<br />
Password for expert mode 1 (6343) is needed to<br />
reset!<br />
Reset duty time*:<br />
Reset the operating time of all stages e.g. after<br />
replacing capacitors. Password for expert mode 1<br />
(6343) is needed to reset!<br />
* BR6000 V5.1 and higher<br />
<strong>BR7000</strong>-<strong>Soft</strong> <strong>V5.3</strong> Short Form <strong>Manual</strong> Ed. 5 REV.08/10 16
6. Configuration Manager<br />
The configuration manager is made for complete read-out, editing, storage<br />
and writing of all parameters of the <strong>Power</strong> Factor Controller via PC.<br />
Configuration-Manager:<br />
Press the“Edit” button in the group Configuration-Manager<br />
Use the settings that you would like to adjust. A window, listbox or up/downcontrol<br />
will appear to change settings.<br />
Pressing the icons on the right site allows to send, read, load and store the<br />
settings.<br />
Note: you can load the basic settings by pressing the corresponding button.<br />
Select device<br />
Send to device<br />
Read device<br />
Load from file<br />
Store into file<br />
<strong>BR7000</strong>-<strong>Soft</strong> <strong>V5.3</strong> Short Form <strong>Manual</strong> Ed. 5 REV.08/10 17
7. Recording of grid parameters<br />
This part of the software is created for online-recording (on your<br />
computer hard drive) of free editable grid parameters (over a longer time)<br />
for later analysis.<br />
- Start: Press the “Start” button in Record Parameter<br />
- In the next window Data logging options the Devices whose<br />
measuring values should be stored can be chosen and<br />
- parameters which shall be recorded could be selected in the Function<br />
column<br />
<strong>BR7000</strong>-<strong>Soft</strong> <strong>V5.3</strong> Short Form <strong>Manual</strong> Ed. 5 REV.08/10 18
7. Recording of grid parameters<br />
Additional the following parameters for record-file could be selected here:<br />
- Separator (separates values in the internal file à Semicolon for .csv)<br />
- Decimal point (country specific decimal separators)<br />
- Time setting (only for csv):<br />
Absolute (actual time – HH:MM) or<br />
Relative (starting at 0)<br />
- “Clear” will delete the column Function.<br />
After pressing „Start“ the system will ask for a record-file name.<br />
Recommended is a *.csv-file that can be opened in MS Excel. This file<br />
must be situated in the program folder (e.g. C:\Program Files\<strong>BR7000</strong>-<br />
<strong>Soft</strong> V5) ! Then the recording will start.<br />
During recording the program generate 2 kinds of files:<br />
1. *.csv-file that can be opened in excel: Parameters/Open with Excel<br />
2. Linking-file (e.g. Logfile.csv) and a folder with an equal name. This<br />
folder contains the graphic data. To display the data by open the<br />
linking-file at the analysis tool.<br />
<strong>BR7000</strong>-<strong>Soft</strong> <strong>V5.3</strong> Short Form <strong>Manual</strong> Ed. 5 REV.08/10 19
7. Recording of grid parameters<br />
The red dot ● in Display-Mode shows all parameters which are recorded.<br />
A permanent recording is also displayed in the main menu by :<br />
– RECORDING –<br />
The button Stop at Record parameter will stop the recording.<br />
Please note that during recording it is not possible to<br />
• search for devices<br />
• configure devices<br />
• display stage information<br />
<strong>BR7000</strong>-<strong>Soft</strong> <strong>V5.3</strong> Short Form <strong>Manual</strong> Ed. 5 REV.08/10 20
8. Analysis Tool<br />
In the main menu Graphical analysis / Analysis Tool, stored<br />
parameters can be displayed graphically.<br />
This option is also active if no controller is connected to the software.<br />
Before starting with the graphical analysis, a .csv-file generated with<br />
<strong>BR7000</strong>-<strong>Soft</strong> has to be opened.<br />
For demonstration purpose a file named „LogFile_DEMO.csv“ is already<br />
delivered during the installation.<br />
<strong>BR7000</strong>-<strong>Soft</strong> <strong>V5.3</strong> Short Form <strong>Manual</strong> Ed. 5 REV.08/10 21
8. Analysis Tool<br />
After the graphic file has been loaded, the graphic tableau will be opened.<br />
If a file is loaded the first time, the parameter table is empty and standard<br />
scaling values are loaded.<br />
Graphic menu<br />
- After pressing “Display” button selection of up to 7 parameters is<br />
possible.<br />
- By pressing the button “Change File”, another file can be loaded.<br />
- The actual graph can be printed with “Print”<br />
- By pressing the button “Copy graphic to clipboard” the actual diagram<br />
is copied to the clipboard and can be included into other programs with<br />
[Ctrl] + [V]. (Paste)<br />
Coordinate<br />
system<br />
Graphic<br />
menu<br />
Parameter<br />
table<br />
Setting of<br />
value range<br />
Setting of<br />
time axis<br />
<strong>BR7000</strong>-<strong>Soft</strong> <strong>V5.3</strong> Short Form <strong>Manual</strong> Ed. 5 REV.08/10 22
8. Analysis Tool<br />
Parameter table<br />
A parameter can be marked by clicking on the particular line in the table.<br />
- Marked parameters are brought to the foreground of the diagram<br />
- The range-scale of the marked parameters is shifted to the right side.<br />
- Situation and resolution of the graph can be changed in the menu<br />
Settings of value range<br />
Shift graph to top<br />
Selected parameter<br />
Shift graph to bottom<br />
Compress resolution<br />
Expand resolution<br />
For some parameters resolution and shifting is locked to avoid senseless<br />
displays.<br />
Settings of the time axis<br />
Time display:<br />
Absolute (HH:MM)<br />
Relative (start time=0)<br />
Shift graph to left<br />
Shift graph to right<br />
Decrease timing<br />
Increase timing<br />
<strong>BR7000</strong>-<strong>Soft</strong> <strong>V5.3</strong> Short Form <strong>Manual</strong> Ed. 5 REV.08/10 23
8. Analysis Tool<br />
Coordinate system<br />
If the resolution of the value range has changed, this change is related to<br />
the horizontal line (axis of abscissa) of the coordinate system.<br />
If the resolution of the time axis has changed, this change is related to<br />
vertical line (axis of ordinates) of the coordinate system.<br />
Example for expanding the resolution of a graph<br />
Resolution:<br />
200k / graduation<br />
coordinate<br />
system<br />
Resolution is<br />
expanded by 200k<br />
ZERO-line of the<br />
graph<br />
NEW Resolution:<br />
50k / graduation<br />
Resolution has<br />
been expanded by<br />
200k.<br />
ZERO-line of the<br />
graph<br />
<strong>BR7000</strong>-<strong>Soft</strong> <strong>V5.3</strong> Short Form <strong>Manual</strong> Ed. 5 REV.08/10 24
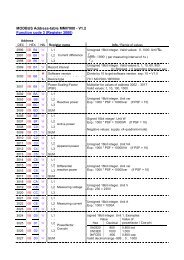
9. Graphical display of harmonics<br />
In the window Graphical analysis / Harmonics all measured actual<br />
harmonics in the grid are displayed as bargraph (FFT – Fast Fourier<br />
Transformation).<br />
- Select a device with attendant tap<br />
- Select voltage- or current harmonics by selection of the radio button<br />
Green-bars: Voltage harmonics (max. values: gray frame)<br />
Red-bars:<br />
Current harmonics (max. values: gray frame)<br />
“Delete maximum values” clears the memory of the maximum<br />
harmonics. Max. THD is not deleted. This has to be done at the device !<br />
N/A means: the value is not measured with this device<br />
Select device<br />
Chose voltage- or<br />
current harmonics<br />
Note: The indication is updated each 10 - 30 seconds (depends on the<br />
number of devices.) Automatic dynamic adjustment of the value range<br />
is done. Dynamic and Hybrid PFC are not supported<br />
<strong>BR7000</strong>-<strong>Soft</strong> <strong>V5.3</strong> Short Form <strong>Manual</strong> Ed. 5 REV.08/10 25
10. Error messages<br />
The BR6000 and <strong>BR7000</strong> controllers are able to display different warnings<br />
and error messages. These warnings will also appear in the window of the<br />
PC-software.<br />
Open Edit / Error messages in<br />
the task-bar to enable (check<br />
box) or block error messages in<br />
the program.<br />
If an error message is enabled<br />
the ERROR / WARNING window<br />
will pop-up.<br />
Note: It is only possible to indicate<br />
errors which also enabled in<br />
the device as well!<br />
Error messages<br />
If an error occur during the connection with the controller, it will be displayed<br />
in the window ERROR / WARNING.<br />
Press “Close” to confirm the<br />
information and close the<br />
error-window.<br />
Confirmed error messages<br />
can be displayed in the Info /<br />
Open error file again.<br />
Show actual errors and warnings by opening Display/ Active Errors. The<br />
error-flags are not masked by <strong>BR7000</strong><strong>Soft</strong> (see top).<br />
<strong>BR7000</strong>-<strong>Soft</strong> <strong>V5.3</strong> Short Form <strong>Manual</strong> Ed. 5 REV.08/10 26